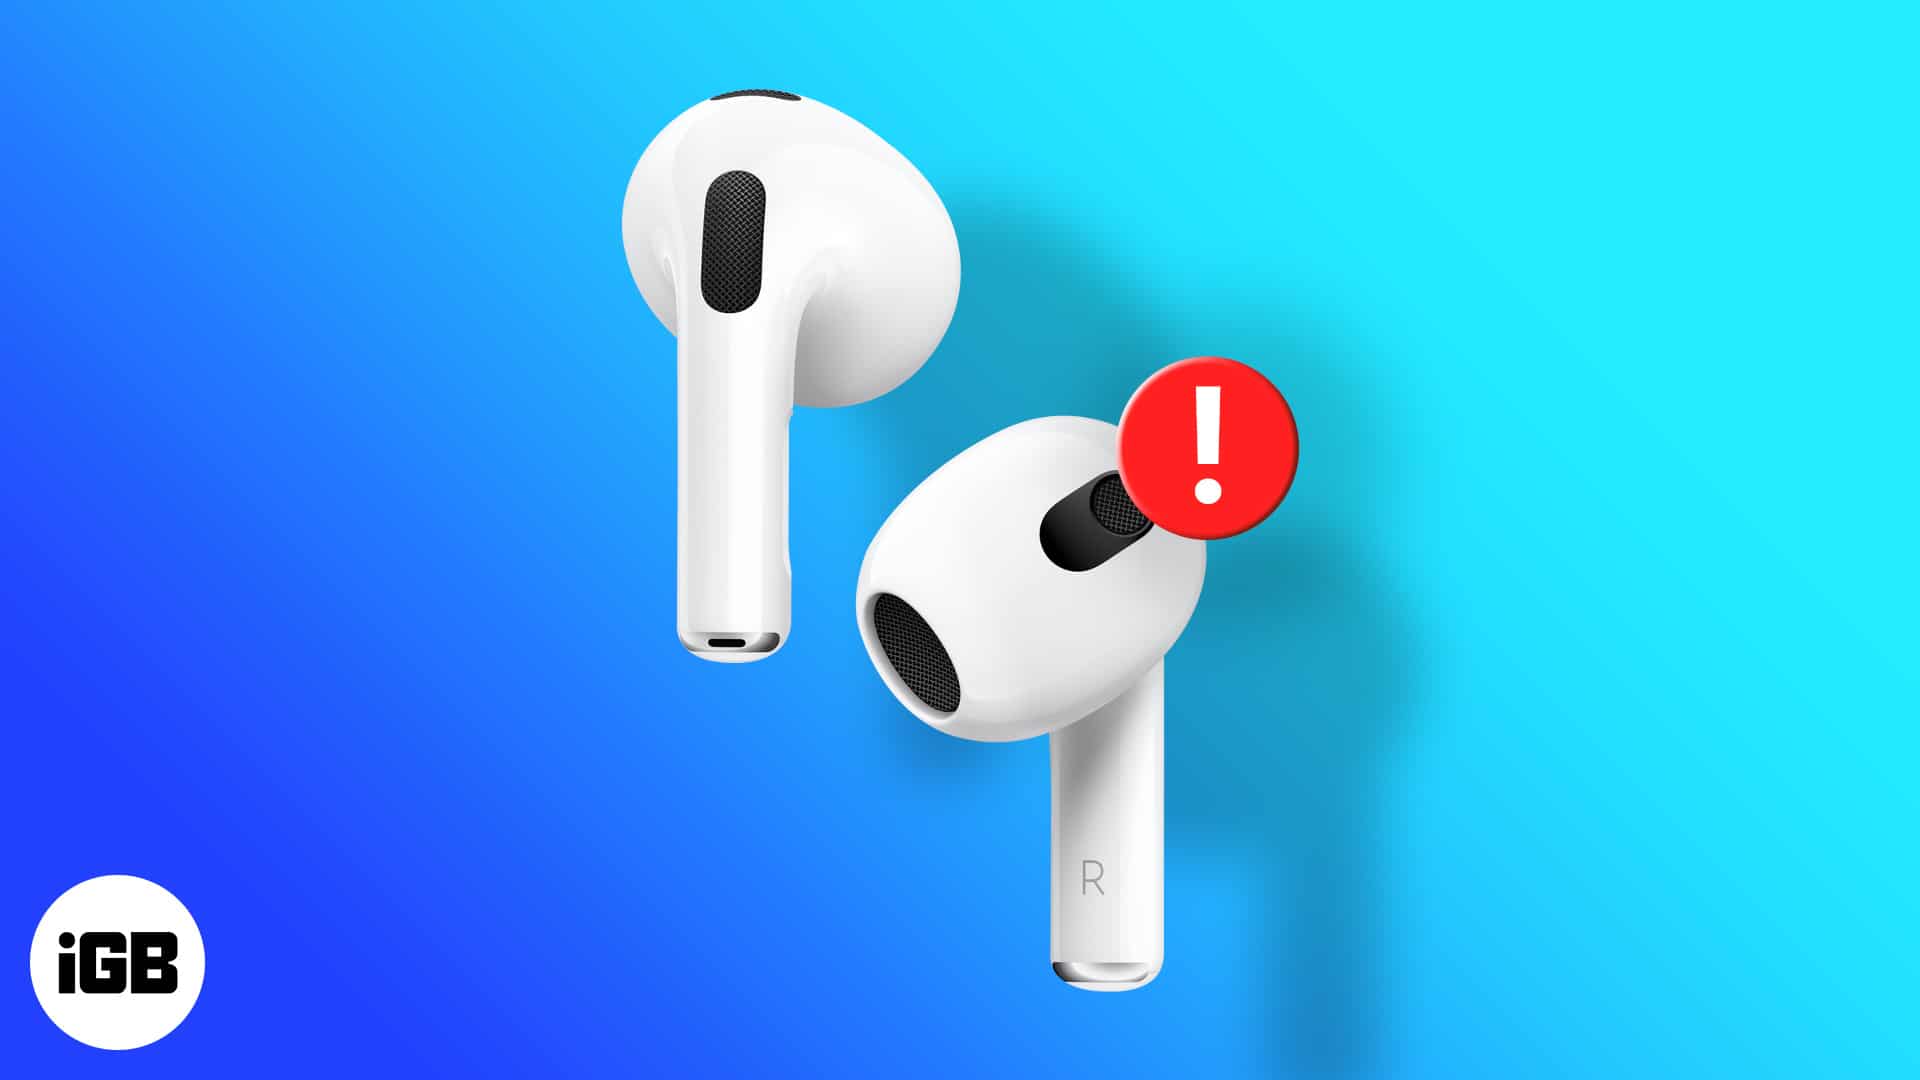
Fix One AirPod Not Working – Complete Troubleshooting Guide
Is one AirPod silent? Get both working again fast with these simple fixes—plus, know when to
call Apple for help.
- Why one AirPod might stop working: It often comes down to battery imbalance, Bluetooth bugs, grime, outdated firmware, or just one off audio setting. Sometimes, it’s physical damage.
- Start with the basics: Fully charge both AirPods and the case, clean them gently, and double-check your audio balance and Bluetooth settings. That fixes a lot of common issues.
- Still not working? Try updating your firmware, doing a hard reset, or testing on another device. Firmware’s sneaky like that—it can mess things up without warning.
- Know when to escalate: If one pod refuses to charge, shows physical damage, or nothing else has worked, it’s time to contact Apple Support.
- Keep things running smooth: Clean regularly, store them properly, avoid moisture, and update software. Trust me, a quick wipe now saves you later.
Apple AirPods have become a go-to for many of us because they connect effortlessly and are so easy to use—no wonder they’re such a favorite for wireless listening! But let’s be honest: even the best gadgets can run into hiccups. If you’ve ever had just one AirPod—the left or the right—suddenly stop working, you’re not alone. It can throw off your groove but don’t stress. This is a common issue, and there are several simple ways to fix it.
Below, you’ll find a friendly, step-by-step guide that walks you through everything from quick checks and easy troubleshooting to more advanced fixes. I have also included some expert tips to help you decide if it’s time to get professional help or consider a replacement. My goal is to help you understand why one AirPod is not working—and what you can do to fix it, so you can get back to enjoying your music without missing a beat!
Why is One AirPod Not Working? Common Causes
Before trying to fix the problem, it’s helpful to know what could be causing it:
- Battery problems: One AirPod may be out of power, not charging correctly, or its battery may be defective.
- Bluetooth issues: The connection between your AirPods and your device might not be working correctly.
- Dirt or debris: Dust, earwax, or lint can block the speaker, making one AirPod seem quiet or silent.
- Software or firmware bugs: Old software or firmware can cause connection or sound issues.
- Audio settings: Incorrect balance or mono audio settings may direct sound to only one ear.
- Physical damage: Drops or getting wet can harm the inside parts.
Proactive Red Flags:
Watch for early warning signs of bigger problems—like one AirPod draining battery faster, random dropouts, or taking longer to pair or charge. Addressing these issues promptly can prevent them from getting worse. With that said, here’s what to do if one AirPod is not working—starting from the basics and moving to advanced fixes.
Basic Checks and Quick Fixes
Before you panic, make sure your AirPods are charged—and not clogged with dust or earwax.
1. Ensure Both AirPods and Case Are Charged
Let’s start simple: pop both AirPods into their case and give them at least 30 minutes to recharge. Double-check that your case has enough juice and that your charging cable and adapter are plugged in and working—sometimes, it really is that easy!
How to check battery levels
- Hold your AirPods case close to your iPhone or iPad. A popup will appear showing the battery level of each AirPod and the case.
- To check more battery details, swipe right on your iPhone’s home screen to open the Today View and find the Batteries widget. If you can’t see it, scroll down, tap “Edit,” and add the Batteries widget.
If only one AirPod isn’t charging
- Take out both AirPods and check the charging contacts in the case and on the AirPods for any dirt or debris. Clean them gently if needed (see cleaning instructions below).
- If possible, try charging a different pair of AirPods in your case or place your AirPods in another case to determine if the case is the issue.
- If one AirPod still does not charge, it may be a battery or hardware issue—see the section below for guidance on seeking professional help.
2. Clean Your AirPods Carefully
If you notice sound problems, muffled audio, or your connection cutting in and out, it could mean your AirPods are getting dirty. Please don’t wait until one AirPod stops working to clean them.
How to inspect and clean your AirPods
- Check first: Look at the speaker mesh and microphone holes on both AirPods. If you see dust, earwax, or dirt, it’s time to clean them.
- Wipe the exterior: Gently wipe your AirPods and the charging case with a soft, dry, lint-free cloth.
- Clean the speaker mesh: Use a soft, dry brush (such as a clean makeup or paintbrush) or a dry cotton swab to gently remove dirt from the mesh. Don’t use liquids or sharp objects, as they can damage your AirPods.
- Clean the charging points: Use a dry cotton swab to clean the charging contacts inside the case and on the AirPods.
- If you have AirPods Pro or AirPods 4: Take off the silicone or foam ear tips, rinse them with water (never rinse the AirPods), and dry them thoroughly before putting them back on.
Myth-busting tip
Do not use compressed air to clean your AirPods. It can force debris deeper inside or damage fragile components.
How often should you clean?
- For daily users: once a week
- After workouts or heavy use: after each session
- If you notice muffled sound or fit issues, inspect and clean immediately
If cleaning doesn’t restore sound, continue with the next steps.
Connection and Audio Settings
Fix common connection and sound issues by repairing your AirPods, restarting your device, and adjusting audio settings.
1. Repair Your AirPods
A fresh connection of AirPods to your device resolves many issues. Here’s how:
- Go to Settings > Bluetooth on your device and tap the “i” next to your AirPods, then tap “Forget This Device.”
- Put both AirPods back in the charging case and close the lid for at least 15 seconds.
- Open the lid and hold the case near your device.
- Press and hold the setup button on the back of the case (if present) until the light flashes white.
- Follow the on-screen instructions to reconnect.
How to check your AirPods model
Go to Settings > Bluetooth, tap the “i” next to your AirPods, and note the model number. You can look up your AirPods model on Apple’s identification page.
2. Restart Your Device
Sometimes, the problem is with your phone, tablet, or computer. Restart your device (while your AirPods are in the case), then try to connect again.
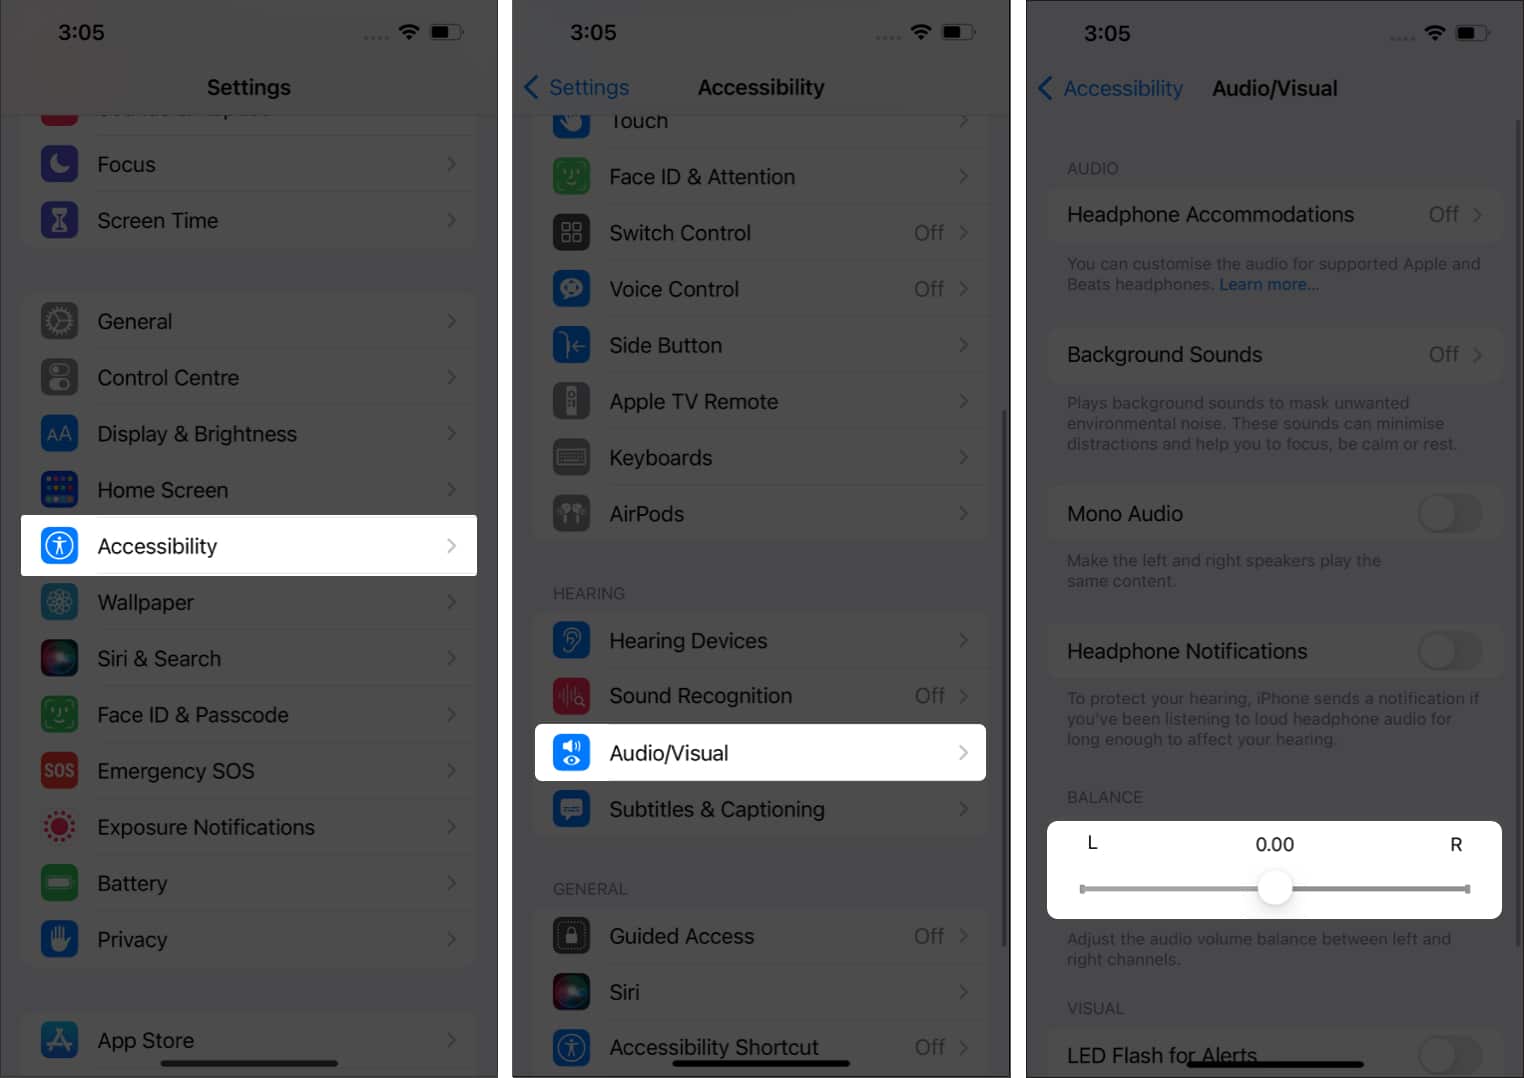
3. Check Audio and Accessibility Settings (Balance and Mono Audio)
Wrong audio settings are a common problem—and they can change without you noticing. Accessibility features, software updates, or allowing others to use your device can all modify these settings without notice.
1. How to check and adjust
- Go to Settings > Accessibility > Audio/Visual.
- Make sure the “Balance” slider is centered between L and R. If it’s off to one side, the sound will only play through one AirPod.
- Ensure “Mono Audio” is turned OFF. If Mono Audio is on, all sound will play through just one AirPod.
2. Check your stereo sound
After changing your settings, play a song or video that features clear left and right sound effects (many music apps or YouTube have test tracks available). Listen to see if the sound moves between your ears to make sure both AirPods are working.
- Open Settings.
- Go to Accessibility.
- Tap the Audio/Visual tab.
- Bring the slider under Balance to the center or at 0.00.
Software and Firmware Troubleshooting
Updating your device software and AirPods firmware can resolve common connectivity and audio issues.
1. Update Your Device Software
Ensure your device is up to date. Go to Settings > General > Software Update and install any available updates.
2. Check and Update AirPods Firmware
Firmware updates for AirPods are automatically downloaded and installed when they’re charging and near your device. To check your firmware version:
- Go to Settings > Bluetooth, tap the “i” next to your AirPods, and look for the firmware version.
- Compare it with the latest version on Apple’s AirPods firmware page.
- If you suspect an update is pending, keep your AirPods in the case, connected, and near your device.
Advanced Troubleshooting
Still facing issues? These deeper troubleshooting methods can help resolve stubborn AirPods problems.
1. Hard Reset Your AirPods (Model-Specific)
If previous steps haven’t worked, try a complete reset of your AirPods:
AirPods with case button
- Place AirPods in the charging case and open the lid.
- Press and hold the button on the back for about 15 seconds until the LED flashes amber, then white.
- Reconnect to your device.
AirPods 4 (no button)
- Open the lid and double-tap the front of the case while the status light is on.
- Double-tap again when the light flashes white and a third time when it flashes faster.
- When the light flashes amber and then white, reconnect your AirPods.
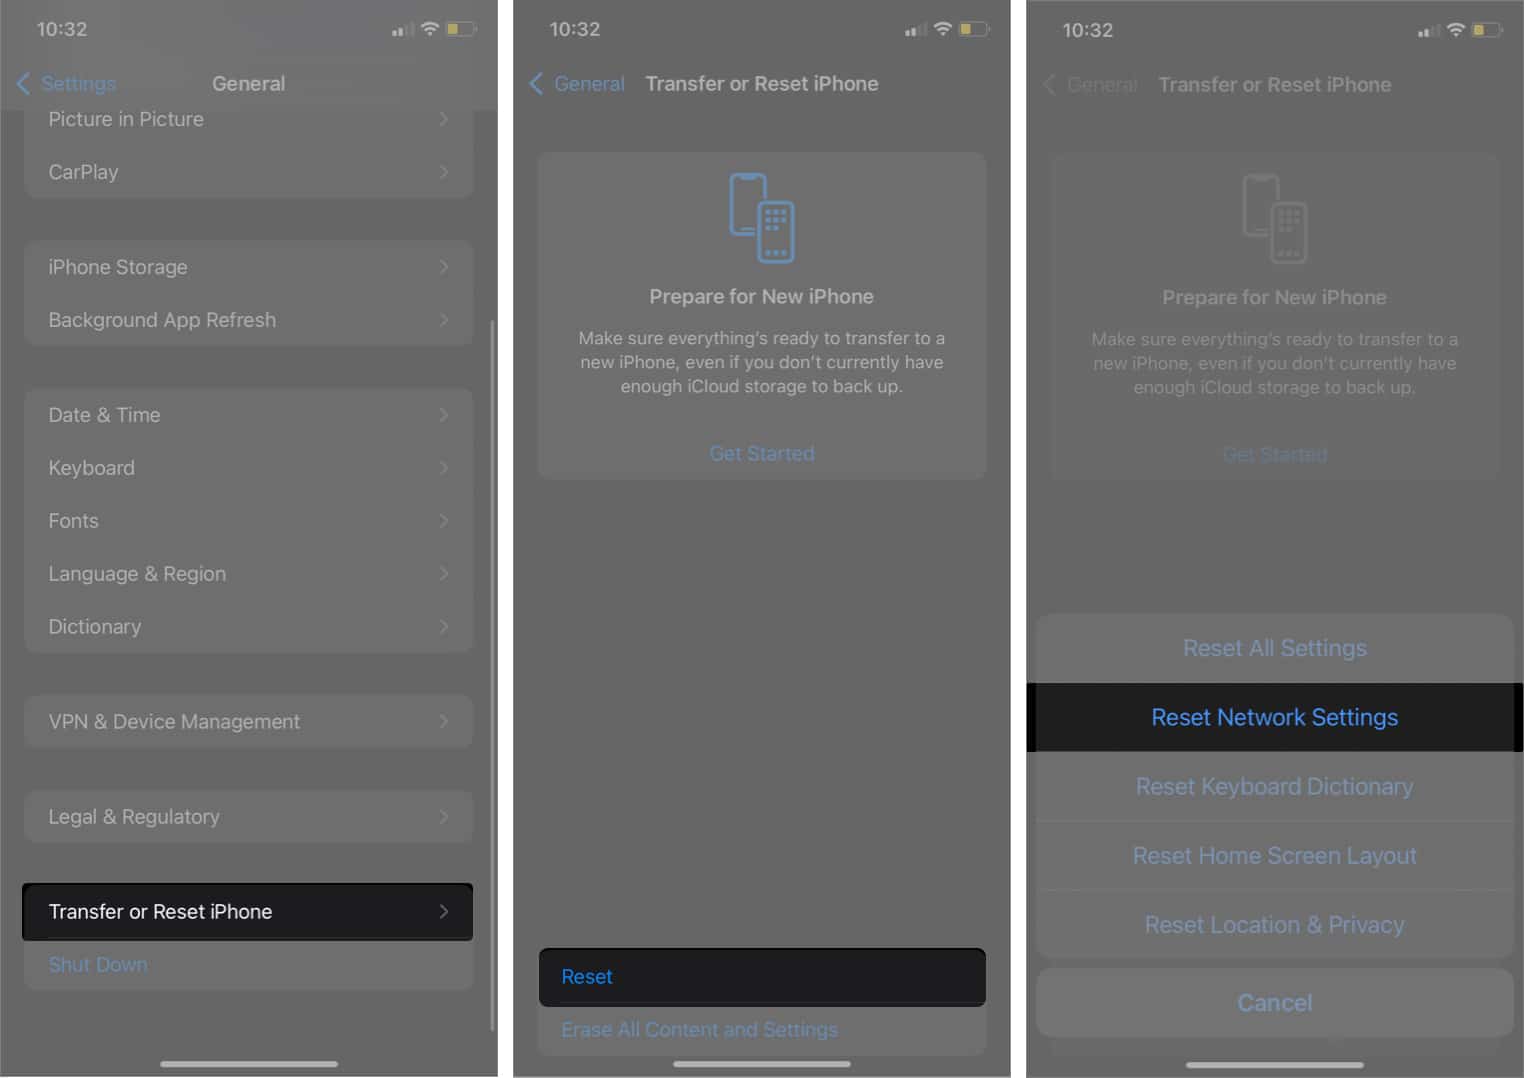
2. Reset Network Settings
If you suspect a network or Bluetooth issue:
- Go to Settings > General > Transfer or Reset iPhone > Reset > Reset Network Settings.
3. Test on Another Device
To check if your original device is the problem, try connecting your AirPods to another phone, tablet, or computer. If both AirPods work on the other device, the problem might be with your original device’s settings or hardware.
When to Contact Apple Support
If you have tried all the troubleshooting steps and still have problems, it’s time to ask the experts for help. Here’s how to know when getting professional help is the best choice:
Contact Apple Support if you notice any of these
- One AirPod will not charge, turn on, or be recognized—no matter what you try.
- Persistent audio dropouts, static, or distortion that don’t improve with resets or cleaning.
- One AirPods battery drains significantly faster than the other, even after a reset.
- Visible physical damage (cracks, dents, water exposure)
- No sound from one AirPod despite all troubleshooting
What to Prepare Before You Call or Visit Apple Support
- AirPods serial number (found on the case or in device settings)
- Proof of purchase (for warranty or AppleCare+ claims)
- A quick list of the troubleshooting steps you’ve already tried
- A brief description of the issue and when it started
Watch for subtle warning signs before total failure
- One AirPod takes much longer to pair or charge
- Occasional unexplained audio cutouts on one side
- Gradually worsening battery life on a single AirPod
Spotting these early can help you get support before the situation worsens.
What to Expect from Apple Support
- Remote diagnostics or in-person evaluation (at a Genius Bar)
- Mail-in repair or replacement options.
- Repairs or replacements free or discounted if under warranty/AppleCare+.
- Out-of-warranty service for a fee (Apple will quote you the cost)
- Advice on safe, authorized repairs (using third-party repair services may void your warranty!)
Need to keep listening while you wait?
Set your device to mono audio and use your working AirPod for calls or music until the problem is fixed.
In summary: If you see these warning signs, don’t keep trying the same fixes. Apple Support can help you—acting early can save you time, money, and stress.
Maintenance Tips to Prevent Future Issues
- Inspect and clean regularly: Check your AirPods and case for debris weekly or after heavy use. Wipe with a dry, lint-free cloth and gently brush the speaker mesh.
- Store properly: Always keep AirPods in their case when not in use.
- Avoid moisture and extreme temperatures: AirPods are not waterproof.
- Keep firmware and device updated: Updates can fix bugs and improve performance.
- Routinely check audio settings: After software updates or device sharing, quickly verify your audio balance and mono audio settings.
- Watch for battery decline: If one AirPods battery life drops significantly, consider service or replacement.
- Set a reminder: Add a recurring calendar event or phone reminder to clean your AirPods—proactive care prevents most issues.
Keep Your AirPods Working Perfectly
Most times, getting your AirPods back up and running again simply takes the form of quick troubleshooting. When you get into the habit of keeping them clean, checking the settings, and giving them the TLC they require, you’re not just getting things working—you’re getting the best out of your music and extending the life of your AirPods.
Go through these steps one at a time, and odds are you’ll be back to enjoying your favorite tunes in stereo before you know it. And if things still aren’t right, don’t worry—Apple Support has your back.
Has our tip worked, or is there a question to ask? I would love to hear from you in the comments below!
Frequently Asked Questions

Written by
Darryl DsouzaConsumer Technology and Motorcycles are the two things that excite Darryl the most. Why? Because Tech helps better people's lives, and solving people's problems related to tech is something he enjoys. And what about bikes, you ask? Well, drop a gear and disappear.
View all posts →More from AirPods
AirPods Flashing Orange? What It Means and How to Fix It
Confused by the orange flashing light on AirPods? Find its meaning and quick troubleshooting steps that actually work.
How to Fix AirPods Battery Drain Issues: Step-by-Step Guide
AirPods draining too fast or dying overnight? This step-by-step guide explains why it happens and shows you how to fix AirPods battery drain issues before replacing them.
How to Update Your AirPods to the Latest Firmware Version
Make sure you enjoy the latest features on your AirPods.