- Before You Start: Ensure your devices, cables, and computer storage space meet the requirements for a smooth photo transfer.
- Choosing a Method: Methods like AirDrop, iCloud, or a cable each offer different speeds, convenience, and levels of organization.
- For Mac Users: On a Mac, use the Photos app for organized libraries or Image Capture for simple file transfers.
- Wireless Options: Use AirDrop for quick local transfers between Apple devices, or iCloud to sync photos across them all.
- For Windows Users: For Windows, transfer photos using the Apple Devices app, Windows Photos, File Explorer, or iCloud for Windows.
If your iPhone is running out of space, it’s time to transfer those precious photos and videos to your Mac or Windows PC! This lets you manage your media efficiently, create secure backups, and allow advanced editing on larger screens. This guide explains the latest methods for easily transferring photos and videos from iPhone to computer.
What You Need to Transfer
Before you start, gather these essentials:
- Your iPhone (charged, unlocked, and running iOS 18 or later)
- A Mac (macOS Ventura 13 or later) or a Windows PC (Windows 10 or 11)
- A compatible USB-C or Lightning cable
- An internet connection for cloud-based transfers like iCloud and AirDrop
- Enough free space on your computer
- Optional: iCloud, Google Photos, Dropbox, or third-party apps (e.g., iMazing)
Quick Comparison of Transfer Methods
Here’s a comparison of transfer methods to help you choose the best one:
| Method | Speed | Ease of Use | Supported File Formats | Best For |
| Photos App (Mac) | Medium (USB) | Very Easy | JPEG, HEIC, MP4, MOV | Beginners and organized imports |
| Image Capture (Mac) | Medium (USB) | Moderate | JPEG, HEIC, MP4, MOV | Specific file selection |
| AirDrop (Mac) | Fast (Wi-Fi) | Easy | JPEG, HEIC, MP4, MOV | Wireless transfers |
| iCloud | Varies (Wi-Fi) | Easy | JPEG, HEIC, MP4, MOV | Automatic syncing |
| Third-Party Apps | Varies | Moderate | Varies by app | Advanced users |
| Apple Devices (Win) | Medium (USB) | Easy | JPEG, HEIC, MP4, MOV | Seamless Apple ecosystem integration |
| Windows Photos App | Medium (USB) | Very Easy | JPEG, HEIC, MP4, MOV | Beginners |
| File Explorer (Win) | Medium (USB) | Moderate | JPEG, HEIC, MP4, MOV | Manual control and bulk transfers |
Transfer Photos and Videos From iPhone to Mac
Here are the main methods to get iPhone photos and videos to your Mac:
1. Use the Photos App
The Photos app is pre-installed on macOS and syncs seamlessly with your iPhone.
- Connect your iPhone to your Mac using a USB cable.
- Click Allow on your Mac to grant accessories permission.
- Open your Mac’s Photos app.
- Select your iPhone under Devices in the sidebar.
- Choose photos/videos and click Import x selected at the top.
- Alternatively, click Import All New Items to transfer your camera roll.

Great for automatic organizing, but you can’t choose the file save path.
2. Use Image Capture
Image Capture lets you select specific files and choose where to save them.
- Connect your iPhone via USB.
- Open Image Capture (search via Spotlight) on your Mac.
- Select your iPhone from the device list if not already.
- Choose a save location from the Import To dropdown.
- Select photos and videos and click Download or Download All.

I prefer this method of saving files in my organized albums, though it feels less intuitive than the Photos app.
3. Use AirDrop for Wireless Transfer
This is one of the easiest ways to transfer photos from your iPhone to your Mac without the hassle of plugging in a USB cable. Let’s examine how to use Airdrop on your iPhone.
First, ensure that you have toggled on Bluetooth and Wi-Fi on your iPhone and Mac.
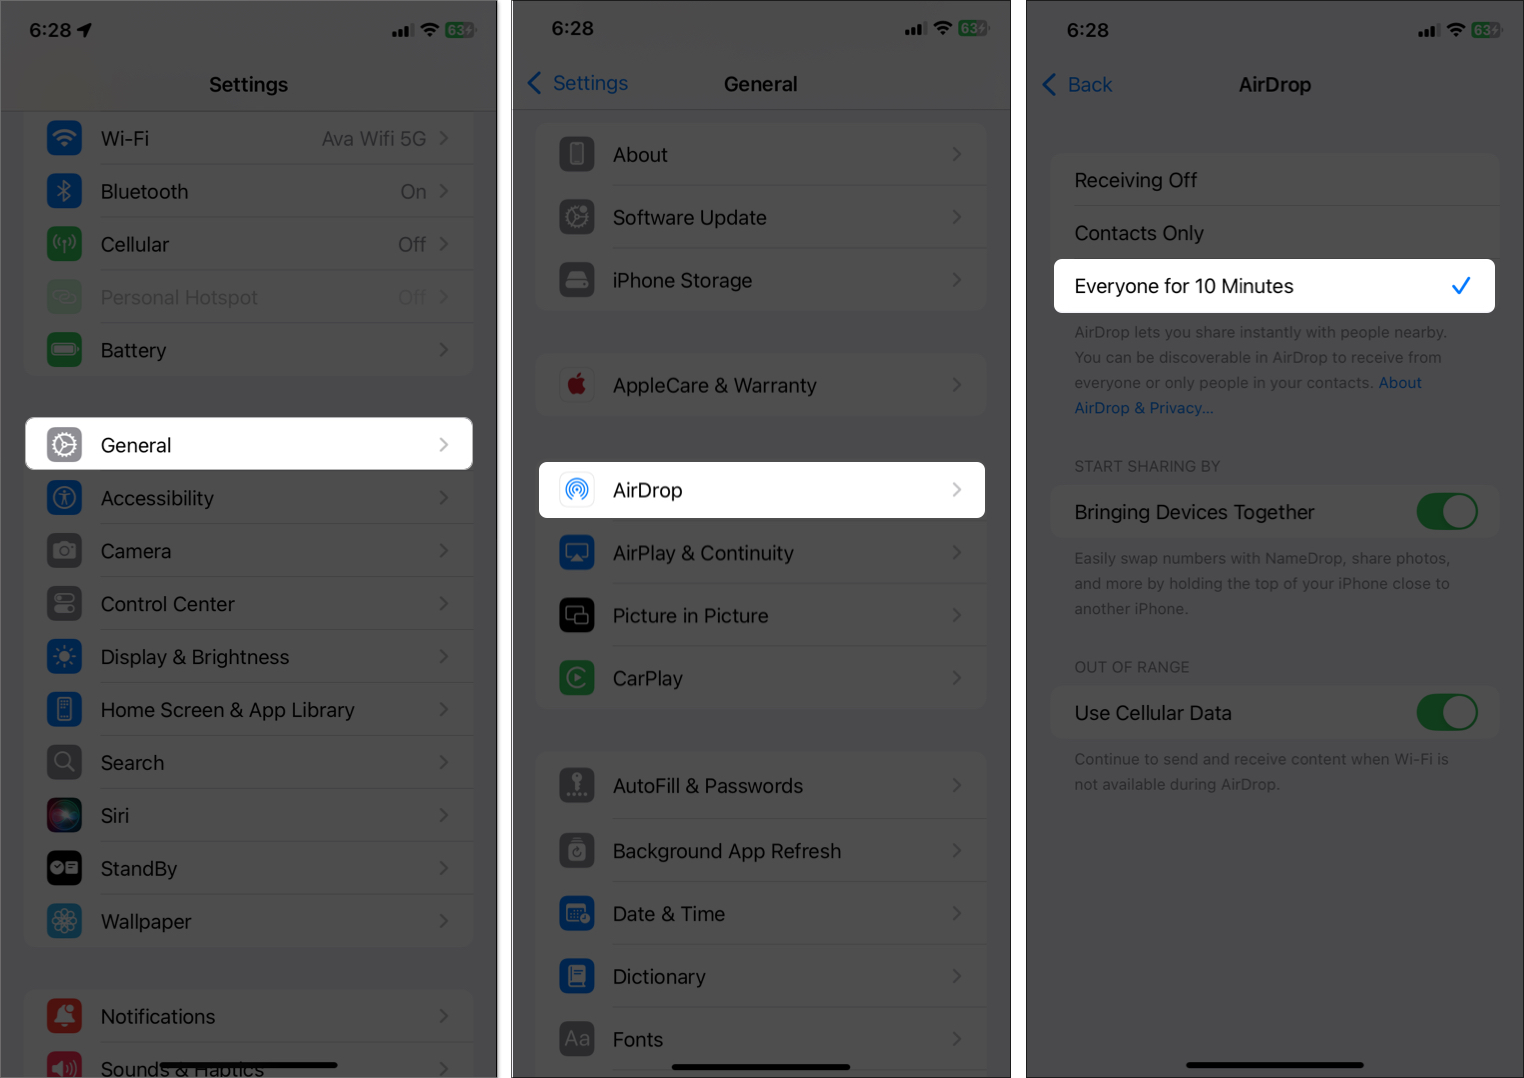
- Enable AirDrop on your iPhone (Settings > General > AirDrop > Everyone for 10 Minutes).
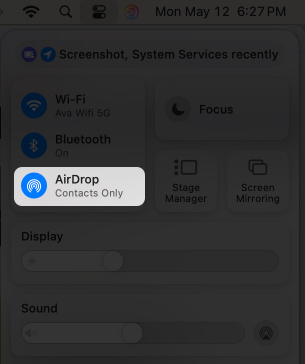
- Turn on AirDrop on your Mac (Control Center > AirDrop).
- On your iPhone, open Photos, select media, tap the share icon, and choose AirDrop > your Mac.
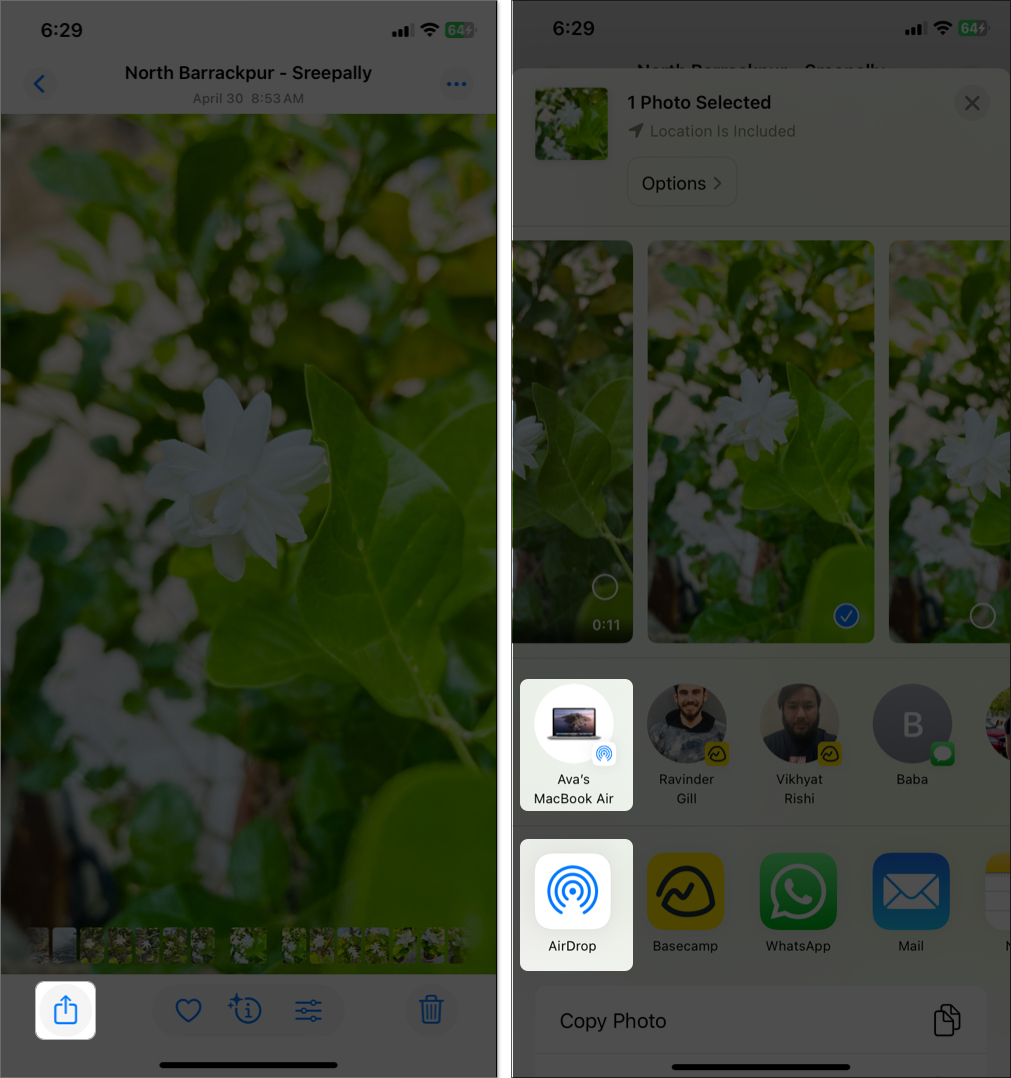
- Accept the transfer on your Mac. The shared photo(s) will appear in your Finder window.


Perfect for quick, wireless transfers—but both devices must be nearby.
4. Use iCloud Photos or Other Cloud Services
iCloud syncs photos across devices, while services like Google Photos or Dropbox offer alternatives.
For iCloud:
- On iPhone: Enable iCloud Photos from Settings > [Your Name] > iCloud > Photos > Sync this iPhone.
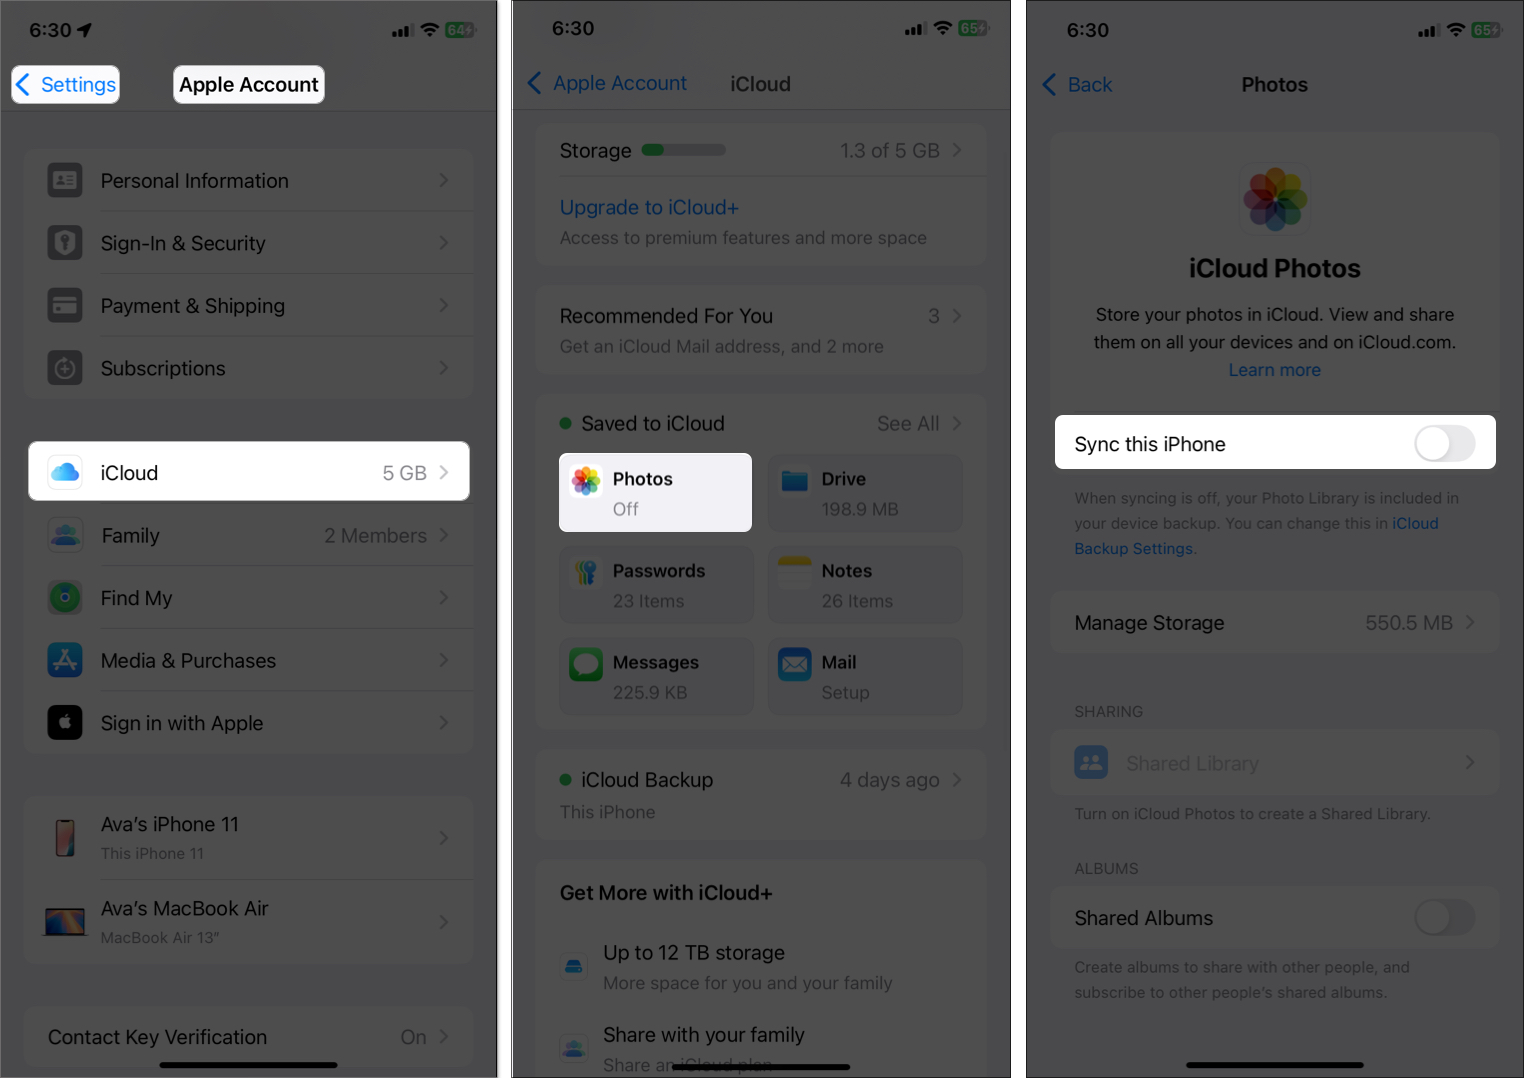
- On Mac: Open the Photos app, go to Photos in the menu bar > Settings > iCloud, and enable iCloud Photos. Then, select Download originals to your Mac.
- Now, access your photos or videos in the Photos app or via iCloud.com.

Enabling iCloud Photos on your Mac and iPhone will automatically sync photos and videos between them without using USB. However, once enabled, syncing could take up to 24 hours to complete.
iCloud Photos always saves photos and videos in their full resolution so the free 5GB storage can be insufficient to get all your photos and videos. You may consider upgrading to iCloud+ for more storage.
Other Cloud Services:
Upload your media to Google Photos/Dropbox via their iPhone apps, then download on Mac. This may compress files.
5. Third-Party Apps (iMazing, AnyTrans)
Apps like iMazing or CopyTrans offer advanced options for file format control and backups.
- Install the app on your Mac.
- Connect your iPhone via USB or Wi-Fi (app-dependent).
- Follow app instructions to select and transfer files.
These apps are flexible with formats and destinations. However, you may require a subscription for full features.
Note:
You can use these third-party apps to send your photos and videos from your iPhone to your Windows computer.
Transfer Photos and Videos From iPhone to Windows PC
Windows users can also import their iPhone media easily with the below options, tailored to the PC environment.
1. Apple Devices App for Windows
The Apple Devices app is Apple’s official tool for Windows.
- Install Apple Devices from the Microsoft Store.
- Connect your iPhone via USB.
- Open the Apple Devices app, select your iPhone, and choose Photos from the sidebar.
- Select images and videos and import them to a folder.
Your PC must be updated to the latest Windows version for seamless Apple integration.
2. Using Windows Photos App
The Windows Photos app is beginner-friendly and pre-installed.
- Connect your iPhone via USB.
- Open the Photos app and click Import > From a connected device.
- Select photos/videos and choose a destination.
- Click Import to start the transfer.
This method is easy to use but may not detect all media formats, especially HEIC.
3. Use File Explorer
File Explorer treats your iPhone like a USB drive.
- Connect your iPhone and unlock it.
- Open File Explorer and find your iPhone under This PC.
- Navigate to Internal Storage > DCIM folders.
- Copy/paste files to your PC.
Perfect for copying all photos and videos manually in bulk.
4. Using iCloud for Windows
iCloud for Windows syncs photos to your PC.
- Install iCloud for Windows from the Microsoft Store.
- Sign in with your Apple ID and enable Photos.
- Access photos in File Explorer under iCloud Photos.
It syncs wirelessly but requires iCloud storage.
Best Practices for Seamless Transfers
- Use high-quality cables to avoid connection drops.
- Organize photos into folders after import.
- Check free space on Mac or PC beforehand.
- For HEIC images, enable automatic conversion to JPEG (Settings > Photos > Transfer to Mac or PC > Automatic).
- Prefer USB 3.0 ports for faster wired transfers.
- Strong Wi-Fi is a must for AirDrop and iCloud.
- Turn off iCloud Photos before USB import to prevent duplication.
Troubleshooting Common Transfer Issues
- iPhone not showing up? Unlock it and tap Trust This Computer.
- Transfers slow? Switch cables or ports.
- AirDrop not working? Ensure both devices are on the same network.
- iCloud sync delays? Make sure you have storage and strong connectivity.
- HEIC format issues? Convert on iPhone or use HEIC-to-JPEG tools.
Transfer iPhone Media the Smart Way
Moving photos and videos from your iPhone to your computer doesn’t need to be a hassle. Whether you use a USB cable, AirDrop, or iCloud, there’s a method that fits your setup. Just follow the steps above to free up storage, edit on your desktop, or create backups without stress.
Got stuck during transfer? Drop your question in the comments—I’m here to help!
Related articles worth reading: