
I know that moment of panic when you accidentally delete a photo and immediately wish you could undo it. Maybe it was a favorite family picture, a travel memory, or an important screenshot. But don’t panic just yet.
In many cases, deleted photos aren’t gone forever. Depending on when they were deleted and how your device is set up, you may be able to restore them. In this guide, I’ll walk you through the most effective ways to recover deleted photos from an iPhone or iPad, from the obvious fixes to the advanced options when the photos seem permanently removed.
Before you start: Understand what happens when you delete photos
The problem arises because most people mistakenly believe that deleting something means the file is gone forever. Usually, it doesn’t.
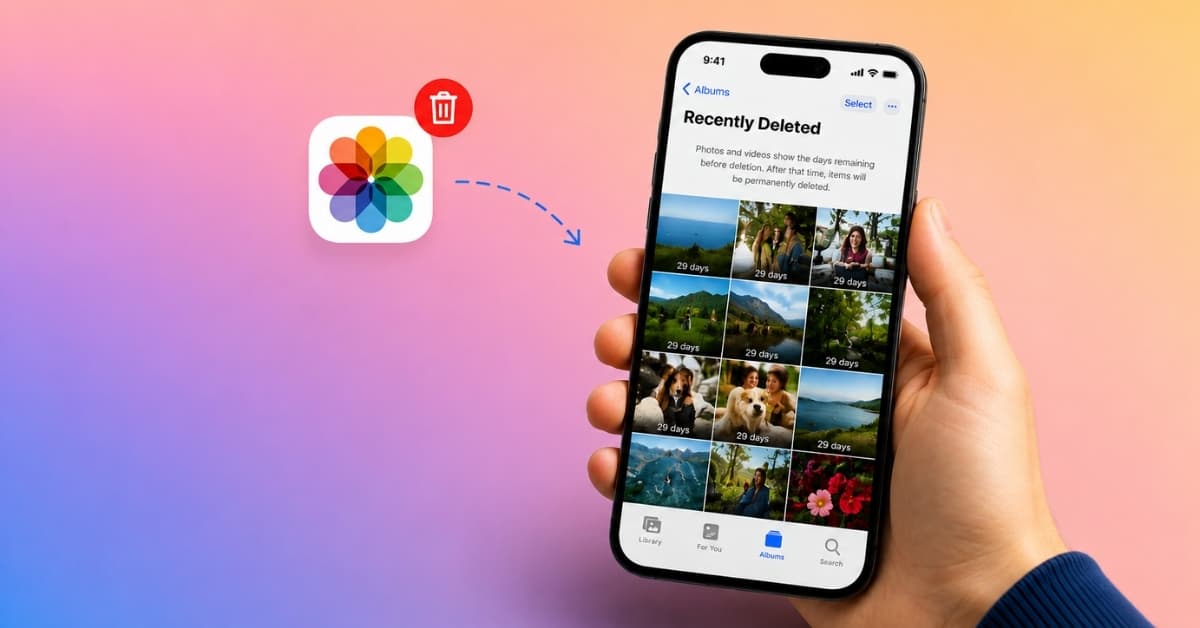
When you delete a photo or video from your iPhone or iPad, it usually moves to the Recently Deleted album. Apple keeps deleted items there for up to 30 days, giving you a window to recover them if you change your mind or delete something by mistake.
However, things can get more complicated if you also use iCloud Photos. When iCloud Photos is enabled, your photo library syncs across devices using the same Apple Account. That means changes, including deletions, can also sync across your iPhone, iPad, and Mac.
It’s also important not to confuse iCloud Photos with iCloud Backup. A backup stores a snapshot of your device data at a particular point in time. Understanding this difference will help you choose the right recovery method.
So before trying anything drastic, I always take a moment to check where those photos may still exist. Don’t rush into resetting your device or installing recovery software.
Method 1: Recover photos from the Recently Deleted album
This is the first place I look. If you deleted the photos recently, recovery can take less than a minute.
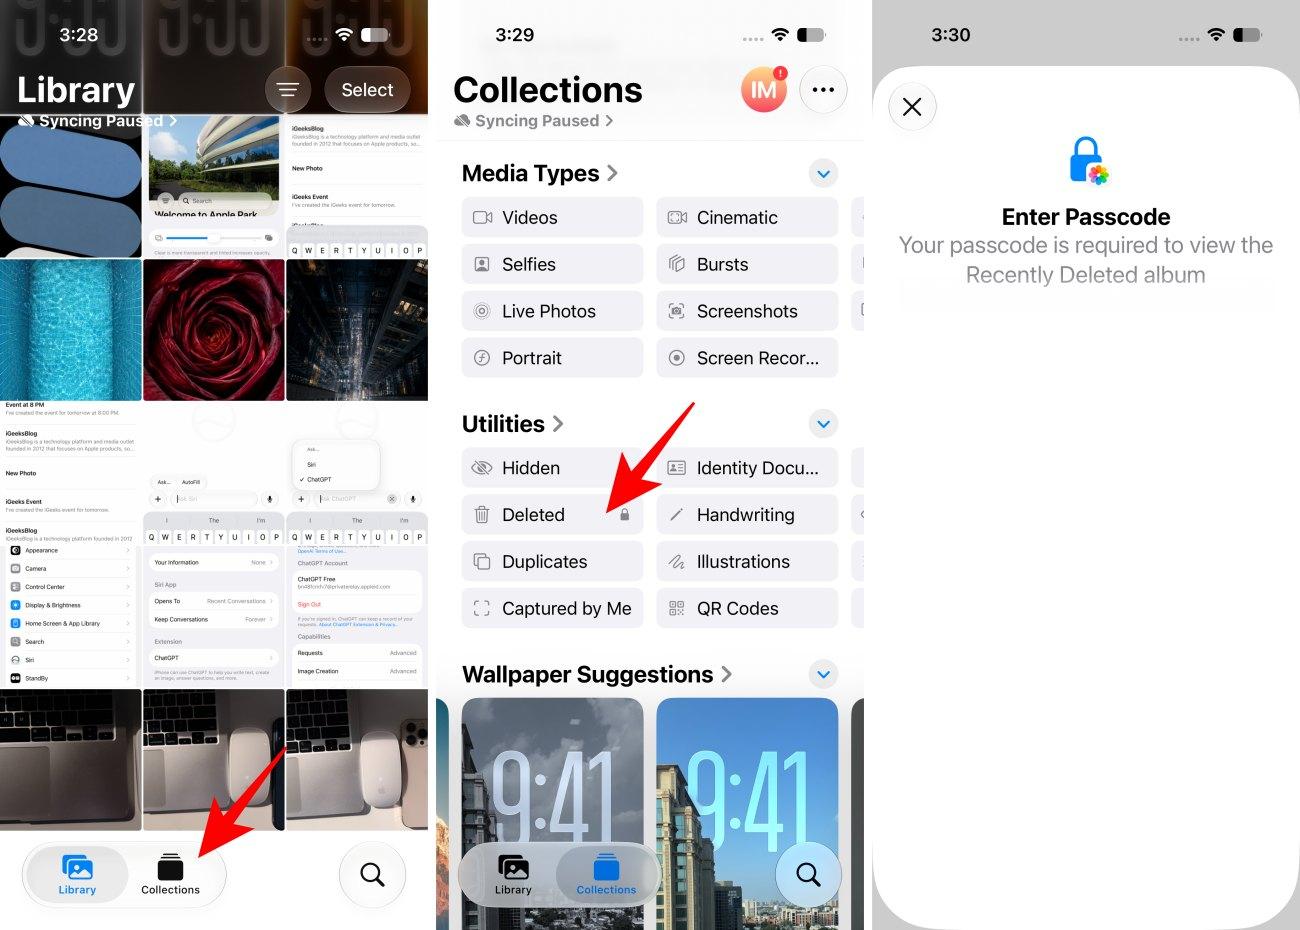
- Open the Photos app and move to the Collections tab.
- Scroll to the Utilities section and select Recently Deleted.
- Tap View Album.
- Authenticate using Face ID, Touch ID, or your device passcode.
- Select the photos you want to restore.
- Tap the three-dot icon > Recover.
- Finally, select Recover Photo to confirm.
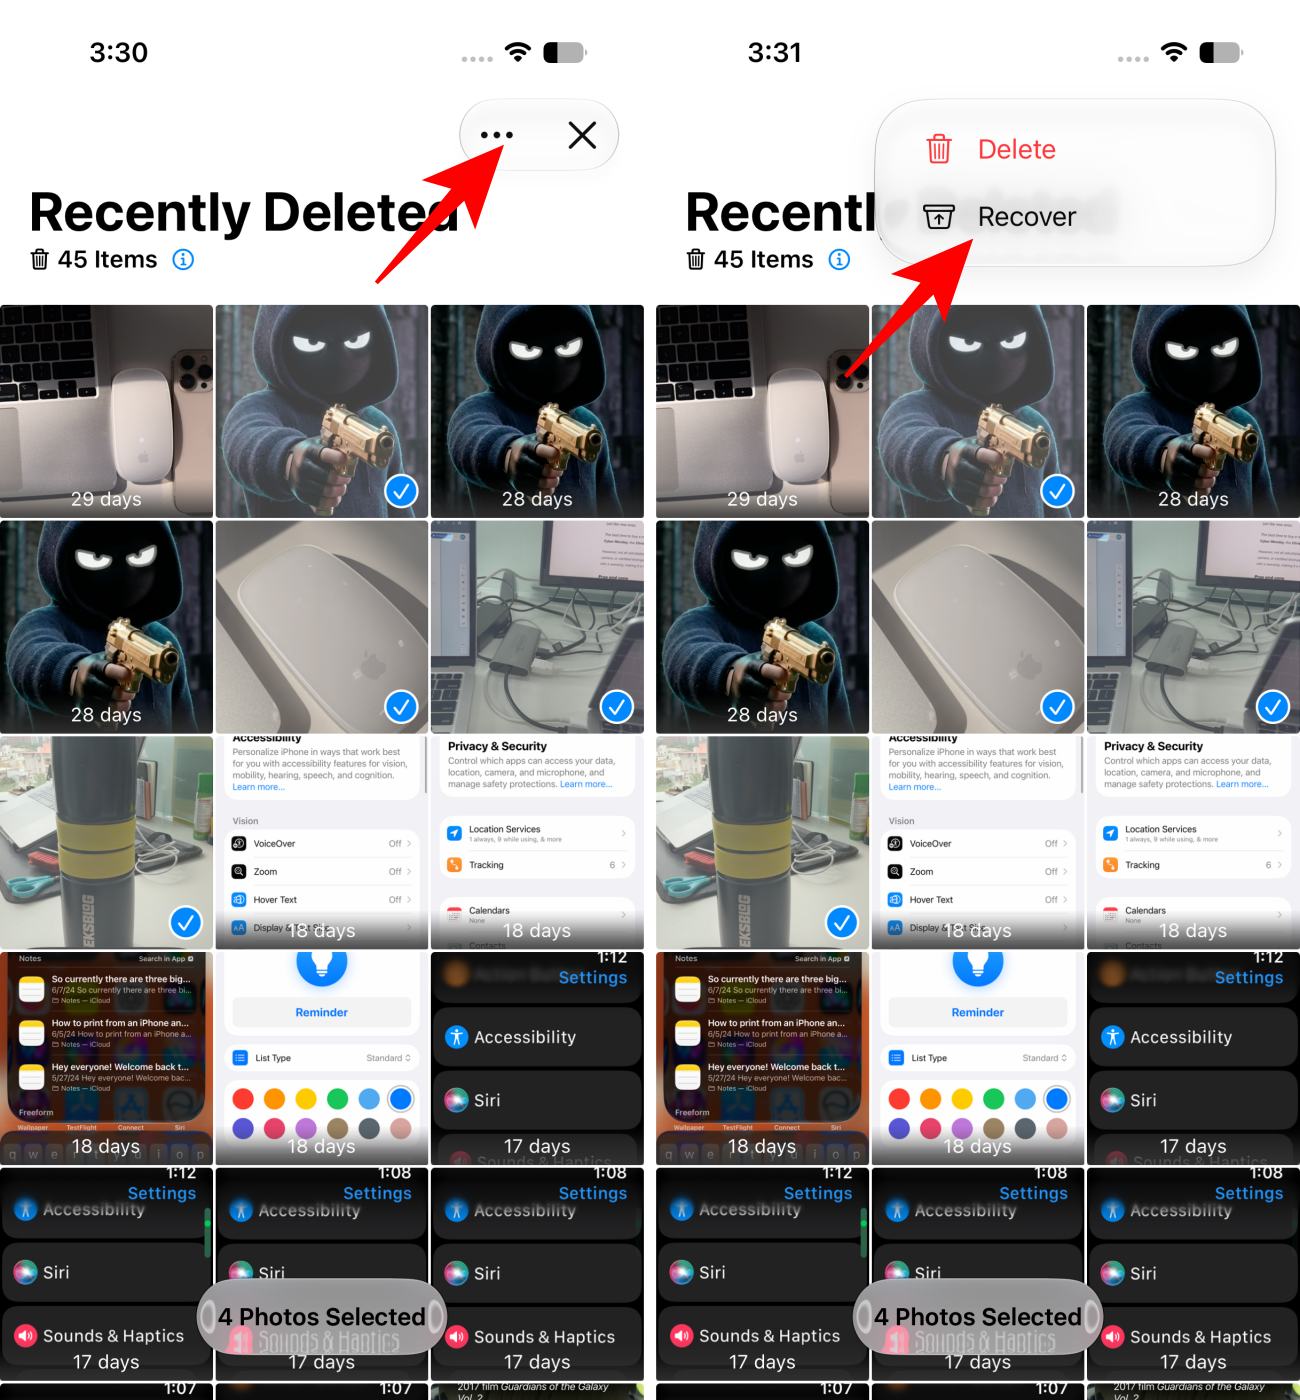
The best part is you can recover multiple photos and videos at once. It’s fast, free, and risk-free. You don’t need to restore a backup or install questionable software.
However, if the photo isn’t there, it may still exist. Move through the next methods before declaring the photo permanently lost.
Method 2: Check iCloud Photos immediately
If you have accidentally deleted the photos from your Recently Deleted album on your iPhone, one of the first places I’d check to recover them is iCloud Photos. In some situations, a copy of your photo may still be available in your iCloud library or on another device connected to your Apple Account. The key is to act promptly.
First, immediately disconnect the iPhone or iPad from the internet where the photos were deleted. This can prevent additional syncing while you check whether the photos still exist elsewhere.
Next, use a Mac or another device and follow these steps:
- Open a web browser and visit iCloud.com.
- Sign in with your Apple ID and password.
- Scroll and click the Photos tile.
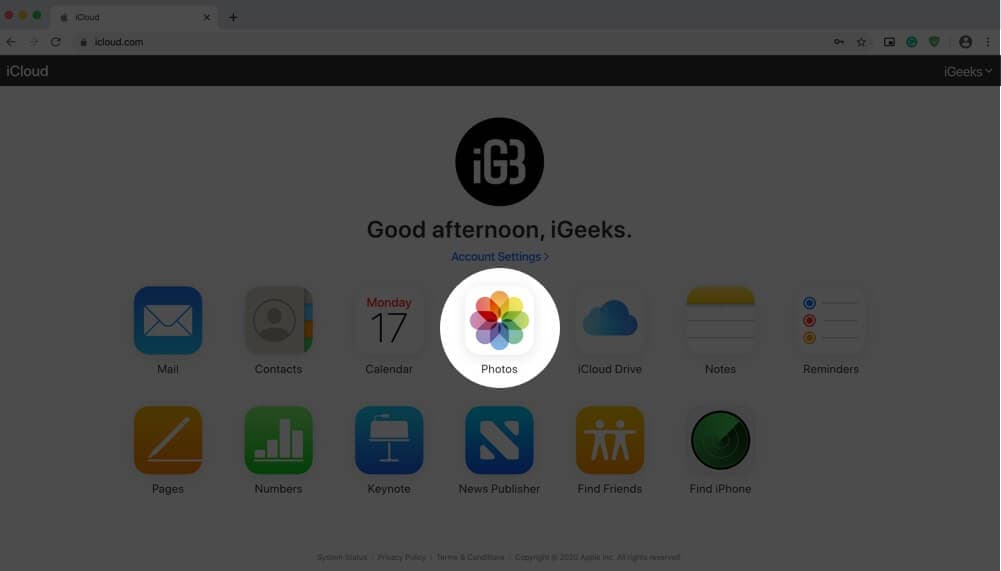
- Check the Recently Deleted section in the sidebar.
- If you find your photos, select them and click Recover or download a copy immediately.
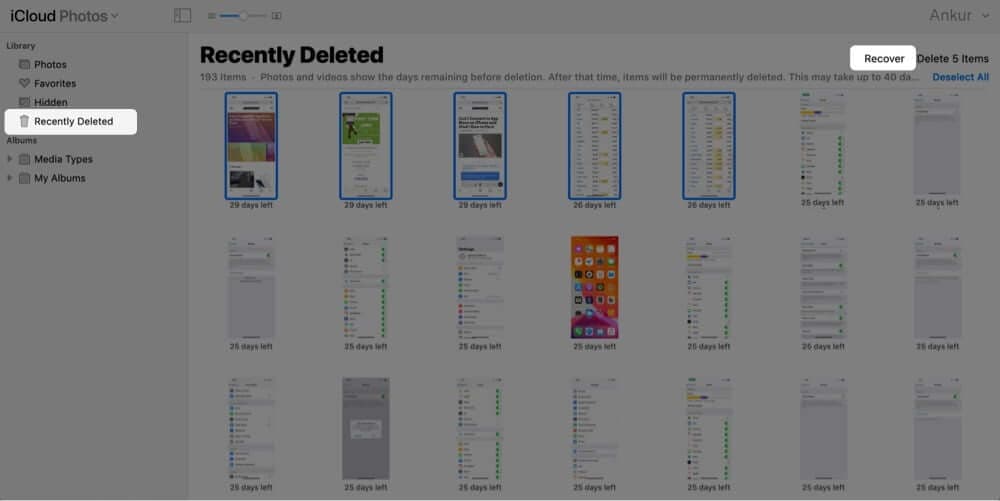
It’s important to be realistic here: if the photos were deleted more than 30 days ago, they may no longer appear in iCloud’s Recently Deleted folder.
Tip:
Do you have an old iPhone, iPad, or Mac signed in to the same Apple Account that has not been connected to the internet recently? Check the Photos app on each one of them. If one device hasn’t fully synced, your missing photos may still be there.
Method 3: Recover permanently deleted photos after 30 days using an iCloud backup
If more than 30 days have passed and your photos have disappeared from the Recently Deleted album, recovering them becomes more challenging. But I didn’t give up and checked whether I had an older iCloud backup.
The backup is a snapshot of your iPhone or iPad from a specific point in time. If your missing photos existed when that backup was created, restoring it may restore them.
However, there’s one major catch: you can’t simply restore a few photos from an iCloud backup. Restoring a backup replaces the current data on your device with the data from that earlier backup. That’s why I strongly recommend checking the backup date before proceeding.
First, look for a backup created before your photos disappeared:
- Open Settings on your iPhone or iPad.
- Tap your name at the top.
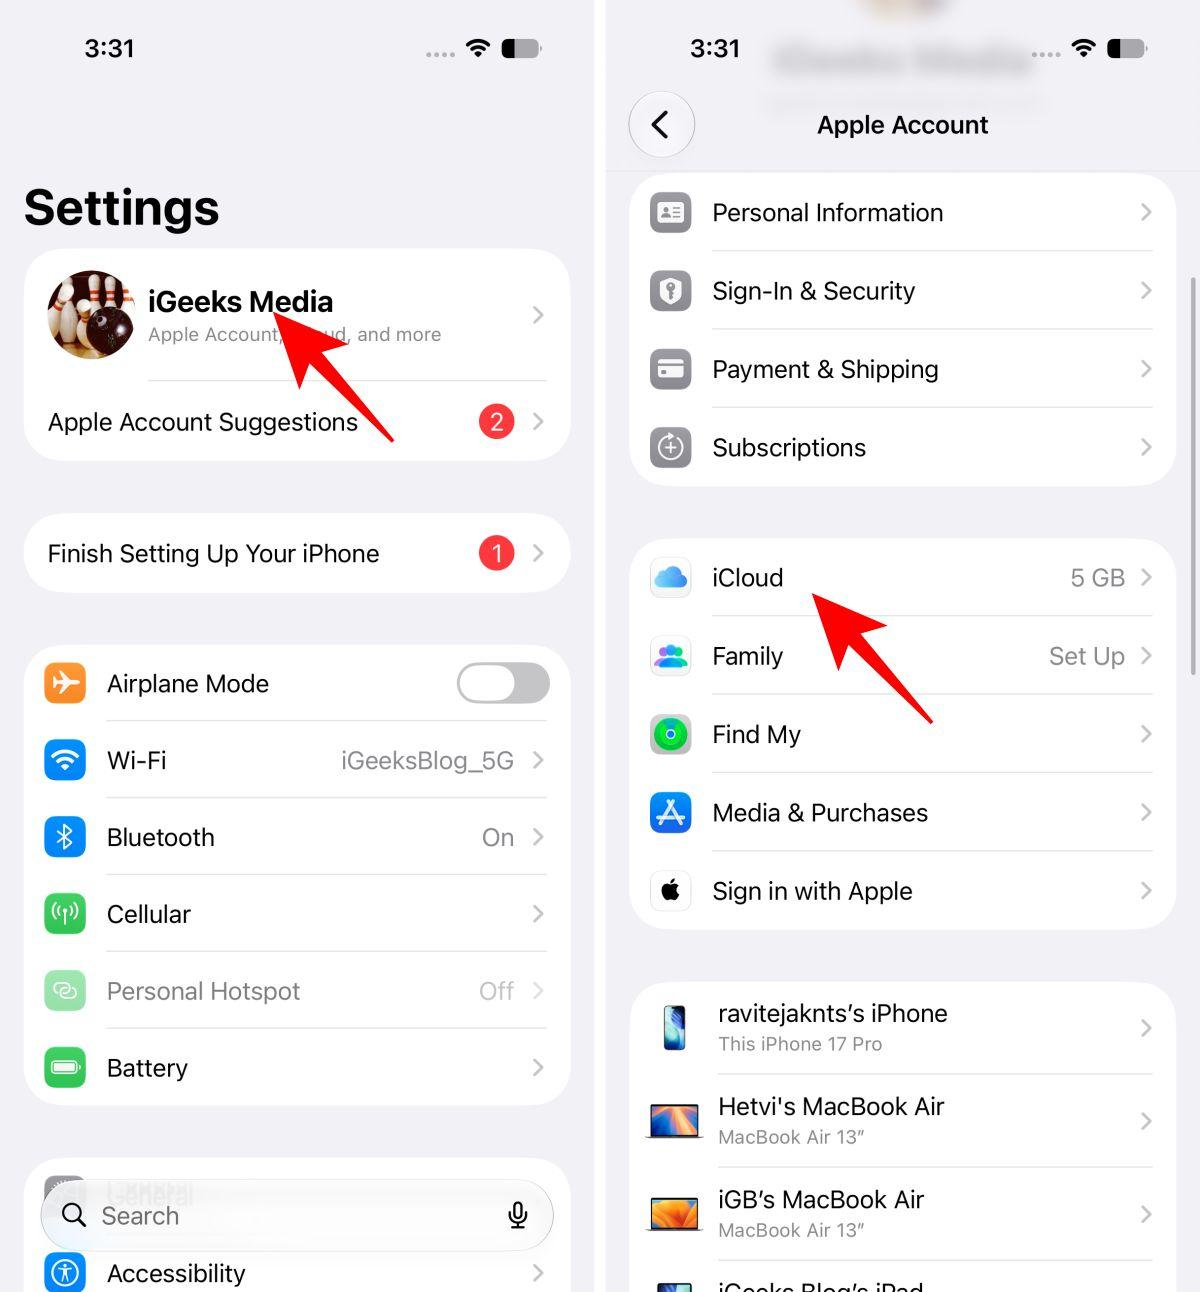
- Go to iCloud > iCloud Backup.
- Check whether you have an available backup and note its date.
- Make sure the backup was created before you permanently deleted the photos.
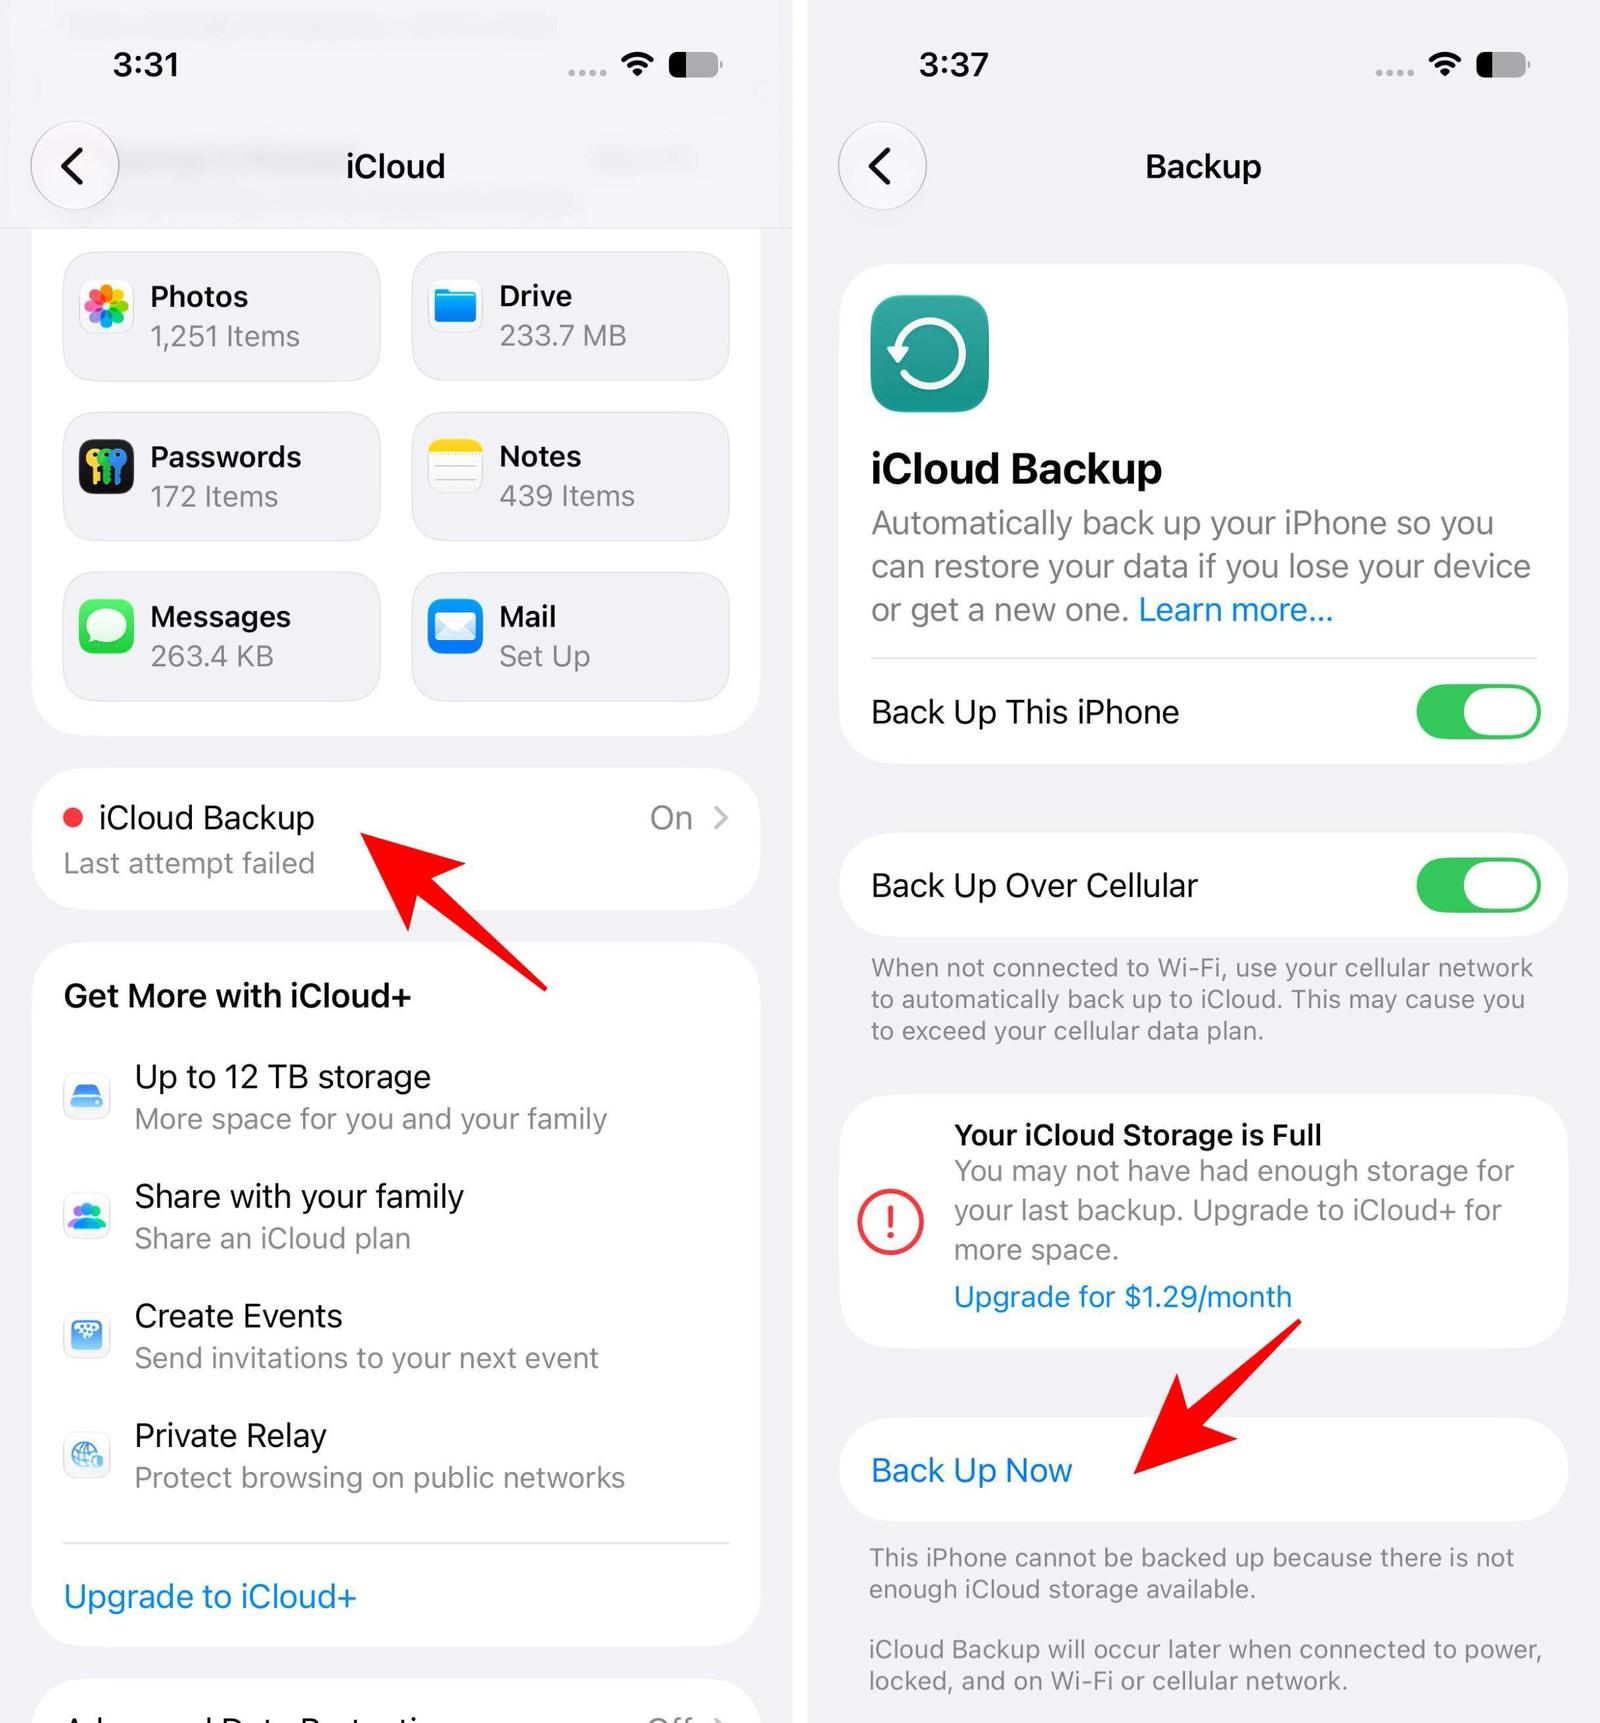
If you find a suitable backup, take a moment to save any important files, messages, or photos currently on your device. You may transfer photos and videos to a computer or services like Google Photos. Restoring an older backup could replace newer data.
Once you’ve confirmed that an older backup is worth restoring, follow these steps:
- Erase your iPhone or iPad to return it to the setup screen.
- Turn on your device and follow the on-screen setup instructions.
- When you reach the Apps & Data screen, choose Restore from iCloud Backup.
- Sign in with the Apple Account connected to your backup.
- Select the backup created before your photos were deleted.
- Keep your device connected to Wi-Fi while the backup restores.
After the restoration process is complete, launch the Photos app to confirm the missing photos have been restored successfully. The backup restore process takes time; be patient and allow time for the synchronization to complete.
Important:
If you use iCloud Photos, your photos may sync separately from your standard iCloud device backup. In that situation, this method may not bring back photos that were already permanently deleted from iCloud Photos.
Method 4: Recover photos from Finder using a Mac backup
Don’t have an iCloud backup? That doesn’t necessarily mean your deleted photos are gone forever. If you’ve ever backed up your iPhone or iPad to a Mac, you may have a local copy of your device data stored on your computer. This proved useful when my missing photos weren’t available in iCloud or in the Recently Deleted album.
The most important thing is the backup date. Ideally, you need a backup created before the photos were deleted.
First, check whether your Mac has an older backup of your iPhone or iPad:
- Connect your iPhone or iPad to the Mac using a USB cable.
- Open Finder.
- Select your iPhone or iPad from the sidebar.
- Look for available backups and check their dates.
- Find a backup created before the photos were deleted.
If you find a suitable backup, you can restore it by following these steps. Before clicking Restore, I always save anything important.
- Keep your iPhone or iPad connected to your Mac.
- Open Finder and select your device.
- Click Restore Backup.
- Choose the backup created before your photos disappeared.
- Check the backup date and size to make sure you’ve selected the right one.
- If the backup is encrypted, enter the backup password when prompted.
- Click Restore and wait for the process to finish.
- Keep your device connected until it restarts and completes syncing.
After the restoration is complete, open the Photos app and check whether your deleted pictures have returned. I recommend choosing the most relevant backup based on its date and size and keeping the device connected until the restore and sync are complete.
Tip:
If you use a Windows PC instead of a Mac, the process is similar. You can restore a computer backup using the Apple Devices app on Windows or iTunes on older setups.
Method 5: Look in Messages, Mail, and shared conversations
This is one of my favourite recovery tricks because it’s easy to forget how many copies of our photos we accidentally create.
Think about it. Have you ever sent the missing photo to a friend, family member, coworker, group chat, or yourself? If yes, there’s a chance the photo is still sitting inside that conversation.
Check Messages
Open relevant conversations and look through:
- iMessage attachments
- Shared photos
- Old conversations
- Group chats
You may be able to save a copy directly back to your Photos library.
Check messaging apps
Don’t stop at Apple’s Messages app.
I always look through apps such as:
- Telegram
- Messenger
- Signal
- Other chat apps I regularly use
If the photo was shared but the conversation still exists, you may have an easy recovery option.
Check your email
Search your inbox and sent mail for:
- Attachments
- Photo names
- Important dates
- Names of people you shared the images with
The recovered version may not always be the original full-resolution file, but a slightly compressed copy is still better than losing a meaningful photo forever.
Method 6: Check third-party cloud storage services
If you’ve ever installed a cloud storage app, don’t underestimate it. Most people do not even remember setting up the automatic photo upload months or years ago.
Check services such as:
- Google Photos
- Microsoft OneDrive
- Dropbox
- Amazon Photos
- Other cloud backup apps
The key places to inspect are your main photo library, Trash or Bin folders, archived items, and automatically uploaded camera folders. Browse by date, location, or people to quickly find photos and videos. If you recover it, download a copy immediately.
Once, I accidentally deleted my summer vacation album from my iPhone. Fortunately, they were automatically uploaded to OneDrive.
What to do if you permanently deleted the photos
Let’s address the scenario nobody wants to hear: You’ve checked Recently Deleted, iCloud Library, Shared Albums, Backups, Messages, old devices, and even social media. But the photo still isn’t there.
What now?
The honest answer is that the photos may no longer be recoverable. This is quite a bummer, but it’s also a good reminder to protect important memories with more than one backup going forward.
Also, avoid random actions such as:
- Repeatedly resetting the device.
- Installing multiple unknown recovery apps.
- Giving suspicious software access to your Apple Account.
- Paying for tools that promise guaranteed recovery.
Take a systematic approach instead.
Can iPhone photo recovery software help?
Here’s my blunt opinion: Be skeptical of anyone who promises to recover every permanently deleted iPhone photo.
Modern iPhones are heavily encrypted and tightly controlled. Recovering data isn’t as simple as plugging in a device and magically scanning every deleted file like old desktop hard-drive recovery.
Some third-party tools may help in specific situations, particularly when recoverable copies exist in backups, local storage, or other accessible data sources. But there is no universal magic button.
Before using iPhone photo recovery software, ask:
- What exactly is the tool recovering?
- Is it scanning the iPhone directly or searching backups?
- Does it support your version of iOS or iPadOS?
- Can you preview results before paying?
- Does the company have a trustworthy reputation?
- What data permissions are you giving the software?
While looking for such tools, I always avoid the ones that demand payment before showing whether anything is recoverable and make vague claims about bypassing Apple’s security.
Popular third-party tools to recover deleted iPhone photos are,
Most of this software is paid. So, make sure you thoroughly check their website before buying a license.
Tips to prevent losing photos in the future
Recovering deleted photos is stressful. So, I always choose prevention.
Here are the habits I strongly recommend.
- Don’t rely on a single backup: Keep important photos in multiple locations, such as your iPhone or iPad, a computer backup, and a second cloud storage service or an external drive. However, don’t duplicate every screenshot obsessively.
- Back up before major cleanups: Planning to delete duplicate photos or screenshots? Back up first. It’s easy to tap too quickly, select the wrong images, or delete a photo you thought was a duplicate.
- Review Recently Deleted often: Apple’s Recently Deleted album gives you a safety net, but it’s not permanent. Make it a habit to check it if you’ve recently performed a major photo cleanup.
- Verify your photos are backed up: Check whether your recent photos are safely synced to iCloud Photos. Open Settings, tap your name > iCloud > Photos, and make sure Sync this iPhone/iPad is turned on.
My advice: If losing a photo would genuinely upset me, I want at least two independent copies of it.
Get back your important pictures!
Accidentally deleting photos from your iPhone or iPad can be stressful, but they aren’t always gone forever. Start with the simplest options, such as checking the Recently Deleted album and iCloud Photos, before moving on to backups, other devices, or cloud storage services.
If you’ve tried all the recovery methods and still can’t find your photos, recovery may not always be possible. My biggest takeaway? Don’t wait until you lose an important photo to think about backups. Keep your important photos stored in more than one place, so the next accidental deletion doesn’t have to turn into a panic.