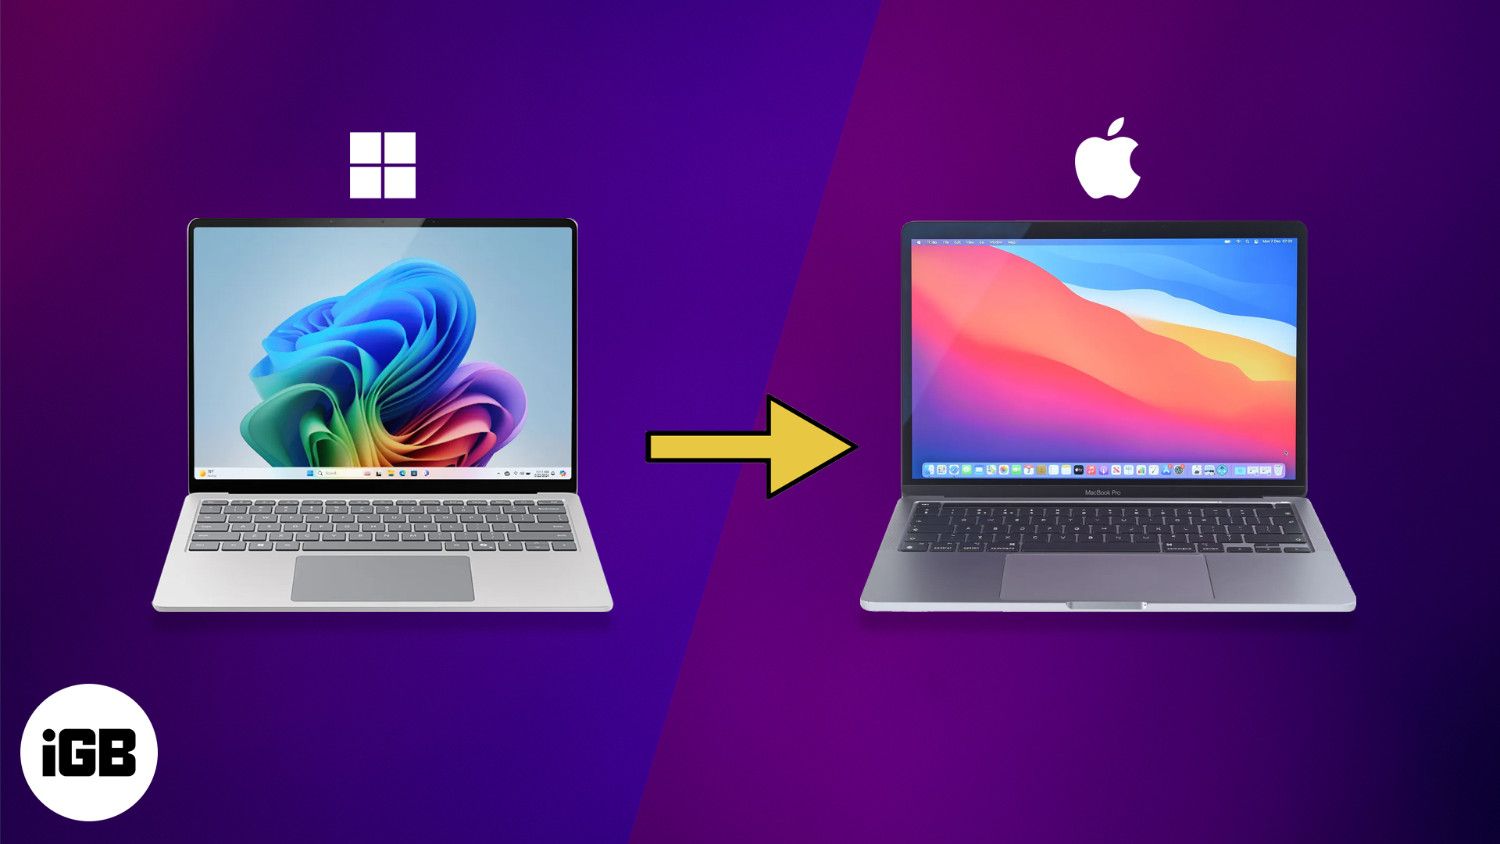
Switching from a Windows PC to a Mac is exciting—but transferring your files, photos, documents, music, and apps can feel overwhelming. The good news? There are several reliable methods for transferring your data safely and easily. In this guide, I’ll walk you through six proven methods to transfer data from a Windows PC to a Mac using built-in tools, cloud services, or external drives.
Preparations Before Transferring Data from Windows to Mac
Start strong with these essential pre-transfer steps to avoid data loss or confusion:
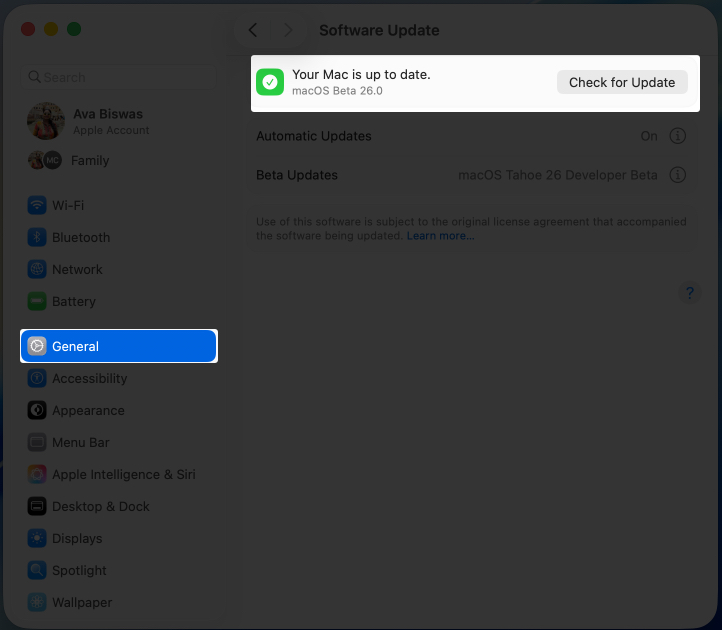
- Update Your Devices: Ensure your Windows PC runs the latest version of Windows 11 (Settings > Windows Update) and your Mac is updated to the latest macOS (System Settings > General > Software Update).
- Back Up Everything: Use Windows Backup (Settings > Accounts > Windows Backup), Acronis True Image, or an external drive to create a full backup of your PC.
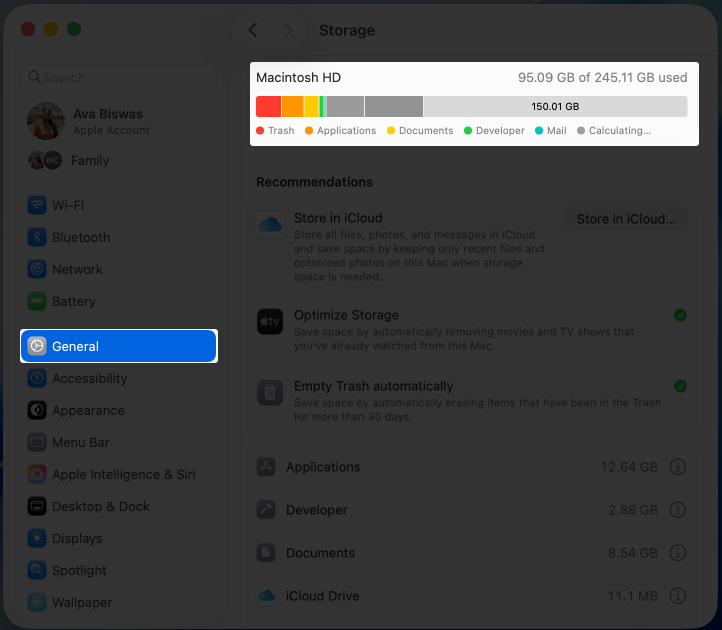
- Check Mac Storage: Make sure your Mac has enough free space for the incoming files (System Settings > General > Storage). If transferring 500GB, your Mac should have at least 500GB of free space.
- Organize Files: Group files into folders like Documents, Photos, and Videos. Delete unnecessary files to streamline the transfer.
- Check Compatibility: Some files (.exe programs) won’t run on macOS. Convert media formats like .wma to .mp3 using VLC Media Player.
- Make a Software List: Identify your frequently used Windows apps. Some may have Mac versions; research alternatives where needed.
- Note Login Credentials: Jot down Microsoft account info, email logins, and Wi-Fi passwords.
- Gather Equipment: You may need an external USB drive, a Thunderbolt cable, or a reliable internet/Ethernet connection.
- Adjust Security Settings: Disable firewall, VPN, or antivirus temporarily to ensure smooth transfers.
6 Ways to Transfer Data from Windows to Mac
Let’s explore each method with how-tos, pros, cons, and expert tips.
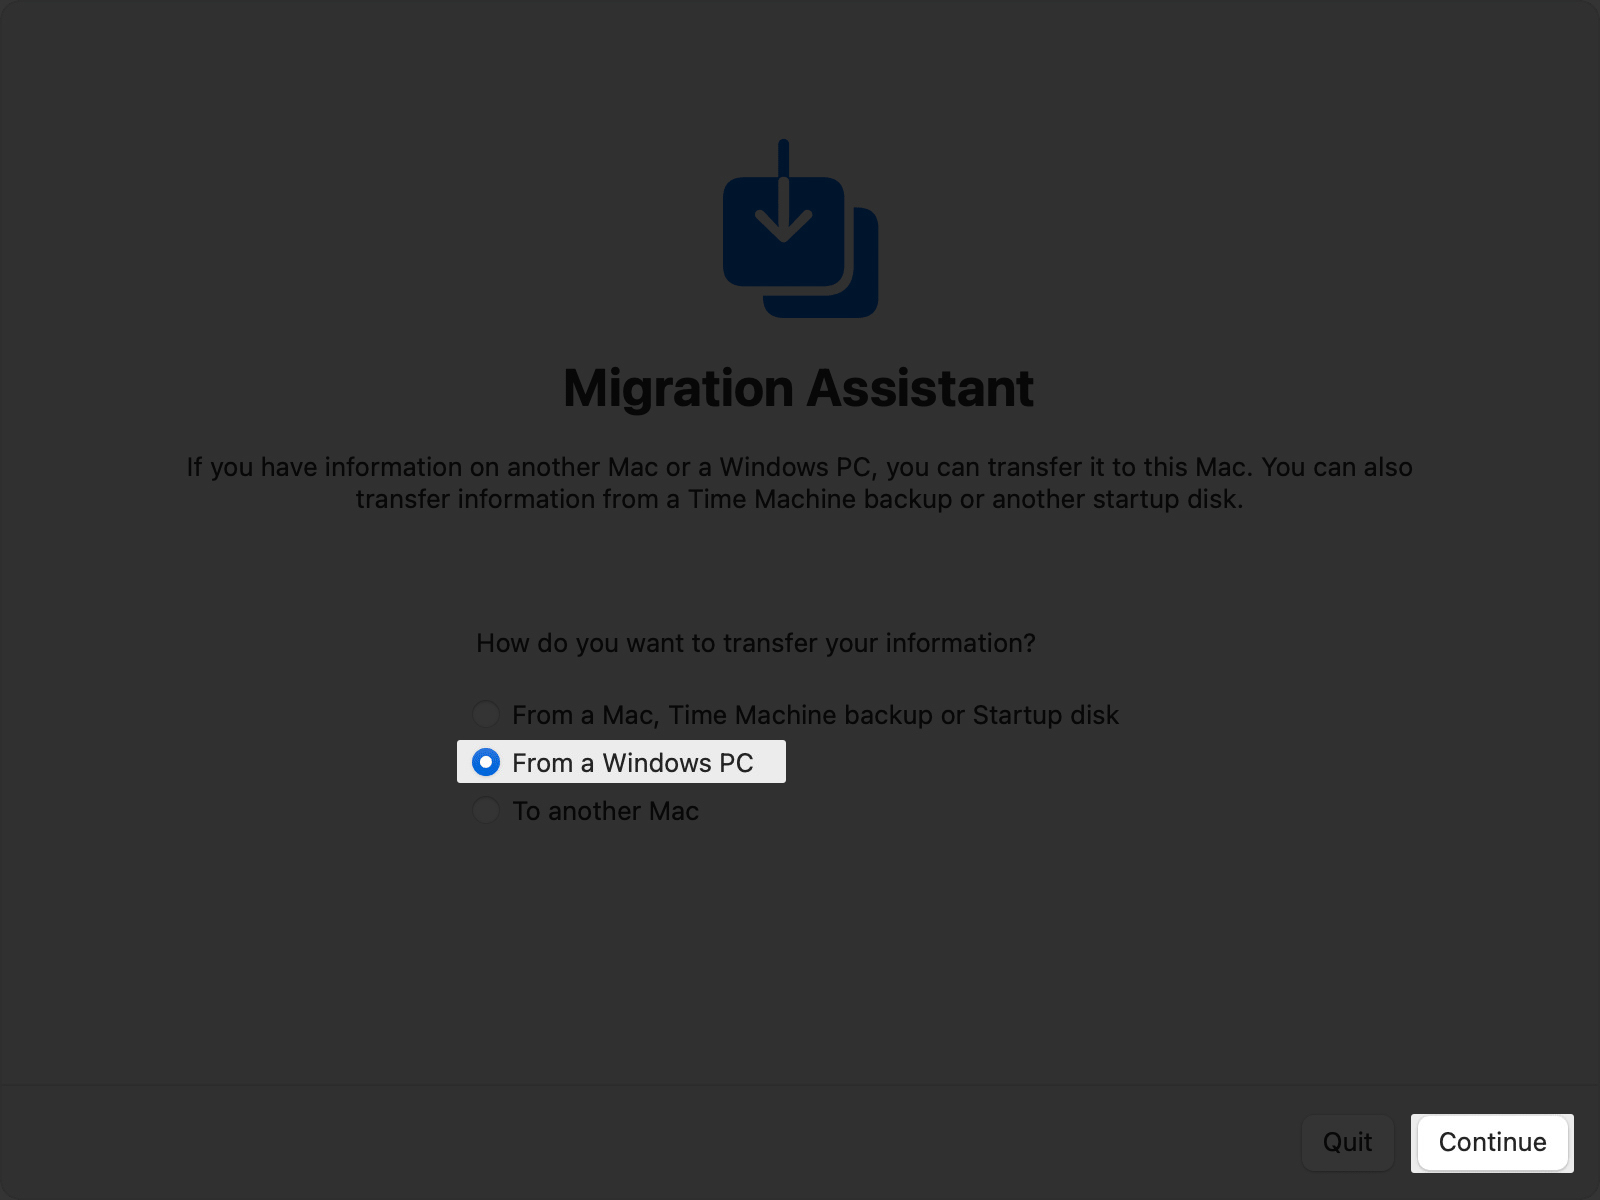
1. Use Apple Migration Assistant
Best For: Full profile transfers during Mac setup
Requires: Both devices are connected to the same network or Ethernet
Steps:
- On your Windows PC, download Migration Assistant from Apple’s official website. It’s compatible with macOS Sonoma 14.4 or later and Windows 10 or later.
- Open Migration Assistant on both devices. On Mac, find it in Applications > Utilities or search via Spotlight.
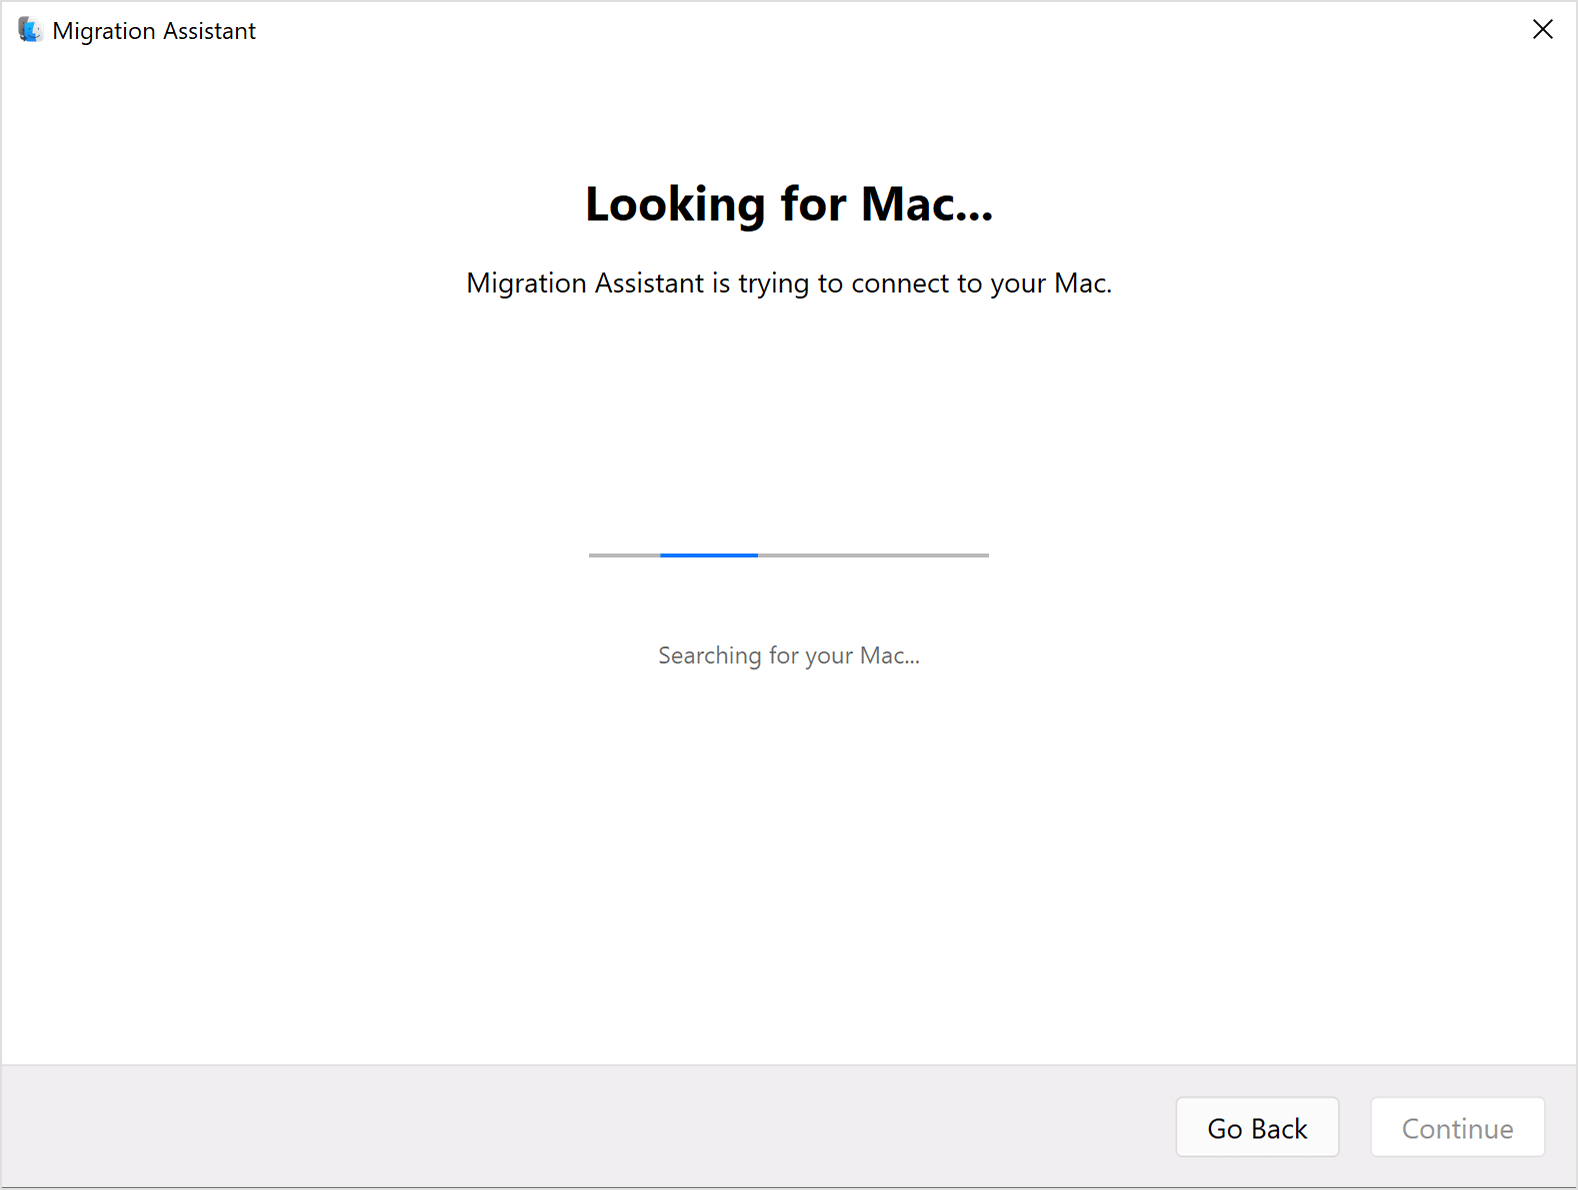
- Follow the on-screen prompts to connect both devices to the same Wi-Fi network or use an Ethernet cable. Ensure you are logged in as an administrator on your PC.
- On the Mac, select From a Windows PC, then click Continue.
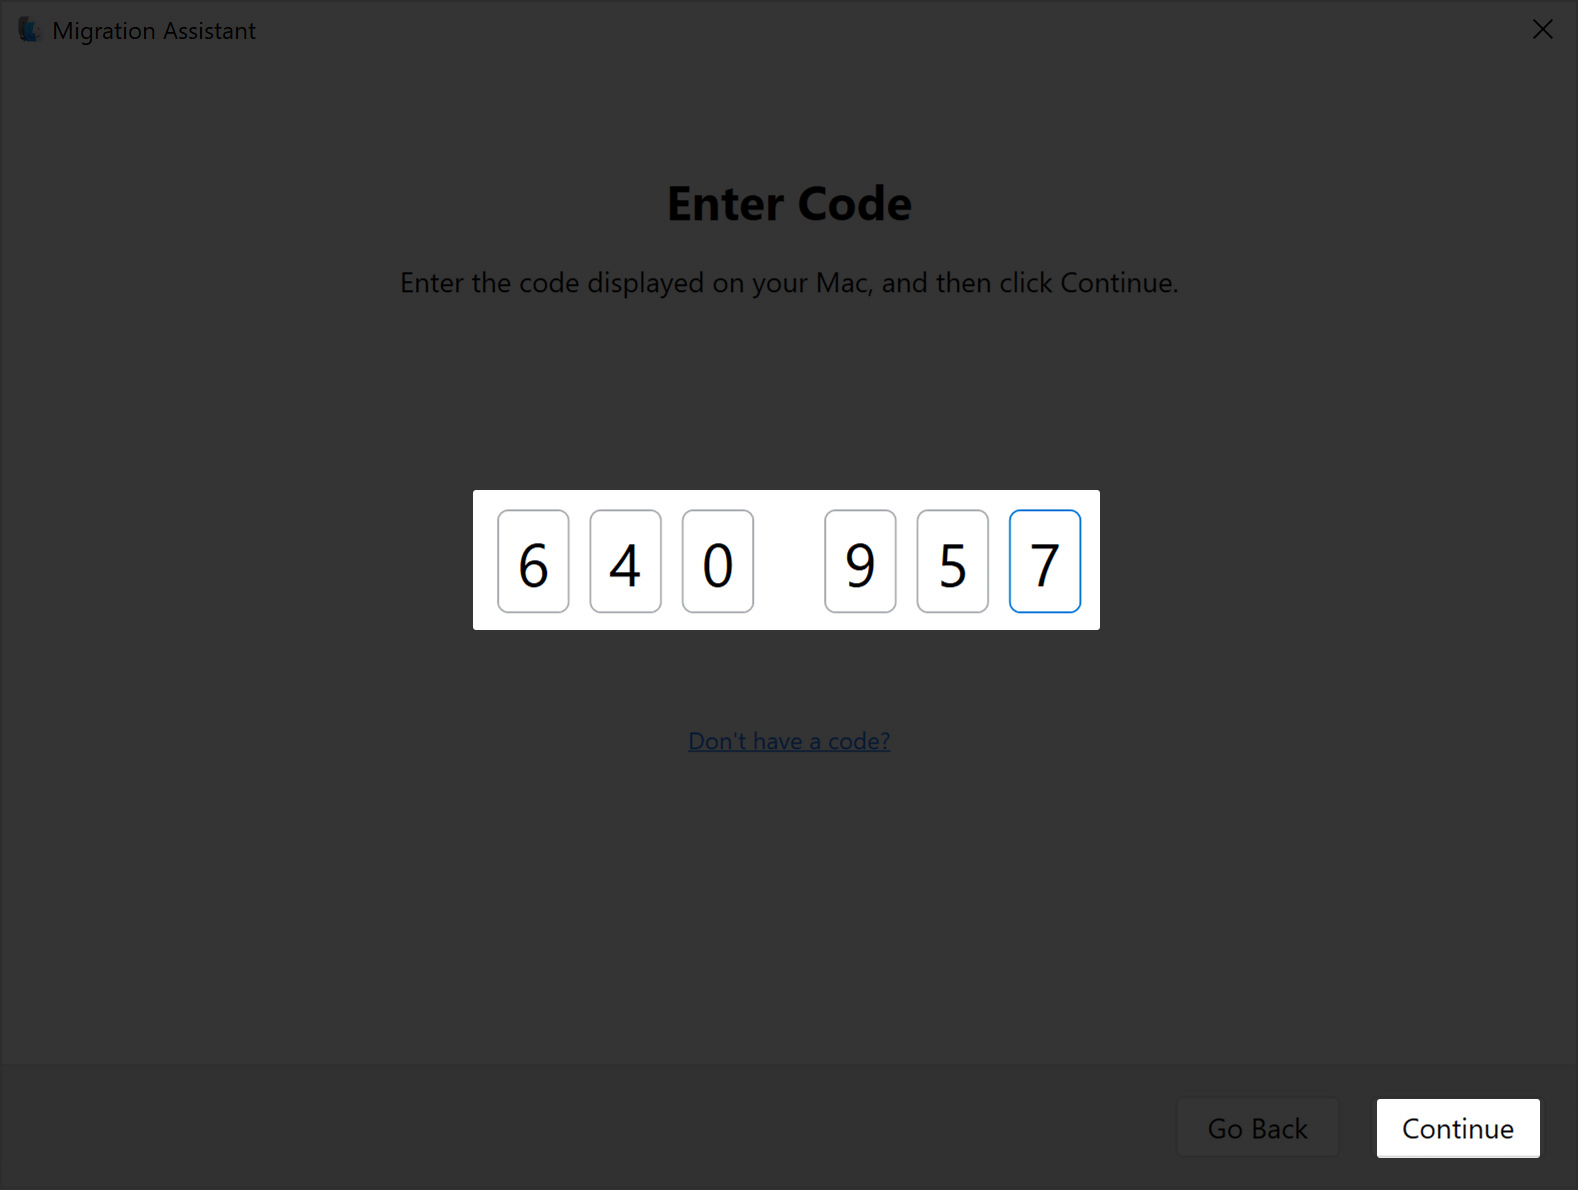
- Enter the code displayed on your Mac into the Windows Migration Assistant.
- Now, Migration Assistant analyzes your computer’s data and determines how much storage space each type of file takes up. Scroll down and select the data you want to move.
- To initiate the transfer, click Continue. Wait for it to be completed (time depends on data size and connection speed).
- After the transfer is finished, exit Migration Assistant on both PC and Mac. To access the files, log into the migrated account on your Mac.

- Set up your Apple Account on your Mac to sync it or access content from Apple.


If you need to transfer data from another Windows user account, log in to that account on your PC and repeat the steps.
What Transfers:
You can choose what data you want to transfer using Migration Assistant. This includes:
- Email and email settings from Windows Mail and Outlook are moved to the Mail app.
- Contacts from People (Windows 10 or later), Outlook, and the Contacts folder in your home directory all go to the Contacts app.
- Appointments from Outlook and Calendar (Windows 10 or later) transfer to the Calendar app.
- Tasks from Outlook are saved to the Reminders app.
- Music, podcasts, audiobooks, and movies/TV series are accessed through the Music app, Podcasts app, Books app, and Apple TV app, respectively.
- Bookmarks and the homepage from Chrome, Edge, Firefox, Internet Explorer, and other browsers are transferred to Safari.
- Custom desktop images, language preferences, known Wi-Fi networks, and location settings are automatically saved in System Settings.
- Documents and other things from your home directory are now in your home folder. Photos and other images are also moved to the home folder. To add them to the Photos app, you can either add them manually or open Photos and let it search and import them.
- Non-system files and documents from the system disk (usually the C drive) and other accessible drives go to the Shared folder.
- Transfers entire user profiles
- Maintains folder structure and system settings
- No extra software needed
- Can be slow for large transfers
- Apps from Windows won’t run on macOS
Tips for Migration Assistant
- Use during initial Mac setup for the smoothest experience.
- Plug both devices into power to avoid interruptions.
- If the transfer stalls, restart both devices and try again. You must close antivirus/firewalls temporarily if the connection fails.
- Ensure both devices are on the same Wi-Fi network band (e.g., 5 GHz). Use Ethernet to speed things up.
2. Transfer via Windows File Sharing
Best For: Transferring select files over Wi-Fi or Ethernet
Mac Setup:
- Go to System Settings > General > Sharing
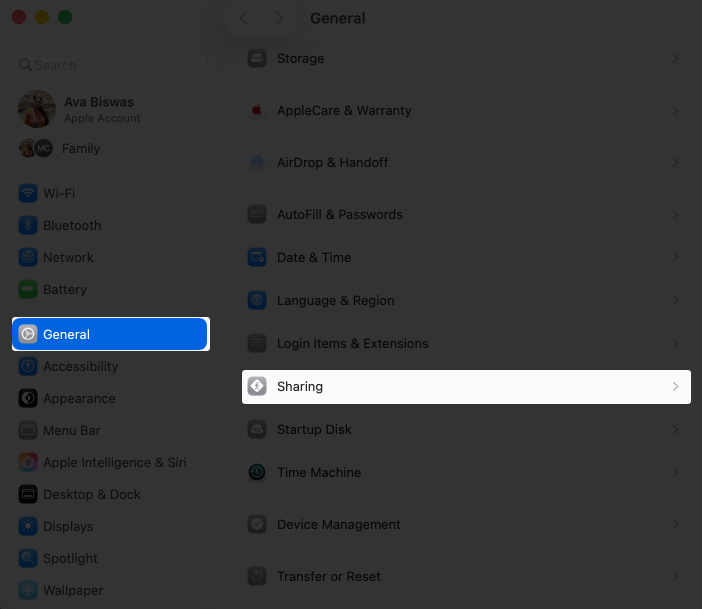
- Toggle on File Sharing and click the info button next to it.
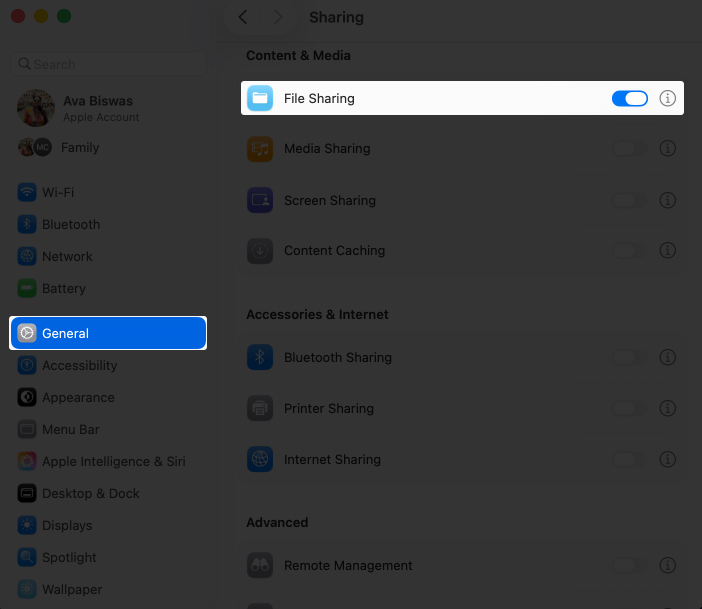
- Next, click the Options section at the bottom.
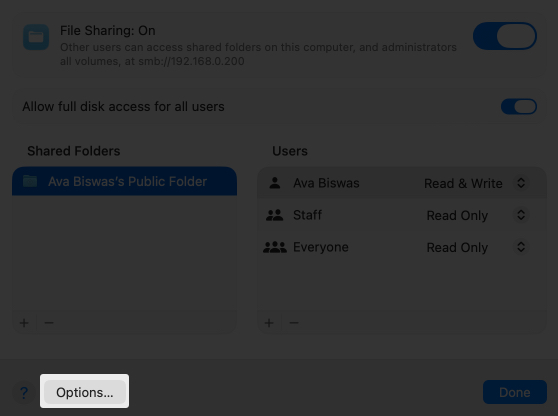
- Toggle on Share files and folders using SMB.
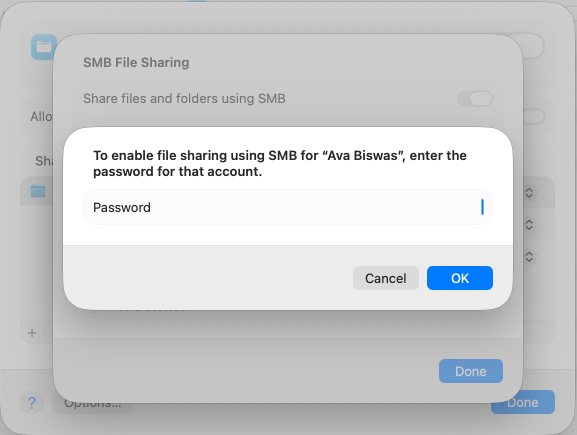
- Under the Windows File Sharing section, check the box next to the account name whose files you wish to access on Windows.
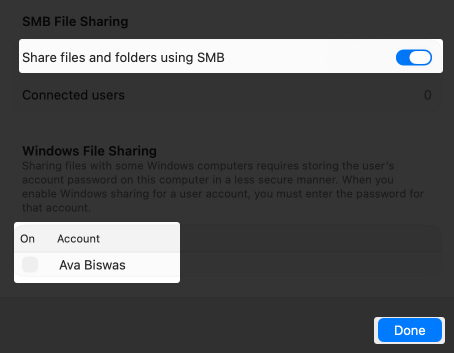
- Enter the user’s password, then click OK.
- Click Done to save your choice.
- Take note of the IP address displayed under the File Sharing: On at the top of the window (e.g., smb://your-mac-address).


Windows Setup:
- Launch File Explorer and right-click a folder (e.g., Documents).
- Select Properties > Sharing > Share.
- Add Everyone or a specific user and note the network path (e.g., \\your-pc-name\folder).
To Transfer:
- Connect both devices to the same Wi-Fi or Ethernet network.
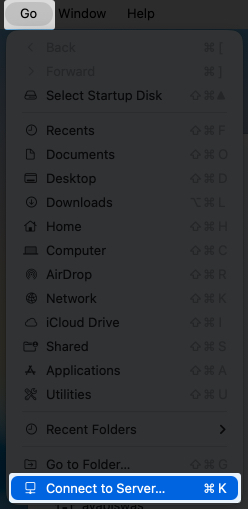
- On your Mac, open Finder, click Go in the menu bar, and select Connect to Server.
- Enter
smb://<Windows_IP_address>and click Connect.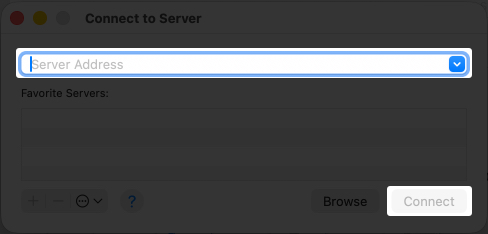
- Alternatively, click Network in the sidebar and locate your Windows PC.
- Enter your Windows PC’s username and password if prompted.
- Drag and drop files from the Windows shared folder to your Mac.


What Transfers:
- Any files or folders you’ve shared (e.g., Documents, Photos, Videos).
- Does not transfer user accounts or app settings.
- Fast on modern networks
- No hardware needed
- Great for selective file transfers
- Setup can be complex
- May be blocked by firewalls or antivirus software
Tips
- Use an Ethernet cable for faster, more stable transfers.
- Disable Windows Defender Firewall temporarily if the connection fails (re-enable after).
- Name shared folders clearly to avoid confusion.
- Test with a small file to ensure the connection works.
3. Using Cloud Storage (iCloud, Google Drive, etc.)
Best For: Small-to-medium file transfers and remote access
Popular Services:
- iCloud: 5GB free, up to 12TB with paid plans, integrated with macOS.
- Google Drive: 15GB free, cross-platform, easy to use.
- Dropbox: 2GB free, reliable for both platforms.
- Microsoft OneDrive: 5GB free, great for Windows users.
Steps to transfer files:
- On your Windows PC, install the cloud service app or use the browser version.
- Sign in with your account (or create one).
- Upload files from Windows to the cloud (e.g., drag folders to Google Drive).
- On your Mac, install the same cloud service app or sign in via browser.
- Download the files to your Mac or sync them via Finder.
- No cables needed
- Access files from anywhere
- Easy to share specific files or folders.
- Limited free storage
- Upload speed depends on the internet connection
Tips
- Compress large folders (e.g., ZIP) to save space and speed up uploads.
- Use a wired internet connection for faster uploads and downloads.
- Enable two-factor authentication for security.
- Clear cloud storage regularly to free up space. For iCloud, use selective sync to save local space.
4. Using External Storage (USB or Hard Drive)
Best For: Large files or no internet
Steps:
- Connect an external drive to your Windows PC.
- Go to File Explorer, right-click on a drive, select Format > exFAT for cross-platform compatibility.
- Copy files from Windows to the drive (e.g., drag the Documents folder).
- Safely eject the drive from Windows.
- Connect the drive to your Mac.
- Open Finder, locate the drive, and drag files to your Mac.
- Reliable, works offline
- Ideal for big data sets
- Requires a physical drive
- Formatting may erase data
Tips
- Use USB-C or Thunderbolt 4 drives for speeds up to 40 Gbps on Mac.
- Verify files after transfer (e.g., open a photo or document).
- Label your drive to avoid confusion.
- Back up the drive before formatting.
- For very large data transfers, consider a fast SSD.
- Once done, keep it as a manual backup.
5. Network-Attached Storage (NAS)
Best For: Ongoing file access or large-scale transfers
Steps:
- Set up your NAS device (e.g., Synology, QNAP) per the manufacturer’s instructions.
- Connect both your Windows PC and Mac to the same network as the NAS.
- On Windows, map the NAS as a network drive (File Explorer > This PC > Map Network Drive).
- Copy files from Windows to the NAS.
- On Mac, open Finder, select Go > Connect to Server and access the NAS (use SMB protocol, e.g., smb://nas-name).
- Move files from the NAS to your Mac.
- Centralized storage for multiple devices
- Useful for backups and shared access
- Requires NAS hardware
- Slower on weak networks
Tips
- Use wired gigabit Ethernet or 5 GHz Wi-Fi to connect to the NAS for faster transfers.
- Regularly update NAS firmware for compatibility with macOS and Windows.
- Set up user permissions to secure your data.
- Test with a small folder to confirm access.
6. Use Third-Party Tools
Best For: Power users needing advanced control
Popular Tools:
- Carbon Copy Cloner: Creates exact copies of drives (Mac-focused but supports Windows drives).
- EaseUS Todo PCTrans: Transfers files, apps, and settings.
- AOMEI Backupper: Backs up and restores across platforms.
Steps:
- Install the third-party tool on both Windows and Mac (check compatibility with Windows 11 and macOS Sequoia).
- Follow the tool’s instructions to connect devices (usually via network or direct cable).
- Select files, folders, or entire drives to transfer.
- Monitor the transfer and verify files on the Mac.
- Selective transfer options
- Some tools clone entire drives
- Some features are paid
- It can be complex for beginners
Tips
- Research tools for macOS Sequoia compatibility (check vendor websites).
- Start with free trials to test functionality.
- Back up data before using third-party tools.
- Use trusted software to avoid malware.
Post-Transfer Checklist
After transferring your files and data from your PC to your Mac, ensure everything is in place:
- Verify Files: Open a few files (e.g., photos, documents) to confirm they transferred correctly and aren’t corrupted. Confirm all important files are present on your Mac.
- Install Apps: Download Mac versions of essential software (e.g., Microsoft Office, Adobe Photoshop) from the Mac App Store or official websites. Also, reconnect printers, scanners, and peripherals.
- Organize Files: Move files to appropriate folders (e.g., Photos to the Photos app, Documents to iCloud Drive).
- Secure Your Mac: Enable FileVault (System Settings > Privacy & Security) to encrypt your data.
- Clean Up: Delete temporary files, eject external drives, or clear cloud storage.
- Update Settings: Reconfigure email accounts, browser bookmarks, or calendar syncs if needed.
Troubleshooting: Can’t Transfer Data to Mac?
If you hit a snag, try these solutions:
| Issue | Solution |
| Migration Assistant Fails | Ensure the drive is formatted as exFAT or FAT32. Try a different USB/Thunderbolt port or cable. Avoid NTFS. |
| Slow speeds | Use direct Ethernet or USB 3.0 drives. |
| Network Sharing Issues | Check firewall settings (Windows Defender or Mac’s firewall may block port 445). Temporarily disable firewalls or add exceptions for SMB. |
| Cloud Uploads Stuck | Verify internet speed (use Speedtest.net). Compress large files to reduce upload time. Check cloud storage limits. |
| External Drive Not Recognized or Not Readable | Re-transfer affected files. If the issue persists, check the source files on Windows for errors. |
| Corrupted Files | Re-transfer affected files. If persistent, check the source files on Windows for errors. |
| Files missing | Be sure you’re copying from the correct folders. Re-run Migration Assistant. |
| Passwords not transferring | Manually re-enter passwords on your Mac apps. |
| NAS Connection Problems | Confirm NAS IP address and credentials. Update NAS firmware and ensure SMB is enabled. |
If issues persist, visit Apple’s support website or contact the tool’s support team.
Transfer Files to Mac Without the Stress
Migrating from a Windows PC to a Mac doesn’t have to be complicated. Whether you prefer a hands-on approach, such as using an external drive, or an automated one, like Migration Assistant, there’s a solution that fits your needs.
Prepare well, choose your method wisely, and follow through with the checklist. In no time, you’ll be enjoying your new macOS Sequoia setup with all your files intact and ready to go.
Here are some more Mac tips and tricks for you: