If you want to try the new macOS Tahoe 26, fix a Mac that’s acting up, or set up multiple Macs, a bootable USB installer is your go-to tool. It offers faster installation, safer beta testing, easy recovery, and offline setup. In this guide, I’ll show you how to create a bootable USB installer for macOS Tahoe 26 in simple, beginner-friendly steps.
Table of Contents
- Why Do You Need a Bootable USB Installer?
- What You Need Before You Begin
- Step-by-Step: Create a macOS Tahoe Bootable USB Installer
- Alternate Tools to Create macOS Tahoe USB Installer
- How to Install macOS Tahoe Using the Bootable USB
- Expert Tips for a Smooth Experience
- Can't Use the Bootable USB Installer? Here Are the Fixes
Why Do You Need a Bootable USB Installer?
A bootable USB installer is a small but powerful tool. Here’s why it’s useful:
- Perform a clean install to fix persistent bugs or declutter your Mac.
- Install macOS Tahoe on multiple Macs without re-downloading the ~16GB installer every time.
- Deploy macOS offline, especially in places with poor or no internet.
- Recover a non-booting Mac and reinstall the OS quickly.
- Safely test the macOS Tahoe 26 developer beta on an external drive without affecting your main system.
What You Need Before You Begin
Make sure you have the following before starting:
- Compatible Mac: macOS Tahoe works on all Apple Silicon Macs (M1 and later) and some Intel-based Macs. Check our guide on macOS 26 supported devices to confirm your model.
- USB Drive (32GB or more): Use a USB 3.0/USB-C drive for faster performance. Back up its contents—this process erases the drive.
- macOS Tahoe Installer (Beta): Approximately 16–18GB. You’ll get the download link below.
- Apple Developer Account: Required to access beta installers.
- Internet Connection: Needed to download and verify the installer.
- Time Machine Backup: Always back up your Mac using Time Machine or another tool before installing a new OS, especially a beta version.
- Admin Access: You’ll need it to run Terminal commands.
Step-by-Step: Create a macOS Tahoe Bootable USB Installer
Follow along, and you’ll have a working USB installer in no time.
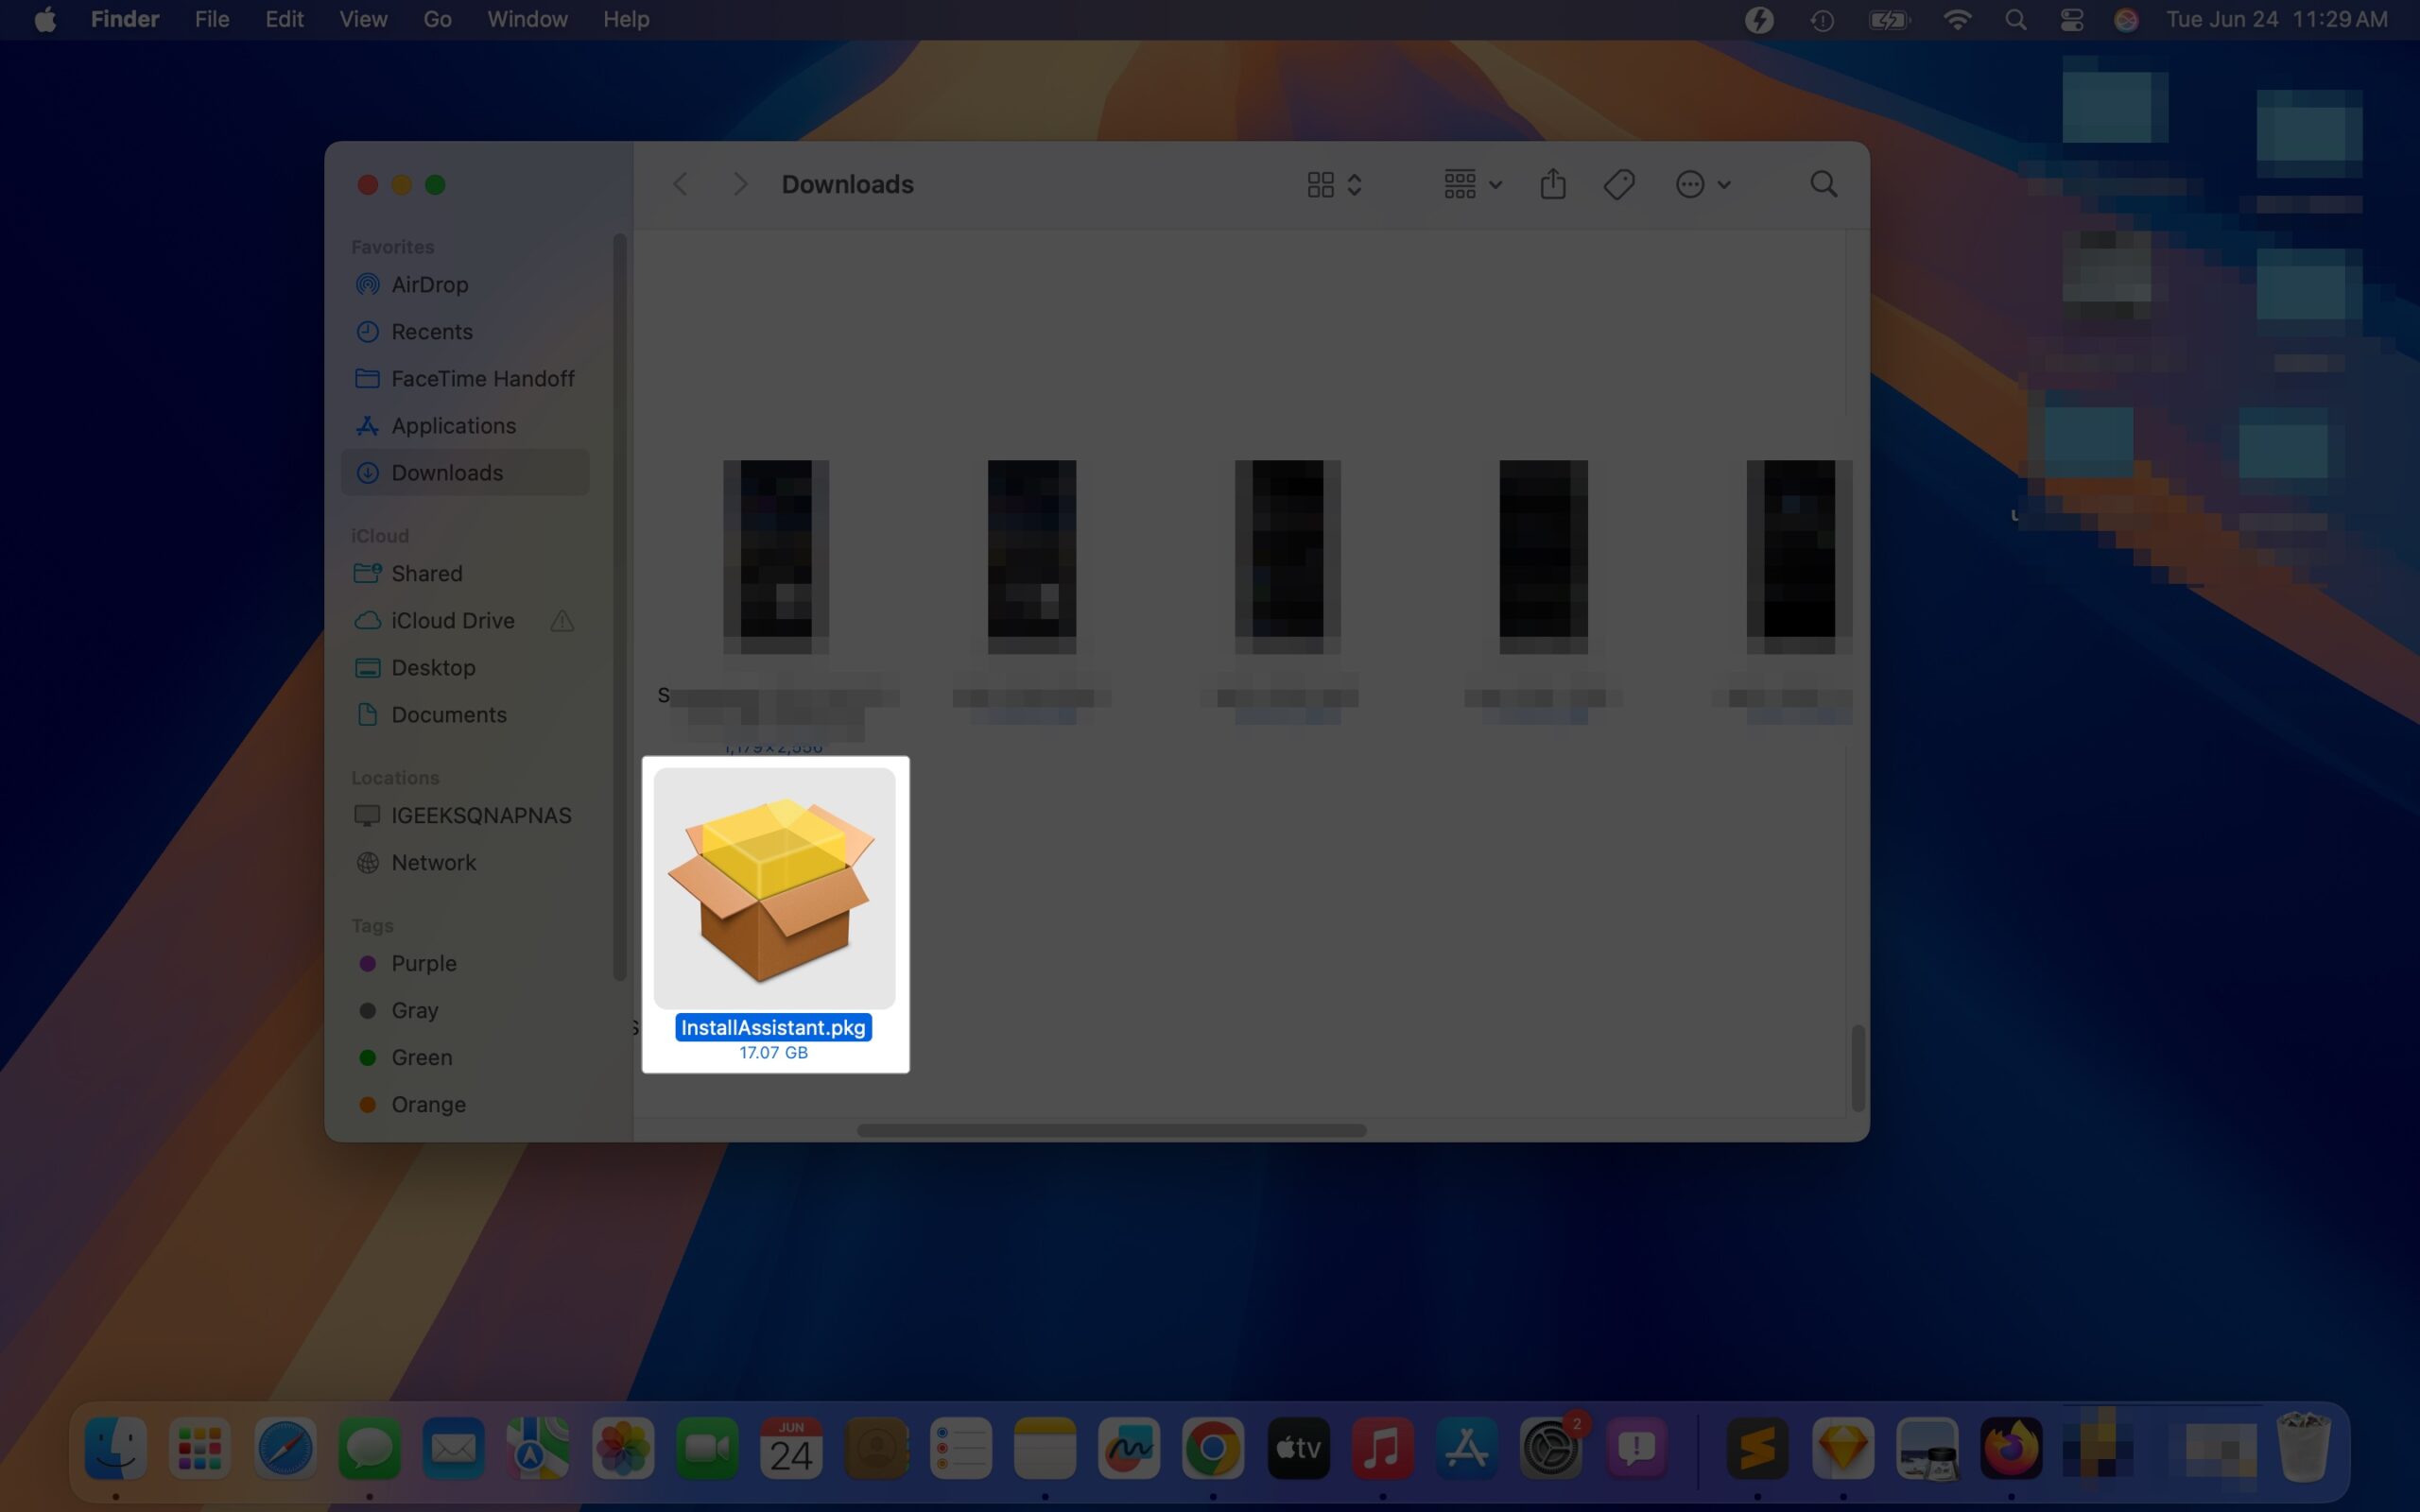
Step 1: Download macOS Tahoe 26 Installer
- Click this link to get the “InstallAssistant.pkg” for macOS Tahoe beta from Apple.
- Once downloaded, go to Finder > Downloads and double-click the zip file.
- Click Continue and follow the prompts on the new dialog box. Then, hit Install.
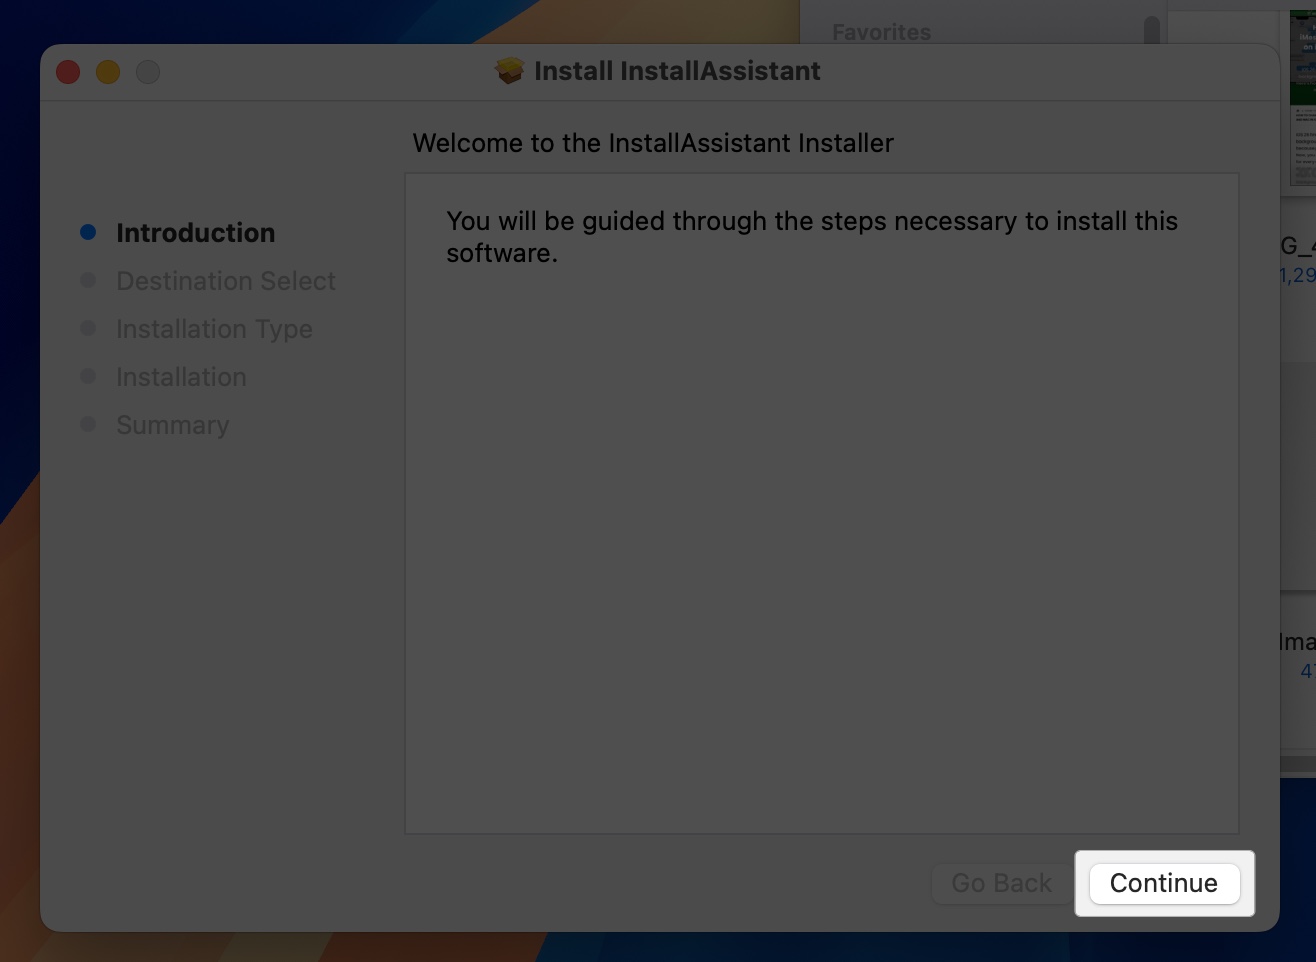
- Finally, click Close to complete the procedure. Your Mac may prompt you to trash the Installer.
- Next, go to the Application folder in Finder and look for the Install macOS Beta.app to ensure a successful installation.
Don’t run the installer yet—just keep it in the Applications folder.
Pro Tip: Rename the installer to “Tahoe.app” (Control-click > Rename) to make the next steps easier.
Step 2: Format the USB Drive
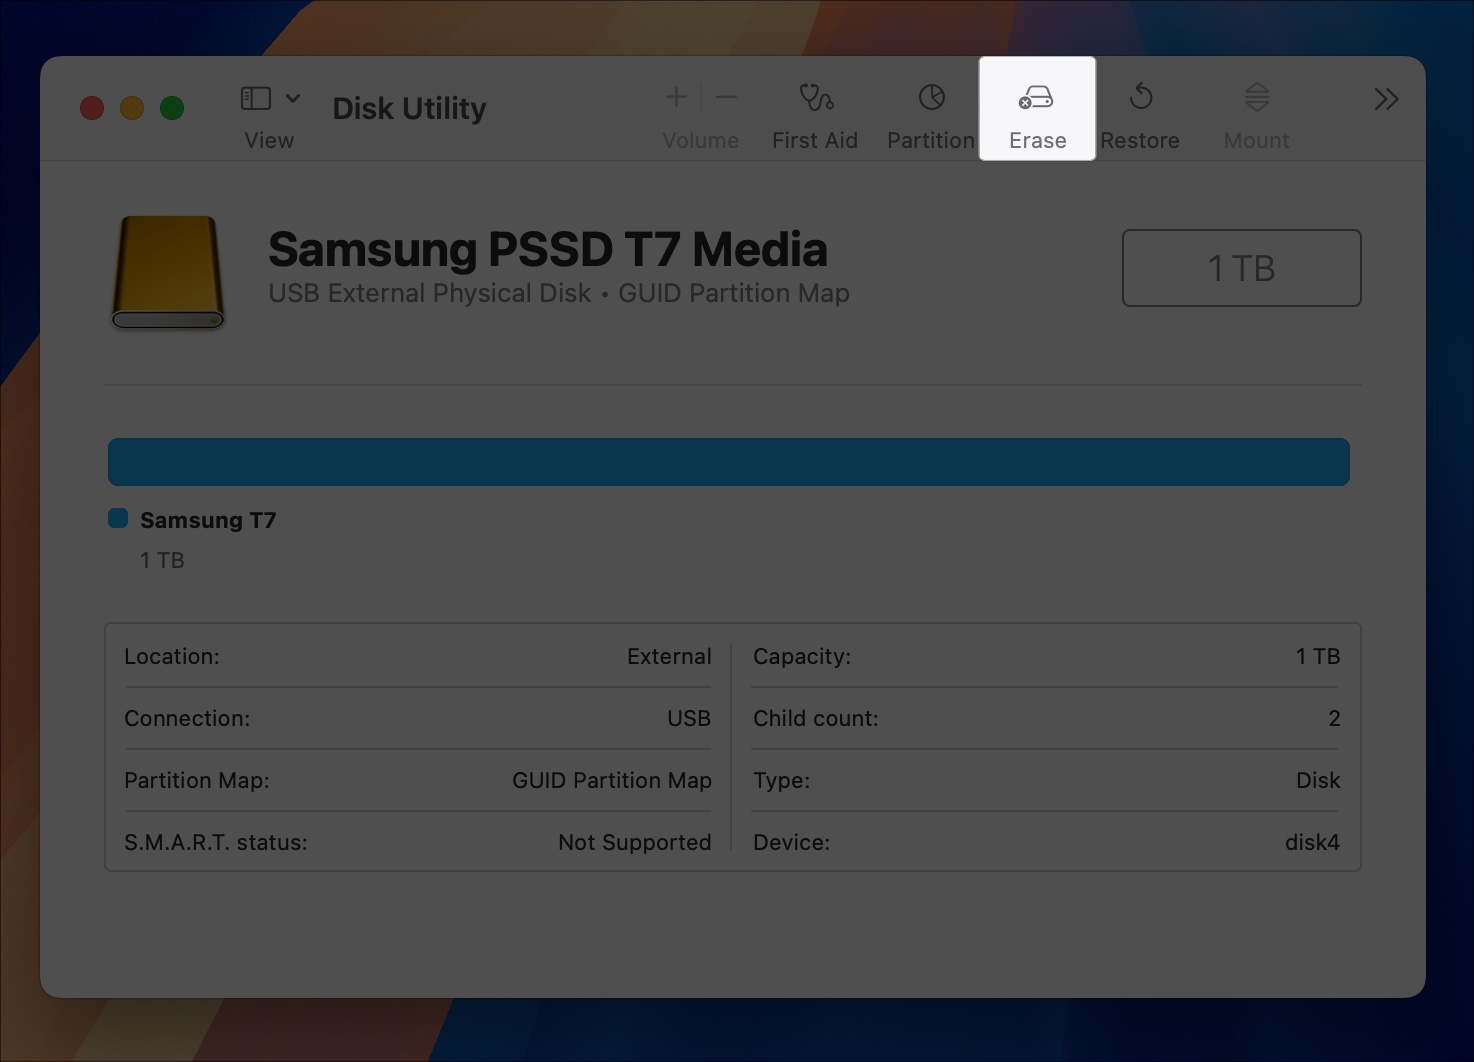
- Insert your USB drive into the Mac.
- Open Disk Utility (search for it using Spotlight or find it in Applications > Utilities).
- In Disk Utility, find your USB drive in the left sidebar. Select the top-level name (e.g., SanDisk 32GB), not the volume name below it.
- Click Erase at the top and set these options:
- Name: Call it “MyVolume” (or any name you like—just remember it for later).
- Format: Choose Mac OS Extended (Journaled).
- Scheme: Select GUID Partition Map.
- Click Erase to confirm and wait for the process to finish (usually a minute or two).
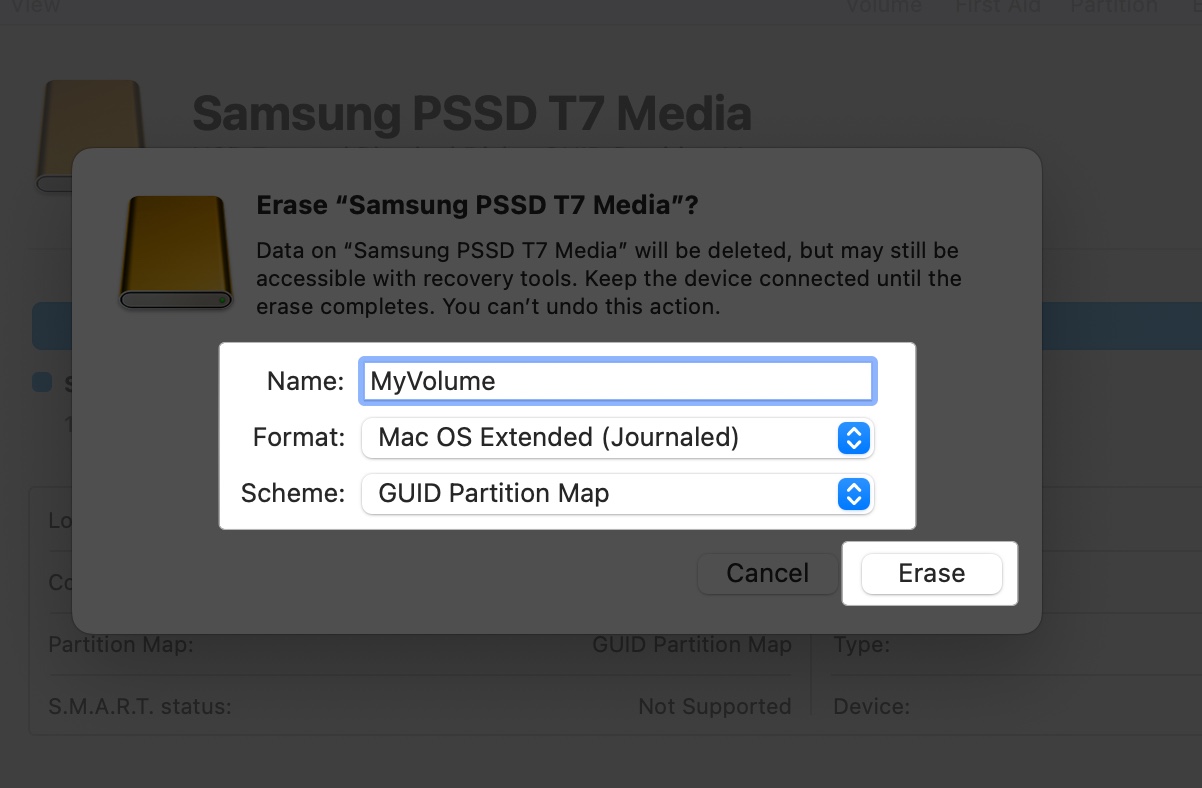
- Close Disk Utility when done.


Your USB drive is now ready for the next step.
Step 3: Use Terminal to Create the Bootable Installer
Now, we’ll use a macOS tool called createinstallmedia to turn your USB drive into a bootable installer. Don’t worry—Terminal is easier than it sounds!
- Open Terminal (search for it with Spotlight or go to Applications > Utilities > Terminal).
- Type this command, replacing “MyVolume” with the name you gave your USB drive. Also, I have renamed my installer to Tahoe.app.
sudo /Applications/Tahoe.app/Contents/Resources/createinstallmedia --volume /Volumes/MyVolume - Press return and then type your admin password when asked (you won’t see the password as you type for security reasons).
- Terminal will ask if you’re sure you want to erase the external USB drive. Type “Y” and press return.
- Wait for the process to finish. This can take 5–10 minutes, depending on your USB drive’s speed. You’ll see progress messages like Copying installer files, Making disk bootable, etc.
- When done, Terminal will say:
Install media now available at ‘/Volumes/Install macOS Beta’.
That’s it! Your USB is now a bootable installer for macOS Tahoe beta.
Step 4: Verify the USB Installer
- Eject the USB drive (click the eject icon next to it in Finder).
- Plug it back in. It should appear as Install macOS Beta or a similar option.
- Open the USB drive in Finder. You should see a file called Install Tahoe.app (or similar). There are also hidden boot files, but you don’t need to worry about those.
- If the drive’s name or contents look wrong, repeat Steps 2 and 3 to reformat and recreate the installer.
Your USB is ready to install macOS Tahoe 26!
Alternate Tools to Create macOS Tahoe USB Installer
If Terminal feels too tricky, try these user-friendly tools:
- Donemax Disk Clone for Mac: This app features a straightforward interface for creating installers without requiring any commands. Use the Make Installer option, click Add > macOS Tahoe Beta.app, select your USB drive, and hit Create a macOS installer. It’s great for beginners.
- For Hackintosh Users: If you’re installing macOS Tahoe on non-Apple hardware, use OpenCore or Clover bootloader. You’ll need extra files (kexts like Lilu.kext and VirtualSMC.kext) for compatibility.
These tools can save time, but the Terminal method is free and reliable. Once macOS Tahoe is publicly released in fall 2025, you can download the installer for both beta and stable macOS versions in Terminal itself.
How to Install macOS Tahoe Using the Bootable USB
Ready to install macOS Tahoe 26? Here’s how to use your USB:
For Apple Silicon Macs:
- Shut down your Mac.
- Plug in the USB, then press and hold the power button until you see “Loading startup options.”
- Select Install macOS Beta and click Continue.
For Intel Macs (2019–2020):
- Shut down your Mac.
- Plug in the USB, then press the power button and immediately press and hold the Option (⌥) key.
- When the boot picker appears, choose Install macOS Beta and press return.
Choose Your Install Method:
- Clean Install: In the macOS Utilities window, open Disk Utility, erase your Mac’s drive (use APFS format and GUID Partition Map), then return to the main menu and select Install macOS.
- Upgrade: Select Install macOS to update your current system while keeping files and apps.
- Dual-Boot: Create a new APFS volume in Disk Utility and install macOS Tahoe there to keep your existing OS.
Finally, follow the prompts to complete the installation. The installer will copy files and restart your Mac a few times. It can take 30–60 minutes, depending on your Mac and USB speed.
Your Mac must be connected to a stable Wi-Fi to verify the update with Apple’s servers. After installation, follow the setup wizard to set up your Mac.
Expert Tips for a Smooth Experience
Make your bootable USB experience even smoother with these tips:
- Choose a USB 3.0 or 3.1 drive to cut down creation and installation time. Look for brands like SanDisk or Samsung.
- Label your USB “Tahoe Installer” or similar to avoid confusion with other drives.
- Keep the USB with your Time Machine backup for a complete recovery kit.
- macOS Tahoe 26 is in beta, so bugs are possible. Install it on a secondary Mac or partition, not your main work device.
- When Apple releases new betas or the final version (expected fall 2025), recreate the USB with the latest installer for the best experience.
Can’t Use the Bootable USB Installer? Here Are the Fixes
Running into problems? Try these solutions:
USB Not Showing in Boot Menu:
- Open Disk Utility and confirm the USB is formatted as Mac OS Extended (Journaled) with GUID Partition Map.
- Try another USB port or a different USB drive. Avoid using hubs or dongles on newer Macs.
- For Apple Silicon Macs, boot into Recovery mode (hold power button), open Startup Security Utility, and enable Allow booting from external media.
Installer Won’t Create:
- Ensure Install macOS Tahoe Beta.app is in the Applications folder, not elsewhere.
- Ensure your USB drive has sufficient free space (at least 32GB).
- If the installer seems corrupted, re-download it from Apple.
Terminal Errors:
- Make sure that the Install macOS Beta.app is in the Applications folder.
- Use proper backslashes and no spaces in Terminal.
- Enter your admin password properly.
- To prevent errors, copy and paste the command rather than typing it yourself.
Installation Fails:
- Verify your Mac supports macOS Tahoe 26.
- Ensure a stable internet connection is maintained during the installation process.
- In macOS Utilities, use Disk Utility to repair the target drive (select the drive > First Aid).
- Re-create the bootable installer on the USB drive.
- Ensure your Mac has at least 25–30 GB of free space on the internal drive.
USB Creation is Slow:
- Use a USB 3.0 or USB-C drive for faster performance.
- Quit background apps and processes while creating.
- If the USB stick continues to stall, reformat it and try again.
Still Stuck? Contact Apple Support for detailed troubleshooting.
Install macOS Tahoe Quickly with a Bootable USB
Creating a bootable USB installer for macOS Tahoe 26 is one of the most efficient ways to explore the new OS, recover a bricked Mac, or manage bulk installations. Just follow the steps, back up your data, and you’ll be ready to dive into everything macOS Tahoe has to offer—without the wait.
Need help or have questions? Drop them in the comments below—we’re happy to assist.
Want more macOS tips and tricks? Here’s some:


