Need some inspiration to stick to your fitness regime? Or want to push your friends towards a healthier lifestyle? Well, sharing your Activity data from Apple Watch or iPhone might be a good idea.
It not only enables you to share data with trainers for better guidance but also allows you to compete with friends in weekly challenges. Amazing, right? Now that you are all pepped up, let me show you to set up Activity Sharing and compete using your Apple Watch and iPhone.
What to know before you start sharing Activity?
Activity Sharing works as a two-way lane for sharing daily progress, monitoring workouts, exchanging encouragements, and more. And you can add up to 40 friends.
Notably, you won’t get a comprehensive data chart, health trends, or alerts like you do with iOS 15 Health Sharing. Instead, only these data points are shared across the board:
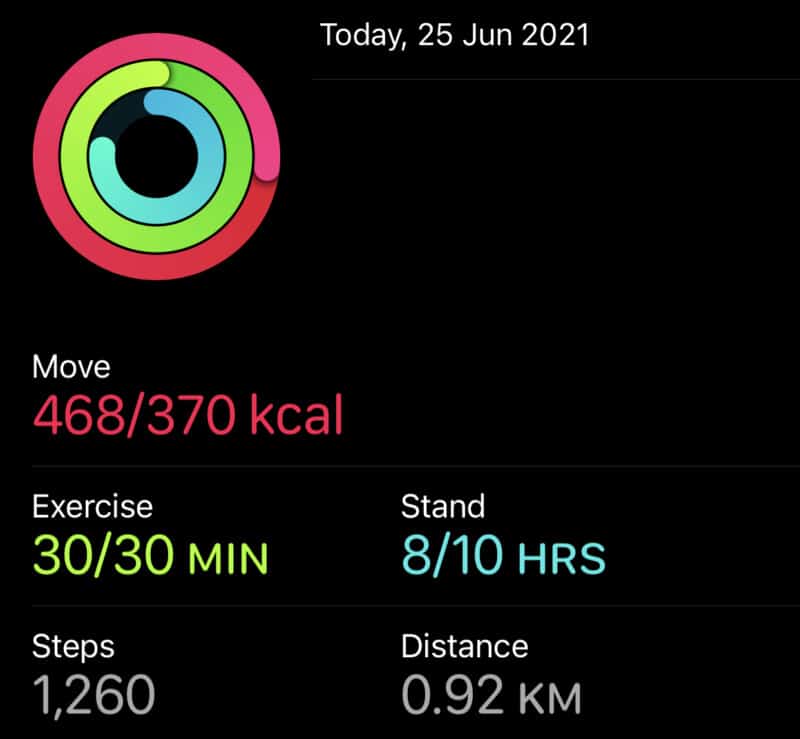
- Daily Activity rings progress
- Steps and distance traveled
- Standing hours
- Workout type
- Duration of the exercises
- Calories burned
Along with that, they can also see your iCloud email address, time zone, and the Workout awards you have won.
What about my privacy?
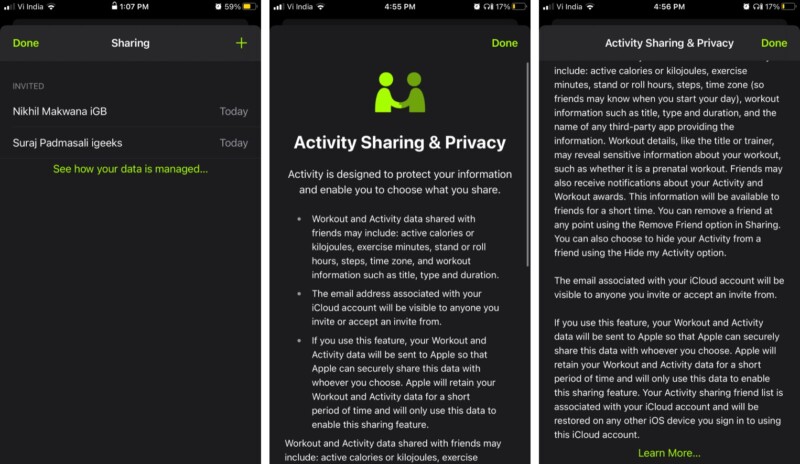
When you enable Activity Sharing, Apple will also receive a copy of this data. As per Apple, this allows them to share the data with the other involved party securely.
The tech giant also adds that they retain the data for a short span and only use it to enable and facilitate the setting. You can check the privacy details anytime from the Fitness app; tap See how your data is managed from the summary tab.
Turn on Activity Sharing on iPhone
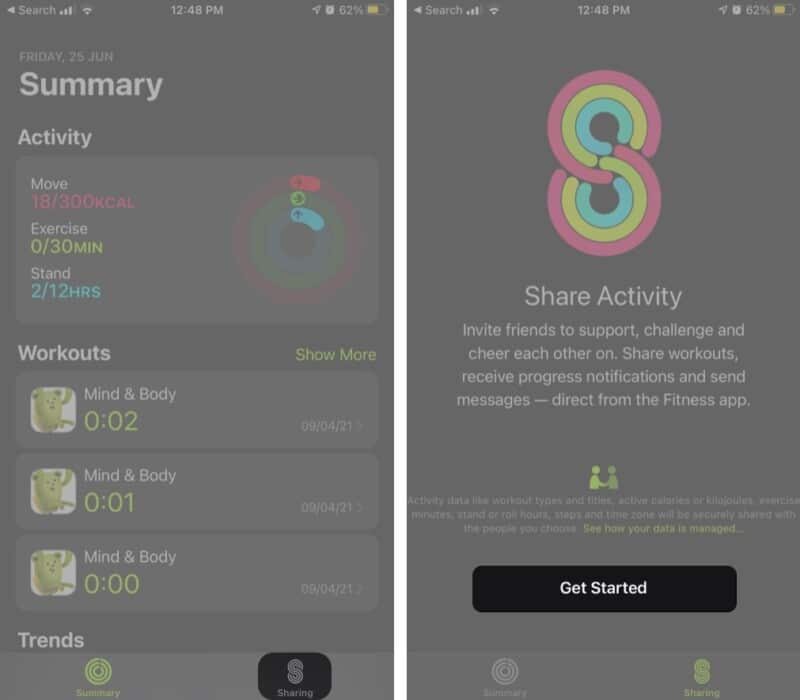
To invite and add friends to Activity Sharing, you must enable the feature. You’ll need to use the paired iPhone to do so.
And if it is not enabled, a prompt will appear on your Apple Watch, “To start sharing your activity, use the Activity app on your iPhone.“
- Launch the Fitness app and go to the Sharing Tab.
- Tap Get Started to enable the setting.
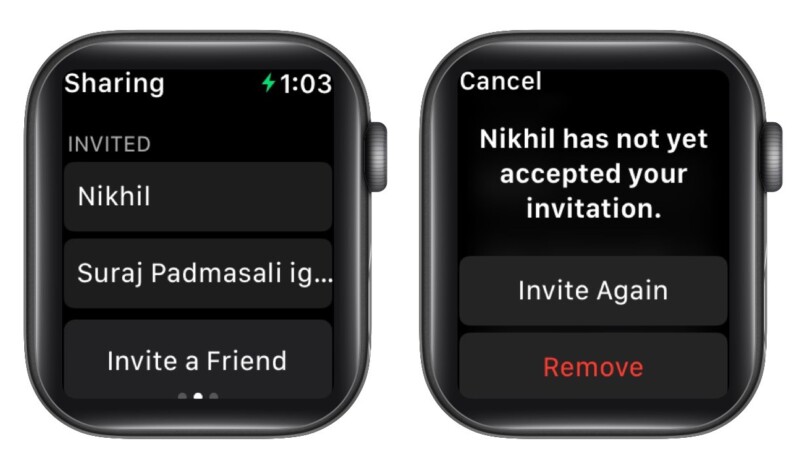
Send invitation from Apple Watch
- Open the Activity app.
- Swipe left and scroll to the bottom.
- Tap Invite a Friend.
- Here, look for the friend and tap their name.
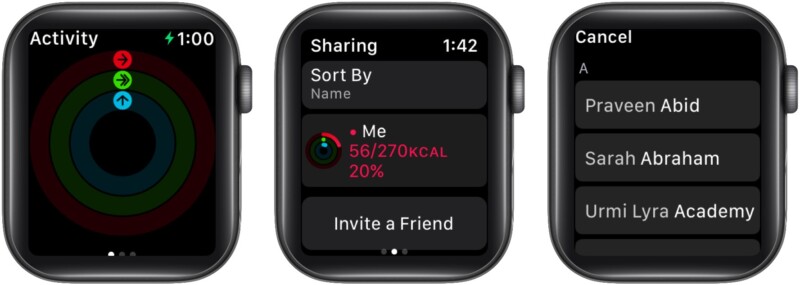
You can check out all the previously invited people here; tap the name to Invite Again or Remove the invite.
Invite using iPhone
- Open the Fitness app.
- In the Sharing Tab, tap the Account + icon at the top right.
- Tap + again to add your friend’s contact.
You can add multiple people at once. - Hit Send to confirm.
- Now, wait for your friend(s) to accept the invitation.
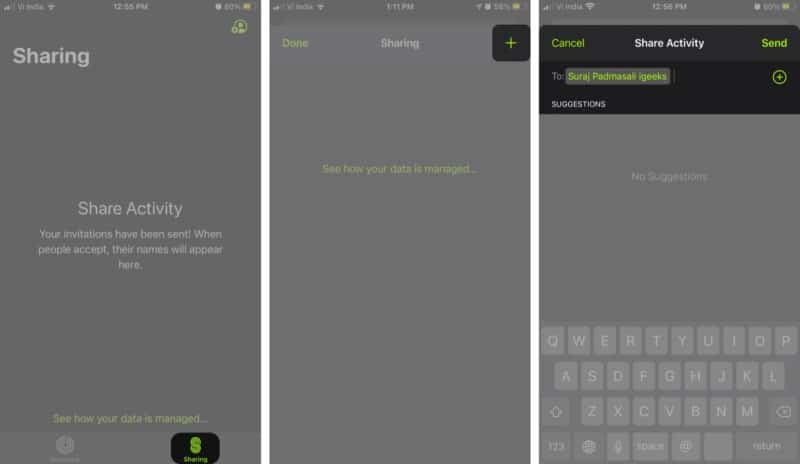
This section also shows pending invites. Swipe left, and tap Delete to remove them, and resend the invite if you wish to.

How to accept Activity Sharing invite
The moment someone sends you an Activity Sharing invite, your Apple Watch and iPhone should ping. And here’s what you need to do next.
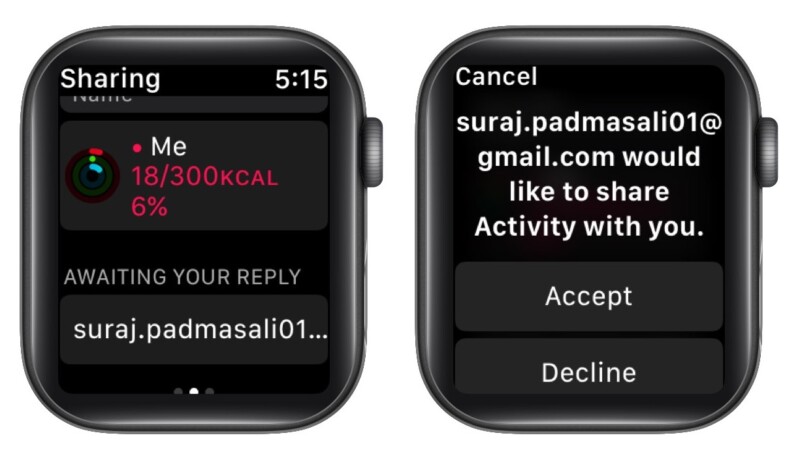
On Apple Watch
- Launch the Activity app, swipe left, and then scroll down.
- You’ll see the invite under an Awaiting Your Reply heading.
- Tap Accept or Decline accordingly.
On iPhone
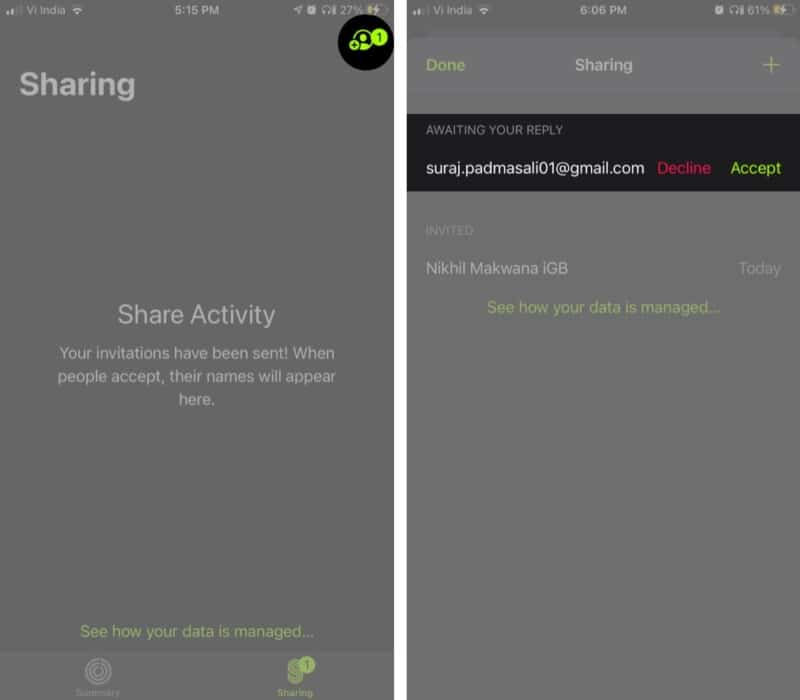
- Go to the Fitness app → Sharing Tab.
There should be one or more notifications. - Tap the profile icon.
- Now, select Accept or Decline.
That’s it! You are all set to share your activity data with your friends. Now, let’s see how to challenge them.
Compete with friends on the Activity app
Whenever a friend closes all three rings or achieves something great, you will get a notification on your Watch. Hit Compete (from the notification) and let the seven-day war begin.
And if you want to start the challenge upfront, here’s what you should do.
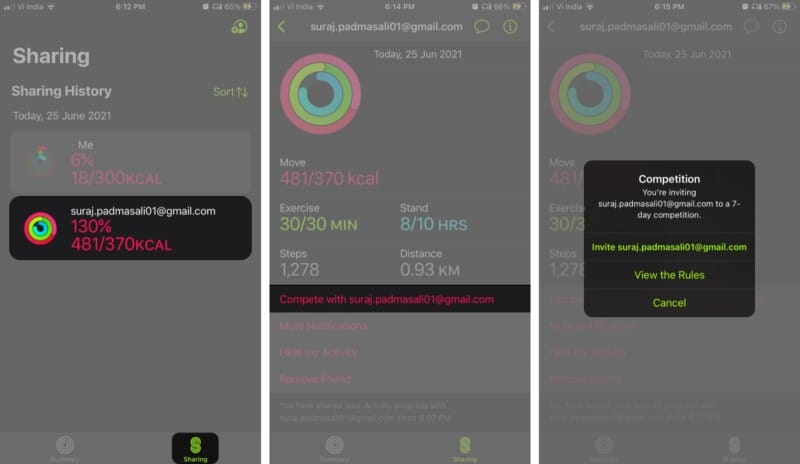
Challenge a friend to compete from your iPhone
- Launch the Fitness app → Sharing tab.
- Tap the friend’s name you want to compete with.
- Select Compete with ‘name/iCloud ID.’
- Tap Invite ‘name/iCloud ID’ to set the challenge.
How to compete on Apple Watch
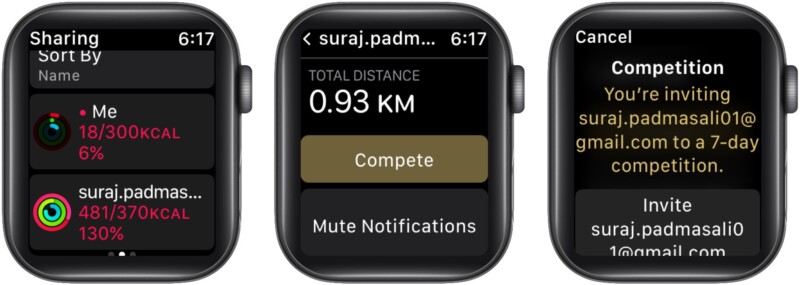
- Open the Activity app, swipe left, and select the friend.
- Scroll down and hit Compete.
- Tap Invite ‘name/iCloud ID‘ to confirm the action.
Once your friend has accepted the invitation, it’s game time! You earn a point for every percent added to the rings. A maximum of 600 points for grabs in a day and 4,200 points in a week.
One who has the most points is declared the winner. Along with bragging rights, the winner also earns an award. So, let’s get moving, no slacking, my friend!
How to check your friend’s progress
Whether you are competing with a friend or not, you might want to keep an eye out for their progress. And offer praises for their successes, support during stormy days, and motivate them to do better each day.
On Apple Watch
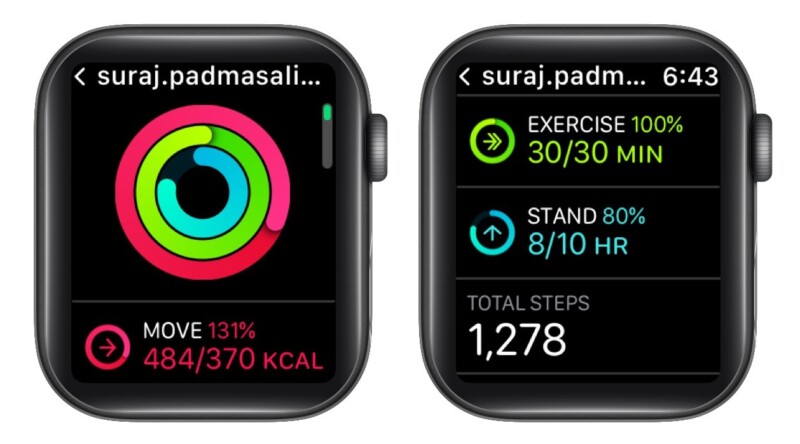
- Open the Activity app, swipe left, and select the friend.
- You’ll see their rings first; scroll down to see all the details.
On iPhone
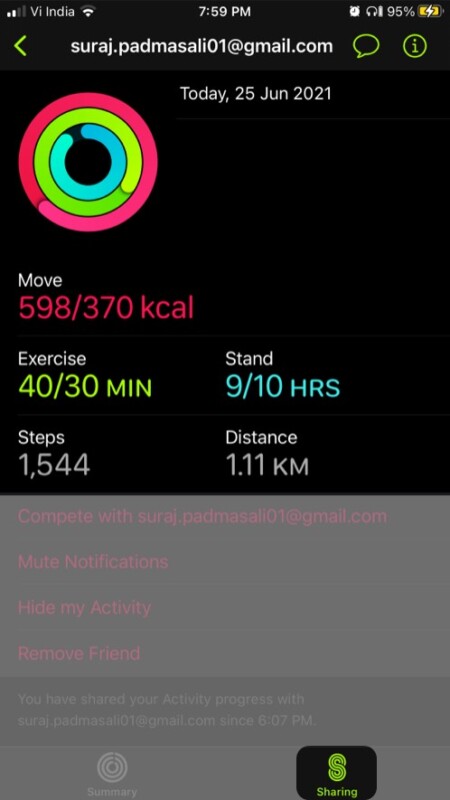
- In the Fitness app, go to the Sharing tab.
- Tap the friend’s name.
- Here, you can see all the shared metrics.
Look at everyone’s progress at once from iPhone
- Launch the Fitness app → Sharing tab.
- Tap Sort.
- Here, you’ll see multiple metrics like Move, Steps, Exercise, and Workout to choose from.
- Select the preferred option.
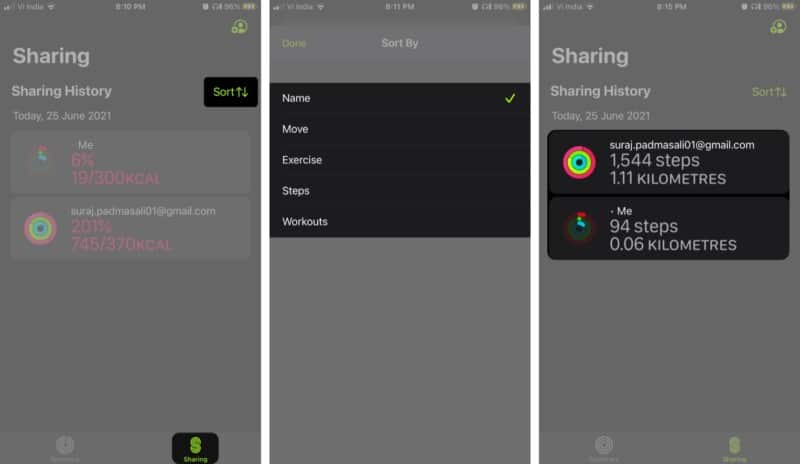
Now, all the friends will be listed in ascending order of the metric selected.
How to mute notifications, hide or stop sharing activity
The sharing window on iPhone and Apple Watch also boasts a few more actions.
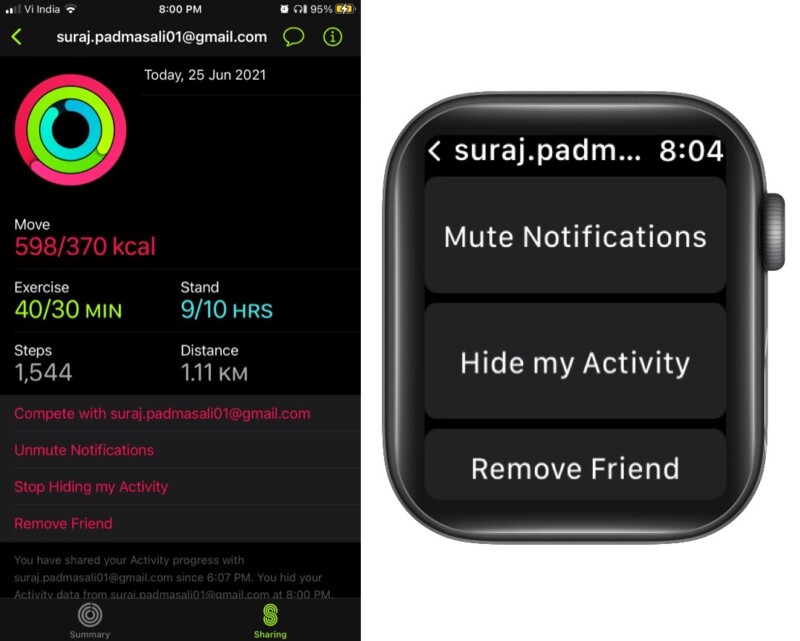
- Mute/unmute notifications – To stop seeing your friend’s notifications.
- Hide/unhide my activity – When enabled, you will be able to view your friend’s activity, but they won’t see yours. And when you are ready, tap Stop Hiding my Activity.
Note: You can’t conceal your activity from the friend you are competing with. - Remove Friend – Choose this option when you want to stop sharing activity data on Apple Watch or iPhone with the friend. Next, tap Yes in the popup to confirm.
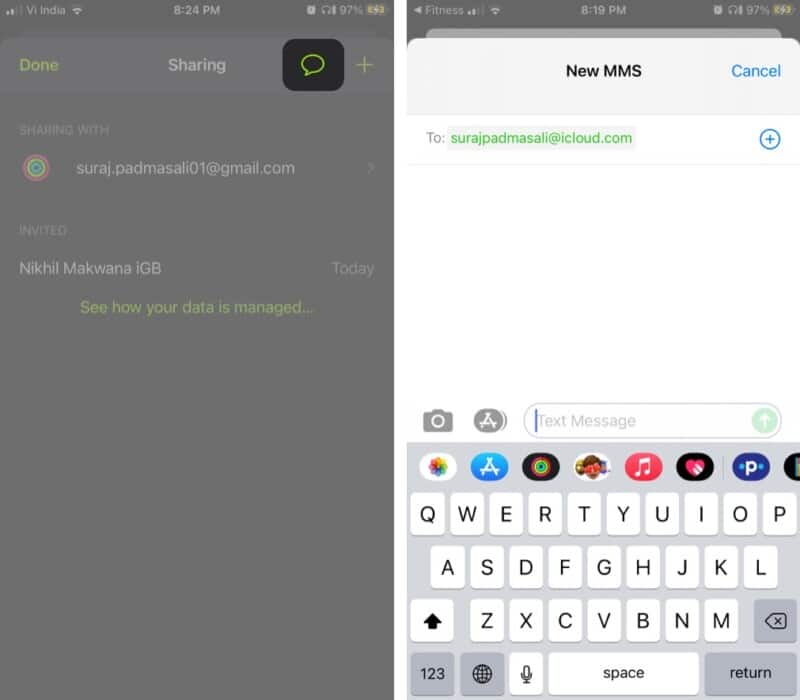
Note: It will wipe out all the related Activity data. If you want to share the data again, resend the invite. - Message – Tap the Message icon at the top, type the message to tease or motivate them, and send it.
How to send a message to all friends from the Activity app
You surpassed your daily goal and want to share the good news with everyone. However, sending individual messages might eat up your time.
Apple has wisely thought of that as well, and here’s how you can share your success with all.
- From the Sharing tab, tap the Account icon.
- Select the Message icon.
- Type in the message, and send it to all.
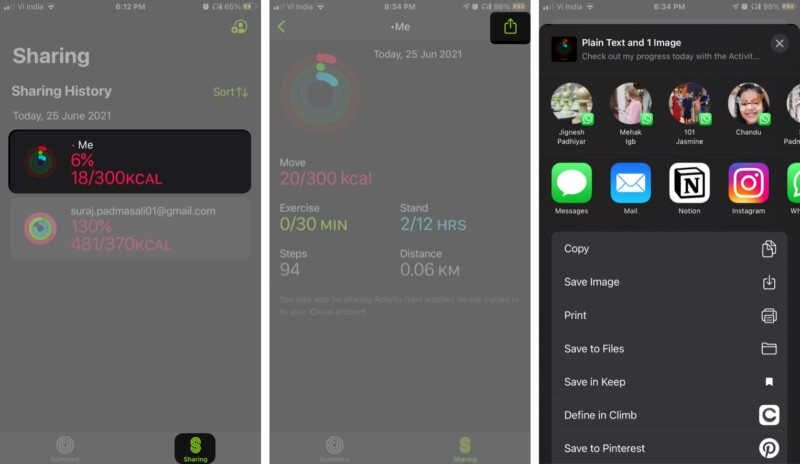
What if you wish to flex your success with someone who doesn’t own an Apple Watch? Here’s how to do it.
- Fire up the Fitness app → Sharing tab, tap on Me.
- Tap the Share button from the top right of the page.
- Here select a preferred option; you can email the data, share it on Twitter, Facebook, print, or even save it to Files.
How to view your Activity awards
As mentioned above, the app also offers awards when you win a competition. And, you can easily keep track of your ever-growing gallery.
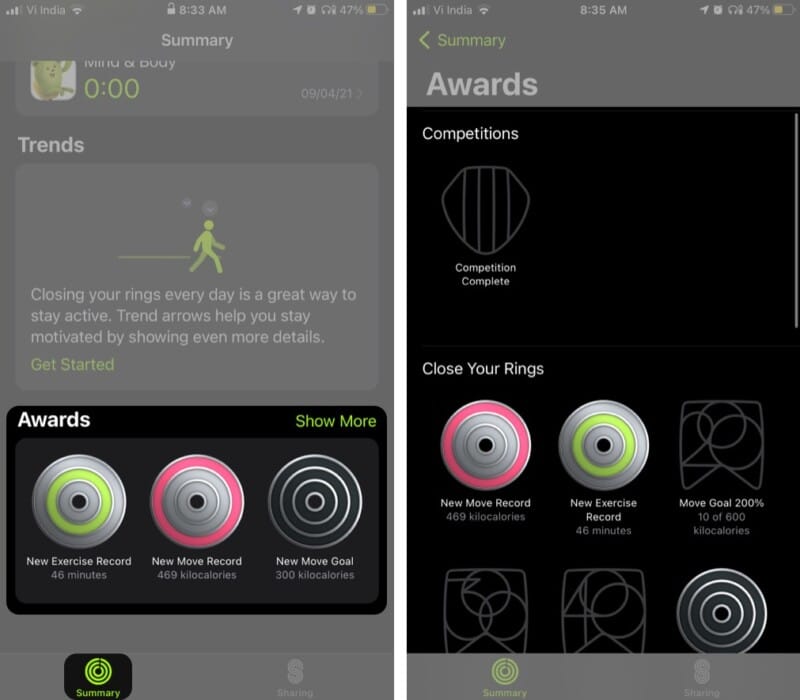
From iPhone
- In the Fitness app, go to the Summary tab.
- Scroll down to the Awards section
- Tap Show More.
From Apple Watch
- Open the Activity app.
- Swipe left to the last (third) window.
- Scroll down to explore the section.
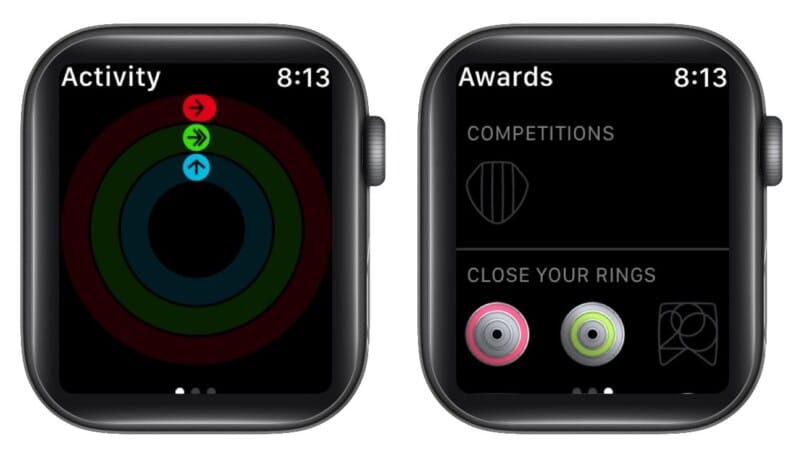
You can check all the awards and competitions in which you have taken part here.
Fixes to common issues with Activity Sharing
Can’t send an invitation
- Reconfirm your friend’s Apple ID and resend the invitation.
- Try to sign out of your iCloud account, and they sign in again.
- Check your Activity sharing friend list. If you have 40 friends, you might have to remove someone before adding a new one.
If you aren’t getting updates from friends
- Ensure that you’re signed in to iCloud and the iPhone is connected to the internet.
- Sign out and sign in to your iCloud account.
- Enable and disable Airplane Mode.
And if you are still facing some issues, feel free to share your concerns with us in the comments below. We will be happy to help.
I hope this article gave you a comprehensive understanding of how to set up and share your activity on the Apple Watch and iPhone.
I should confess, I am not a fitness freak but, competing with friends and the euphoria of completing those rings is quite tempting. You should surely give it a try.
Read more:

