FaceTime Like A Pro (eBook)

Get our exclusive Ultimate FaceTime Guide 📚 — absolutely FREE when you sign up for our newsletter below.

How to Lock Notes on Mac with Password or Touch ID

Lock notes on your Mac with Touch ID or a password and keep your private info secure in macOS Tahoe.

Have you ever used Notes to quickly jot down passwords, financial info, or personal details? Most of us have! To protect such sensitive content, Apple lets you lock individual notes on Mac with a password or Touch ID. This way, even if someone else is using your Mac, your notes remain hidden until you unlock them.

In this guide, I’ll show you how to lock and unlock notes on Mac, set up a custom password, reset forgotten ones, and remove locks when you no longer need them.

Why Lock Notes on Mac?

Not all notes are shopping lists or reminders. Many of us store private information like:

  • Banking and credit card details
  • Medical records
  • Personal thoughts or journals

The Notes lock feature with end-to-end encryption ensures that only you can access them. It’s especially useful if:

FaceTime Like a Pro:

Get our exclusive Ultimate FaceTime Guide 📚 — absolutely FREE when you sign up for our newsletter below.

  • You share your Mac with family, friends, or coworkers
  • You often leave your Mac unattended in cafés or libraries
  • You want peace of mind that your private details stay private

Plus, iCloud syncing keeps your locked notes secure across iPhone, iPad, and other Macs.

Requirements for Locking Notes

Before you start, make sure you meet these conditions:

  • macOS updated to the latest version (best compatibility with Tahoe)
  • iCloud Keychain enabled: If you want to use your Mac’s login password or Touch ID, turn on iCloud Keychain in System Settings > [your name] > iCloud
  • 2FA set up: The Apple Account signed into your Mac should have two-factor authentication enabled.  
  • Notes stored locally or in iCloud: You can’t lock notes synced with third-party services like Gmail or Yahoo. 
  • Other devices: Your devices need to be running iOS 16, iPadOS 16, or macOS 13 or later to view unlocked notes. 
  • No unsupported attachments: Notes with PDFs, audio, video, document, or Keynote/Pages/Numbers files can’t be locked. Stick to notes with text, images, sketches, tables, maps, or web links. 
  • Not shared: You can’t lock notes shared with others via iCloud. 
  • Notes category: Lock feature is unavailable for Quick Notes and notes containing tags. 

Got all that? Awesome, let’s get started. 

How to Set Up Locked Notes on Mac

Locking notes involves two simple steps:

Step 1: Set a Password 

  1. Open the Notes app on your Mac. 
  2. Click Notes in the menu bar, then select Settings (or Preferences in some versions). 
    Open notes app settings
  3. Scroll down to the Locked Notes section and click Set Password.
    Open notes settings and choose set password
  4. Choose between: 
    • Use Login Password: This uses your Mac’s login password for convenience. 
    • Create Password: Enter a unique password, write it again in the Verify box, set a hint and click Set Password. This separate password is just for Notes. 
      Choose create password option
  5. If your Mac supports Touch ID, check the Use Touch ID box for quick unlocking with your fingerprint. I highly recommend enabling it. 
    Set new password for notes

Pro tip: If others know your Mac login, always set a custom password. Write down your password hint somewhere safe—Apple can’t recover forgotten ones.

Step 2: Lock a Note 

After you have the password to secure your notes: 

  1. In the Notes app, select the note you want to lock. 
  2. Click the Lock button in the toolbar (it looks like a padlock) and choose Lock Note
    Select lock button to lock notes
  3. If you haven’t set a password yet, you’ll be prompted to do so now. 
  4. Enter your password or use Touch ID if enabled, and the note is locked!
    Enter password to lock notes

Your note will show a lock icon. The content hides once you close Notes or manually lock it.

How to View Locked Notes

To unlock:

  1. Open the Notes app and find the locked note. It’ll have a lock icon next to it. 
  2. Click the note
  3. Enter your password or use Touch ID to unlock it. 
    Tap on locked note and add password to access notes

Once it verifies, you can go through the content. When you quit the Notes app or stay idle for some time, it gets locked automatically.  

This also unlocks all locked notes, so you can view or edit other ones in the same account without re-entering the password. If the note uses a different password, you’ll need to authenticate again. Also, you must be using the Notes app in the foreground to keep them open. 

Remember: If you’re on another device, make sure iCloud sync is enabled and you’re signed in with the same Apple ID.

Close All Locked Notes at Once

Want to secure everything quickly?

  1. Inside a locked note, click the Lock button in the toolbar. It should look like an open padlock. 
  2. Select Close All Locked Notes
  3. Alternatively, go to Notes in the menu bar and click Close All Locked Notes.
    Tap on the lock icon and choose close all locked notes

This hides all locked notes instantly—perfect when leaving your Mac unattended.

Change or Reset Your Notes Password

You can update your notes password or switch the method anytime you want. All the existing notes will use the new one. This is helpful if your password gets leaked. The process depends on whether you’re using your device passcode or a custom one. 

If You Use Mac Login Password

  1. Go to System Settings and select Touch ID & Password
  2. Click Change at the top and follow the prompts to update it. 

Now, you need to use this new password to open your Mac and other administrative settings or features. 

If You Use a Custom Password

  1. Open Notes and go to Notes in the menu bar and select Settings
    Open notes app settings
  2. In the Locked Notes section, click Change Password
    Scroll down and get option to add password  
  3. Select your account if you have multiple like iCloud or On My Mac. 
  4. Choose Use Password and enter your current password to authenticate. You can also use your Touch ID if enabled earlier. 
  5. Now, type a new one in the Password and Verify field and then enter a hint
  6. Click Change Password to save. 
    Set new password

If you use the same password for both your On My Mac and your iCloud accounts, you can update them together by changing your iCloud account password.  

Want to switch between your Mac’s login password and a custom one? 

  1. In Notes > Settings, go to the Locked Notes section. 
  2. Choose the Notes account that you wish to change. 
  3. Click the dropdown below and select the option between Use Login Password or Use Custom Password you are currently not using.  

Forgot Your Notes Password on Mac? Here’s How to Reset It

If you forgot your custom password, you can reset it, but there’s a catch: 

  1. Go to Notes > Settings in the Notes app. 
  2. Click Reset Password next to Locked Notes. It only appears if Use Custom Password is selected.
    Select reset password option
  3. Click OK to proceed.
  4. Enter your Apple ID password to authenticate and press Return.
    Enter apple id password to set new password
  5. Set a new password or use your Mac’s login password. Enter a hint as well.
  6. Finally, click Set Password to save.
    Set new password for notes

Important: Resetting only applies to new notes. Old ones stay locked unless you remember the old password.

How to Remove Lock from Notes

Don’t need a lock anymore? Here’s how to remove it: 

  1. Open the Notes app and select the locked note.
  2. Click the Lock button in the toolbar, then choose Remove Lock.
    Tap on the lock icon then choose remove lock
  3. Enter the password or use Touch ID to confirm.
    Enter password to remove lock

The note will unlock permanently and sync across all devices.

Troubleshooting Common Issues

Running into problems? Here are some common issues and fixes:

IssuesSolutions
Can’t lock a noteCheck if it has unsupported attachments (like PDFs or videos) or is shared via iCloud. Also, ensure the note isn’t in a third-party account like Gmail.
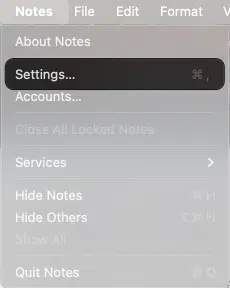
Touch ID is not workingMake sure it’s enabled in Notes > Settings and that your Mac’s Touch ID is set up in System Settings > Touch ID & Password
Forgot your passwordAs mentioned, you can reset it, but old notes stay locked with the original password. Try your hint or old passwords you might’ve used. 
Notes not syncingEnsure iCloud Keychain and Notes are enabled in System Settings > [Your Apple ID] > iCloud. Check that all devices are running the latest software versions.
Wrong password alertIf you have multiple passwords for different accounts, double-check which account the note is in. The hint will appear after two consecutive wrong attempts.

Still stuck? Contact Apple Support for help. 

Final Thoughts: Keep Your Private Notes Safe

Locking notes on Mac with Touch ID or a password is a simple but powerful way to protect sensitive data. From setup and unlocking to password resets and troubleshooting, you now have everything you need to keep your information safe.

So go ahead, lock your notes today and enjoy peace of mind knowing your private details are secure on macOS Tahoe!

Don’t miss these related reads:

Add Igeekblog as a preferred source on Google

Jignesh
Jignesh

Jignesh Padhiyar is the co-founder of iGeeksBlog.com, who has a keen eye for news, rumors, and all the unusual stuff around Apple products. During his tight schedule, Jignesh finds some moments of respite to share side-splitting content on social media.

Articles: 380

FaceTime Like a Pro:

Get our exclusive Ultimate FaceTime Guide 📚 — absolutely FREE when you sign up for our newsletter below.

Leave a Reply

Your email address will not be published. Required fields are marked *