Your Apple Account is the key to your personal data, including your iCloud photos, contacts, emails, payment information, etc. It is essential to keep it secure from unauthorized access. One of the best ways to do this is by enabling two-factor authentication. With 2FA, even if someone gets your password, they still can’t access your account without a verification code.
In this guide, I’ll explain how to secure your Apple account by setting up and using two-factor authentication on your iPhone and iPad.
What is two-factor authentication?
Two-factor authentication (2FA) is an extra layer of security for your Apple Account that helps protect it from unauthorized access. Since passwords alone can be weak or stolen through phishing attacks and data breaches, Apple introduced 2FA to enhance security. With 2FA enabled, logging into your account requires not only your password but also a six-digit verification code sent to a trusted device or phone number. This makes it significantly harder for hackers to gain access, even if they have your password.
Let’s understand how this security feature works!
How does two-factor authentication (2FA) work for your Apple Account?
After enabling 2FA, whenever you sign in to your Apple Account on a new device or browser, you start by entering your Apple ID credentials as usual. If you enter the correct credentials, Apple will check whether 2FA is enabled for your account.
Since 2FA is activated, Apple will send a unique, temporary six-digit verification code to one of your trusted devices or trusted phone numbers. You can receive the code in different ways:
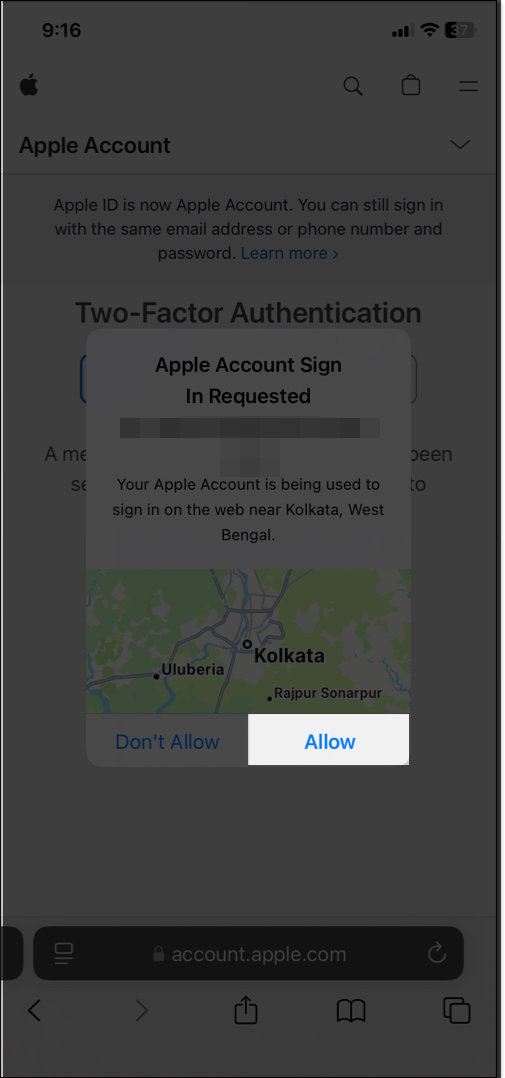
- A notification on a trusted Apple device: If you have another Apple device signed into the same Apple ID, a pop-up will appear showing a map of the login attempt and a verification code.
- A text message or phone call: When you don’t have a trusted Apple device nearby, you may request Apple to send the code via SMS or automated phone call to your trusted phone number.
Once you receive the six-digit code, enter it into the login screen on the new device or browser. This step confirms that you are the authorized user trying to access the account.
Therefore, this security feature ensures your Apple account is protected against data theft, phishing, password leaks, and unauthorized logins. In the next section, we’ll go over the system requirements to enable 2FA on your Apple account.
System requirements to set up two-factor authentication for your Apple Account
Before enabling two-factor authentication (2FA) on your Apple account, you need to ensure your devices and account meet Apple’s system requirements.
- A secure Apple ID password that you can remember, as you’ll need it to enable 2FA and sign in.
- All your Apple devices should be running the latest software version.
- You must add at least one trusted phone number or trusted device to receive verification codes via SMS or phone call when signing in. Apple recommends adding multiple trusted phone numbers in case you lose access to one.
- You need an internet connection to set up 2FA and sign in to your Apple account.
While setting up 2FA, Apple may offer the option to create a Recovery Key or use Account Recovery in case you lose access to your account. It is recommended to use a credit card, too, as it can help you verify your identity in case you forget your password.
You need to meet these system requirements to ensure a seamless setup process and prevent getting locked out. If you don’t meet these system requirements on all the devices you use with your Apple ID or if you don’t have a valid credit card on file, you’ll see a warning message. Read it before proceeding. Then, follow the steps below.
Turn on two-factor authentication for your Apple Account
Most of the time, your device prompts you to activate 2FA when setting up your Apple ID. If you have skipped it, you may enable it on your iPhone, iPad, or Mac or through the Apple website.
On iPhone and iPad
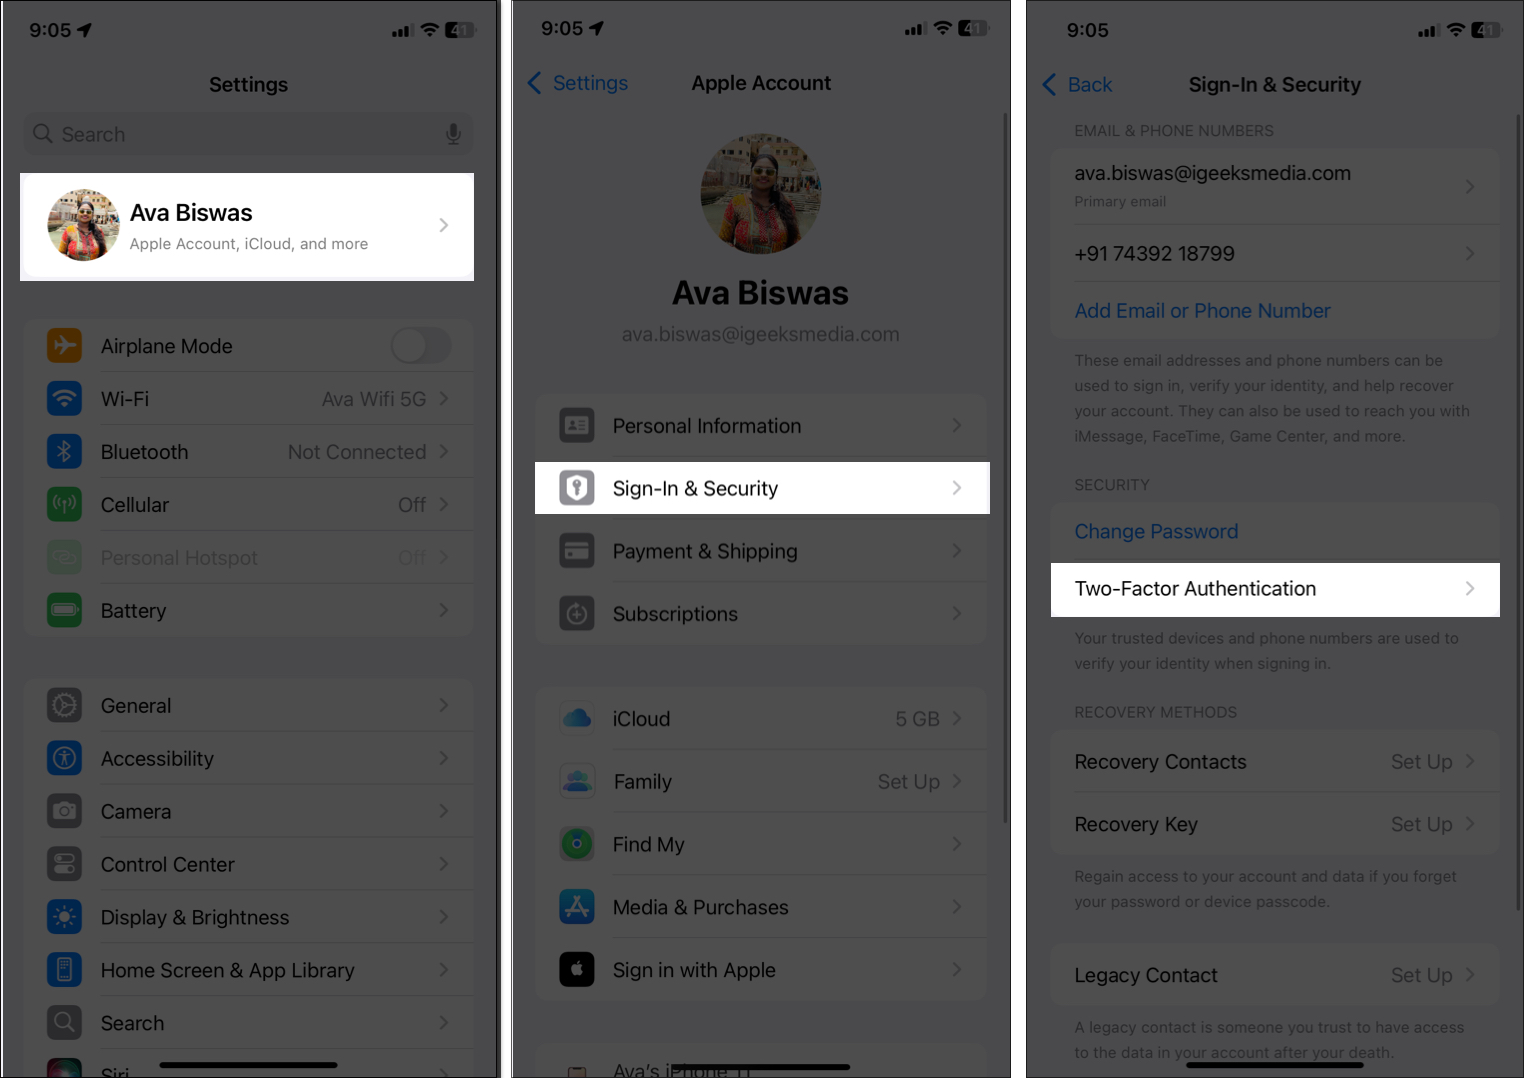
- Open Settings and tap your name at the top.
- Select Sign-In & Security.
- Here, tap Turn On Two-Factor Authentication.
- Follow the on-screen instructions to complete the setup.
If you don’t see the Turn On option, that means it is already enabled for your Apple Account.
On Mac
- Click the Apple menu () at the top and select System Settings.
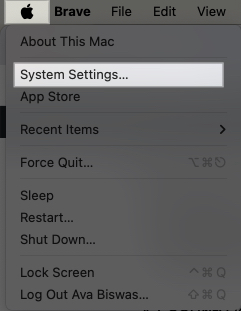
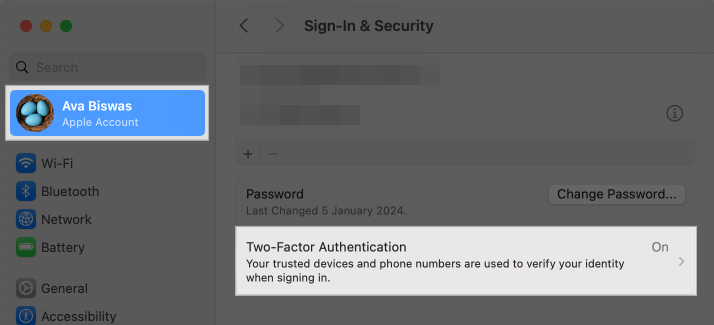
- Select your name at the top of the sidebar and click on Sign-In & Security.
- Look for Two-Factor Authentication, click Turn On next to it, and follow the prompts.
From the Apple website
- Visit Apple’s Account Page.
- Sign in with your Apple ID.
- Now, it may ask you some security questions. Answer them and click Continue to proceed.
- Then, you will see a prompt to upgrade account security. Tap on Upgrade Account Security and follow the onscreen instructions.

You cannot disable two-factor authentication if you have been using it with your Apple Account for more than two weeks. For more protection, follow these tips to secure your Apple Account.
How to use two-factor authentication on your Apple device
Once you have two-factor authentication (2FA) enabled on your Apple Account, you will need to use it whenever you sign in to a new device, change account security settings, or access your account from the web. Apple also has made it mandatory to use certain services and features, such as Apple Pay, Sign in with Apple, etc.
Every time your Apple Account is signed in to a new device or web browser for the first time, you’ll be notified on your trusted devices. You will also see the approximate location of the sign-in attempt. If you’re trying to login but the location is different, worry not! Depending on the IP address and connected network, the shown location may differ.
To approve the sign-in request on your other Apple device, tap Allow and see the verification code. To prevent someone else from attempting to log in, select Don’t Allow.
If you don’t have a trusted Apple device nearby, tap on the Didn’t Get a Code? option and choose to receive a six-digit verification code to your trusted phone number. Type in it and select Continue. If the code is correct, Apple will log you in.
After entering the code, you will have the option to Trust this device. If you choose this option, you won’t need to enter a 2FA code again on that device unless you sign out your Apple ID on that device, erase the device, change your password, or perform a factory reset.
For websites, you can select Trust this Browser to avoid 2FA for the next 30 days. If you signed into a website or device that you would never use in the future, tap Don’t Trust. Apple will ask for a verification code every time you log in. You can also review your trusted devices to remove any unwanted access.
Manage your trusted devices and phone numbers on your Apple Account
As mentioned earlier, trusted devices and phone numbers are essential for activating 2FA for your Apple Account. These trusted devices and numbers allow you to receive verification codes, approve sign-in requests, and regain access if you’re ever locked out. Keeping this list up to date ensures that you always have a way to verify your identity securely.
View and remove your trusted devices
You can check which Apple devices (iPhone, iPad, Mac, or Apple Watch) are trusted and signed in with your Apple ID using the following methods:
- Go to your Apple ID settings and select Two-Factor Authentication.
- Here, you will see a list of your devices.
- Tap a device to view details such as the model, OS version, and whether it is a trusted device.
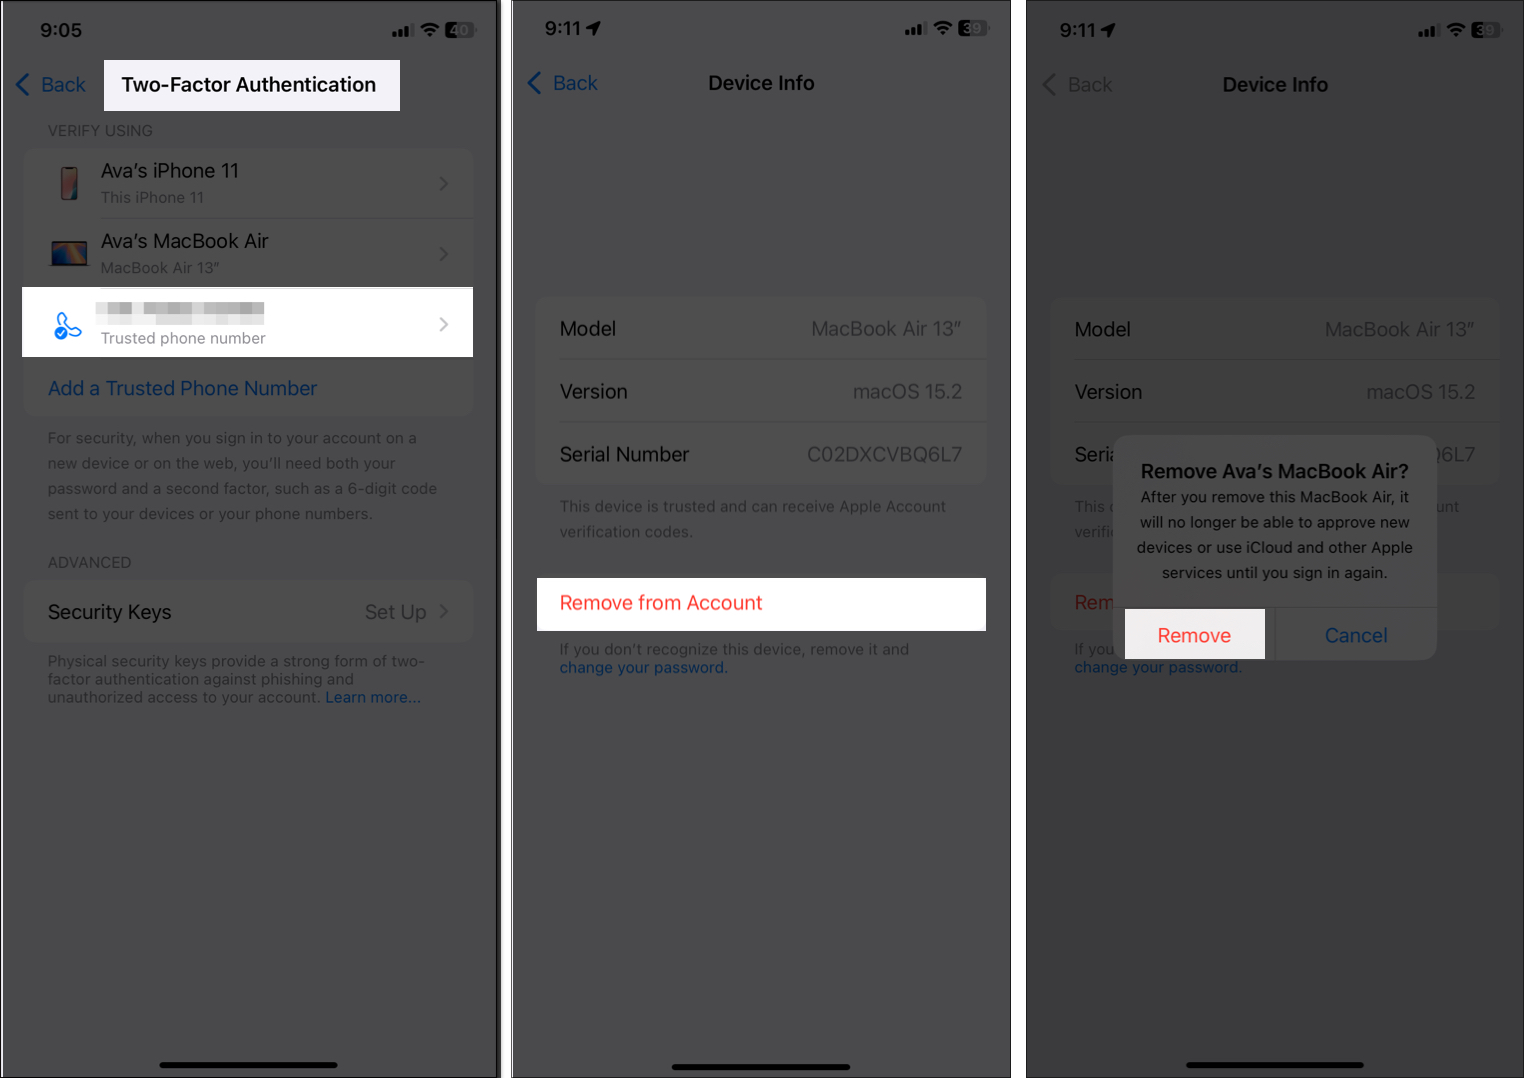
If you don’t want to receive verification prompts on this device, tap Remove from Account. Then, change your Apple ID password. This will log it out of iCloud and other Apple services, preventing unauthorized access.
Add or remove trusted phone numbers
It’s recommended to add at least one backup phone number in case your primary phone is lost or inaccessible. Here’s how you can use a new number for 2FA:
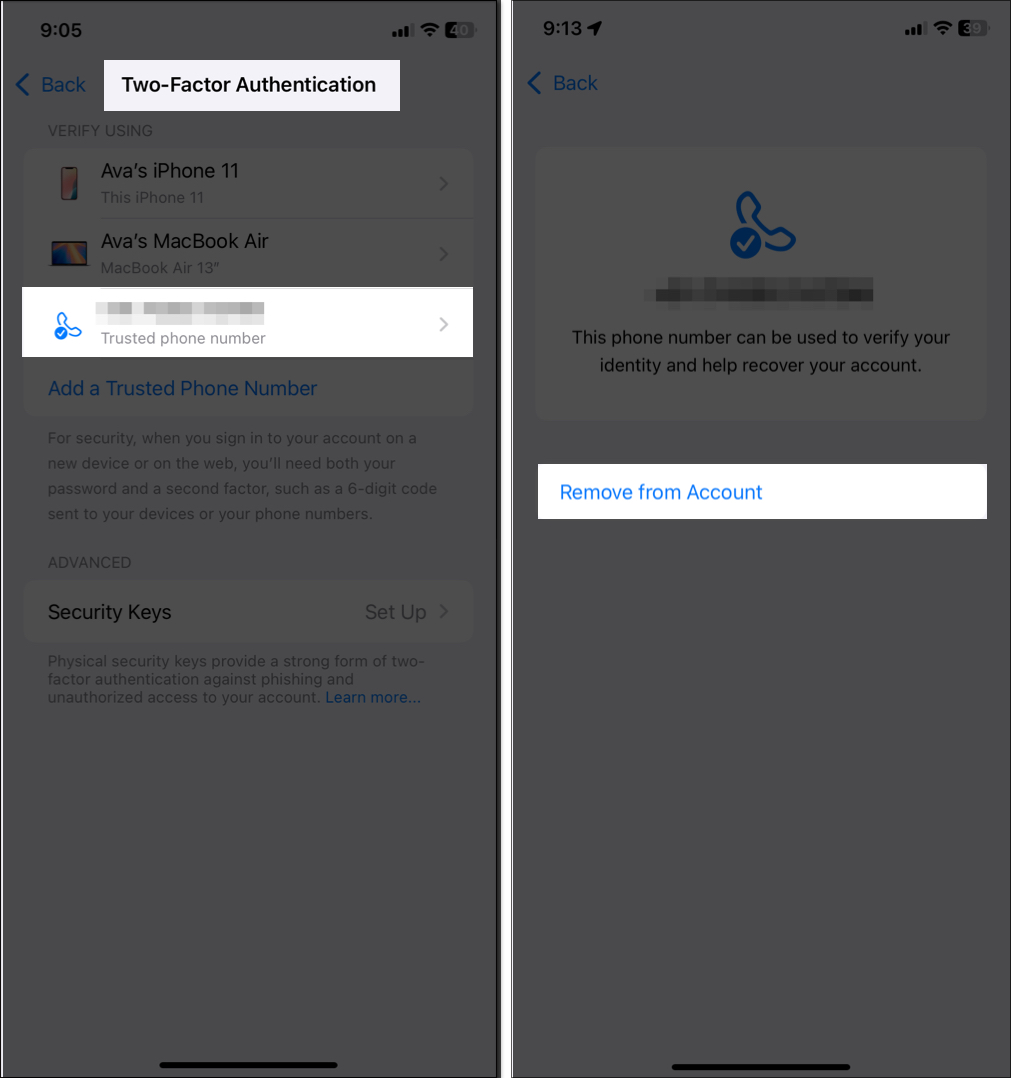
- Access the Apple ID settings and tap on Two-Factor Authentication.
- It will show your existing trusted phone number. To unlink an obsolete number, select it and tap Remove from Account.
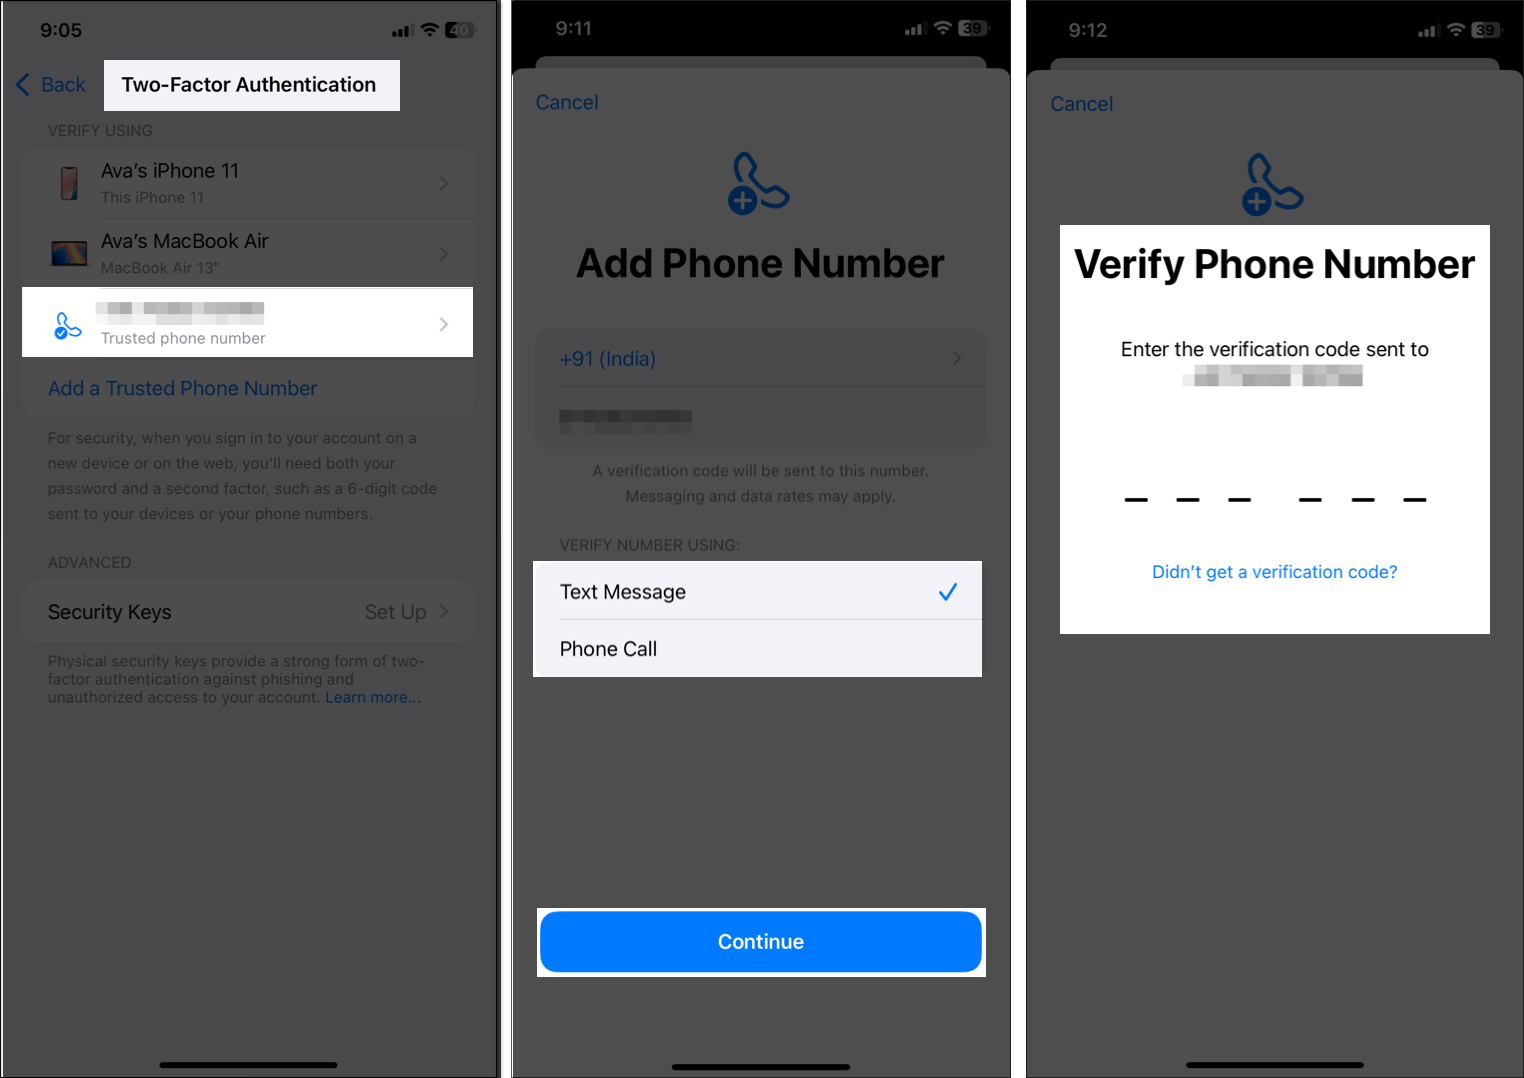
- To use a new number, tap Add a Trusted Phone Number and enter your device passcode.
- Next, type in your phone number and select between Text Message or Phone Call as a verification method.
- Tap Continue to proceed.
- You will now receive an Apple Account code on that number. Enter it carefully to finish the process.
How to enable a Security Key for your Apple Account
A Security Key is a physical device that adds an extra layer of protection to your Apple ID. It acts as a second factor for authentication, replacing the traditional six-digit verification code. When you enable Security Keys for Apple ID, you must insert or tap your key whenever you sign in to a new device or make security-related changes to your account.
This feature is especially useful for people who want stronger protection against phishing attacks or unauthorized access attempts. Security keys provide hardware-based authentication, ensuring that only you can access your account. So, to use it, go through our detailed guide on how to set up Security Key for Apple Account.
Signing off
Securing your Apple Account with two-factor authentication (2FA) is one of the most effective ways to protect your personal data from unauthorized access, even if someone else gets hold of your password. Remember to never share your verification codes with anyone. If you face any issues, let me know in the comments below!