Apple has always been a pioneer when it comes to making tech everyone, and iOS 26 accessibility features takes inclusivity to the next level. From Braille Access and Head Tracking to Accessibility Reader and improved VoiceOver, iPhones continue to evolve as devices that anyone can use comfortably.
Whether you have visual, auditory, or motor challenges or simply want to make your device easier to navigate, this guide covers every major iPhone accessibility feature in iOS 26, with step-by-step instructions so you can start using them today.
iPhone Accessibility Tips for the Visually Impaired
These features help users with visual impairments or reading difficulties interact with their iPhones more comfortably.
1. VoiceOver
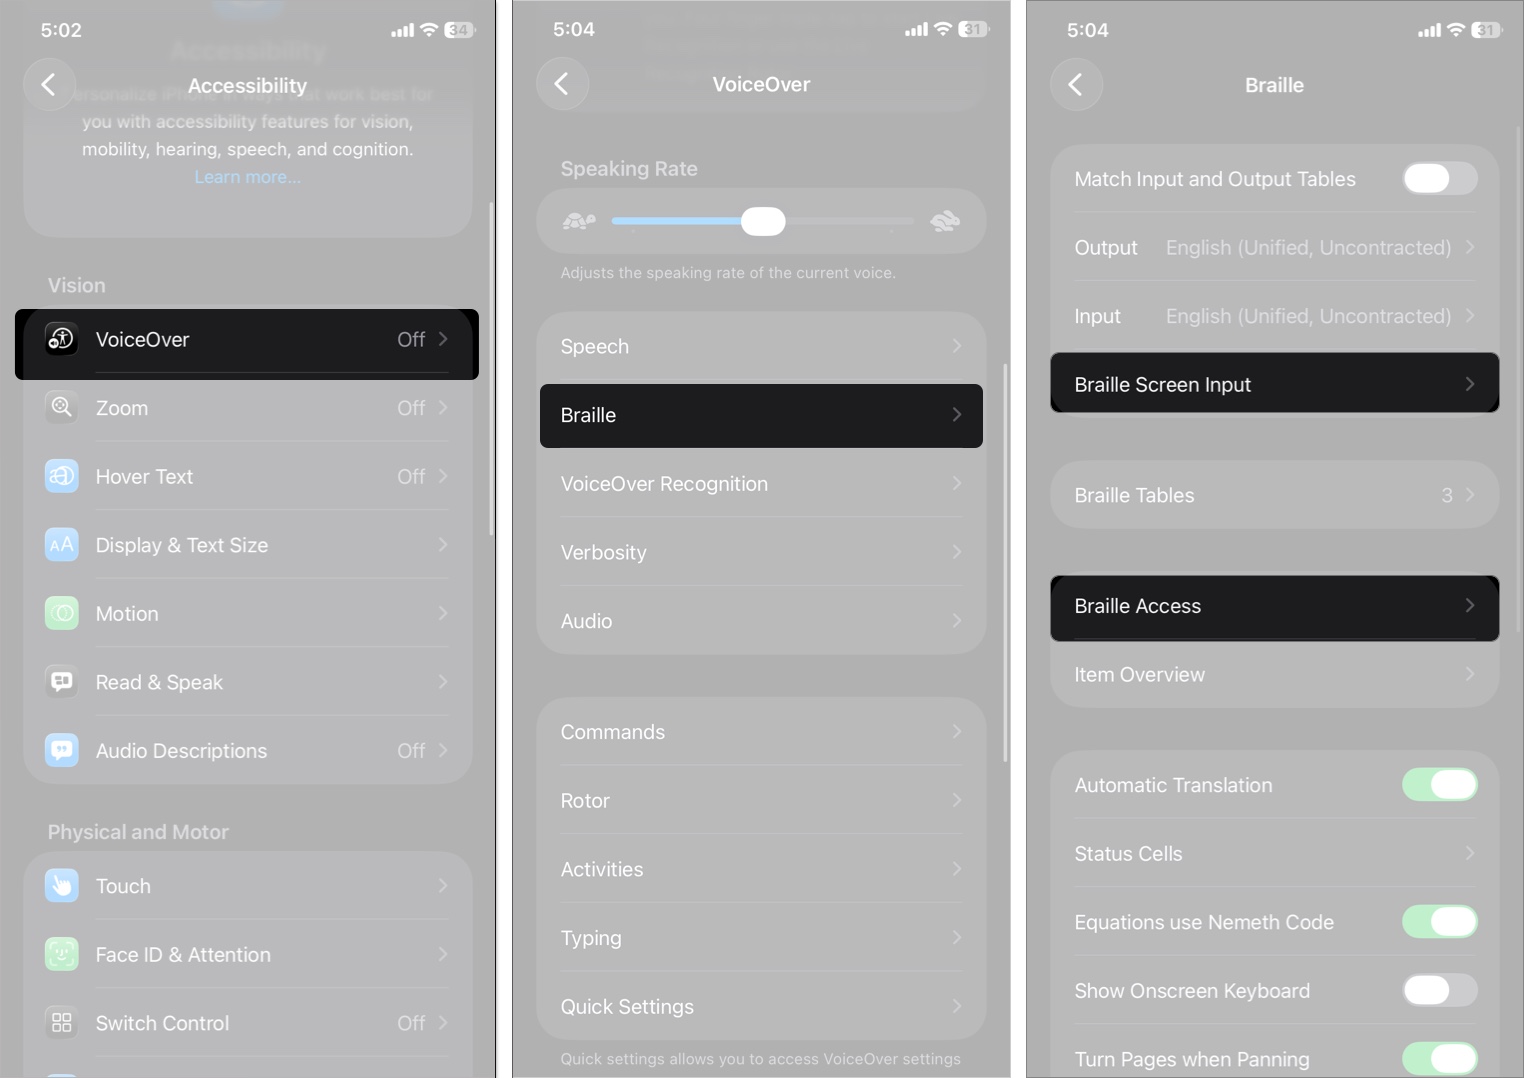
VoiceOver reads aloud every item on the screen, including text, buttons, and icons. So, when you tap a button or an app, a voice tells you what it is. In iOS 26, typing feedback and Braille Screen Input have been improved.
- Open Settings → Accessibility.
- Tap VoiceOver.
- Toggle VoiceOver on.
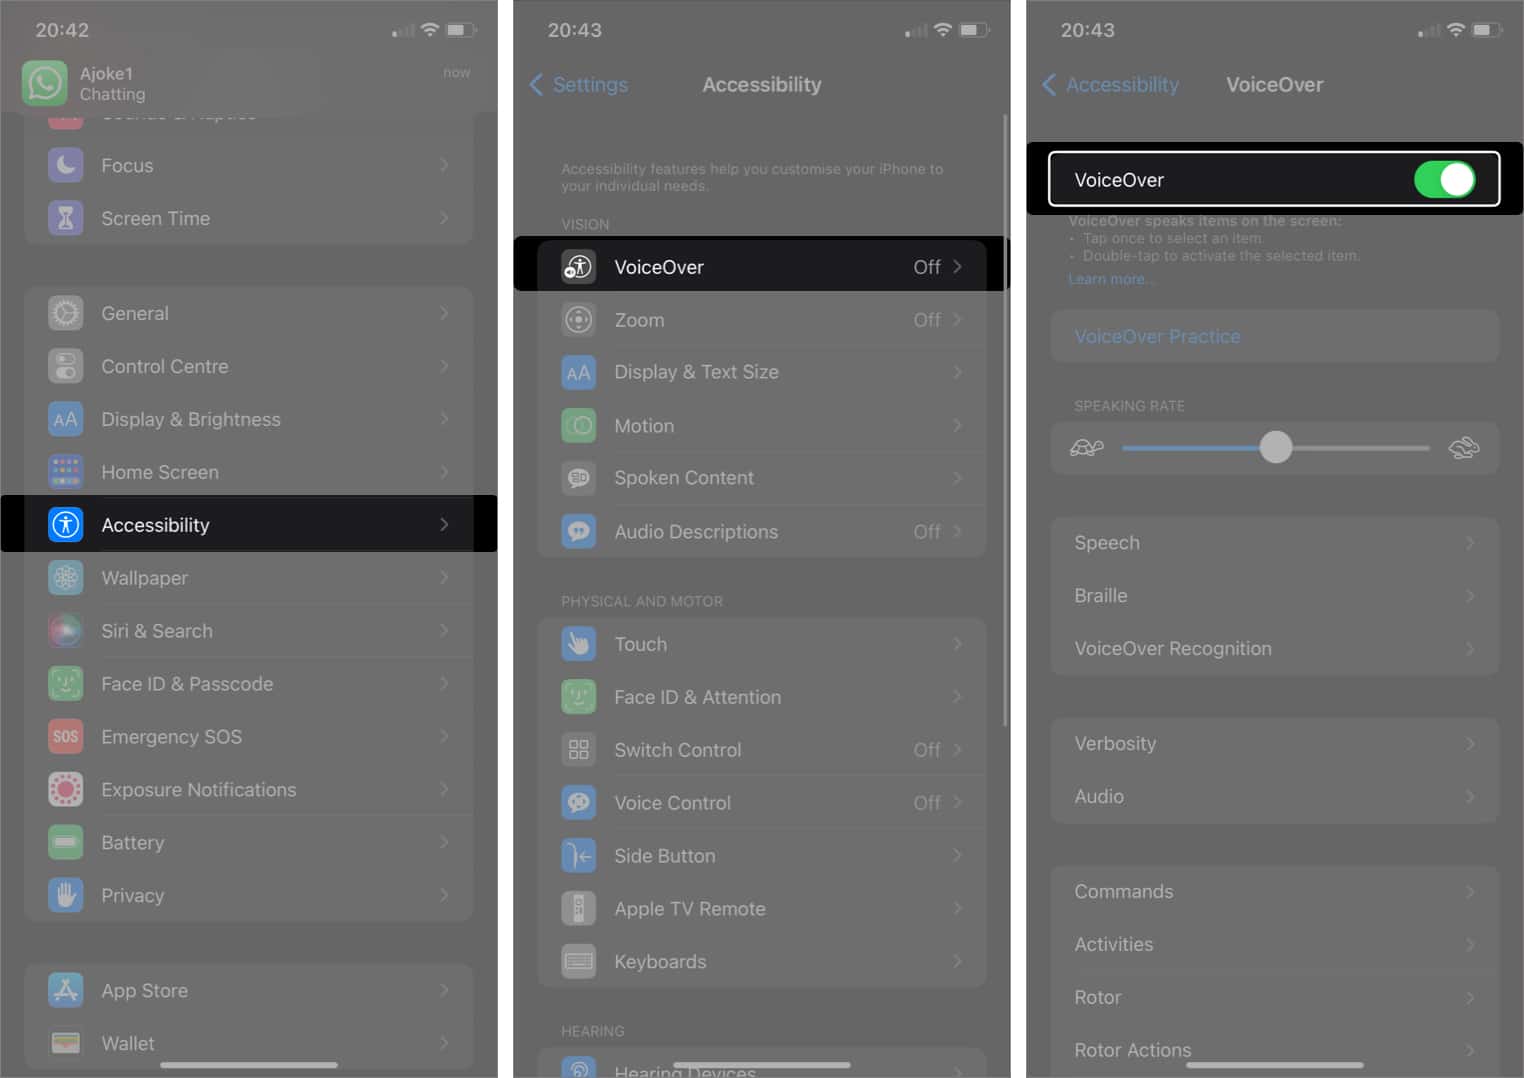
- Customize speech rate, pitch, and verbosity, or enable Braille Screen Input.
2. Accessibility Reader
iOS 26 introduces Accessibility Reader, a system-wide feature that simplifies and highlights text for easier reading. You can also listen to the text thanks to its Spoken Content support. Apple has designed it for people with dyslexia, low vision, or other reading challenges.
- From Accessibility menu, select Read & Speak.
- Tap on Accessibility Reader and toggle on Accessibility Reader.
- Open any app with text and tap the Reader icon to simplify the content.
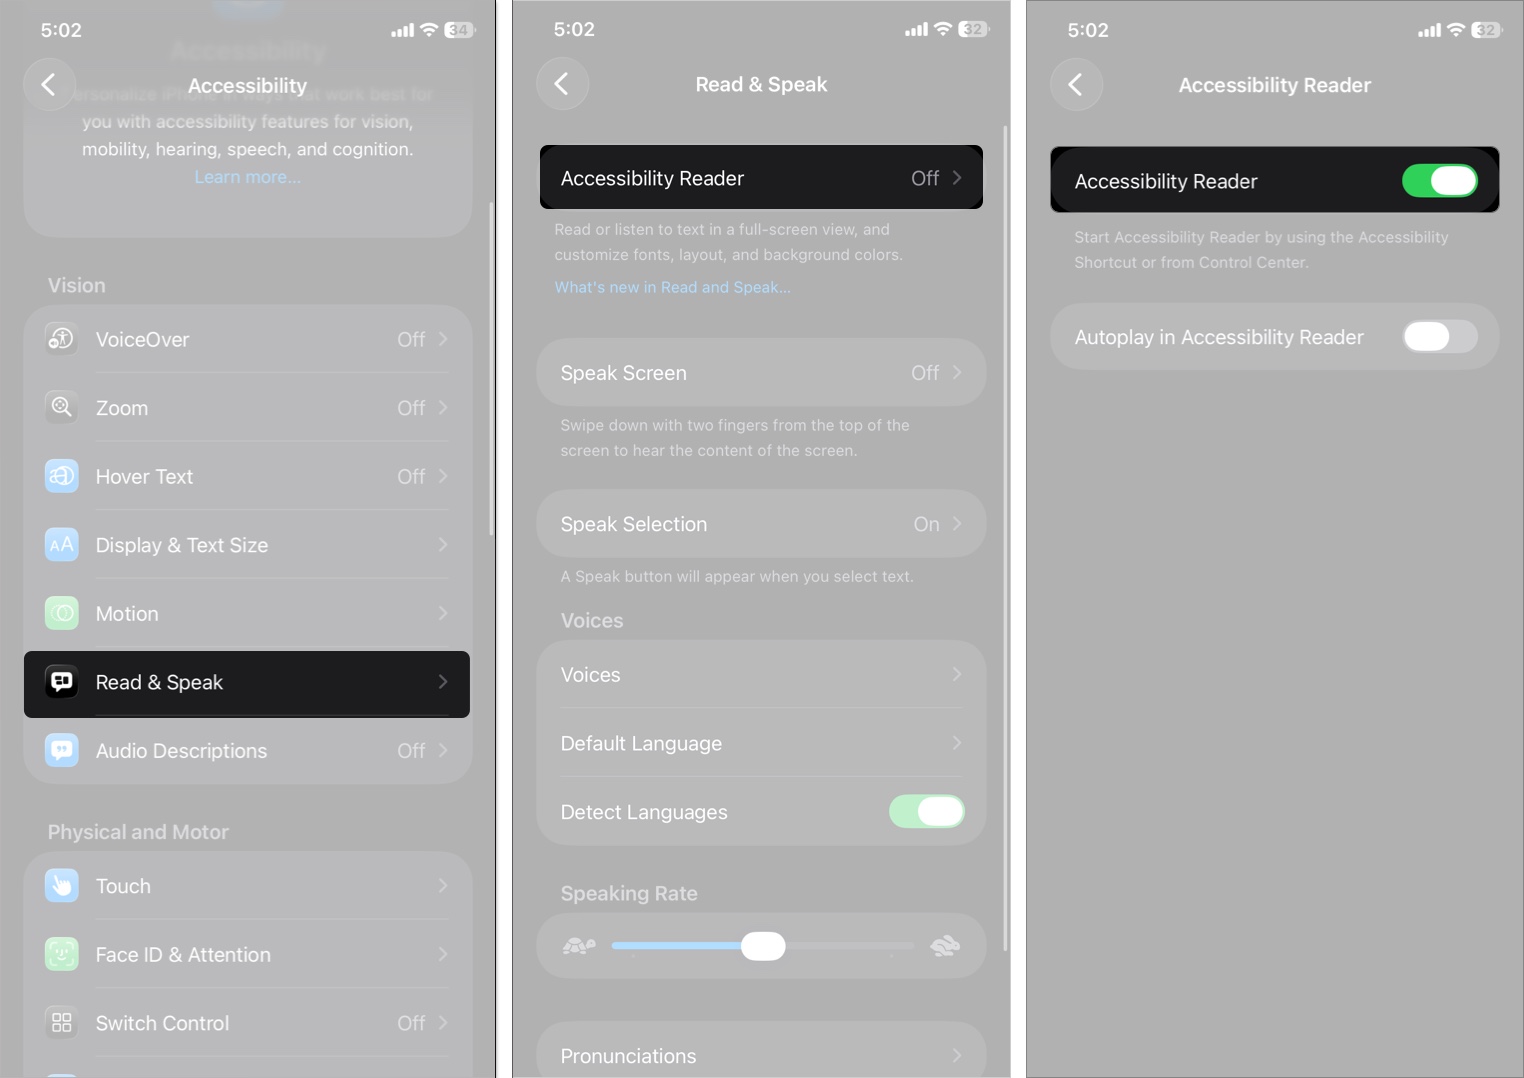
It’s also integrated into the Magnifier app to read real-world text like restaurant menus or books by pointing your device’s camera.
3. Magnify Content
You can use Zoom to magnify the entire screen while using apps or typing on your iPhone or iPad. I recommend this option if you have difficulty seeing small texts. Or if you need a more precise focus on icons.
To activate:
- In Accessibility settings, select Zoom.
- Toggle on Zoom.
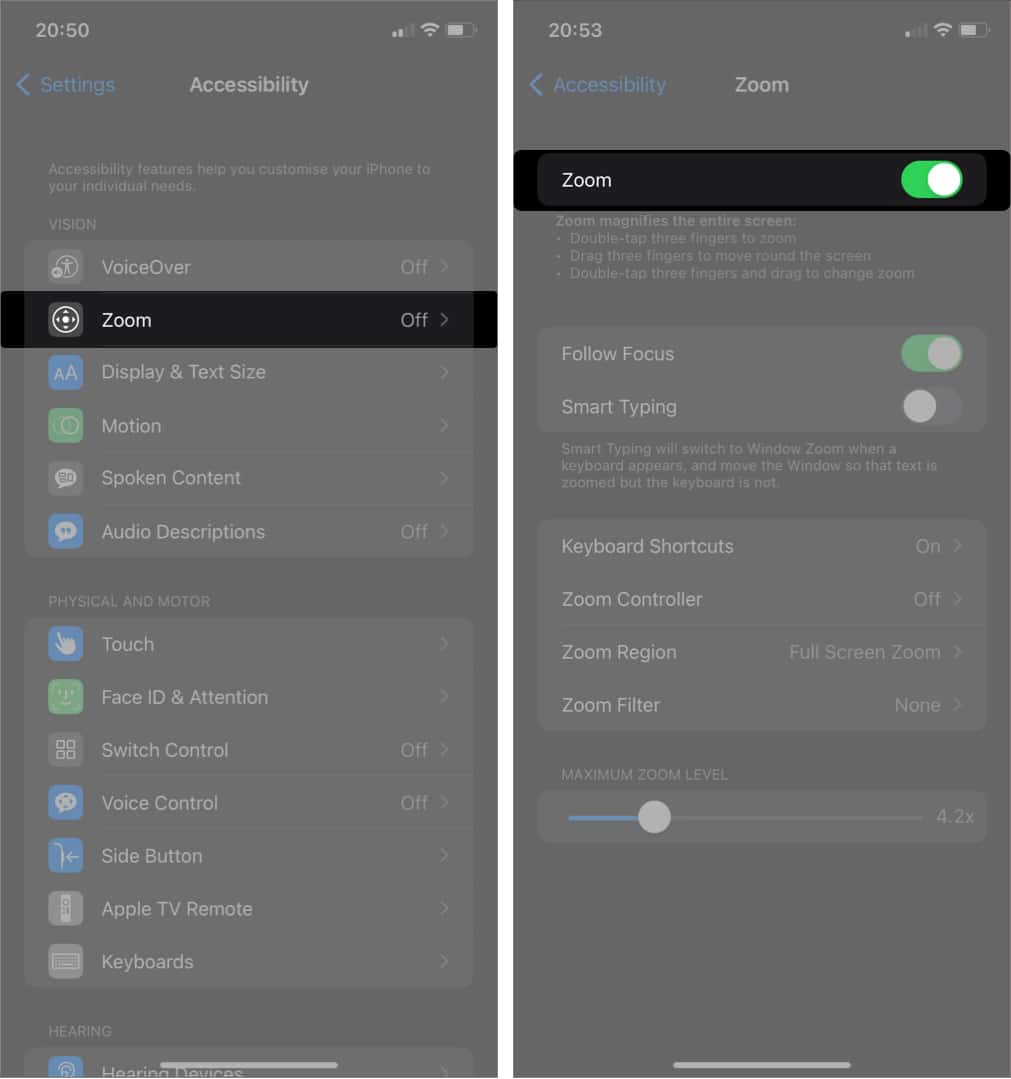
Once active, double-tap with three fingers to switch between zooming in and out. Swipe across the screen with three fingers to move around your device when you zoom icons.
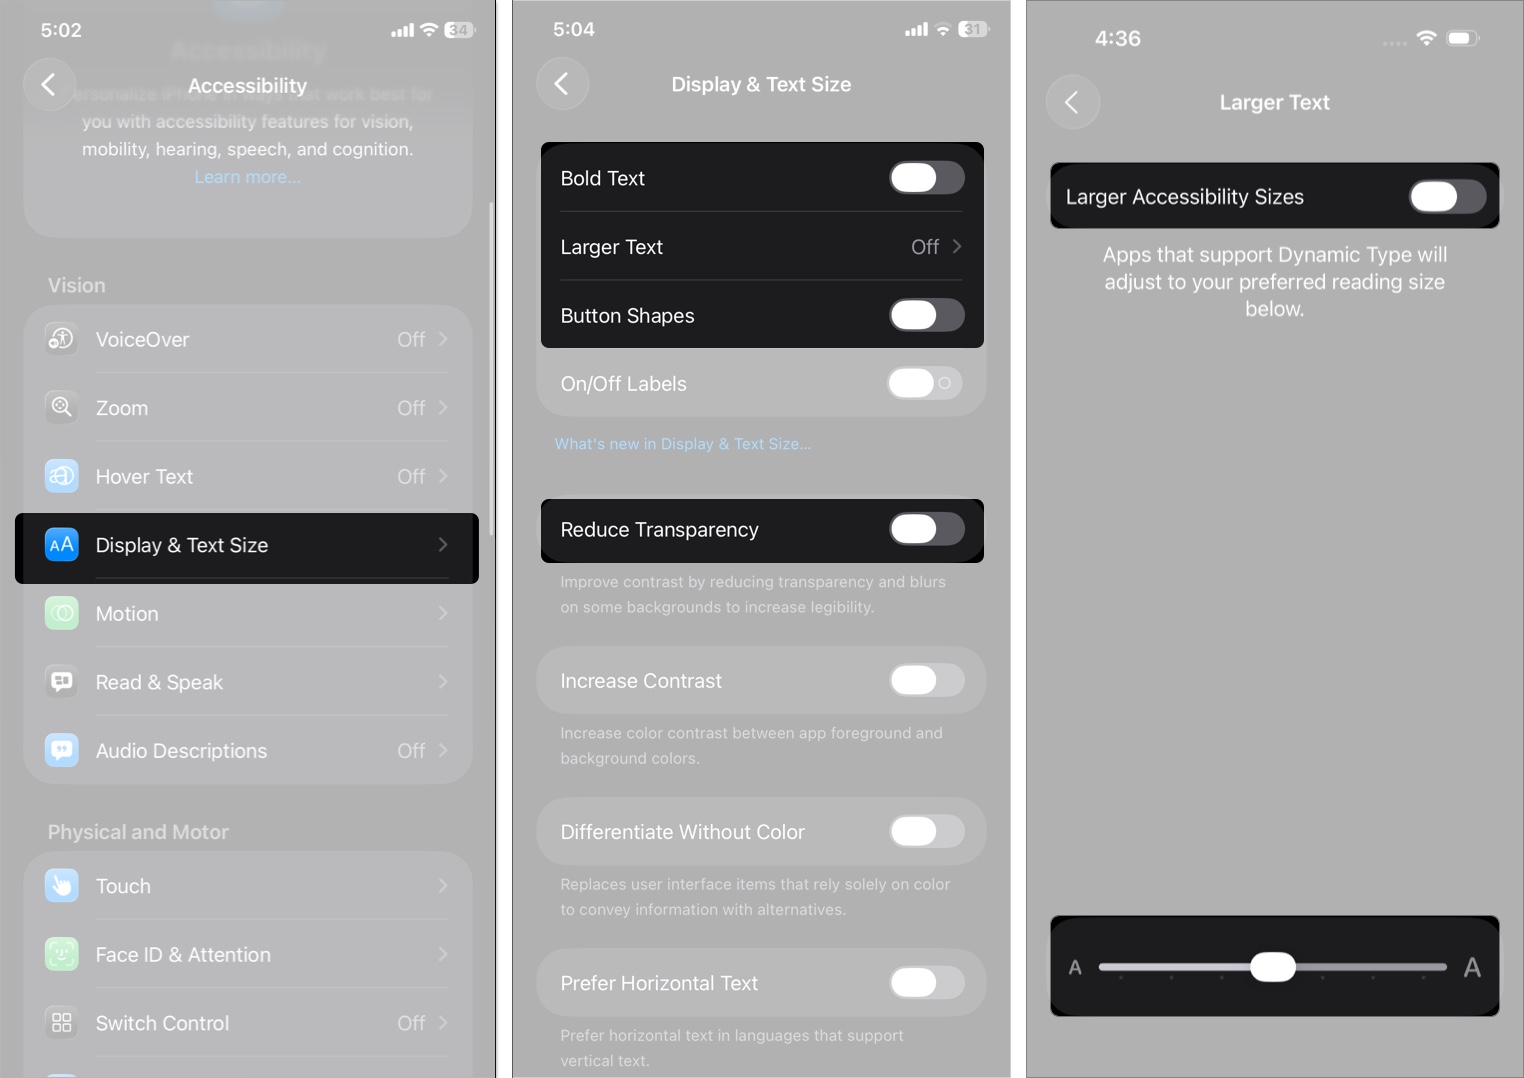
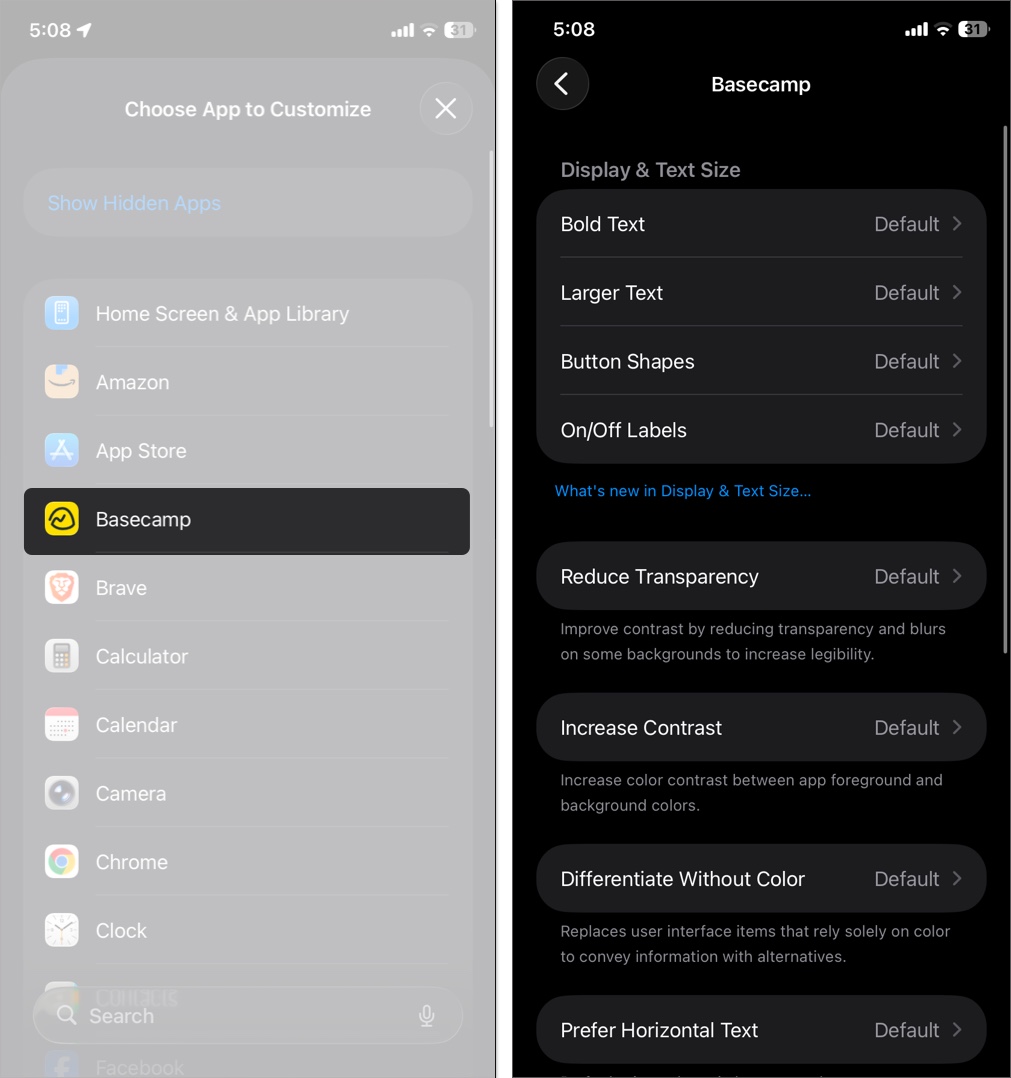
4. Display & Text Adjustments
Control text size, boldness, contrast, and button shapes. New in iOS 26, you can reduce transparency in the Liquid Glass UI for better visibility.
- Go to Accessibility → Display & Text Size.
- Toggle options such as Bold Text, Button Shapes, Increase Contrast, or Reduce Transparency.
- Use Larger Text to adjust the font size system-wide.

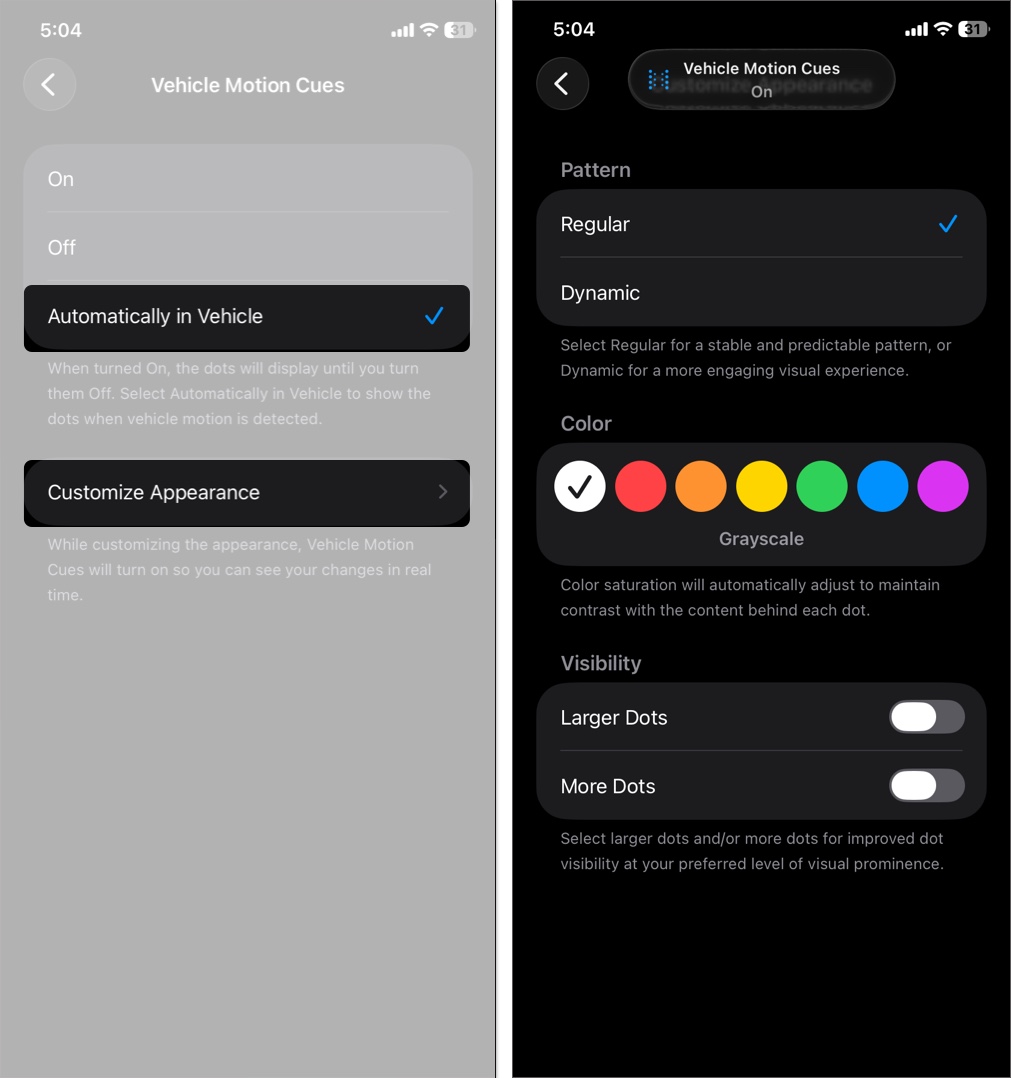
5. Vehicle Motion Cues
If you experience motion sickness while using your iPhone while traveling by road or plane, the Vehicle Motion Cues feature can help. It provides visual cues when the iPhone detects movement during travel. iOS 26 allows more customization.
To set it up:
- Open Settings → Accessibility → Motion.
- Tap on Vehicle Motion Cues.
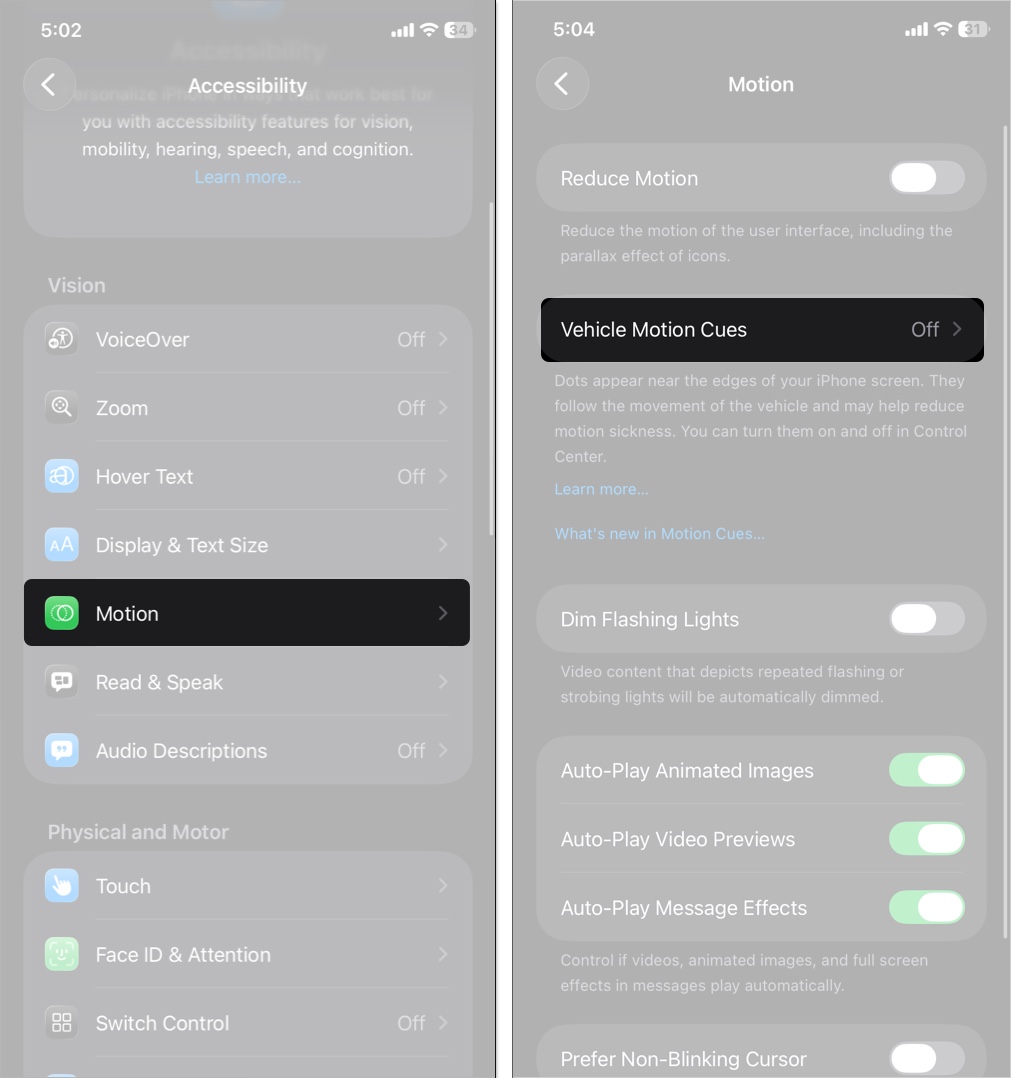
- Select Automatically in Vehicle.
- Now, tap Customize Appearance and choose the cue size, color, density and pattern that works best for you.


6. Braille Access
iOS 26 enables the iPhone to act as a full-featured braille notetaker that can easily open any app by typing with a connected braille display. It supports Nemeth math code, live conversation transcription, Braille Screen Input, external braille displays, and BRF (braille) files.
To use Braille Access:
- From Accessibility menu, select VoiceOver → Braille.
- Here, you can setup commands and customize settings from Braille Access and Braille Screen Input.

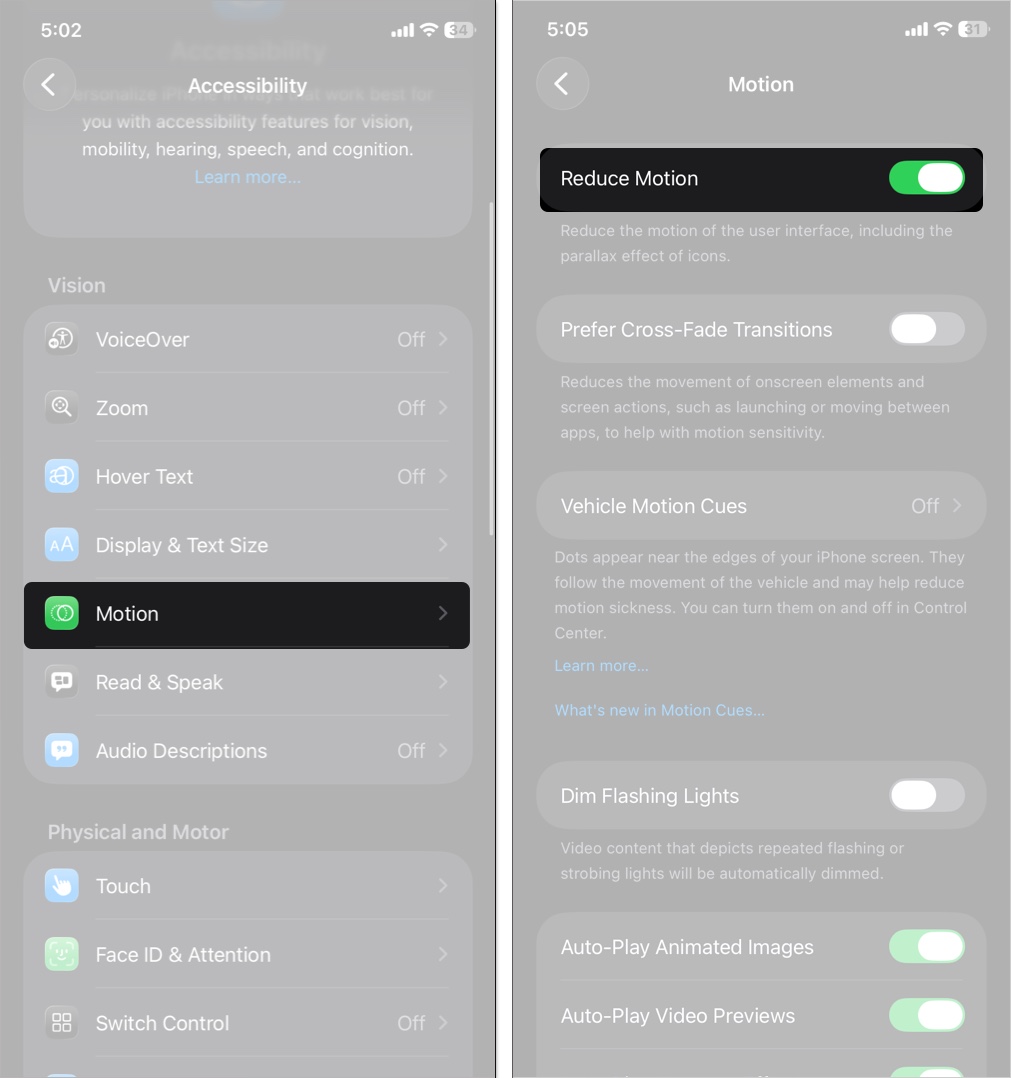
7. Reduce UI motion
It can be hard to visually catch up when actions and movements are too quick on your iPhone. You can slow them down for better comprehension and follow-up. So at least, you’ll know what’s happening next on your device.
To do this:
- From the Accessibility menu, tap Motion.
- Toggle on Reduce Motion.

Physical and Motor Accessibility Features on iPhone
These features support users with motor impairments, limited dexterity, or those seeking hands-free control.
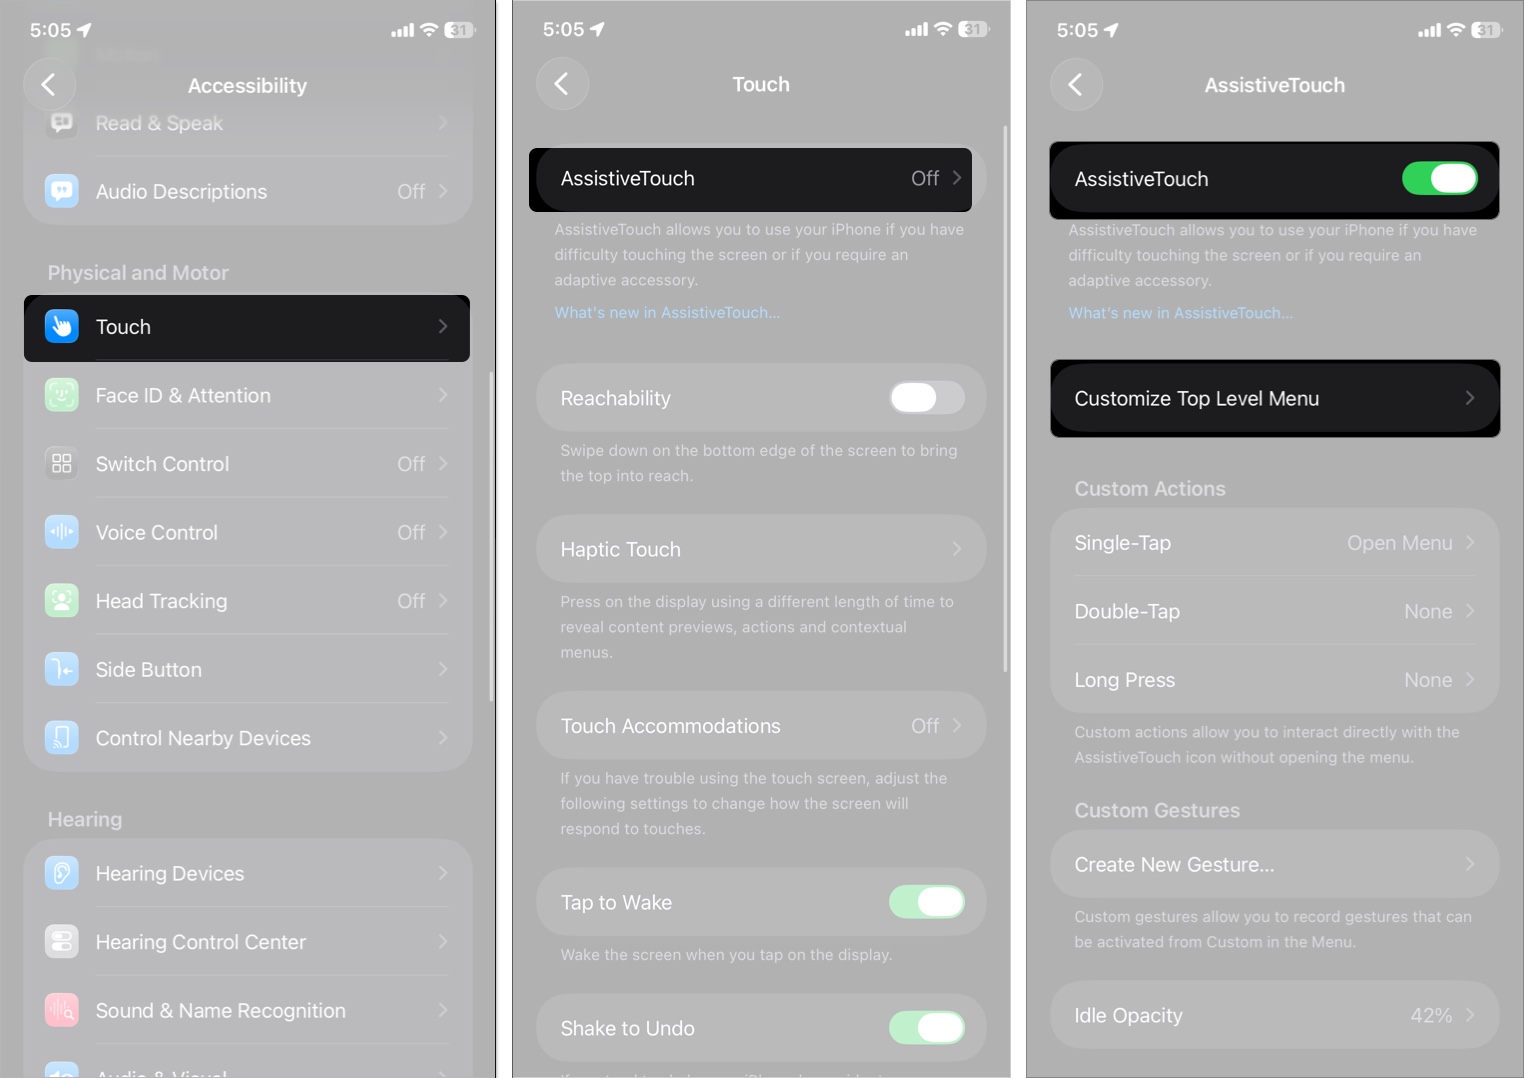
8. AssistiveTouch
Provides a floating menu for gestures like taking screenshots, switching apps, or activating the torch without complex motions.
- Go to Settings → Accessibility → Touch.
- Select AssistiveTouch and toggle it on.
- Tap Customize Top Level Menu to set your most used gestures. Also, set up Single-Tap, Double-Tap, Long Press actions.

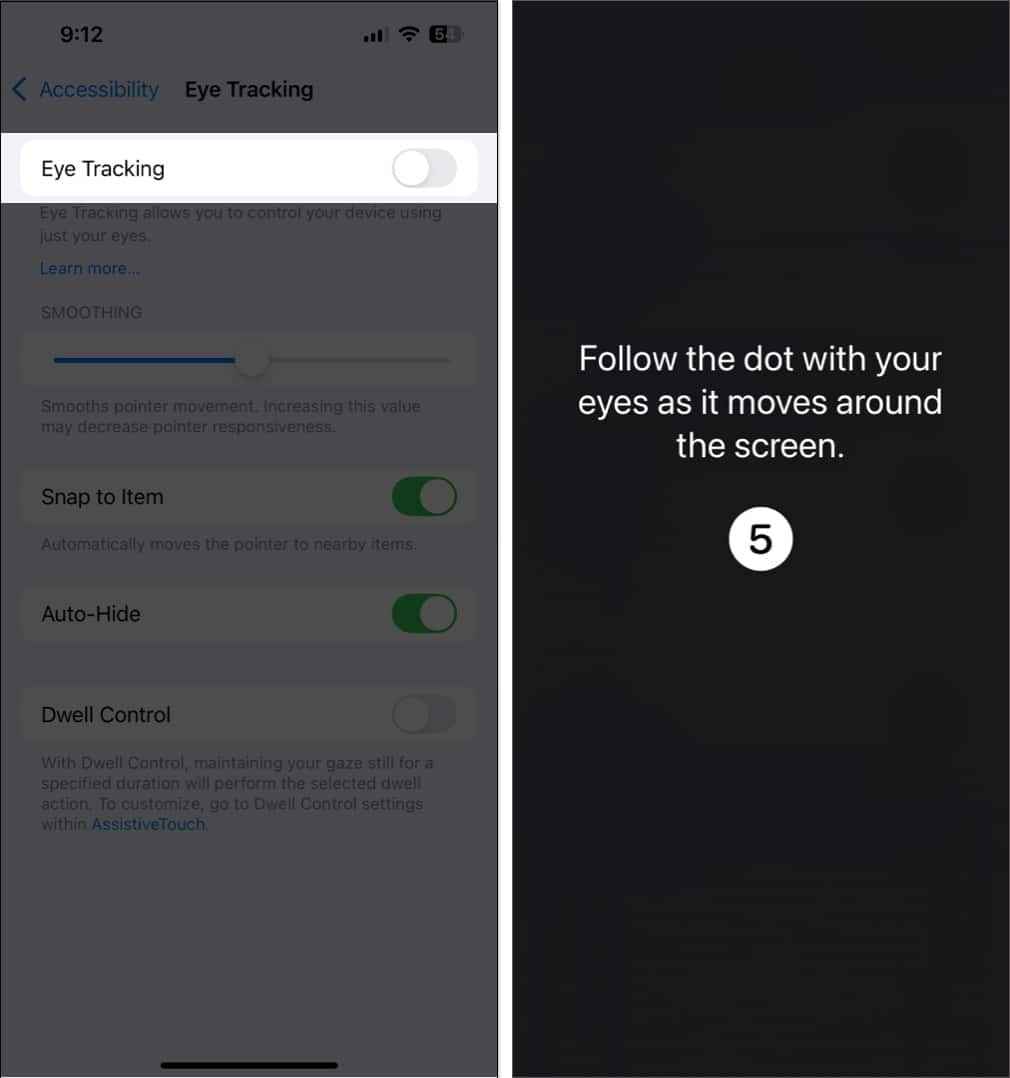
9. Eye Tracking
Use your gaze to control the iPhone pointer or select items. Ideal for hands-free operation. In iOS 26, Eye Tracking provides switch and dwell gestures for typing.
- From Accessibility list, tap Eye Tracking.
- Toggle on Eye Tracking.
- Follow the on-screen calibration guide.
10. Head Tracking
In iOS 26, Head Tracking is a remarkable feature that helps individuals with limited mobility. Control the pointer or trigger actions like tapping on something or taking screenshots using head or facial movements like blinking, smiling, or raising eyebrows.
To enable Head Tracking:
- Go to Accessibility → Head Tracking.
- Toggle on Head Tracking.
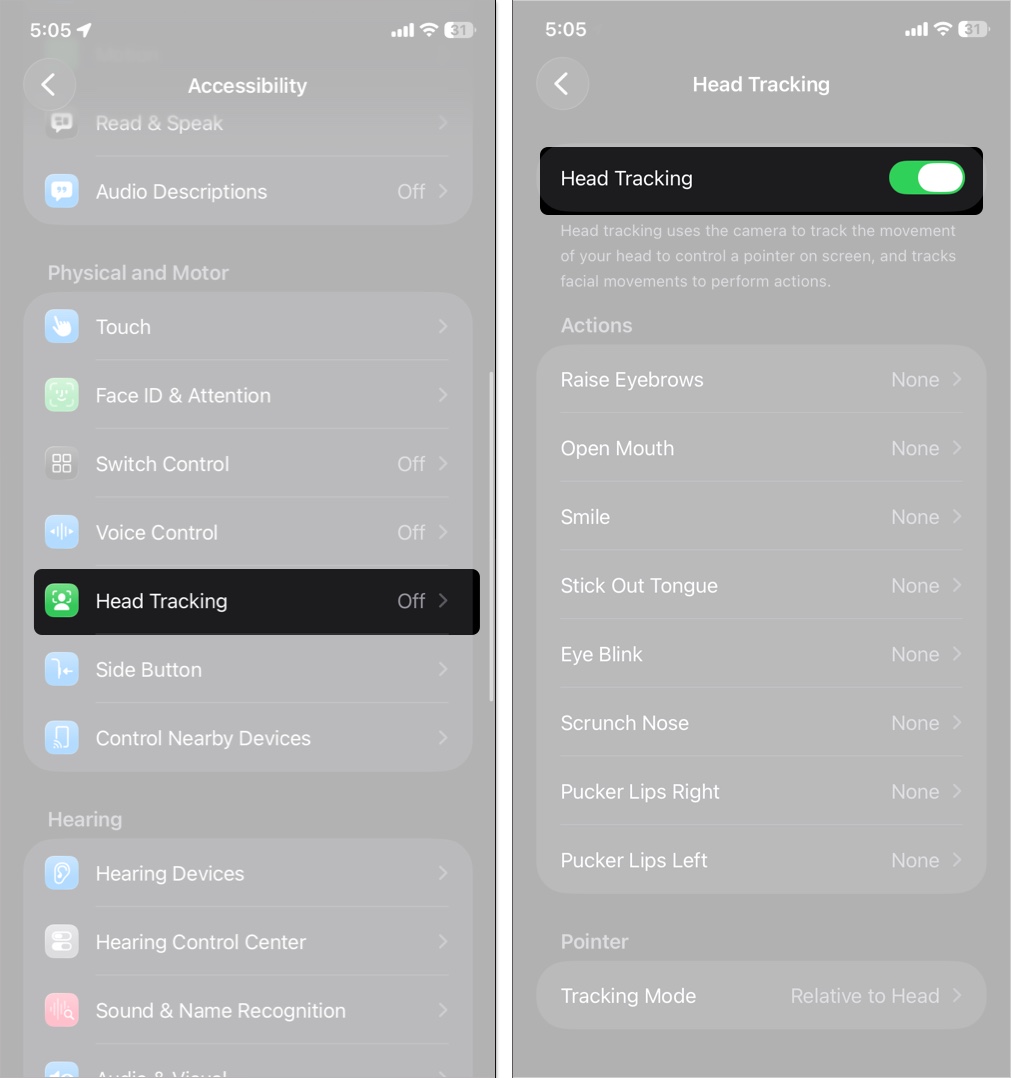
- Customize gestures for specific actions.
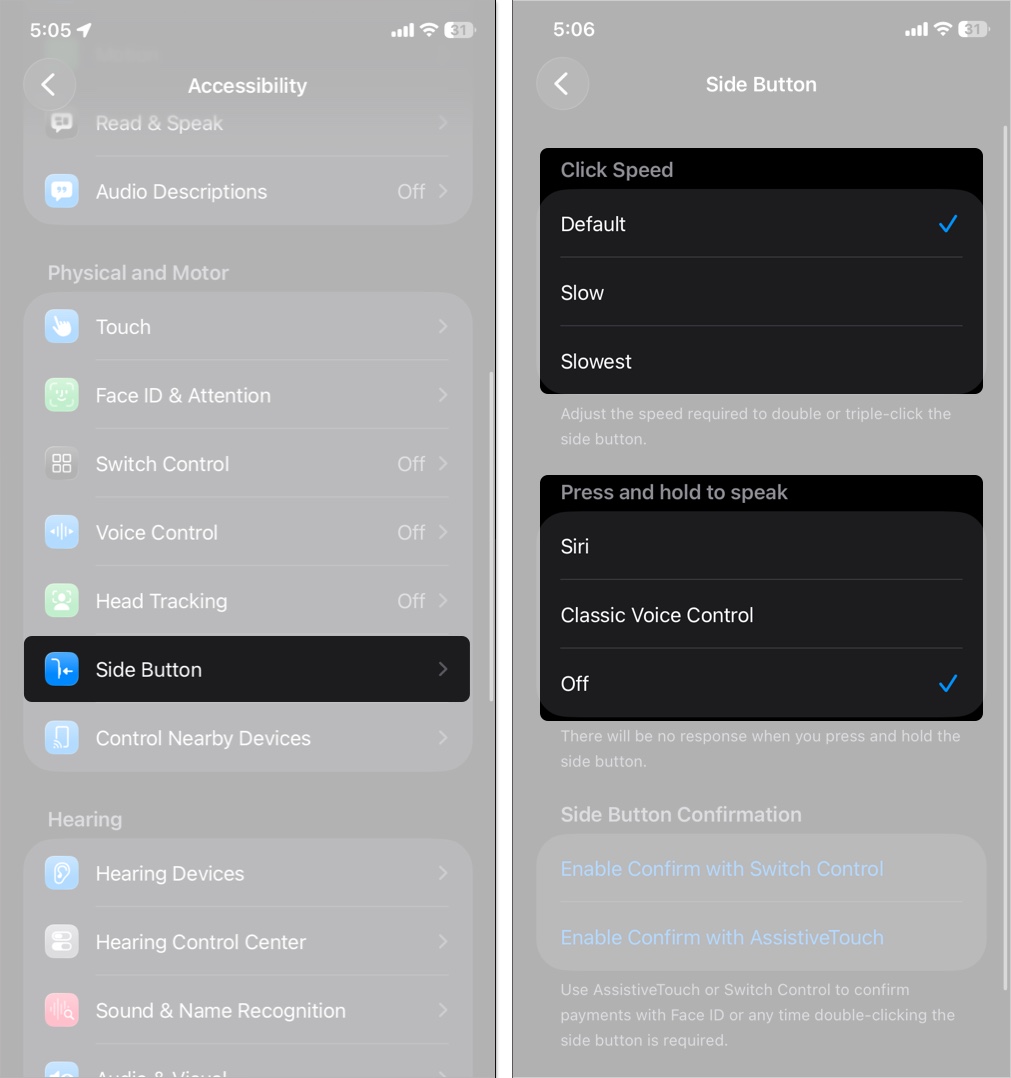
11. Back Tap and Side Button Shortcuts
Perform actions by tapping the back of your iPhone or pressing the side button three times.
Steps to set up Back Tap and Side Button shortcuts:
- Back Tap:
1. Settings → Accessibility → Touch → Back Tap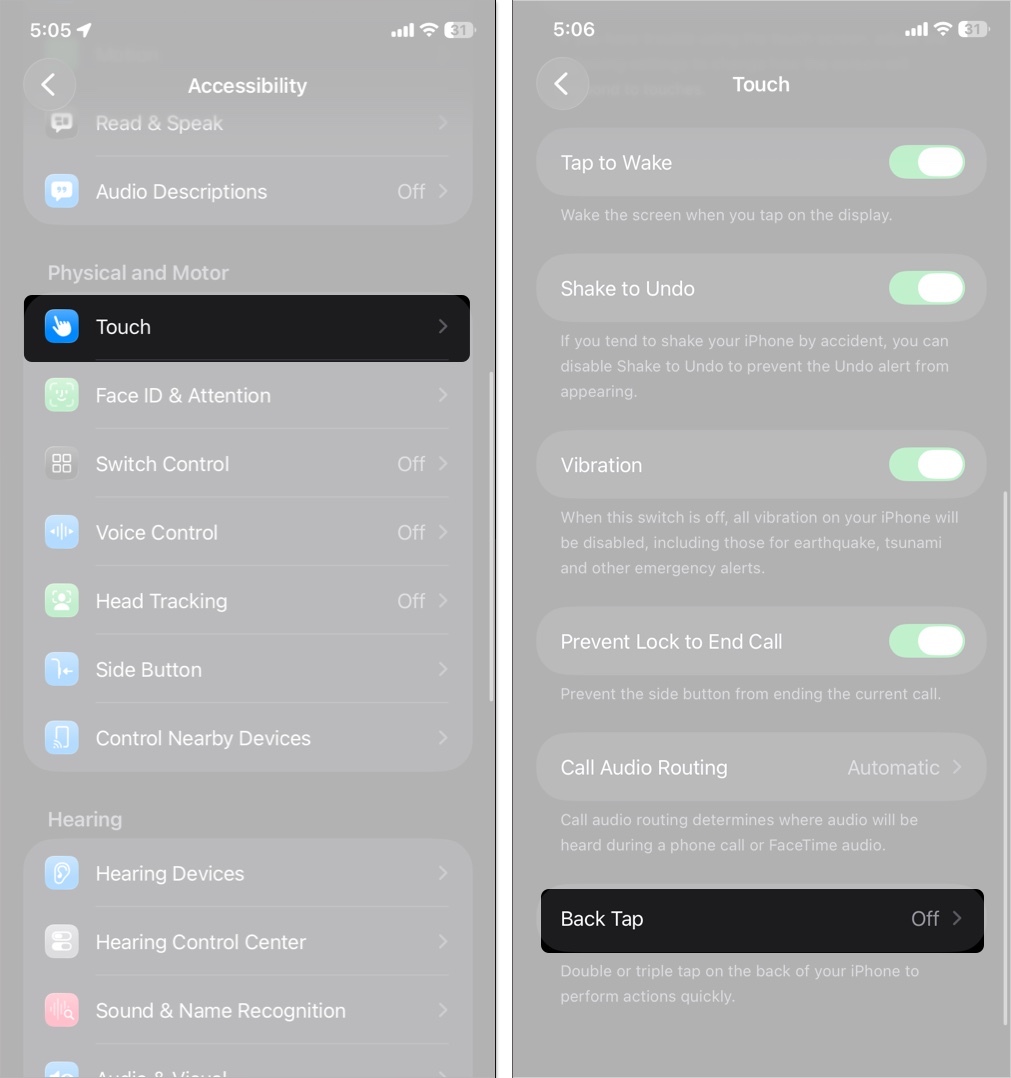
2. Now, Select Double Tap or Triple Tap and assign an action.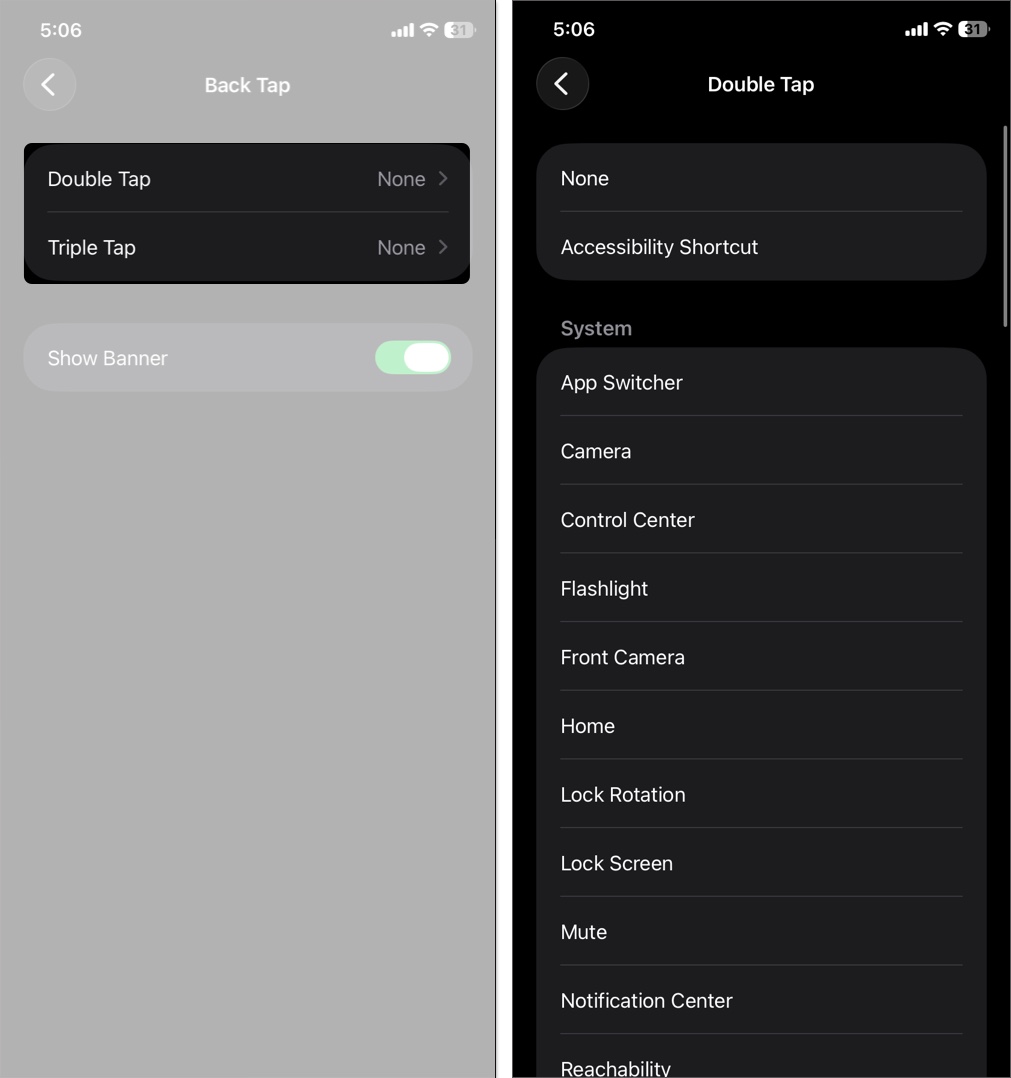
- Side Button: Settings → Accessibility → Side Button → Customize click speed or long-press behavior.


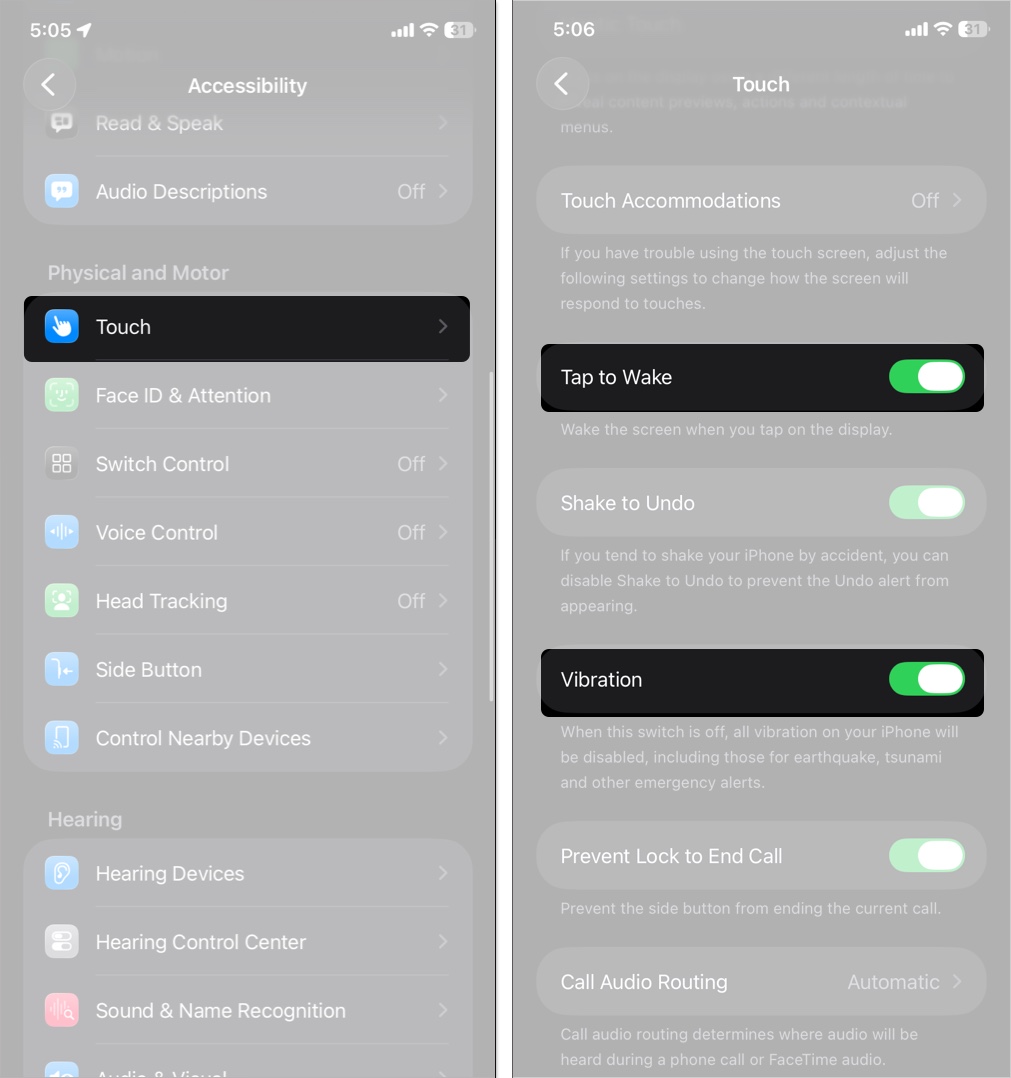
12. Tap to Wake and Haptic Feedback
Like the raise to wake feature on iPhone, you can also configure your device to turn on the screen light whenever you tap it. Vibration keeps your iPhone in vibration mode even when the screen is off. So, at least, you can get emergency alerts even when you’re not actively using them.
To activate these features:
- Go to Settings.
- In the Accessibility menu, select Touch.
- Toggle on the Tap to Wake and Vibration options.

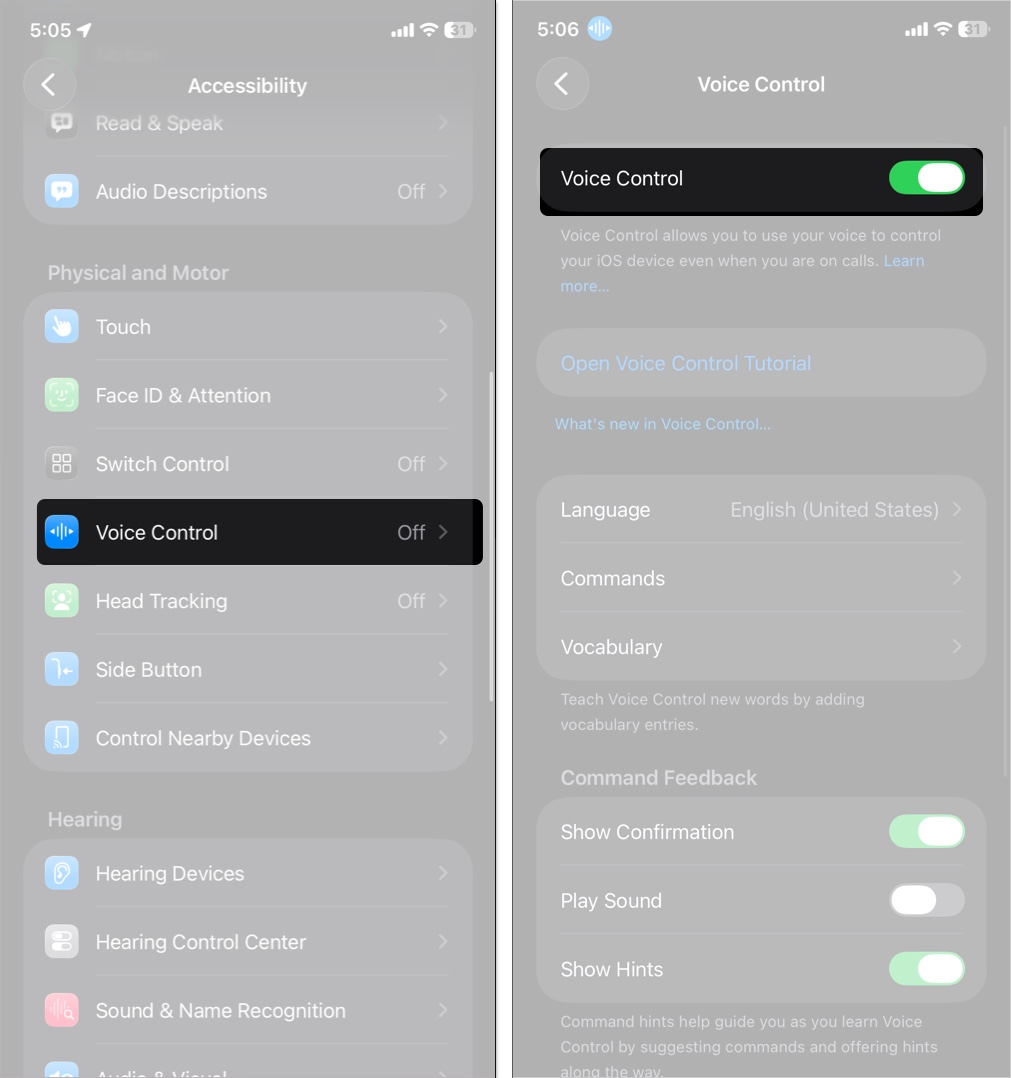
13. Voice Control
Perhaps another lazy feature that the iPhone has added to our lives. Use voice commands for hands-free navigation, dictation, or app control. iOS 26 improves dictation accuracy and spelling support.
Setup Voice Control on your iPhone:
- From Accessibility settings, select Voice Control and toggle it on.
- Follow setup for personalized commands.

iPhone Accessibility Features for Hearing and Sound Disabilities
iOS 26 enhances audio accessibility for people with hearing challenges.
14. Sound & Name Recognition
Get alerts for specific sounds like alarms, sirens, or crying babies. In iOS 26, you can also train your iPhone to recognize names so you can get alerts when those name
is being called.
To activate Sound Recognition:
- Scroll down the Accessibility menu, tap Sound & Name Recognition.
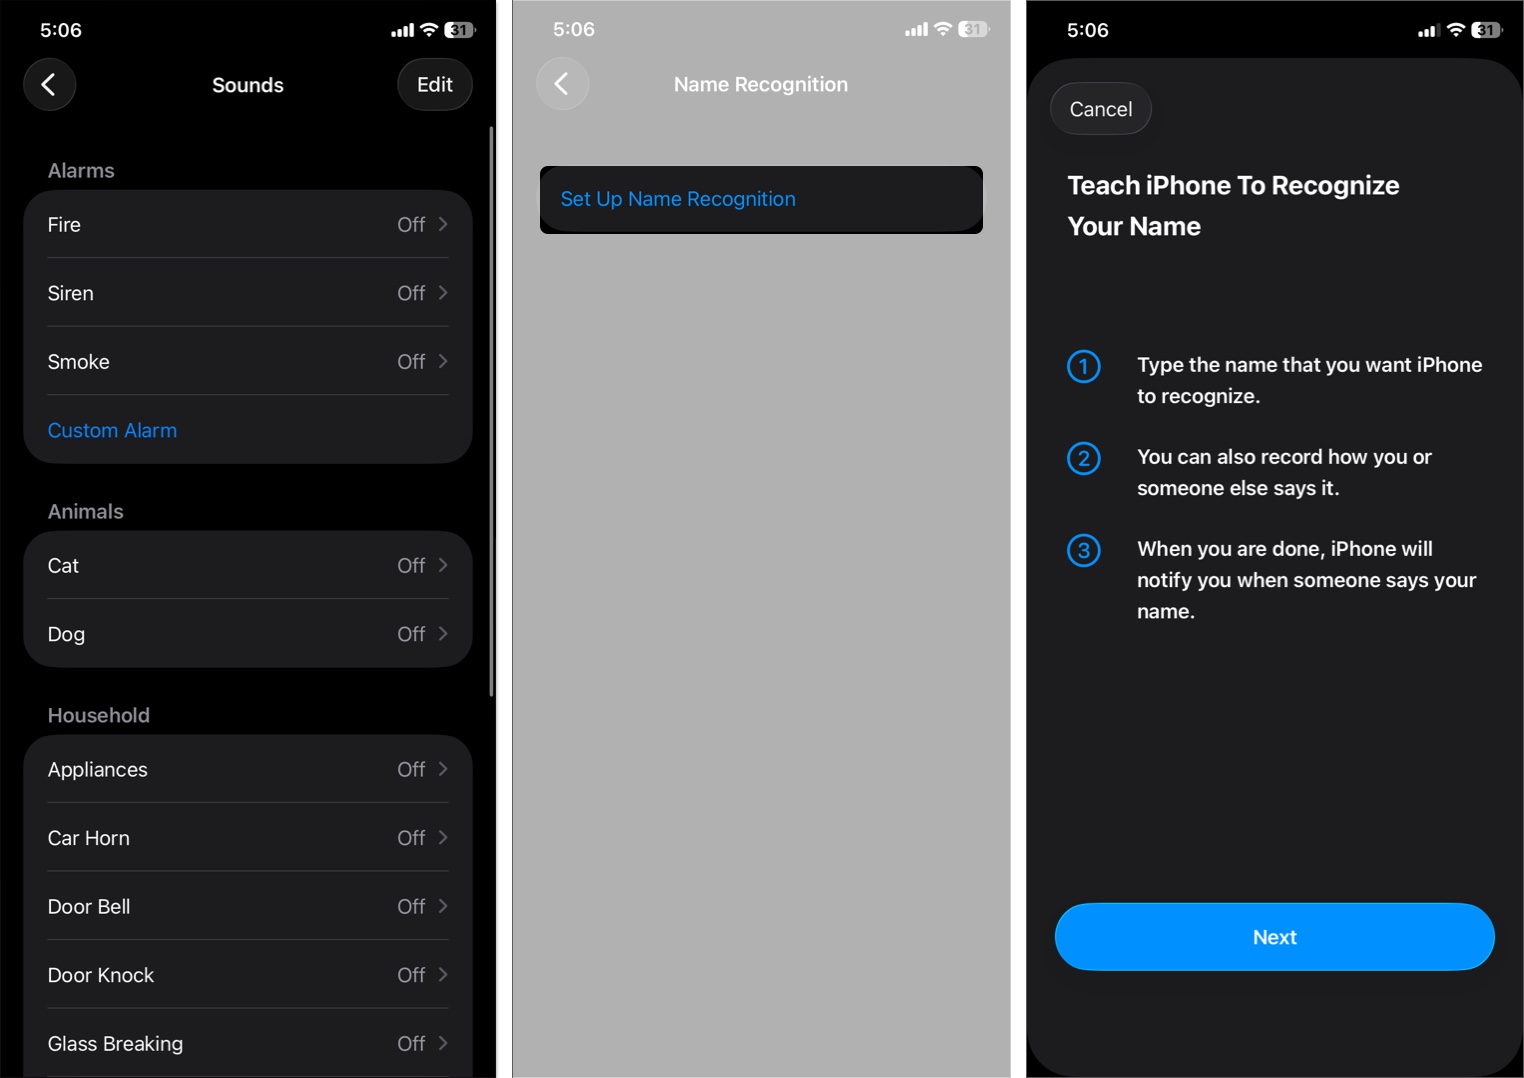
- Select and toggle on Sound Recognition.
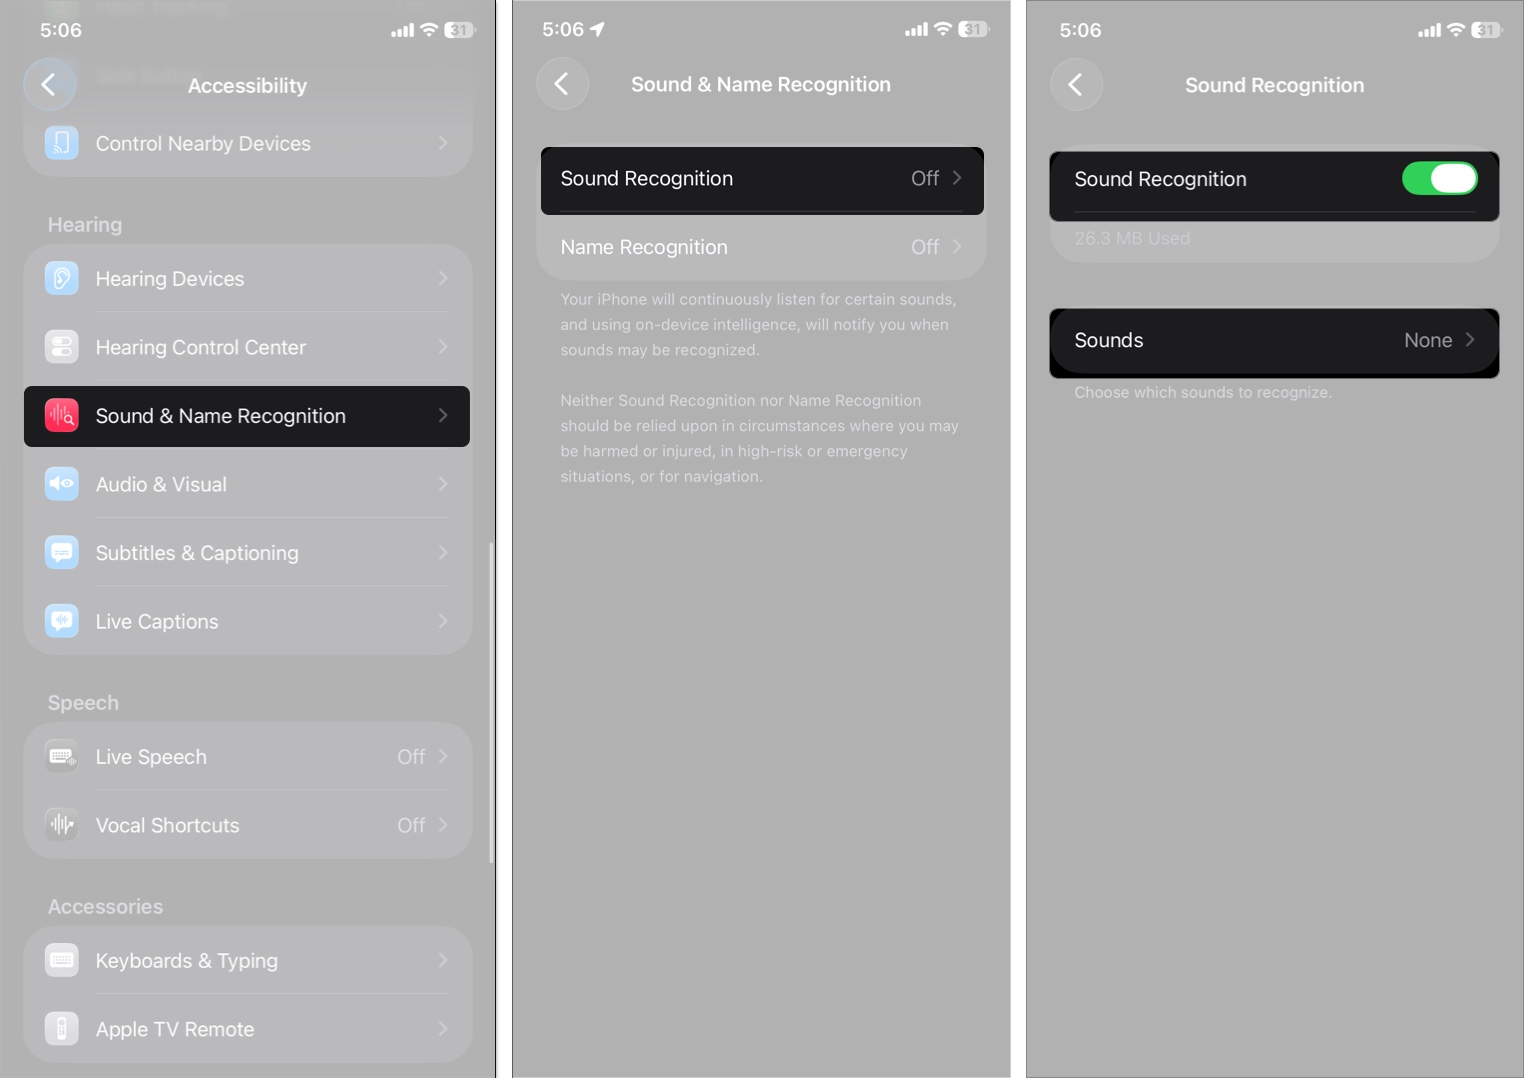
- Tap Sounds to choose which alerts to activate.
- Next, tap Name Recognition and set it up.


15. Music Haptics
Music Haptics is an immersive feature that enhances your music streaming experience by providing tactile feedback that syncs with the type of music playing on your iPhone. In iOS 26, it lets you sync haptics with vocals or full songs, and adjust intensity and textures.
To enable it, go to Settings → Accessibility → Music Haptics and turn it on.
16. Audio/Visual Settings
Adjust sound balance, reduce background noise, and receive headphone notifications. iOS 26 adds audio equalizer presets like Comfort and Focus.
To adjust this setting:
- Access Accessibility → Audio/Visual.
- To play sounds from the left and right speakers, toggle on Mono Audio.
- To reduce background noise while making calls, toggle on Phone Noise Cancellation.
- Toggle on Headphone Notifications to spin up a warning when the earpiece becomes too loud.
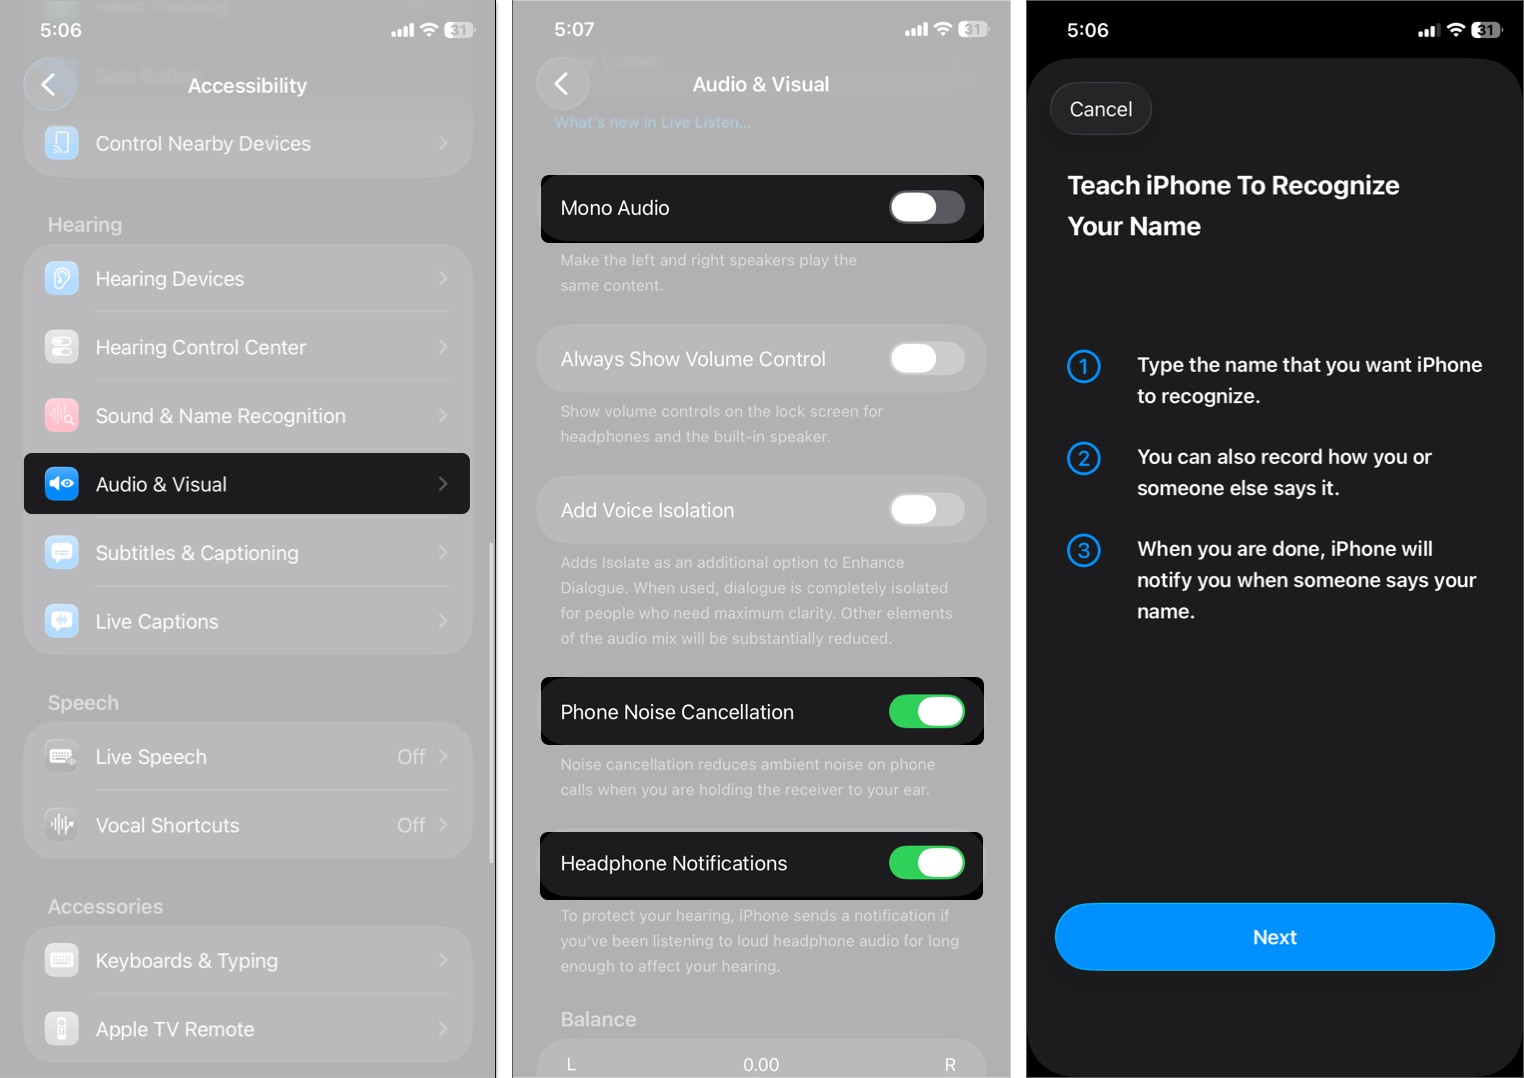
- Choose equalizer presets to enhance clarity.

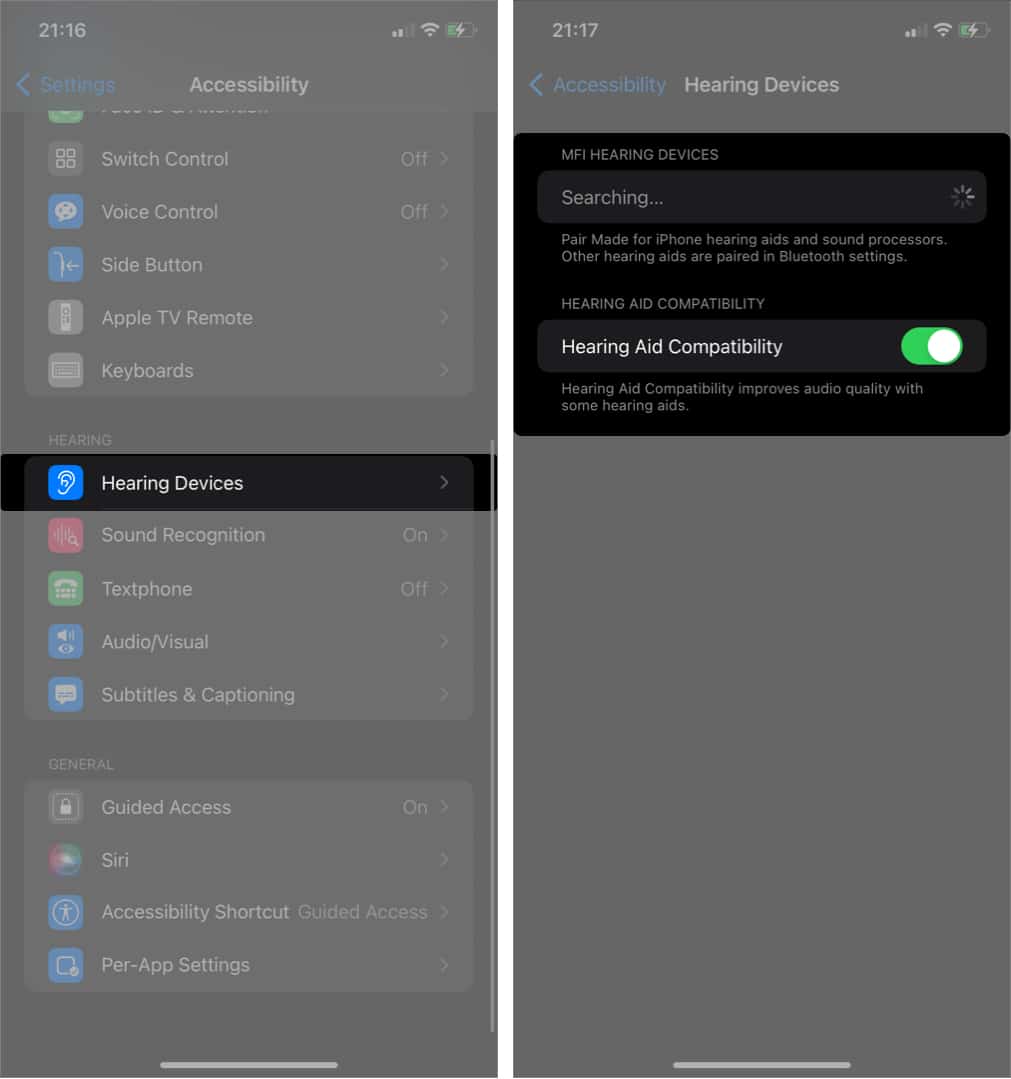
17. Pair Hearing Aids
If you use made-for iPhone hearing aids, you can pair them with your iPhone from the Accessibility menu. When you do so, you can improve sound quality on your iPhone while listening to podcasts, music, or making calls.
To pair a hearing aid on an iPhone:
- Open Settings → Accessibility.
- Scroll down and select Hearing Devices.
- Select your hearing aid device from the result.
- Now, go back and toggle on Hearing Aid Compatibility.

Also read: How to Use AirPods Pro 2 as Hearing Aids
18. Personal Voice
Personal Voice allows users to create a synthesized version of their own voice. This is particularly useful for people who may lose the ability to speak due to medical conditions, ensuring their digital voice sounds natural and personal.
- In Accessibility settings, select Personal Voice.
- Tap Set Up Personal Voice.
- Follow the prompts to record a series of phrases. iOS will generate a synthetic voice that mimics your natural speech.
- Once complete, your Personal Voice can be used with Text-to-Speech, Voice Control, or messaging apps that support speech synthesis.
19. Live Listen with Live Captions
Live Listen amplifies audio from your surroundings through your AirPods or compatible hearing aids. Combined with Live Captions in iOS 26, you can see real-time transcription of conversations, making communication easier for users with hearing difficulties.
To set it up:
- Enable Live Listen: Settings → Accessibility → Hearing Devices → Select your AirPods or hearing aid → Toggle Live Listen on.
- Enable Live Captions: Settings → Accessibility → Live Captions → Toggle on.
- Open Control Center, tap the hearing icon, and select Start Live Listen.
- Conversations will be amplified and transcribed on-screen in real time. You can also adjust caption text size and style in the Live Captions settings.
20. Subtitles & Captioning
iOS 26 provides more control over subtitles and captions, improving readability for videos, streaming content, or live events. You can customize font, size, background color, and even apply transparency adjustments.
- Navigate to Accessibility → Subtitles & Captioning.
- Toggle Closed Captions + SDH on.
- Tap Style to customize it.
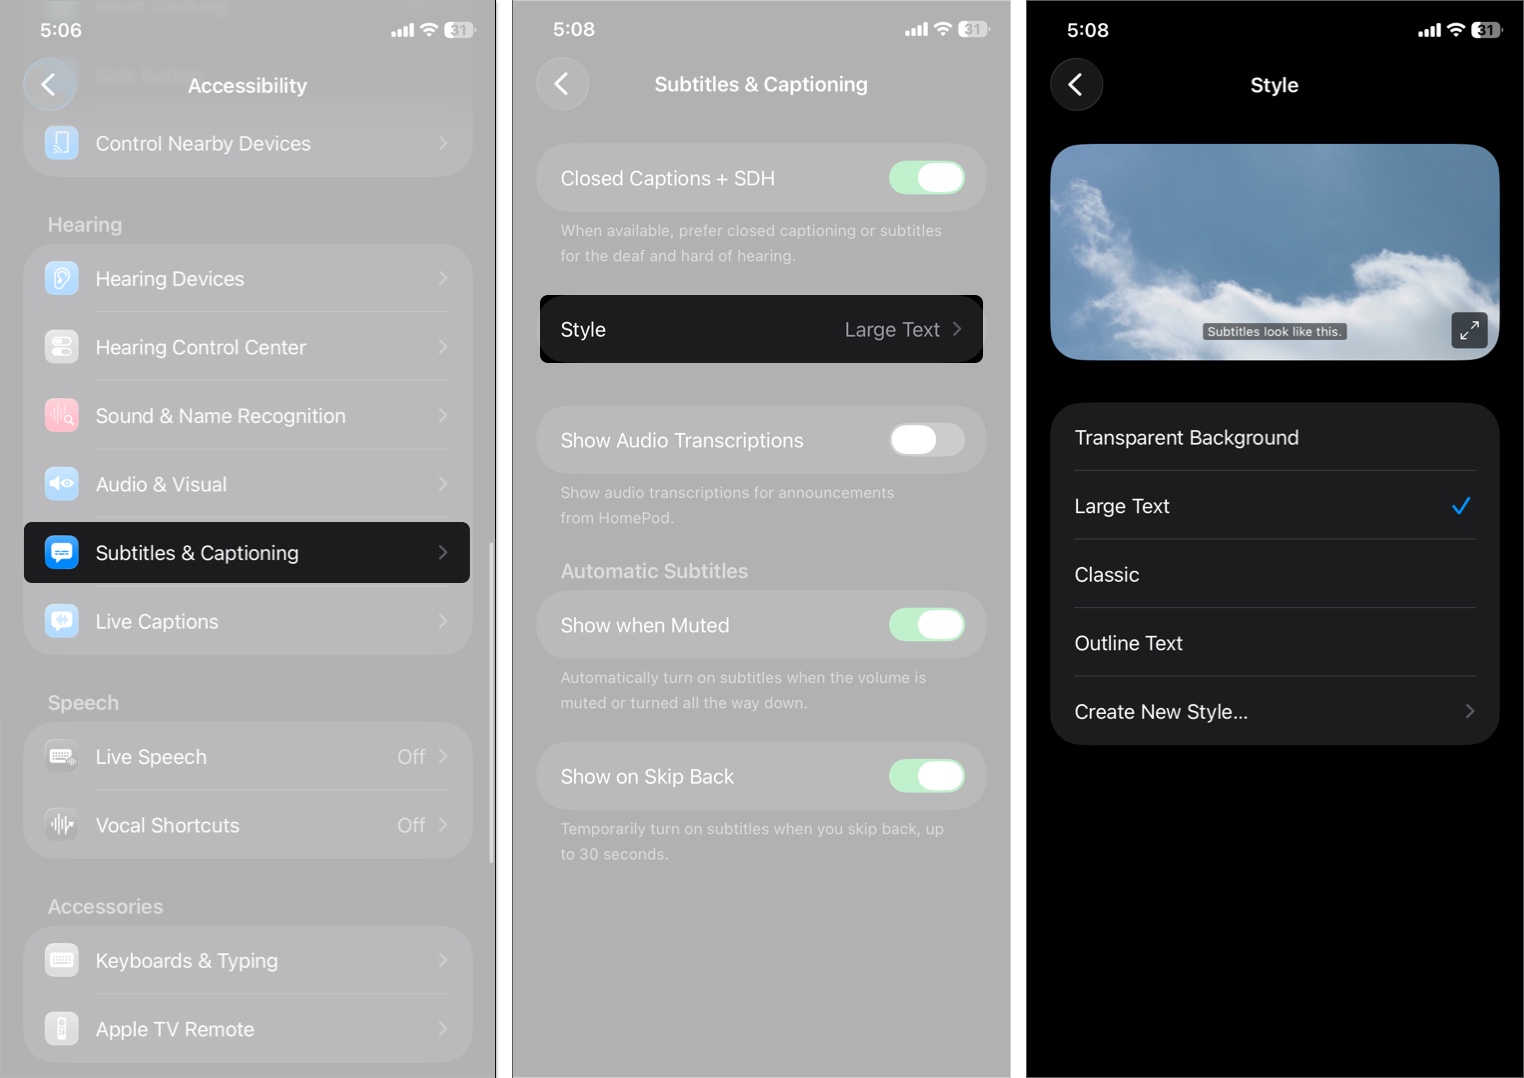
- Changes apply system-wide, including videos in apps like Apple TV, YouTube, or streaming platforms that support captions.

Advanced Accessibility Tools
These features enhance overall usability, privacy, and multitasking.
21. Guided Access
For an added layer of privacy, you can lock your iPhone to a single app when you don’t want others (your kids, for instance) to access other parts of your phone when they’re using a particular feature.
- From Accessibility, tap Guided Access and toggle it on.
- Triple-click the side button to start a session in any app.
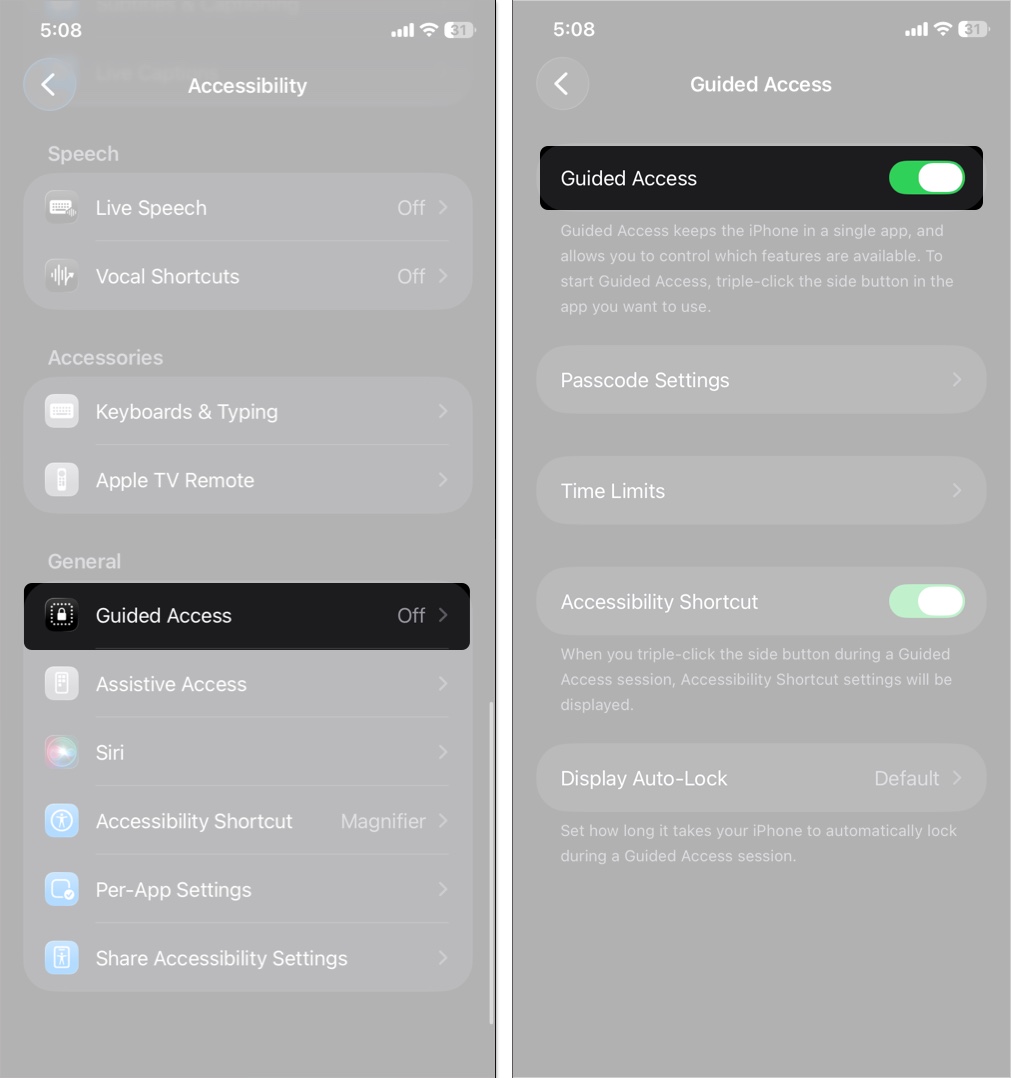

Once activated, all you need to do when your kid is inside an app is freeze your device with your passcode. Want to know more? Here’s a guide on how to use guided access on iPhone and Pad.
22. Share Accessibility Settings
Temporarily share your accessibility setup with another device, useful when lending your iPhone.
To transfer the settings:
- Scroll down the Accessibility settings and select Share Accessibility Settings.
- Tap Share Accessibility Settings and hold your iPhone’s head near another one.
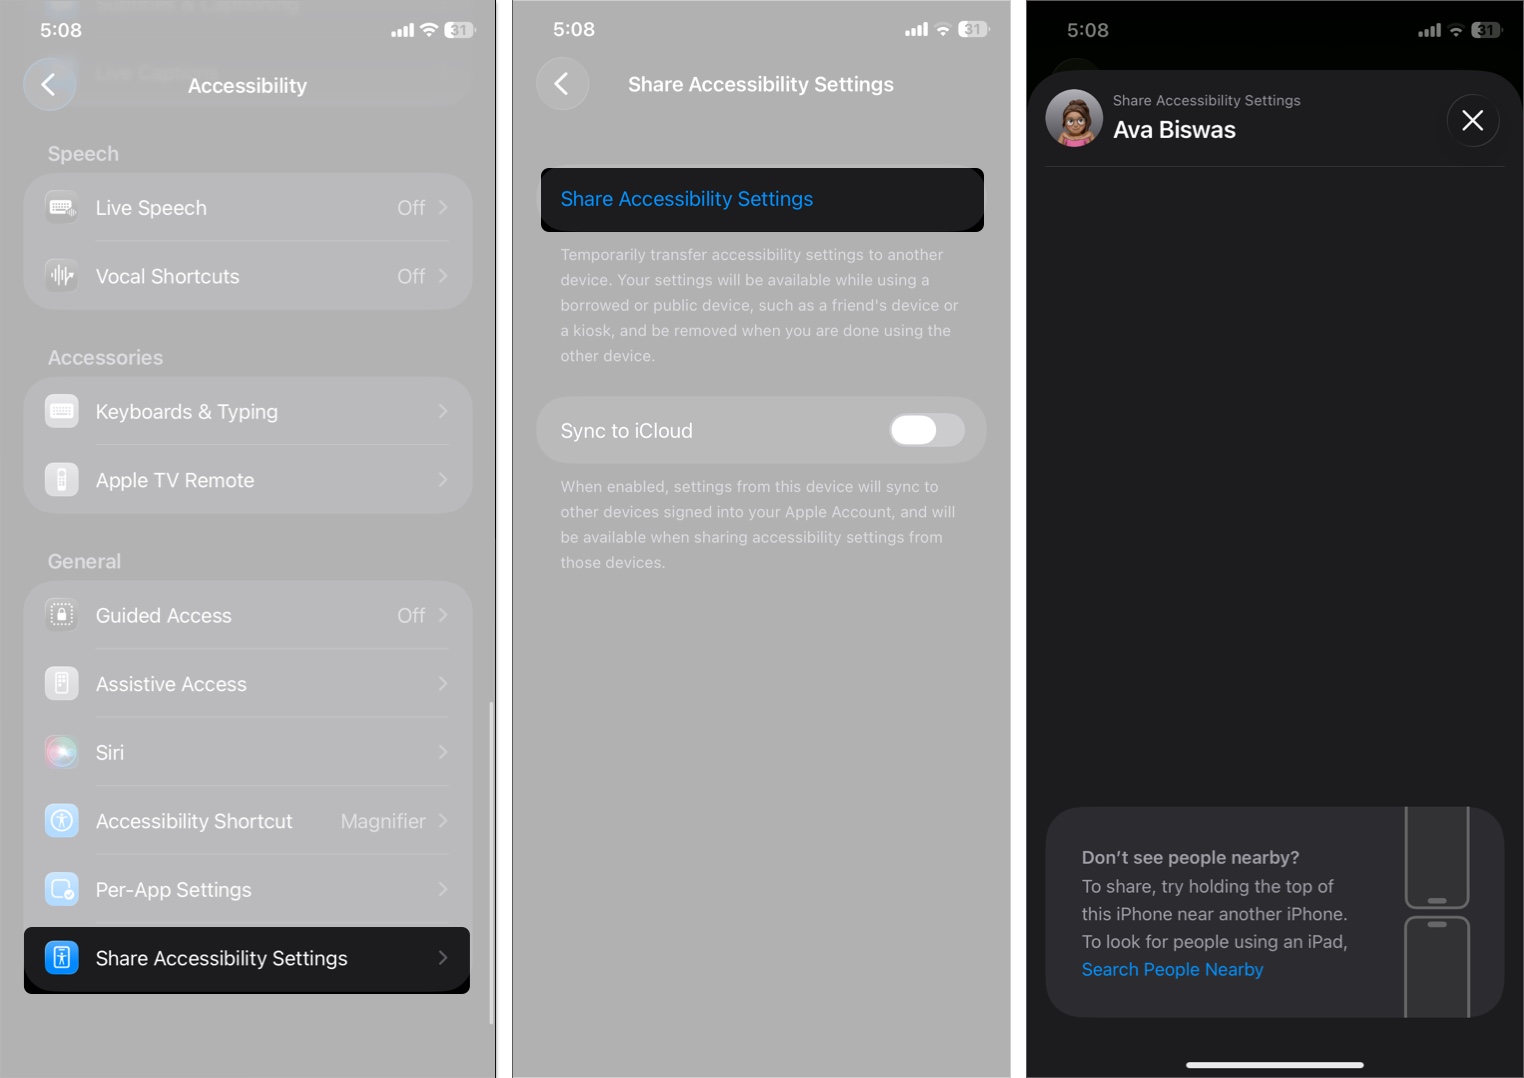
- Follow the steps to share.

23. Per-App Accessibility Settings
If you want visual adjustments only in certain apps rather than across the entire UI, the Per-App Settings in Accessibility can help. This feature allows you to individually customize settings like Bold Text, Increase Contrast, and more on a per-app basis.
- Go to Accessibility → Per-App Settings → Add App.
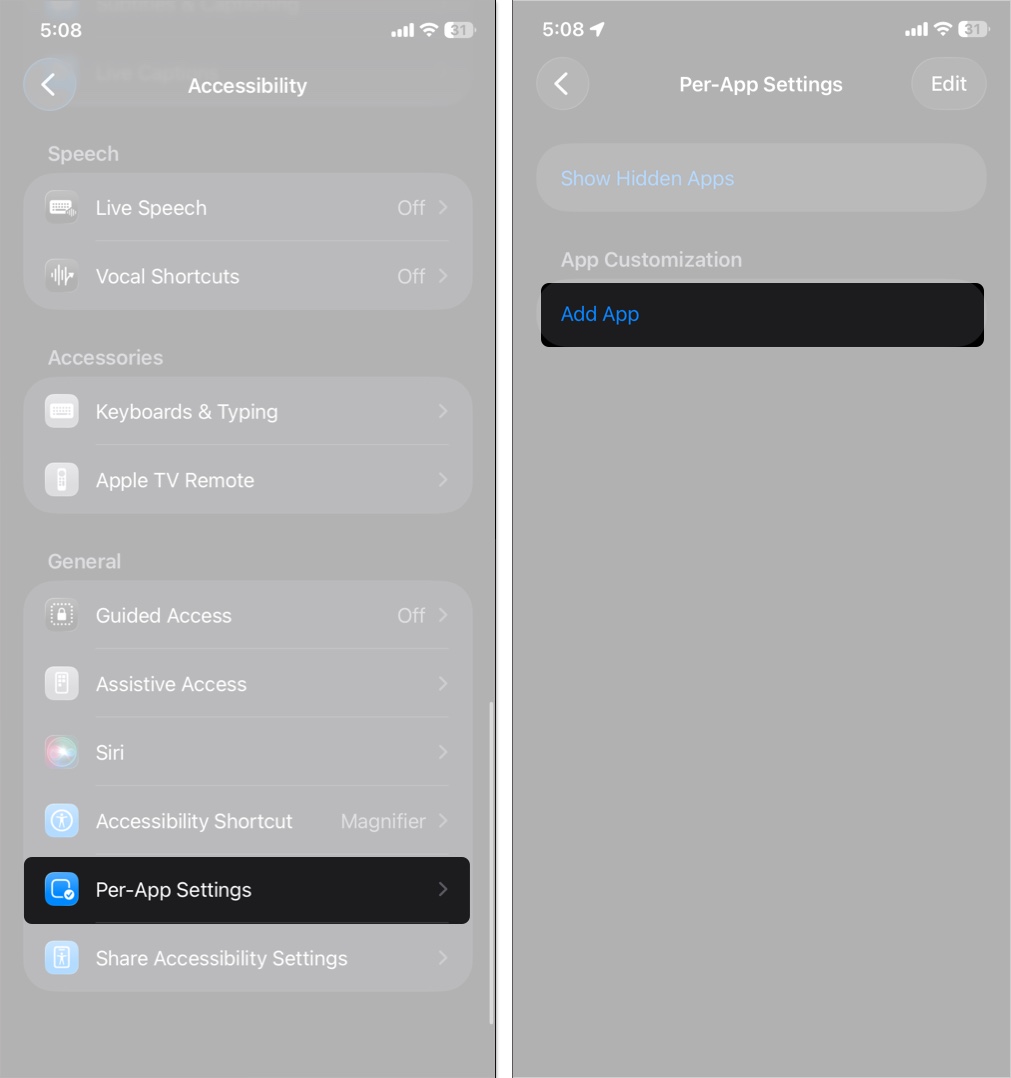
- Select an app and adjust options like Bold Text, Reduce Motion, or Increase Contrast.


24. Accessibility Shortcut
Accessibility shortcuts let you access commonly used gestures whenever you press the side button thrice. To activate:
- Open Settings → Accessibility.
- Scroll down and select Accessibility Shortcut.
- Select an option from the list to activate it when you hit the side button thrice.

Note: When you select many options at a time, the selected options appear in a list when you press the side button thrice. You can then pick one to activate it.

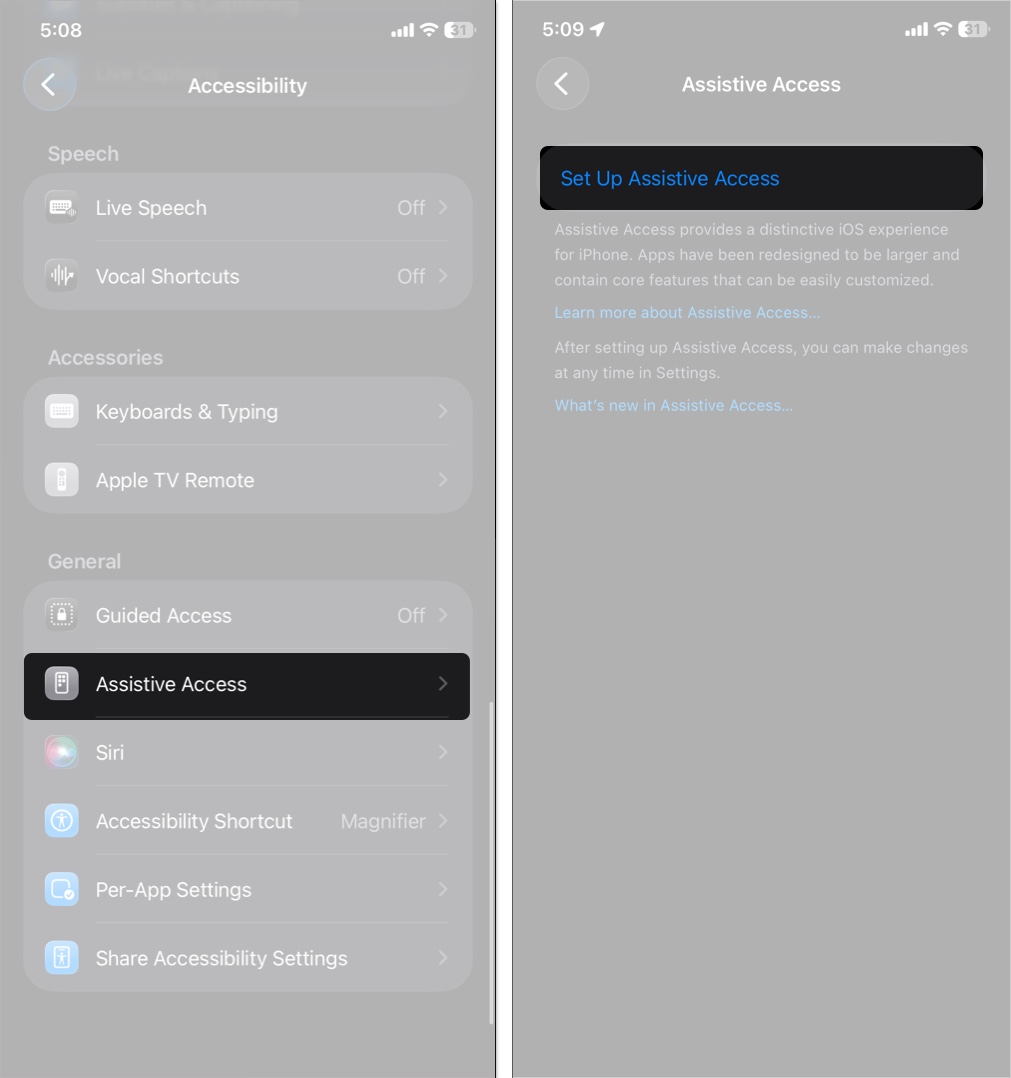
25. Assistive Access
Assistive Access offers a simplified iPhone experience with large buttons, clear text, and streamlined apps. It’s made for users with cognitive challenges, seniors, or anyone who prefers a clutter-free interface.
To use Assistive Access on iPhone:
- From Accessibility settings, select Assistive Access.
- Tap Set Up Assistive Access.
- Choose which apps to include (Phone, Messages, Camera, Music, etc.) and select your preferred layout between Grid or List.
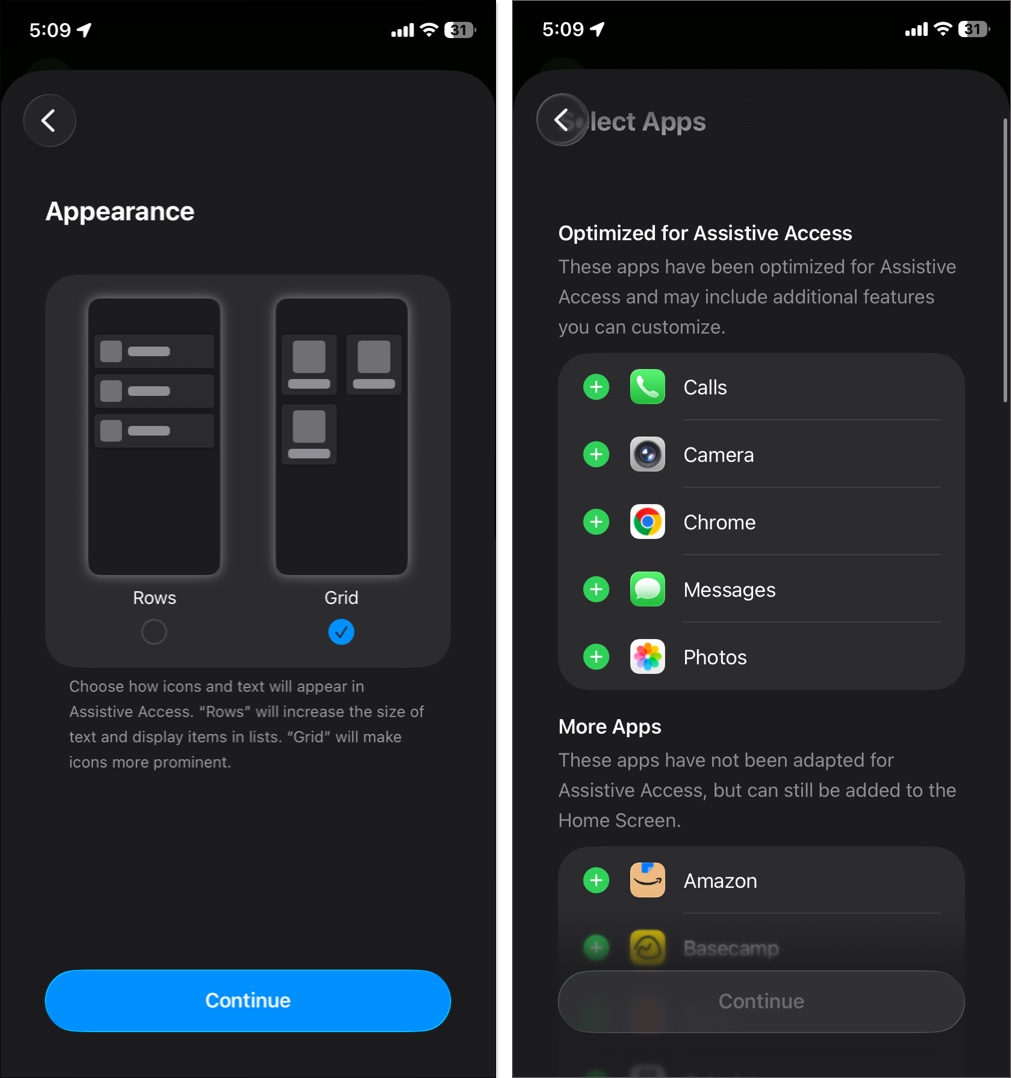


Once enabled, the iPhone switches to a clean, easy-to-use layout focused on just what matters most.
Wrapping Up
Accessibility in iOS 26 is smarter, more intuitive, and more inclusive than ever. From visual enhancements to hearing improvements and hands-free control, Apple continues to make the iPhone a device anyone can enjoy.
Take a few minutes to explore these features, and let me know which ones made your daily usage more enjoyable!
Read more:
