How to Share and Collaborate in Apple Notes on iPhone and Mac
Learn simple steps to share notes, manage permissions, and collaborate in real time on your Apple devices.
If you’re like me, the Notes app has probably become your go-to spot for everything from grocery lists to big project ideas. But did you know it’s also fantastic for teamwork? You can share a note or entire note folders with friends, family, or coworkers, and everyone can edit them in real time from their Apple devices.
This guide covers how to collaborate in the Notes app on iPhone, iPad, and Mac, manage shared folders and permissions and provides troubleshooting tips. So, let’s get started!
Requirements for Apple Notes Collaboration
- The note or folder must be stored in iCloud (not on My iPhone/Mac or third-party accounts like Gmail).
- Everyone involved needs to be signed in to their Apple Account and have Notes enabled in iCloud (Settings > [your name] > iCloud > Notes > Sync this iPhone).
- All participants should be on a recent OS version.
- Up to 100 people can collaborate on a single note or folder.
- You cannot collaborate on locked notes, password-protected notes, or locked PDF attachments.
- Collaboration only works between Apple devices (iPhone, iPad, Mac, or iCloud.com). No Android or Windows native support.
Send a Copy vs Collaborate: What’s the Difference
When you tap the share button, you’ll see two main options:
| Option | What Happens | Best For |
|---|---|---|
| Send Copy | Sends a one-time read-only copy via Mail, Messages, etc. Recipient won’t see future edits unless you send another copy. | Sharing something static like a finished draft. |
| Collaborate | Sends a one-time read-only copy via Mail, Messages, etc. The recipient won’t see future edits unless you send another copy. | Group projects, shared shopping lists, trip planning, family notes, etc. |
For folders, you can only collaborate; no “send copy” option. Also, the owner can choose whether only invited people can make changes, or whether anyone with the link can.
How to Share Notes on iPhone, iPad, and Mac
Here are the steps to collaborate on the Notes app:
On iPhone and iPad
- Open the Notes app and go to the home page.
- Select All iCloud and open the note you want to share (or tap the pen icon to create one). To share a note folder, select it from the iCloud section.
- Tap the Share button at the top right corner.
- Choose Collaborate from the dropdown under the note name.
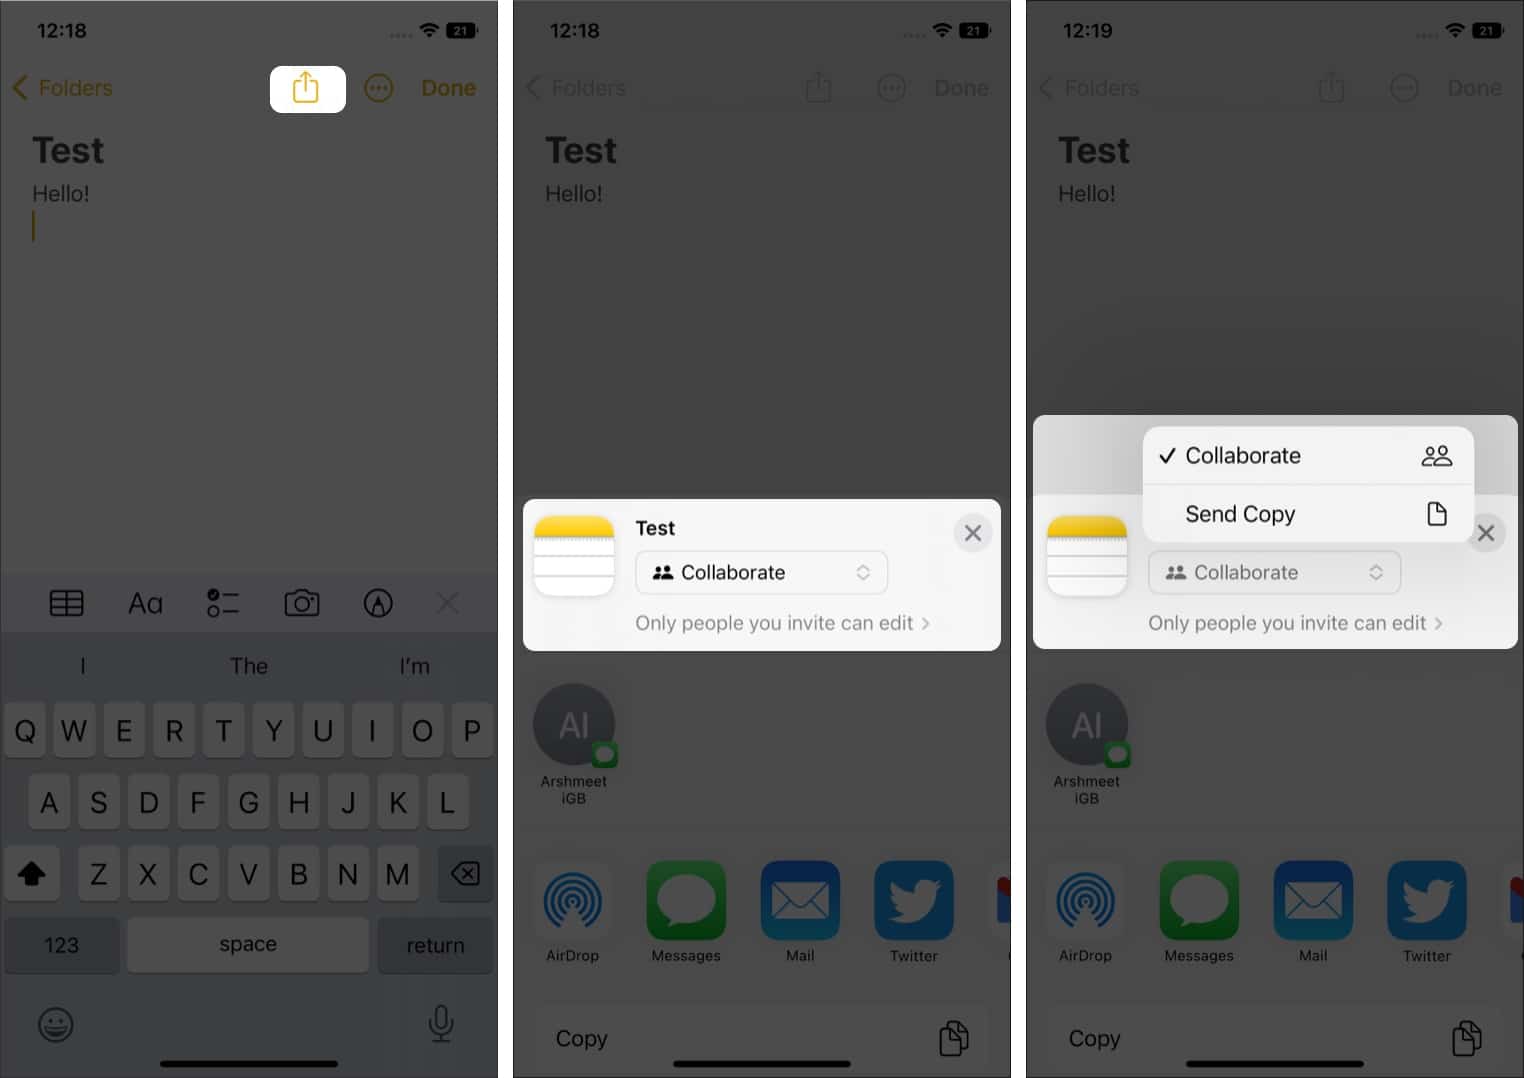
- Now set your options:
- Who can access: Only invited people (better for privacy) or Anyone with the link.
- Permission: Can make changes (full editing, add photos, checklists, subfolders, etc.) or View only (they can read but not edit).
- Toggle on Allow others to invite if you want your collaborators to add more people.
- Tap the checkmark to save your choices.
- Pick how to send the invitation: Messages, Mail, or Invite with Link.
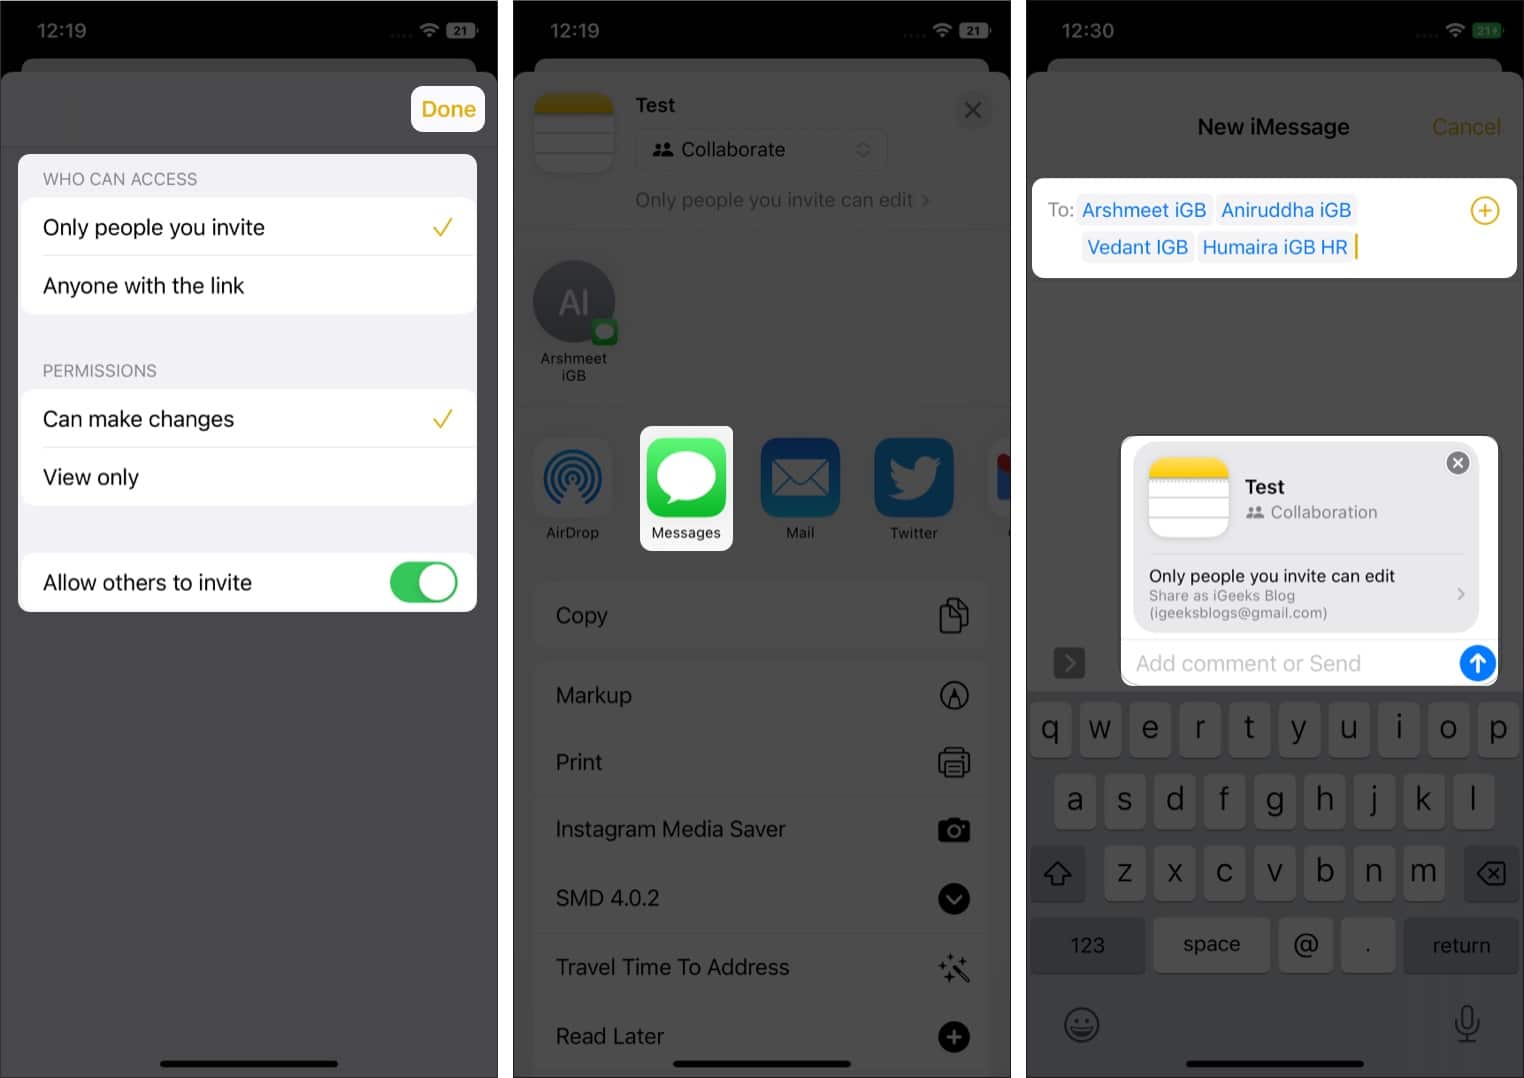


That’s it! You can now start writing or editing the shared note. It remains end-to-end encrypted thanks to iCloud syncing.
Note:
On Mac
- Launch the Notes app and select the note.
- Click the Share button in the note toolbar (or Control-click on the note folder in the sidebar and select Share Folder).
- Now, choose Collaborate, and set the Who can access and Permissions (same options as iPhone).
- Send the invite via Messages, Mail, or Invite with Link.
Real-Time Collaboration Features in Apple Notes
Once it’s shared, the magic happens:
- Live edits: See everyone’s cursor and changes instantly (colored by person).
- Activity updates: If shared via Messages, you’ll get little banners in the chat, like “Sarah added a photo,” tap to jump right to the note.
- Highlights & Activity view: Tap/click the people icon to see the latest changes under Latest Updates.
- Mentions: Type @ + their name to notify someone (they get a push notification). Great for “Hey @Mom, can you add the milk?”
- Unread dot: A yellow dot appears next to the note if something changed while you were away.
With so many built-in features, the Notes app emerges as a good project management tool for basic tasks.
How to Manage Shared Notes and Folders
Once you’ve shared the file with all the members added, a new people icon with a checkmark will appear beside the Share icon at the top right.
- Open the shared note and tap/click the people icon. For the shared folder, tap the three-dot icon for additional options.
- To send a message in the group chat, tap Message. You can also make an audio or video call.
- All the new changes will be visible under the Latest Updates tab. Select Show Updates to
- Under Current Participants, you will see the active collaborators who are editing or viewing this note.
- To view the changes made to the file, tap Show All Activity. You can see the exact time when a user made edits to the file.
- To view the changes made by different users, tap Show Highlights. The Notes app will highlight the edits made by different users by assigning a particular color to each user and their edits.
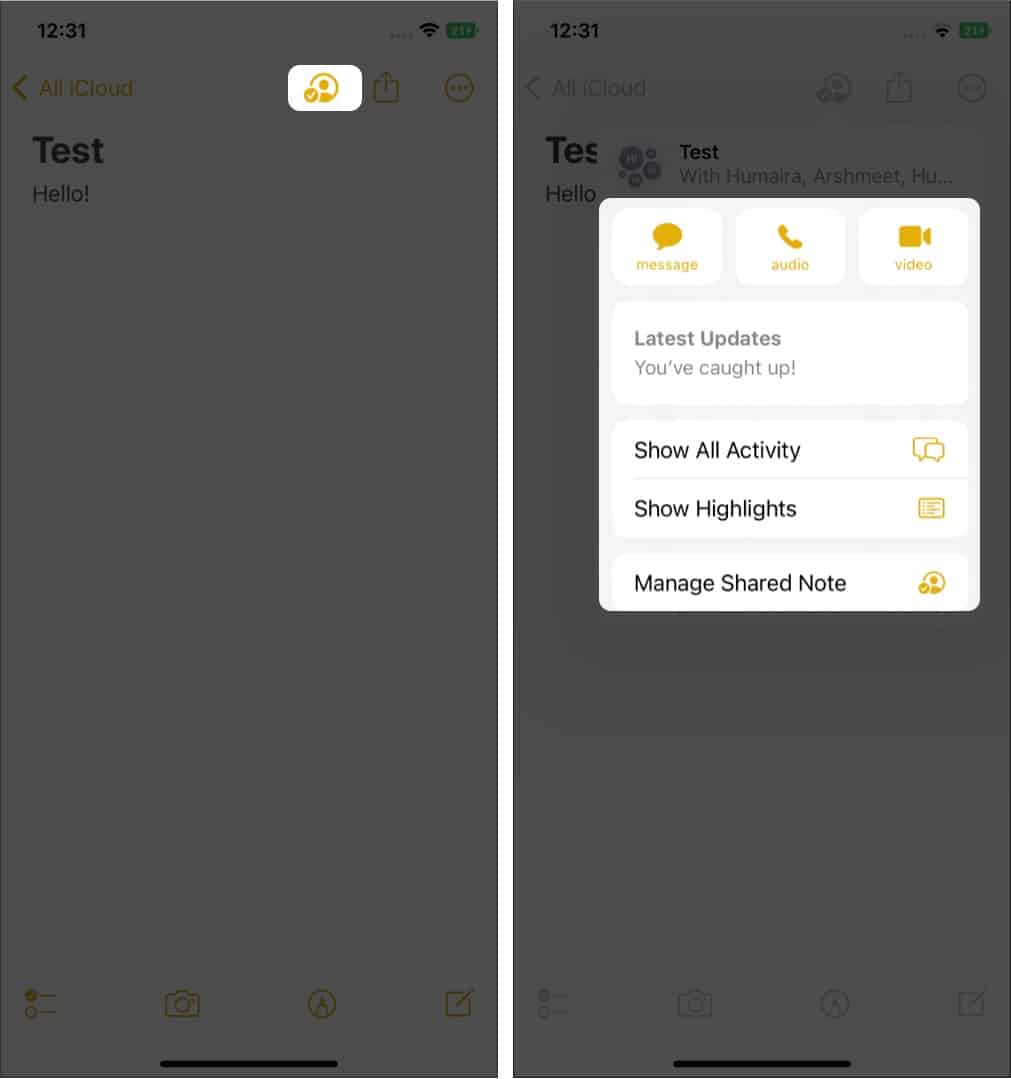
- In the Manage Shared Note option, you can view all the users invited to the Note and change permissions for individual users. You can also Hide Alerts, change the Share Options, and copy an invite link to the note.

Stop Sharing or Remove Access in Apple Notes
- To remove access of a user added/invited to a shared note, tap Manage Shared Note > Tap the name of the user > Scroll down and tap Remove Access and confirm your choice.
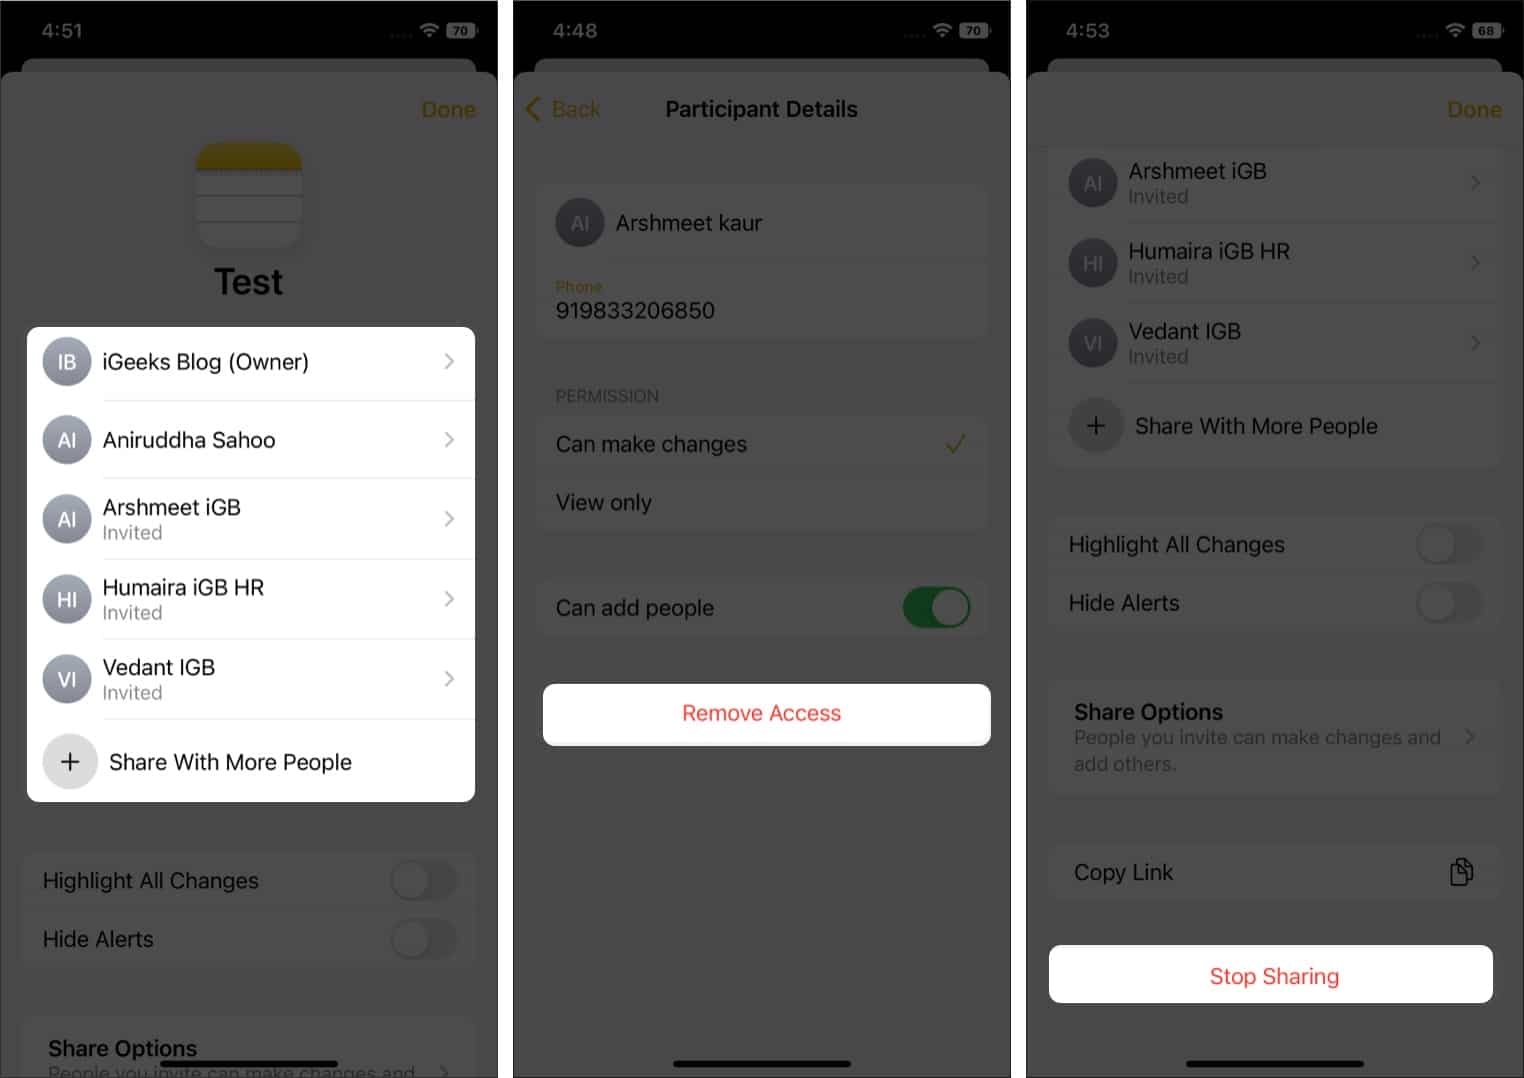
- If the purpose of the shared note is served and no longer needed, go to Manage Shared Note, select Stop Sharing, and tap Stop Sharing on the pop-up.

How to Accept a Shared Note Invitation
When you get a shared note link in Messages or Mail:
- Tap Open or Join on the banner.
- It adds the note/folder to your iCloud Shared section in Notes.
- If the link opens in a non-Apple app, it might open in Safari. Sign in to iCloud.com to view/edit.
Apple Notes Collaboration Not Working? Try These Fixes
If note collaboration isn’t working, try these checks:
| Problem | Fix |
|---|---|
| “Share” option is grayed out | Move the note to iCloud, unlock it if locked, or update iOS/macOS. Also, your iCloud should have enough storage. |
| Person can’t edit | Check permissions and make sure it’s set to “Can make changes,” and that they’re signed in to their Apple Account. |
| Changes not showing up | Force quit & reopen Notes or check internet connection. |
| Want to leave a shared note | Open the note > People icon > Manage > Leave Shared Note. |
Additionally, you can’t share a folder that has been shared with you. If problems persist, you can contact Apple Support for expert assistance.
Advanced Apple Notes Collaboration Tips
- You can pin important shared notes to the top of your list.
- Organize the notes in shared folders using tags.
- If you stop sharing, the note disappears from everybody else’s devices, but they keep a copy if they duplicated it.
- Use Invite with Link for flexible sharing; however, be sure to double-check access permissions.
- Enable two-factor authentication and iCloud Keychain to see others’ edits immediately, and color-coded triangles show where others are working in the note.
Have Fun Collaboration!
Sharing and collaborating in the Notes app on your iPhone, iPad, or Mac is incredibly straightforward. With just a few taps, you can work together, stay organized, and keep everyone on the same page. Once you start using it for group lists or work brainstorms, you’ll wonder how you lived without it.
Have you tried this feature yet? Let me know your thoughts in the comments below!
Topics

Written by
Ava BiswasAva is a die-hard Apple aficionado and seasoned writer with a knack for breaking down complex tech concepts into easily digestible content. Having honed her writing and editing skills over 4 years at renowned media houses like TechBurner, Ava crafts informative and engaging articles including troubleshooting guides, product reviews, editorials at iGeeksBlog. When not typing, you can find her exploring the latest Apple releases or pondering the future of tech innovation.
View all posts →More from How-to

Apple Watch Not Responding? 8 Fixes That Actually Work
Is your Apple Watch unresponsive or stuck on a black screen? Here are 8 proven fixes to help you unfreeze it and get it working again quickly.

How to Block or Unblock Someone on WhatsApp
Want to stop someone from messaging you on WhatsApp? Here’s a simple guide to block or unblock contacts on iPhone, Android, and Web.

How to Mirror Your Apple Watch on Your iPhone: A Simple Guide
Want to control your Apple Watch using your iPhone? This guide explains how to turn on Apple Watch Mirroring, use it easily, and fix common issues.