How to Use Google Maps Offline on iPhone and Android
Traveling without internet? Learn how to download and use Google Maps offline on iPhone and Android to save data and navigate anywhere with ease.
- Offline Map Download Benefits: Downloading Google Maps offline lets you navigate without internet, saves mobile data, and ensures access in rural or poor-signal areas.
- Limitations of Offline Maps: Offline maps on Google Maps don’t show live traffic, rerouting, public transit info, or biking directions, and only cover downloaded regions.
- Downloading Offline Maps on iPhone and Android: Open Google Maps, search a location, select the region, tap Download, with Android users able to save maps to an SD card.
- Managing Offline Maps: Use auto-update for freshness, manually update before trips, and delete unused maps regularly to reclaim storage space.
- Troubleshooting & Alternatives: Fix offline map issues by checking storage, cache, or updates; alternatives include Apple Maps, HERE WeGo, Maps.Me, and OsmAnd.
When you’re traveling or hiking in remote areas, that’s exactly when you need directions the most, but patchy mobile data often ruins the moment. Thankfully, Google Maps lets you download maps and use them offline. This not only saves you from getting stranded without signal but also helps cut down on data usage, especially when roaming internationally.
In this guide, I’ll show you how to download and use Google Maps offline on iPhone and Android so you’ll never get lost, even without the internet.
Why Use Google Maps Offline?
Depending on your cellular network isn’t always practical. By downloading offline maps before heading out, you’re ready for the unexpected.
Benefits of offline Google Maps:
- Navigate without internet or mobile data (perfect for international trips).
- Save mobile data while roaming, download once over Wi-Fi, and you’re set.
- Works in rural areas, subway systems, or basements where signals fail.
Limitations to keep in mind:
- No live traffic updates or reroute suggestions.
- Limited to pre-downloaded areas.
- No offline transit, biking, or walking directions, mainly for driving.
- Not available everywhere due to address formats or regional restrictions.
How to Download Google Maps Offline on iPhone
Make sure you’re signed in to your Google account and connected to Wi-Fi.
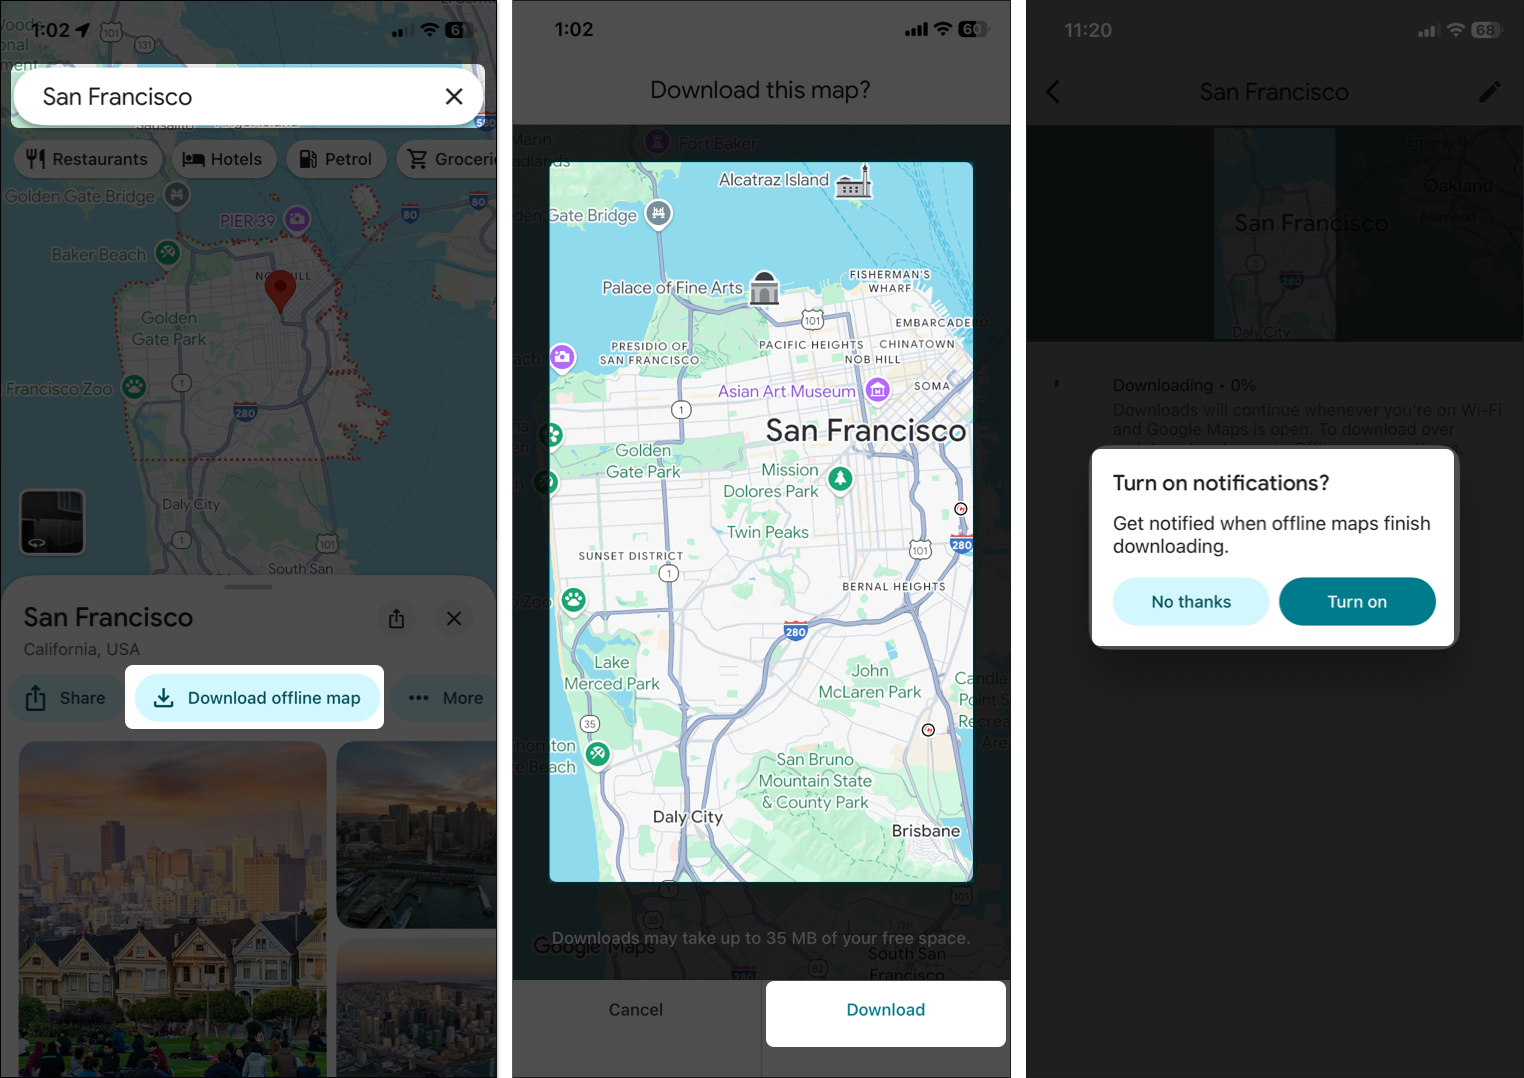
- Open the Google Maps app on your iPhone.
- Search for the place or city you want to download, like California.
- Tap the name or address at the bottom of the screen to pull up details.
- Swipe left on the toolbar below the place name and select Download offline map from there.
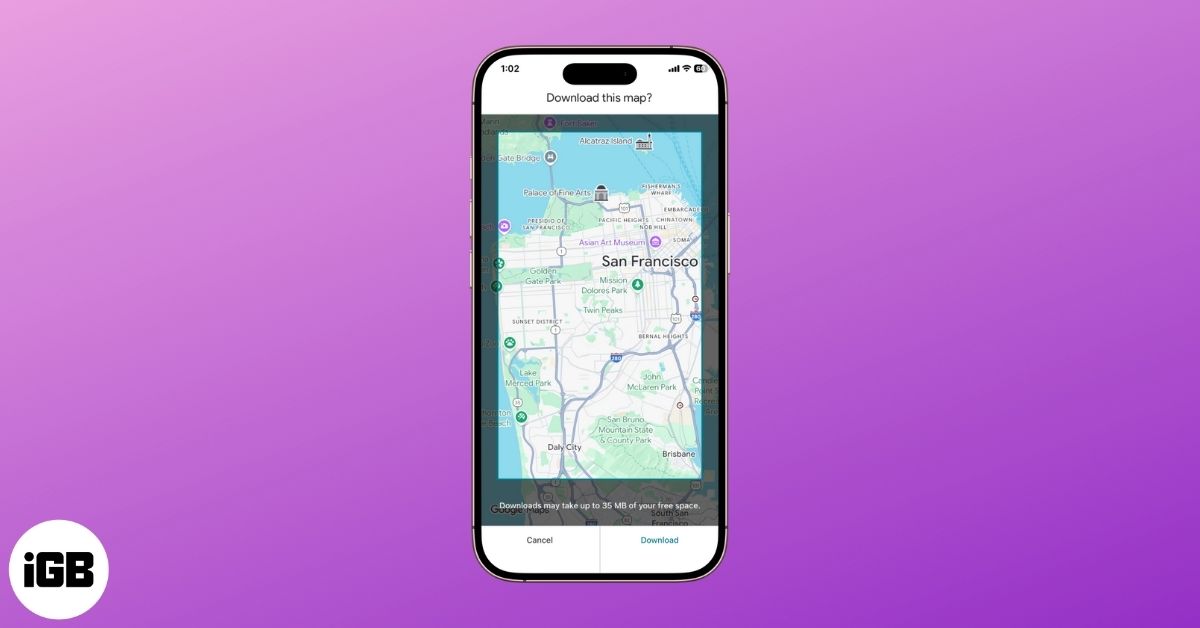
- Adjust the map area by pinching to zoom or dragging the blue rectangle to cover what you need. Google will show you the estimated storage size.
- Tap Download and wait for it to finish.
- Select Turn on if you want to get a notification when the download is completed.
You can repeat the process for multiple areas if needed.
How to Download Google Maps Offline on Android
The steps are nearly identical, with extra perks like saving maps to an SD card.
- Launch the Google Maps app on your Android phone.
- Search for your destination, such as San Francisco or a specific address.
- Tap the place name at the bottom.
- Swipe left, tap the More (three dots) button and choose Download offline map.
- Zoom and drag to customize the download area. Google estimates the size right there.
- Tap Download and let it load over Wi-Fi.
Save Offline Maps to SD Card
Offline maps can take up space, but Android allows you to move downloads to an SD card to conserve storage. Ensure you’re running Android 6.0 or higher and have an SD card installed as portable storage.
Now, tap your profile icon, select Offline maps, tap the Settings icon > Storage preferences, and pick SD card.
Customize Download Settings
Google is known for its heavy customization options, and Maps is no different. You can select your own offline map location and save it even without Wi-Fi. Here’s how:
Choose Download Area Manually
If you want more control, Google Maps lets you customize the map size. It comes in handy if you need a bigger region.
In the Google Maps app, tap your profile picture in the top right, go to Offline maps, and tap on Select your own map. Now, you can select the area manually and hit Download.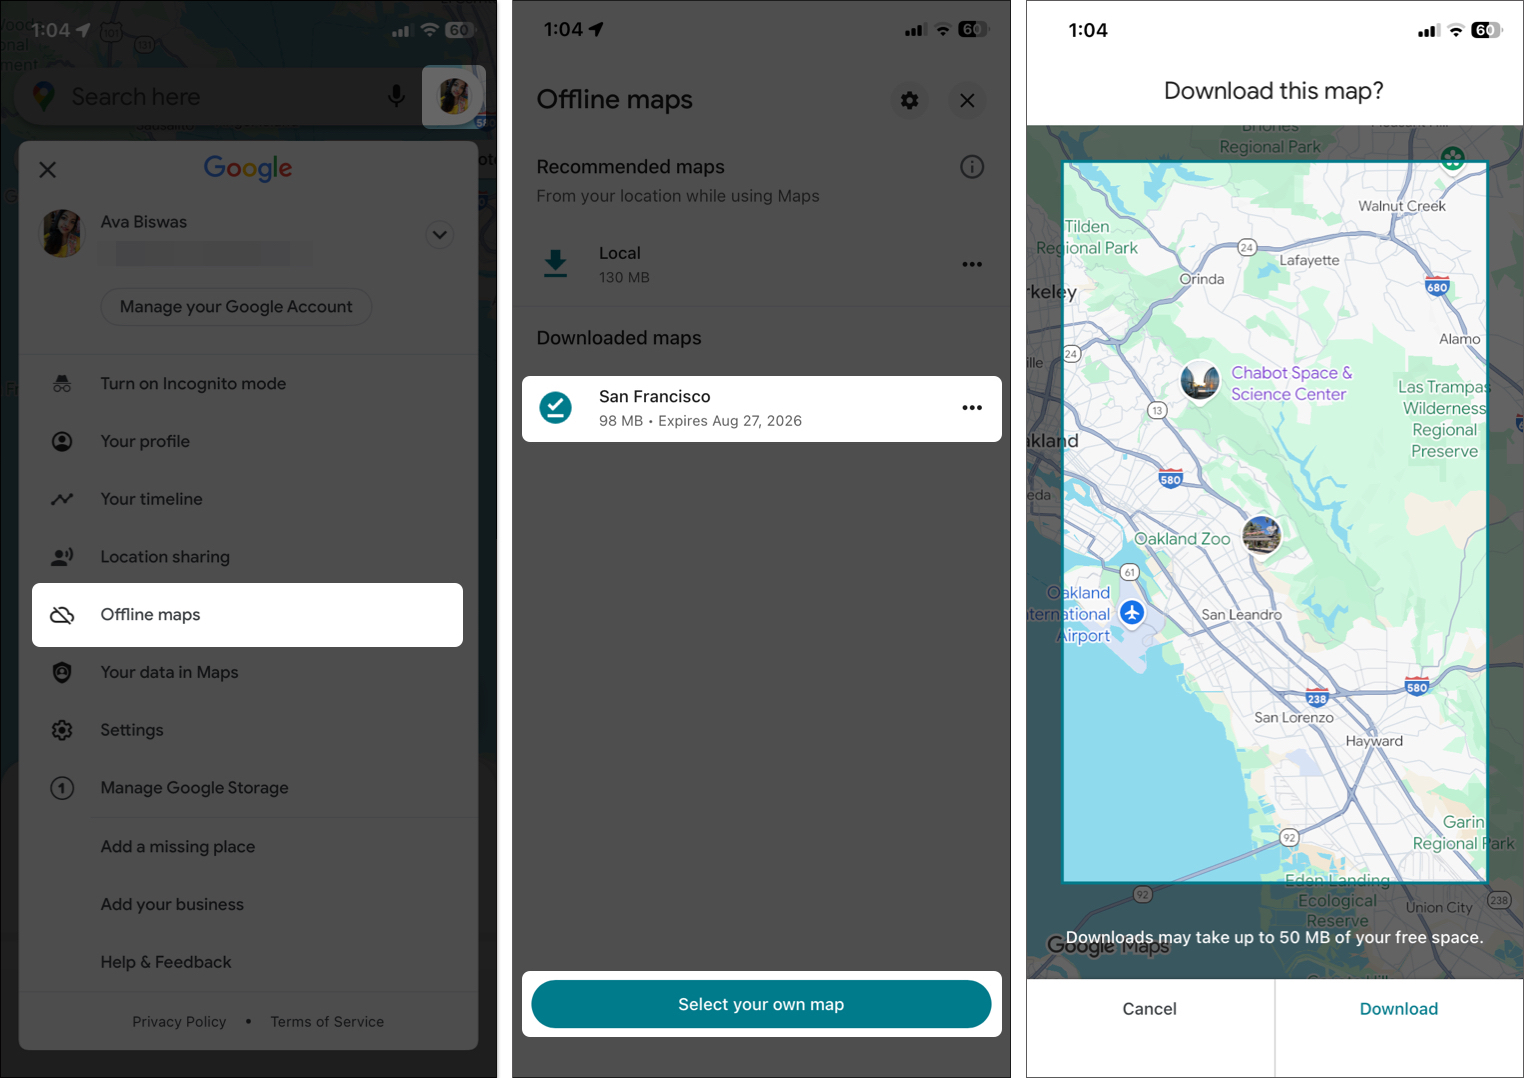
Download over Cellular Data
By default, the app uses Wi-Fi to download maps. But if you’re out of range, you can choose to use your cellular data.
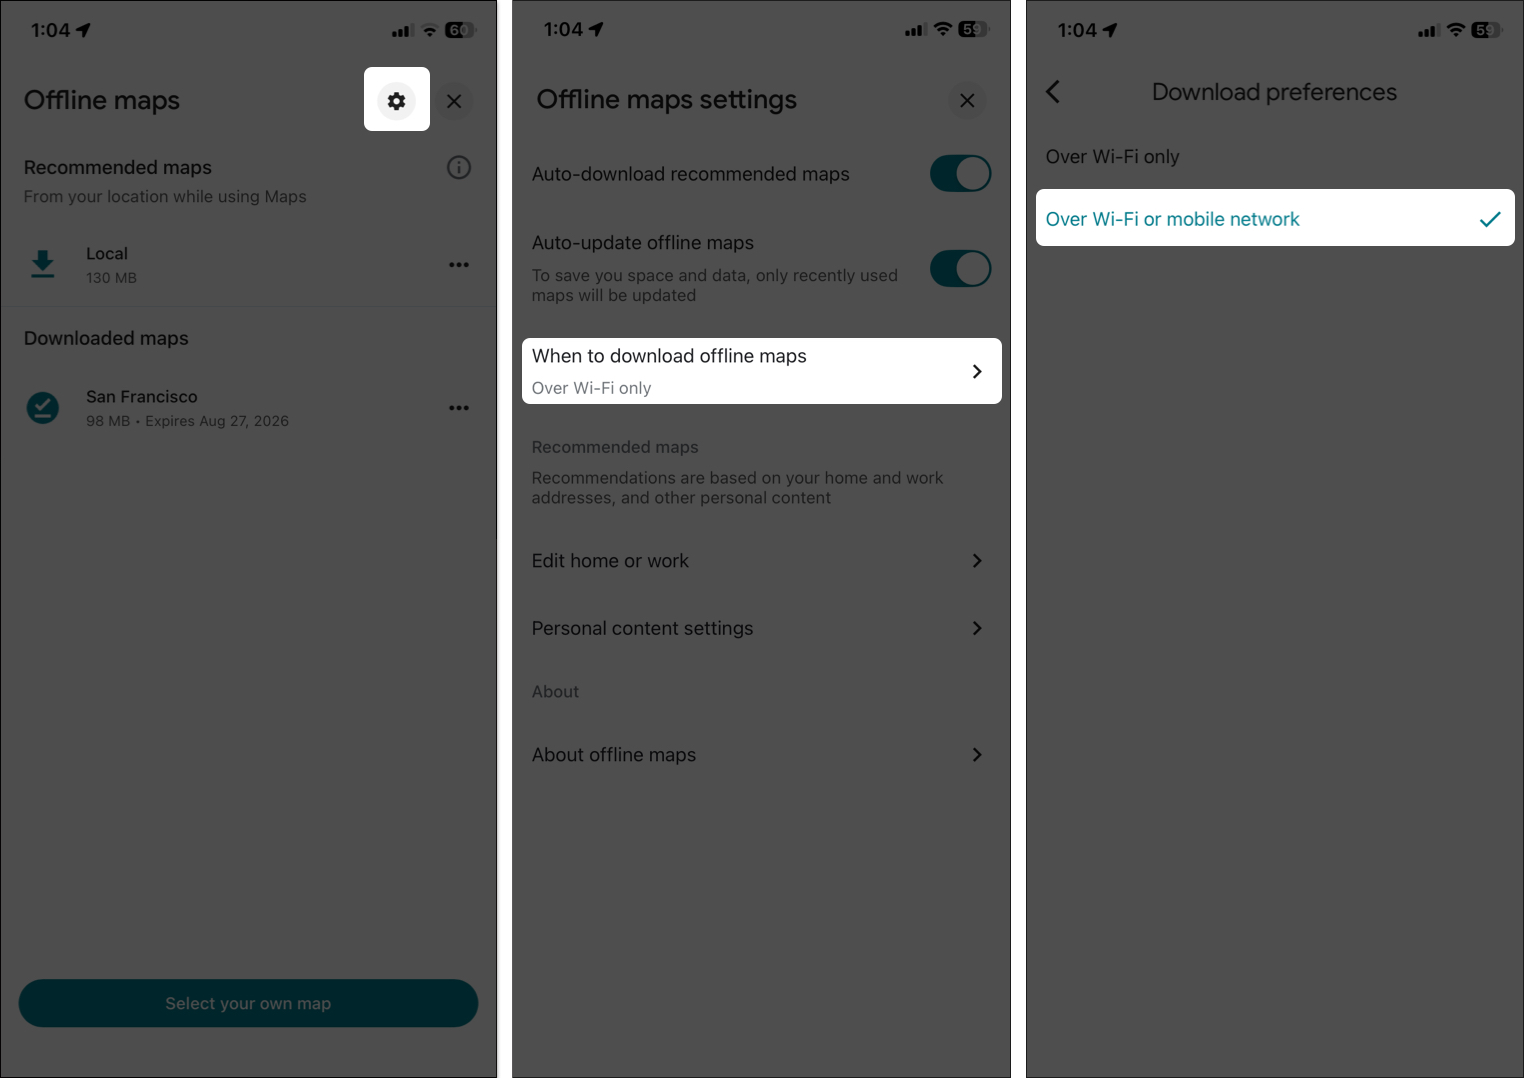
- Head to your profile > Offline maps > Settings gear at the top.
- Select When to download offline maps (for iPhone) or Download preferences (on Android).
- Switch to Over Wi-Fi or mobile network.
- Ensure you have enough mobile data to cover!
How to Use Offline Maps Once Downloaded
Once downloaded, Google Maps automatically switches to offline mode when you lose signal.
To Access Saved Maps:
In the Google Maps app, tap your profile picture and select Offline maps. You’ll see a list of your downloaded places with details like size and expiration date. Select one to view the saved area instantly. Tap the box to open the map.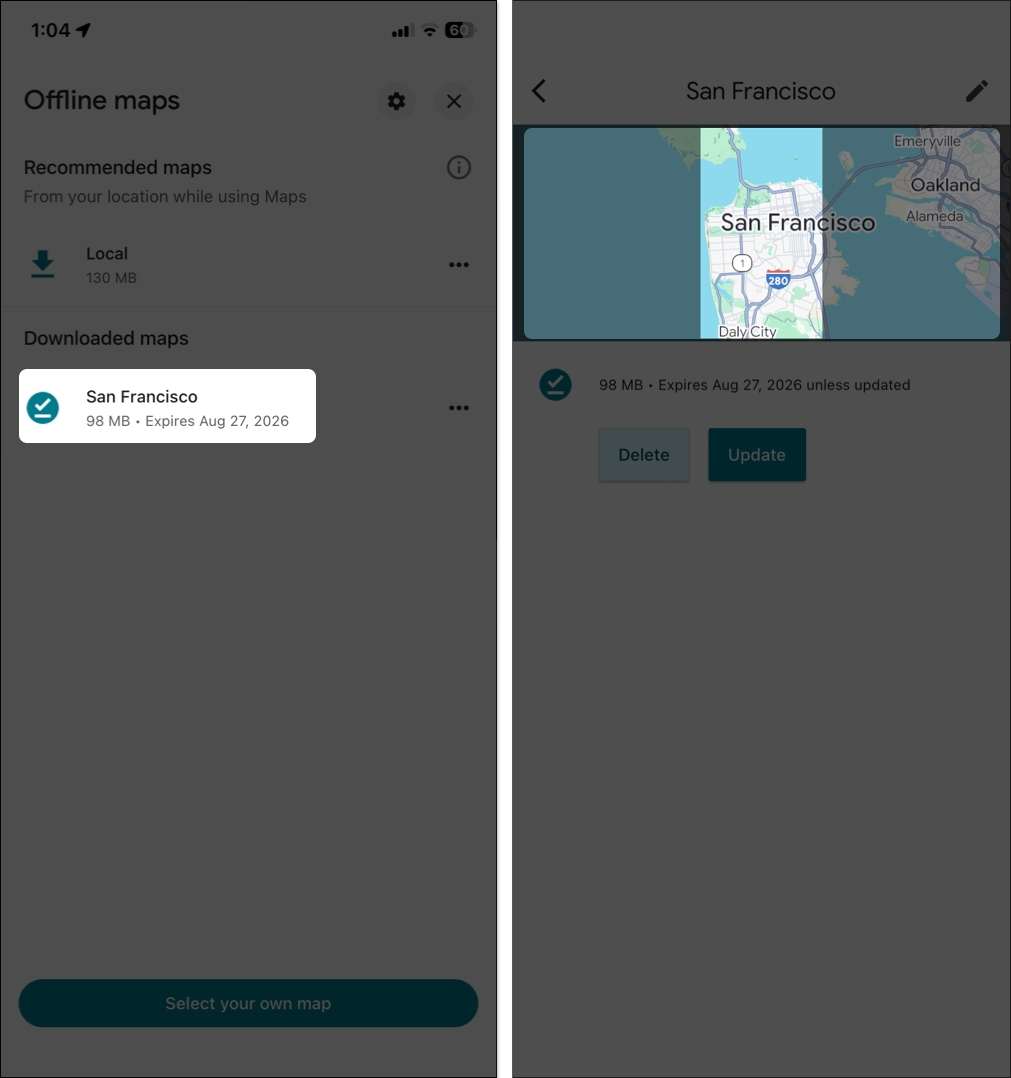
If you’re already in the app and lose connection, a notification appears, indicating that you’re offline. You can still zoom, pan, and search within the saved zone as you normally would.
To Navigate Offline:
Ready for your journey? Even if your internet connection is poor or unreliable, you can still reach your desired location as long as the complete route is covered on the offline map.
- Tap the search bar at the top and enter a spot name or address.
- You will see the suggestions within your downloaded area. Select the place you want to go to.
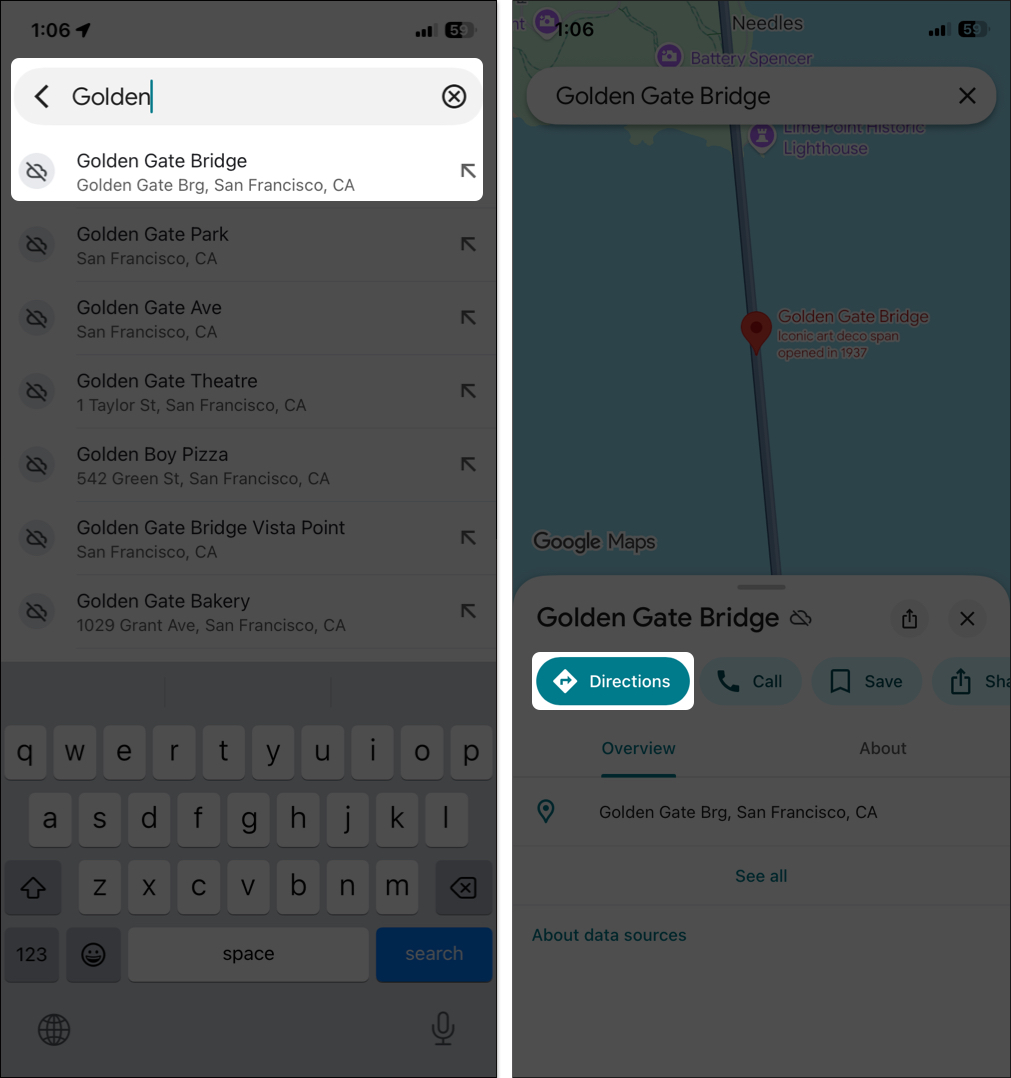
- Tap Directions and choose your starting point.
- Select driving mode and hit Preview/Start.
- You can also Add stops to create a multi-stop route.
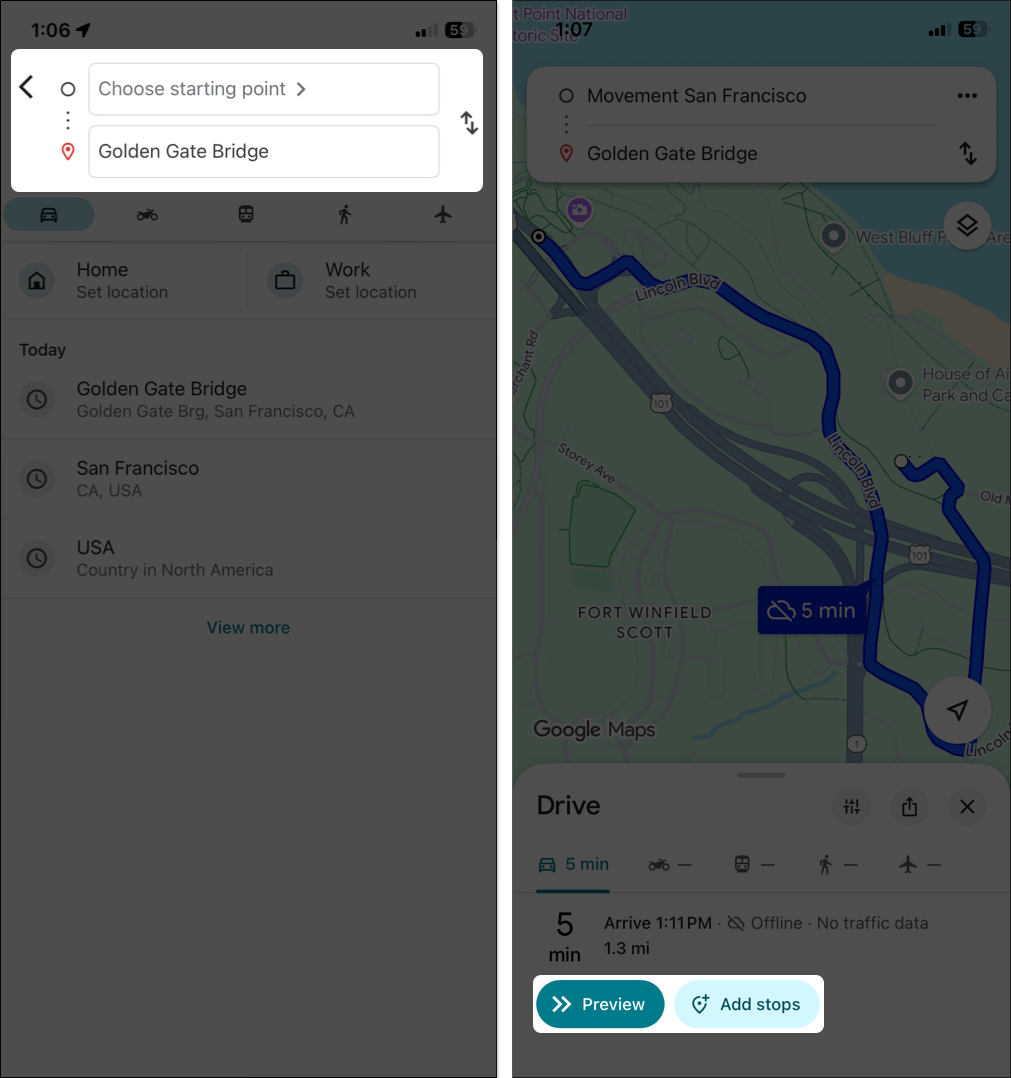
It’ll give you turn-by-turn directions using your phone’s GPS. Voice instructions are available too, but with some restrictions.
Pro tip: I prefer to plan routes while online for the best accuracy, then go offline.
Limitations
Offline mode is solid for basics, but you won’t get the following features:
- Live traffic updates
- Alternative route suggestions
- Updates for public transit
- Biking and walking directions
Moreover, if you venture outside the downloaded area, the app will prompt you to connect for more information.
Managing Offline Maps
Keeping your maps up to date is key, especially since they can expire if not updated.
To Set Automatic Updates Over Wi-Fi
Go to your profile > Offline maps > Settings gear at the top and toggle on Auto-update offline maps. This ensures maps refresh automatically when you’re on Wi-Fi and they’re nearing expiration. Google typically checks when 15 days remain.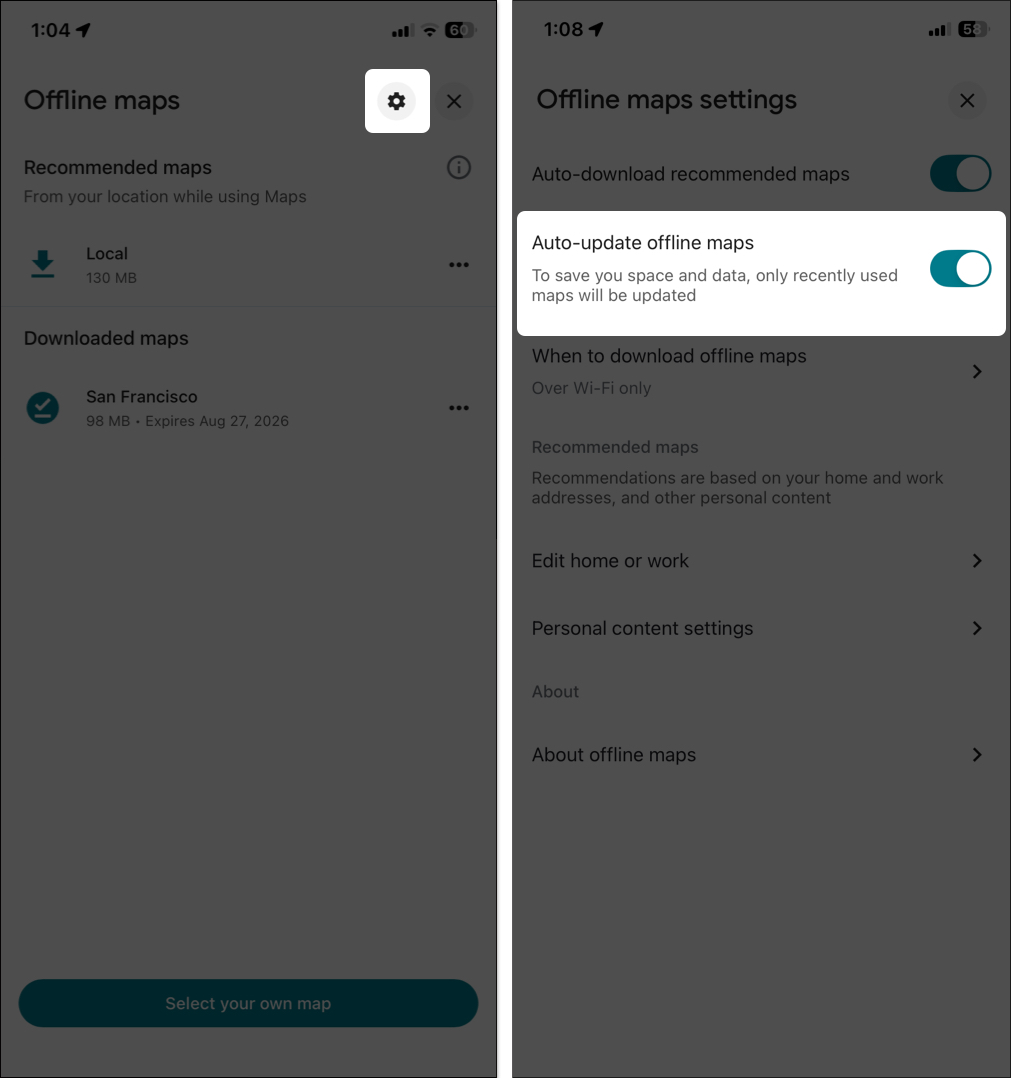
From here, you can also enable Auto-download recommended maps. Google scans your Gmail and Google Travel to find any upcoming trips and saves offline maps based on those suggestions. You will find the recommendations in the Offline maps section.
Manually Updating Before a Trip
Maps are frequently updated to display the current details only. That’s why I always manually update my downloaded maps before a trip, so I never miss any new roads or information.
- Go to the Offline maps section
- Tap the map you want from the list.
- Hit Update. Ensure you are connected to Wi-Fi or cellular network.
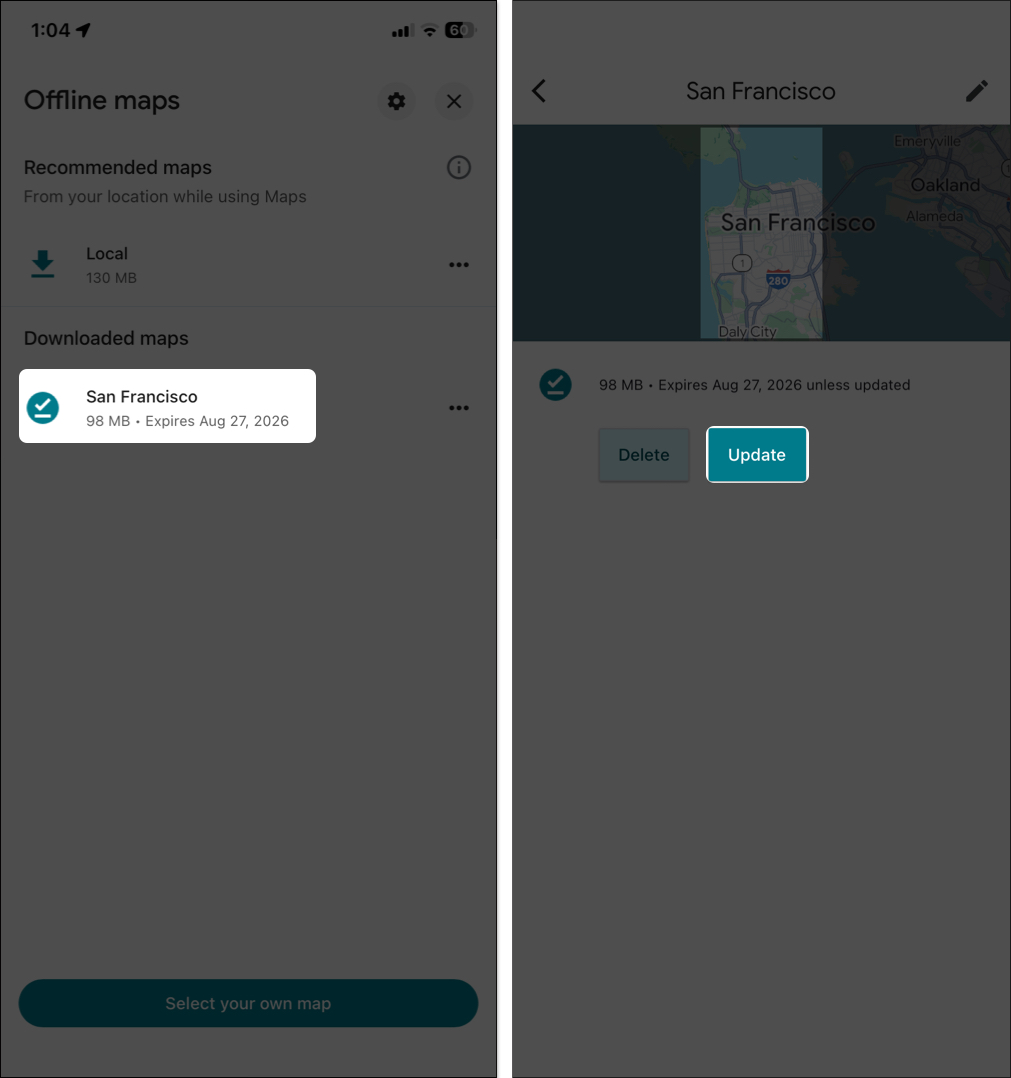
Google also alerts you to update your map if it’s near expiration. From the Update offline maps notification, tap Update now. Now, select the area and tap Update.
Deleting Old Maps to Free Space
If you have multiple offline maps saved on your device, it can consume a significant amount of storage. Since maps can eat 50MB to 500MB each, depending on the area. So, when you’re out of space, removing the old ones is helpful.
From Offline maps, you will see the areas with its size. Tap the three-dot next to the area, select Delete, and confirm. This frees up storage.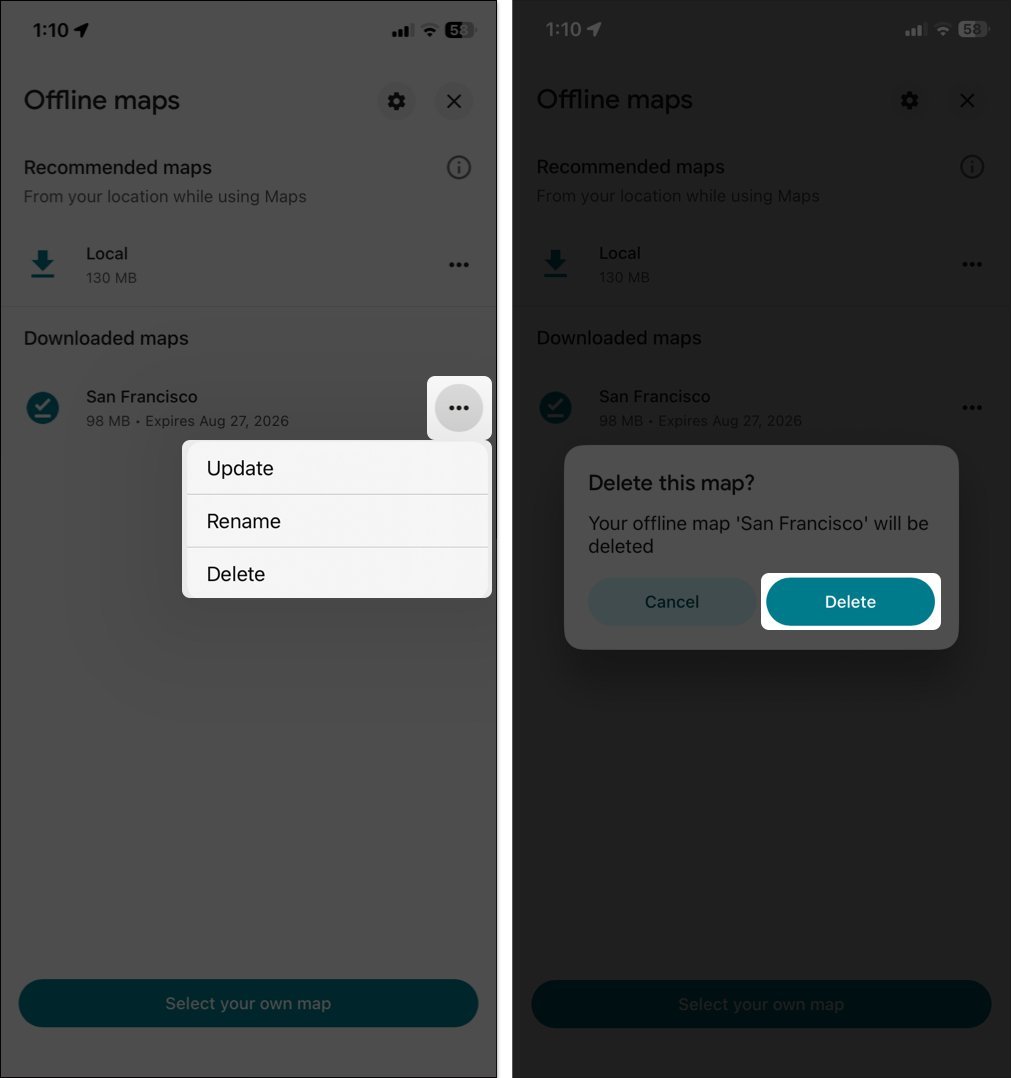
Troubleshooting Offline Maps Issues
At times, offline Google Maps fails to perform as we want. Perhaps the map will not open, or navigation constantly requests the internet. Don’t panic! Most of these are normal issues, and solutions are quick.
- Check your internet for the initial setup. If downloads stall, restart your phone.
- If your phone is running low on storage space, downloads may fail, or maps may not be saved. Free up some storage, then try again.
- Clear cache: On iPhone, offload the app via Settings, then reinstall. On Android, go to Settings > Apps > Google Maps > Storage > Clear cache or data.
- If navigation won’t start offline, ensure location services are turned on. Get outside for a clear sky to receive signals better.
- For “offline” errors when you should be online, switch Airplane Mode or look for app updates.
- When maps unexpectedly expire, enable auto-updates and confirm Wi-Fi connections.
- Still having issues? Force the app to quit or delete and re-download the map.
Alternatives to Google Maps Offline
Google Maps isn’t your only choice! If you need something different, try these offline maps apps:
- Apple Maps: Built into iPhones with offline downloads starting in iOS 17+. It’s limited to driving and walking, no biking/transit offline, but it works well for Apple ecosystem users.
- HERE WeGo: Also a solid offline contender with free country/state downloads. Let’s you drive, transit, and even book taxis offline in certain areas. Switch if you require more extensive coverage without area restrictions.
Other solid picks include Maps.Me (fully offline with detailed hiking trails) or OsmAnd (open-source with customizable maps).
Final Thoughts: Never Get Lost Without Internet
Using Google Maps offline is a travel essential—whether you’re exploring new cities, hiking remote trails, or just dealing with spotty Wi-Fi. By downloading maps in advance, you’ll always have directions ready without worrying about data.
Pro tip: Carry a power bank since GPS drains battery quickly, and always update maps before your trip.
Want to take your trip planning further? Check out my guide on how to use Google Maps as a trip planner on iPhone.
Frequently Asked Questions
You shouldn’t miss out on the following posts as well:
Topics

Written by
Dhvanesh AdhiyaThe founder of iGeeksBlog, Dhvanesh, is an Apple aficionado, who cannot stand even a slight innuendo about Apple products. He dons the cap of editor-in-chief to make sure that articles match the quality standard before they are published.
View all posts →More from How-to

Snapchat Parental Controls: How to Set Up Family Center and Keep Your Teen Safe
Snapchat’s Family Center lets parents monitor their teen’s friend activity and screen time without reading private messages. Here’s how to set it up and what to expect.

How to Block and Unblock Someone on Instagram
Instagram lets you block or unblock someone in seconds. Follow these simple steps to take full control of your privacy and online peace.

Apple Watch Not Responding? 8 Fixes That Actually Work
Is your Apple Watch unresponsive or stuck on a black screen? Here are 8 proven fixes to help you unfreeze it and get it working again quickly.