- Update iOS frequently for better security by installing the latest patches that fix vulnerabilities, privacy flaws, and exploits targeting older iPhone versions.
- Turn on two-factor authentication for Apple ID to block unauthorized logins, even if someone guesses or steals your password.
- Use Find My iPhone to lock lost devices and trigger Activation Lock, which stops anyone from resetting or reusing your iPhone without your Apple ID.
- Restrict lock screen features like Siri and reply options to avoid exposing messages, contact info, or sensitive tools when your phone is locked.
- Set a short auto-lock timer and strong passcode so your iPhone quickly locks and stays safe from prying eyes or physical tampering.
Your iPhone is the gateway to all your personal, financial, and professional data. So, no matter how secure Apple claims the iPhone to be, it remains a prime target for hackers, data brokers, and even prying eyes around you. While every iPhone ships with industry-leading security features, it’s up to you to fine-tune these settings for maximum privacy and protection.
This guide highlights the most important iPhone privacy and security settings you should adjust immediately.
1. Update to the Latest iOS Version
Apple frequently releases iOS updates packed with new features and critical security patches. These patches fix vulnerabilities and bugs that cyber attackers might exploit. Keeping your iPhone updated ensures it remains protected against the latest threats.
Go to Settings → General → Software Update to check for and install the latest version.
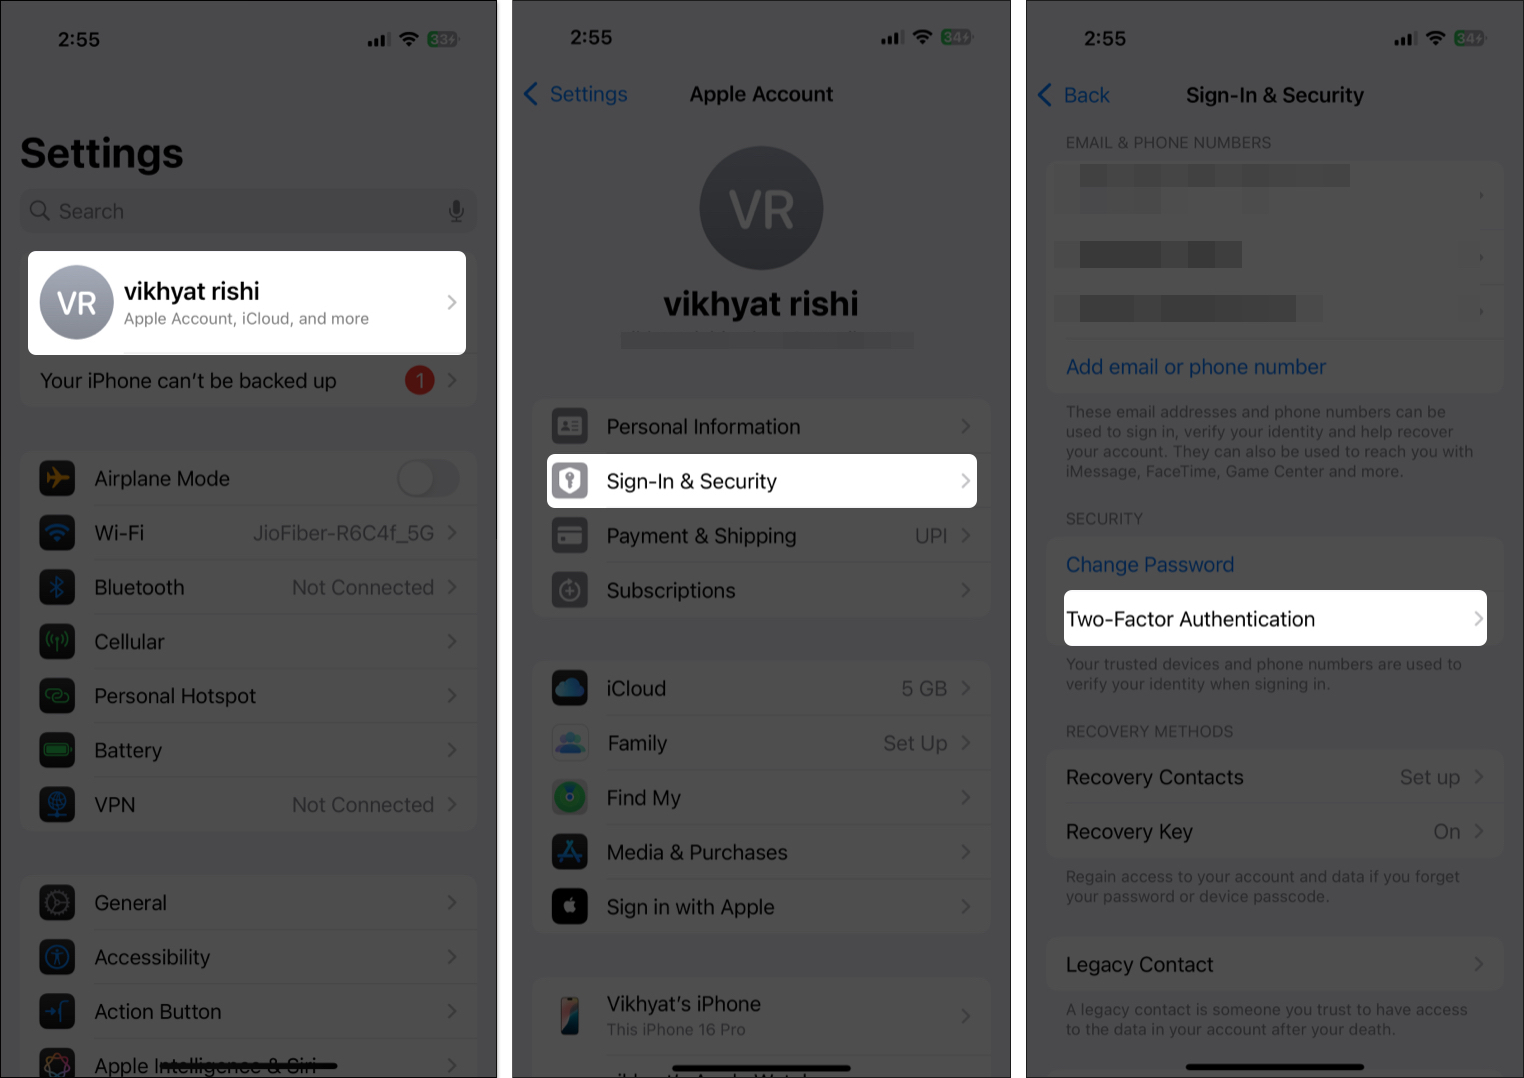
2. Enable Two-Factor Authentication (2FA)
Your Apple Account (formerly Apple ID) is the core of your Apple ecosystem. It grants access to iCloud data, App Store purchases, and device management, making it vital to secure.
While a strong password helps, it’s not enough. Two-factor authentication ensures that even if someone guesses your password, they can’t log in without the second layer of verification.
To enable:
- Open Settings → Apple Account → Sign-in & Security.
- Here, tap Two Factor Authentication and follow the on-screen instructions.
3. Turn ON Find My iPhone
Find My iPhone isn’t just for locating lost devices. It enables Activation Lock, which prevents thieves from erasing or reactivating your iPhone without your Apple ID.
To enable:
- Go to Settings → [Your Name] → Find My
- Tap Find My iPhone and toggle it on
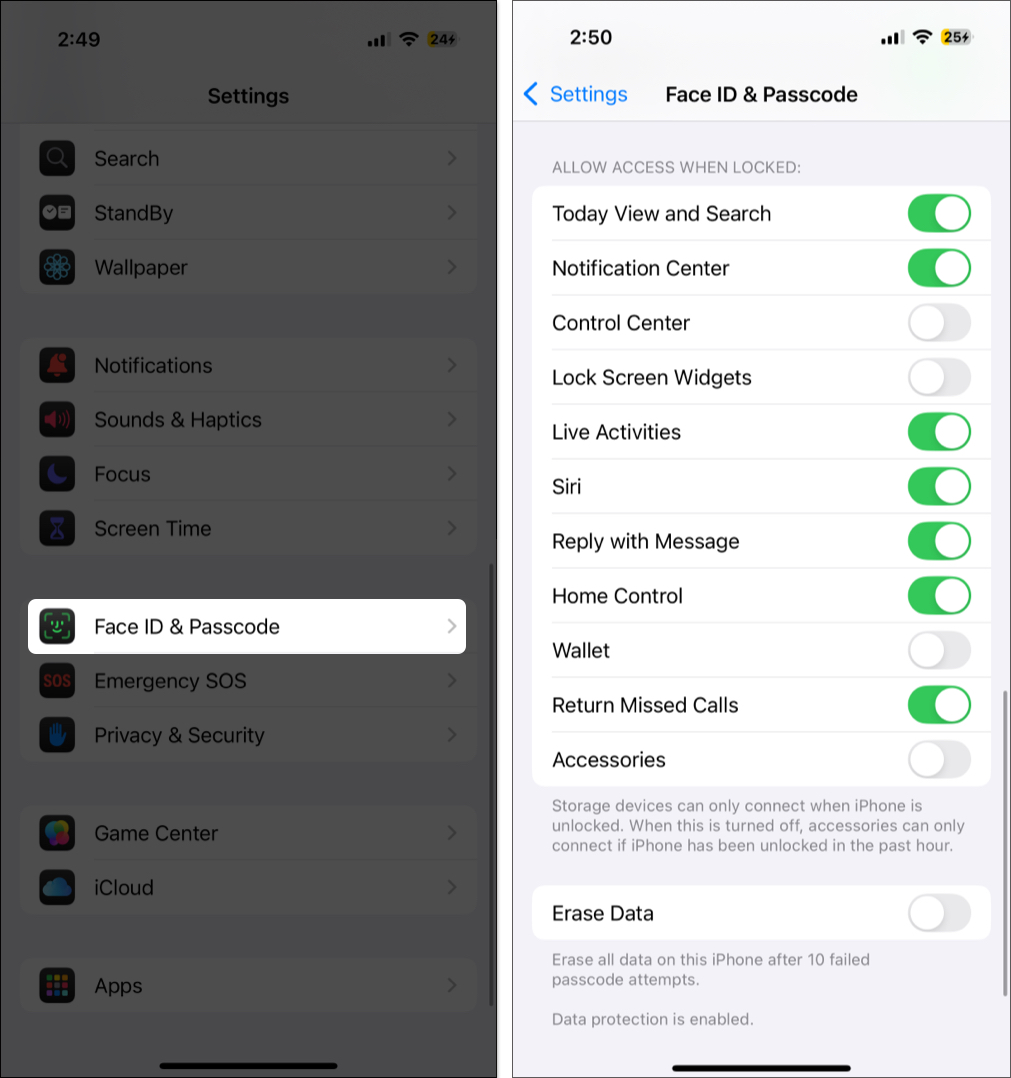
4. Limit Lock Screen Access
Even when locked, your iPhone’s Lock Screen may expose notifications, widgets, Siri, and more. Anyone nearby could access your data without unlocking your phone.
To secure your lock screen:
- Open Settings → Face ID & Passcode.
- Scroll down and toggle off the features you don’t want accessible without unlocking your device.
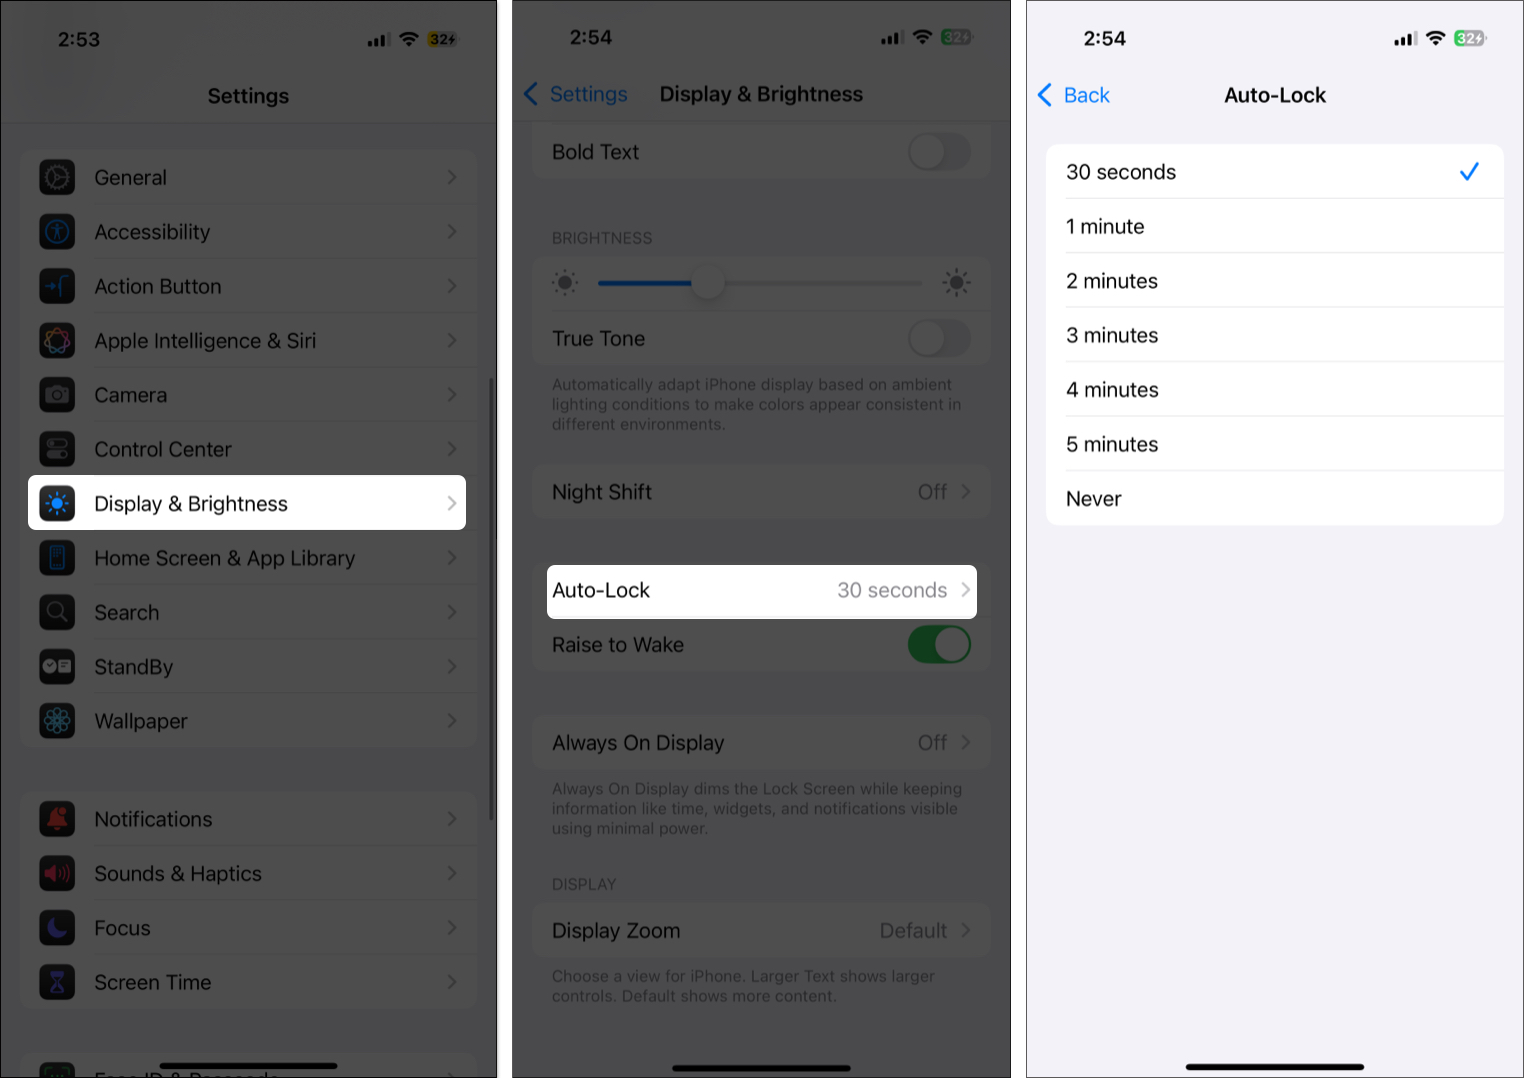
5. Set Auto-Lock and Use a Strong Passcode
Leaving your iPhone unattended — even for a minute — can expose your data. Setting a short auto-lock timer reduces this risk.
- Open Settings → Display & Brightness.
- Tap Auto Lock and set it to 30 seconds or 1 minute.

Next, use a strong alphanumeric passcode instead of a simple 4- or 6-digit one:
To change your passcode:
- Open Settings → Face ID & Passcode.
- Tap Change Passcode and enter your current passcode.
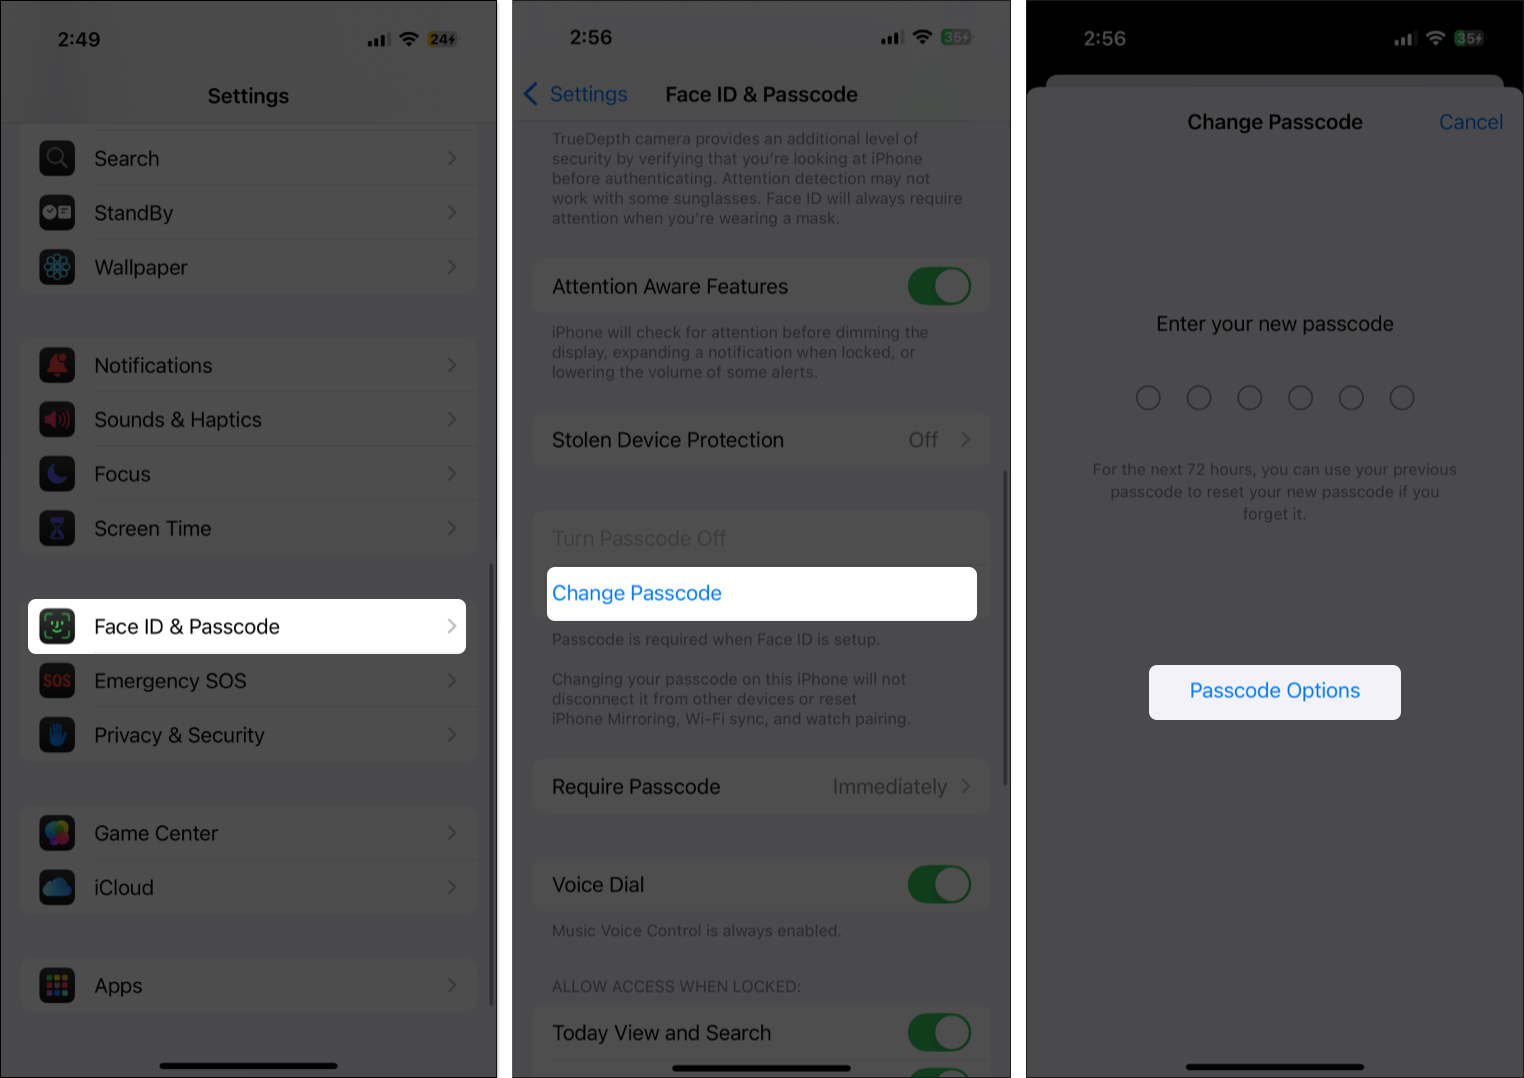
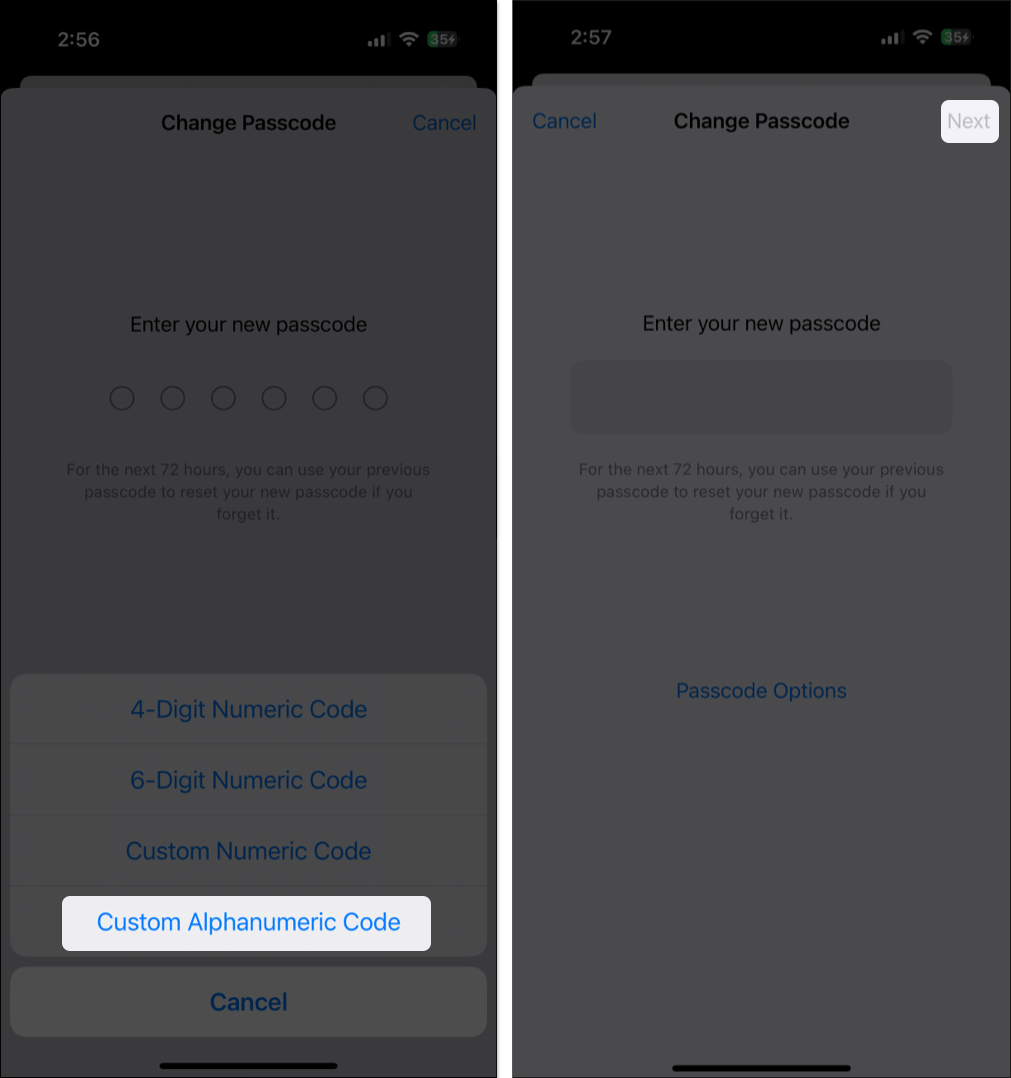
- Tap Passcode Options and select Custom Alphanumeric Code in the pop-up menu.
- Enter a strong mix of letters, numbers, and symbols and tap Next to confirm.


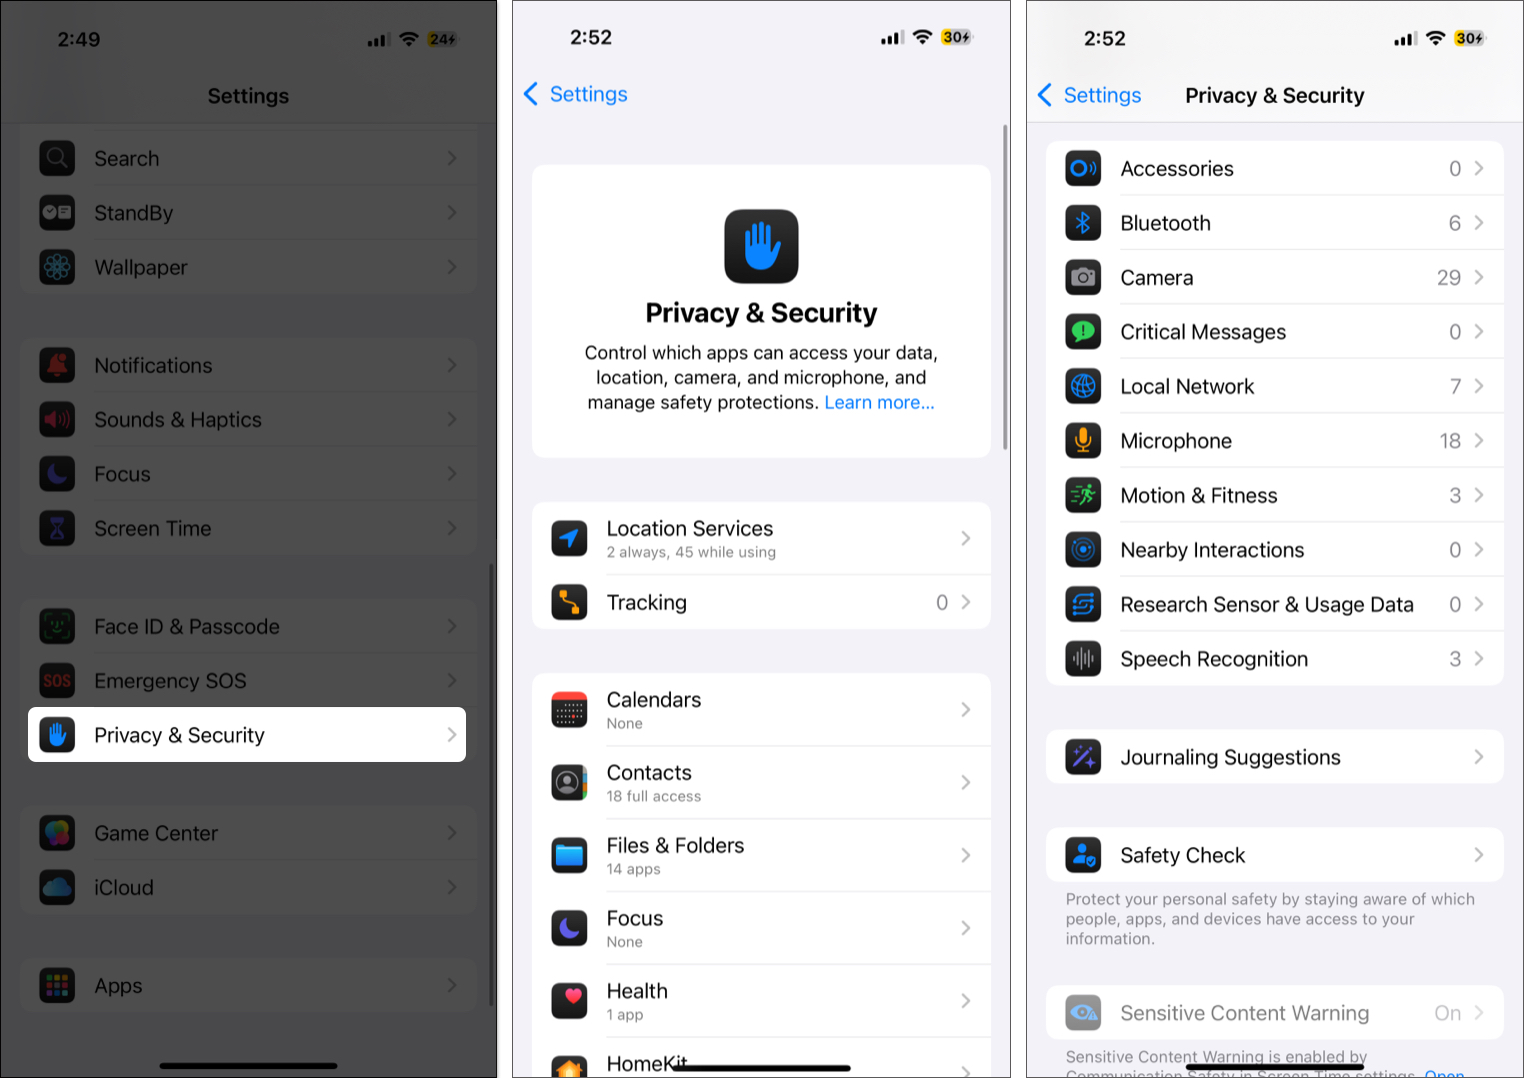
6. Manage App Permissions Smartly
Some apps request access to your camera, microphone, or location unnecessarily. Regularly reviewing app permissions helps keep your data private.
- Open Settings → Privacy & Security.
- Here, review permissions for Location Services, Camera, Microphone, Contacts, and other categories.

7. Enable USB Restricted Mode
Even a locked iPhone can be vulnerable to physical attacks like “juice-jacking” when connected to public charging stations.
To disable USB access while locked:
- Open Settings → Face ID & Passcode.
- Scroll down to the Allow Access When Locked section and toggle off Accessories.


Once done, your iPhone will not allow data connections via the Lightning or USB-C (depending on your iPhone model) port when it has been locked for more than an hour.
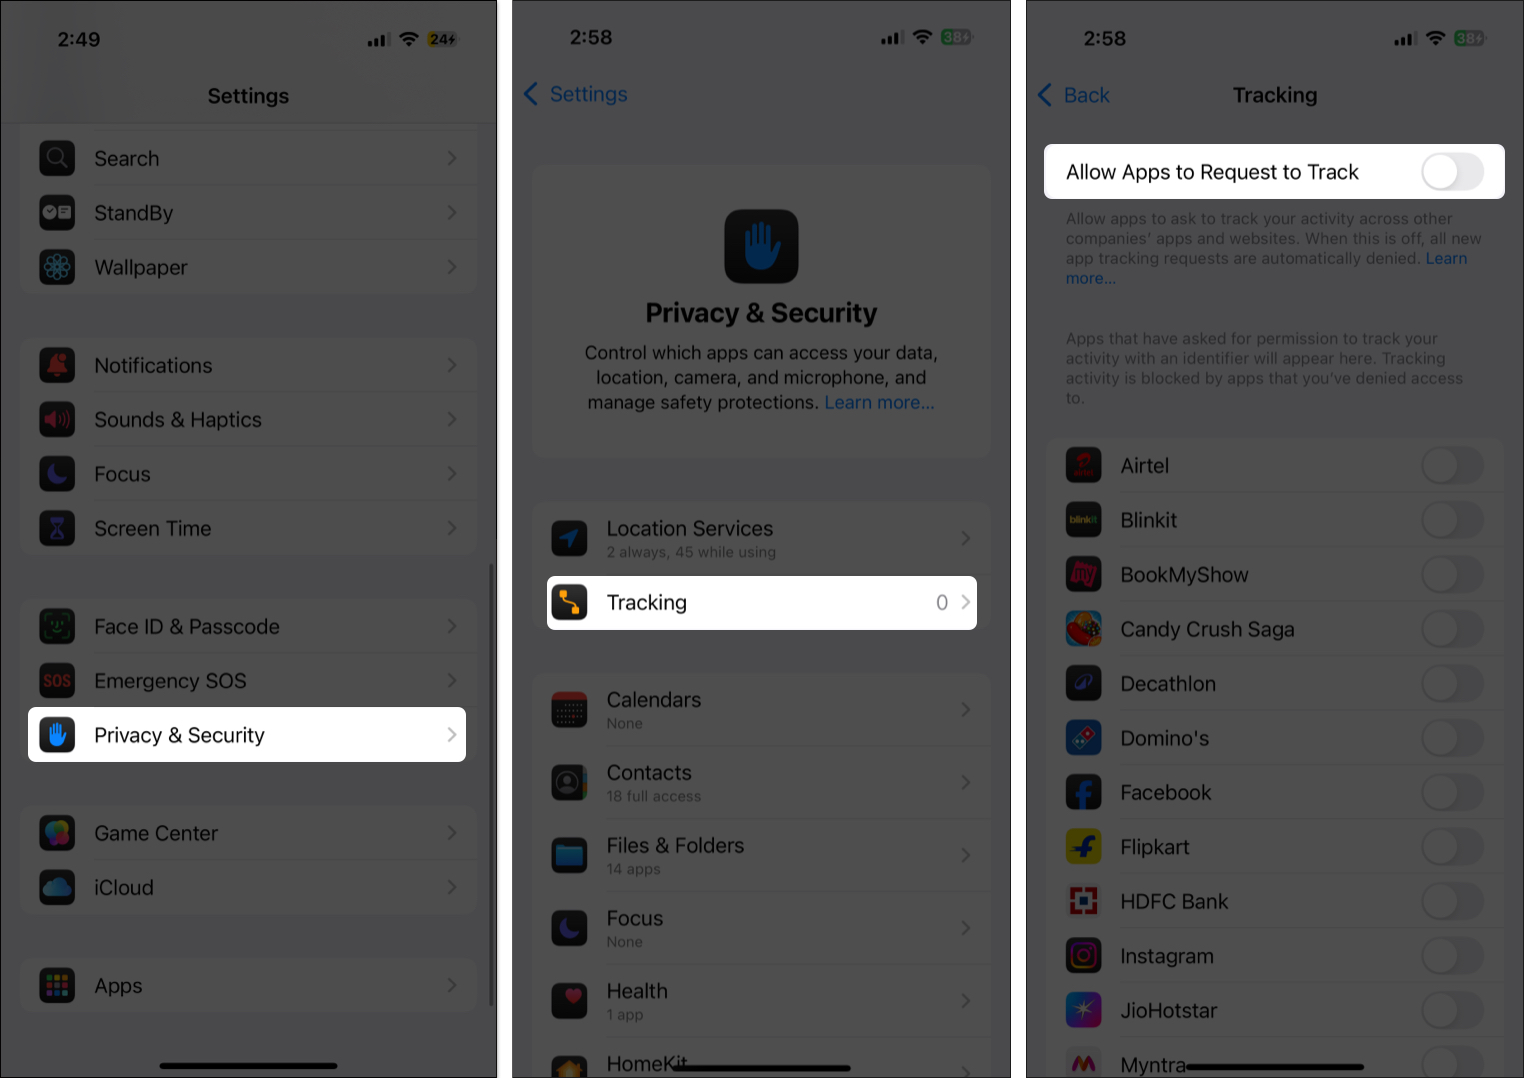
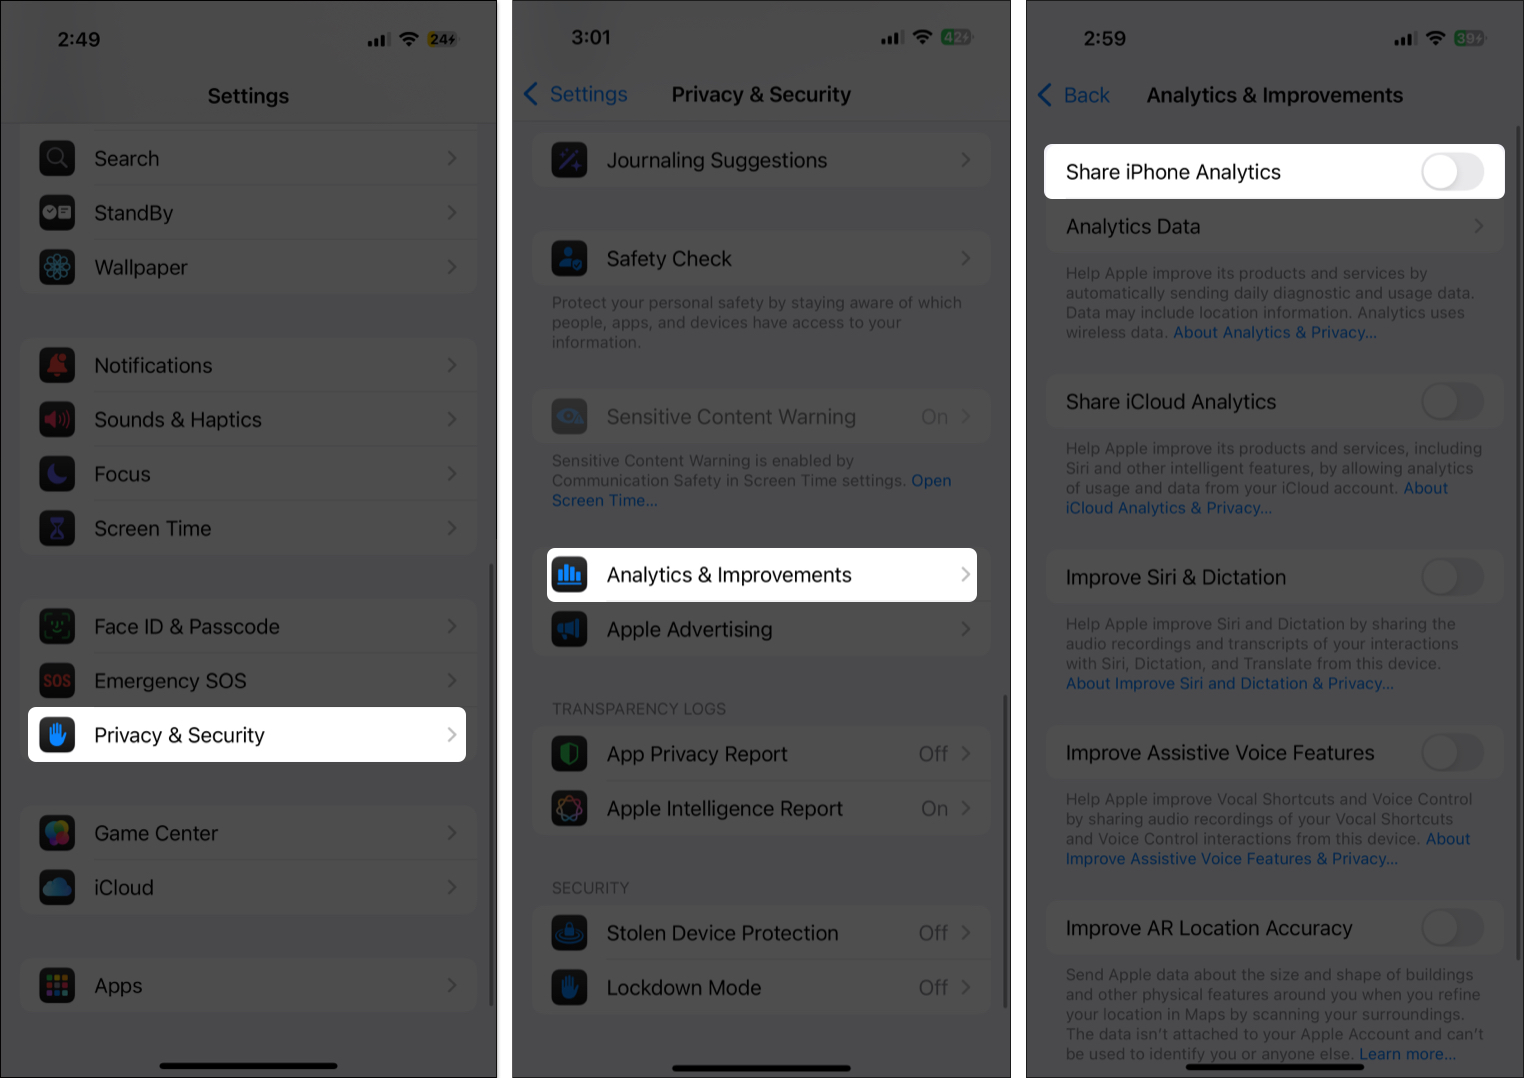
8. Turn Off Ad Tracking and Analytics Sharing
Many users unknowingly allow apps to track their behavior or share iPhone usage data with Apple. Turning these off reduces profiling and data collection.
To disable tracking and analytics:
- Go to Settings → Privacy & Security → Tracking.
- Toggle off Allow Apps to Request to Track.
- Go to Settings → Privacy & Security → Analytics & Improvements.
- Toggle off Share iPhone Analytics.


8. Use iCloud Private Relay or a VPN
If you’re an iCloud+ subscriber, Private Relay hides your IP address and Safari browsing activity. If not, a trusted VPN can protect your privacy across all apps.
To enable Private Relay:
- Open Settings → iCloud → Private Relay.
- Turn it on and choose Maintain General Location or Use Country and Time Zone.
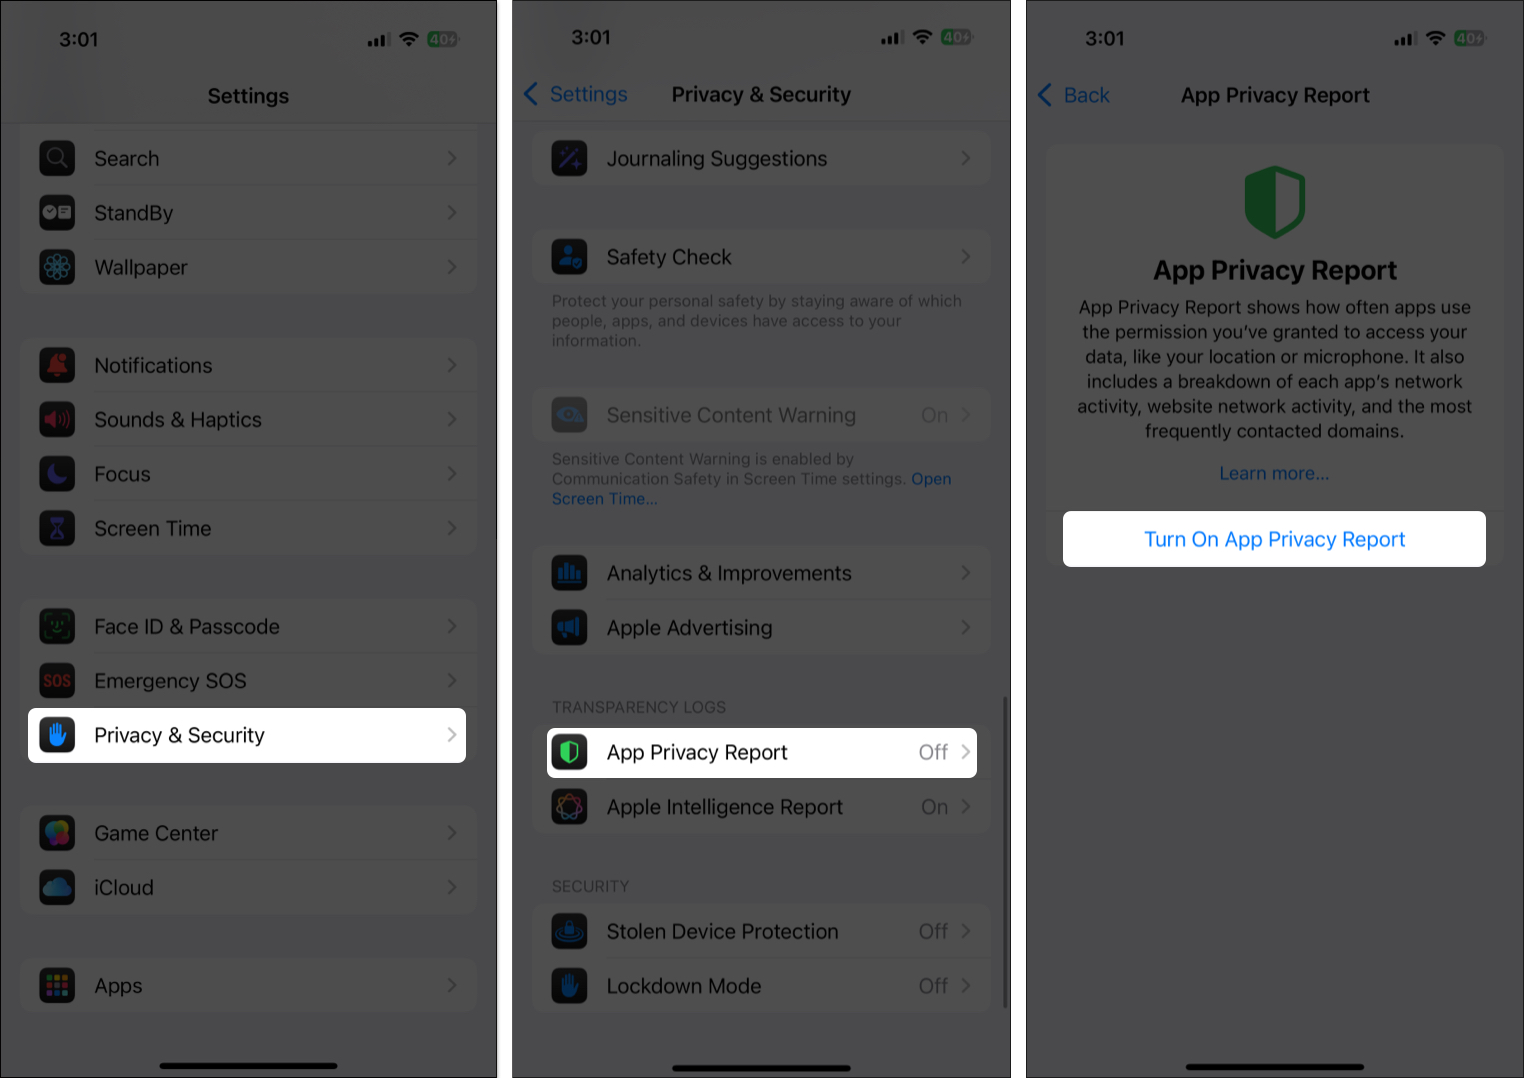
9. Enable App Privacy Reports and Safety Check
The App Privacy Report lets you monitor how often apps access sensitive permissions — and whether they share data with third parties.
To enable:
- Open Settings → Privacy & Security.
- Scroll down to the bottom and tap App Privacy Report.
- Tap Turn On App Privacy Report.

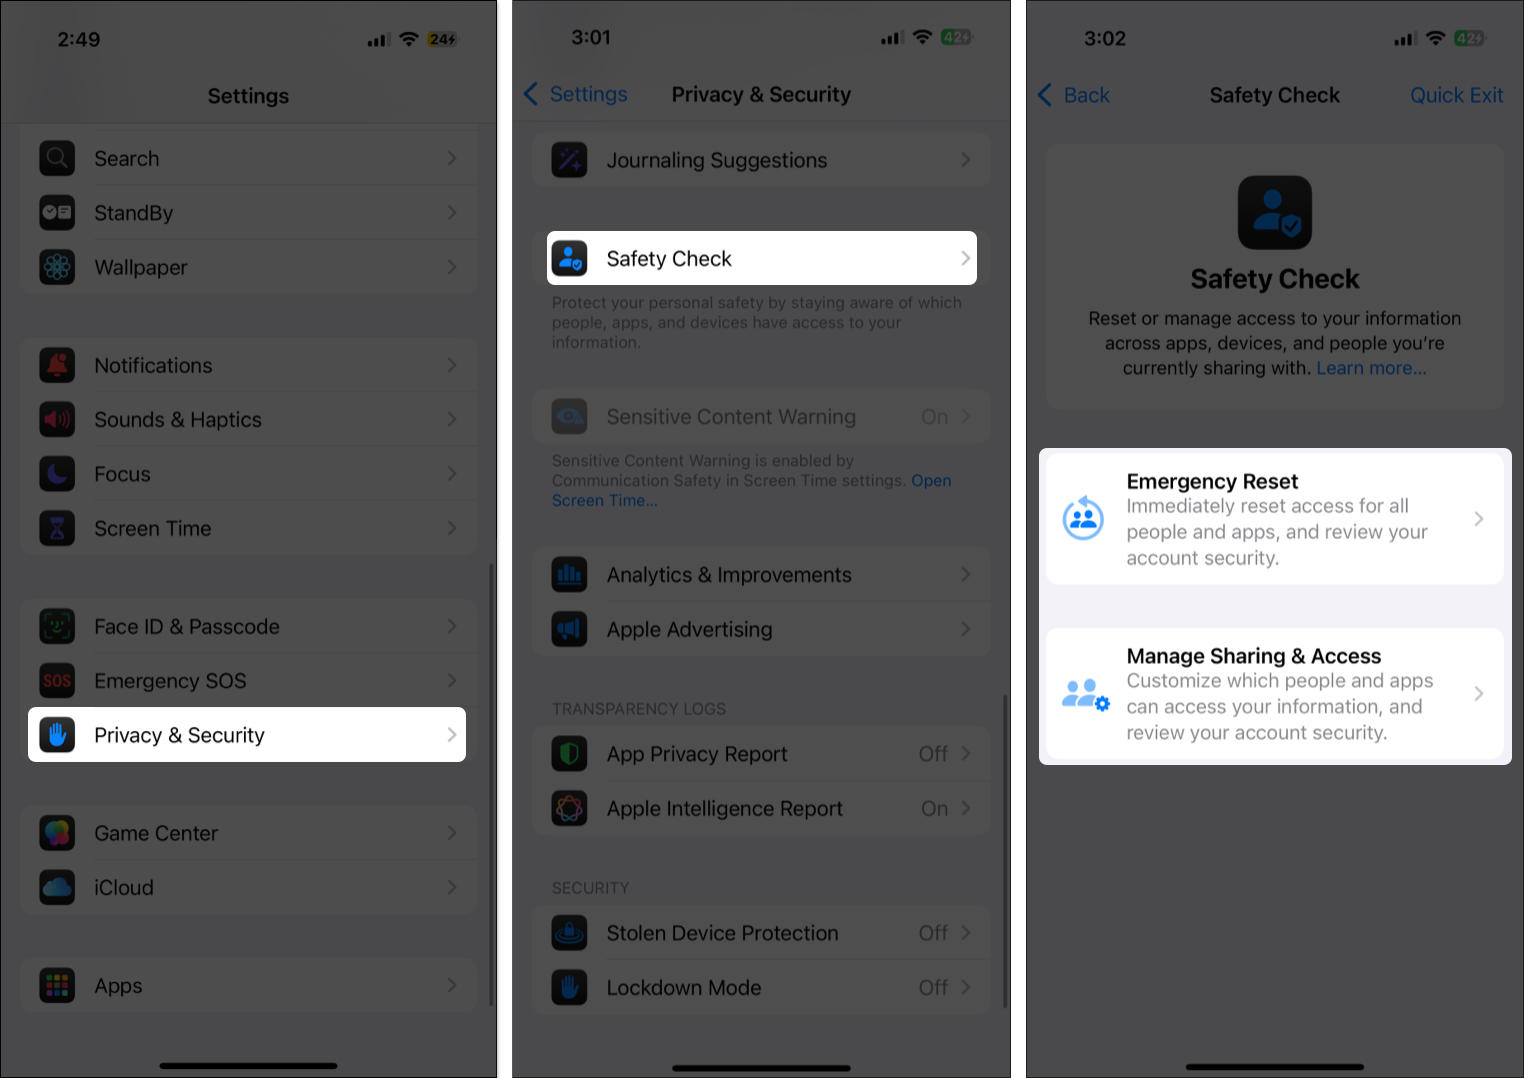
For those in vulnerable or abusive situations, Safety Check is a lifesaver. It lets you instantly revoke app access, sign out of iCloud on other devices, and more.
- Open Settings → Privacy & Security.
- Locate and tap Safety Check.
- Choose Emergency Reset or Manage Sharing & Access.

Bonus Tips for Enhanced iPhone Privacy
Here are a few more quick settings that can strengthen your iPhone privacy:
- Disable Siri Suggestions on Lock Screen: Open Settings → Apple Intelligence & Siri → toggle off suggestions for sensitive apps.
- Turn off Bluetooth and AirDrop when not in use: Swipe into Control Center and toggle them off.
- Enable Attention Detection for Face ID: Open Settings → Face ID & Passcode → Toggle on Require Attention for Face ID.
Your Privacy, Your Control
That’s it, you’re now equipped with the essential iPhone privacy and security settings that can dramatically reduce your digital risk. From locking down sensitive app permissions to protecting your Apple ID and browsing habits, these simple changes go a long way.
Take a few minutes to implement these changes today and keep your iPhone and everything on it safe from prying eyes.
Read more: