New iPhone? 25 Must-Know Tips for First-Time iPhone Users (2026 Guide)
Switched to your first iPhone? Here are 25 smart tips to help you set up, personalize, and master your iPhone like a pro in no time.

So, the iPhone 17 or iPhone Air finally convinced you to switch to your first-ever iPhone, but you’re not sure where to start? Don’t worry, every iPhone user has been there. While the interface might feel different at first, Apple has designed it to be intuitive once you get the hang of it.
To help you get started and make the switch from Android to iPhone easier, here are 25 essential tips every first-time iPhone user should know.
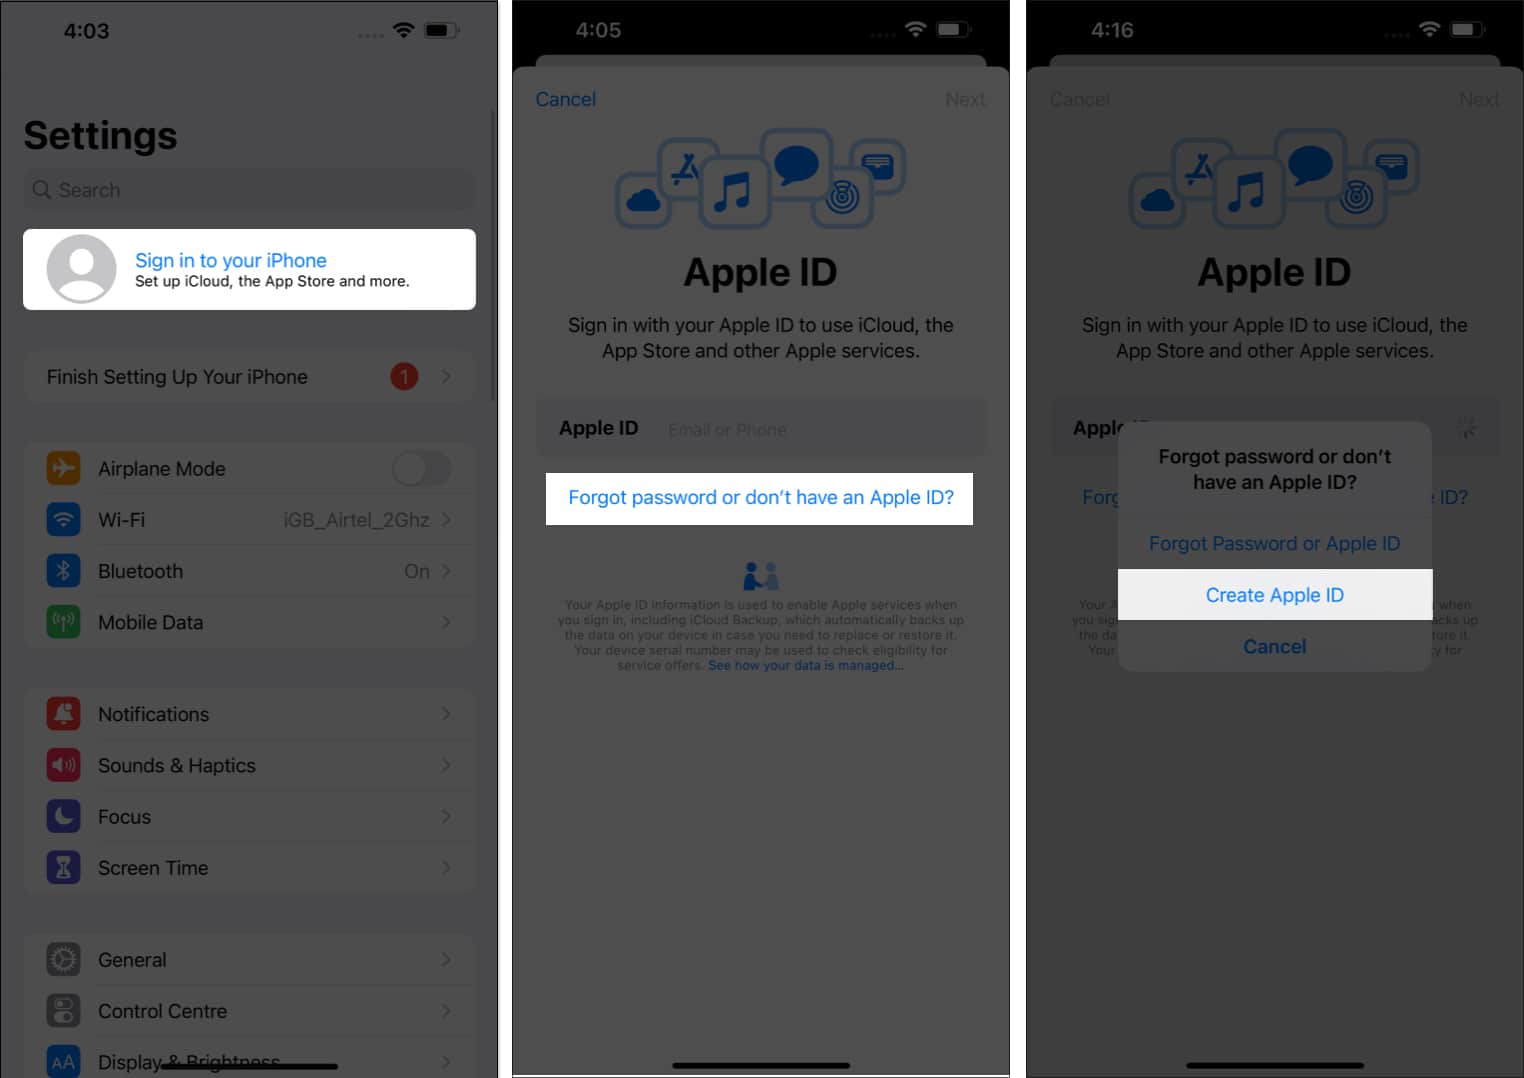
1. Create an Apple Account
Your Apple Account (formerly Apple ID) is the key to everything in the Apple ecosystem. You’ll need it for the App Store, iCloud, iMessage, FaceTime, Find My, and more.
If you want to speed up your setup, you can even create your Apple Account beforehand using the web or your Mac.
2. Turn on Find My
Before doing anything else, enable Find My iPhone. It’s Apple’s built-in tracking tool that helps you locate your iPhone if it’s ever lost or stolen. You can make it ring, track it on a map, or remotely erase your data for security.
Want to learn more? Check out our detailed guide on using the Find My app.
3. Set Up Face ID
This is another important security measure you must undertake to safeguard your private data from unauthorized access. Face ID not only helps you unlock your iPhone but also authorizes payments and app downloads.
Once you are done setting up Face ID, you can stay at peace as no one can unlock your iPhone without you allowing them to unless they have the Passcode.
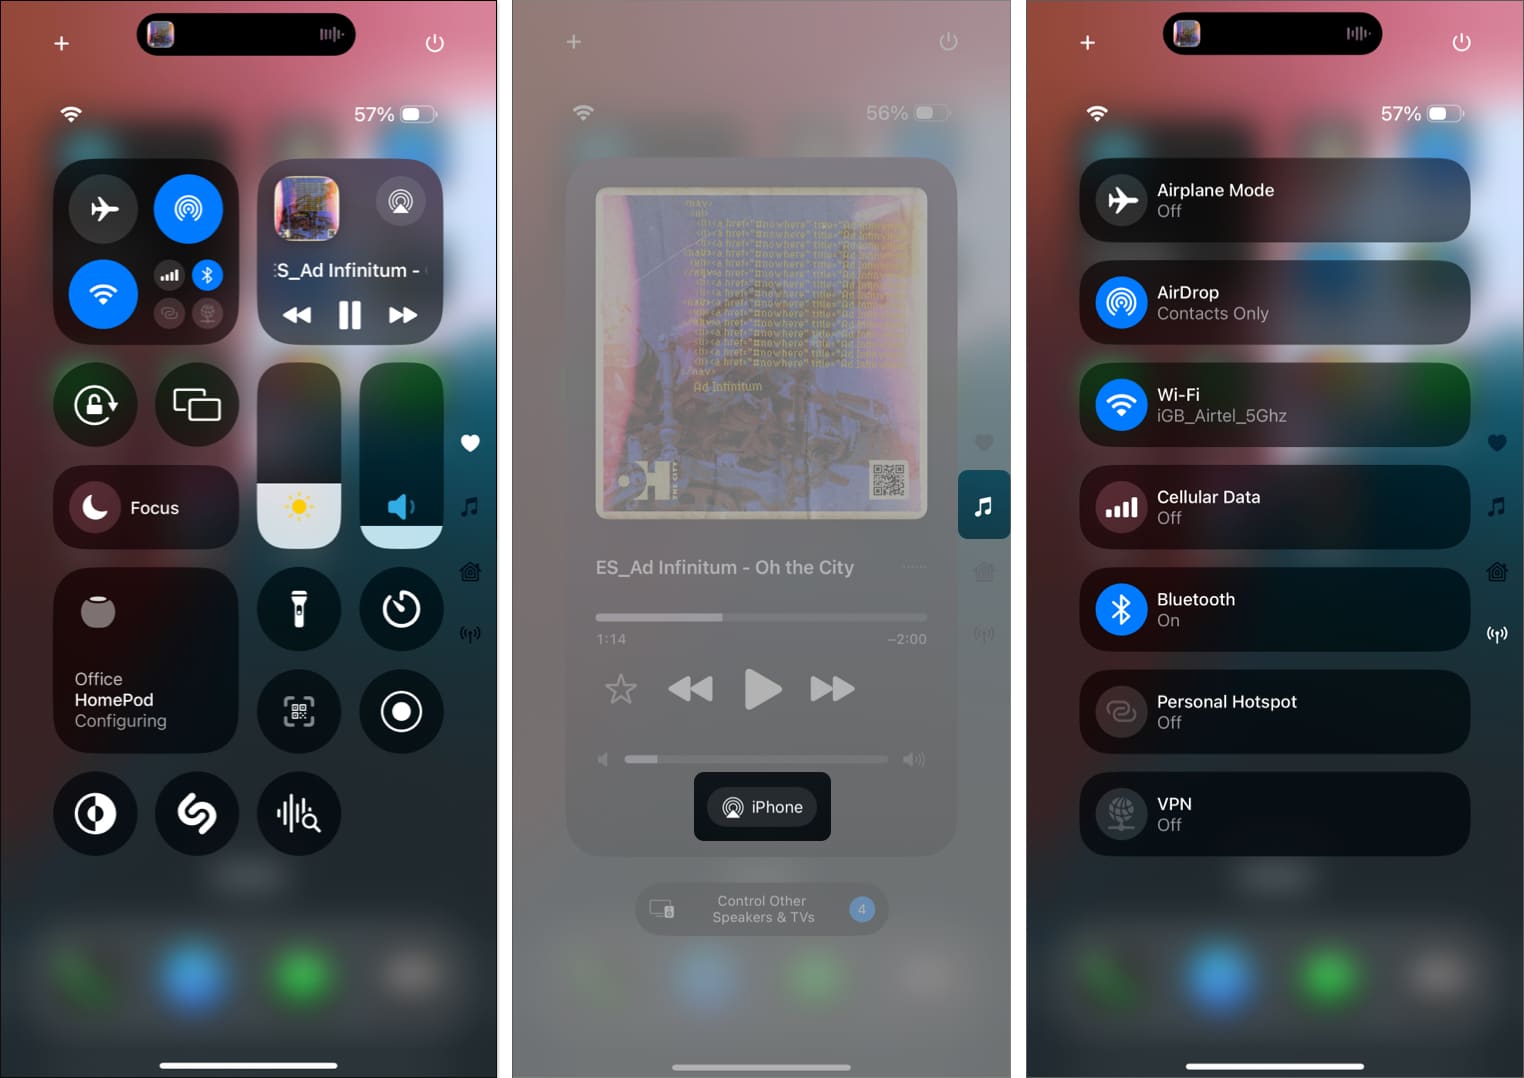
4. Customize Control Center
Simply swipe down from the top right of the display to pull down the Control Center on your iPhone. Here, you can quickly toggle Wi-Fi, Bluetooth, Mobile data, Airdrop, and more with just a tap of an in-display button.
While the default setup isn’t bad either, Apple’s iOS 18 allows you to customize the Control Center completely. You can add/remove toggles, resize them, create a new Control Center screen, or even delete one altogether.
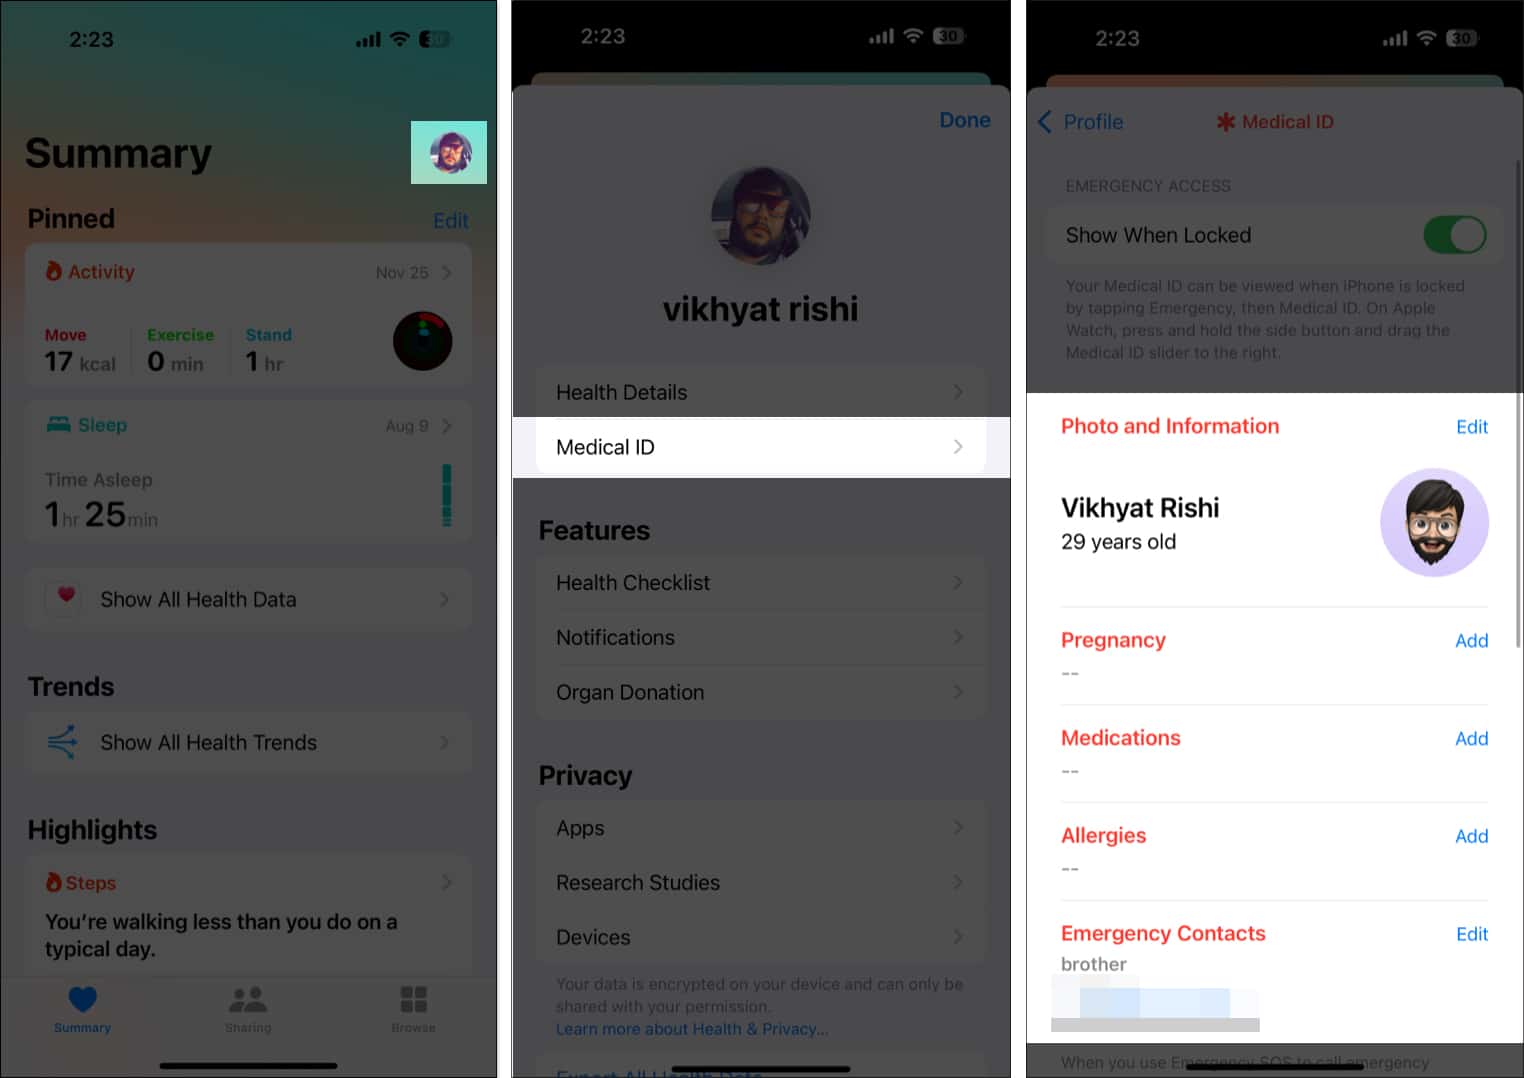
5. Set Up Medical ID
Accidents and medical emergencies can happen anytime, so it’s important to be prepared for them in some capacity. The Medical ID on your iPhone stores all your vital information about your medical health, such as your allergies, medications, emergency contacts, and more.
Setting up the Medical ID on your iPhone in advance can help the first responder know about your health condition in an emergency.
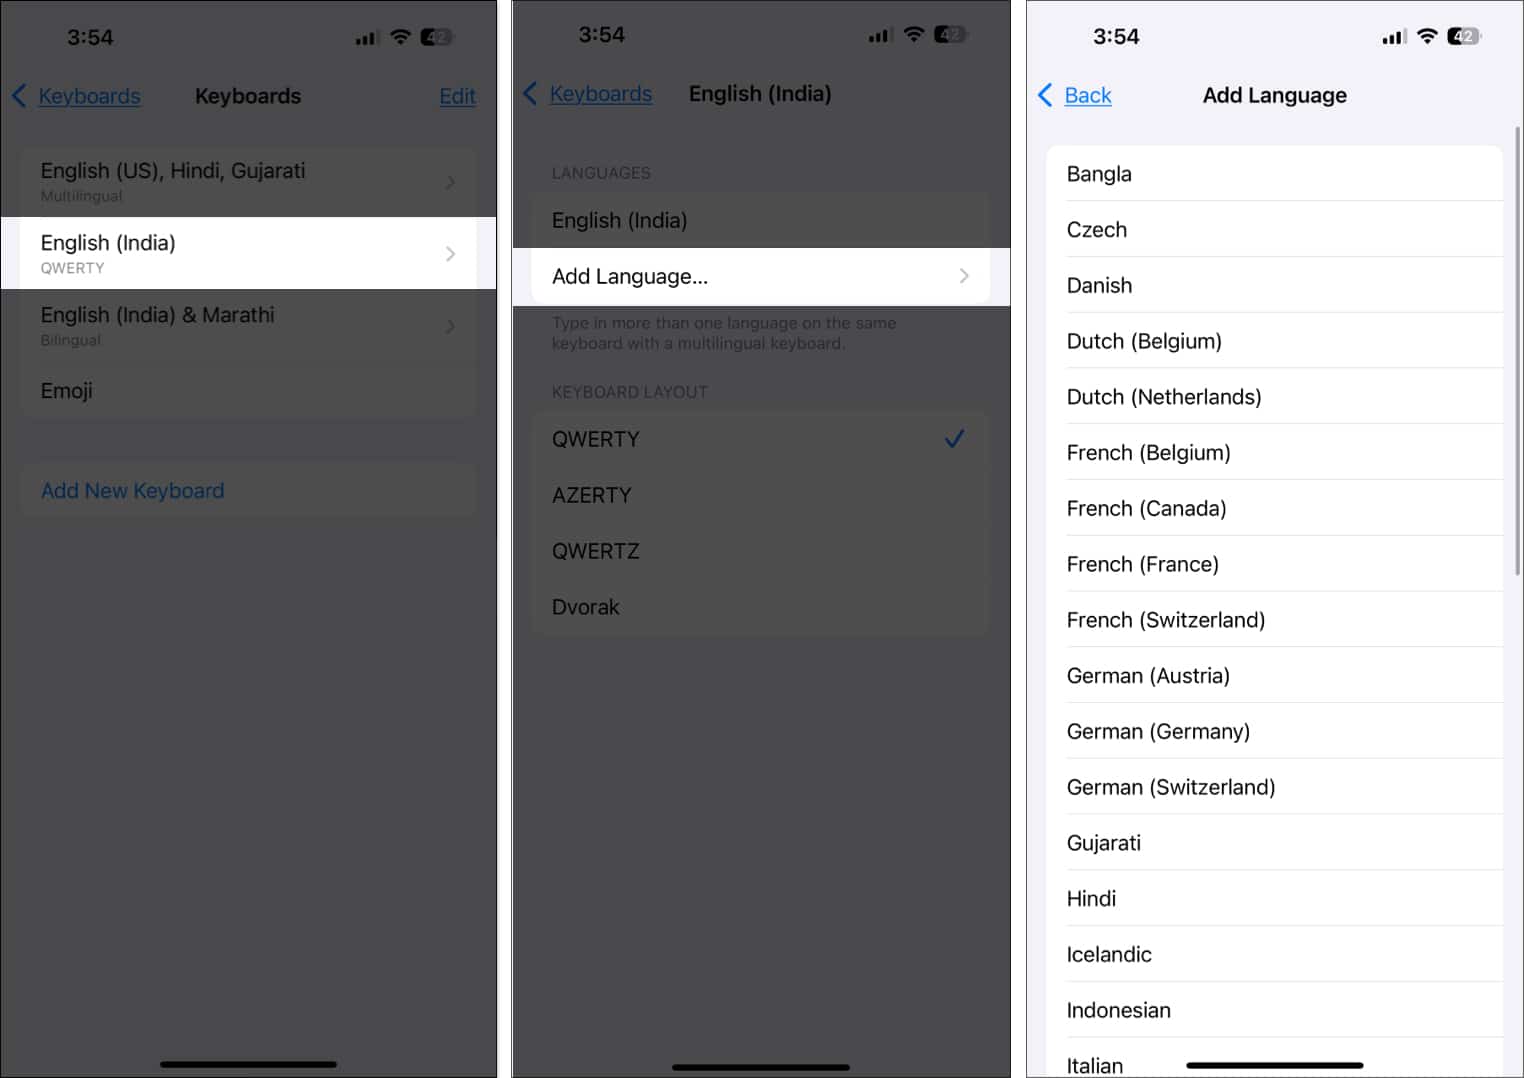
6. Use Multilingual Keyboard
If you are well-versed in multiple languages and prefer to include words from each in a single sentence but switching keyboards while typing feels time-consuming, your iPhone can help you.
Apple, with the latest iOS 18, added multilingual keyboard support to the supported iPhones. You can add up to three different languages to your iPhone keyboard and switch between them simultaneously while typing. Any word you type in English is automatically translated to another selected language.
To set up a multilingual keyboard on your iPhone:
- Go to Settings → General → Keyboards → Keyboards.
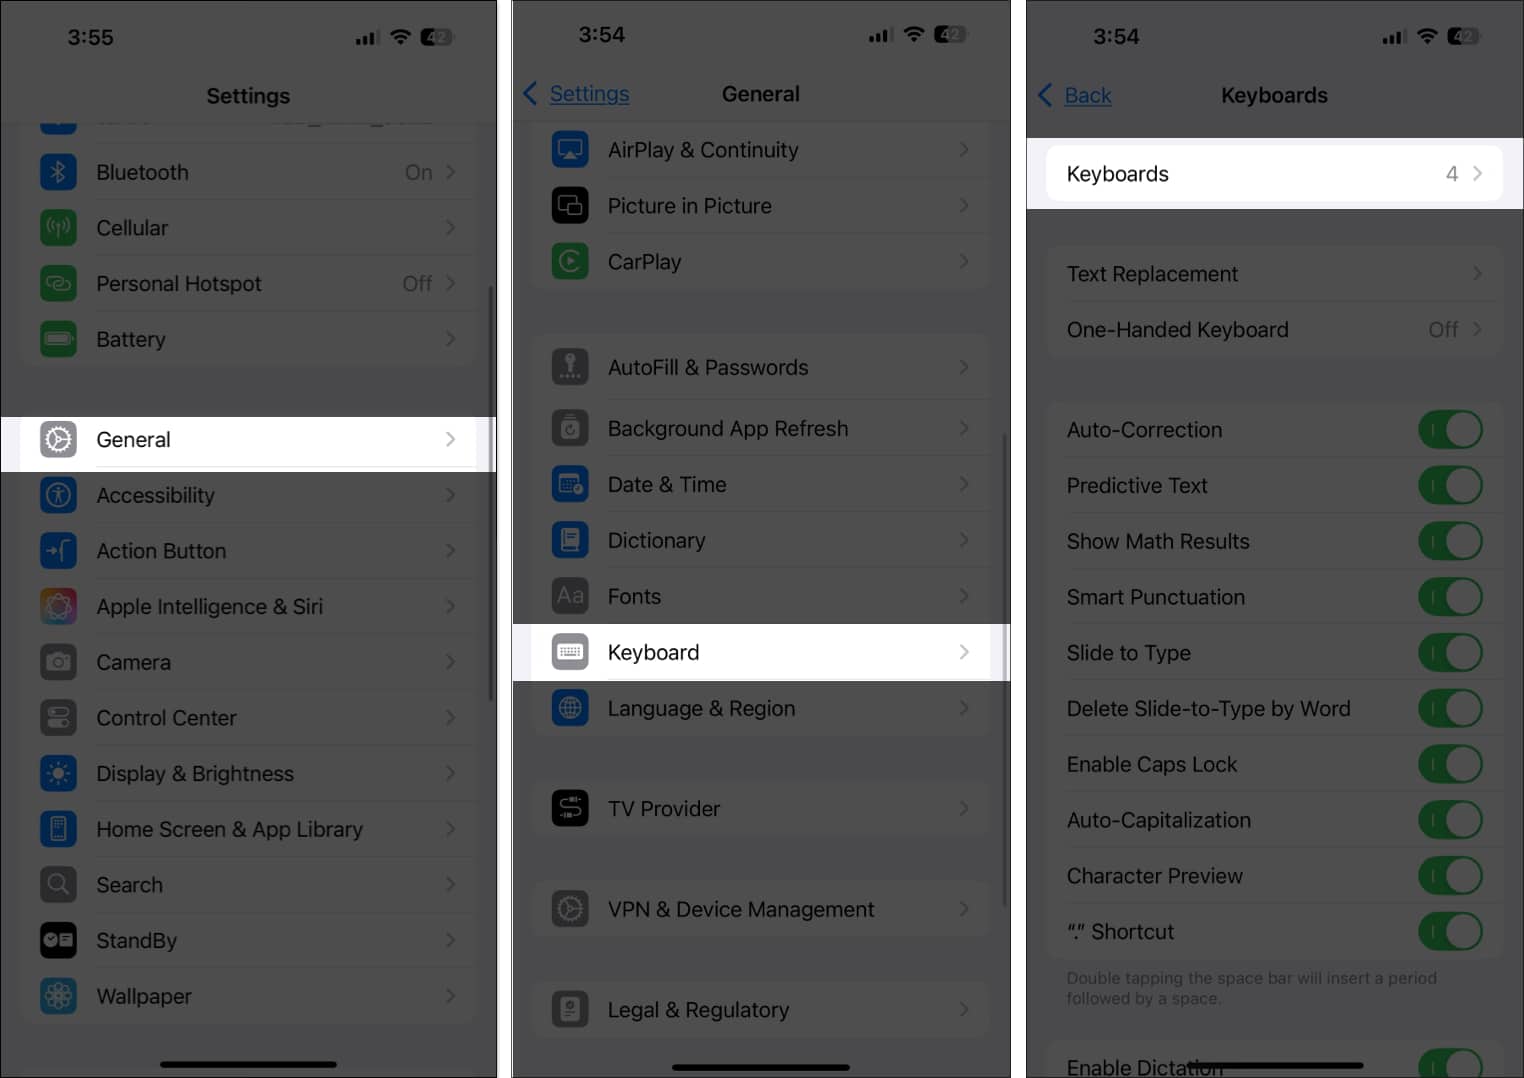
- Tap English (your primary language) → Add Language.
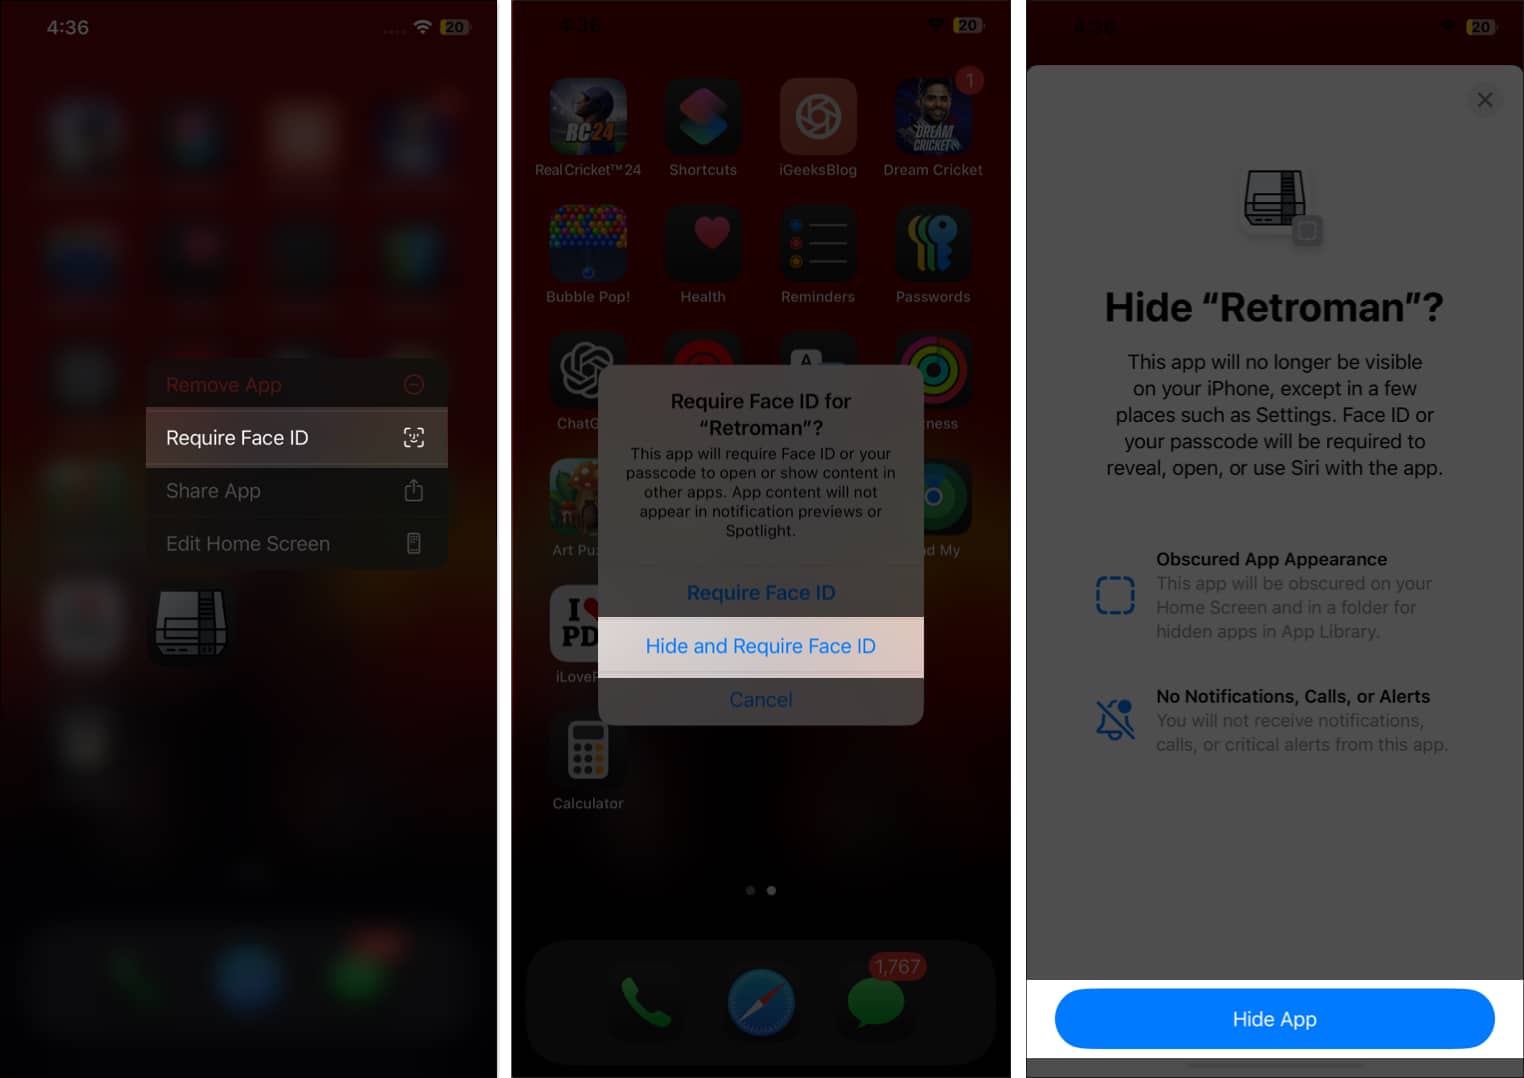
7. Hide or Lock Apps
There are many apps on our iPhones that we don’t want others to have access to or even know that they exist on our iPhones. While hiding or locking apps wasn’t possible earlier, iOS 18 has bought this most requested feature as well.
To lock and hide apps on your iPhone, simply press and hold the app → tap Require Face ID → select whether you want to lock or hide the app.
8. Customize the Action button
Starting with the iPhone 15 Pro, Apple replaced the mute slider with a new Action Button. While the Action Button, by default, is programmed to do the same job the mute slider used to do, you can customize it to perform other tasks, such as turning on Focus, Flashlight, recognizing music, and more.
However, unlike other physical buttons, you must press hold the Action Button for it to function instead of simply pressing it.
To customize the Action button, head to Settings → Action Button.

9. Use Screen Time Restrictions
As the name suggests, Screen Time restrictions help you limit your screen time by managing content, apps, and settings on your iPhone. The feature is most useful when managing your child’s iPhone or if you want to control your phone usage.
Do read our detailed guide on how to use Screen Time on your iPhone.
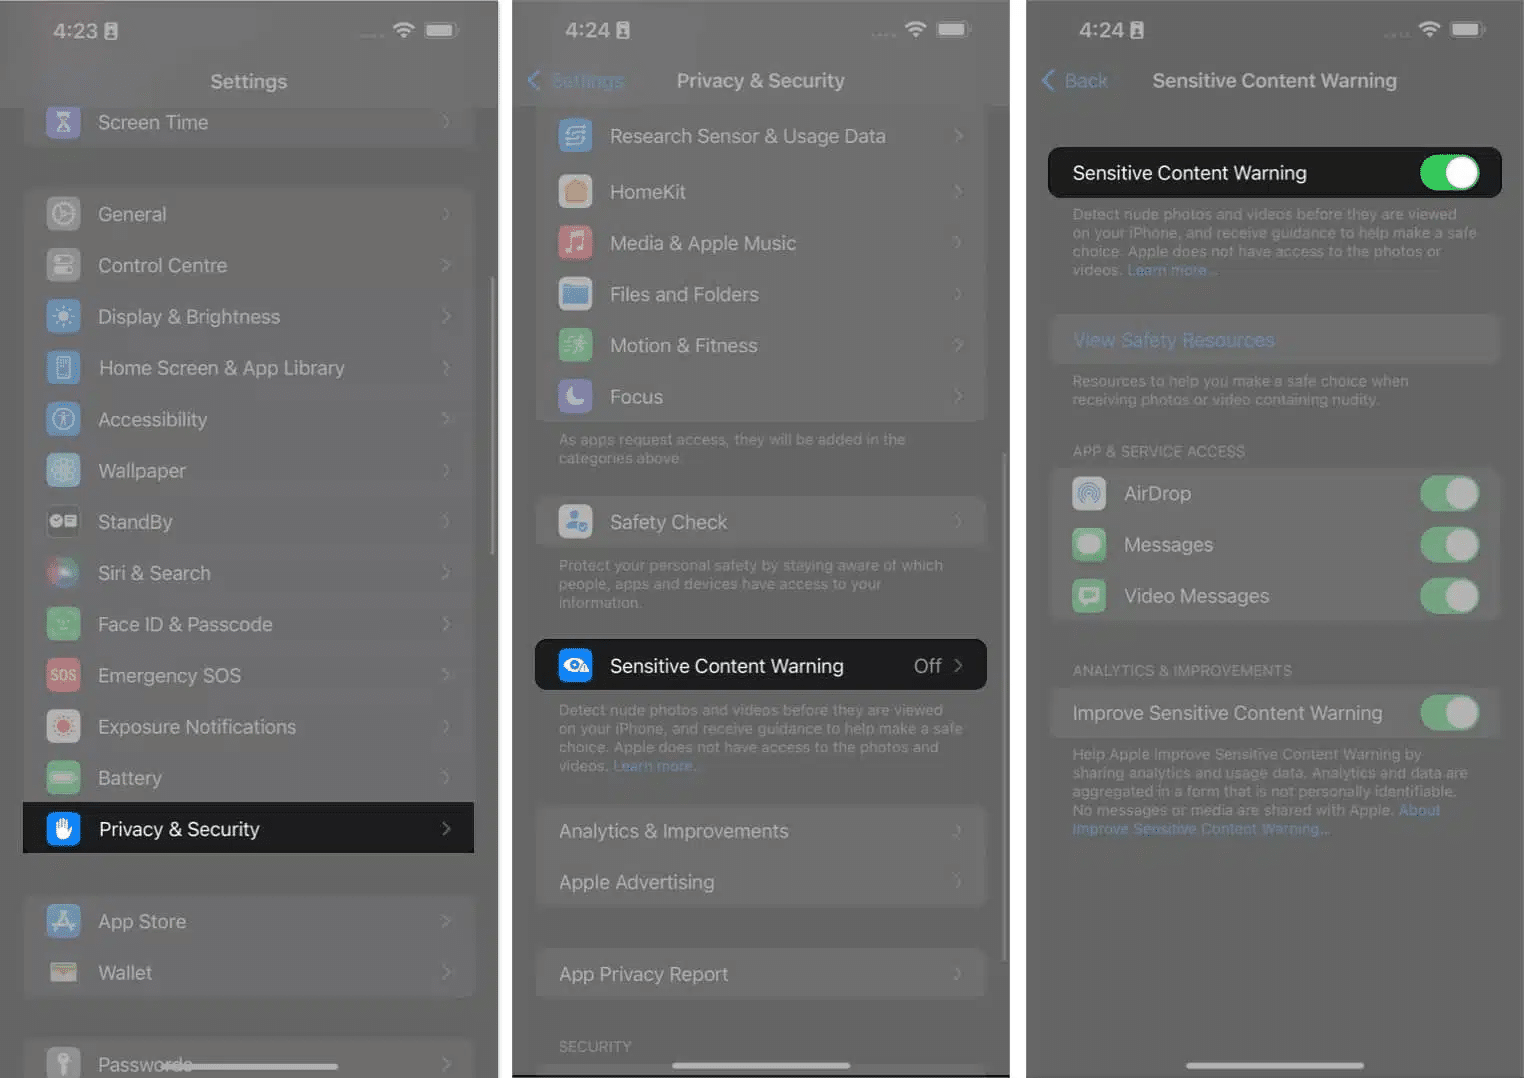
10. Enable Sensitive Content Warning
The internet is a dangerous place, so protecting yourself from exposure to inappropriate online content is paramount. While you can decide not to visit such websites, you can do anything if someone sends you something inappropriate via FaceTime, Messages, AirDrop, and other apps. This is exactly where Sensitive Content Warning comes in.
Once enabled, the Sensitive Content Warning blurs any image it deems sensitive and inappropriate received via the said apps and will display a “This may be sensitive” dialog box over it.
To enable Sensitive Content Warning, go to Settings → Privacy & Security → Sensitive Content Warning.
11. Take a Scrolling Screenshot
By now, you might have figured out how to take screenshots on your iPhone, but what about scrolling screenshots? Yes, taking a scrolling screenshot on an iPhone is not as straightforward as it is on an Android. Unlike Android, you can only take scrolling screenshots of web pages, documents, PDFs, notes, or emails. While earlier you could only save them as PDF files, this changed with iOS 17, as you can now save them as regular images. Here’s how:
Take a regular screenshot, then tap the preview tile at the bottom left to reveal it. Next, tap the Full Page tab, then tap Done to save the screenshot.
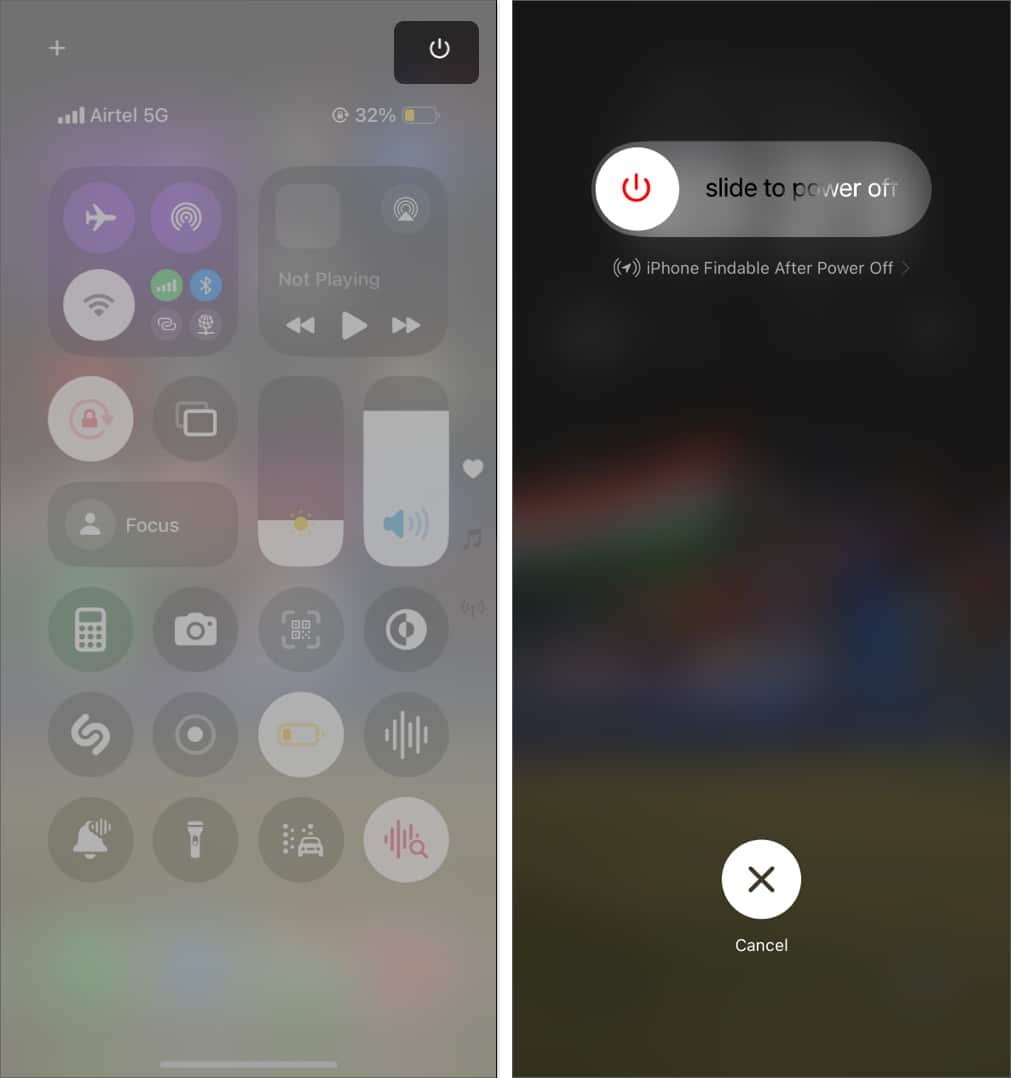
12. Turn Off Your iPhone From the Control Center
Not knowing the right button combination to turn off the iPhone is among the top frustrating moments for a new iPhone user. Luckily, you don’t have to remember it anymore. With iOS 18, Apple has added the Power button in the Control Center, making things much easier for first-time iPhone owners.
You can find the Power button at the top right corner of the Control Center. All you need to do is tap and hold it, and the power slider will appear.
13. Use Safari Distraction Control
Like Chrome is for Google, Safari is Apple’s proprietary web browser, which Apple has reserved for Apple devices, including the iPhone. Like any other web browser, Safari web pages can also annoy you with unwanted elements like sign-in prompts and cookie preference popups. But unlike other browsers, Safari offers you a way to hide them and keep your web page as clean as you want.
Do read our exclusive guide on the Safari Distraction Control feature to learn more about it.
14. Use the Spotlight Search
Spotlight Search on iPhone makes it super easy to find what you’re looking for on your iPhone. It can literally help you with anything on your iPhone, be it finding events on your calendar, files, apps, TV shows, or dedicated settings option, and even name, place, or person in photos.
So, the next time you have difficulty finding anything on your iPhone, simply make a small down swipe to access the Spotlight Search.
15. Set Up Emergency Contact
Along with the Medical ID, you can also add emergency contacts on your iPhone. Just like the Medical ID, the emergency contact will let the first responder know whom to contact when you are in an emergency.
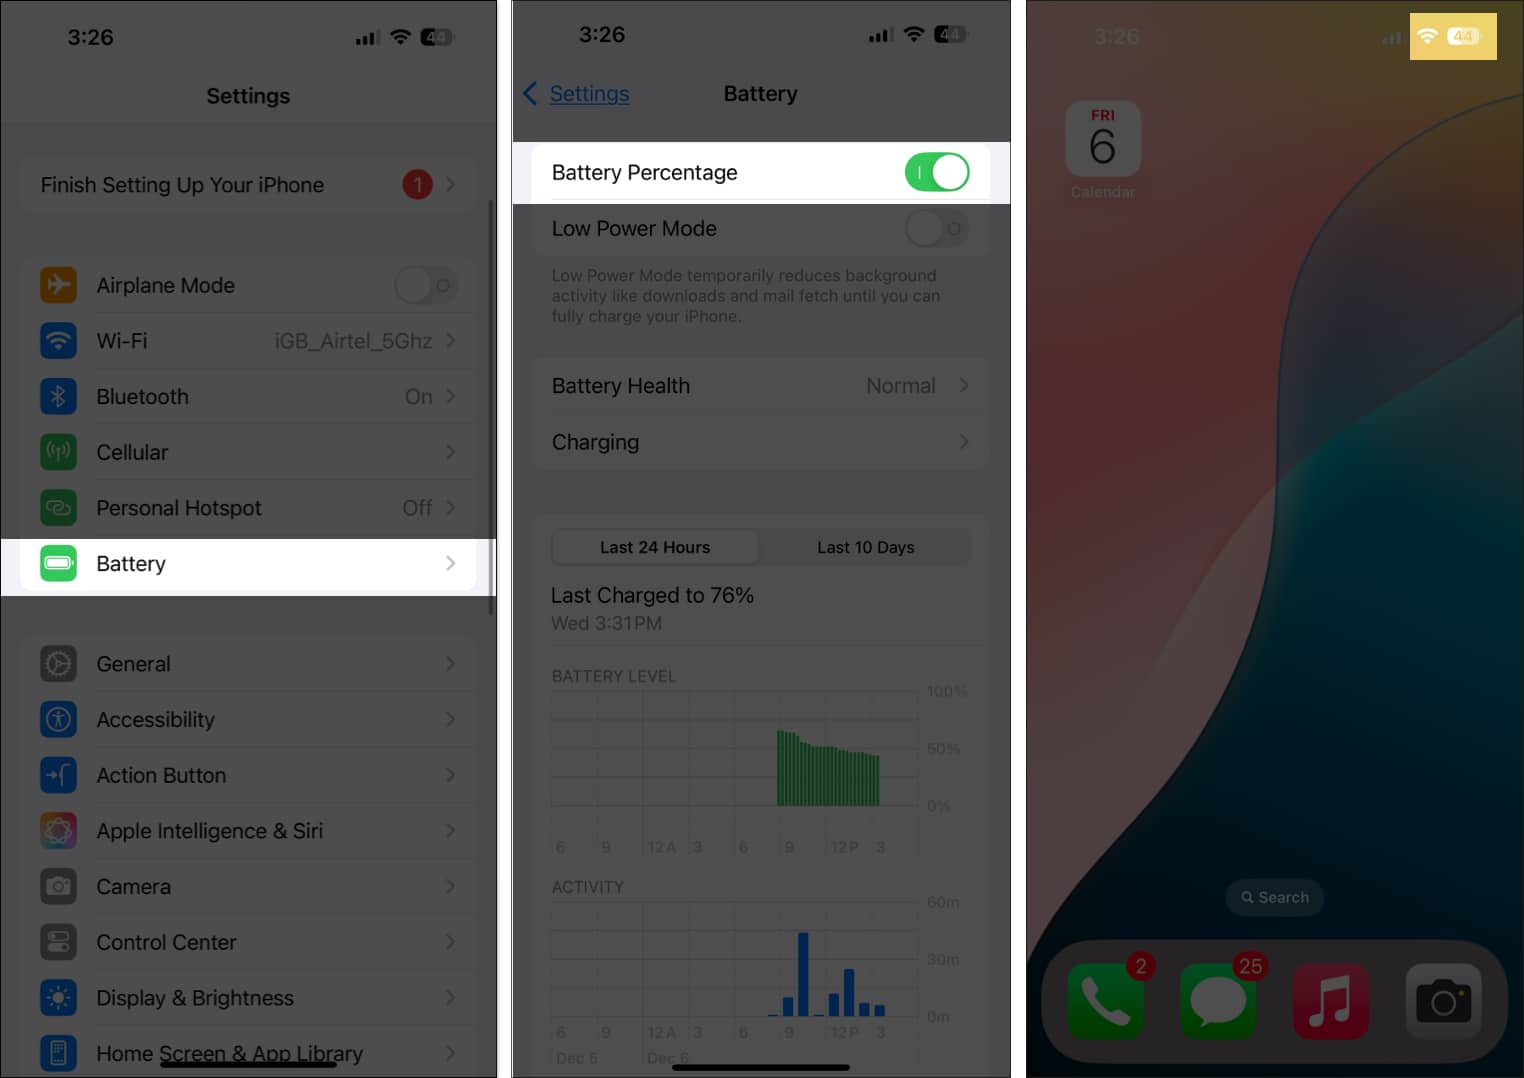
16. Enable Battery Percentage Display
One thing that even I hated when I switched to the iPhone was finding out Apple hadn’t enabled the battery percentage indicator by default, and I am sure you, too, would hate this fact. There is no way one could make out exactly how long their battery will last by simply looking at the battery indicator with no number on it.
Luckily, unlike other basic features, Apple lets you enable the battery percentage indicator via the settings. To do so, go to Settings → Battery → toggle on Battery Percentage.
17. Customize Photos App
If you had moved to the iPhone before the arrival of iOS 18, you would have been satisfied with how the Photos app used to look. However, Apple completely redesigned the Photos app in iOS 18, leaving even the seasoned user confused, let alone new iPhone users. You get a single scrollable screen instead of multiple tabs.
Thankfully, Apple allows you to customize the Photos app on your iPhone, so you can rearrange things according to your preferences. All you need to do is scroll down to the bottom of the Photos app, hit the Customize button and start customizing.
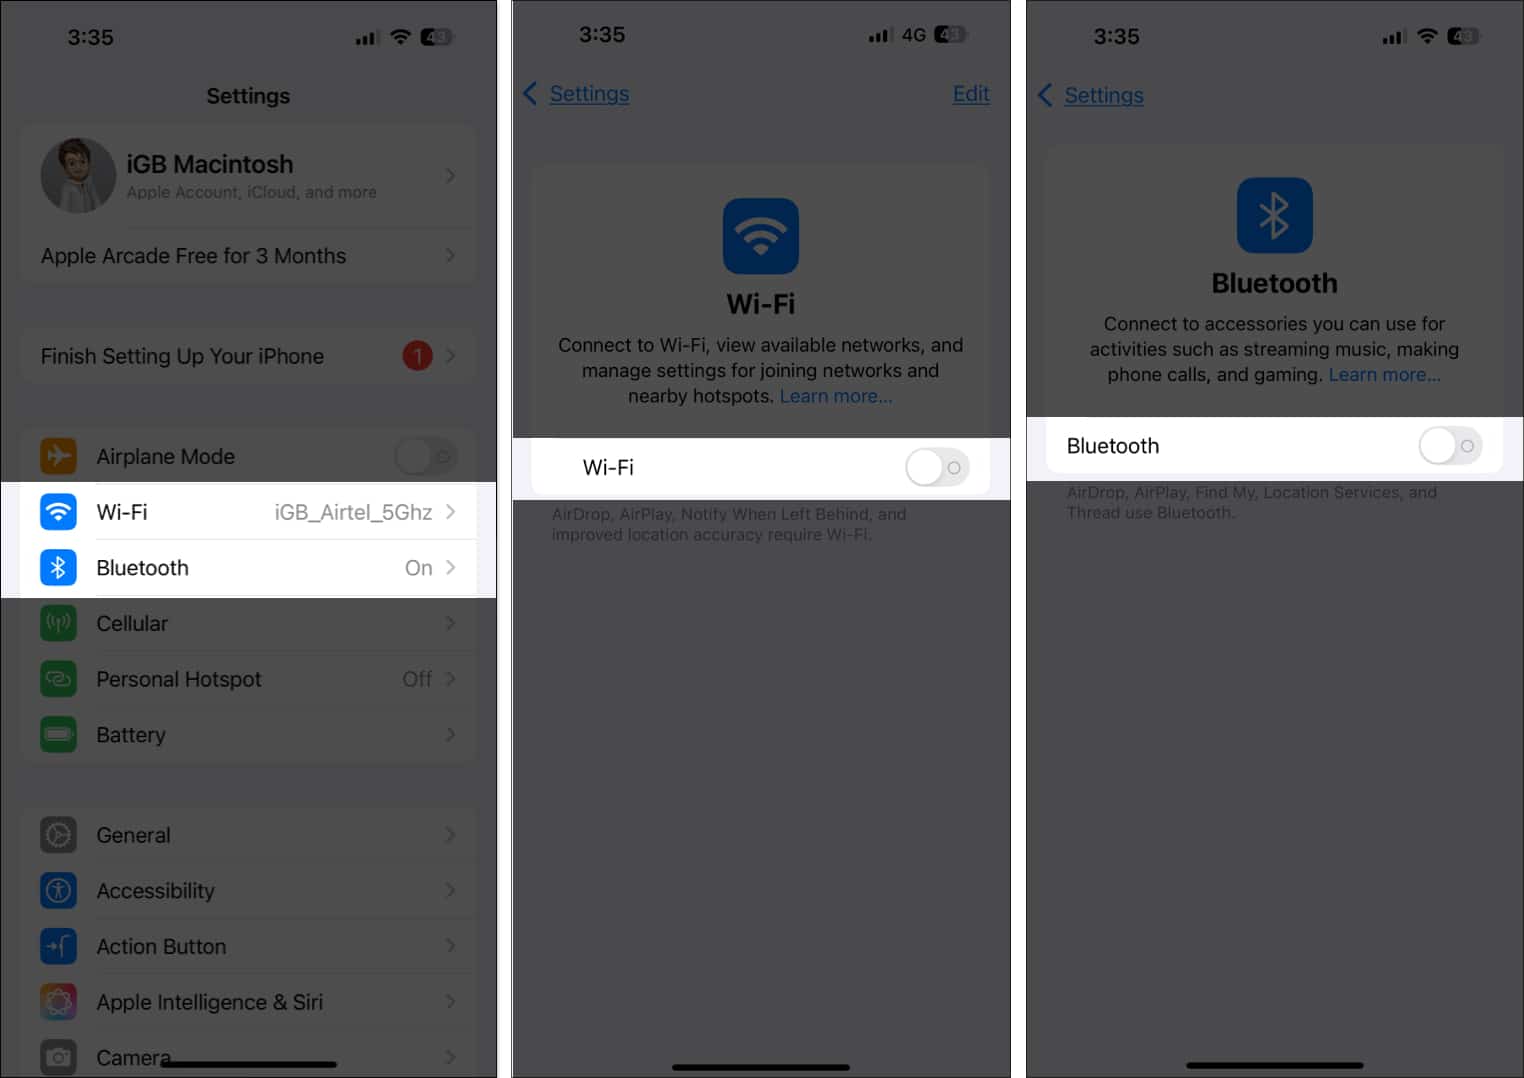
18. Fully Turn Off Wi-Fi and Bluetooth
Another weird thing about the iPhone is that even when you disable Bluetooth and Wi-Fi from the Control Center, they are not truly disabled. Both services still stay active in the background. You must disable both services within the iPhone Settings to completely turn them off.
19. Use Focus Mode
An advanced version of the Do Not Disturb mode, the Focus mode on the iPhone helps you limit distractions and concentrate on the things that matter most. You can customize the focus options to your preference, such as work, sleep, personal, fitness, and more.
Do read our detailed guide on how to use Focus on iPhone to learn more.
20. Customize Lock Screen Controls
Do you also get frustrated when the flashlight gets activated out of nowhere without you even knowing? Well, most of the time, this happens when you accidentally press the flashlight button on the Lock Screen. While there is no solution for this on Android, you can customize the lock screen on your iPhone or remove the flashlight control altogether.
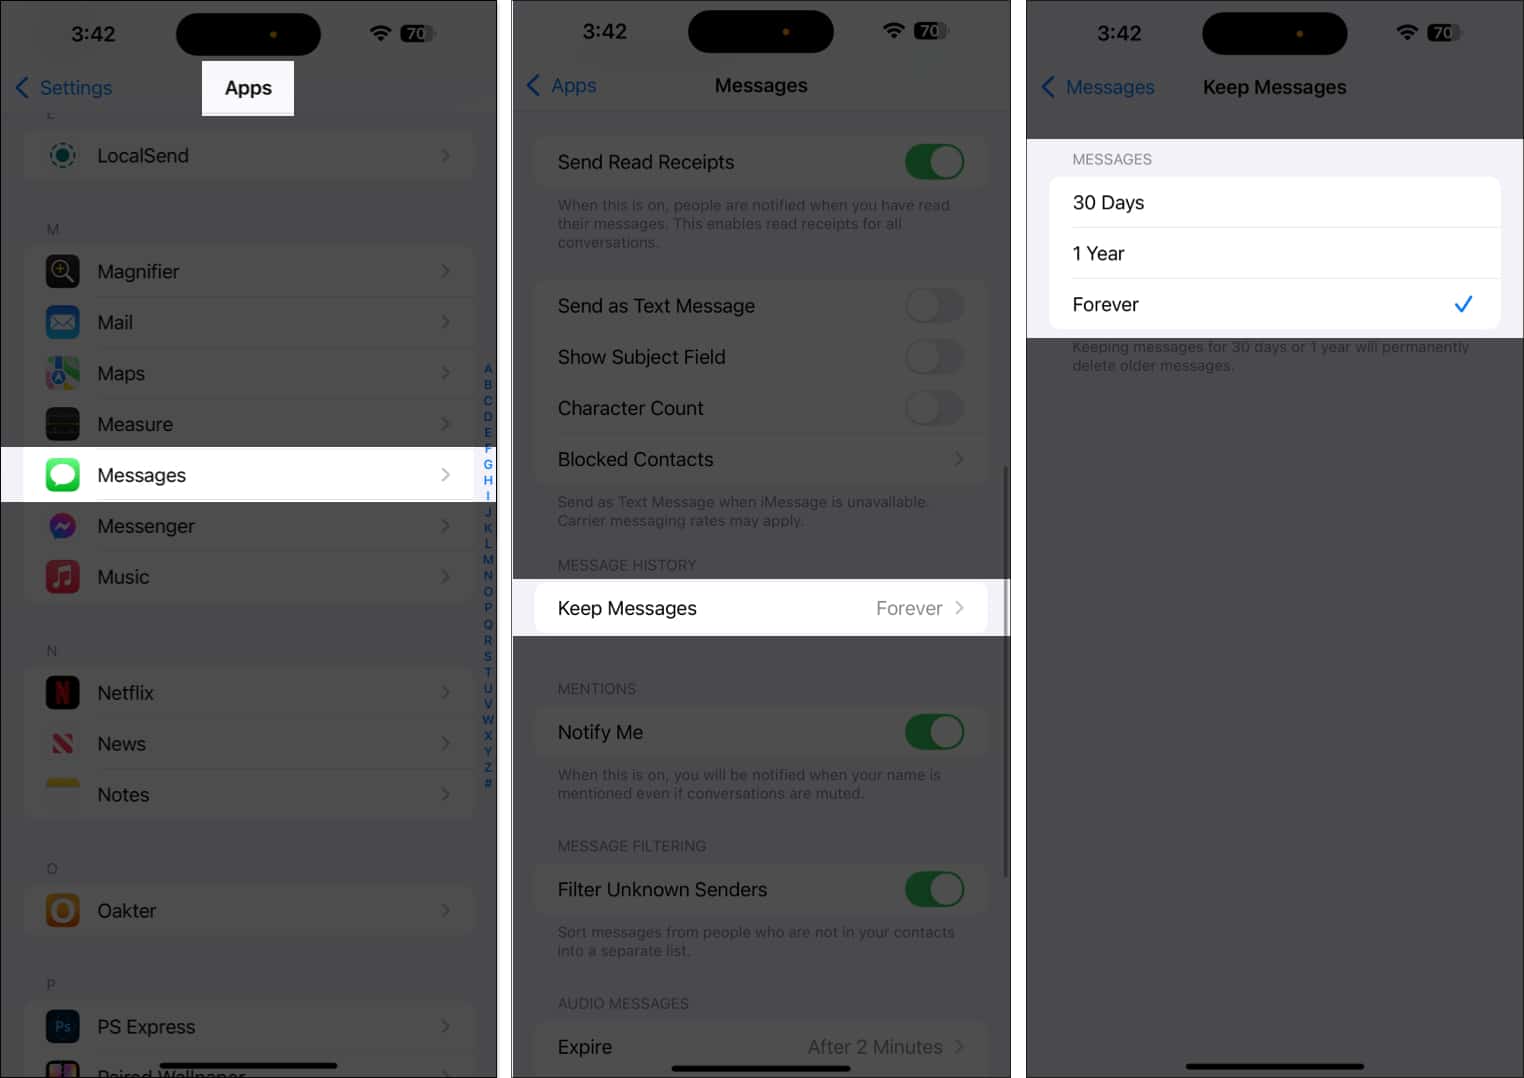
21. Set Messages to Auto-Delete
There is no point in having countless older messages eating valuable space on your iPhone for no good reason. However, with tens of promotional and spam messages arriving daily, deleting each message manually isn’t feasible. To help you with that, the iPhone lets you choose a time frame for auto-deleting messages. Here’s how:
Open Settings → Apps → Messages → Keep Messages → Choose time period.
22. Use Family Sharing
Buying your first iPhone can help you save money if other family members also own Apple devices. Once set up and enabled, Family Sharing lets you share your subscriptions for Apple services, including iCloud+, Apple Music, Apple TV+, Apple Fitness+, Apple News+, and Apple Arcade, without sharing the Apple Account.
Read our dedicated guide to learn What is Apple Family Sharing and How to Use It?
23. Scroll to the Top Instantly
Do you ever find yourself scrolling so much that returning to the top of the screen takes an eternity? Well, here’s a fantastic iPhone tip that every new user should be aware of. Simply tap at the top of the screen, and you’ll automatically return to the top of whatever you’re scrolling through.
24. Record Calls Natively
After years of anticipation, Apple finally added native call recording support to iPhones with iOS 18. However, the recording process isn’t discreet; the iPhone lets the person know the call will be recorded when you hit the record button.
Do read our detailed guide on call recording on iPhone to learn more.
25. Try Apple Intelligence Writing Tools
Although a bit late, Apple also joined the AI bandwagon with iOS 18. Writing tools are among the various features of Apple Intelligence, which you can use to proofread and rewrite text directly on your iPhone. This eliminates the need to pay for paid tools such as Grammarly. However, in order to experience this feature, you must own an Apple Intelligence-supported iPhone, i.e., iPhone 15 Pro or later models.
Wrapping Up
Your new iPhone can do much more than you might expect at first glance. These tips will help you navigate iOS confidently and discover what makes Apple’s ecosystem so seamless.
Explore, experiment, and enjoy your new iPhone. If you’ve found a hidden gem or clever trick, share it in the comments to help other first-time users.
Also read:

Written by
Mehak SiddiquiMehak has a master’s degree in communication and over ten years of writing experience. Her passion for technology and Apple products led her to iGeeksBlog, where she specializes in writing product roundups and app recommendations for fellow Apple users. When not typing away on her MacBook Pro, she loves being lost in a book or out exploring the world.
View all posts →More from How-to

Snapchat Parental Controls: How to Set Up Family Center and Keep Your Teen Safe
Snapchat’s Family Center lets parents monitor their teen’s friend activity and screen time without reading private messages. Here’s how to set it up and what to expect.

How to Block and Unblock Someone on Instagram
Instagram lets you block or unblock someone in seconds. Follow these simple steps to take full control of your privacy and online peace.

Apple Watch Not Responding? 8 Fixes That Actually Work
Is your Apple Watch unresponsive or stuck on a black screen? Here are 8 proven fixes to help you unfreeze it and get it working again quickly.