- Enable Live Translation in Messages for real-time chat—iOS now lets you translate replies instantly in multilingual conversations without switching apps.
- Adaptive Power uses on-device AI to extend battery life by learning your usage patterns and adjusting system behavior during high power consumption.
- Call Screening can auto-ask callers why they’re calling or send unknown numbers to voicemail, reducing spam and unwanted interruptions.
- You can simplify the Liquid Glass interface by reducing transparency for a cleaner look—great for focus or accessibility needs.
- Disable full-screen screenshot previews if you prefer minimal visual clutter after taking a screen grab in iOS 18 Settings.
Got the new iPhone 17 or updated to iOS 26? You’re in the right place. Whether you’re new to iOS or a long-time user, there are essential settings you should tweak right away to get the best iPhone experience, some you may not even know exist.
From securing your data to protecting your hearing, here’s the full list of iOS 26 settings you should change on your iPhone, simple tweaks that instantly upgrade your experience.
Table of Contents
- 1. Enable Live Translation in Messages
- 2. Turn On Adaptive Power
- 3. Turn On Call Screening
- 4. Tweak the Liquid Glass Effect
- 5. Turn Off Full-Screen Screenshot Previews
- 6. Explore New Ringtones
- 7. Turn Off Personalized Ads
- 8. Turn on Optimized Battery Charging
- 9. Disable In-App Ratings & Reviews
- 10. Disable Access to Siri, Home Control, and Control Center When Locked
- 11. Limit Microphone and Camera Access to Certain Apps
- 12. Customize Action Button
- 13. Turn On Find My iPhone to Track a Lost Device
- 14. Optimize Storage with High-Efficiency Format
- 15. Disable Auto-Correction in Keyboards
- 16. Use Dark App Icons
- 17. Set Emergency SOS
- 18. Set Up Parental Controls
- 19. Turn on Stolen Device Protection
- 20. Hide App Store purchases
- 21. Enable Calls on Other Devices
- 22. Set Up Live Voicemail
- 23. Lock Apps
- 24. Turn on Vehicle Motion Cues While Traveling
- 25. Hide Apps
- 26. Set Up a Legacy Contact
- 27. Turn off App Tracking
- 28. Turn off Background App Refresh
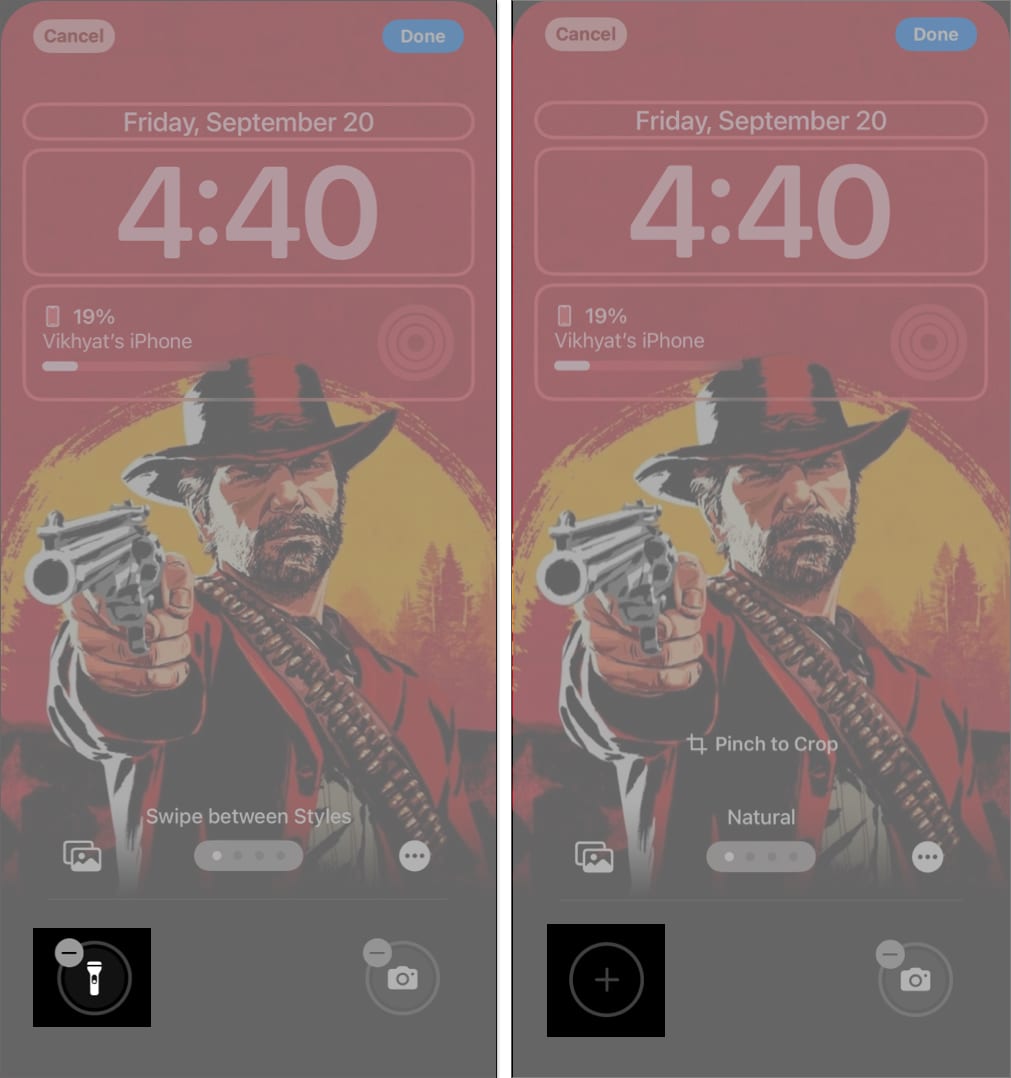
- 29. Change Lock Screen Controls
- 30. Disable Screen Distance
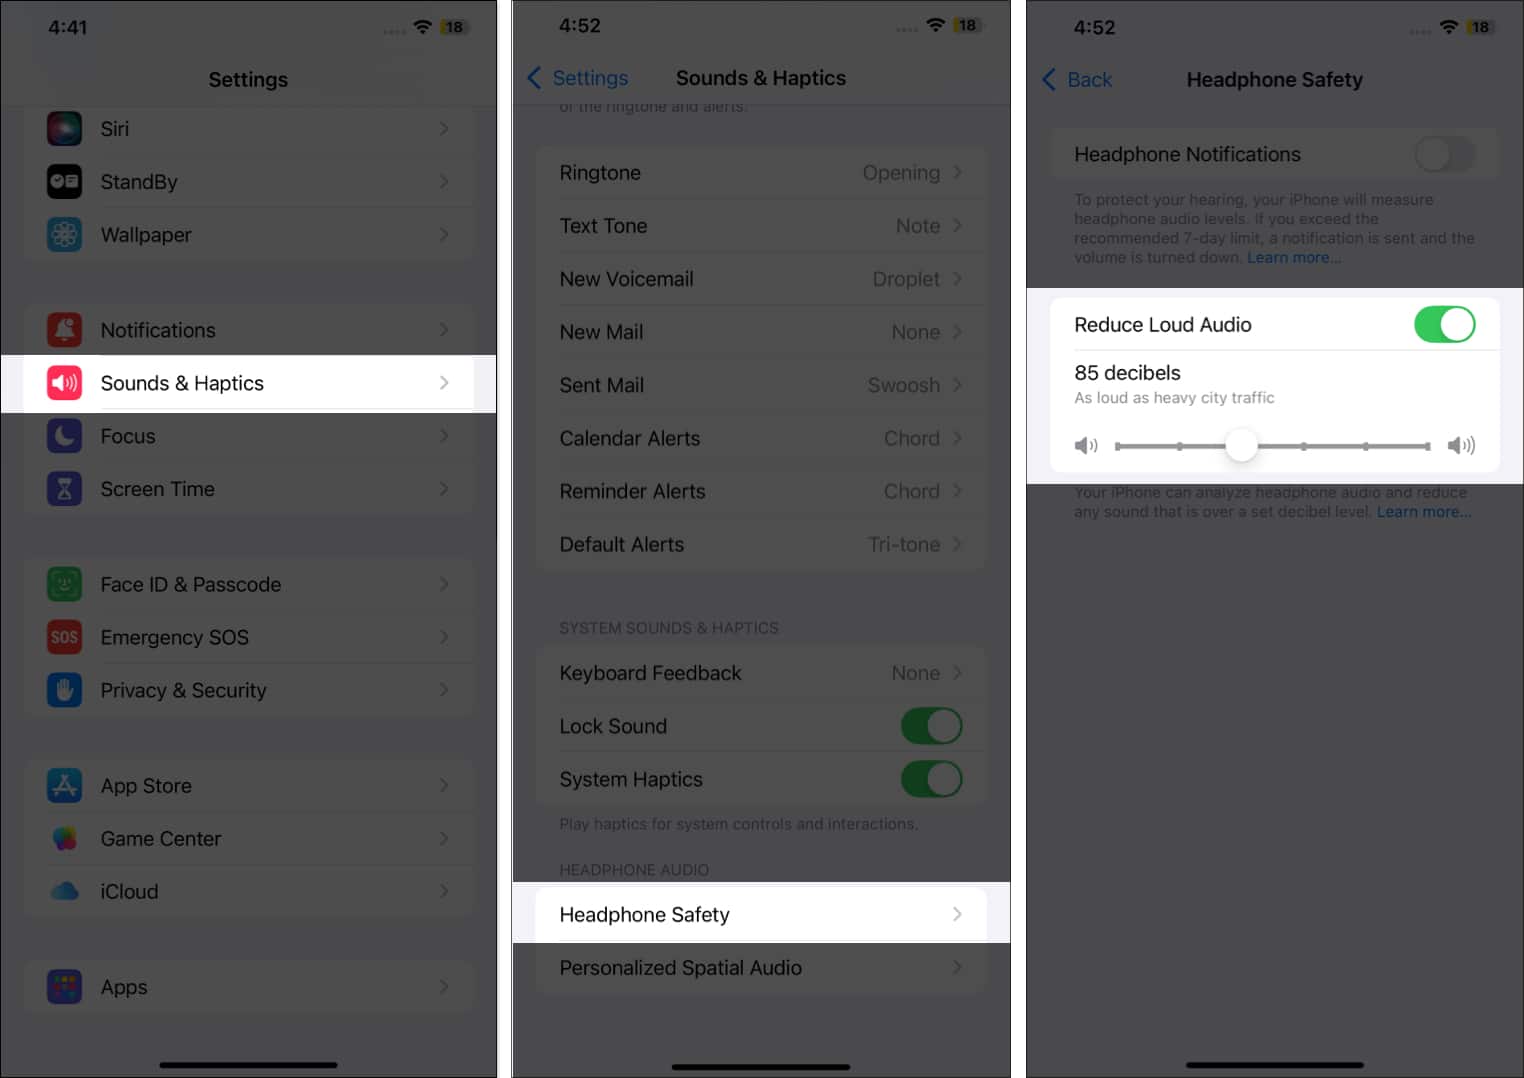
- 31. Enable Reduce Loud Audio
- iPhone Experience Enhanced
1. Enable Live Translation in Messages
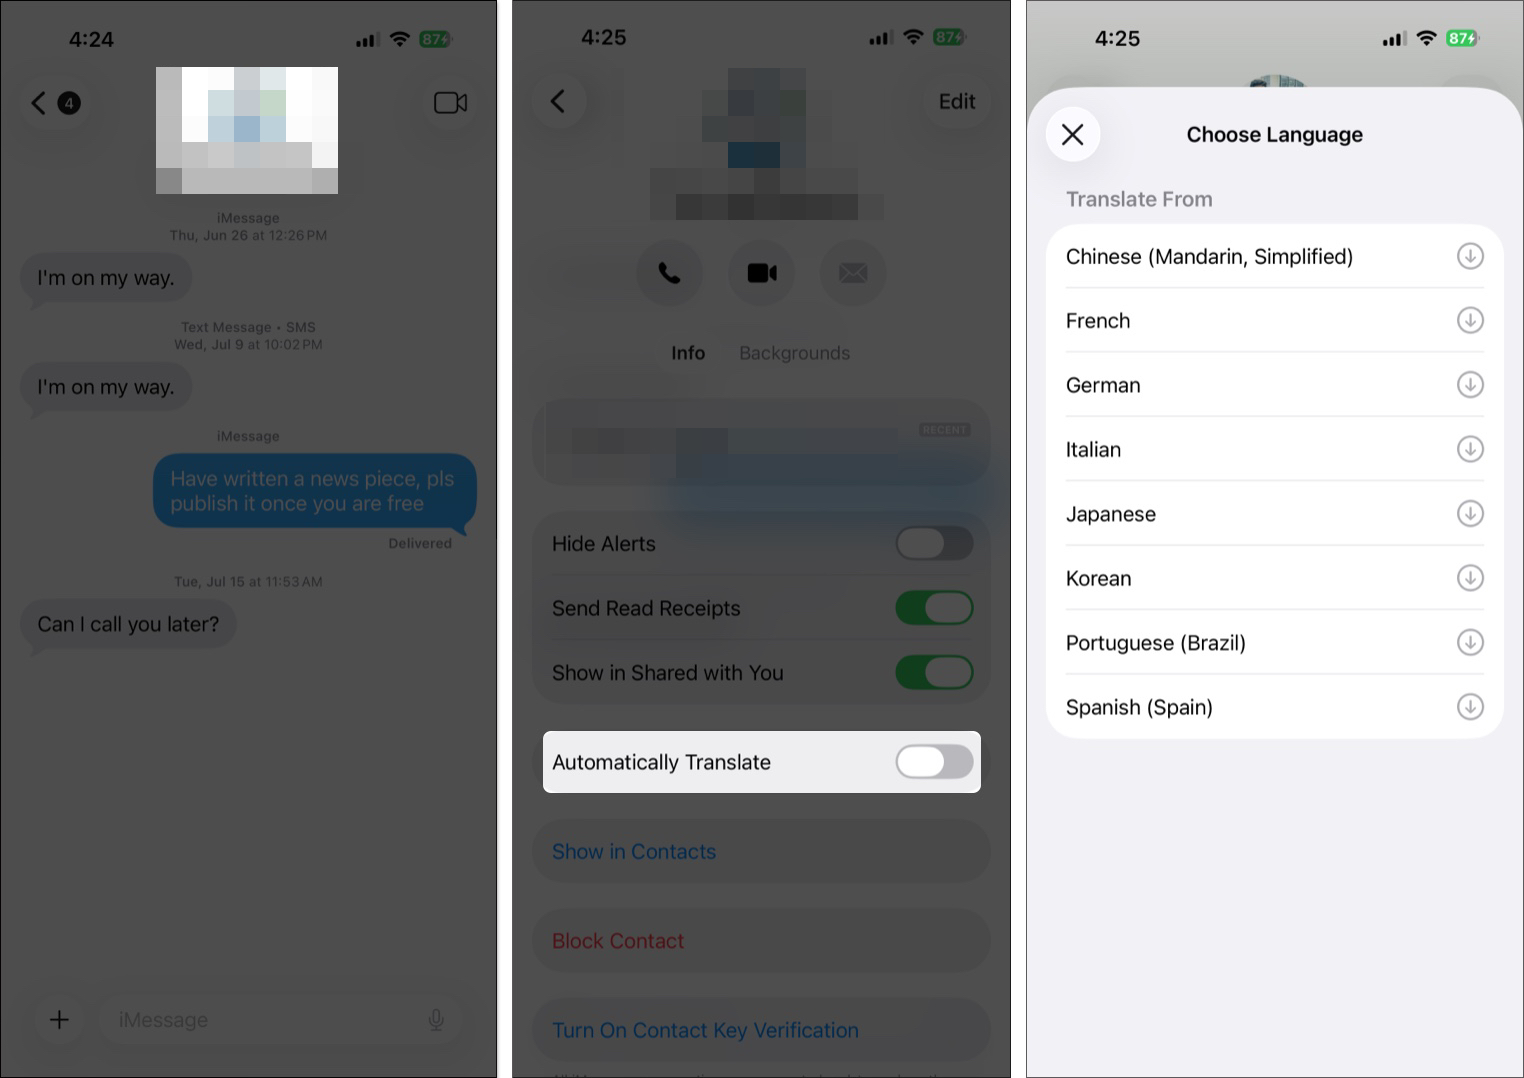
The Live Translation feature in Messages turns your iPhone into a real-time translator, making cross-language chats seamless. You’ll need to enable it manually for each conversation.
How to enable Live Translation:
- Open Messages and head to a conversation with a contact.
- Here, tap the recipient’s name at the top of the screen.
- Toggle on Live Translation.
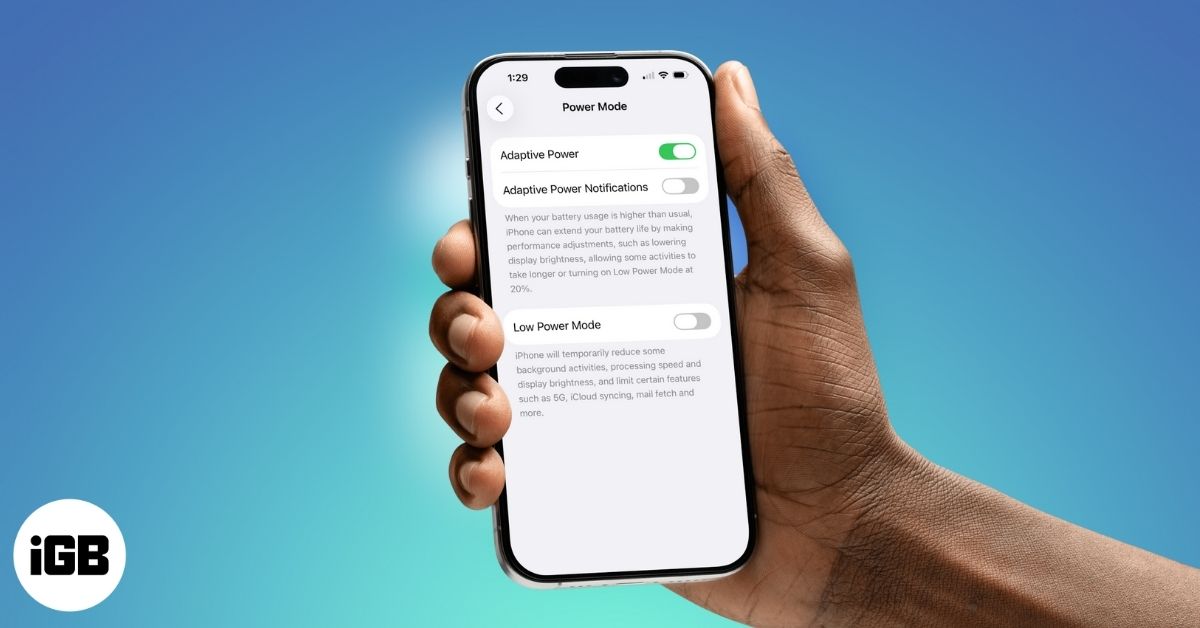
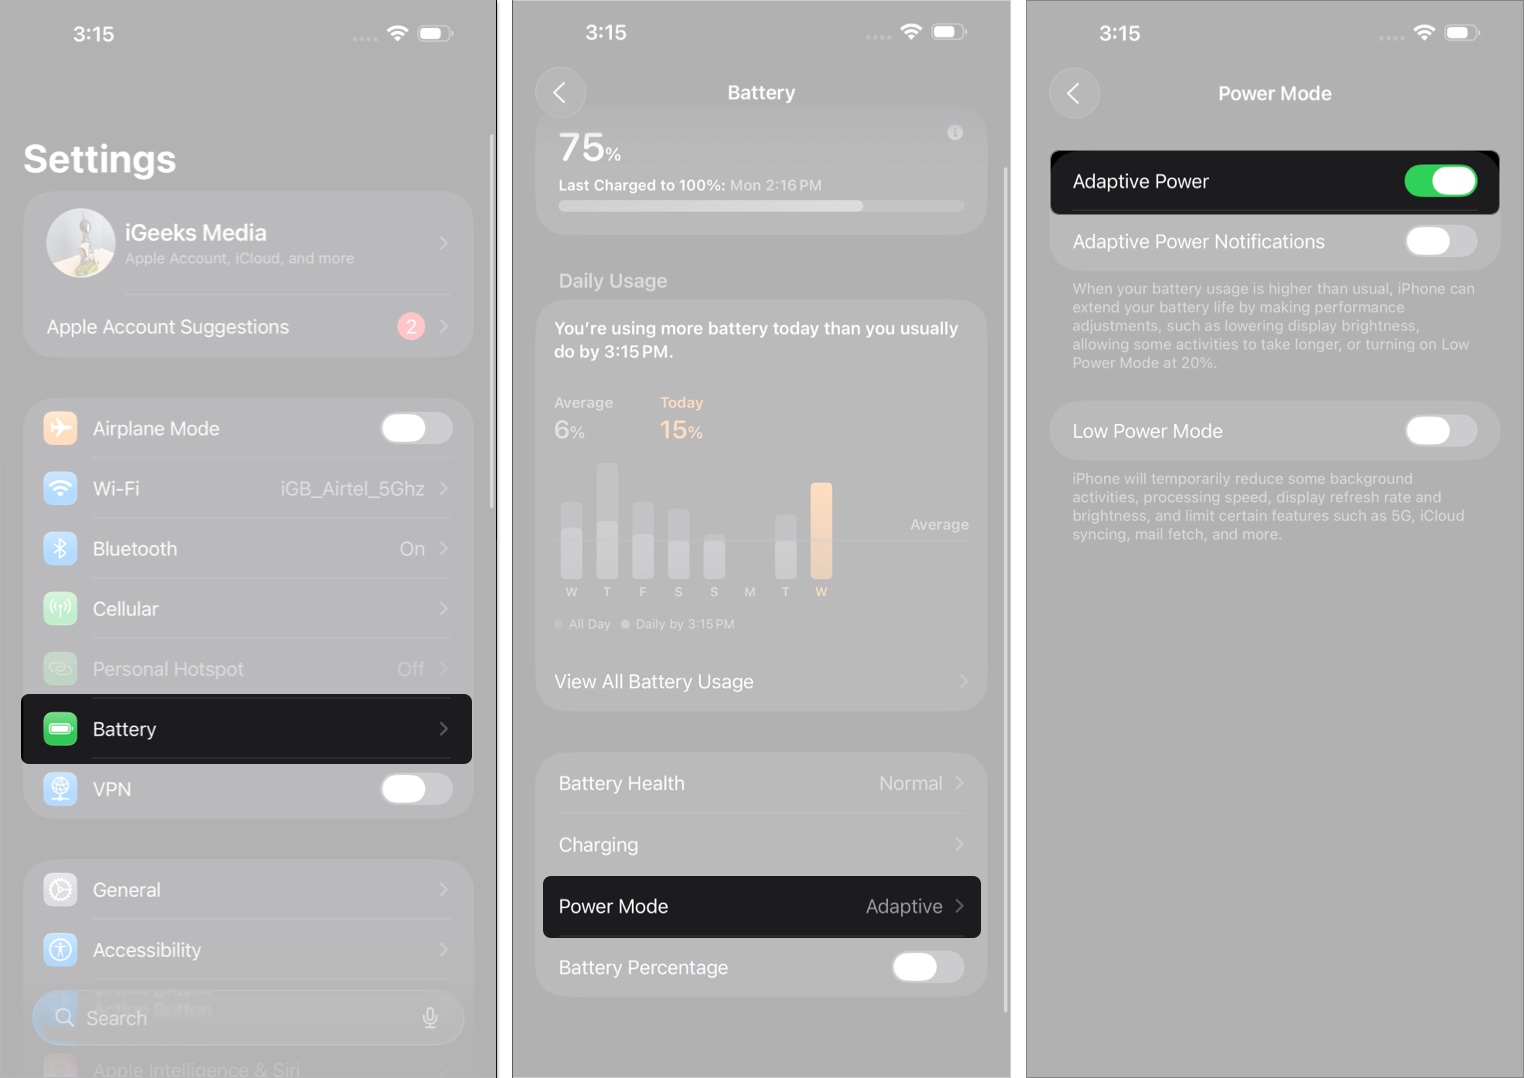
2. Turn On Adaptive Power
Adaptive Power is one of the smartest new battery features in iOS 26. Available on Apple Intelligence-supported iPhones, it uses AI to detect high power usage and quietly optimizes performance to stretch your battery life.
How to enable Adaptive Power:
- Open Settings → Battery → Power Mode.
- Toggle on Adaptive Pow.
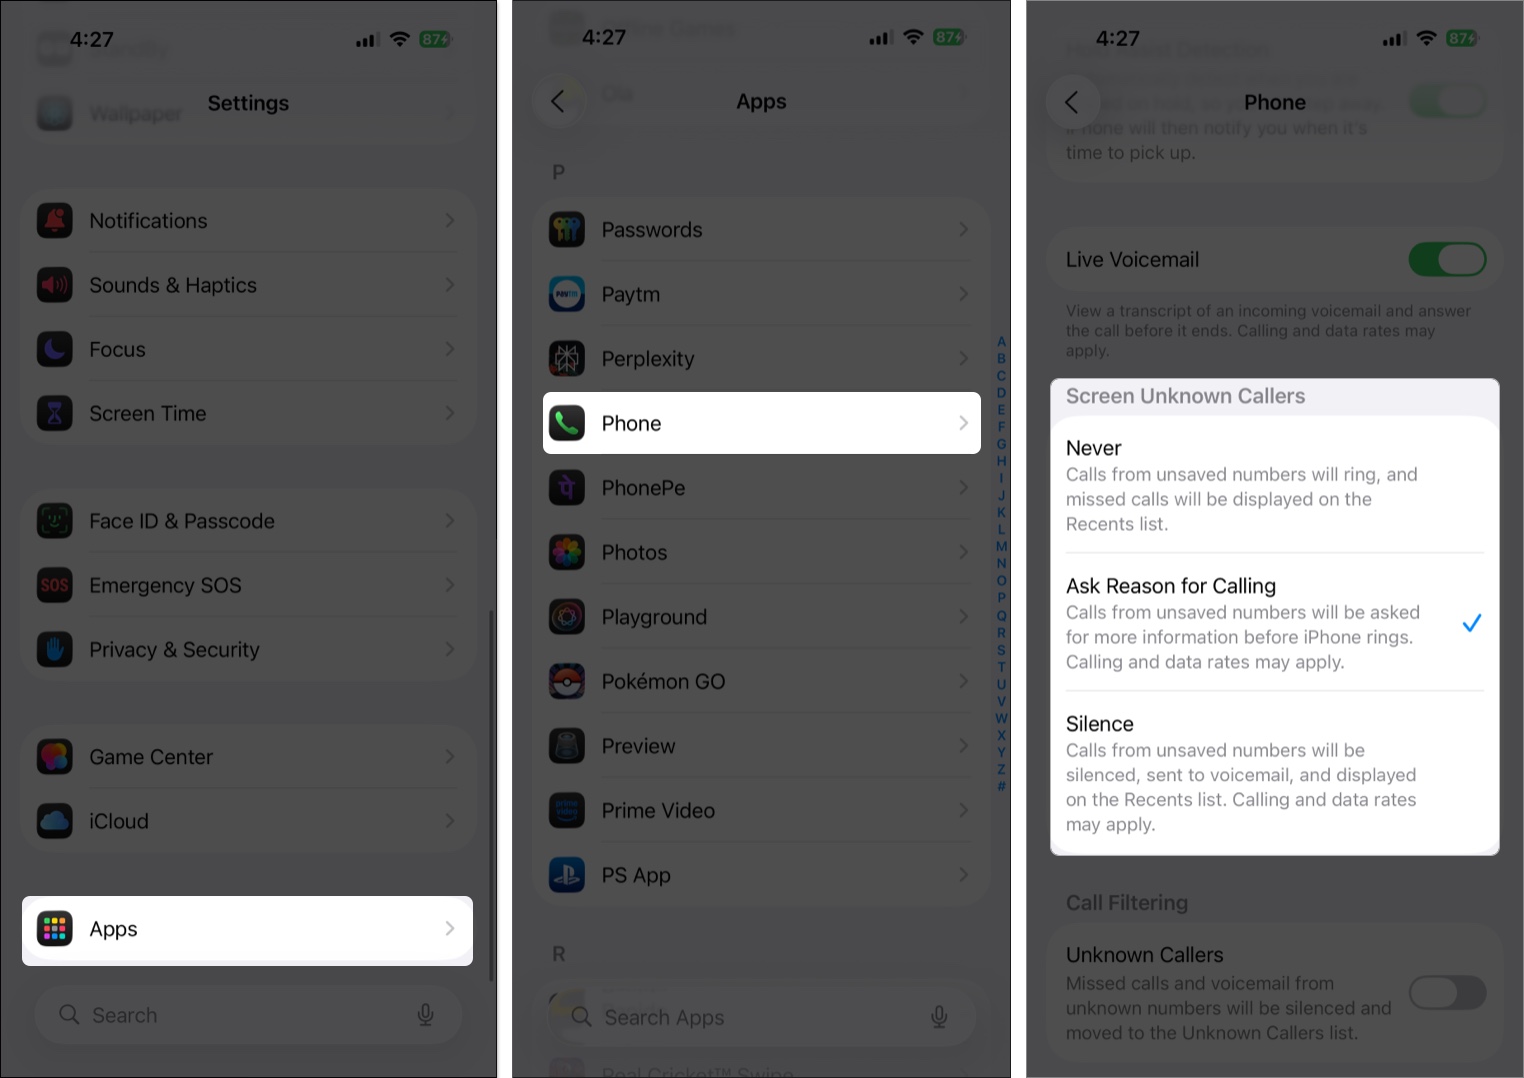
3. Turn On Call Screening
If you’re tired of unknown numbers blowing up your phone, Call Screening is your new best friend. In iOS 26, your iPhone can ask callers to state their name and reason for calling or even send unknown numbers directly to voicemail.
How to set up Call Screening:
- Open Settings → Apps → Phone.
- Here, scroll down to the Call Screening section and select the appropriate option underneath it.
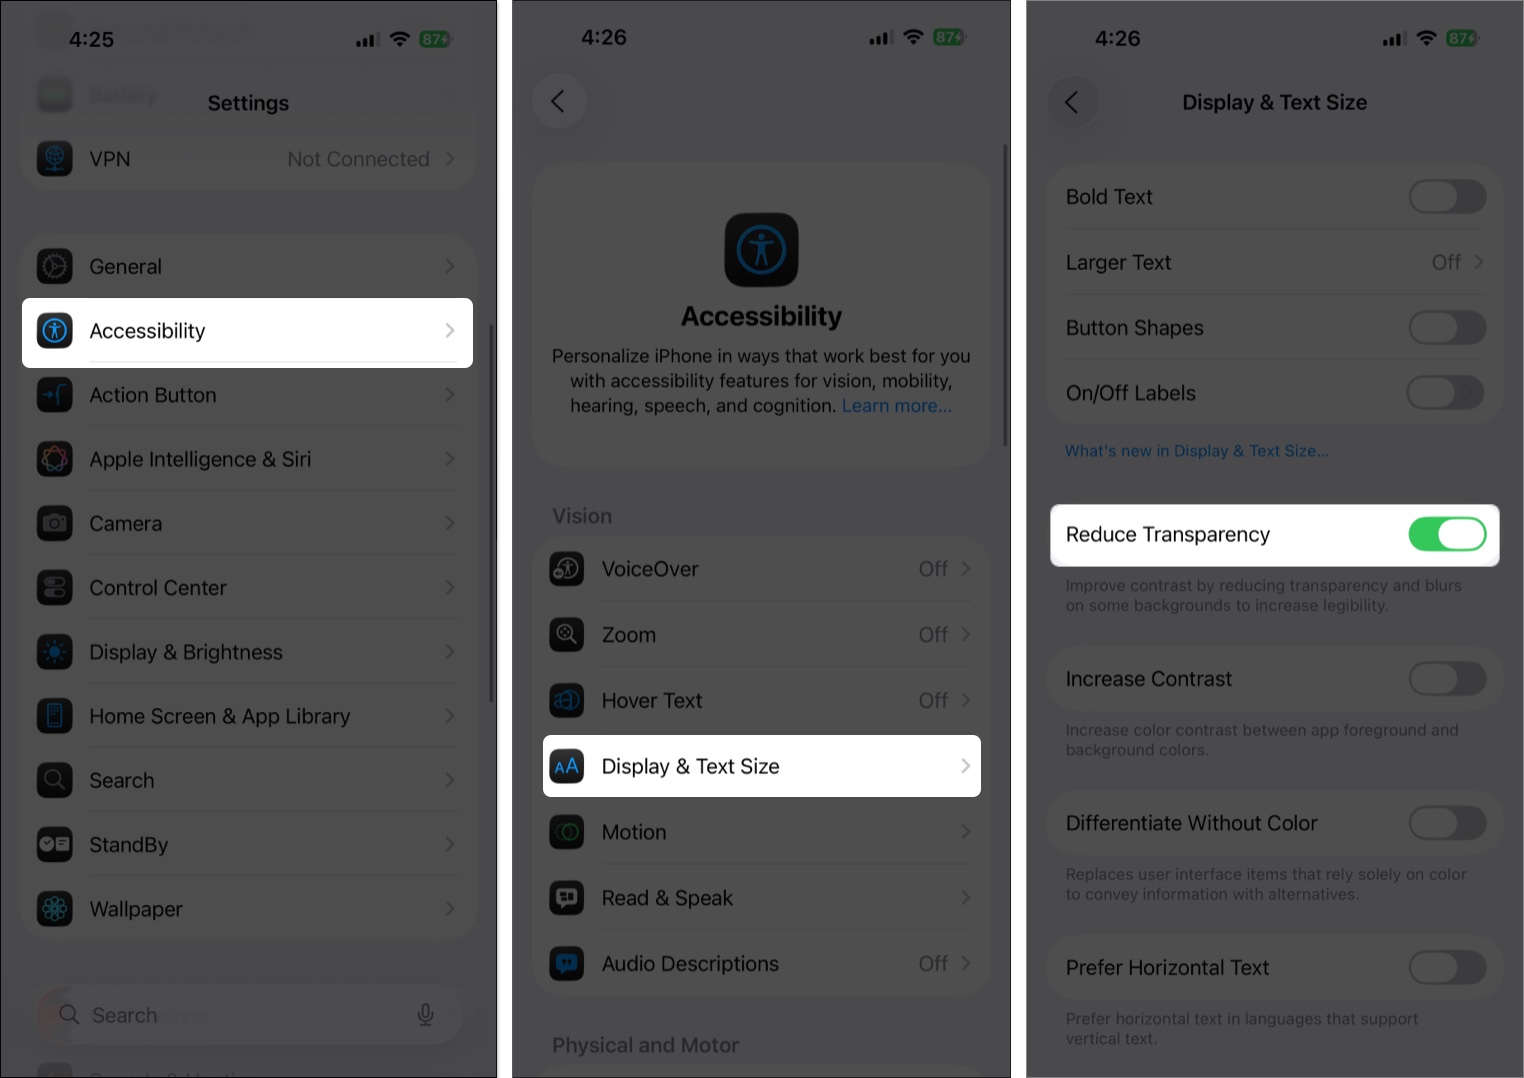
4. Tweak the Liquid Glass Effect
Apple’s new Liquid Glass UI is eye-catching, but not everyone loves it. If you find it distracting, you can reduce the transparency for a cleaner, simpler look.
How to reduce Liquid Glass effects:
- Open Settings → Accessibility → Display & Text Size.
- Toggle on Reduce Transparency.
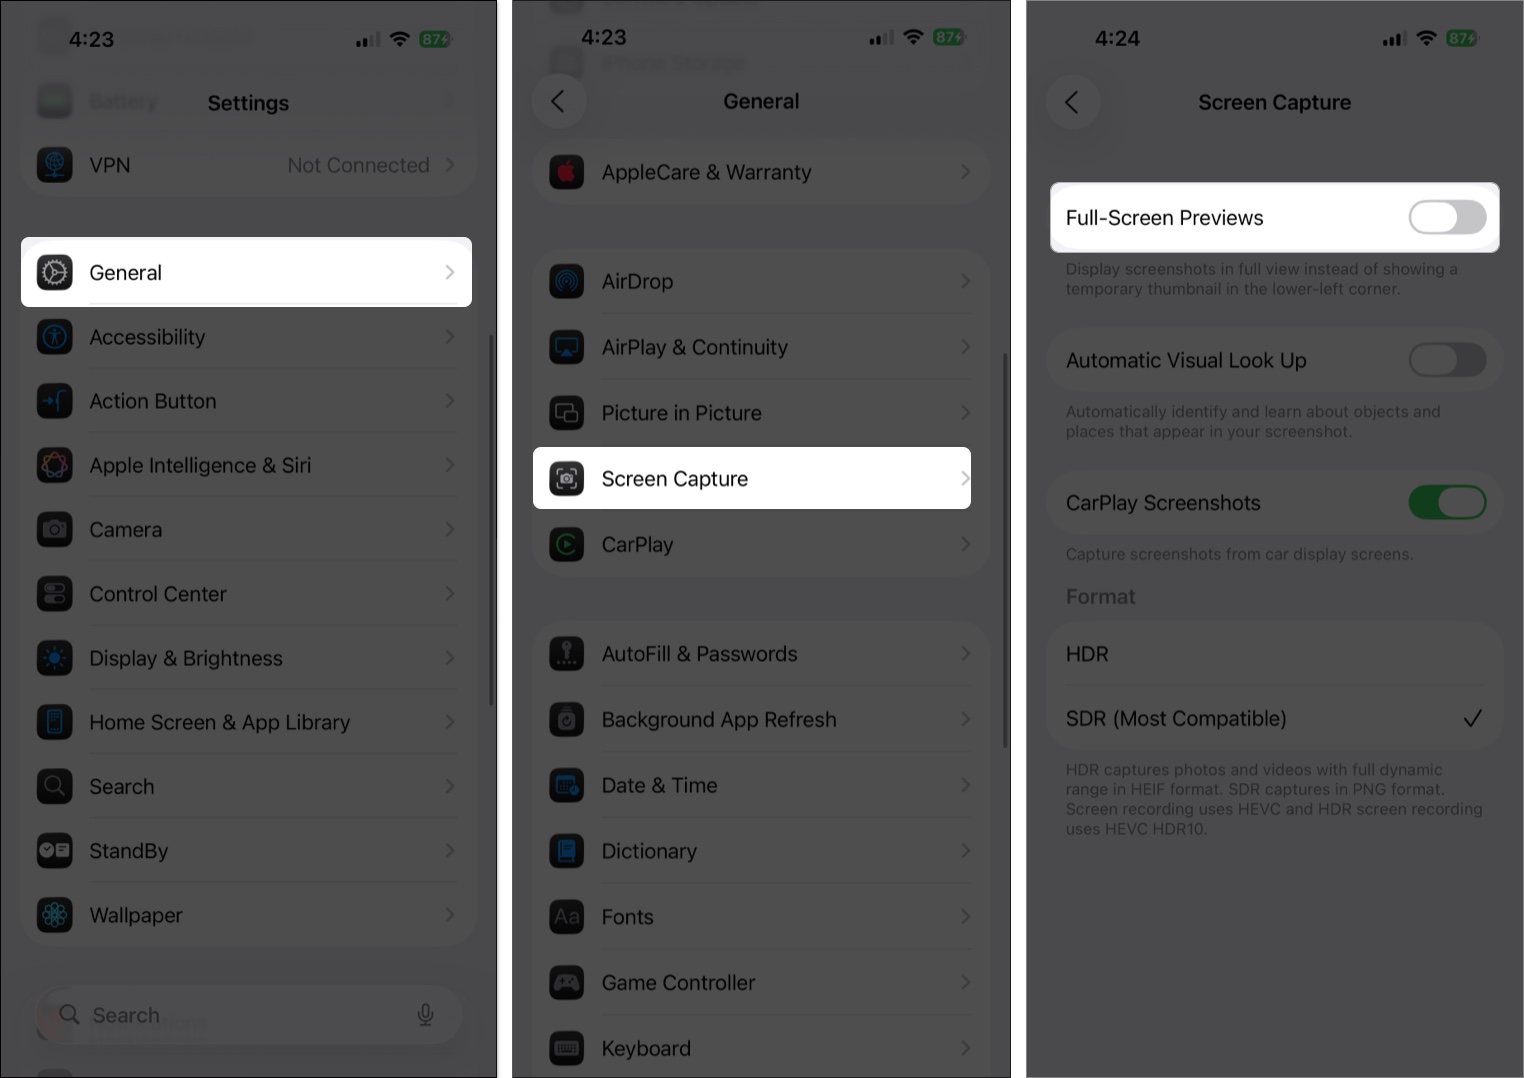
5. Turn Off Full-Screen Screenshot Previews
In iOS 26, screenshots now show up as full-screen previews instead of thumbnails in the corner. Great for some, annoying for others. If you accidentally enabled it, you can switch back anytime.
How to disable full-screen previews:
- Open the Settings → General → Screen Capture.
- Toggle off Full-Screen Previews.
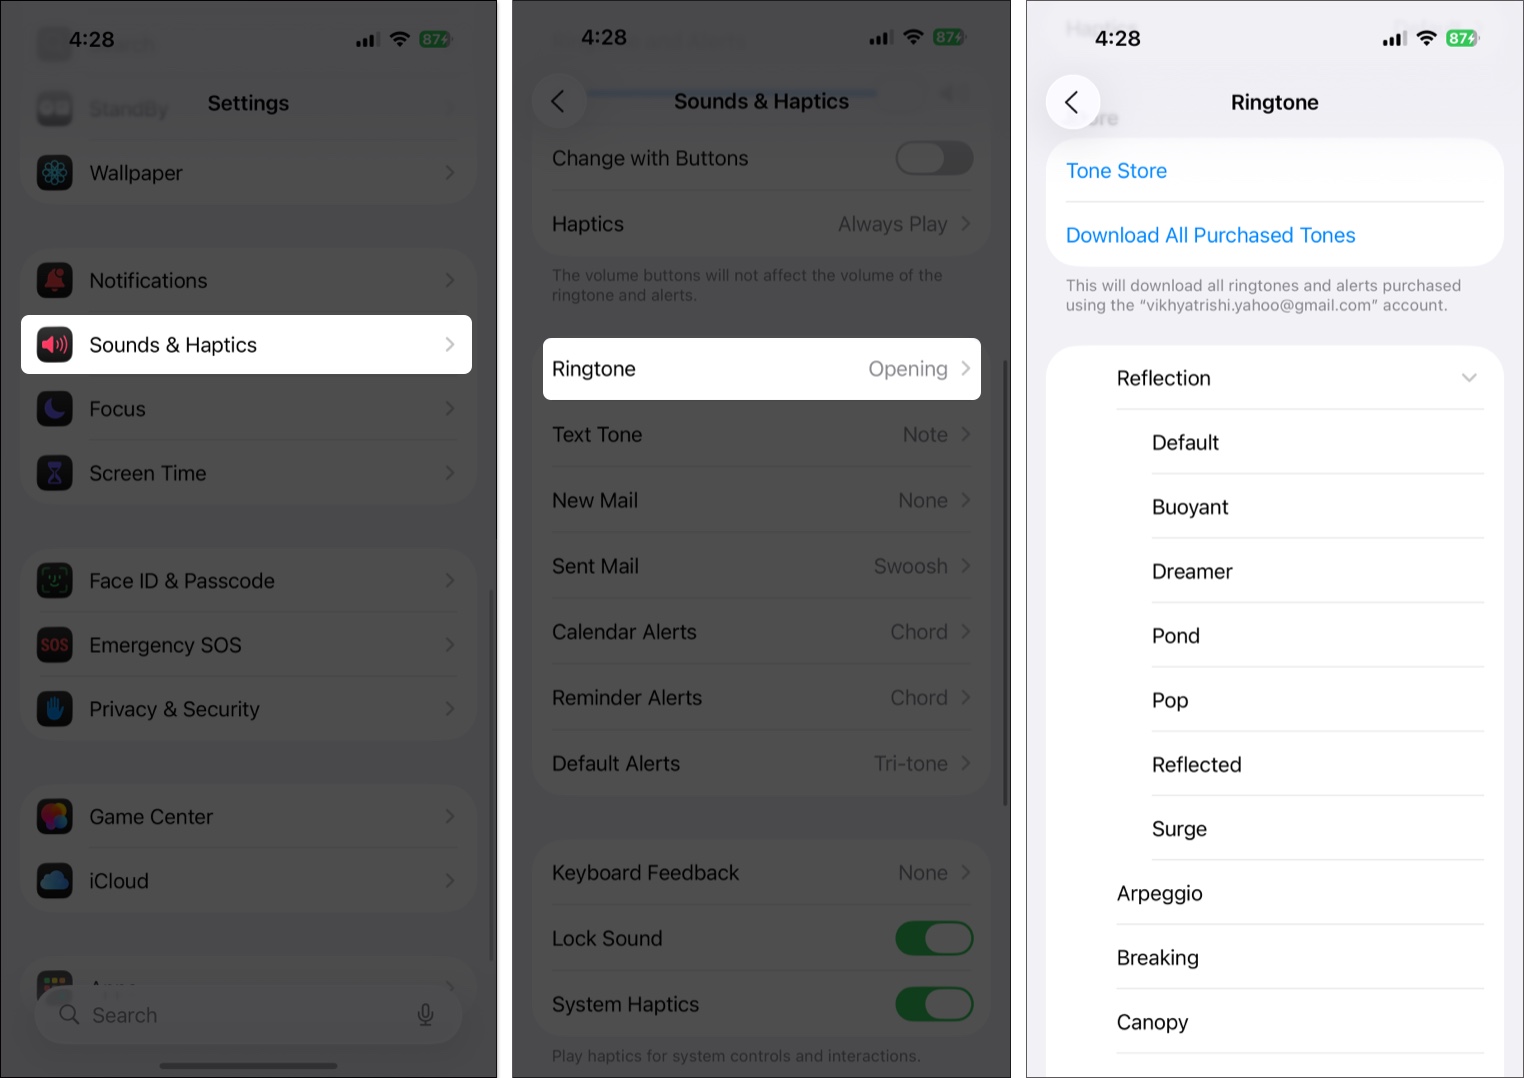
6. Explore New Ringtones
iOS 26 also refreshes your iPhone’s soundscape. You’ll find six new variations of the classic “Reflections” ringtone, plus a cheerful new tone called “Little Bird.” Perfect for calls, texts, or alarms.
How to try new ringtones:
- Open the Settings → Sound & Haptics → Ringtones.
- Here, tap the drop-down arrow next to Reflections, and its new variations will appear.

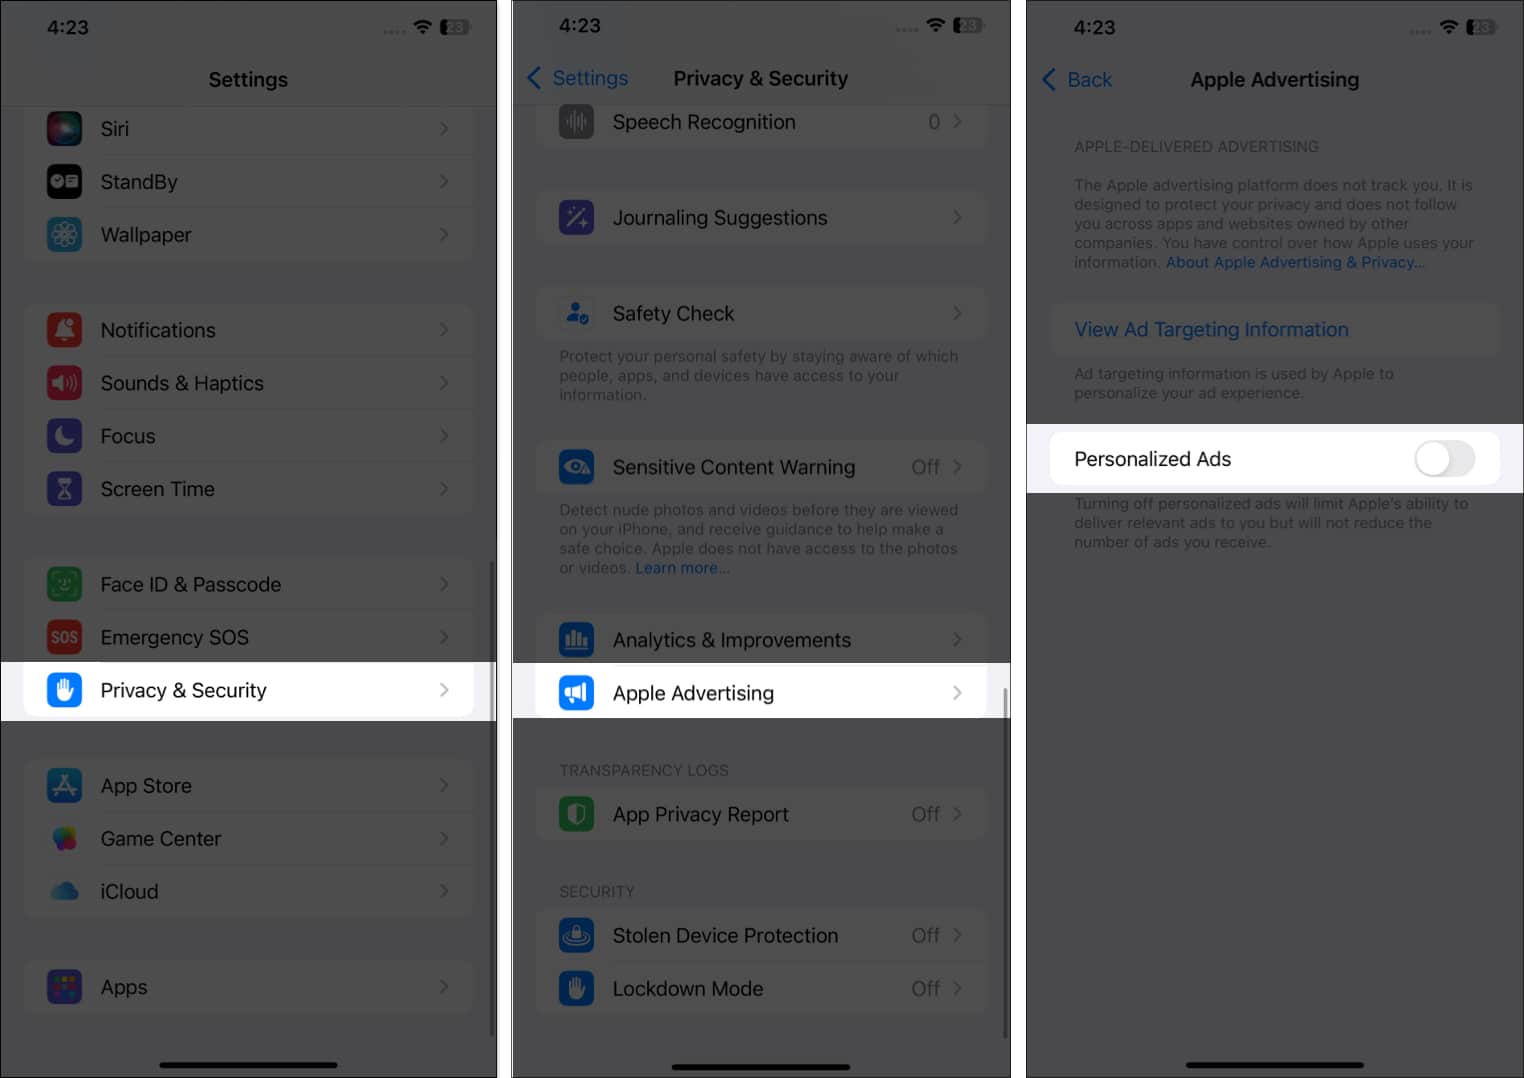
7. Turn Off Personalized Ads
Your iPhone tracks app and web activity to serve personalized ads. Disabling this limits Apple’s data collection and boosts your privacy.
How to turn it off:
- Go to Settings → Privacy & Security.
- Tap Apple Advertising, then toggle off Personalized Ads.
Note:
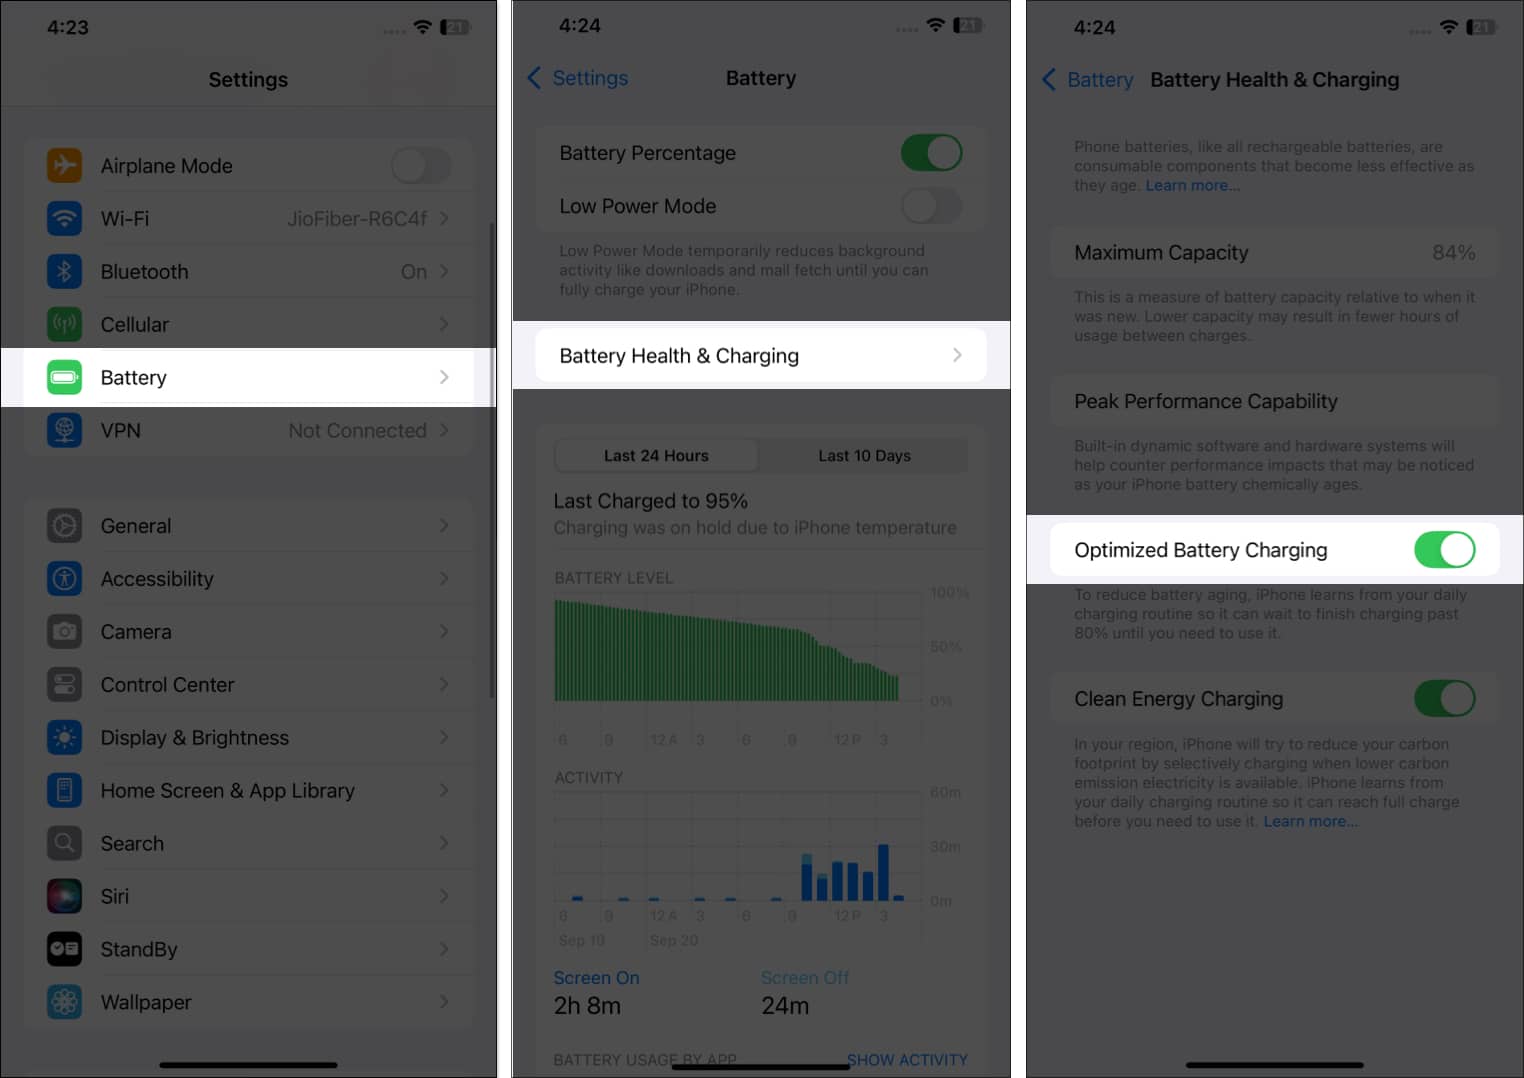
8. Turn on Optimized Battery Charging
Apple advises replacing your iPhone battery once its health drops below 80%. To slow down battery aging, enable Optimized Battery Charging, which learns your routine and pauses charging past 80%.
How to enable:
- Go to Settings → Battery → Battery Health & Charging → Toggle on Optimized Battery Charging.
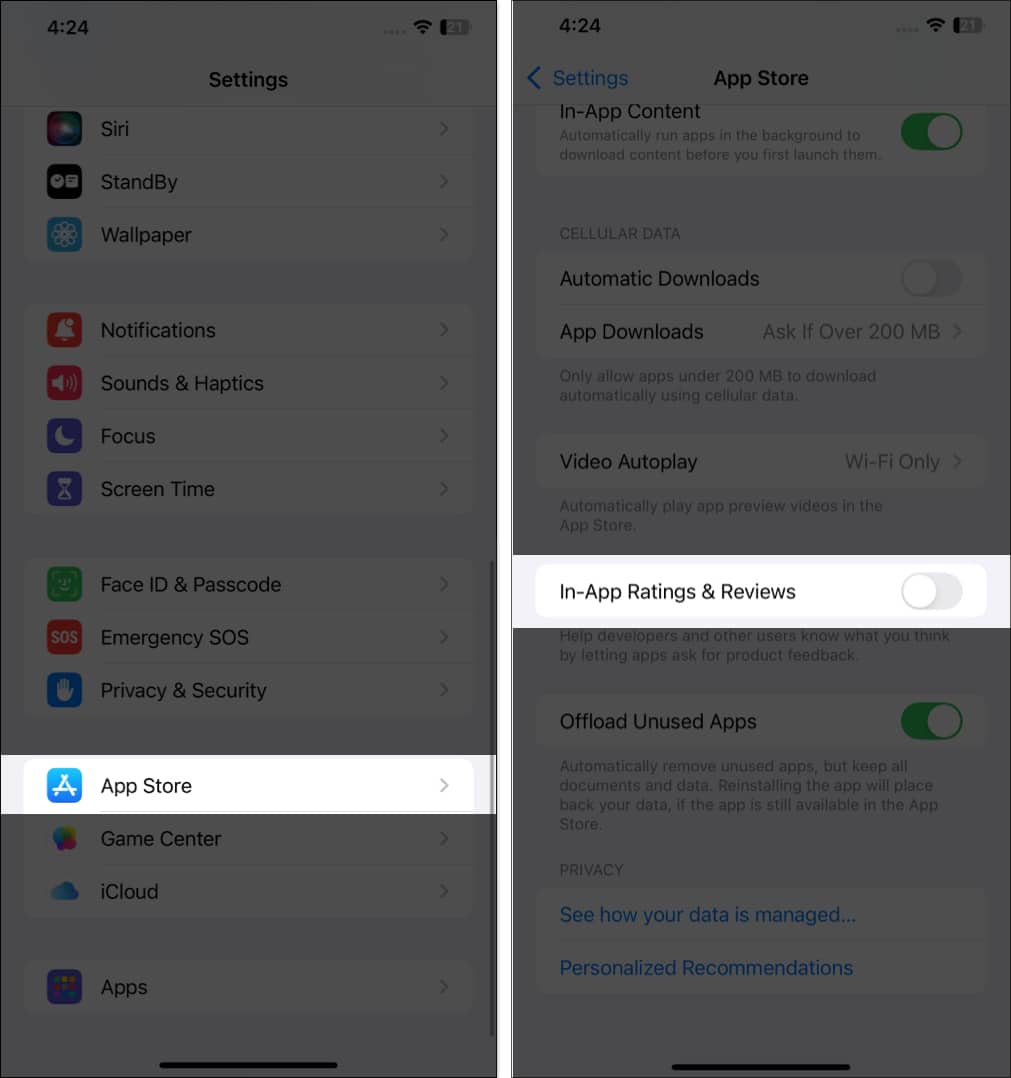
9. Disable In-App Ratings & Reviews
Many apps bombard you with pop-ups asking for ratings or reviews on the App Store. While feedback helps developers and other users, these prompts can be annoying, especially when you’re in the middle of something important.
Here’s how to turn it off:
- Open Settings → App Store → Toggle off In-App Ratings & Reviews.
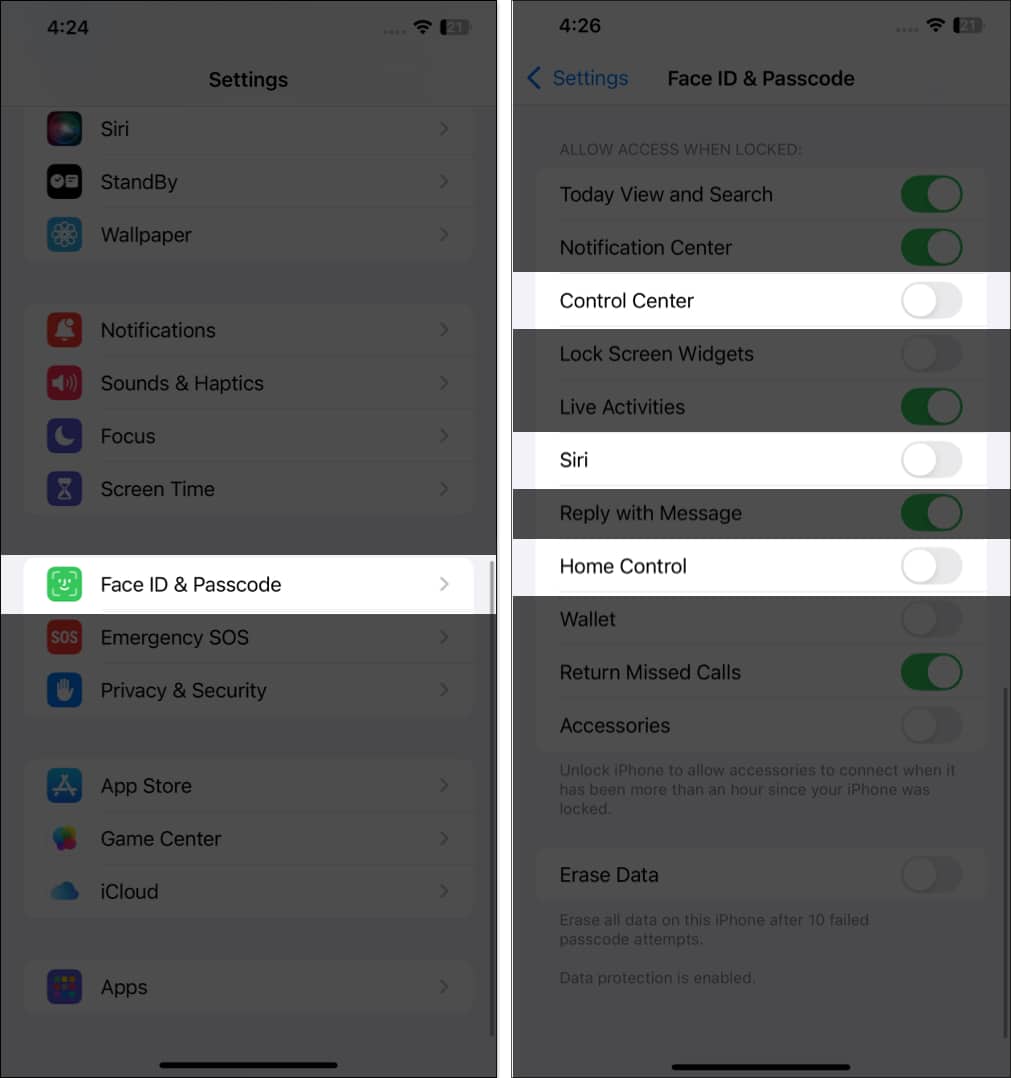
10. Disable Access to Siri, Home Control, and Control Center When Locked
Blocking these features on the lock screen boosts privacy and security by preventing unauthorized access to smart devices, private info, or system controls.
How to disable:
- Go to Settings → FaceID & Passcode → toggle off Control Center, Siri, and Home Control.

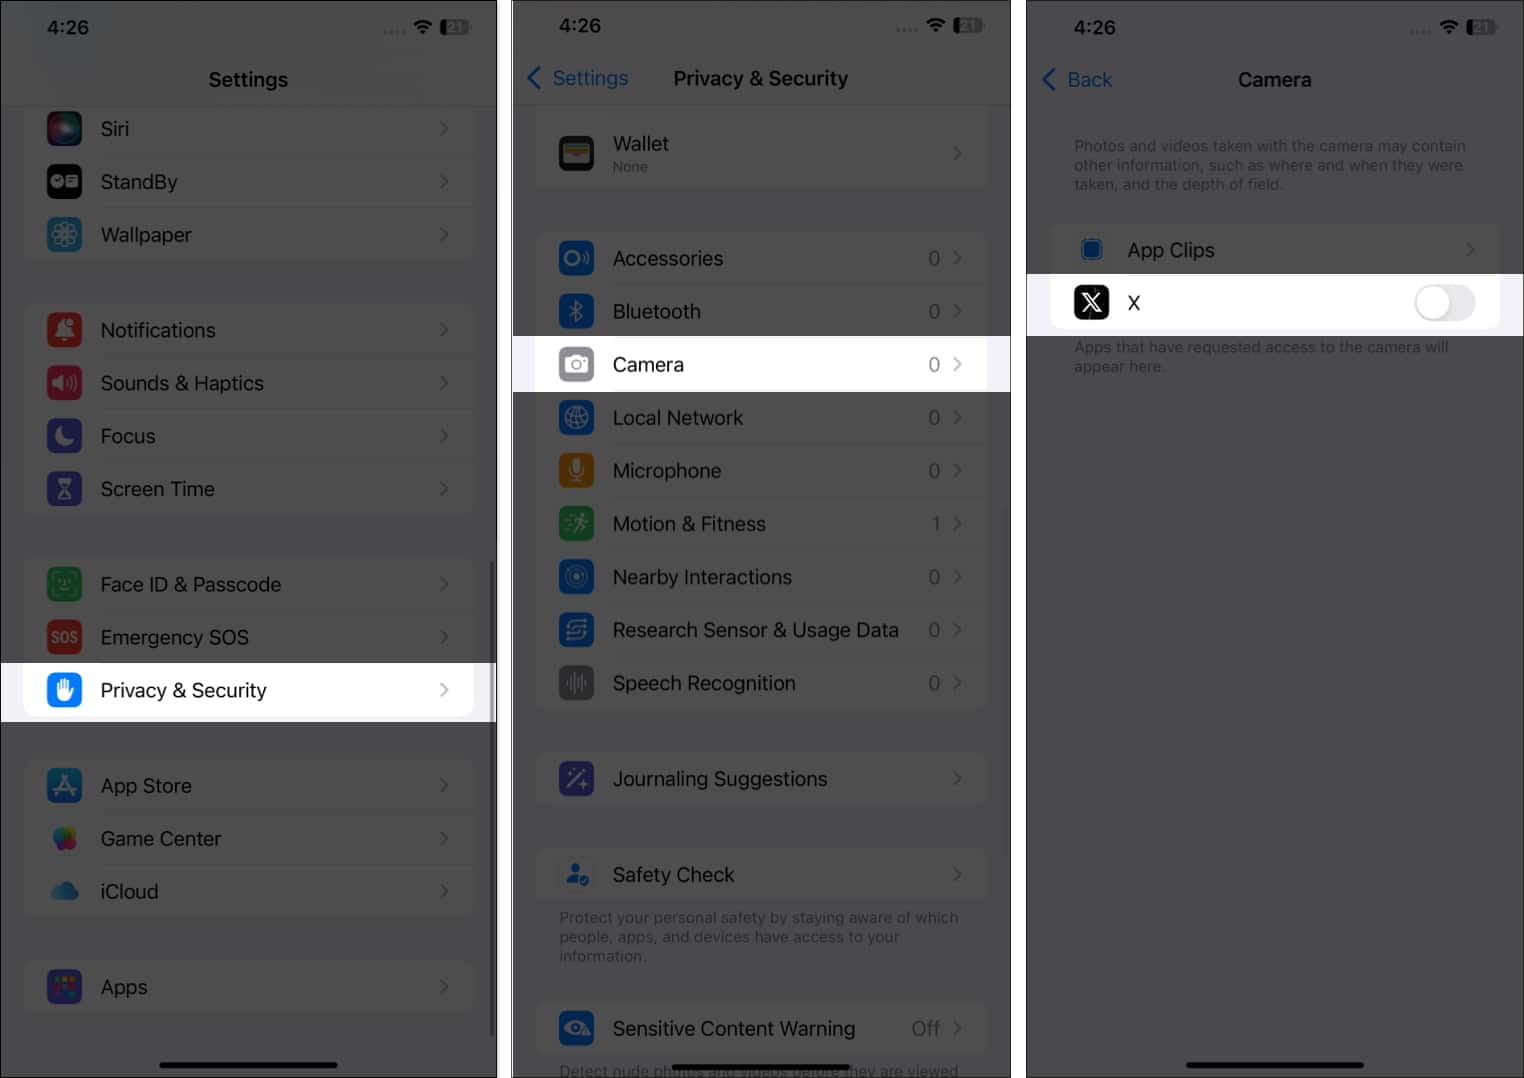
11. Limit Microphone and Camera Access to Certain Apps
Unrestricted access lets apps potentially record audio or video without your knowledge. Restricting it ensures only trusted apps can use these sensitive features, keeping your private moments safe.
How to manage:
- Go to Settings → Privacy & Security → Microphone → toggle off Apps.
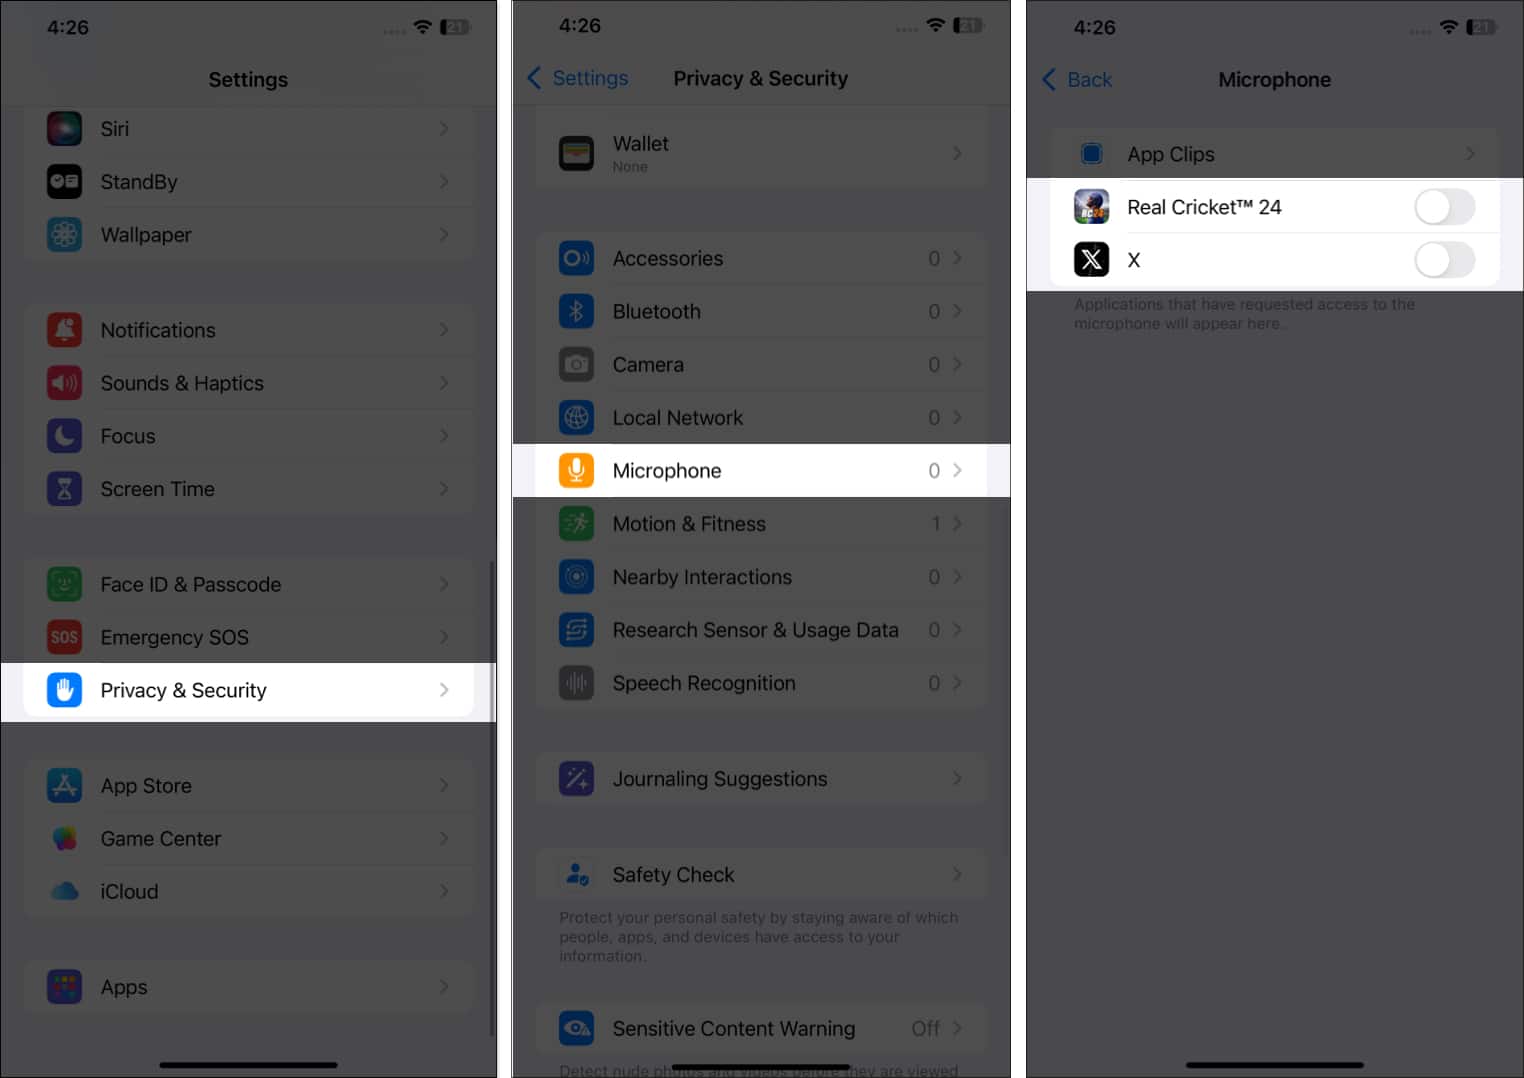
- To limit Camera access, open Settings → Privacy & Security → Camera → toggle off Apps.


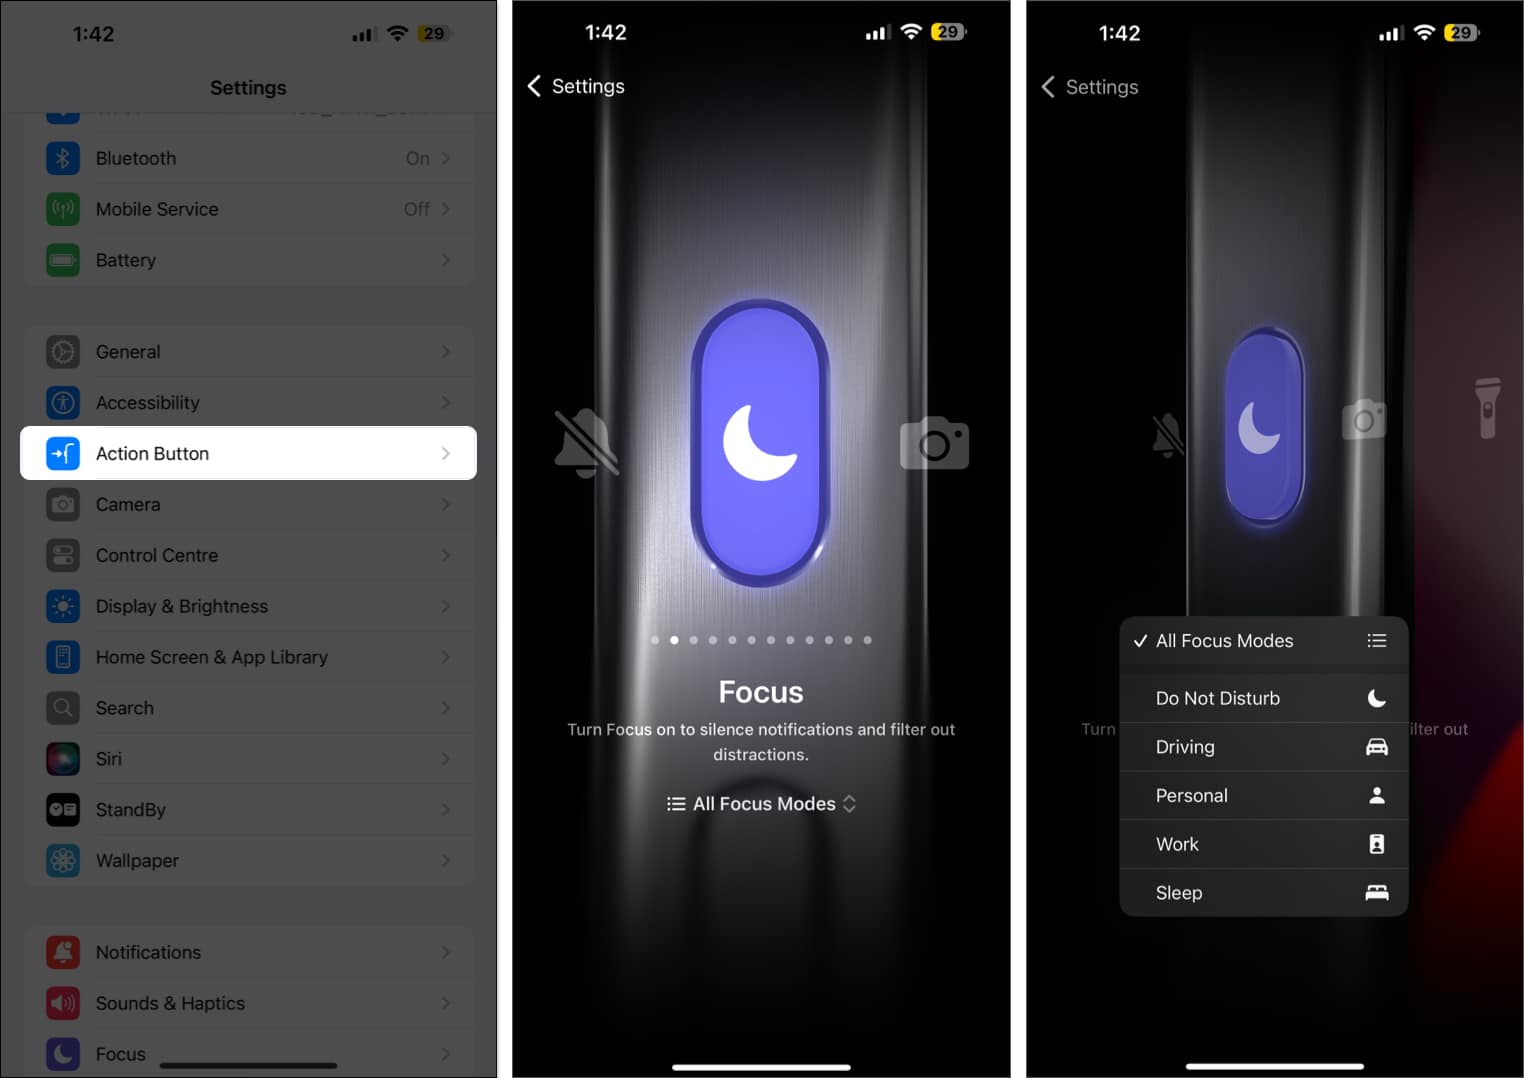
12. Customize Action Button
On iPhone 15 Pro, 15 Pro Max, iPhone 16 and iPhone 17 series, Apple replaced the mute switch with the versatile Action Button. With a long press, you can trigger almost any task from launching the camera to starting a voice memo.
How to customize:
- Open Settings → Action Button → Swipe right or left to assign different functionality to the Action Button.

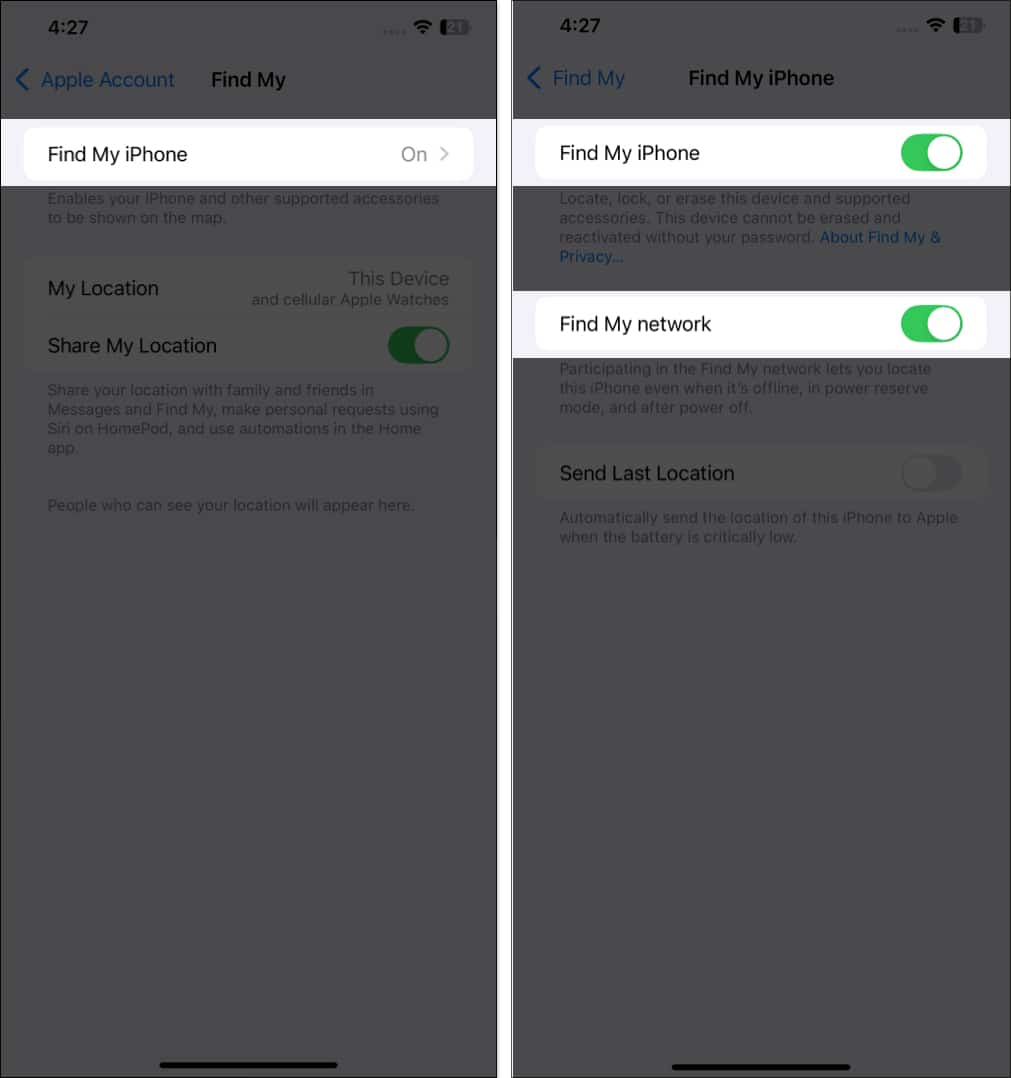
13. Turn On Find My iPhone to Track a Lost Device
Apple’s Find My app lets you locate your iPhone if it’s misplaced, lost, or stolen. But it only works if Find My iPhone is enabled beforehand. Otherwise, you won’t be able to track your iPhone using Apple’s Find My network.
To enable Find My on your iPhone,
- Go to Settings → Apple Account.
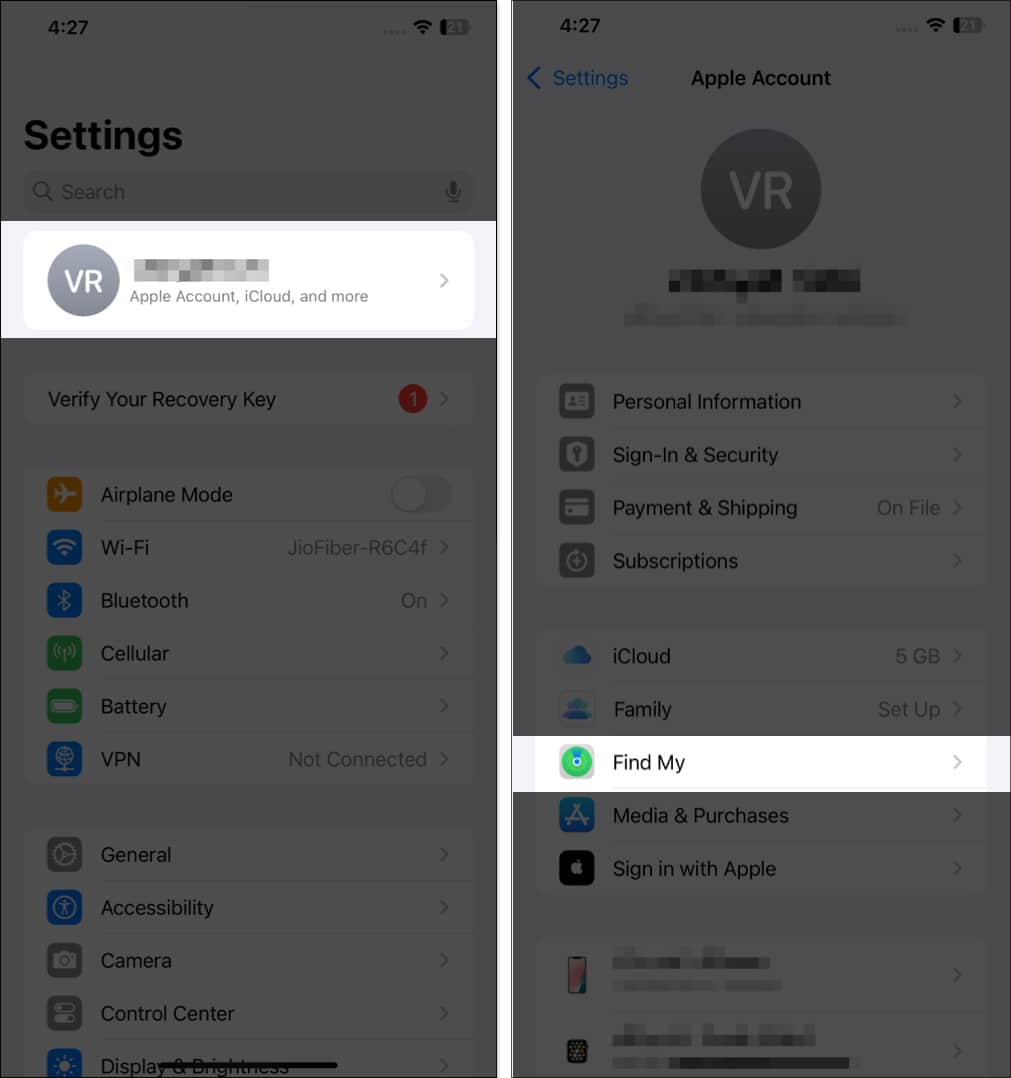
- Tap on Find My iPhone → toggle on Find My iPhone and Find My Network.


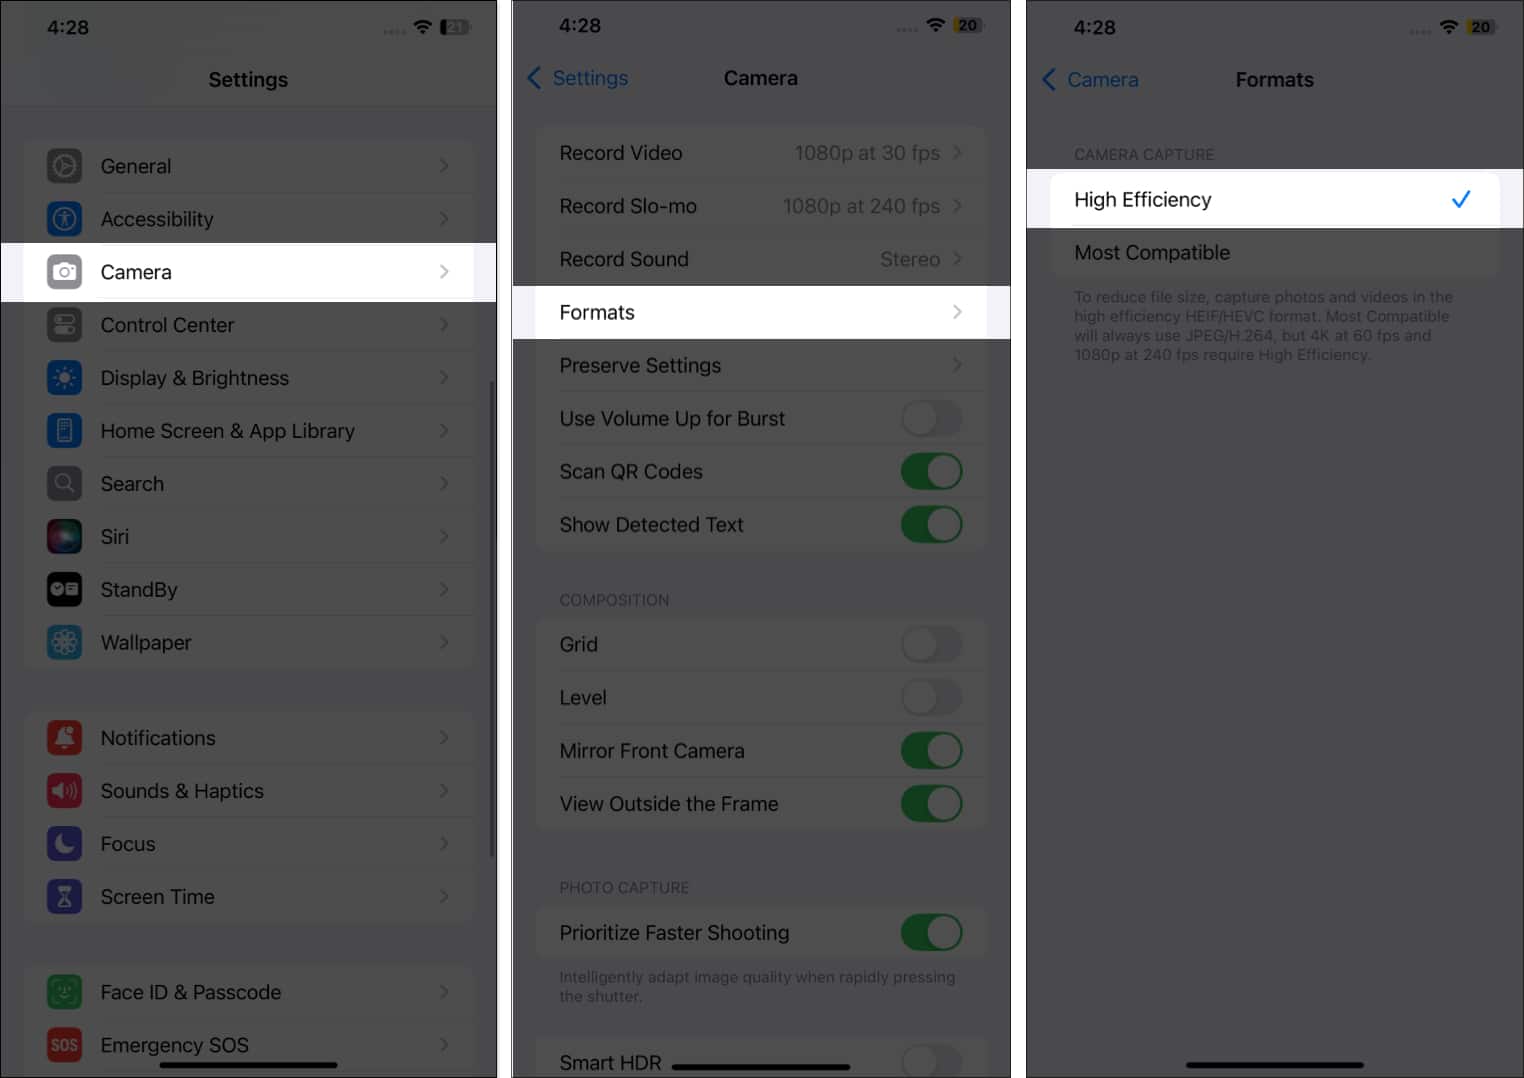
14. Optimize Storage with High-Efficiency Format
High-quality photos take up a lot of space, and a large collection can quickly strain your iPhone’s storage. Switching to the High-Efficiency format (HEIF/HEVC) reduces file size while maintaining image quality.
How to enable:
- Open Settings → Camera → Formats → High Efficiency.

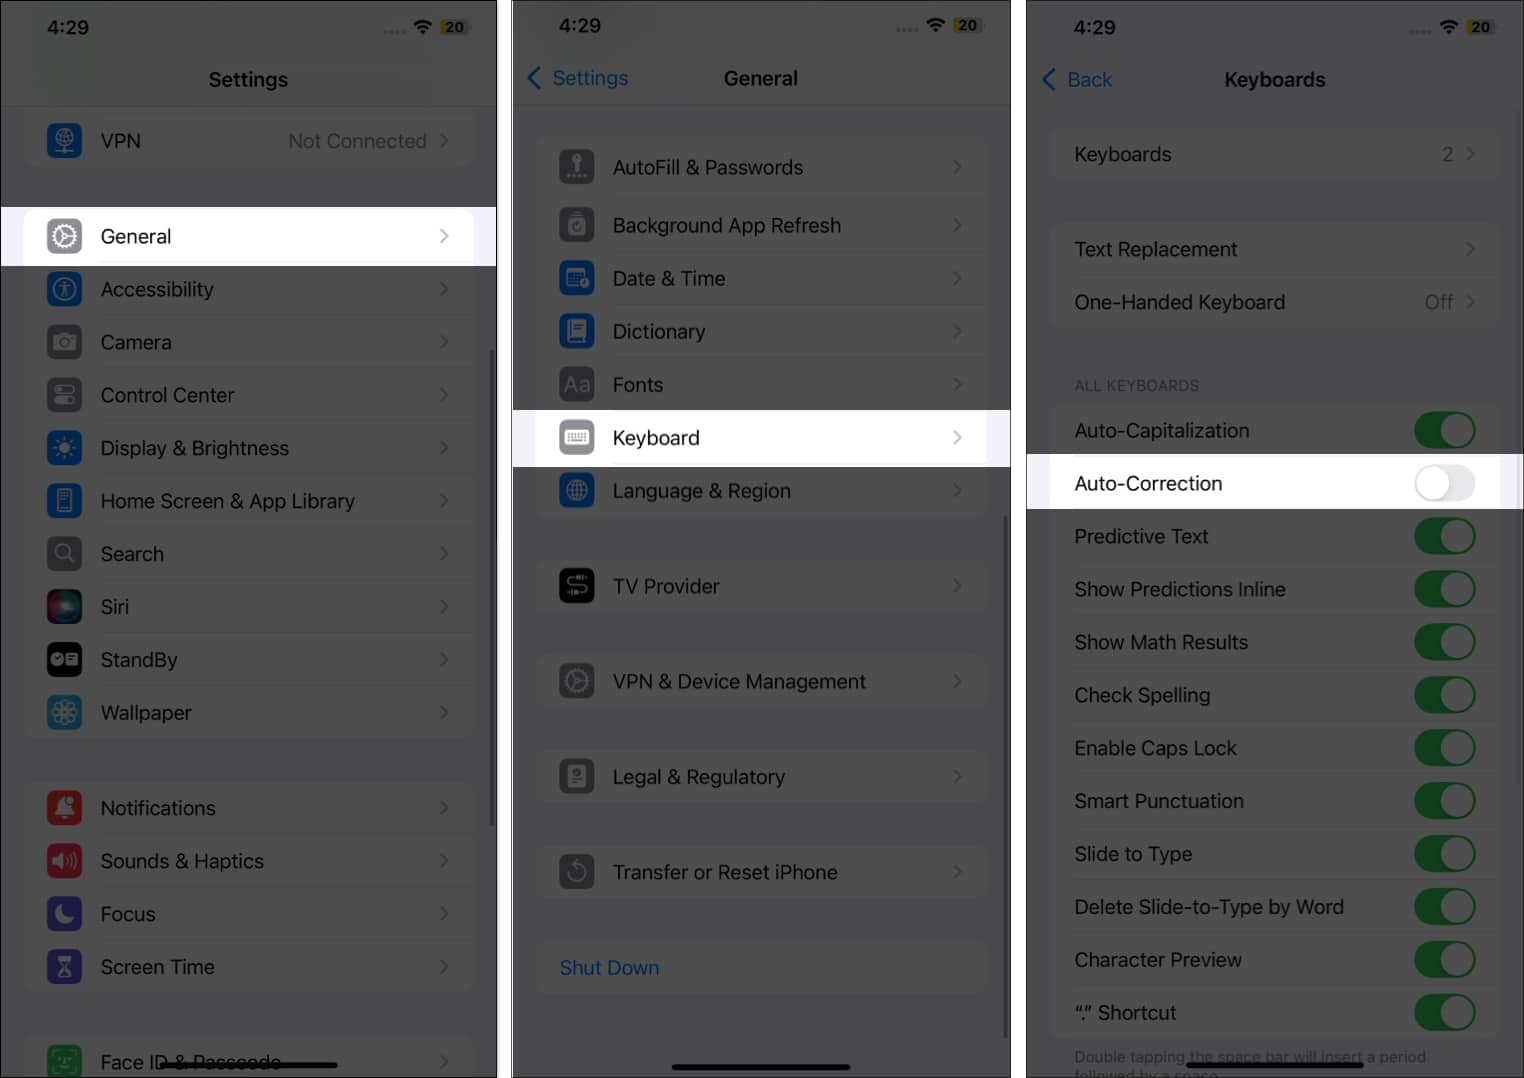
15. Disable Auto-Correction in Keyboards
Auto-correct is designed to fix typos, but it often changes words you don’t want, sometimes altering the meaning of your conversation.
Here’s how you can turn it off:
- Open Settings → General → Keyboard → toggle off Auto-Correction.
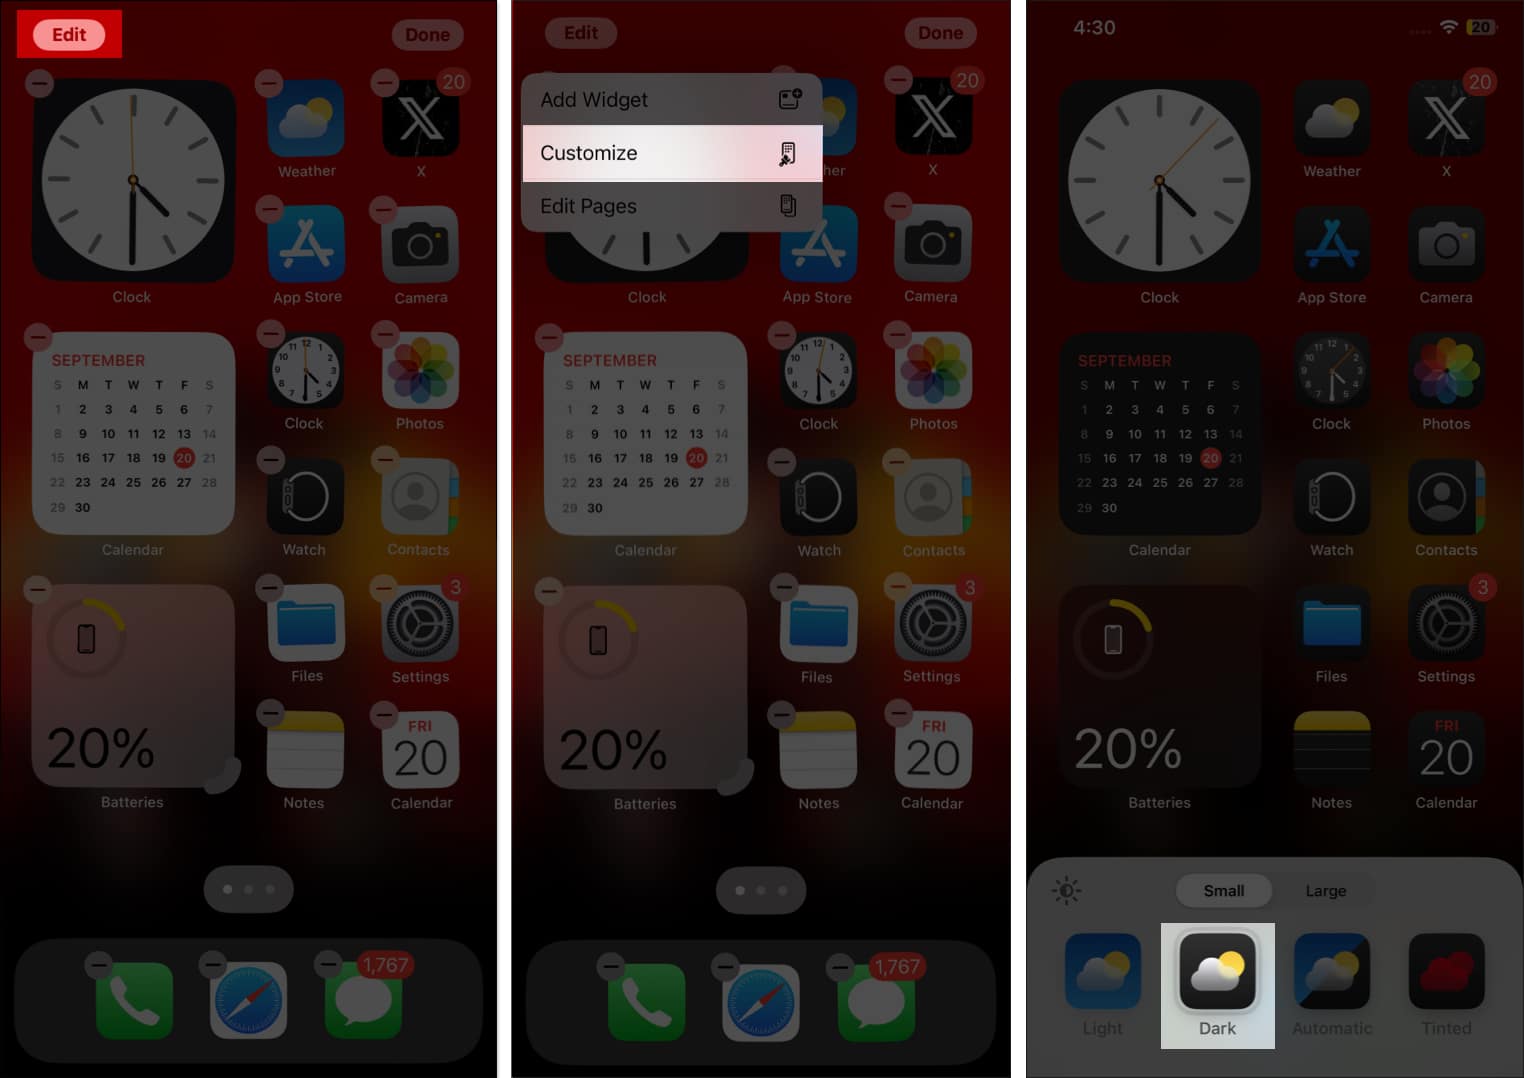
16. Use Dark App Icons
Dark Mode and dark wallpapers already help save battery life, but with iOS 18 or later, you can now give your app icons a matching dark look for a more seamless, battery-friendly experience.
- Touch and hold any empty area of your iPhone’s Home Screen until all the apps start wobbling.
- Tap the Edit button at the top right, then Customize in the drop-down menu.
- Select the Dark option.

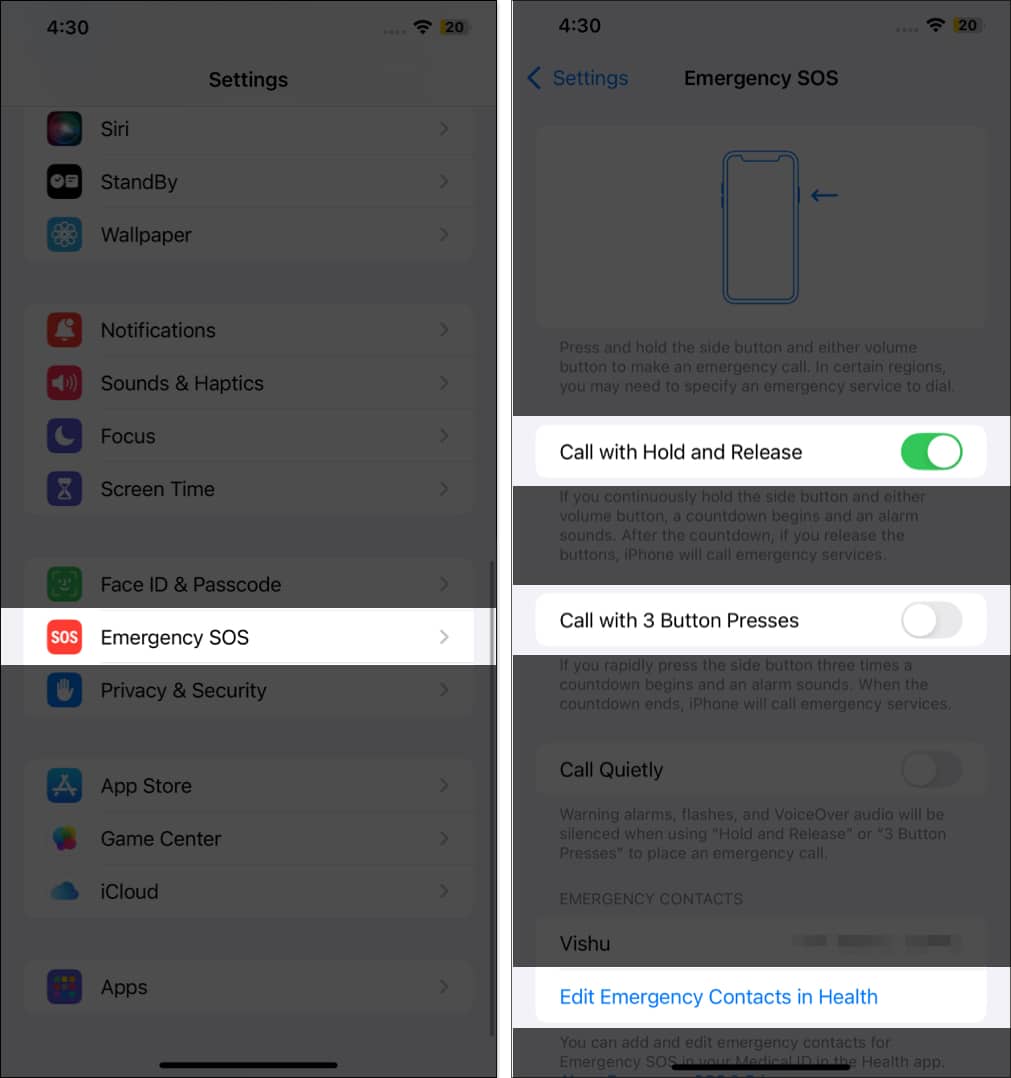
17. Set Emergency SOS
Emergency SOS lets you quickly call for help when you’re in danger. Just press and hold the Side + Power buttons together, or rapidly press the Side button three times.
Here’s how you can enable:
- Open Settings → Emergency SOS → toggle Call with Hold and Release or Call with 3 Button Presses → Add an Emergency Contact.

18. Set Up Parental Controls
Parental controls let you manage your child’s screen time, content, and app downloads—creating a safer digital environment and giving you peace of mind.
To get started, open Settings → Screen Time. Now, you have multiple options:
- Downtime: Schedule time away from your device. You can customize it by day (e.g., Sundays only) or set specific hours.
- App Limits: Set daily usage caps for app categories—for example, limit Games to one hour.
- Communication Limits: Control who can contact your child and when.
- Always Allowed: Choose which apps remain accessible during Downtime. Add with the + button or remove with the “–” button.
- Content & Privacy Restrictions: Restrict iTunes & App Store purchases, block explicit content in music, news, and podcasts, and manage other privacy settings.
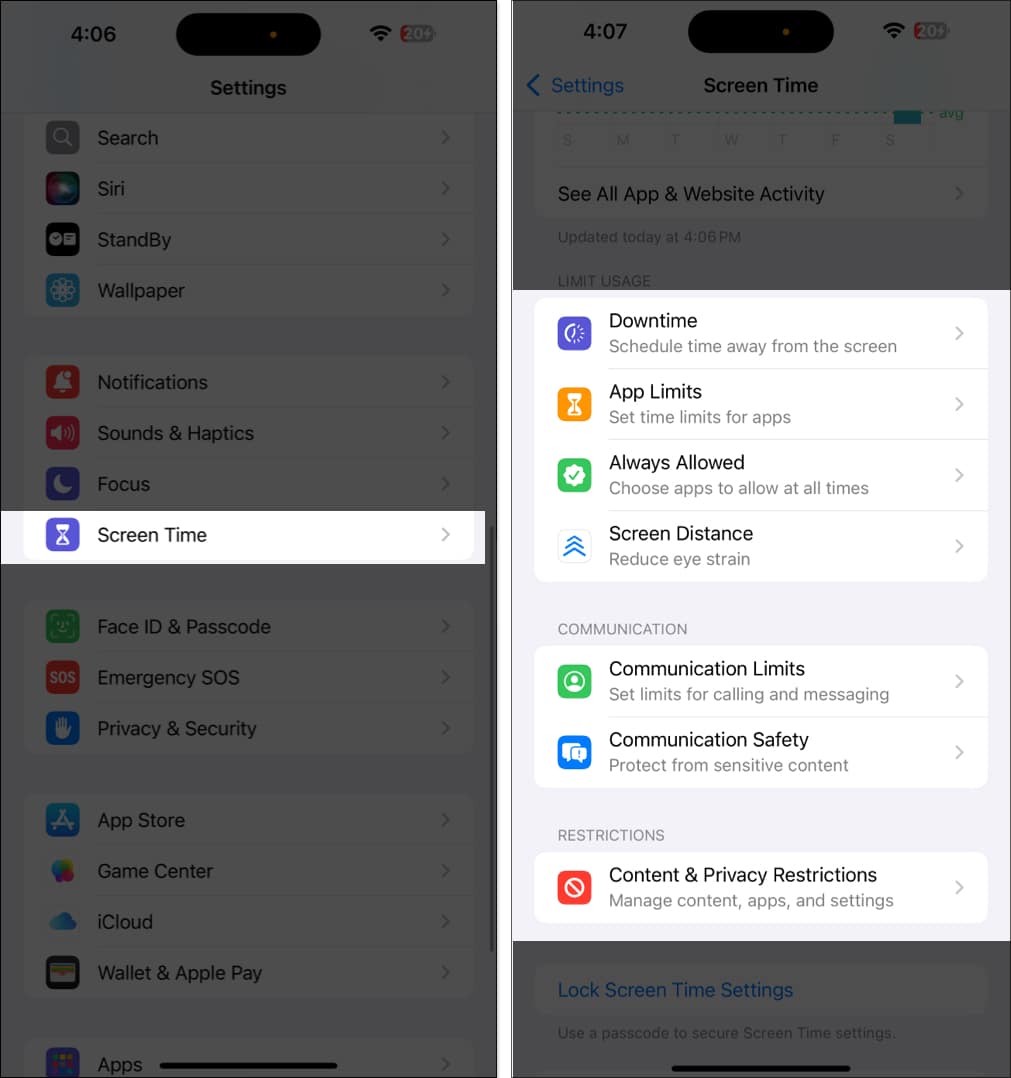
One more essential thing: be sure to set a Screen Time passcode to prevent anyone from making unwanted changes. Simply tap Screen Time Passcode → enter a code and confirm.
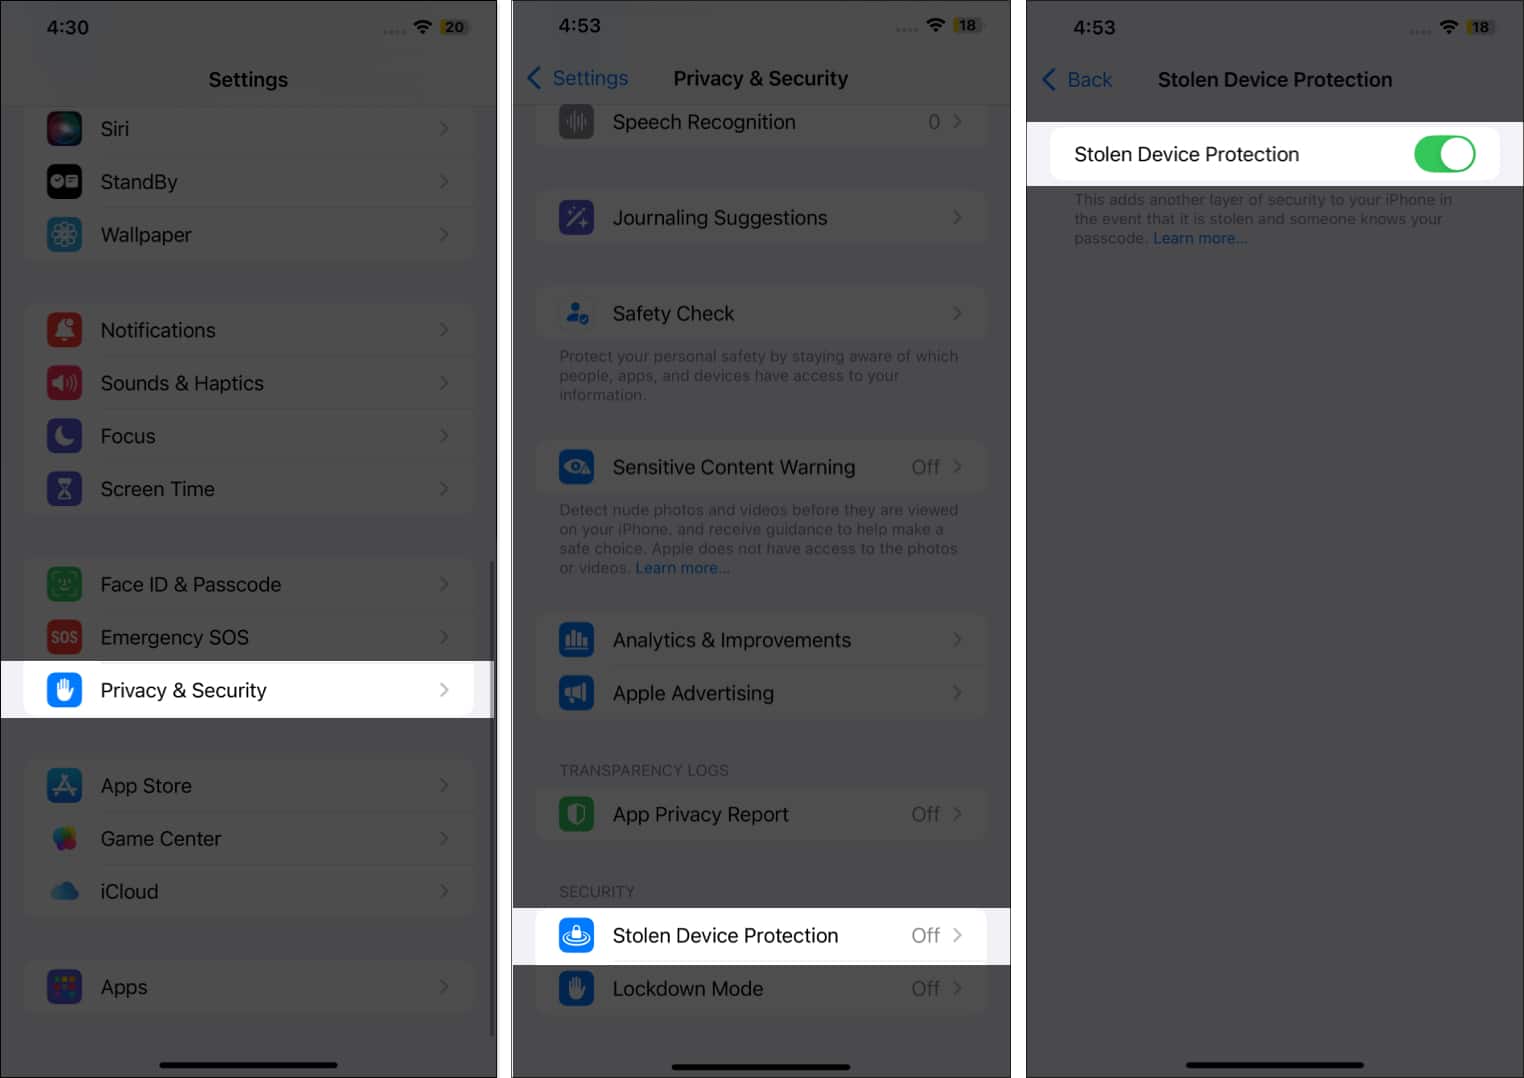
19. Turn on Stolen Device Protection
With Stolen Device Protection, no one can change sensitive settings on your iPhone—even if they know your passcode. It adds a one-hour delay when you’re away from trusted locations and requires Face ID to change critical details like your Apple ID password.
How to enable:
- Go to Settings → Privacy & Security → Stolen Device Protection → toggle on Stolen Device Protection.

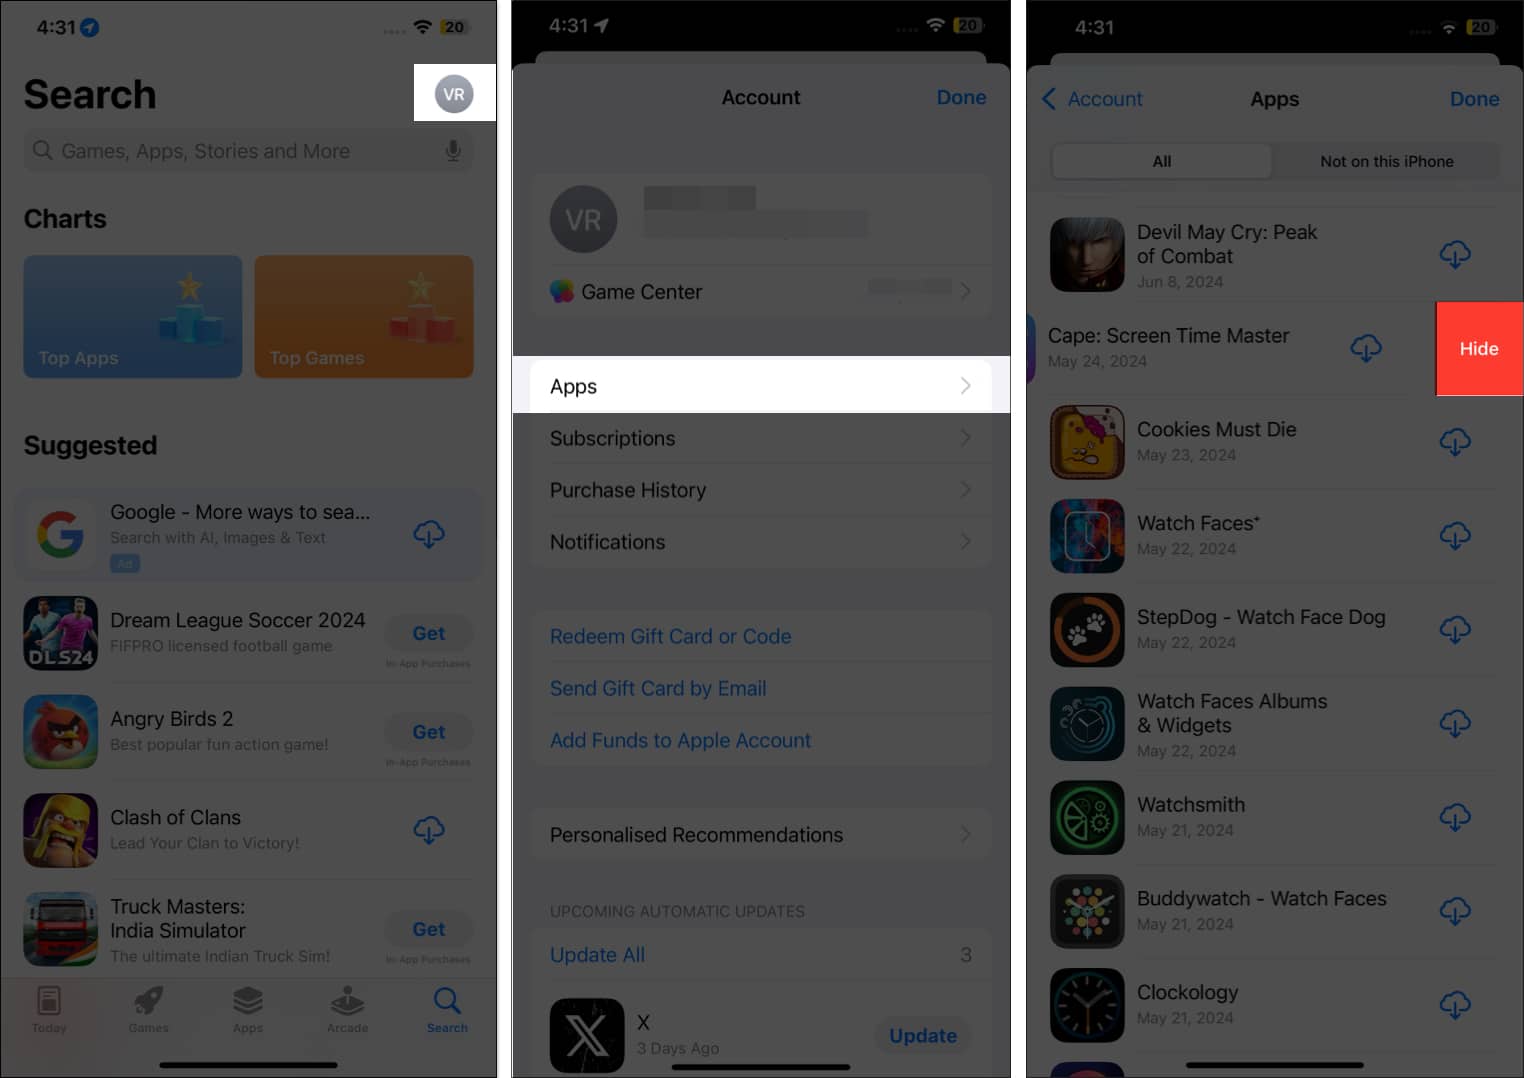
20. Hide App Store purchases
There’s always one app you once had on your iPhone, but you don’t want your partner to find out you did. In that case, you can replace the Cloud icon next to the App’s name on the App Store with the Download icon. Once you’re done, no one will ever know that you downloaded the particular app in the past.
How to hide:
- Open App Store → Your Profile → Apps → Swipe left on the app and tap the Hide button.

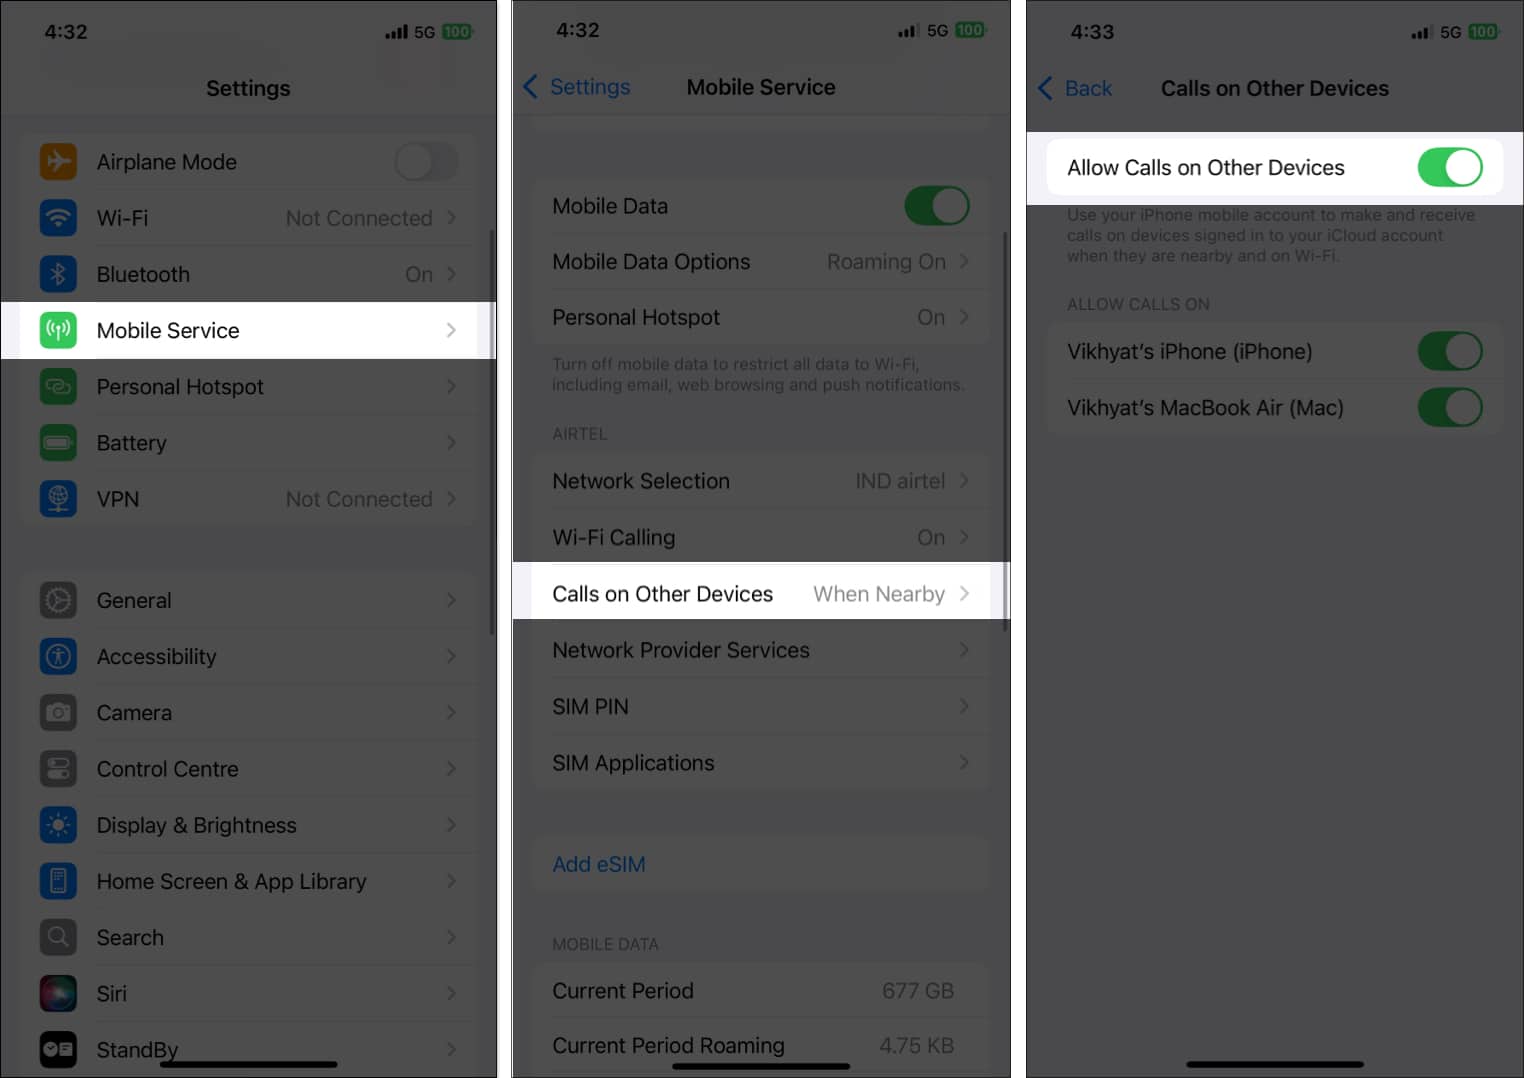
21. Enable Calls on Other Devices
With multiple Apple devices, you can take iPhone calls on your iPad or Mac—perfect when your iPhone is charging or out of reach. Just make sure all devices are signed in with the same Apple ID and within Bluetooth range.
Here’s how you can do this:
- Go to Settings → Mobile Services → Calls on Other Devices → toggle on Allow Calls on other Devices.

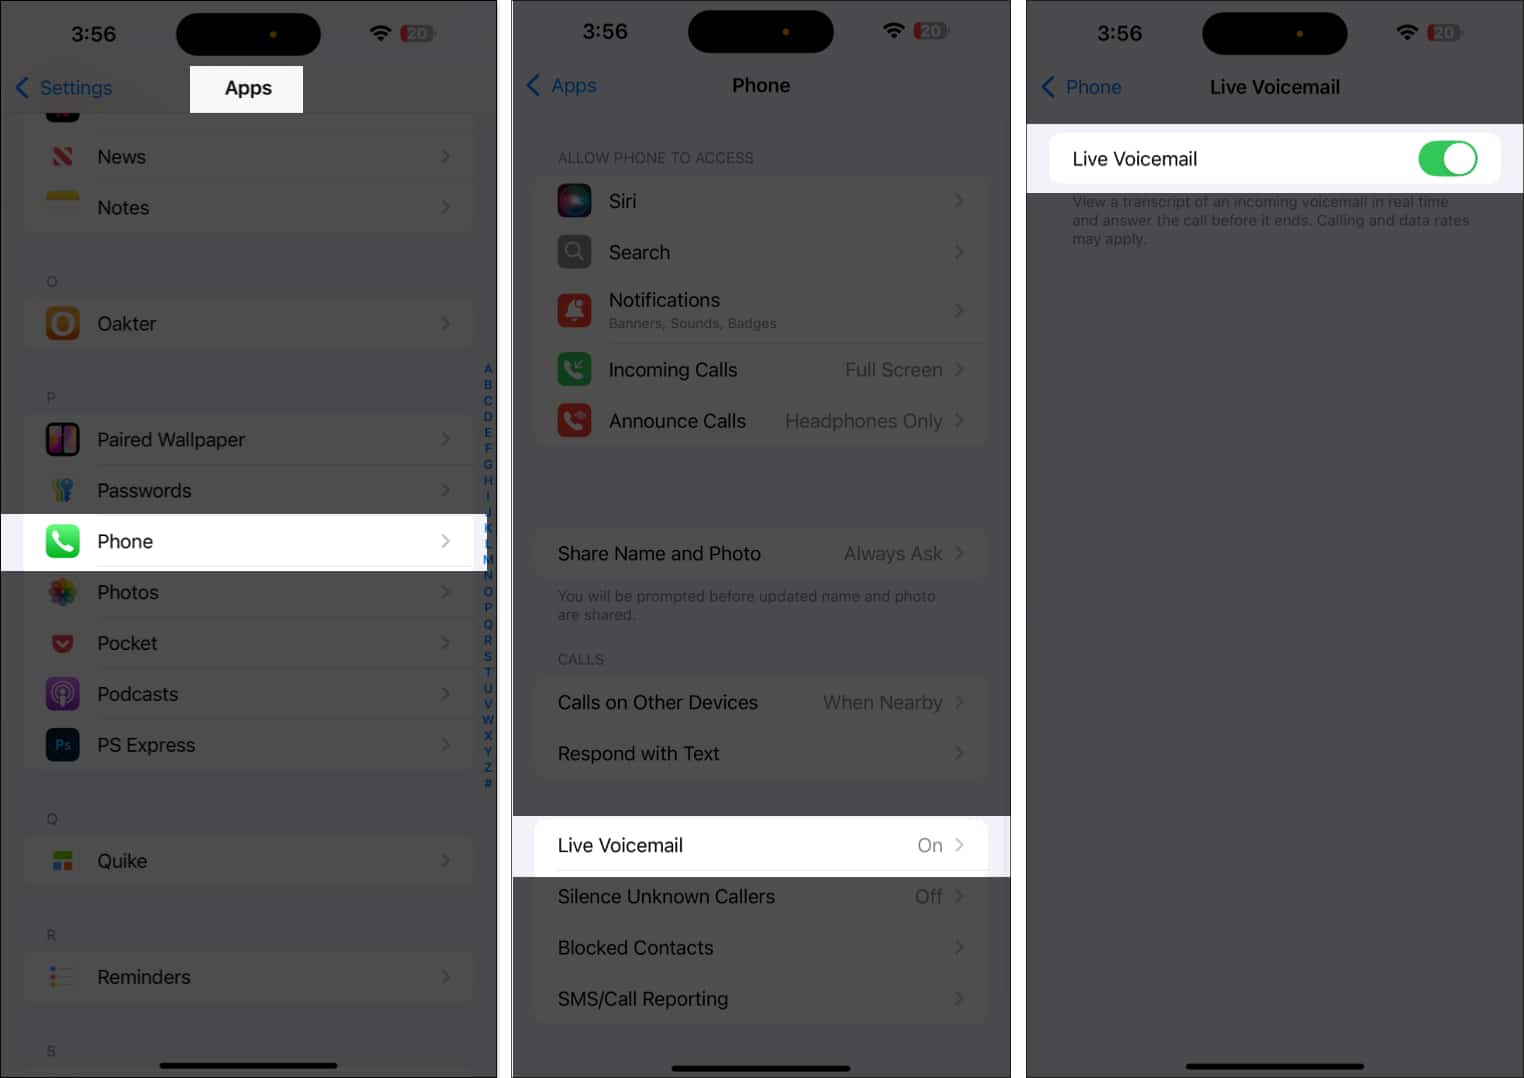
22. Set Up Live Voicemail
With Live Voicemail, you can see a real-time transcript as the caller leaves a message, helping you decide whether to answer immediately.
How to enable:
- Go to Settings → Apps → Phone → Live Voicemail → toggle on Live Voicemail.

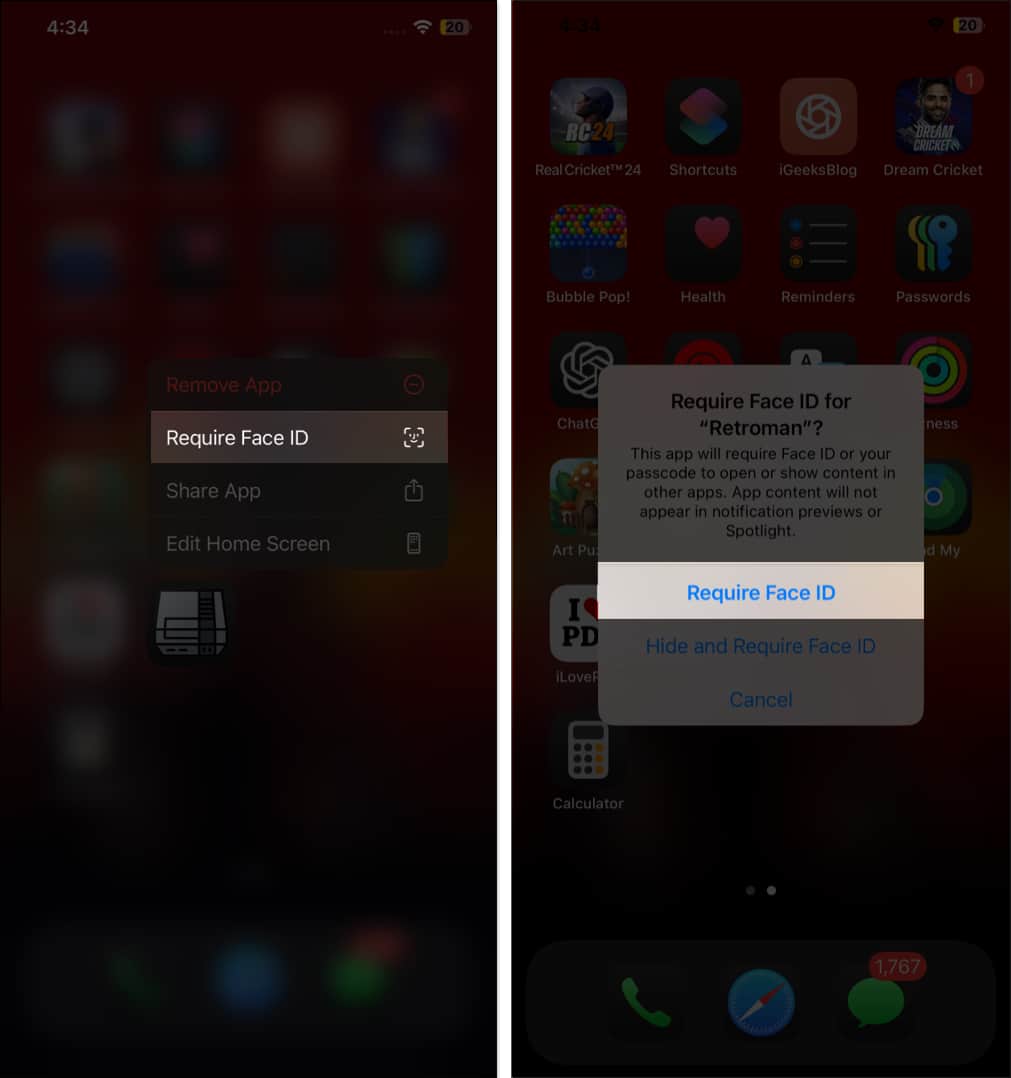
23. Lock Apps
Starting with iOS 18 or later, you can lock individual apps with Face ID, keeping your private content secure from prying eyes.
- Tap and hold on to the App → tap Require Face ID → again tap Require Face ID.

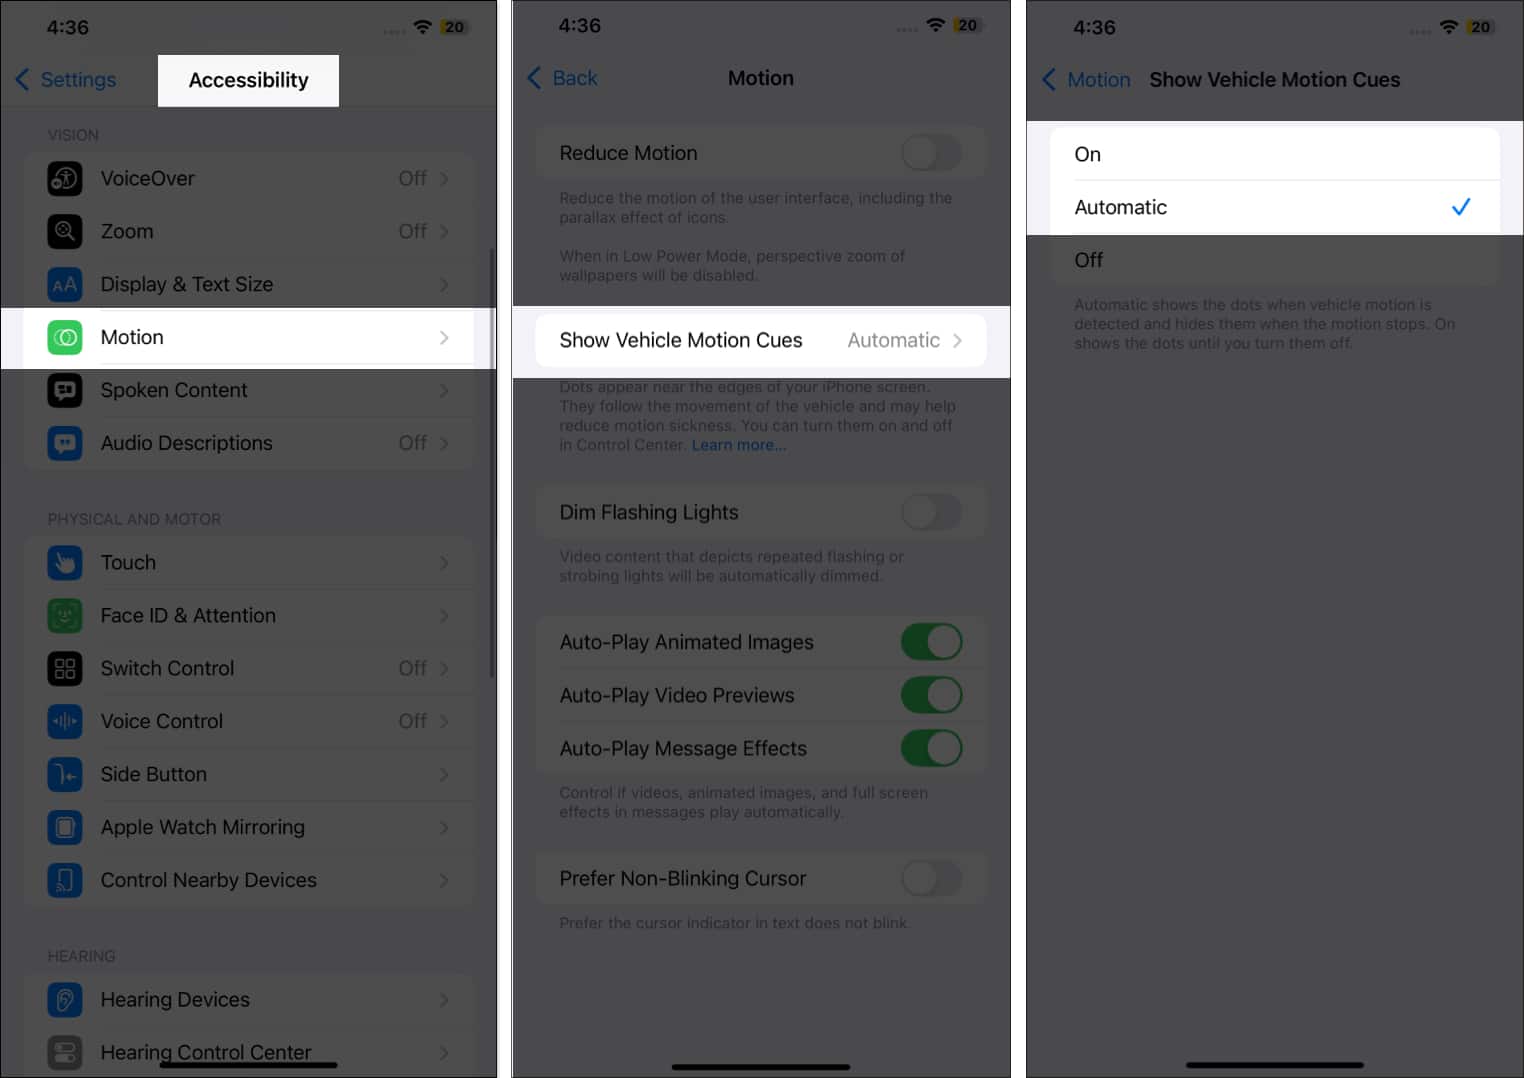
24. Turn on Vehicle Motion Cues While Traveling
If you feel nauseous using your iPhone in a moving car, Vehicle Motion Cues can help. It shows subtle animated dots along the screen edges to match the car’s movement, reducing sensory conflict and motion sickness.
How to enable:
- Open Settings → Accessibility → Motion → Show Vehicle Motion Cues → select the appropriate option.
25. Hide Apps
With iOS 18 or later, you can hide apps you don’t want others—like a partner or child to see, keeping them out of plain sight.
Here’s how:
- Tap and hold on to the App → tap Require Face ID → select Hide and Require Face ID → tap Hide App.


Now, the app will disappear from your Home Screen and move to a hidden folder in the App Library. You’ll need Face ID to reveal and open it.
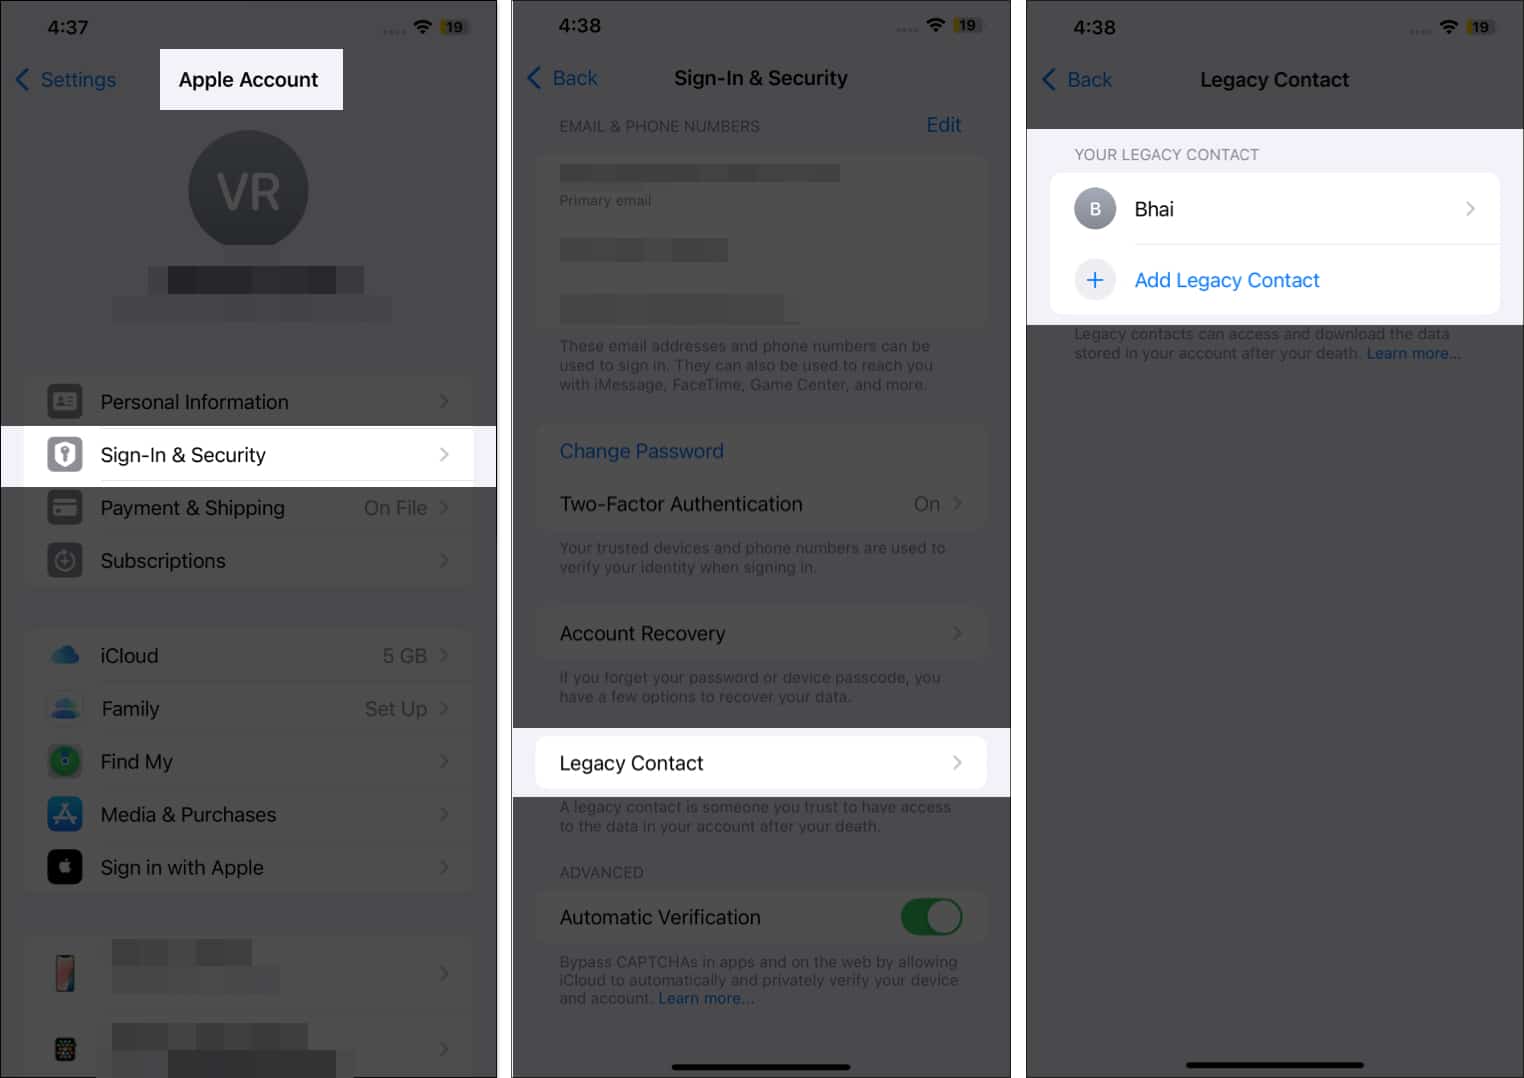
26. Set Up a Legacy Contact
With Legacy Contact, you can designate a trusted friend or family member to access your data—like photos, videos, notes, and other important information—after you pass away. This ensures your loved ones can preserve cherished memories.
How to set it up:
- Go to Settings → Apple Account → Sign-in & Security → Legacy Contact.
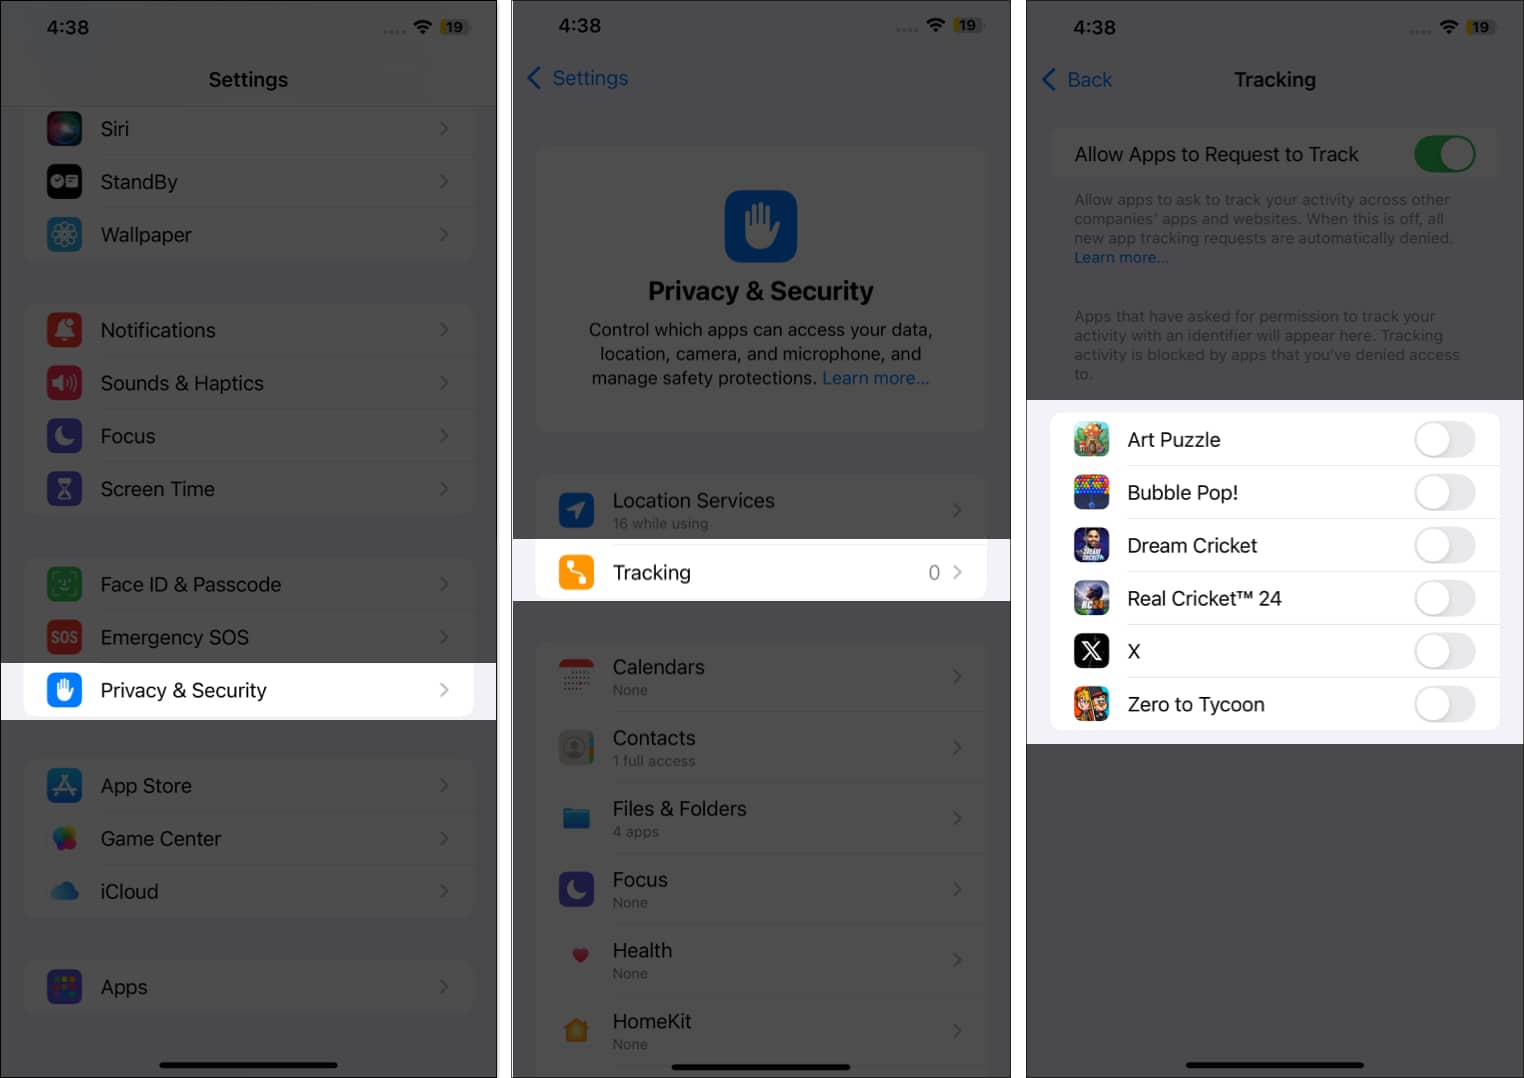
27. Turn off App Tracking
Many apps track your activity across websites and other apps to build profiles and serve targeted ads. Disabling tracking stops this data collection, protecting your privacy.
- To prevent apps from tracking your activity, go to Settings → Privacy & Security → Tracking → toggle off Apps.
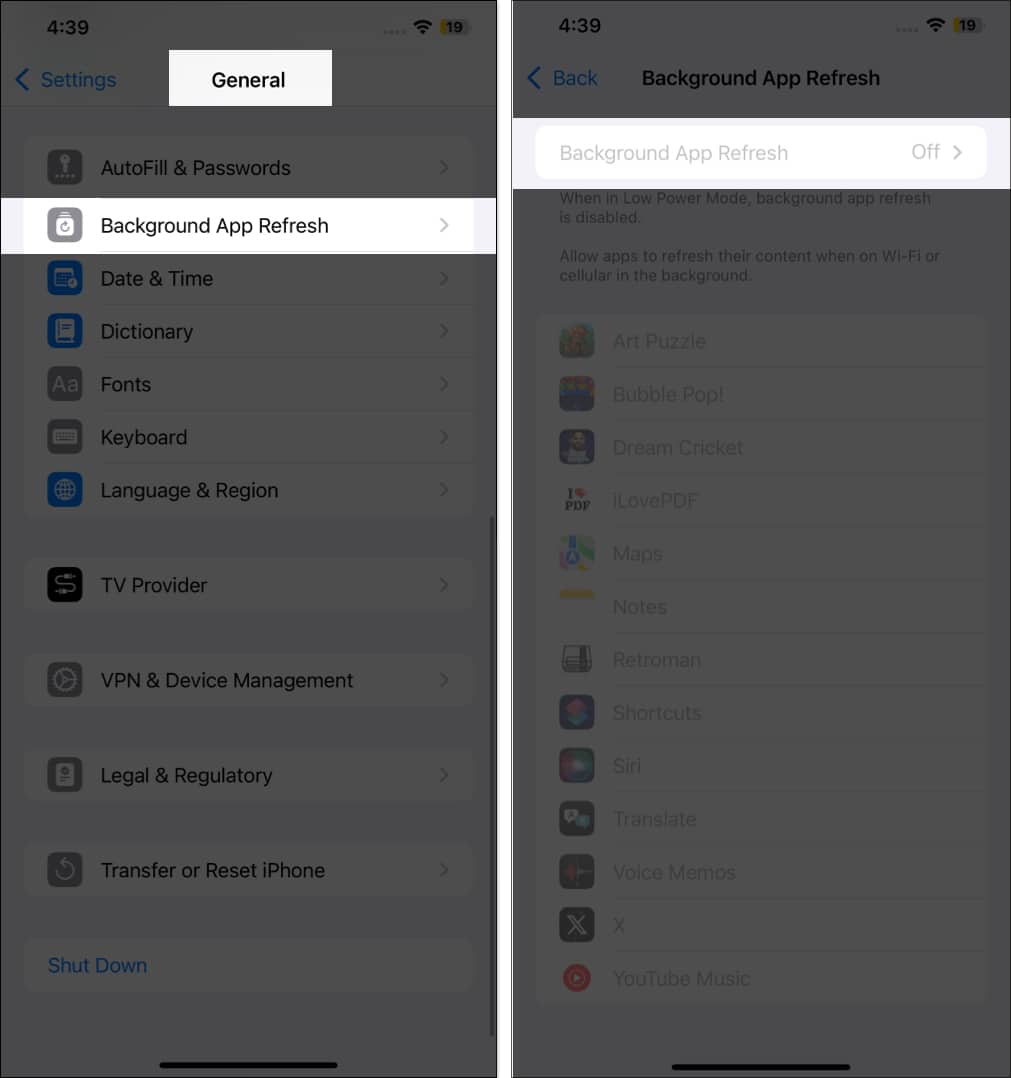
28. Turn off Background App Refresh
Disabling Background App Refresh saves battery, reduces data usage, and boosts performance by stopping apps from updating when not in use.
- Go to Settings → General → Background App Refresh.

29. Change Lock Screen Controls
With iOS 18 or later, you can change the previous default Flashlight and Camera controls on your iPhone’s Lock Screen. This way, you can add shortcuts to the feature you use the most.
Here’s how:
- Tap and hold the Lock Screen → Customize → Lock Screen.
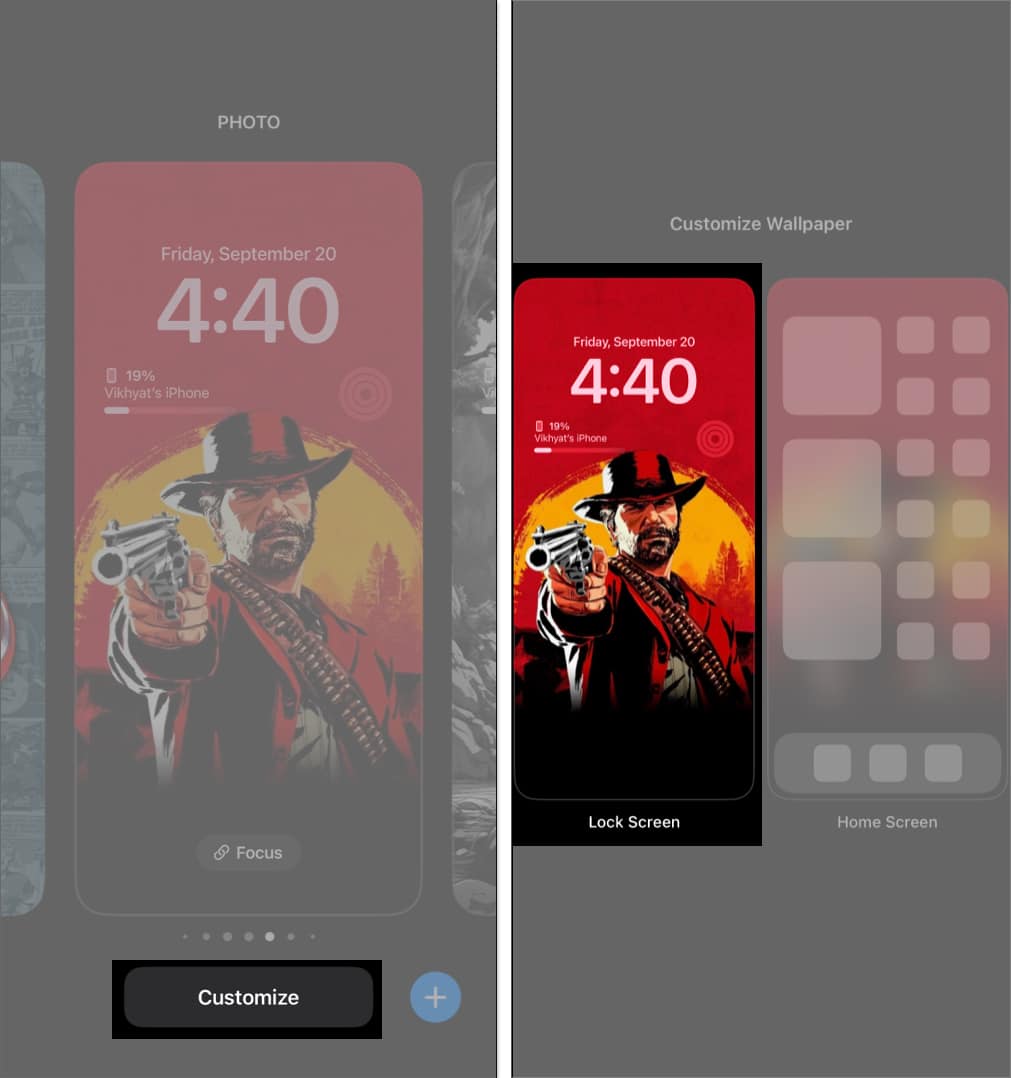
- Now, tap the “-” button to remove control → tap “+” to add a new control.

30. Disable Screen Distance
Introduced in iOS 17, Screen Distance warns you if you hold your iPhone too close for extended periods. While it helps reduce eye strain and the risk of myopia, the alerts can be disruptive. If they bother you, you can turn the feature off.
How to disable:
- Go to Settings → Screen Time → Screen Distance → toggle off Screen Distance.


31. Enable Reduce Loud Audio
To protect your hearing, iPhone lets you set a decibel limit for headphone audio. Once enabled, it continuously monitors sound levels and automatically lowers any audio that exceeds your chosen threshold.
How to enable:
- Open Settings → Sounds & Haptics → Headphone Safety → toggle on Reduce Loud Audio → Set the Decibel limit.

iPhone Experience Enhanced
iOS 26 isn’t just about flashy features — it’s full of small tweaks that make a big difference. From smarter battery life to better call management and personalization, these settings can instantly level up your iPhone.
If you just updated, take a few minutes to explore these options. You’ll be glad you did.
Read More