- Locking or hiding apps helps protect private data—useful in public or shared device scenarios to block accidental or unauthorized access.
- Lock apps by long-pressing the icon and choosing “Require Face ID/Touch ID/Passcode”—note, not all system apps can be locked this way.
- Hide apps in the App Library’s Hidden folder by tapping “Hide and Require Face ID,” then confirming with “Hide App” for extra privacy.
- Unhide or unlock apps by adjusting settings in the Hidden folder—just disable Face ID or passcode requirements to restore normal access.
- Stolen Device Protection limits app unlocks—Face ID or Touch ID is required even after a reset, so it’s best to keep this feature enabled.
Sometimes you want to keep certain apps private, either out of view or protected from others who might use your iPhone. Luckily, Apple does allow you to lock and hide apps on your iPhone.
In this article, we will show you how to lock and hide apps on your iPhone. Before we begin, though, let’s review what you need to know about this feature.
Why Lock or Hide Apps on iPhone?
There are several reasons why you may want to lock or hide an app on your iPhone:
- We all feel anxious when our friends, family, or children use our iPhones. You wouldn’t want them to open an app that may show any personal or sensitive information. Locking or hiding them is the best way to avoid this.
- When you’re at your workplace, you wouldn’t want to accidentally open up any apps that aren’t appropriate for a professional setting. Hiding such apps will help you in such situations.
- Apps that provide banking and financial services contain sensitive information. You may want to prevent unauthorized access to such apps by locking them.
- If you let your kids use your iPhone, locking apps can help prevent accidental in-app purchases. Further, you can lock apps to prevent your kids from changing any important settings on your iPhone.
How to Lock Apps on iPhone
Locking apps on an iPhone is fairly straightforward. Here’s what you need to do:
- Tap and hold the icon of the app you want to hide on the Home Screen or App Library.
- Select Require Face ID (or Touch ID) depending on the device you are using. If you haven’t set up biometrics, you will see the Require Passcode option.
- Select Require Face ID (or Touch ID or Passcode), and it will lock the app on your iPhone.
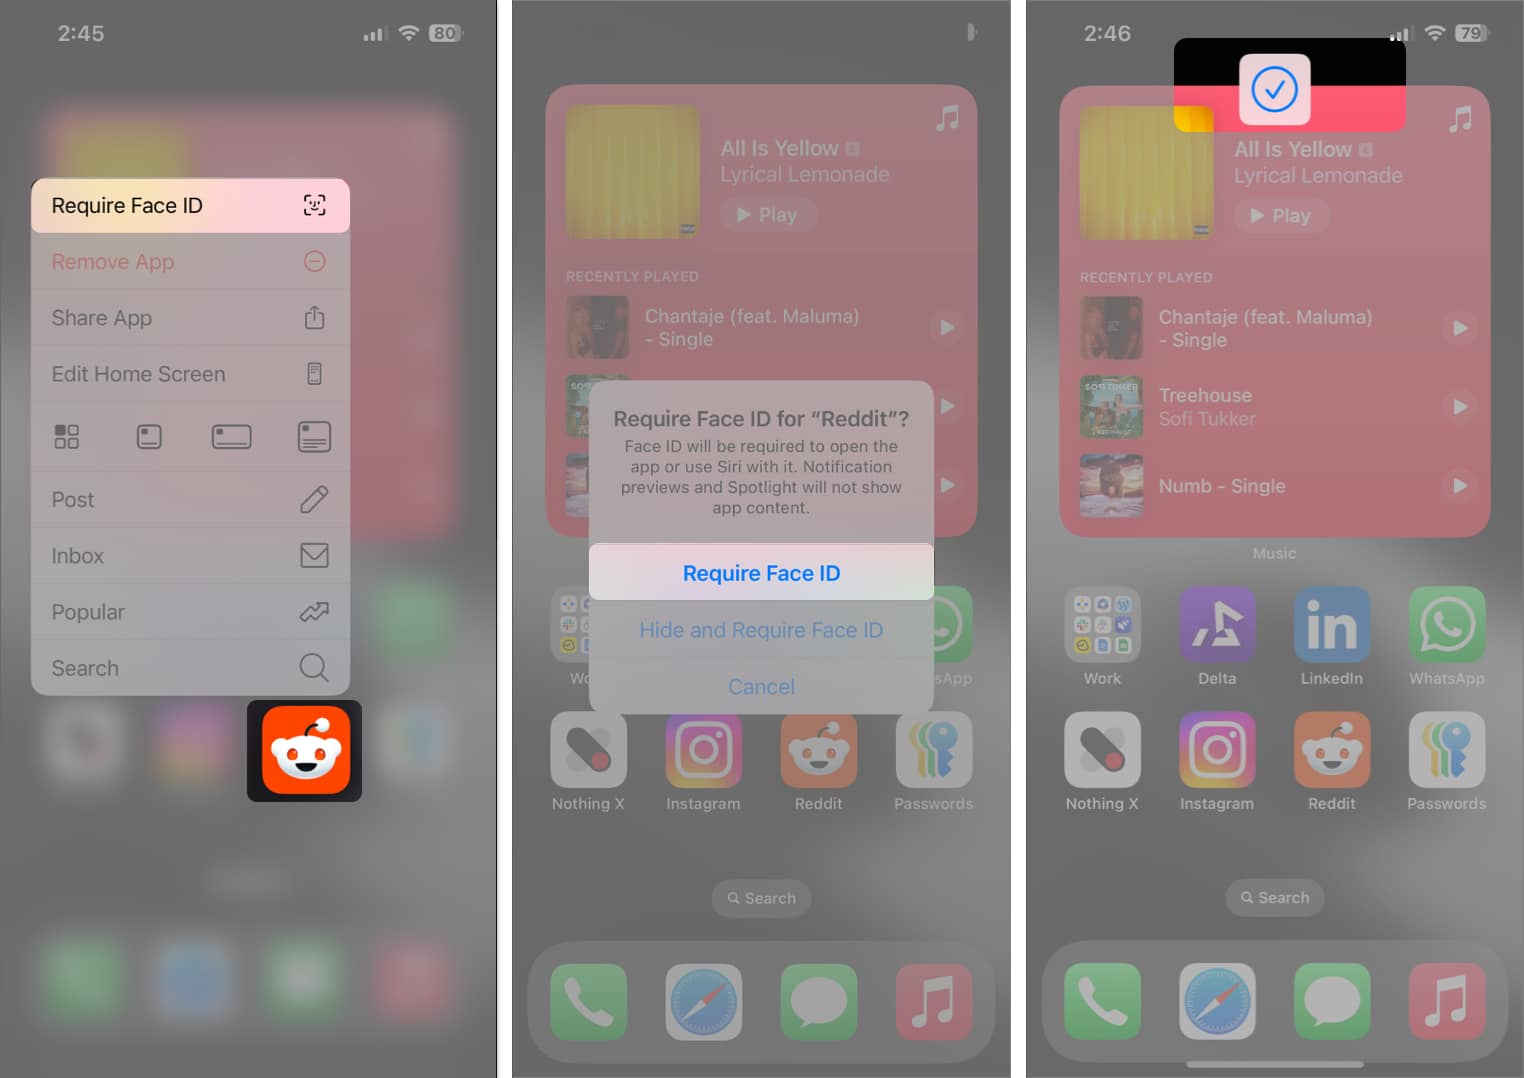
When you lock an app on your iPhone, you can only access it after you unlock it using Face ID, Touch ID, or a passcode. Any information from the app won’t be available in Spotlight Search, nor will it be accessible through Siri. You will, however, still get notifications.
Note:
How to Hide Apps on iPhone
We’ve all put apps deep inside folders to hide them from the Home Screen. But those days are gone, as you can now easily and quickly hide apps on an iPhone with a single tap. Here’s how:
- Tap and hold the icon of the app you want to hide.
- Select Require Face ID (or Touch ID) depending on the device you are using. If you haven’t set up biometrics, you will see the Require Passcode option.
- Select Hide and Require Face ID (or Touch ID or Passcode).
- Finally, tap on Hide App to hide and lock the app on your iPhone.

When you lock and hide an app on your iPhone, it will be sent to the Hidden folder in the App Library. You will need to enter your Face ID, Touch ID, or passcode to open this folder and access the hidden app. When an app is hidden, it’s hidden from everywhere—except for the Settings app—and you won’t be able to find its information through Spotlight Search or Siri, either.
How to Unhide and Unlock Apps
If you ever want to unhide and remove the lock from an app on your iPhone, you can follow these steps:
- Open the Hidden folder in the App Library.
- Tap and hold the app you want to unhide and select Don’t Require Face ID (or Touch ID or Passcode).
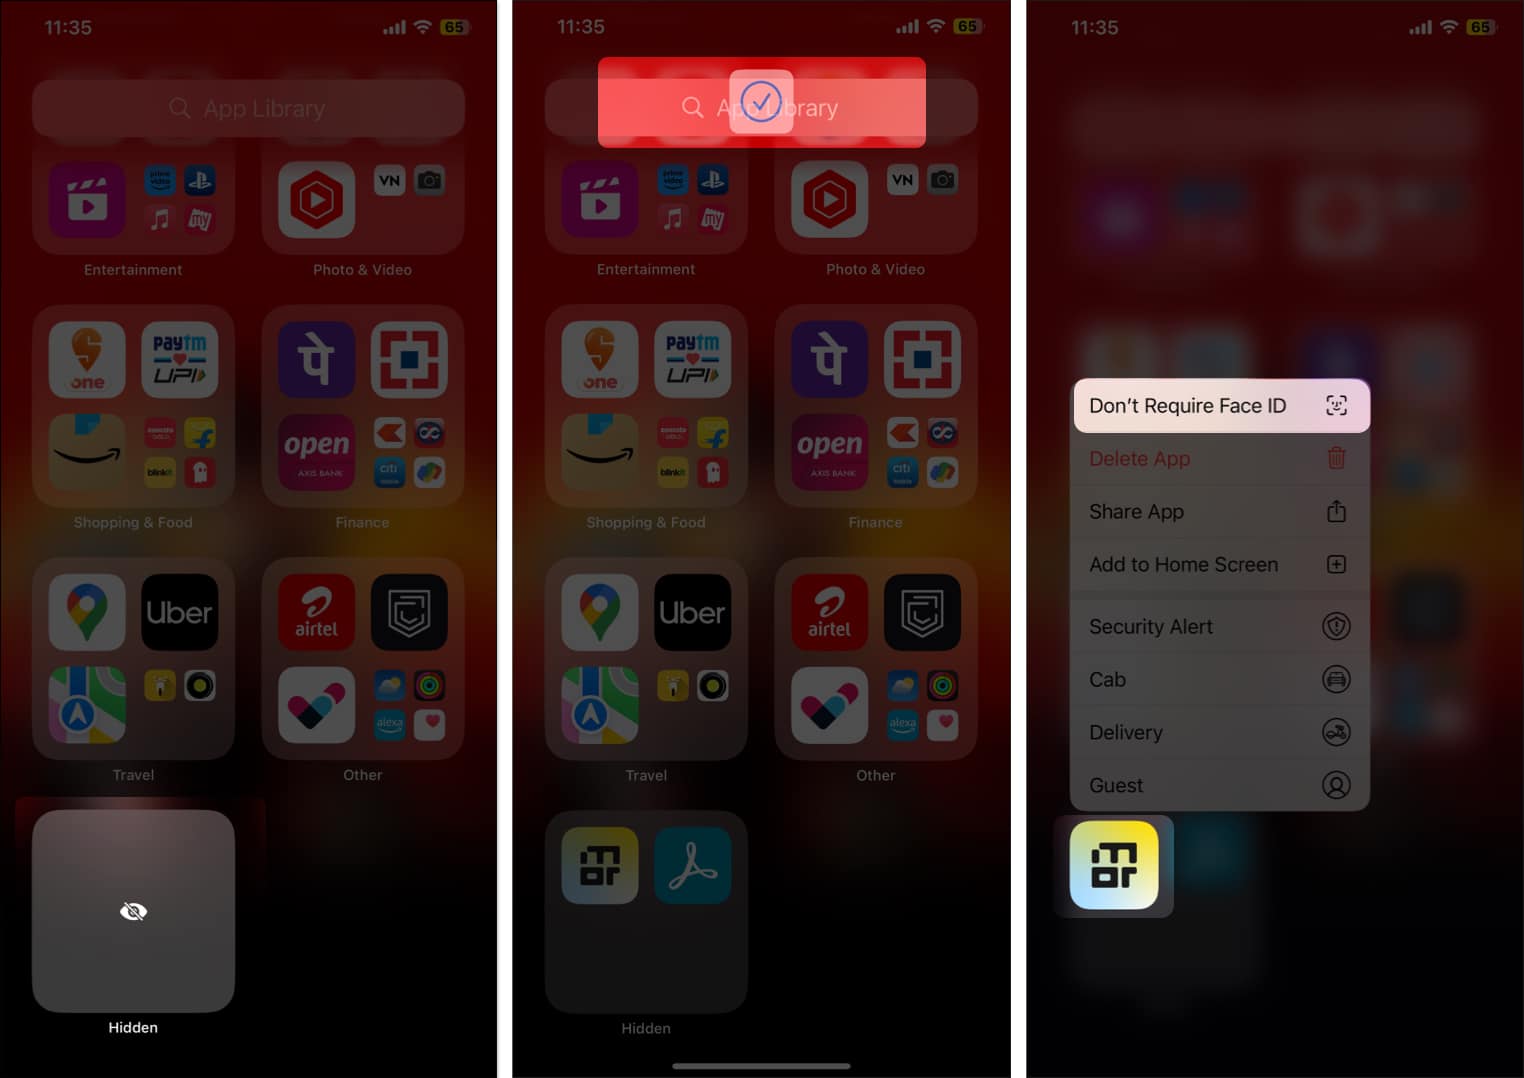

This will unhide the app and remove its lock, and you will see it again in your App Library. If you hid an app on the Home Screen, removing the lock and unhiding it won’t automatically put it back on the Home Screen.
Can’t Unlock Apps With Passcode? Check Stolen Device Protection
If you’ve enabled the Stolen Device Protection feature on your iPhone, you will not be able to hide or lock apps unless you have Face ID or Touch ID enabled. This is an additional security measure to protect your hidden apps from being accessed with your passcode.
We wouldn’t recommend turning off Stolen Device Protection, as it prevents thieves from turning off Find My iPhone and makes it a little less difficult to locate your device. If you want to hide or lock apps on your iPhone, it’s best to use Touch ID or Face ID.
If you insist otherwise, here’s how you can turn off Stolen Device Protection on your iPhone.
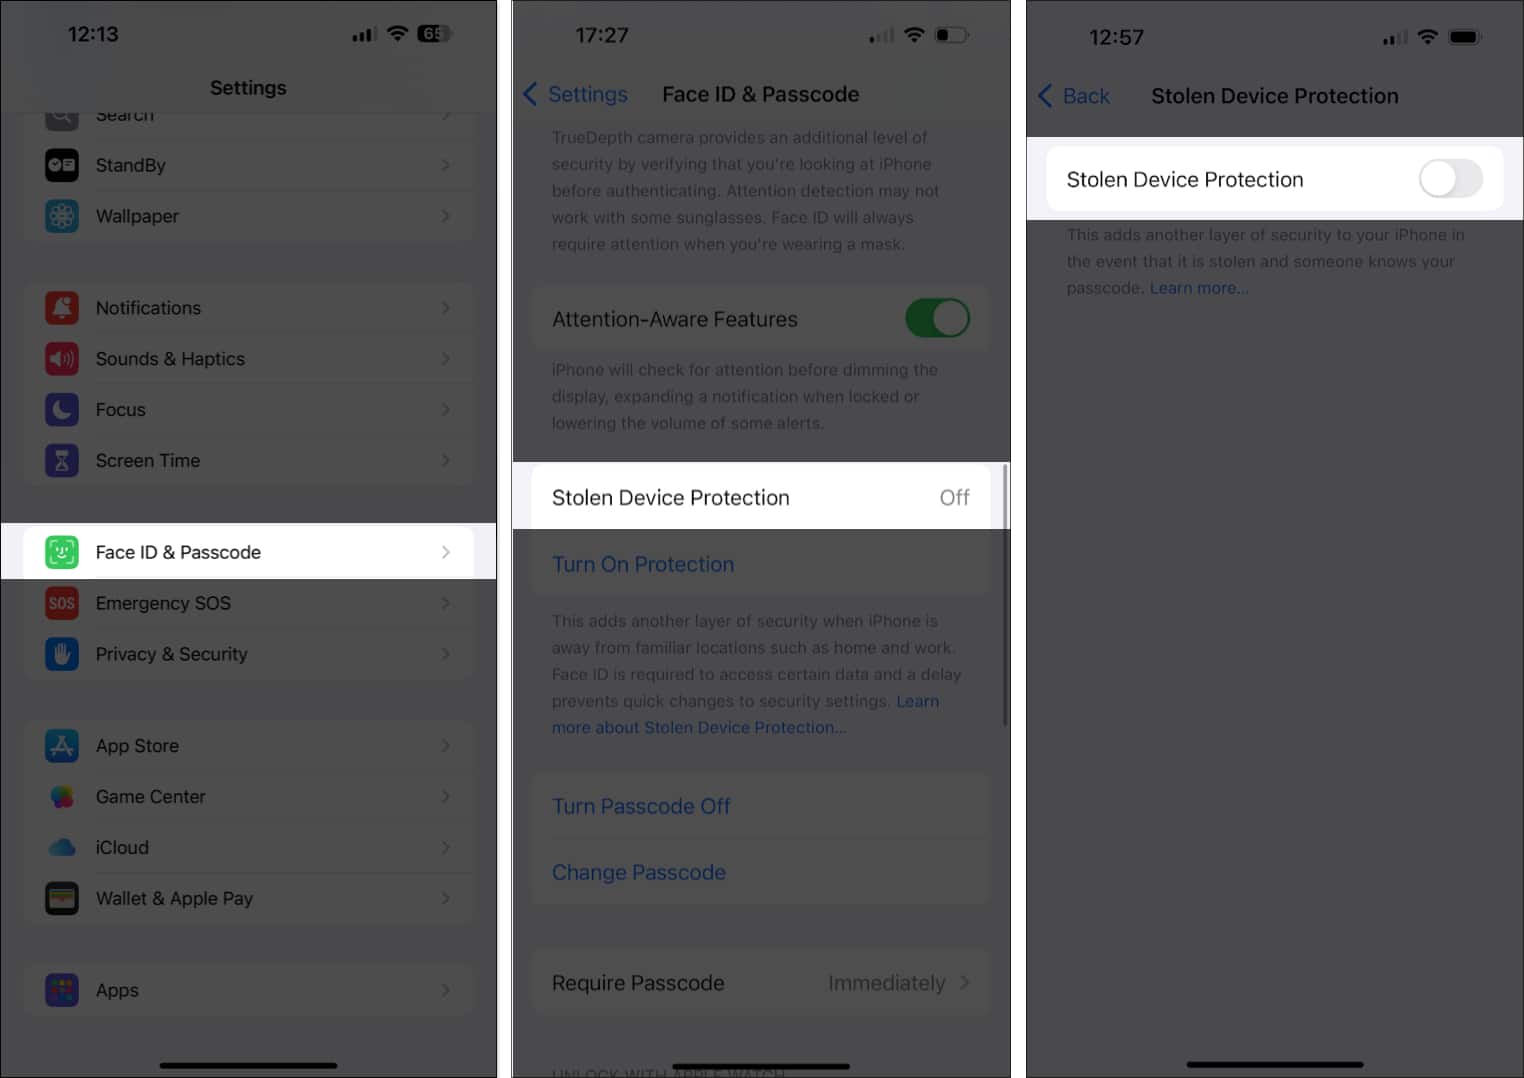
- Open Settings.
- Go to Face ID & Passcode.
- Tap on Stolen Device Protection and turn it off.

Wrapping up…
Thanks to Apple, you no longer have to use the Content Restrictions feature to block access to apps on your iPhone. Simply follow the instructions above, and you can easily lock apps (or hide them for more privacy) to prevent unauthorized access.
Did you know you can also hide photos in a hidden album on your iPhone? You can read our article that explains how you can do it!
If you have any further questions, feel free to drop them in the comments below.