- Enhanced Privacy with Locked Private Tabs: Locking Safari private tabs ensures sensitive browsing stays hidden, requiring Face ID or Touch ID to reopen them.
- Prerequisites for Locking Safari Private Tabs: This feature needs iOS 17 or later on iPhone, Safari 17 on macOS Monterey or newer, plus biometric authentication enabled.
- How to Lock Safari Private Tabs on iPhone and iPad: You can enable the lock in Settings → Apps → Safari → Toggle on Require Face ID to Unlock Private Browsing.
- What Happens After Locking Private Tabs: Private tabs auto-lock when inactive, and they stay secured if you switch apps or your device goes to sleep.
- Using Locked Private Browsing on Mac: On macOS Sonoma, private tabs lock when Safari isn’t active, and you can manually lock or force-quit for added security.
Safari’s Private Browsing is like a “stealth mode” for the internet. It lets you surf the web without saving history, cookies, or other browsing data on your device. But what if you step away from your device and someone tries to check your open tabs? That’s where locked Private Browsing comes in.
By requiring Face ID, Touch ID, or a passcode to reopen your private tabs, Safari makes sure your personal browsing stays protected even when you’re not around. In this guide, I’ll share how to lock Private Browsing tabs on Safari across your iPhone, iPad, and Mac.
Table of Contents
- Why Should You Lock Safari's Private Tabs?
- Prerequisites
- How to Lock Safari Private Browsing Tabs on iPhone and iPad
- What Happens After You Enable the Feature
- How to Use Locked Private Browsing in Safari on Mac
- How to Unlock Private Tabs in Safari
- Additional Safari Privacy Tips
- Troubleshoot Common Issues
- Make Your Browsing Truly Private
Why Should You Lock Safari’s Private Tabs?
Locking your private tabs takes Safari’s privacy game to the next level. When enabled, it offers:
- Extra layer of privacy: Even if someone accesses your unlocked device, they can’t open your private Safari tabs without your authentication.
- Native and convenient: On macOS, this feature is on by default. On iOS and iPadOS, you just need to turn it on once in Settings.
- Peace of mind: Only you can access your private tabs even if someone grabs your device while you’re away. Ideal for shared device users.
So, when you are doing online banking, health research, or searching for anything you don’t want exposed, locked Private Browsing is your way to go.
Prerequisites
Before you jump in, make sure your setup is ready. Here’s what you’ll need:
- For iPhone or iPad: Run iOS 17+
- For Mac: Update Safari to version 17 on macOS Monterey or later.
- Face ID, Touch ID, or passcode set up on your device.
Note:
Although Safari settings sync via iCloud, this lock feature works per device for added security.
How to Lock Safari Private Browsing Tabs on iPhone and iPad
Turning this on takes just a few taps:
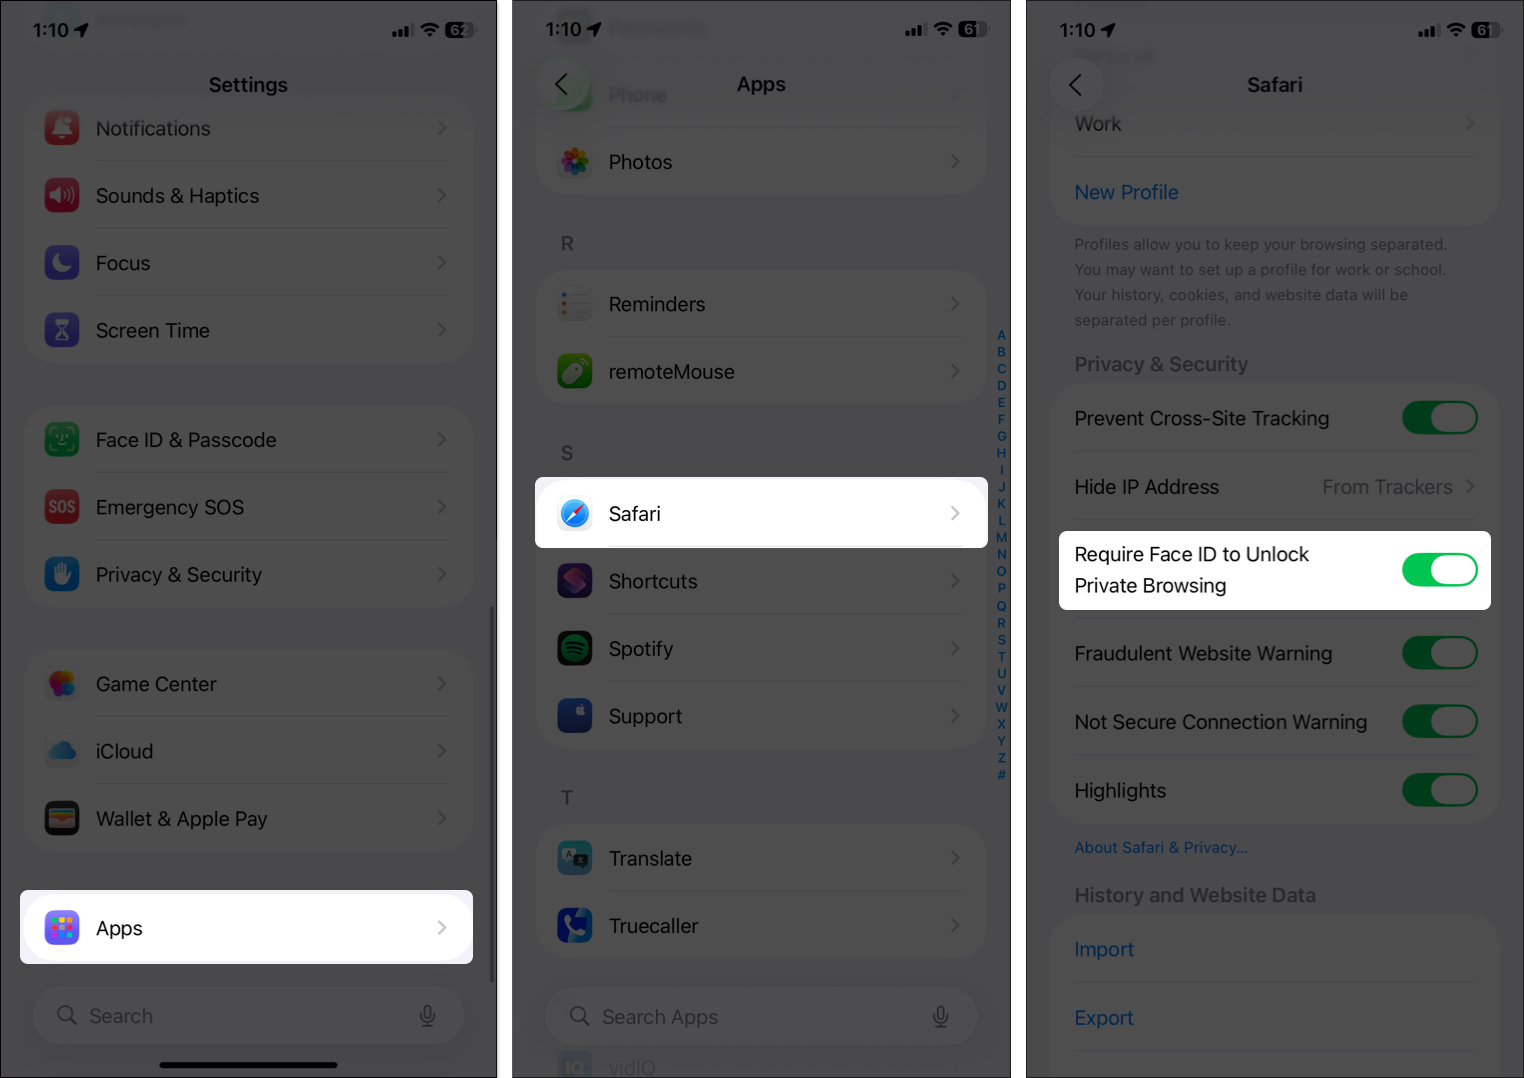
- Open the Settings app.
- Scroll down, tap Apps, and select Safari from the apps list.
- Under the Privacy & Security section, toggle on Require Face ID to Unlock Private Browsing (or Require Touch ID if your device uses that).
- Authenticate with your Face ID, Touch ID, or passcode to confirm.
That’s it! You have successfully enabled the feature. But how does it actually work? Let’s find out.
What Happens After You Enable the Feature
Once it’s on, Safari gets a bit more vigilant. Here’s the breakdown:
- When you open Safari and switch to the Private tab for the first time, you need to load the start page or any website to trigger the feature.
- If there are already tabs open, it automatically locks. You need to verify your biometrics to unlock and start browsing.
- Now, if you switch to another app, press the home button, lock your device, or let your screen sleep due to inactivity, those tabs hide behind a lock screen.
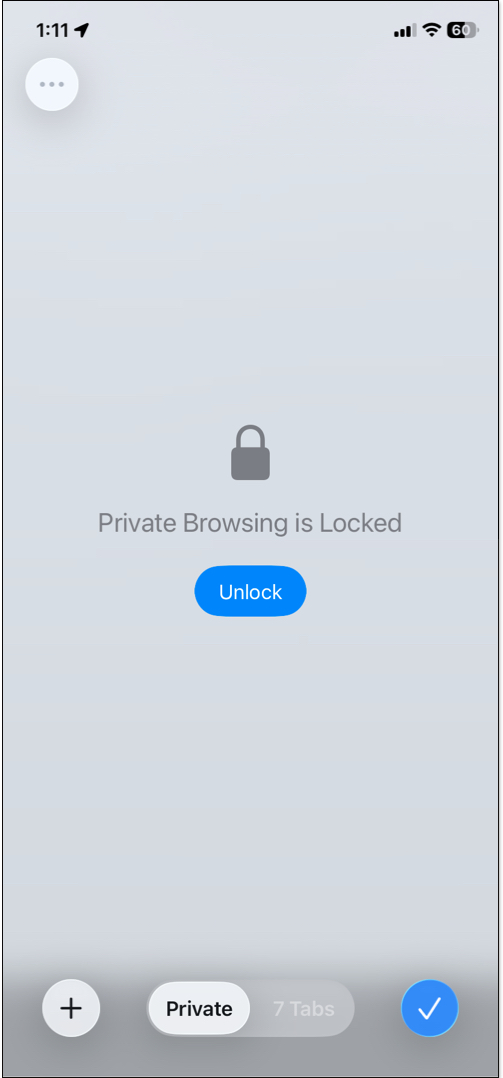
- When you come back to Safari, you’ll see a Private Browsing is Locked screen with an Unlock button.
- Note that if you’re playing audio or video in a private tab, it won’t get locked.
And don’t worry, your regular tabs stay unlocked for quick browsing.
How to Use Locked Private Browsing in Safari on Mac
On Mac, things work slightly differently. It is enabled by default on macOS Sonoma and later. But let’s check and adjust if necessary:
- Open Safari from your Dock or Applications folder.
- Click Safari in the top menu bar, then select Settings.
- Go to the Privacy tab.
- Look for Require Touch ID to view locked tabs (or Require password if no Touch ID) next to Private Browsing. Check the box to enable it if it’s off.
Now you’re set! Private windows will automatically lock when Safari isn’t active, when the screensaver starts, or when your Mac is locked.
Manually Lock Your Private Tabs
Want more control? On Mac, you can manually lock your private sessions. Simply click Windows in the menu bar and select Lock All Private Windows.
If you’re in a hurry, you can also force a lock by force-quitting the Safari app (Option + Command + Esc) or locking your Mac screen (Control + Command + Q). It’s flexible for those times when you need to step away mid-browse.
How to Unlock Private Tabs in Safari
Returned to your personal session? Unlocking is easy on all devices:
On iPhone/iPad:
- Open Safari and tap the three-dot icon at the bottom right corner.
- Select All Tabs and move to Private.
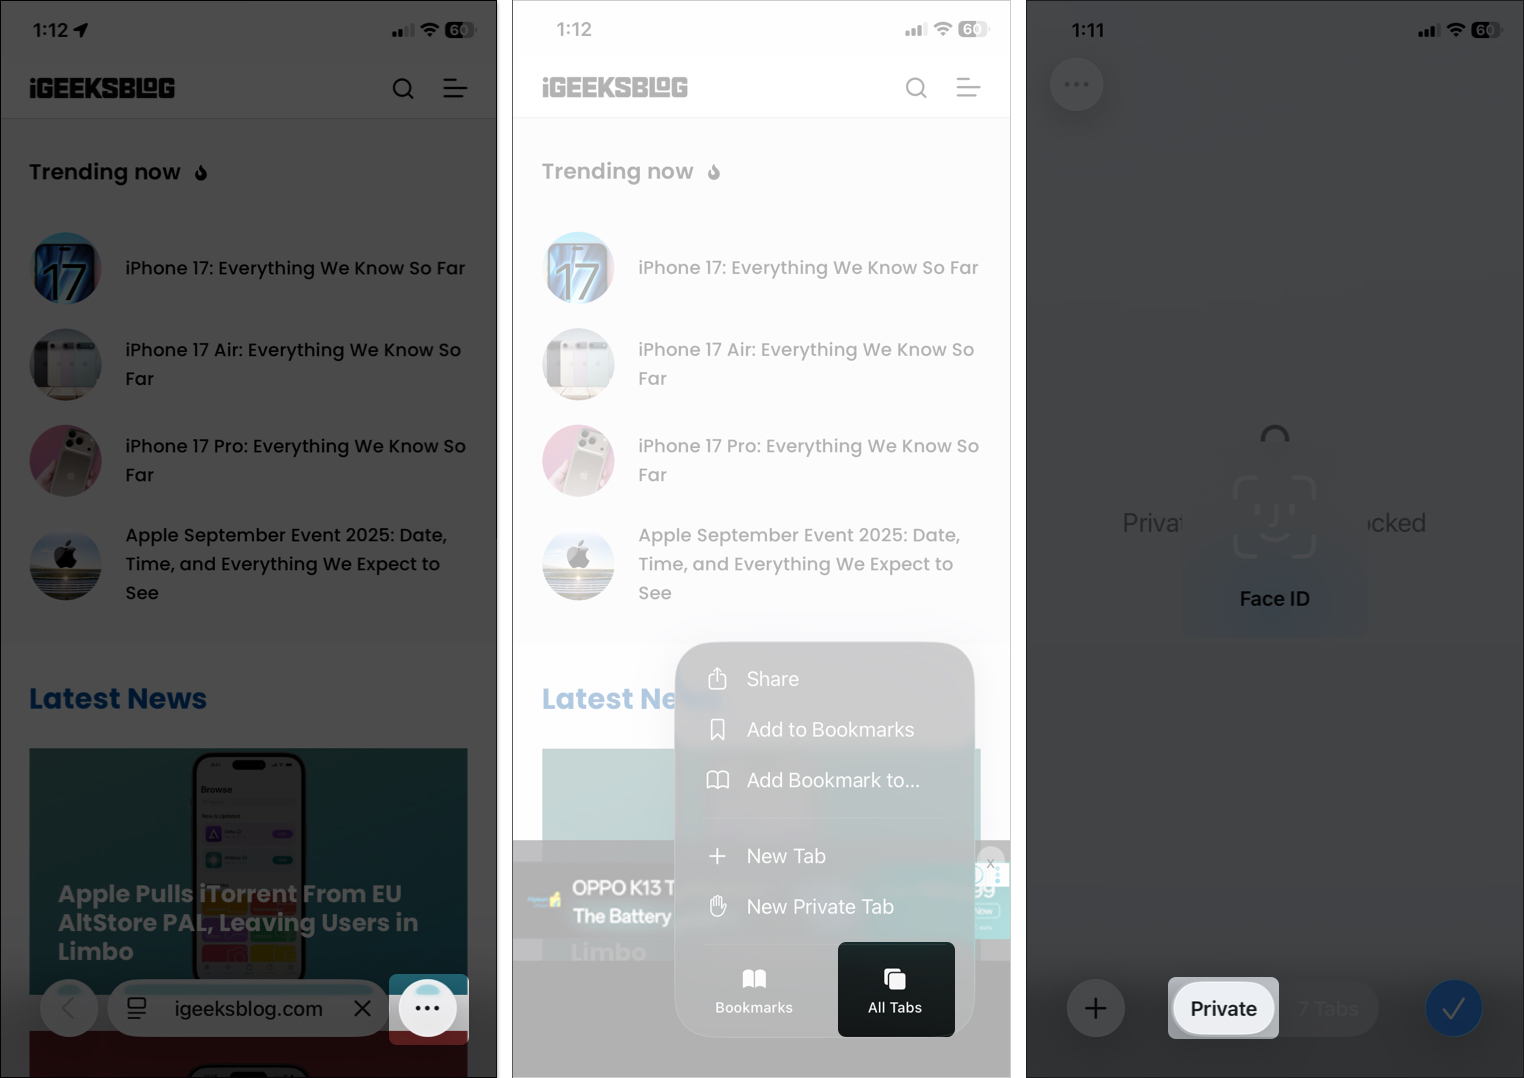
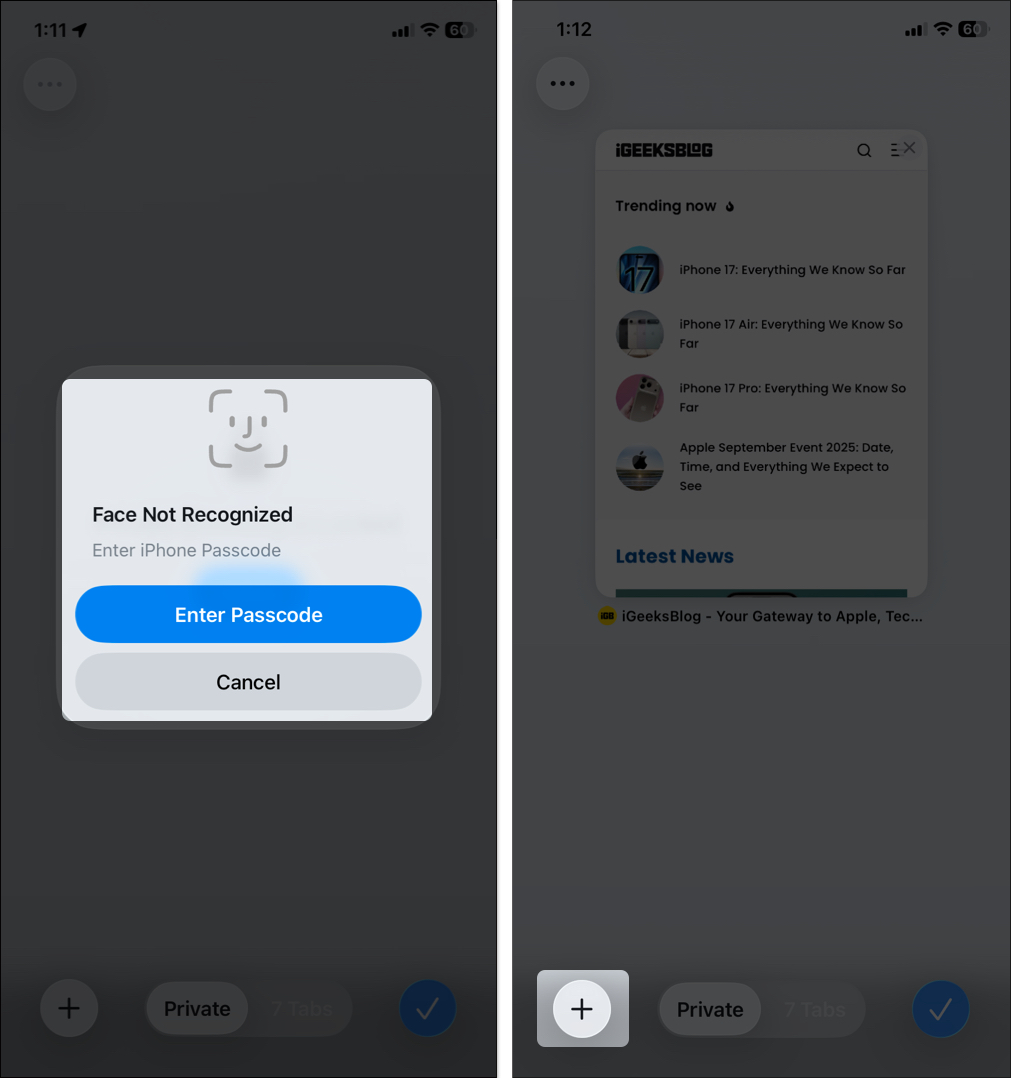
- You’ll see the lock prompt. Look at your camera for Face ID.
- If biometrics fail twice, like you’re wearing sunglasses that block Face ID, tap Enter Passcode on the prompt and type it.
- Once verified, you will see your existing private windows. Tap the plus icon to open a new incognito tab.

On Mac:
Reopen your previously opened Safari Private window from Dock. A prompt pops up that displays Private Browsing is Locked. Now, use Touch ID on your keyboard or type your Mac’s password in the text field.
Once the macOS verifies your Touch ID or password, it will let you surf the Private window again.
Pro tip: Keep your device updated, as glitches in older iOS/macOS versions could cause issues here.
Additional Safari Privacy Tips
Turning on Face ID or Touch ID lock for Safari Private Browsing is awesome, but layer on these for even better protection:
- Lock Safari on iPhone: You can lock and hide the app to save it from your nosy friends or family members.
- Turn on iCloud Private Relay: In Settings > [Your Name] > iCloud > Private Relay, enable it to hide your IP address and encrypt traffic.
- Use a VPN: For full-device protection, grab a trusted VPN app to mask your location and encrypt everything, not just Safari.
- Clear Website Data Often: Even when browsing in private mode, some information may stick around. Go to Settings > Apps > Safari > Advanced > Website Data and clear it out.

- Change Private Search Engines: Use privacy-oriented ones like DuckDuckGo as Safari’s default for fewer trackers.
Troubleshoot Common Issues
Running into hiccups? No sweat, here’s how to fix the usual suspects:
| Issues | Solutions |
| Feature not appearing | Ensure you’re on iOS 17+ or macOS Sonoma+. Update via Settings/System Settings > General > Software Update. |
| Toggle won’t stay on/off | This can happen due to Screen Time restrictions. Check Settings > Screen Time > Content & Privacy Restrictions > Allowed Apps, and toggle on Safari. |
| Biometrics not working | Restart your device or reset Face ID/Touch ID in Settings > Face ID & Passcode. Also, clean your sensor or camera. |
| Private Browsing greyed out | Often linked to Screen Time or parental controls. Toggle Screen Time off and on or adjust web content limits. |
| Password prompt every time on Mac | This might be a macOS glitch. Try toggling the setting off and on. |
| Not locking at all? | Force quit Safari and reopen. If issues continue, reset all settings or contact Apple Support. |
Make Your Browsing Truly Private
There you go! Securing Safari’s private tabs with Face ID or Touch ID is a win at maintaining your browsing life as private and secure as possible. Whether you’re protecting sensitive information or simply want some stress-free surfing, this feature hits hard without making things more complicated.
Try it out today and combine it with those additional tips for better-than-best privacy. If you have any problems, mention it in the comments section below. I’ll be more than happy to assist you!
Related articles worth reading:


