- Why protect folders on macOS: Locking sensitive folders prevents snooping on shared Macs, keeps work and personal files private, and limits unwanted sharing through sync.
- Disk Utility method: Create an encrypted disk image of your folder, choose a password you remember, then mount, move files inside, and eject to lock.
- Terminal ZIP encryption: Use zip with encryption to wrap a folder into a passworded archive. Quick, scriptable, and opens on macOS without installing extra apps.
- Third-party apps on Mac: If Terminal feels tedious, apps like Encrypto, Hider Pro, or Privaulty offer simple interfaces for locking folders securely with encryption.
- Hiding folders vs encryption: chflags hidden only hides items from Finder. Anyone can reveal them. For stronger protection on macOS, encrypt and avoid weak passwords.
Having your important folders password-locked ensures your private and sensitive files are secured from unauthorized access if you often share your Mac with others. But unlike Windows, macOS doesn’t offer a direct “password-protect folder” option. However, a few workarounds that use the built-in Disk Utility and Terminal to protect any folder with a password do exist.
This post details multiple methods to password-protect a folder on your Mac.
Why Password-Protect a Folder on Mac
Privacy, confidentiality, and security are typically the three main reasons to password-protect folders on a Mac:
- Privacy: Keep personal files safe from others using your Mac.
- Confidentiality: Protect work documents, financial records, or client files.
- Security: Prevent unauthorized access in case your Mac is lost or stolen.
3 Ways to Password-Protect a Folder on Your Mac
There are three ways to password-protect a folder on your Mac: using the Disk Utility app, via the Terminal window, or through third-party apps.
1. Using Disk Utility
You can use the Disk Utility tool on your Mac to create a disk image of the folder you want to password-protect.
For those unaware, a disk image is a special file (with the .dmg extension), that acts like a virtual hard drive. When you double-click to open it, you’re required to enter the password. Once done, it mounts on your desktop like an external drive, giving you access to its content. When you eject the drive, the files inside become invisible, and anyone attempting to open it must enter the password.
With that said, here’s how you can create a disk image of a folder using Disk Utility on your Mac:
- Open the Disk Utility app on your Mac. You can do so by heading to Finder → Applications or using the Spotlight search.
- Now, click on File in the top menu bar.
- Next, in the drop-down menu, select New Image → Image from Folder.
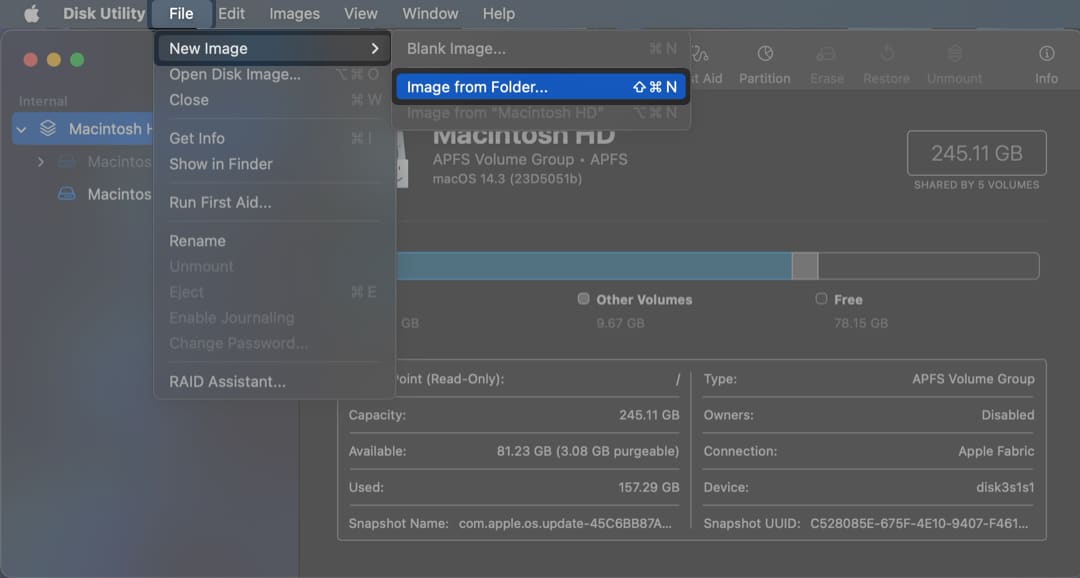
- Then, select the folder you wish to create the disk image of.

- In the dialog box:
- Name your new disk image.
- Choose a location to save it.

- Under Encryption, select 128-bit AES (faster) or 256-bit AES (more secure).

- Enter and verify your password.

- Finally, click Save and wait for the disk image to be created.


Once the .dmg file is ready, you can delete the original folder. To access your files in the future, double-click the disk image, enter the password, and it will open like a secure drive.
Note:
2. Create a Password-Protected ZIP File via Terminal Window
If ejecting the disk image every time you close it feels like a hassle, and you’re familiar with Terminal commands, you can use the Terminal window to create a password-protected ZIP file of the folder instead. Here’s how:
- Open Terminal and type the following command: zip -er ProtectedFolder.zip FolderName
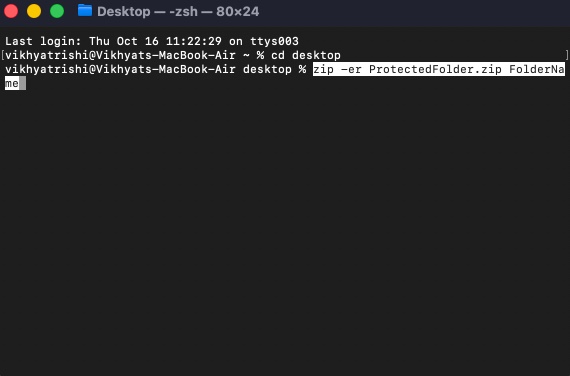
- Before hitting the Return key, make sure:
- Replace ProtectedFolder.zip with your desired filename.
- Replace FolderName with the actual folder’s name.
- Once done, hit Return and enter your password.
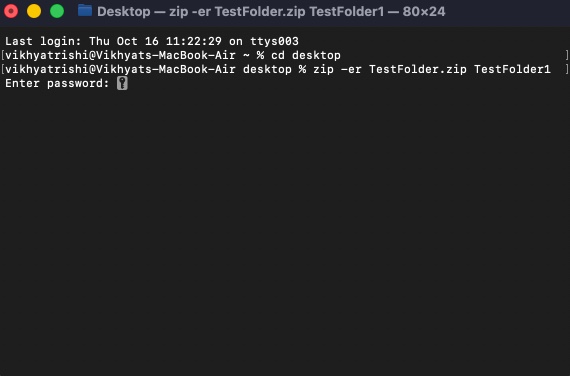


This creates a password-protected ZIP file. You’ll need to enter the password whenever you unzip it.
Now, you can either delete the original folder if you no longer need it or save it somewhere safe away from prying eyes.
3. Using Third-Party Apps
Not everyone is good at writing Terminal commands; even one wrong character can wreak havoc in the system. If you prefer a simpler interface or extra features, consider trying third-party apps like Privaulty, Hider Pro, or Encrypto.
These apps make it easy to lock files and folders, but may come with a cost. Since macOS already provides Disk Utility and Terminal, many users stick with the built-in options.
Alternative Solution: Hide Sensitive Folder on Mac
If password-protecting a folder natively on Mac feels complex and you don’t wish to spend on third-party apps, another simple way to keep files out of sight is to hide the folder using Terminal. While this doesn’t provide actual security like password protection, it’s useful for keeping sensitive files away from casual snooping. Here’s how you can do it:
- Open Terminal.
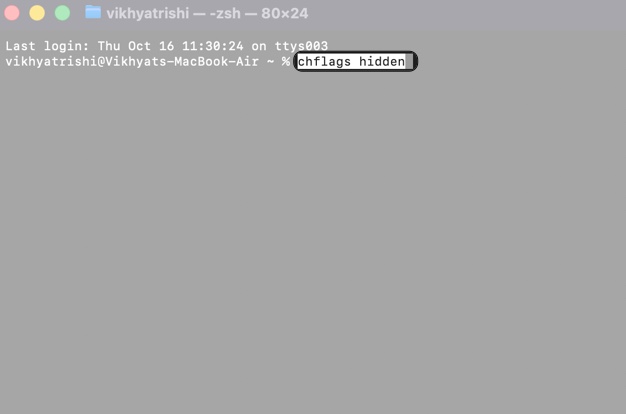
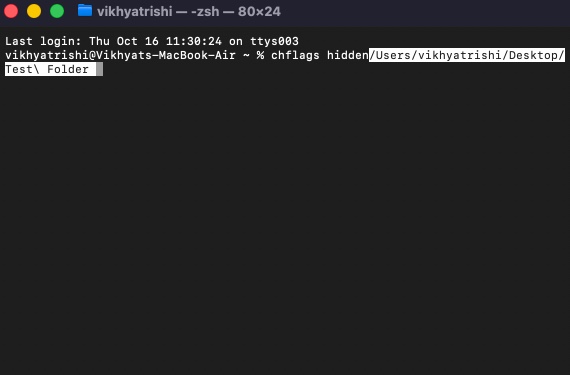
- Type in ‘chflags hidden‘ and drop the folder you want to hide onto Terminal, and the folder path will appear next to the command.
- Press the Return key, and the folder will disappear from the Finder.


To view the hidden folder:
- Open Finder and press the Command + Shift + . (period) keyboard shortcut to toggle hidden files and folders.
- The hidden folder will appear slightly faded, but you can open it normally.
- Press the same keyboard shortcut to hide the folder again.
To permanently unhide the folder, simply replace the ‘chflags hidden’ command with ‘chflags unhidden‘ and hit Return.
Tips for Managing Password-Protected Folders
Now that you know how to password-protect your files and folders on a Mac, use these tips to manage them:
- Use a strong password combining letters, numbers, and symbols.
- Store your password safely (e.g., in iCloud Keychain or a password manager).
- Remember that if you forget the password, you may lose access permanently.
- Always delete the original folder after securing it.
Secure Your Files the Right Way…
And that’s it; now you know how easy it is to password-protect a folder on a Mac once you know which tool to use and how. Disk Utility is the most secure option, while Terminal offers a quick solution for creating encrypted ZIP files. For a user-friendly experience, consider opting for third-party apps.
Which method do you prefer for securing your folders on Mac? Let us know in the comments.