How to Fix iPhone Stuck in Emergency SOS Mode
Stuck on the SOS screen? Don’t worry—quick fixes will get your iPhone (and peace of mind) back in no time.
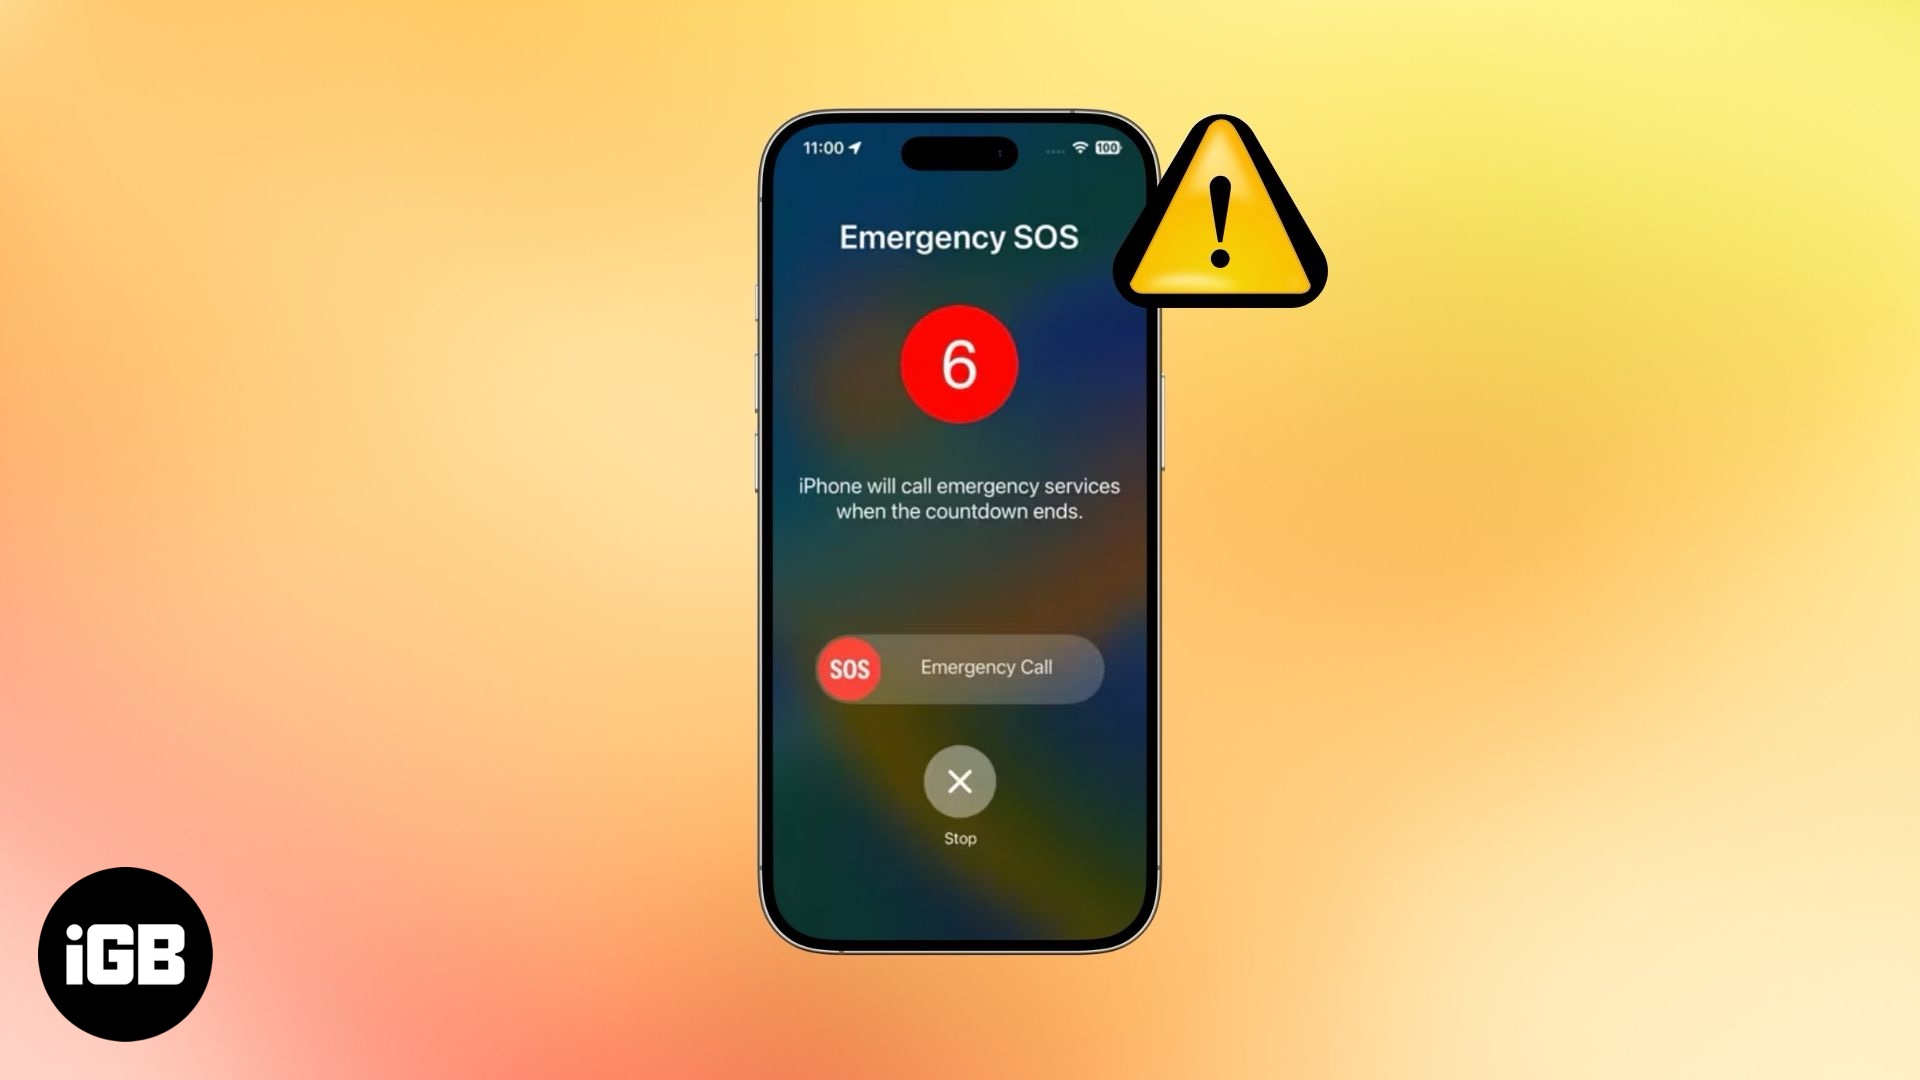
If your iPhone 13, iPhone 14, iPhone 15, or any recent model is stuck on the Emergency SOS screen, you’re not alone. Emergency SOS mode is a fantastic safety feature—it helps you quickly reach emergency services and notify your contacts in the event of an emergency. However, your iPhone can sometimes get stuck in this mode, making it difficult to use your device normally. Don’t worry—this is a common issue, and it’s usually easy to fix.
Below, you’ll find a quick troubleshooting checklist, a detailed guide, and a handy comparison table to help you get your iPhone out of SOS mode and back to normal.
- Quick Checklist to Fix iPhone Stuck in Emergency SOS Mode
- 1. Restart or Force Restart Your iPhone
- 2. Charge Your iPhone
- 3. Check Network Coverage and Toggle Cellular Data
- 4. Reinsert or Check Your SIM Card
- 5. Update iOS and Carrier Settings
- 6. Reset Network Settings
- 7. (Optional) Reset All Settings
- 8. Use a Specialized Repair Tool (Optional)
- 9. Restore iPhone via iTunes/Finder (Last Resort)
- 10. Use Recovery Mode or DFU Mode (Deep Recovery)
What is Emergency SOS Mode on iPhone?
Emergency SOS mode is your iPhone’s built-in safety net for urgent situations. By pressing and holding the side button and a volume button, your phone can call emergency services and share your location with your emergency contacts. While in this mode, some regular features are limited to prioritize your safety.
What’s the difference between Emergency SOS mode and “SOS Only”?
- Emergency SOS mode is triggered by you for emergencies.
- “SOS Only” appears in your status bar when your iPhone can’t connect to your Carrier but can still make emergency calls, usually due to network or SIM card issues.
Why is My iPhone Stuck in Emergency SOS Mode?
Understanding the root cause can help you fix the problem more efficiently. Here are the most common reasons:
- Accidental Activation: It’s easy to trigger Emergency SOS by mistakenly pressing the side button and a volume button together, especially if your phone is in your pocket or bag.
- Example: You might accidentally activate SOS mode while fumbling with your phone, causing it to remain on the emergency screen.
- Software Glitches or Crashes: Like any computer, your iPhone can experience software bugs or crashes that may cause it to get stuck in SOS mode.
- Example: After a recent iOS update, your device may not exit SOS mode as expected.
- Network or Carrier Issues: If you’re in an area with poor cellular coverage or there’s a carrier outage, your iPhone may only allow emergency calls.
- Example: In remote or underground locations, you might see “SOS Only” until you return to an area with service.
- SIM Card Problems: A misaligned, damaged, or missing SIM card can disrupt your connection to your Carrier, prompting SOS mode.
- Example: If you recently swapped SIM cards or dropped your phone, check that the SIM card is inserted correctly.
- Hardware Malfunctions: Physical or water damage can interfere with your device’s ability to connect to networks or function properly.
- Example: A damaged antenna or malfunctioning buttons may cause recurring SOS mode issues.
- Jailbreaking or Unauthorized Modifications: Jailbreaking your iPhone or installing unauthorized software can make it more prone to system errors, including being stuck in SOS mode.
- Clarification: Jailbreaking is performed by users to bypass Apple’s software restrictions, but it increases the risk of instability and is not recommended.
How to Identify If Your iPhone is Stuck in SOS Mode
- Visual Indicators: “SOS” or “SOS Only” appears in the status bar instead of your Carrier’s name.
- Functional Limitations: You can only make emergency calls; other calling and data features are unavailable.
- Restricted App Access: Most apps and features are inaccessible.
- Battery Drain: Prolonged SOS mode can drain your battery faster as the device continuously searches for a signal.
Quick Troubleshooting Decision Guide
Unsure where to start? Use this quick reference to decide your next step:
- Is your iPhone responsive and can you access Settings?
- Yes: Start with the basic steps below.
- No: Try a force restart, then proceed to advanced steps if the device remains unresponsive.
- Do you see a “No SIM” or “Invalid SIM” message?
- Yes: Check and reseat your SIM card before other steps.
- Did the issue start after a software update or SIM swap?
- Yes: Prioritize updating carrier settings and checking for iOS updates.
Troubleshooting Table: How to Fix iPhone Stuck on Emergency SOS
| Troubleshooting Step | Difficulty | Data Loss Risk | Success Rate | Works for “SOS Only”? |
|---|---|---|---|---|
| Restart/Force Restart | Easy | None | High | Yes |
| Charge Device | Easy | None | Medium | Yes |
| Move for Better Coverage | Easy | None | Medium | Yes |
| Reinsert SIM Card | Easy | None | Medium | Yes |
| Update iOS/Carrier Settings | Easy | None | High | Yes |
| Reset Network Settings | Medium | None | Medium | Yes |
| Reset All Settings | Medium | None | Medium | Yes |
| Restore via iTunes/Finder | Advanced | High | High | Sometimes |
| Recovery/DFU Mode | Advanced | High | High | Sometimes |
Step-by-Step Troubleshooting Guide
Follow these simple steps to get your iPhone out of Emergency SOS mode and working normally again.
1. Restart or Force Restart Your iPhone
Why this helps: Restarting clears temporary software glitches that may be causing your device to remain in SOS mode.
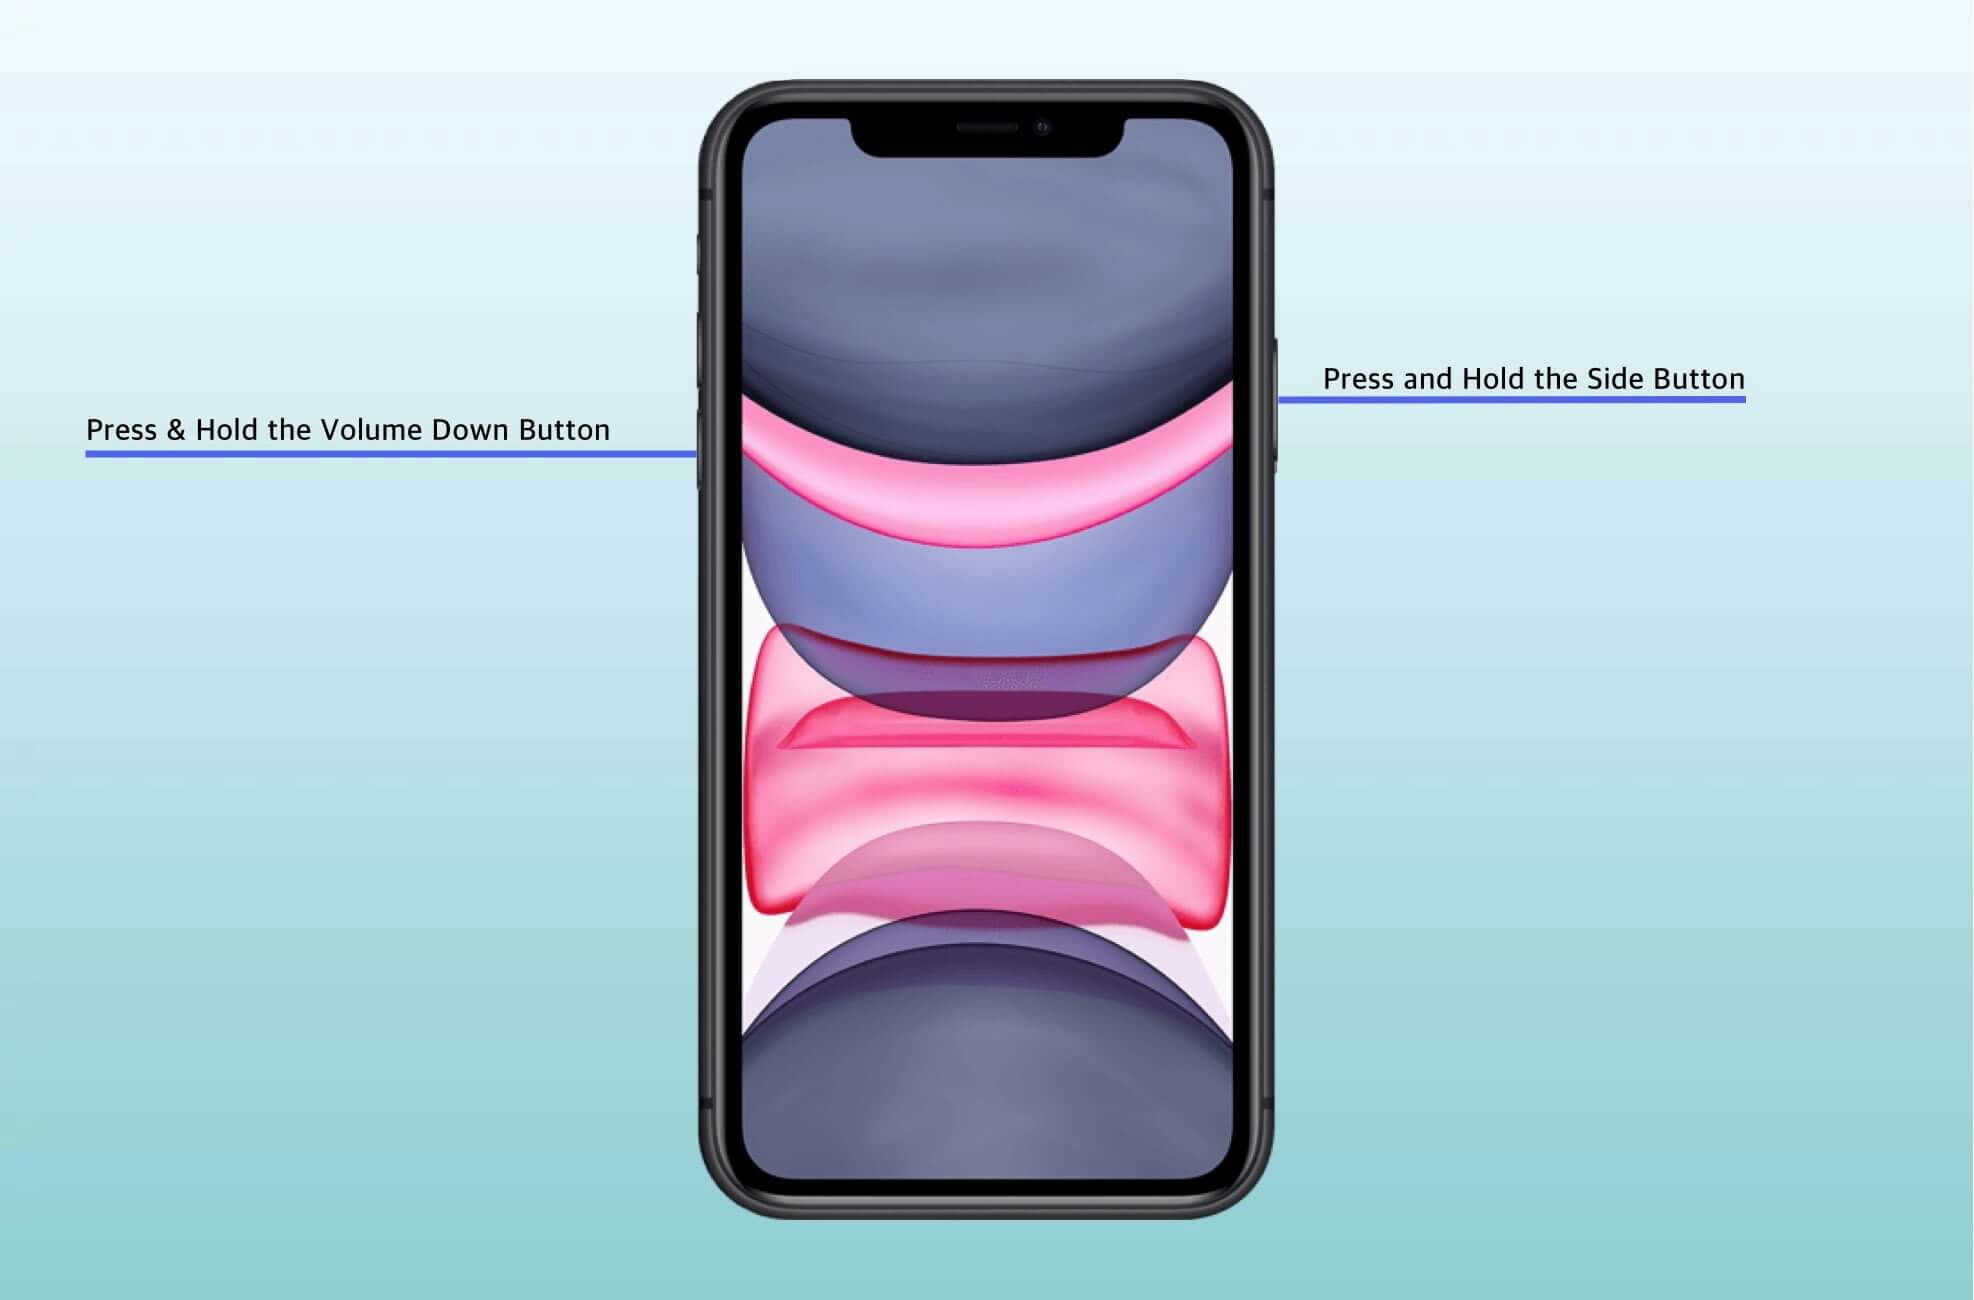
For iPhones with Face ID (iPhone X, 11, 12, 13, 14, 15, and 16):
- Quickly press and release the Volume Up button.
- Quickly press and release the Volume Down button.
- Press and hold the Side button until you see the Apple logo.
For iPhones with a Home Button:
- Press and hold the Top (or Side) button until the power off slider appears.
- Drag the slider to turn off your iPhone.
- Once off, press and hold the Top (or Side) button again until you see the Apple logo.
2. Charge Your iPhone
Why this helps: A low or depleted battery can cause your iPhone to behave unpredictably, including getting stuck in SOS mode. Charging resets some internal processes.
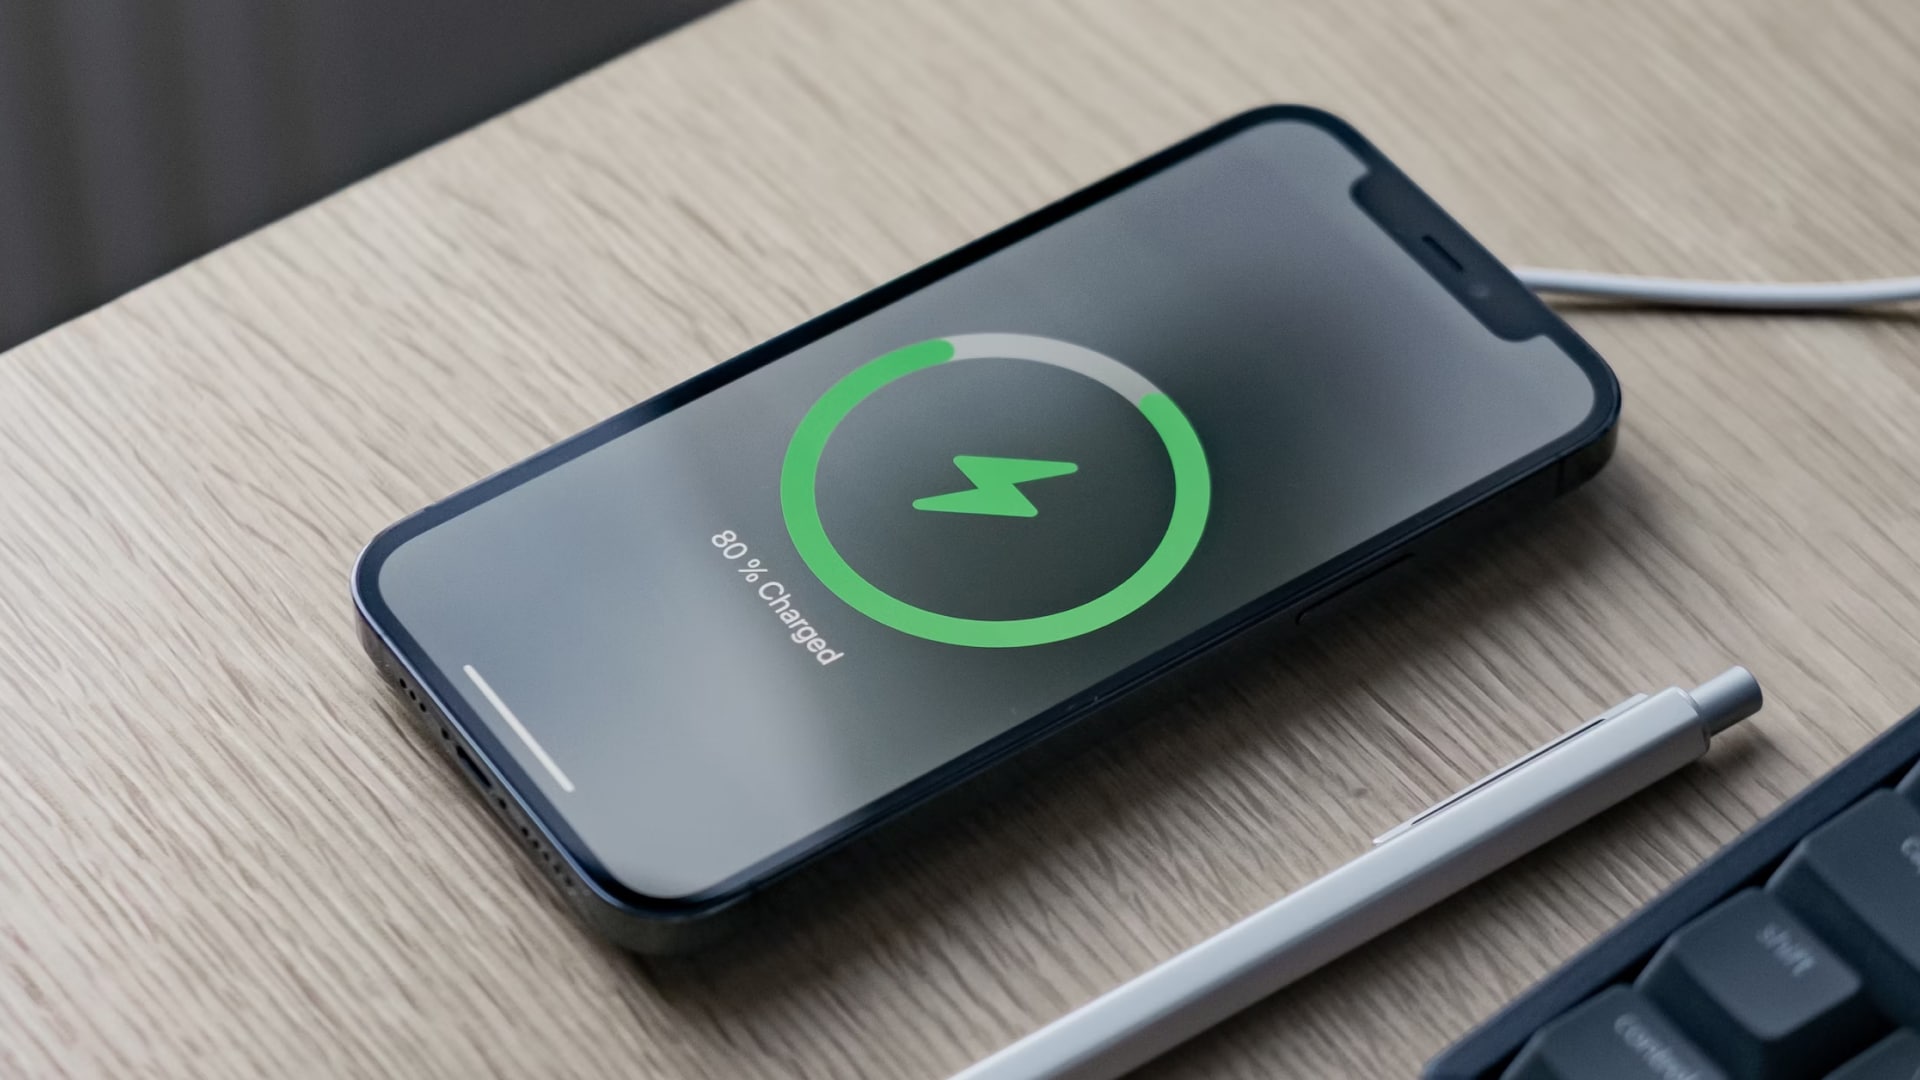
If your iPhone is unresponsive or the battery is extremely low, fully charge your device while it’s powered off, then attempt a restart.
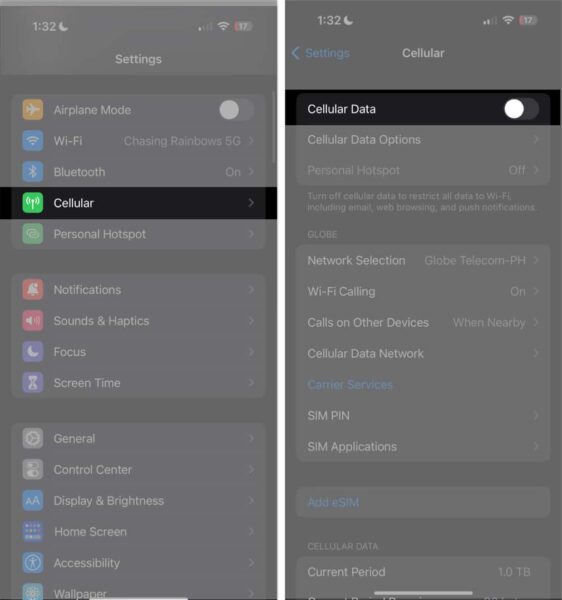
3. Check Network Coverage and Toggle Cellular Data
Why this helps: If you’re in an area with poor coverage, your iPhone may default to SOS mode.
- Move to an area with known good cellular coverage. If you’re indoors or underground, try stepping outside.
- Go to Settings > Cellular and turn Cellular Data off, wait a few seconds, then turn it back on.
4. Reinsert or Check Your SIM Card
Why this helps: A loose, dirty, or damaged SIM card can cause your iPhone to lose carrier connection and enter SOS mode.
- Use a SIM ejector tool or paperclip to remove the SIM tray.
- Inspect the SIM card for dirt or damage.
- Gently clean the SIM and tray if needed.
- Reinsert the SIM card carefully and ensure it’s properly seated.
5. Update iOS and Carrier Settings
Why this helps: Outdated software or carrier settings can cause connectivity issues that trigger SOS mode.
- Go to Settings > General > Software Update to check for and install iOS updates.
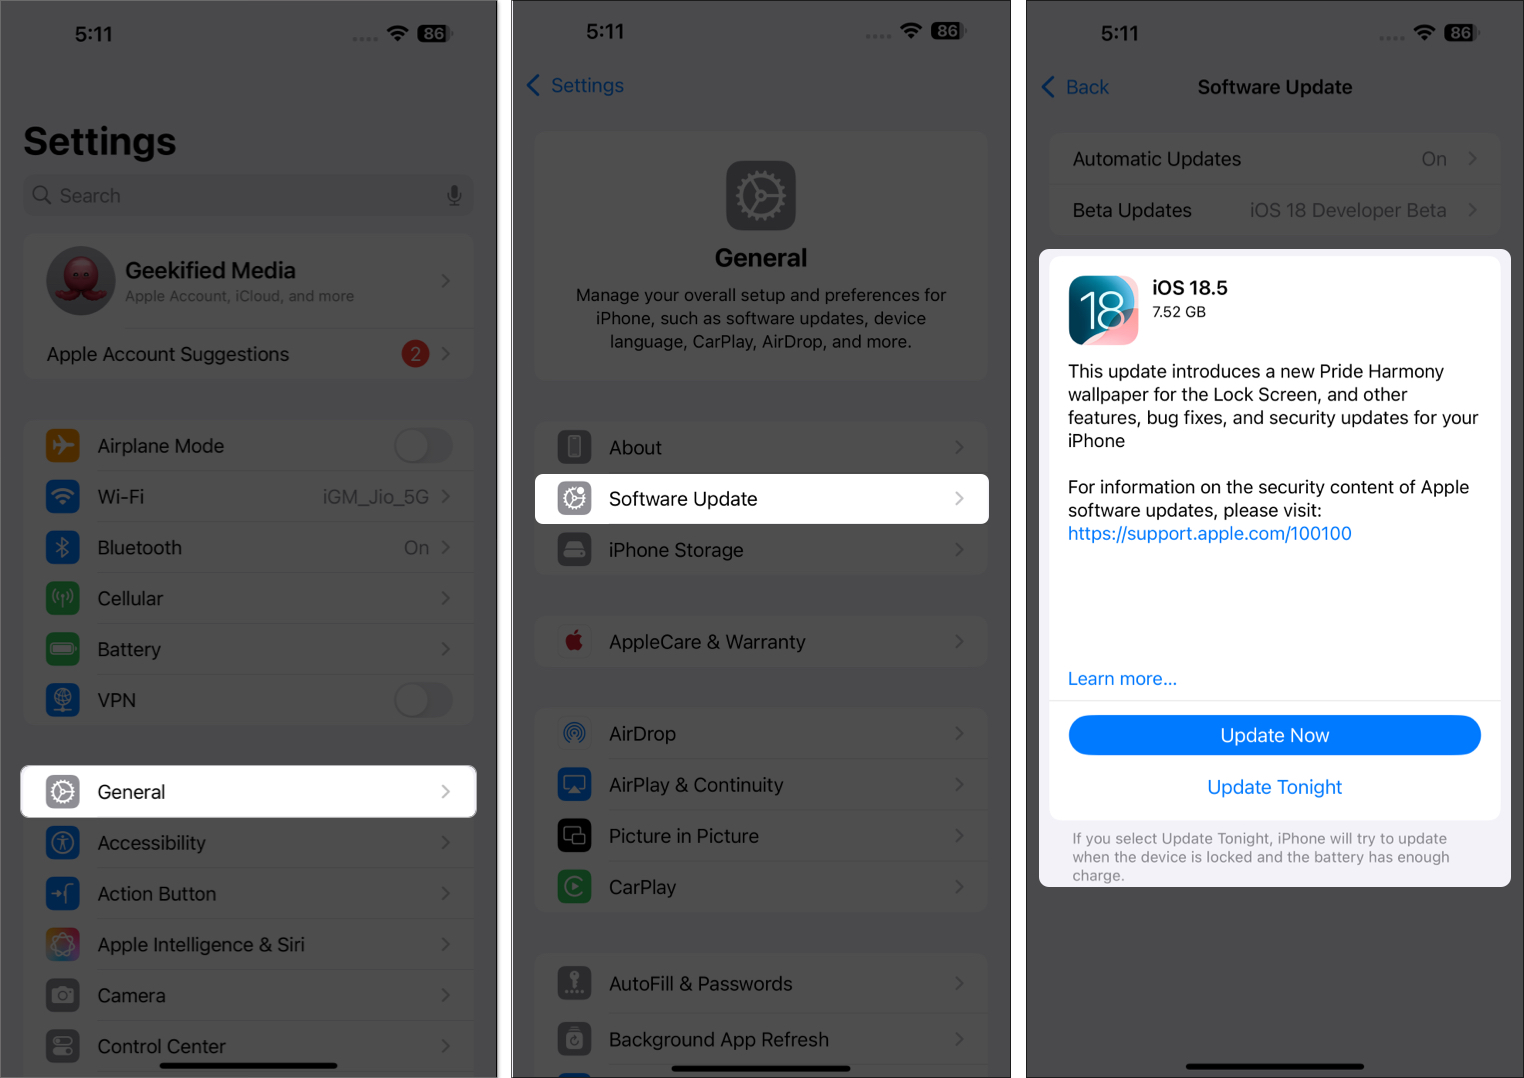
- For carrier settings, go to Settings > General > About. If an update is available, you’ll see a prompt to update.
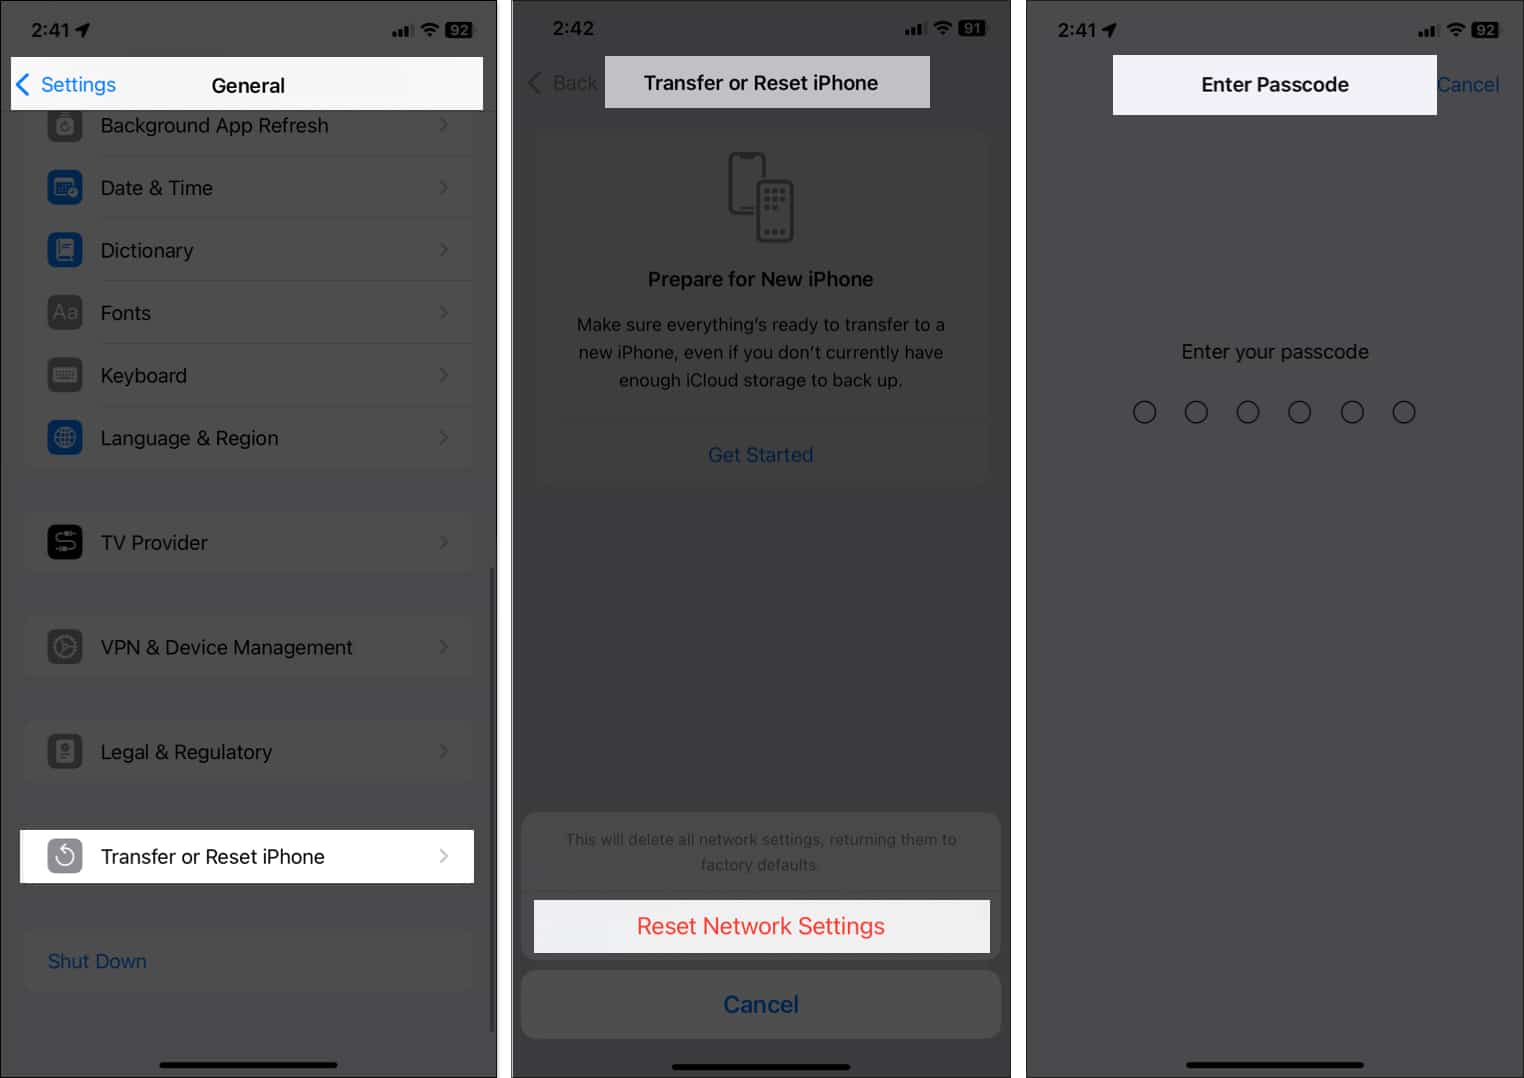
6. Reset Network Settings
Why this helps: Resets all network-related settings, which can resolve misconfigurations causing SOS mode.
- Go to Settings > General > Transfer or Reset iPhone > Reset > Reset Network Settings.
- Enter your passcode and confirm.
7. (Optional) Reset All Settings
If the above steps don’t work, you can try resetting all settings. This won’t delete your data, but will return system preferences (including network settings) to default.
Go to Settings > General > Transfer or Reset iPhone > Reset > Reset All Settings.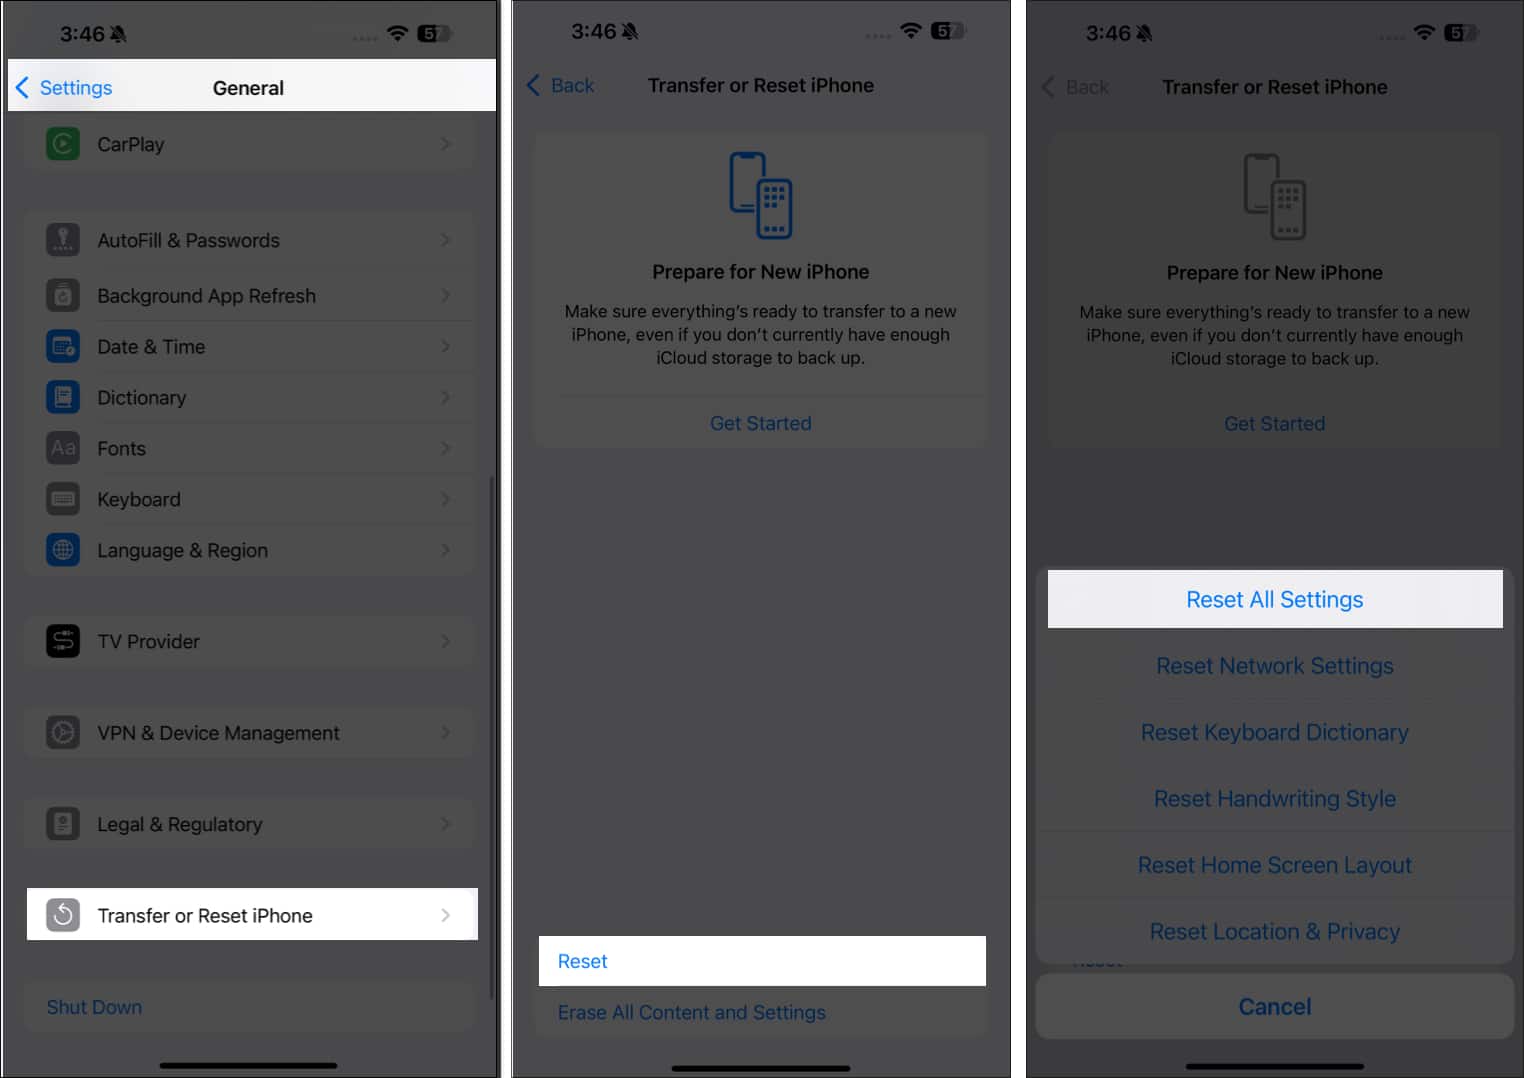
8. Use a Specialized Repair Tool (Optional)
Third-party tools, such as Tenorshare ReiBoot or MagFone iOS System Recovery, can resolve deep software issues without data loss. Use these if your iPhone is stuck in SOS mode but still recognized by your computer.
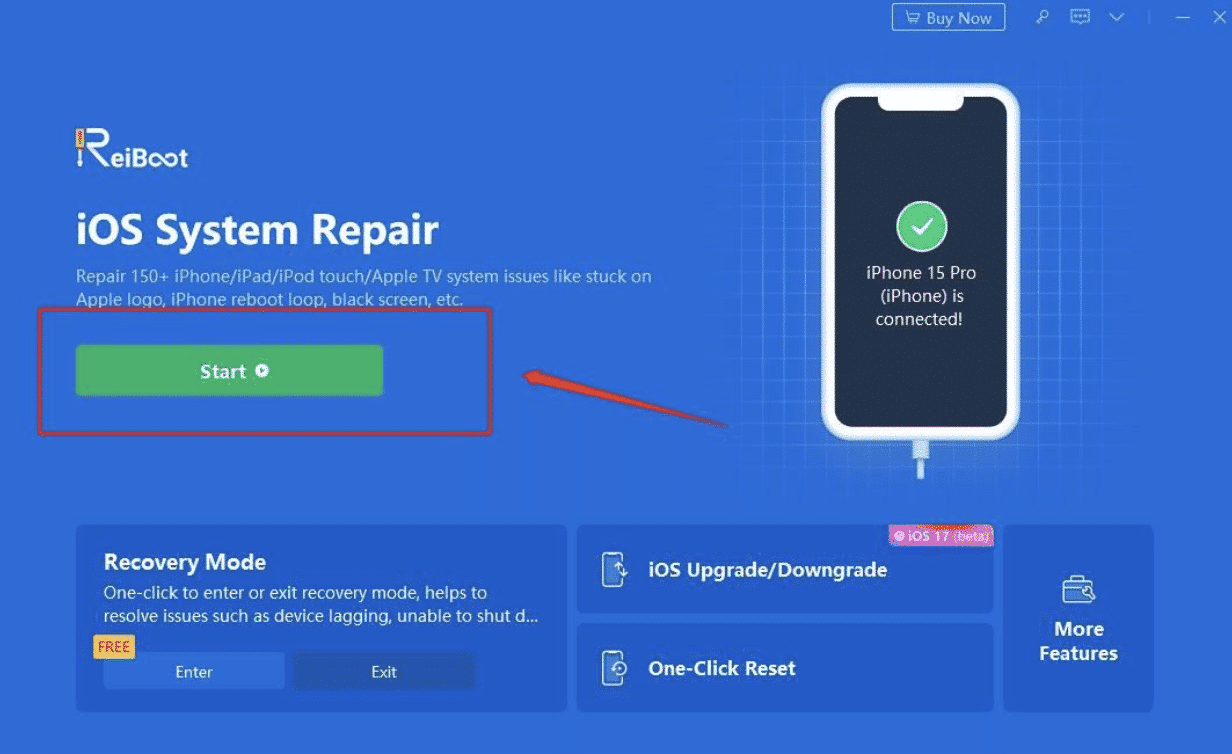
- Download and install the tool on your computer.
- Connect your iPhone and follow the tool’s guided steps for system repair.
9. Restore iPhone via iTunes/Finder (Last Resort)
- Connect your iPhone to your computer using a USB cable.
- Open iTunes (on Windows or macOS Mojave and earlier) or Finder (on macOS Catalina and later).
- Select your iPhone and choose the Restore iPhone option.
- Follow the on-screen instructions.
What to Expect After Restore: After restoring, set up your iPhone as new or restore from backup. Test for carrier signal and reconfigure emergency settings.
10. Use Recovery Mode or DFU Mode (Deep Recovery)
Recovery Mode: Use if your iPhone is detected but unresponsive.
- Connect your iPhone to your computer.
- For Face ID models: Quickly press and release Volume Up, then Volume Down, then hold the Side button until the recovery mode screen appears.
- For Home Button models: Hold the Home and Top (or Side) buttons together until recovery mode appears.
- In iTunes/Finder, choose Update or Restore.
DFU Mode: Use only if Recovery Mode fails. This performs a deeper firmware restore and should be attempted with care, as it can resolve firmware-level issues but will erase all data.
- Search Apple’s official guide for your model’s DFU sequence.
- Restore using iTunes/Finder as prompted.
Common Mistakes to Avoid
- Attempting resets or updates with a low battery—charge your device first.
- Using damaged or uncertified charging cables.
- Unplugging the device during a restore or update.
- Skipping steps—follow the order for best results.
Quick-Reference Table: Troubleshooting Steps
| Step | Expected Outcome | Time Needed |
|---|---|---|
| Restart/Force Restart | Clears temporary glitches | 2 minutes |
| Charge Device | Resolves issues from low battery | 1 hour+ |
| Check Network Coverage | Restores connection if coverage returns | 1–5 minutes |
| Reinsert SIM Card | Fixes SIM-related network problems | 2 minutes |
| Update iOS/Carrier Settings | Fixes bugs, restores connectivity | 5–15 minutes |
| Reset Network Settings | Resolves misconfigured settings | 5 minutes |
| Reset All Settings | Fixes persistent config issues | 5 minutes |
When to Try Advanced Recovery Solutions
If you’ve completed all basic steps and your iPhone is still stuck in Emergency SOS mode, proceed with advanced recovery options:
Decision Guide:
- If your iPhone is responsive and detected by your computer: Try a standard restore via iTunes or Finder.
- If your iPhone is unresponsive or not detected: Use Recovery Mode first. If that fails, proceed to DFU Mode.
When to Seek Professional Help
Most of the time, you can fix an iPhone stuck in Emergency SOS mode by following the right troubleshooting steps. But sometimes, it’s okay to ask for a little extra help. If you’ve tried everything and your phone still isn’t working, reaching out to Apple Support or a trusted repair center is the smart move. Not only will you protect your device and your data, but you’ll also save yourself time and stress. Knowing when to involve the pros can make all the difference and help you regain confidence in using your iPhone.
Recognizing When It’s Time to Escalate
Consider seeking professional help if you experience any of the following:
- Persistent SOS Mode: Your iPhone remains stuck in SOS mode after you’ve completed all recommended troubleshooting steps, including advanced recovery options.
- Physical or Water Damage: There are signs of hardware damage—such as a cracked screen near the antenna, visible water inside the device, or malfunctioning buttons—that may be interfering with connectivity.
- Repeated Failures or Errors: Attempts to restore, update, or reset your device result in error messages, or your iPhone is not recognized by your computer.
- Account or Carrier Issues: You suspect your SIM card is faulty, your account is suspended, or your Carrier cannot restore service through standard procedures.
- Device Unresponsive or Erratic: Your iPhone won’t turn on, overheats, restarts randomly, or exhibit other unusual behaviors after troubleshooting.
Why Professional Support Matters
Apple Support and authorized repair centers have special tools and equipment for diagnosing and testing devices that most people do not have at home. Technicians can:
- Run in-depth diagnostics to pinpoint hardware or software faults.
- Repair or replace damaged components with genuine Apple parts.
- Securely update or restore your device if standard methods fail.
- Advise on warranty coverage, AppleCare+ benefits, and repair costs.
Your mobile Carrier can also help if the issue is related to your SIM card, account status, or network provisioning.
How to Prepare for Your Support Visit
To make your support experience smoother and faster, consider these steps:
- Back-Up Your Data: If possible, back up your iPhone to iCloud or your computer before your visit.
- Document Your Steps: Bring a list of all troubleshooting actions you’ve tried and any error messages you’ve seen.
- Gather Essentials: Have your Apple ID, proof of purchase, and a valid ID ready if requested.
- Bring Accessories: Bring your charging cable, SIM card, and any relevant accessories in case they need to be tested.
What to Expect During Diagnosis
- Remote Support: Apple may run diagnostics, request logs, or attempt remote repairs before recommending an in-store visit.
- In-Store or Authorized Repair: Technicians may perform hardware checks, replace components, or run network diagnostics. Some repairs can be completed on the spot; others may require leaving your device for further testing.
- Carrier Support: If you visit your Carrier, they may replace your SIM card, reprovision your account, or check for network outages.
Warranty and Repair Considerations
- Warranty Status: Repairs may be covered under warranty or AppleCare+—ask for a quote before authorizing any out-of-warranty service.
- Repair Documentation: Request a service summary or receipt and ask about any warranties covering the repair itself.
After Your Device Is Serviced
Before leaving the store or ending your support session:
- Test your iPhone to ensure it’s working as expected.
- Review the technician’s findings and recommendations.
- Ask about steps to prevent future SOS mode issues.
Empowered, Proactive Device Care
Seeking help from a professional is a wise choice when your iPhone needs to function optimally. By recognizing the warning signs, preparing for your support visit, and understanding what to expect, you can maximize the benefits of Apple’s assistance and keep your device running smoothly.
Proactive Tips to Prevent Future SOS Mode Issues
- Regularly Update iOS and Carrier Settings: Stay current to avoid known bugs.
- Handle SIM and Hardware with Care: Avoid drops and water exposure.
- Back-Up Your Data Frequently: Use iCloud or Finder/iTunes.
- Customize SOS Activation: Go to Settings > Emergency SOS and adjust activation methods to reduce accidental triggers.
- Use a Protective Case: Prevent hardware damage that could affect connectivity.
Resolve iPhone Emergency SOS Issues with Ease
Being stuck in Emergency SOS mode can be stressful, but you can usually fix it yourself by following some simple steps. Learn what causes the problem, follow easy troubleshooting tips, and know when to ask for more help to keep your iPhone working well for emergencies.
Need help or have questions? Leave a comment or contact support. Your iPhone’s safety features should help you, and with these tips, you stay in control.
Frequently Asked Questions
Topics

Written by
Jibin JosephJibin Joseph is an editor at iGeeksBlog and has excellent attention to detail. He is a voracious reader, with interests ranging from philosophy and history to geopolitics and tech. When not reading or correcting grammar, you’d find him engaging in discussions about football. You can follow him on Twitter and Instagram at @4ibin.
View all posts →More from How-to
How to Turn Off Location on Snapchat (Step-by-Step Guide)
Want to stop sharing your location on Snapchat? This guide explains how Snapchat location sharing works and shows simple ways to turn off your location using Ghost Mode or phone settings. Stay in control of your privacy in just a few steps.

Snapchat Parental Controls: How to Set Up Family Center and Keep Your Teen Safe
Snapchat’s Family Center lets parents monitor their teen’s friend activity and screen time without reading private messages. Here’s how to set it up and what to expect.

How to Block and Unblock Someone on Instagram
Instagram lets you block or unblock someone in seconds. Follow these simple steps to take full control of your privacy and online peace.