The Mail app on Apple Watch is not built for long replies or inbox-zero goals. Used correctly, it lets you check important emails, take quick action, and move on without constantly reaching for your iPhone.
Most users never go beyond reading subject lines or dismissing notifications. That leaves a lot of useful features untouched. With a few smart settings and gestures, Apple Watch becomes a practical inbox companion that keeps you responsive without constant distractions.
Here are practical tips to help you use the Mail app efficiently and manage emails smoothly on Apple Watch.
1. Set Up Mail on Apple Watch the Right Way
Syncing every email account to the Apple Watch is the fastest way to overwhelm the app. The watch works best when it carries only one job-focused inbox.
Limit Mail to essential accounts and inboxes from the Watch app on iPhone. Fewer emails make every notification meaningful.
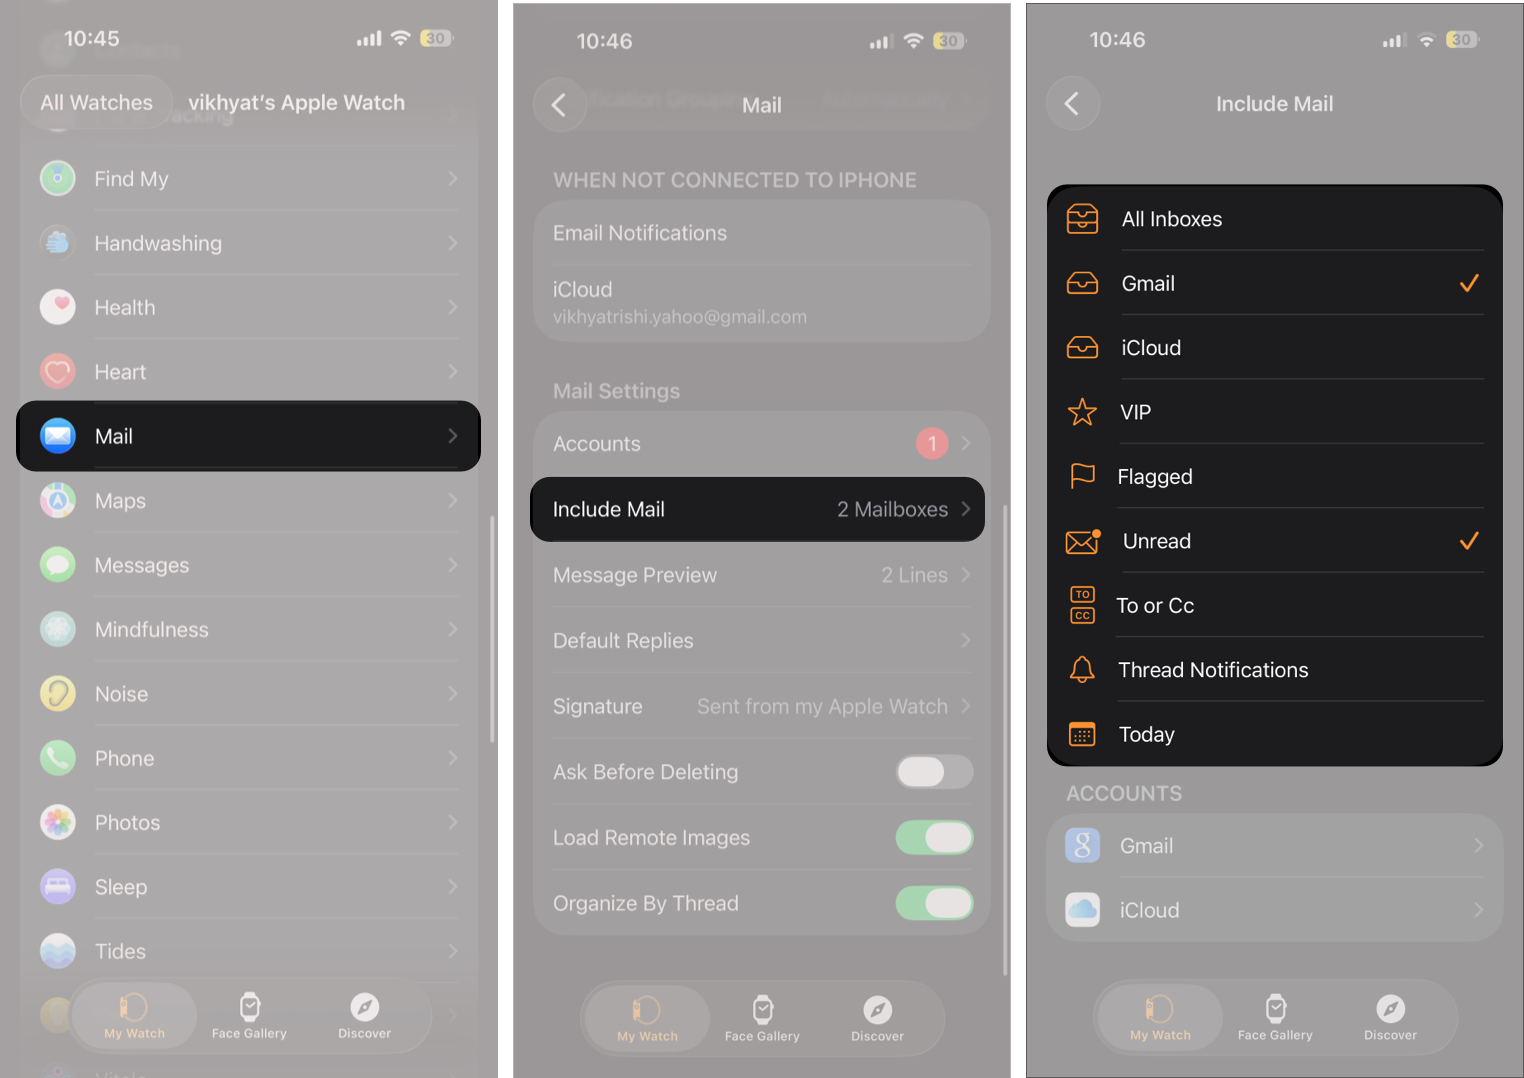
- Open the Watch app, scroll down, and tap Mail.
- Tap Include Mail under Mail Settings.
- Here, select the inboxes and mail accounts that you want to see on your Apple Watch.
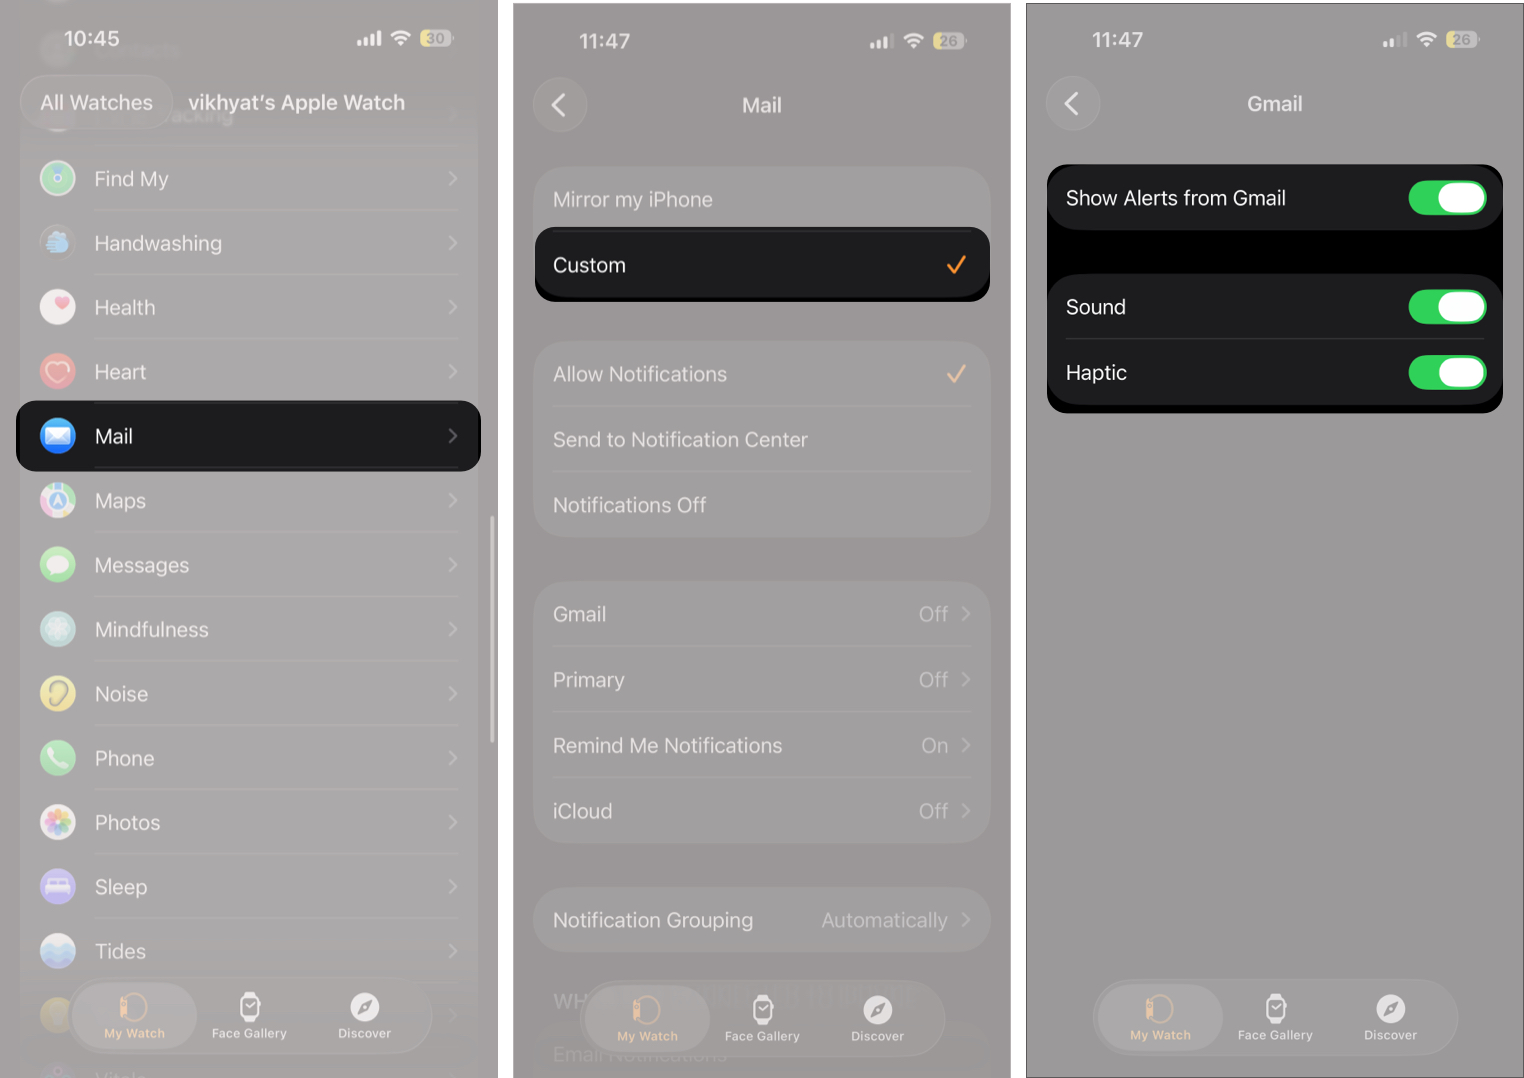
2. Customize Mail Notifications for Priority Emails
Apple Watch notifications should interrupt you only when necessary. Anything else belongs in Notification Center or& not on the watch at all.
Use Custom notifications and allow alerts only for priority accounts or VIPs. This keeps Mail useful instead of noisy.
- Open Watch app → Mail.
- Select Custom.
- Now, choose how alerts are delivered.
- Next, pick an email account and enable Show Alerts.
- You can also turn on Sound and Haptic for audible alerts and wrist taps.
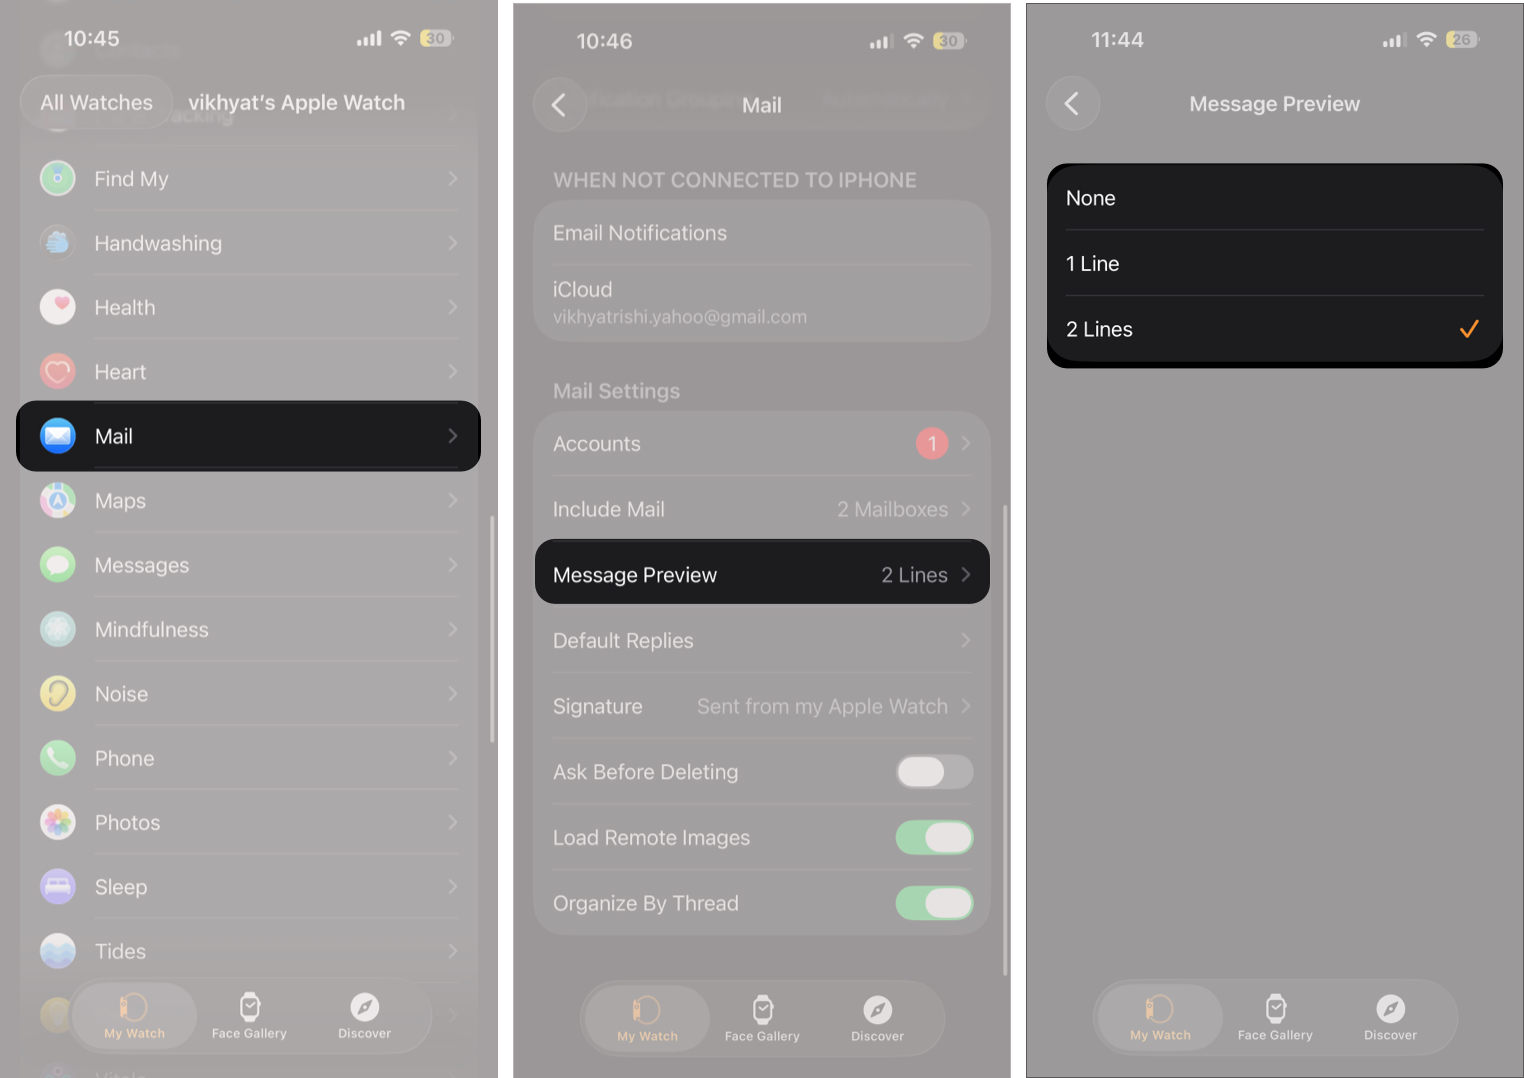
3. Adjust Message Preview Length for Quick Scanning
One line previews work best. It gives just enough context to decide whether I should open the email or ignore it for later. Anything longer feels cramped on the small screen and slows down scrolling.
- Open Watch app → Mail → Message Preview.
- Select the appropriate option.
4. Navigate Emails Using the Digital Crown
Once you stop swiping and start using the Digital Crown, reading emails feels far smoother. Your finger will no longer block the text, and scrolling long messages is more controlled.
5. Archive or Mark Emails Quickly
You do not need to open every email to manage it.
- Swipe left on a message to archive or flag it.
- Swipe right to mark it as read or unread.
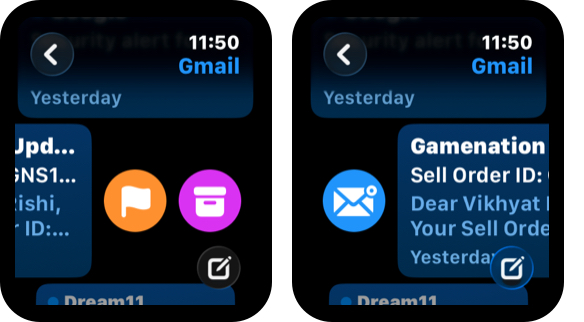

These gestures let you clear clutter in seconds.
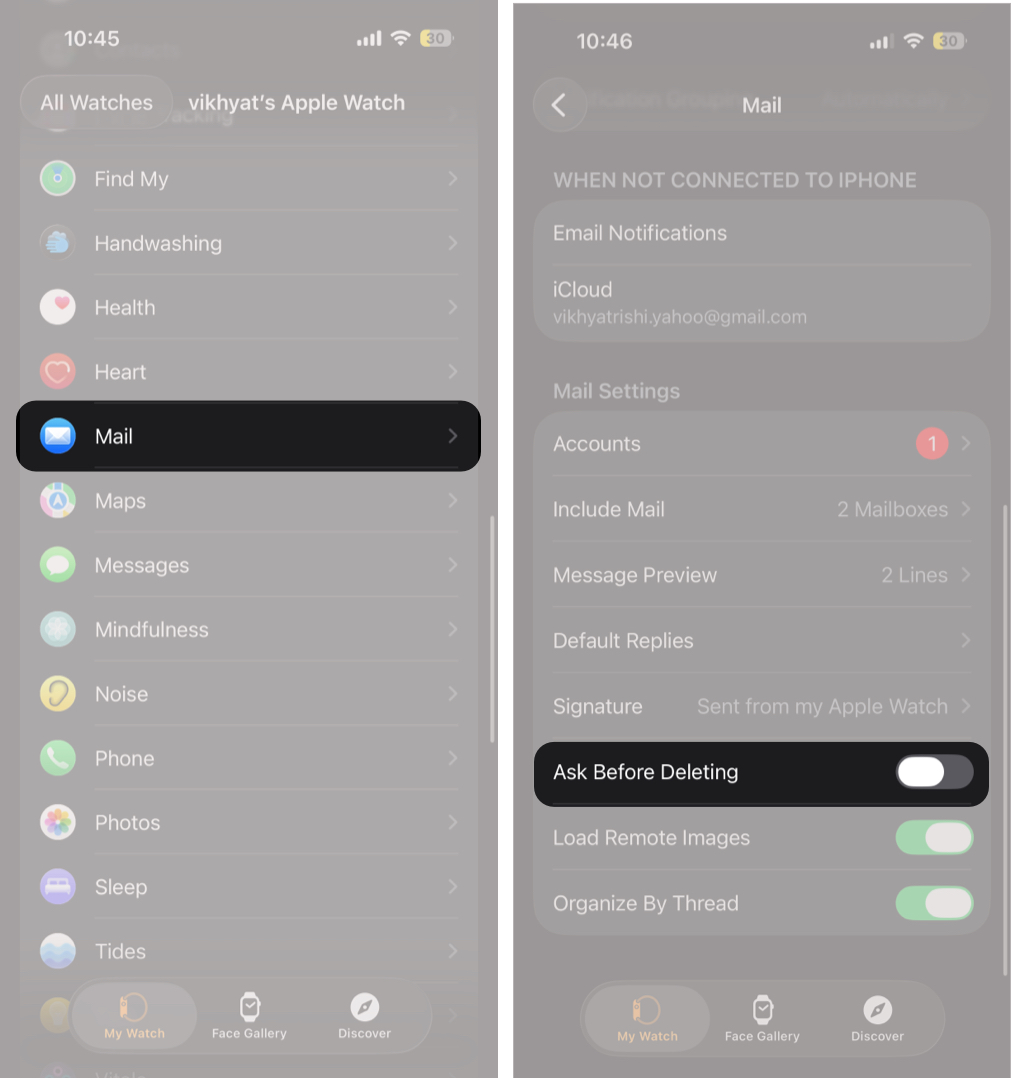
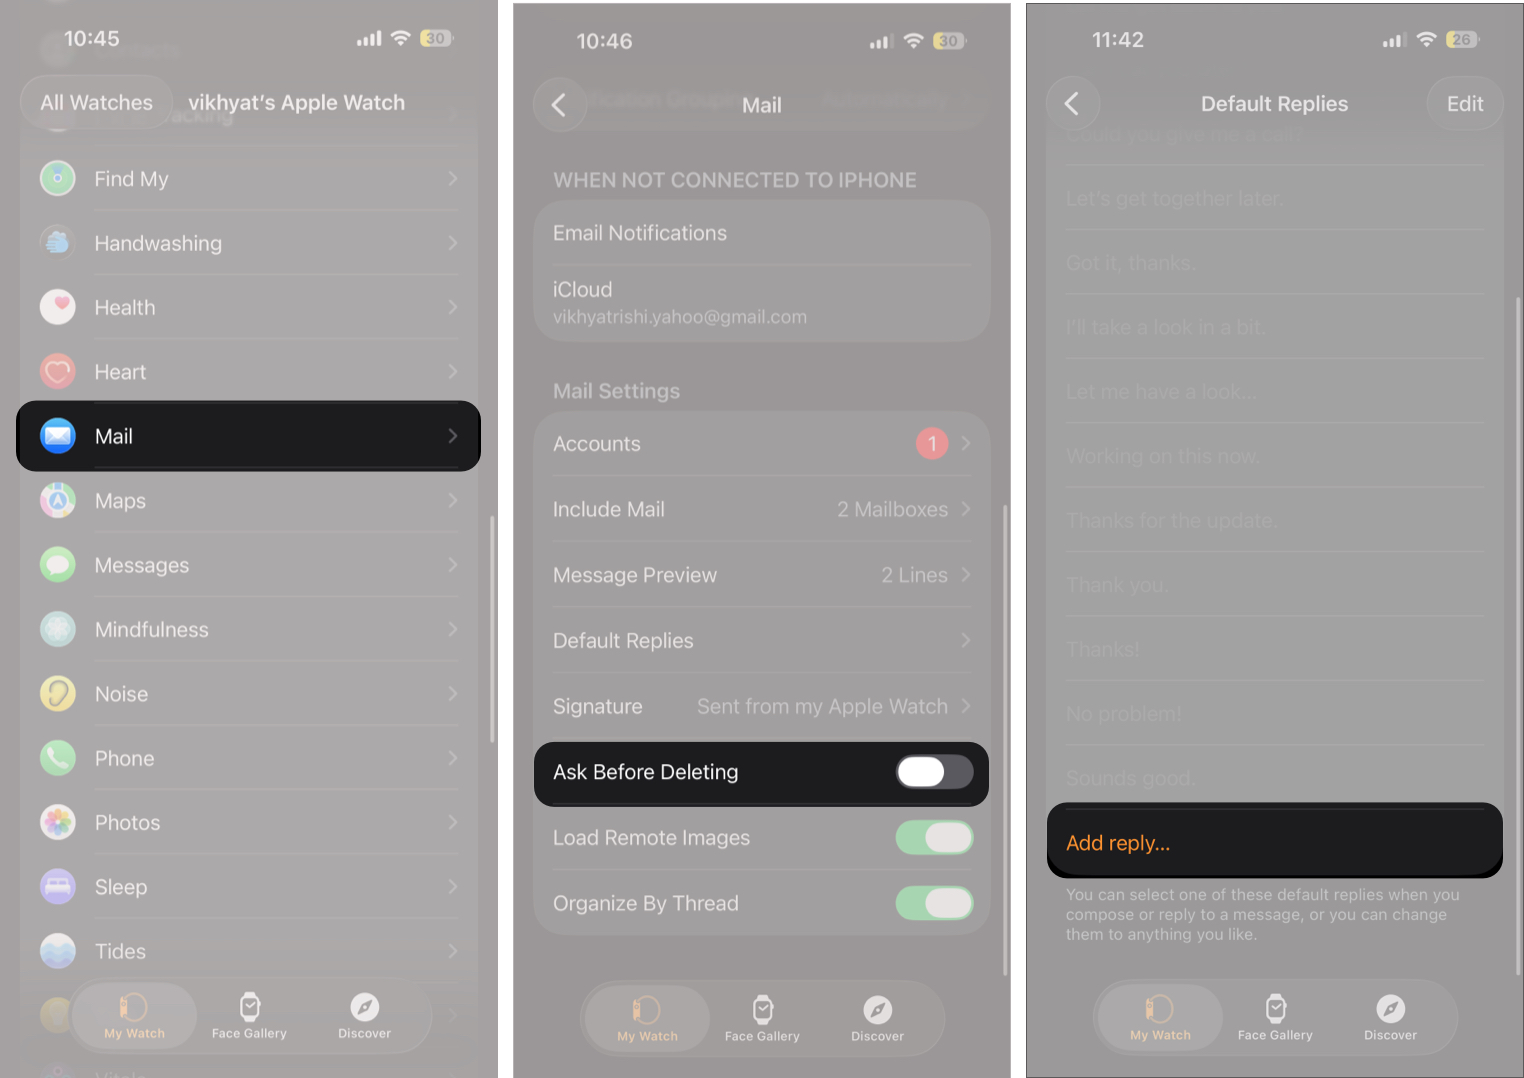
6. Enable Confirmation Before Deleting Emails
Because the Apple Watch has a small screen, accidental swipes can happen. Enabling a delete confirmation adds a safety layer before an email is removed.
This setting comes in handy if you frequently manage emails from your watch and want to avoid deleting important messages by mistake.
Here’s how to enable this:
- Open Watch app → Mail.
- Toggle On Ask Before Deleting under Mail Settings.

7. Flag Important Emails for Later Follow-up
Flagging helps you mark emails that need attention without replying right away. Instead of leaving an email unread and hoping you remember it, flagging makes the message intentionally stand out.
This approach works better than unread markers and keeps important emails from getting lost once notifications are cleared.
- Swipe left on the email you want to flag.
- Tap the Flag icon that appears.
8. Use Default Replies for Faster Responses
Default replies are pre-written responses that let you reply to emails with a single tap. They are designed for quick acknowledgements, not full conversations.
On Apple Watch, default replies work best for short responses like confirming receipt, acknowledging updates, or sending brief status replies. You can add new replies or customize existing replies per your need, so they match your tone and common phrases. Here’s how:
Using default replies saves time, reduces typing or dictation, and keeps replies quick and consistent when you need to respond without opening your iPhone.
- Open Watch app → Mail.
- Now, tap Default Replies under Mail Settings.
- From here, you can remove existing replies, rearrange their order, or tap Add Reply to create your own.

9. Reply Using Dictation, Scribble, or the QWERTY Keyboard Together
Apple Watch supports multiple input methods for replying to emails, depending on your model and watchOS version.
- Dictation is fastest for short replies in quiet places.
- Scribble works better for names and precise text.
- On supported models, the QWERTY keyboard is ideal for quick typed replies with better accuracy than dictation.
Together, these three input methods give you the flexibility to reply comfortably in almost any situation without reaching for your iPhone.
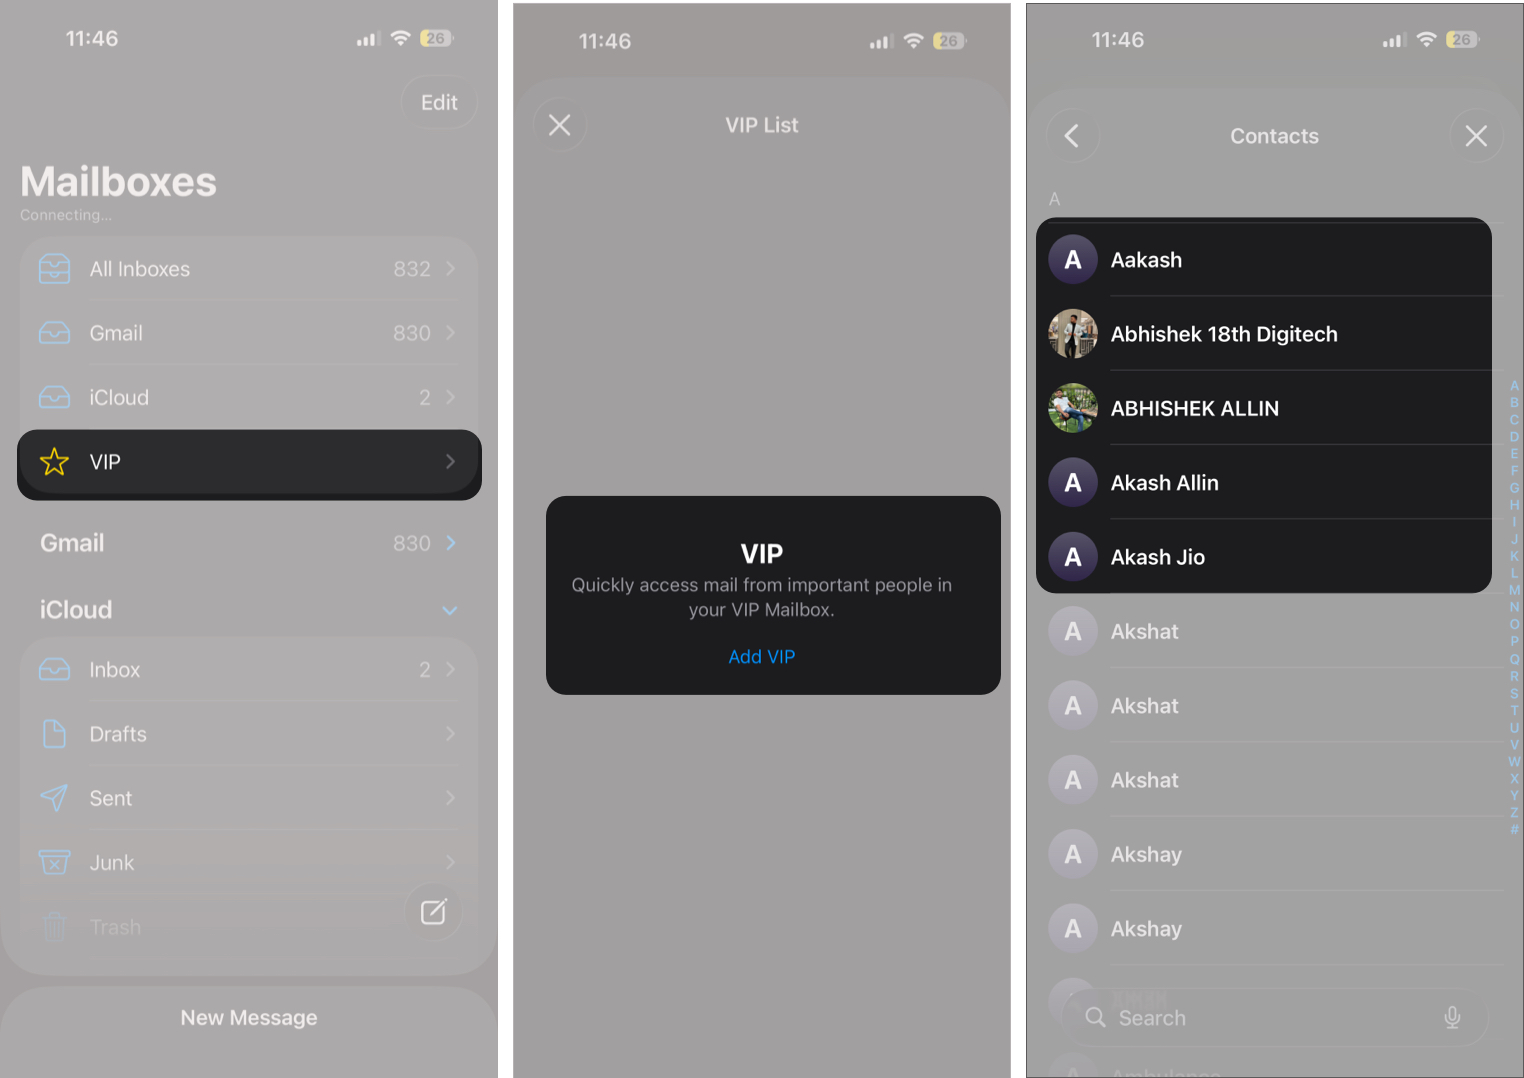
10. Manage VIP Contacts for Urgent Emails
VIPs bypass notification filters and appear immediately on your Apple Watch. However, make sure to add only genuinely important contacts to the VIP list. Keeping this list tight ensures urgent emails stand out without overwhelming you.
- Open the Mail app on iPhone.
- Tap VIP.
- Here, tap Add VIP.
- Select the contact you want to include in your VIP list.

11. Switch Between Multiple Email Accounts
If you use more than one email account, you can switch inboxes directly on your Apple Watch.
- Open the Mail app on the Apple Watch and tap the ‘<‘ button at the top left corner.
- Here, select the email account you need.
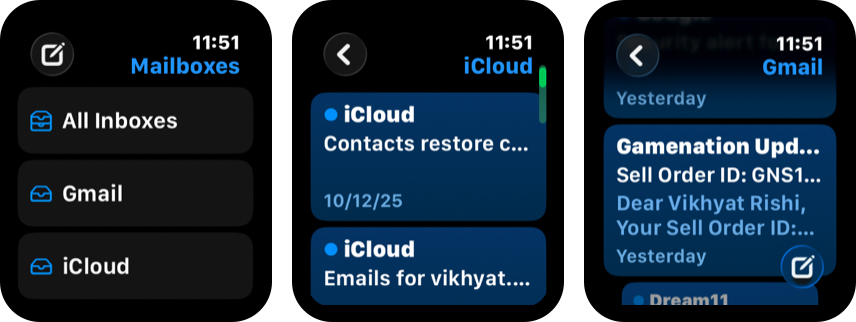

This is useful when checking a secondary inbox quickly without reaching for your phone.
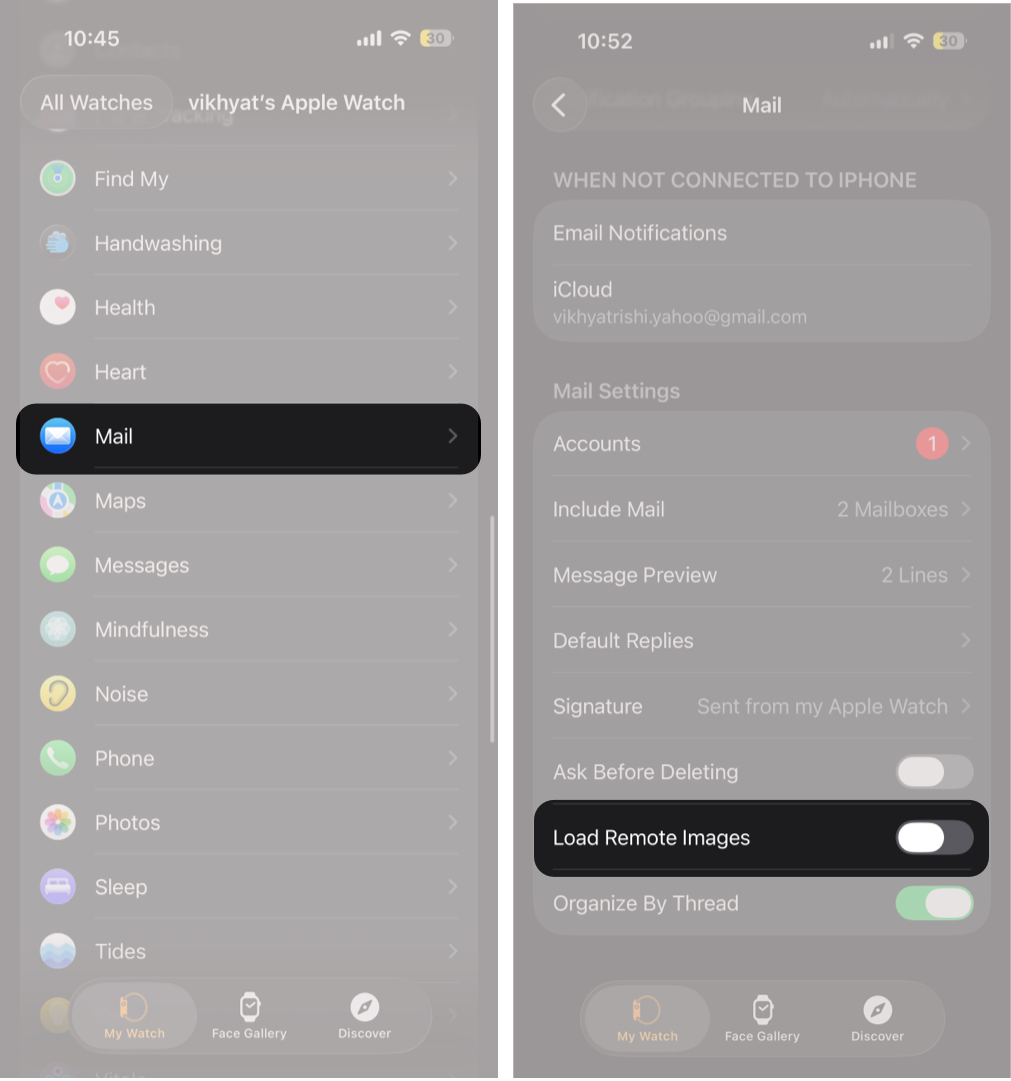
12. Adjust How Images Load in Emails
Apple Watch loads images in emails by default. If you want a cleaner, faster reading experience, you can disable remote images from Mail settings in the Watch app on iPhone.
- Open Watch app → Mail.
- Toggle Off Load Remote Images under Mail Settings.

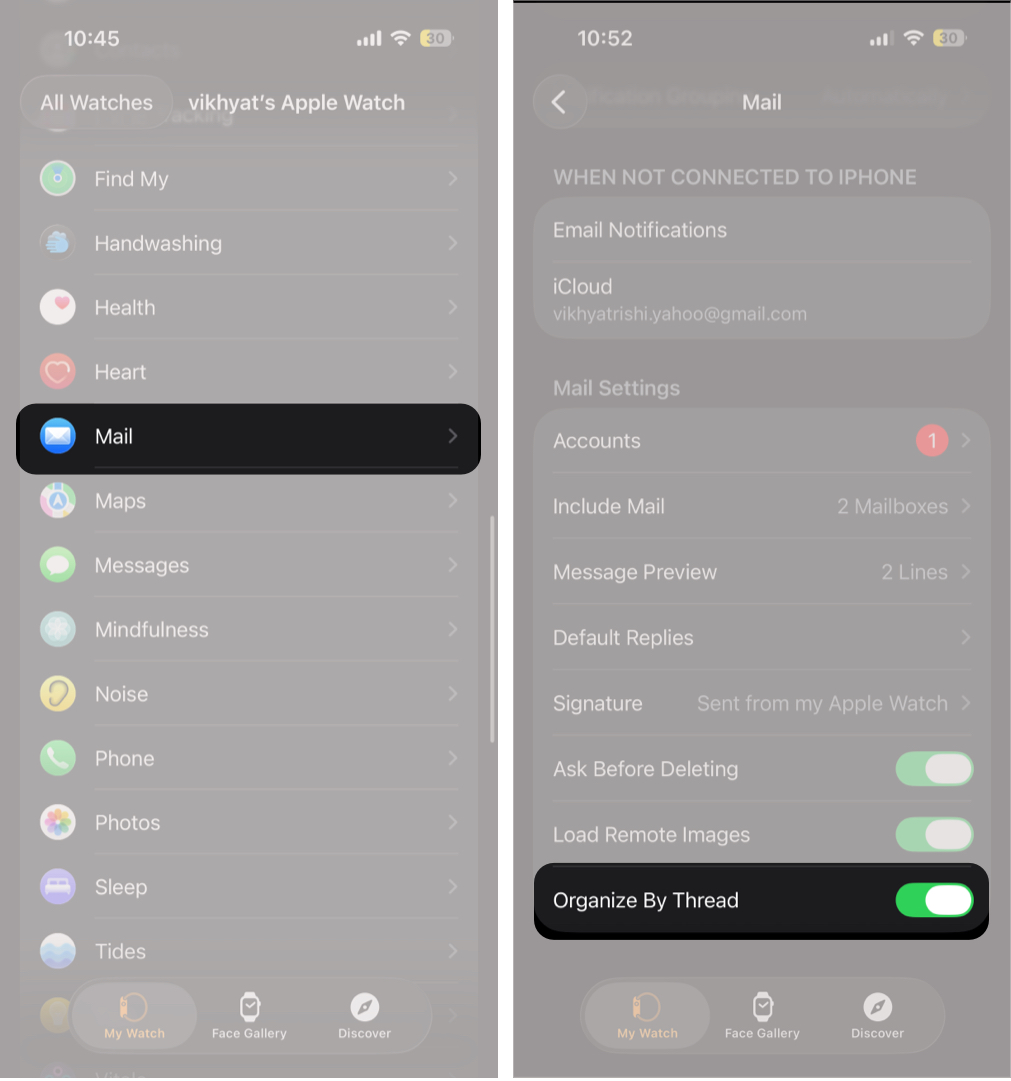
13. Organize email Conversations by Thread
Threaded conversations group related emails and replies into a single chain. This keeps long back-and-forth discussions easier to follow on a small screen.
When enabled, replies, forwards, and follow-up messages appear together instead of as separate emails. This reduces inbox clutter and makes context clear without opening multiple messages.
- Open Watch app → Mail.
- Toggle On Organize By Thread under Mail Settings.

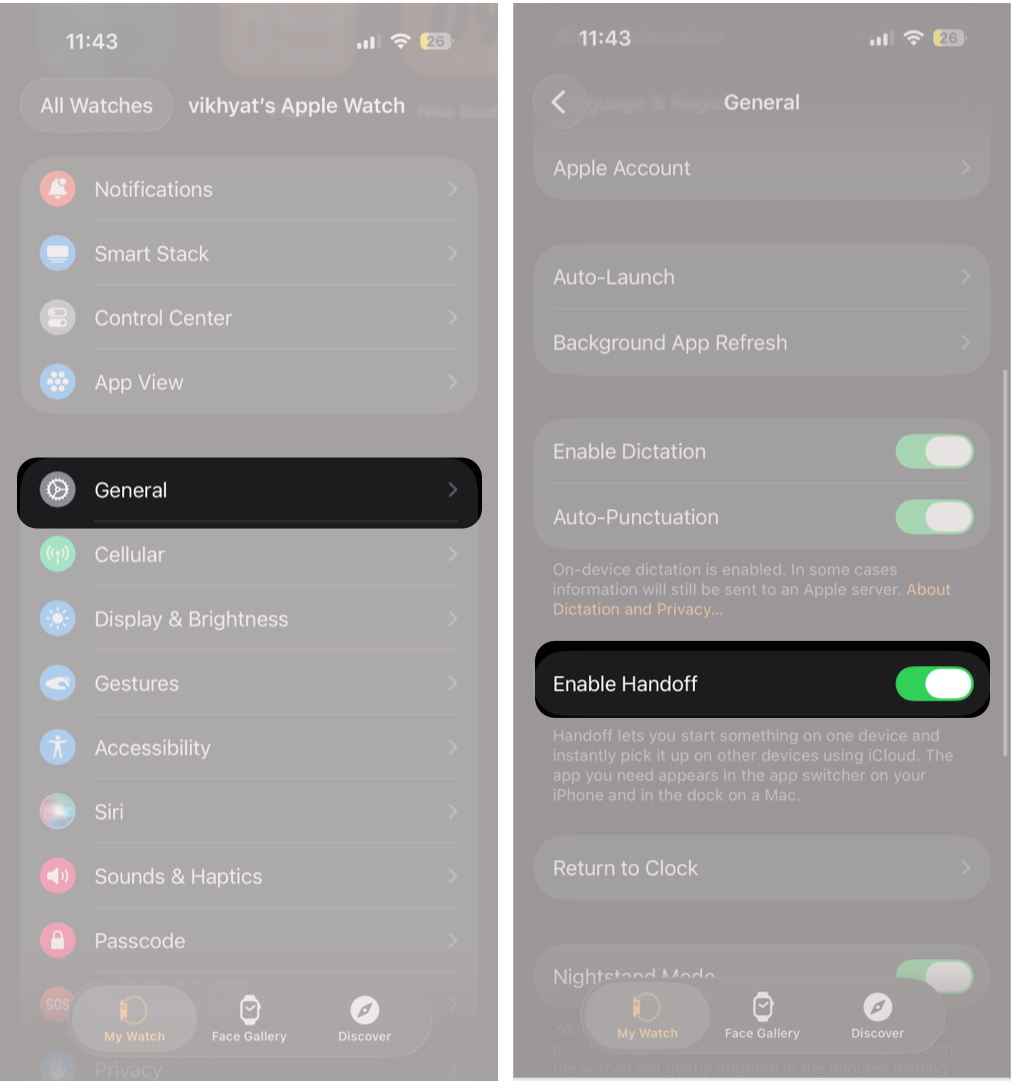
14. Continue emails on iPhone or Mac Using Handoff
Handoff lets you move an email from your Apple Watch to your iPhone or Mac without starting over. When you open an email on your watch, the same message becomes instantly available on your other Apple devices.
This is useful when an email needs a longer reply or attachments that are not practical on the watch. Instead of searching for the message again, you can continue right where you left off.
Handoff keeps context intact and makes Apple Watch Mail feel like part of a larger, seamless workflow rather than a standalone app.
- Open Watch app → General.
- Scroll down and toggle on Enable Handoff.

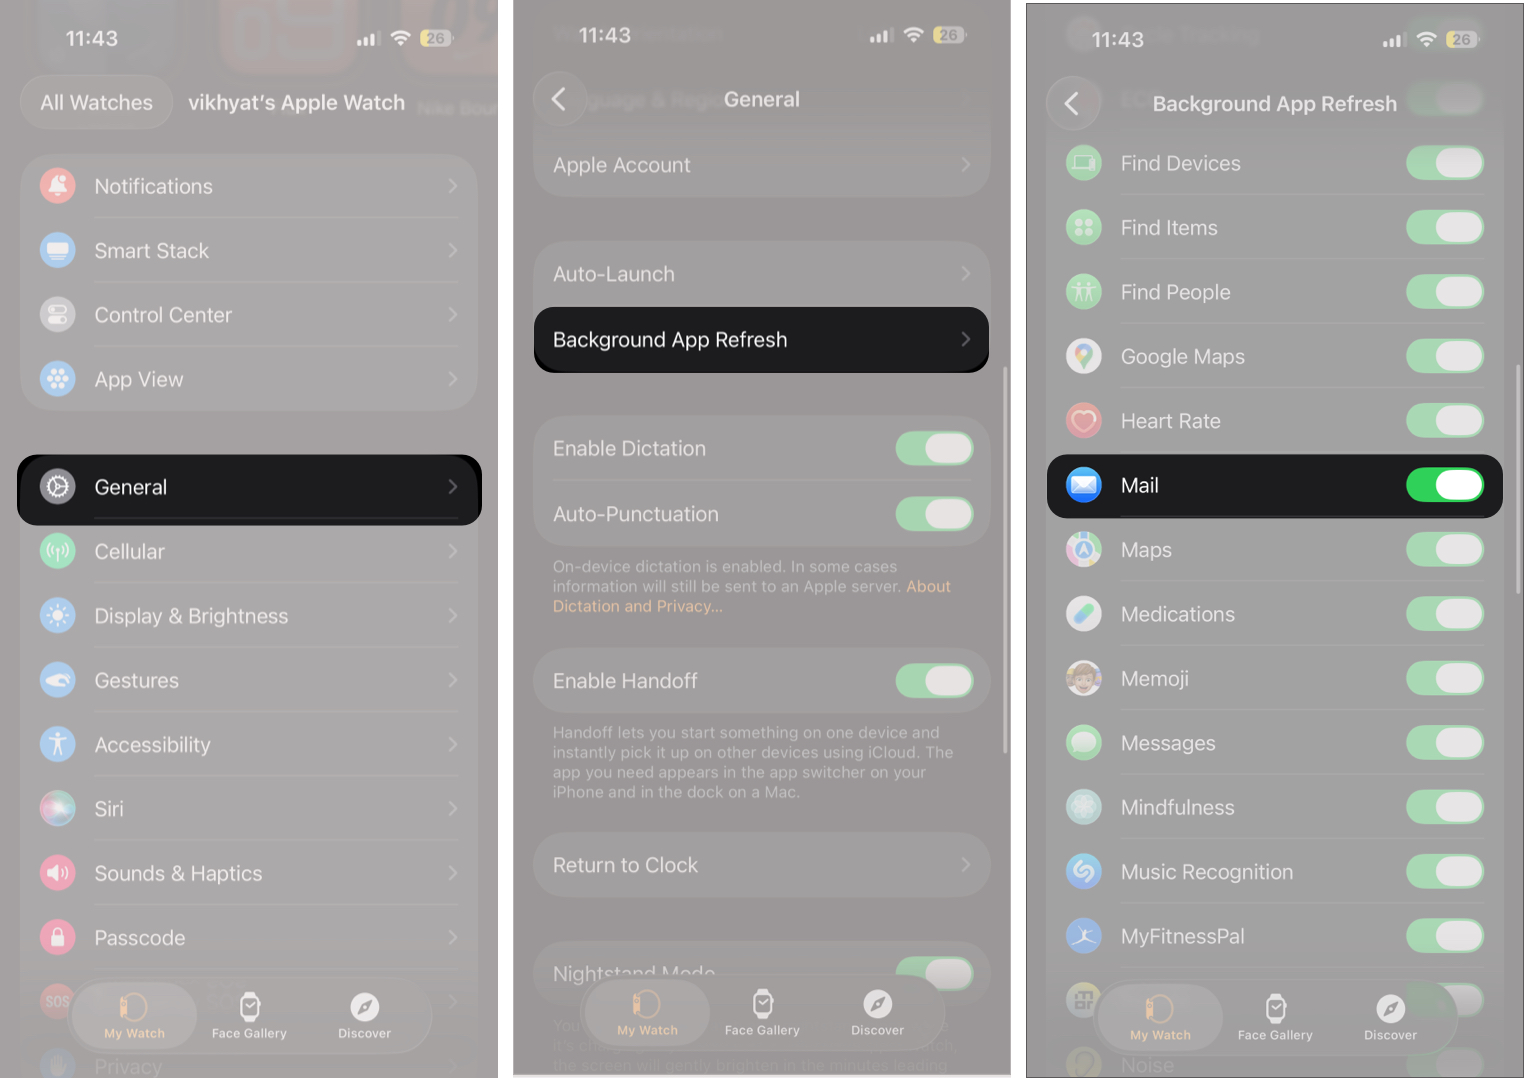
15. Keep Mail Sync and Background Refresh Enabled
For the Mail app to work reliably on Apple Watch, background refresh needs to stay enabled. This allows the watch to fetch new emails and sync actions like deleting, flagging, or marking messages as read.
If background refresh is disabled, emails may arrive late, and inbox actions may not sync properly across your devices, making the Mail app feel inconsistent or outdated.
- Open Watch app → General → Background App Refresh.
- Here, make sure the toggle next to Mail is enabled.

Mail on Apple Watch, Done Right…
The Mail app on Apple Watch works best when it is used with intent. By limiting what syncs, refining notifications, and relying on quick actions, it becomes a fast decision tool rather than a distraction. Used this way, it helps you stay responsive without constantly reaching for your iPhone.
Share your favorite Apple Watch Mail tip in the comments, or let us know which one you use the most.
You like to read: How to Mirror Your Apple Watch on Your iPhone