- What It Is: The Emergency SOS feature on Apple Watch helps you quickly call for help and share your location.
- What Happens: Emergency SOS calls local emergency services, then texts your location to your designated emergency contacts.
- Essential Setup: To prepare, you must add emergency contacts in the Health app and enable fall/crash detection features.
- How to Activate: Activate SOS manually by holding the side button, or automatically via the watch’s fall and crash detection.
- After a Call: If you call by accident, inform the dispatcher. You can stop location sharing after the emergency ends.
Apple’s Emergency SOS feature on the Apple Watch ensures that help is just a button press away. Whether you’re caught in an accident, experience a hard fall, or feel unsafe, your watch can alert emergency services and share your location instantly.
In this guide, I’ll walk you through how to set up and use Emergency SOS on Apple Watch, and how to manage its powerful features.
What is Emergency SOS on Apple Watch?
Emergency SOS is a built-in safety feature that lets you quickly contact emergency services and alert your emergency contacts. Depending on your model and region, it can either be activated manually or automatically during critical incidents like hard falls or car crashes.
What happens when Emergency SOS is triggered?
- The Apple Watch dials local emergency services.
- Sends your current location to your emergency contacts.
- Updates them if your location changes.
- Automatically calls for help if you can’t respond after a detected crash or fall.
How to set up Emergency SOS on your Apple Watch
Before using Emergency SOS, make sure it’s set up correctly on your iPhone and Apple Watch. While the Emergency SOS features are auto-enabled for your Apple Watch, you must manually add an emergency contact. You can add an emergency contact via the Health and Contact app.
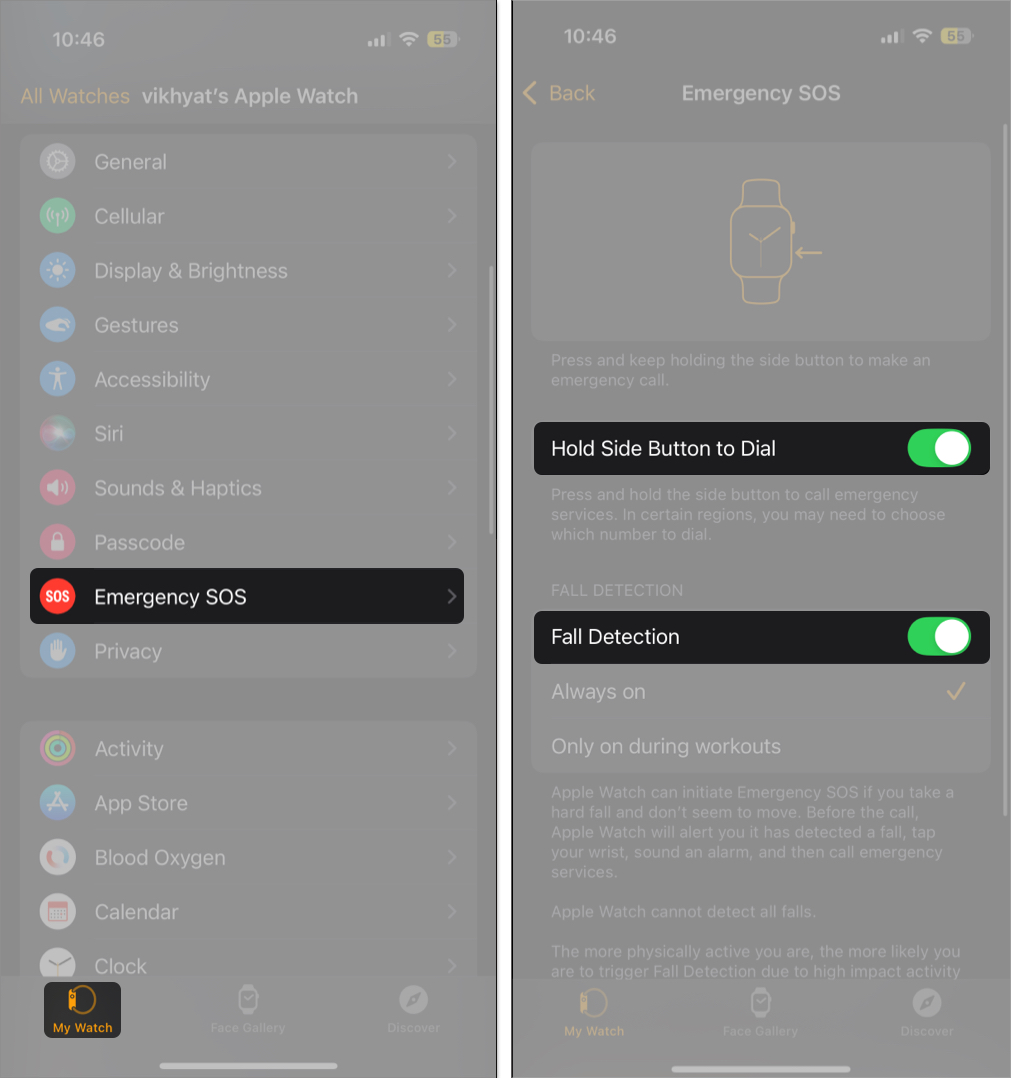
Besides, you can head to the Watch app on your iPhone to check whether all Emergency SOS features are ON. Here’s how:
- Open the Watch app and ensure you are on the My Watch tab.
- Scroll down and tap Emergency SOS.
- Ensure that the Hold Side Button to Dial, Fall Detection, and Crash Detection toggles are green.
How to use Emergency SOS on your Apple Watch
Not only does your Apple Watch let you use Emergency SOS anytime you want, but it can also call emergency services automatically if a severe crash or fall is detected.
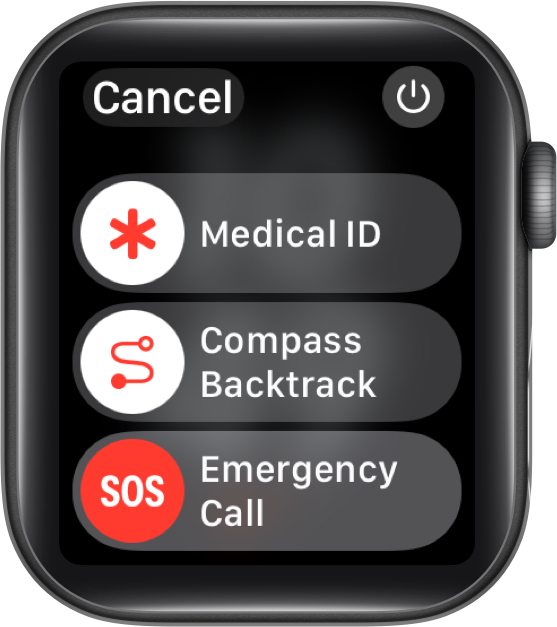
Manually trigger Emergency SOS:
- Press and hold the Side button (Action button on Apple Watch Ultra) until the Emergency Call slider appears.
- Drag the slider to the right to initiate the emergency call immediately.
Alternatively, you can keep holding the Side button until a countdown begins. Once the countdown ends, your Apple Watch will automatically initiate the emergency services.
Use Crash Detection and Fall Detection to call for help automatically:
These features work automatically once enabled:
- The Crash Detection feature is available on the Apple Watch Series 8 and newer models, and the Fall detection feature is available on the Apple Watch Series 4 or newer models.
- As the name suggests, the Crash Detection feature is designed to detect severe car crashes. The Fall Detection feature, on the other hand, detects a hard fall. In both cases:
- Your Apple Watch taps on your wrist, chimes, and displays an alert on the screen.
- You can use the alert to call emergency services right away or dismiss the alert by pressing the Digital crown.
- If the Apple Watch finds out you’re unable to move, I will make the call automatically after a 30-second countdown in case a crash is detected and after a minute in case of fall.
- Your Medical ID and location are shared with responders and emergency contacts.
How to cancel an accidental Emergency SOS call
If you accidentally initiate Emergency SOS:
- Don’t hang up. Wait for the responder to answer.
- Tell them the call was accidental.
- Once the call ends, tap No when asked to send a message to your emergency contacts.
How to stop sharing location after an SOS Call
After an emergency call, your Apple Watch keeps updating your emergency contact with your location every 4 hours.
To stop this: Tap Stop Sharing from the notification that appears.
Signing off…
Emergencies are unpredictable. Thankfully, your Apple Watch makes it easy to call for help—even when your iPhone isn’t nearby. A few minutes of setup can give you peace of mind and might even save your life.
If you’ve got questions or need help setting this up, drop a comment below—we’d love to help!