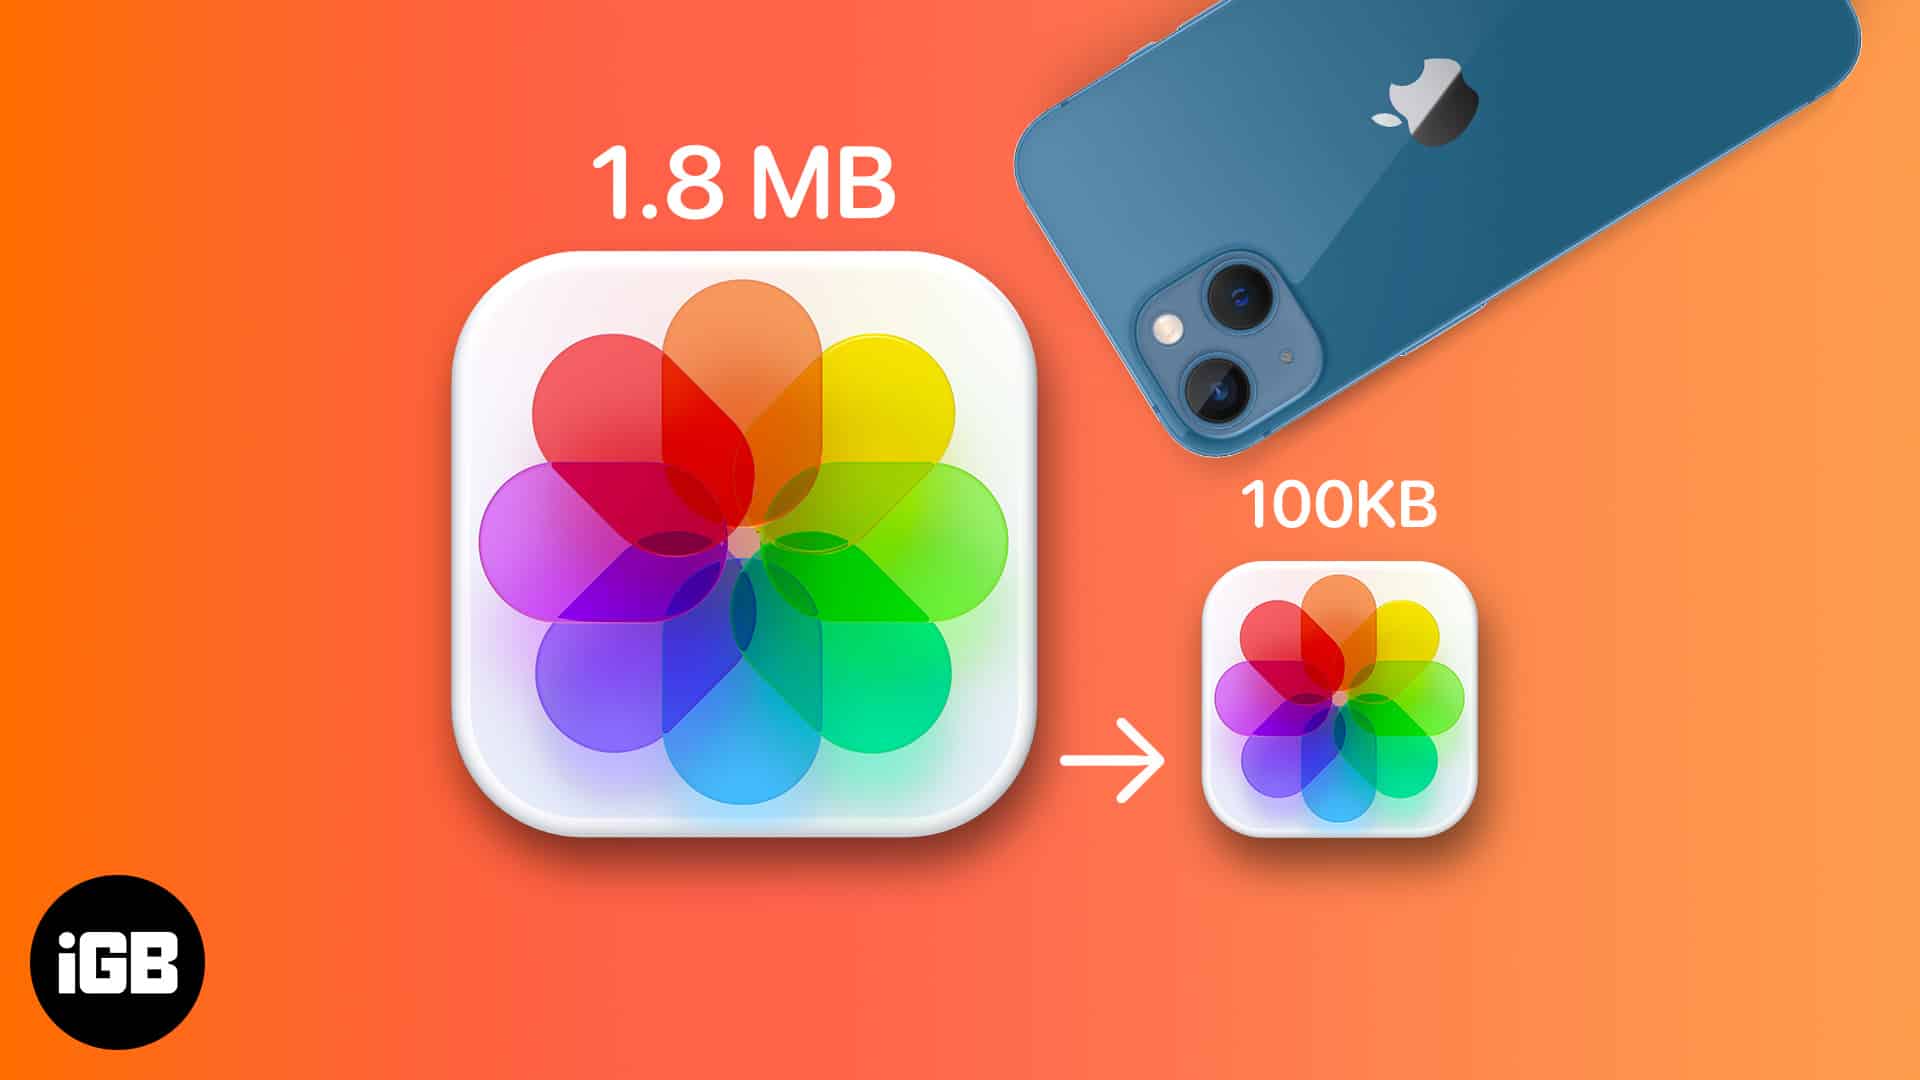
How to Reduce Photo File Size on iPhone Easily
Lighten your camera roll in a snap! Discover clever ways to shrink photo files, save space, and keep your iPhone running smoothly.
Photos taken on an iPhone can quickly take up storage, especially when you capture images in high resolution or share them frequently. Fortunately, iOS offers several simple ways to reduce photo file size without needing a computer or advanced editing skills.
In this guide, you’ll learn the most practical ways to reduce photo file size on iPhone, whether you’re saving storage, preparing images to share, or managing large photo collections. We’ll cover quick built-in methods, explain when each option works best, and help you choose the right approach based on your needs. approach for your needs—and maybe even discover a new favorite trick or two.
What You Need to Know Before Getting Started
Reducing the file size of your iPhone photos does more than just free up storage—it can also affect image quality, privacy, and how your photos are organized or backed up.
Before you start, keep these key points in mind:
- Image Quality: Compressing or resizing photos can make them look less sharp, especially with aggressive settings. Minimal compression (like using HEIF/HEIC format) usually preserves quality, but heavy compression or reducing dimensions may cause visible blurring or color loss.
- Photo Dimensions vs. File Size: Lowering the pixel dimensions of a photo will shrink its file size but may also make it appear smaller or less detailed, especially if printed or viewed on larger screens.
- Format Compatibility: Formats like HEIC save space while maintaining quality but may not be supported on all devices or platforms. JPEG is more universally compatible but often results in larger files.
- Metadata and Privacy: Some compression methods (like screenshots or certain apps) remove metadata such as location, date, and device info. This can help protect your privacy but may also make it harder to search or organize your photos later.
- Backups and iCloud Storage: Smaller photos speed up iCloud backups and take up less space in the cloud. However, compressing pictures after they’ve been backed up may create duplicates, using more storage than intended.
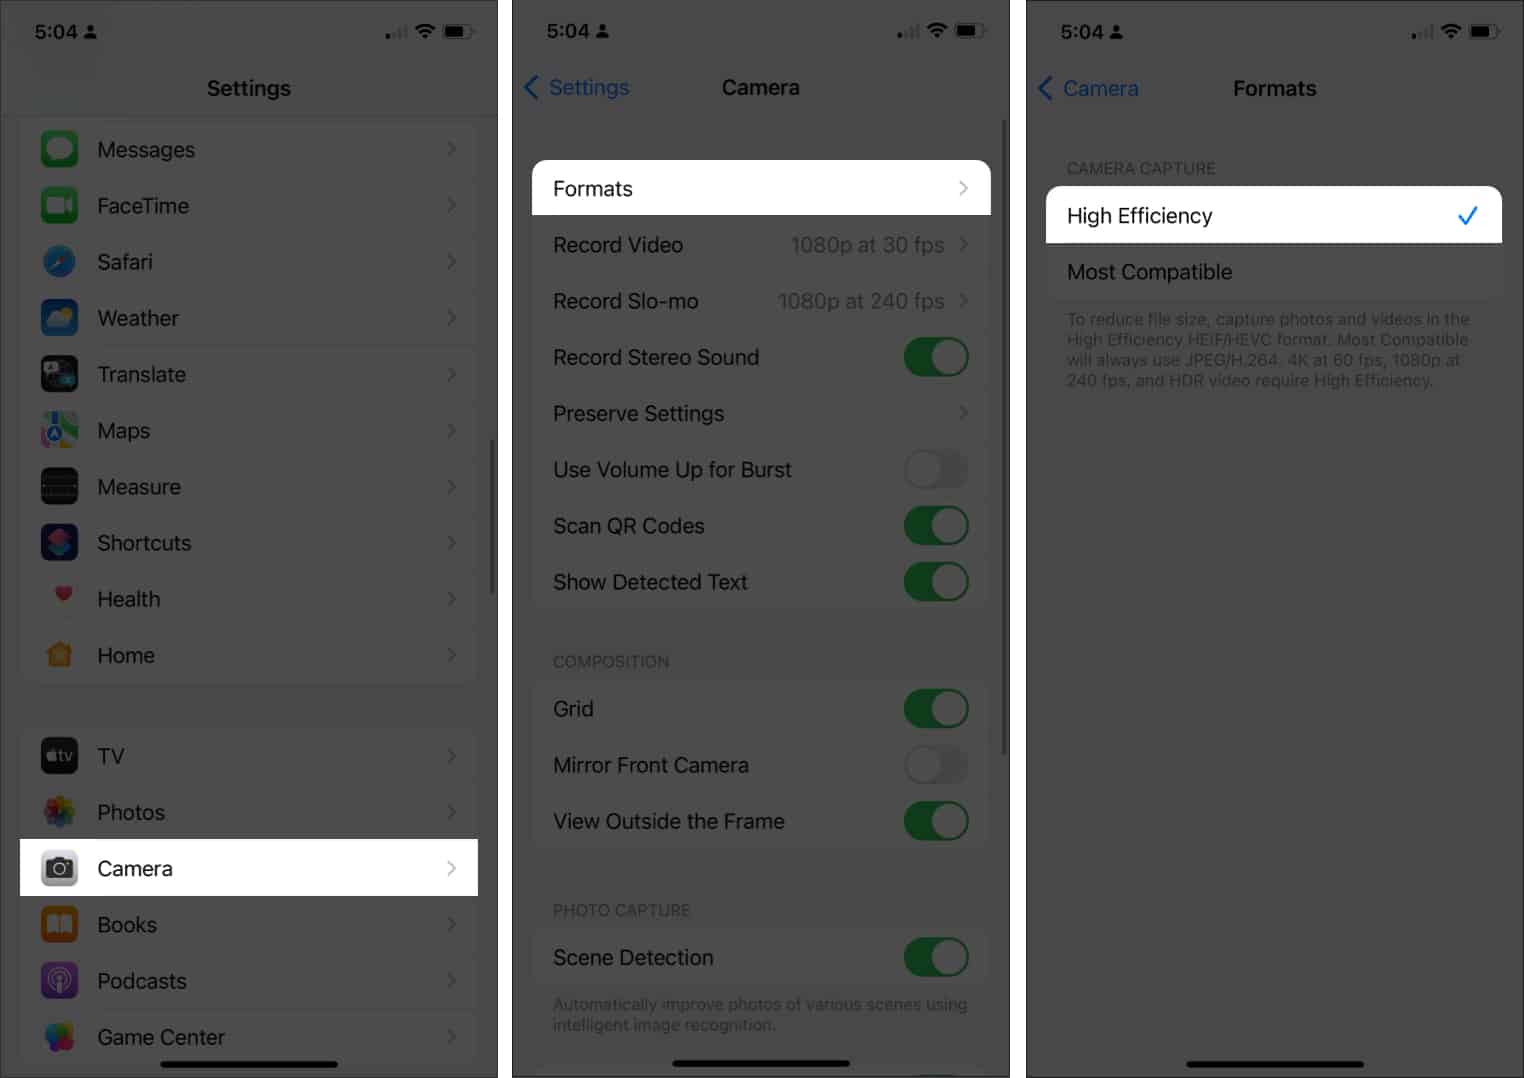
Use High-Efficiency Format (HEIF/HEIC) for New Photos
The High-Efficiency Image Format (HEIF, with .HEIC extension) offers excellent image quality at a much smaller file size compared to JPEG. Most newer iPhones use this format by default, but it’s worth checking your settings.
How to Enable HEIF/HEIC on iPhone:
- Open Settings.
- Tap Camera.
- Tap Formats.
- Select High Efficiency.
Reduce File Size of Existing Photos
Already have photos that are too large? Here are the best ways to shrink them, including standard solutions and creative alternatives.
1. Take a Screenshot of the Photo
Best for: Quick sharing, stripping metadata, privacy
Limitations: Lower resolution, not suitable for printing or high-quality needs
How to do it:
- Open the photo in the Photos app.
- For iPhones with Face ID: Press Side Button + Volume Up.
- For iPhones with Home Button: Press Home + Side/Top Button.
- Edit and crop the screenshot as desired.
- Delete the original if you want to save space.
2. Use the Photos App (Crop or Edit)
Best for: Slight reduction, basic edits, keeping metadata
Limitations: Only slightly reduces file size
How to do it:
- Open the Photos app and select the image.
- Tap Edit (top right).
- Make a small crop or adjustment.
- Tap Done.
3. Use the Shortcuts App for Automated Resizing
Best for: Automation, batch resizing, custom workflows
Limitations: Requires initial setup
How to use:
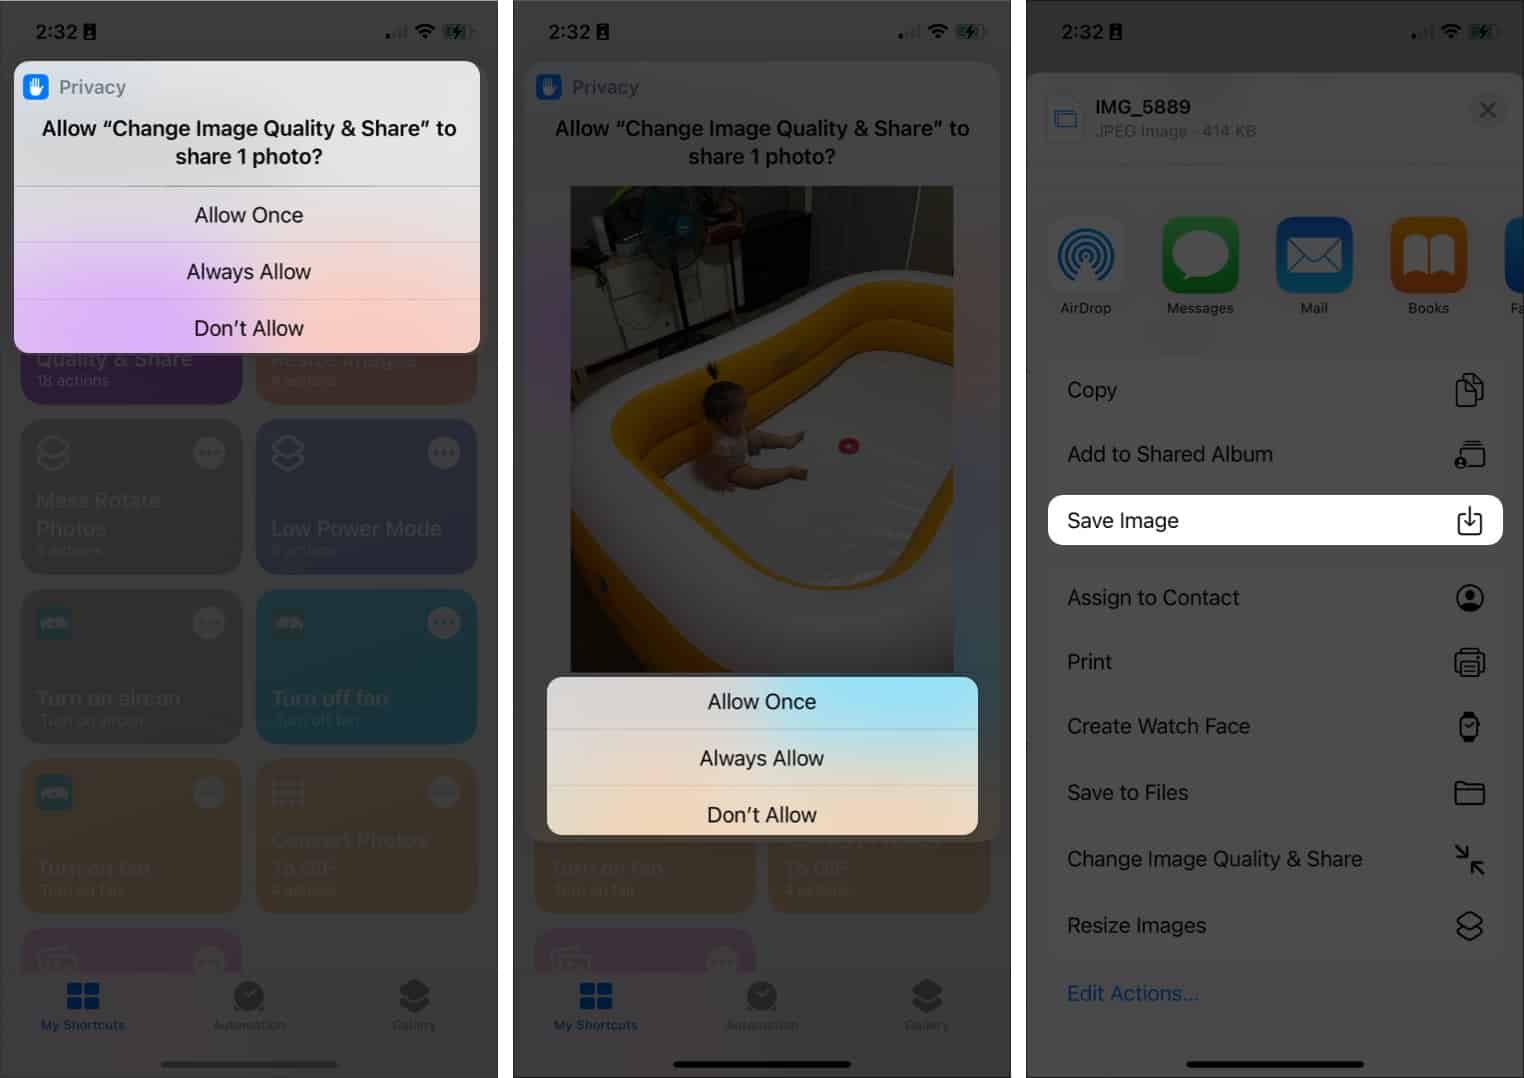
- Download Change Image Quality & Share Shortcut.
- Tap Add Shortcut and wait for it to appear in your Shortcuts app.
- Open the Shortcuts app → Tap Change Image Quality and Share.
You may be asked to give the app access to your photos. Tap Allow Access.
- Select the photo(s) you want to resize → Tap Add at the top right.
- From the pop-up, select your preferred image quality.
I’d prefer going with Medium = Average File Size. - A prompt will appear asking you to allow the shortcut to share the image(s) you resized. Select Allow Once or Always Allow.
- A Share sheet will appear → Tap Save Image.
Pro Tip: Experiment with resize values to target a specific file size. You can also chain actions (e.g., resize, then convert format) for advanced workflows.
4. Use the Mail App to Shrink Photos Before Sending
Best for: Quickly shrinking a few photos, preserving some metadata
Limitations: Limited to preset sizes and a few images at a time
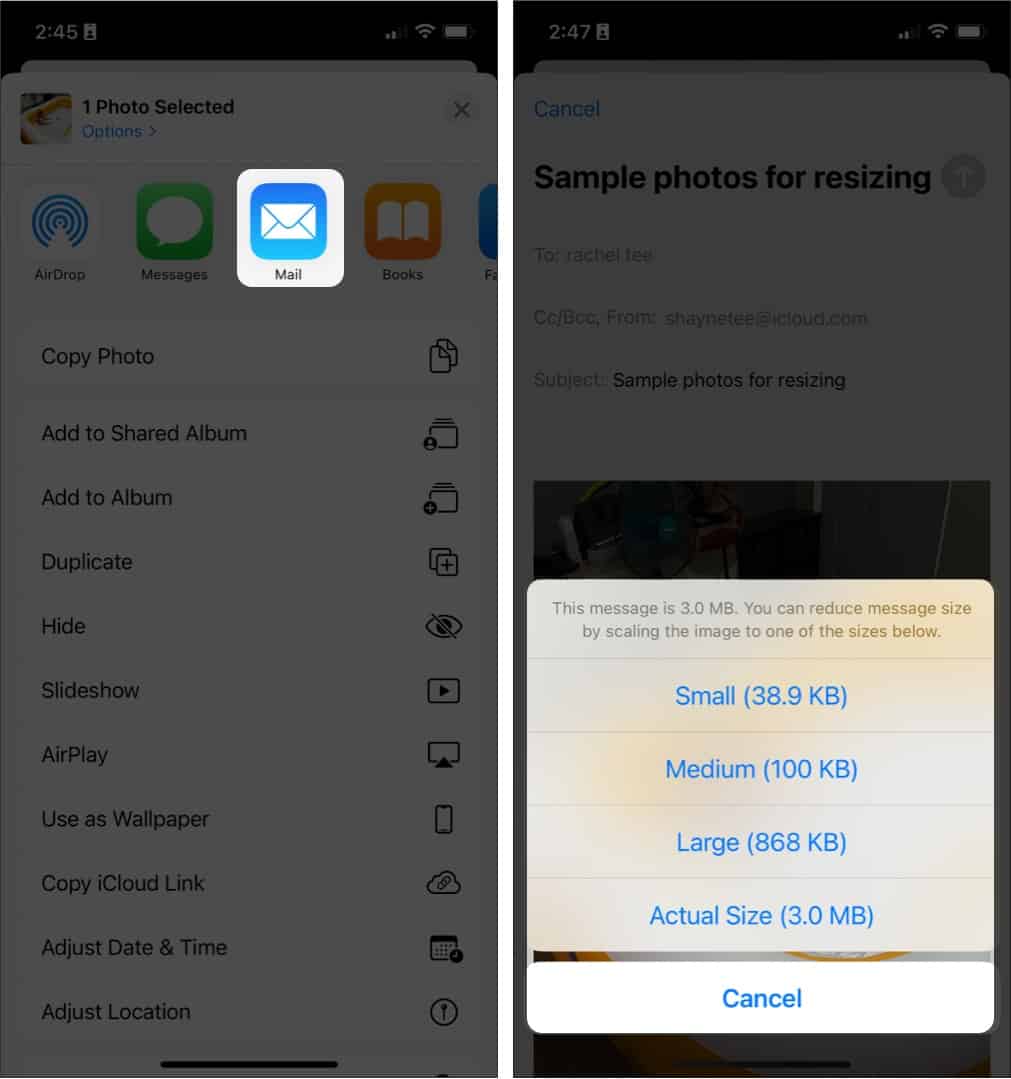
How to do it:
- Open Photos and select the photo(s).
- Tap the Share icon, then choose Mail.
- Enter your email address and tap Send.
- When prompted, choose an image size: Small, Medium, Large, or Actual Size.
- Open your Mail app, find the email, and tap and hold the image to Save the Image back to your Photos app.
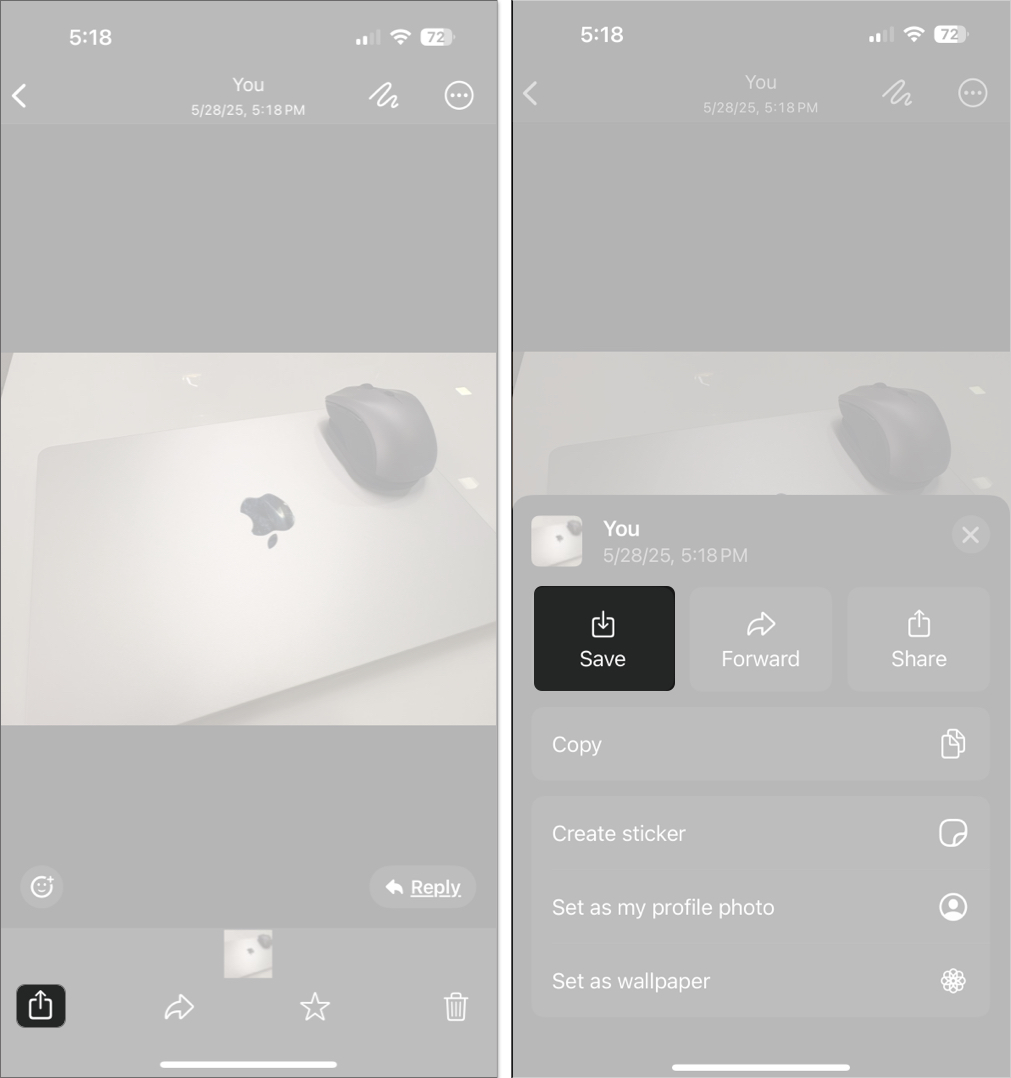
5. Use Messaging Apps (e.g., WhatsApp) to Compress
Best for: Sharing via chat, quick compress
Limitations: Compression level varies by app, metadata may be stripped
How to do it:
- Open WhatsApp and start a new message.
- Tap the + icon and select your photo(s).
- Send the photo(s) to yourself or a trusted contact.
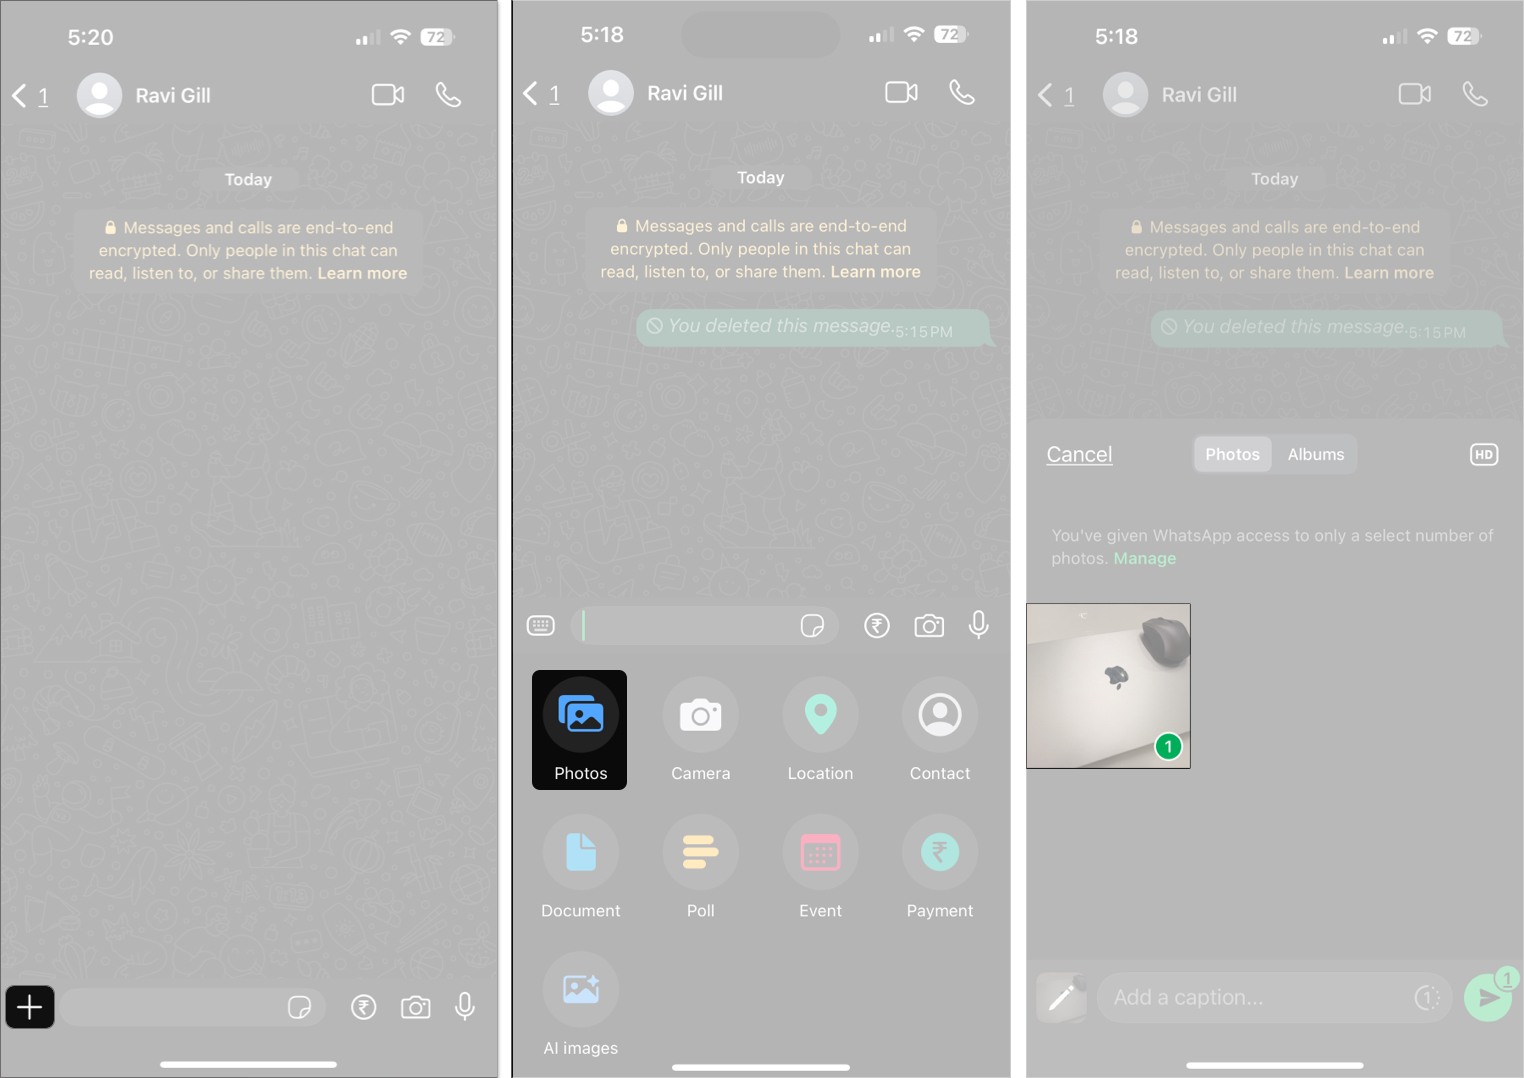
- Tap and hold the sent photo, then save it to your Photos app.
6. Use Web-Based Compression Tools
Best for: No install needed, batch jobs, privacy-sensitive tasks
Limitations: Privacy depends on the site, metadata usually stripped
Popular options: TinyPNG, Watermarkly, Shrink.media
How to do it:
- Visit the website in Safari.
- Upload your photo(s).
- Download the compressed images and save them to your Photos app.
👉 Security Tip: Only use reputable sites and ensure your internet connection is secure when uploading personal photos.
👉 Expert Insight: Before using any web-based tool, check for HTTPS, read their privacy policy, and avoid uploading sensitive images. Prefer tools that explicitly state they do not store or reuse your photos.
7. Use Third-Party Compression Apps
Best for: Full control, batch jobs, customizable quality and size
Limitations: Some features may require purchase, check for ads/limits
Popular apps: Compress Photos & Pictures, Photo Compress – Shrink Pics, Shrink.media
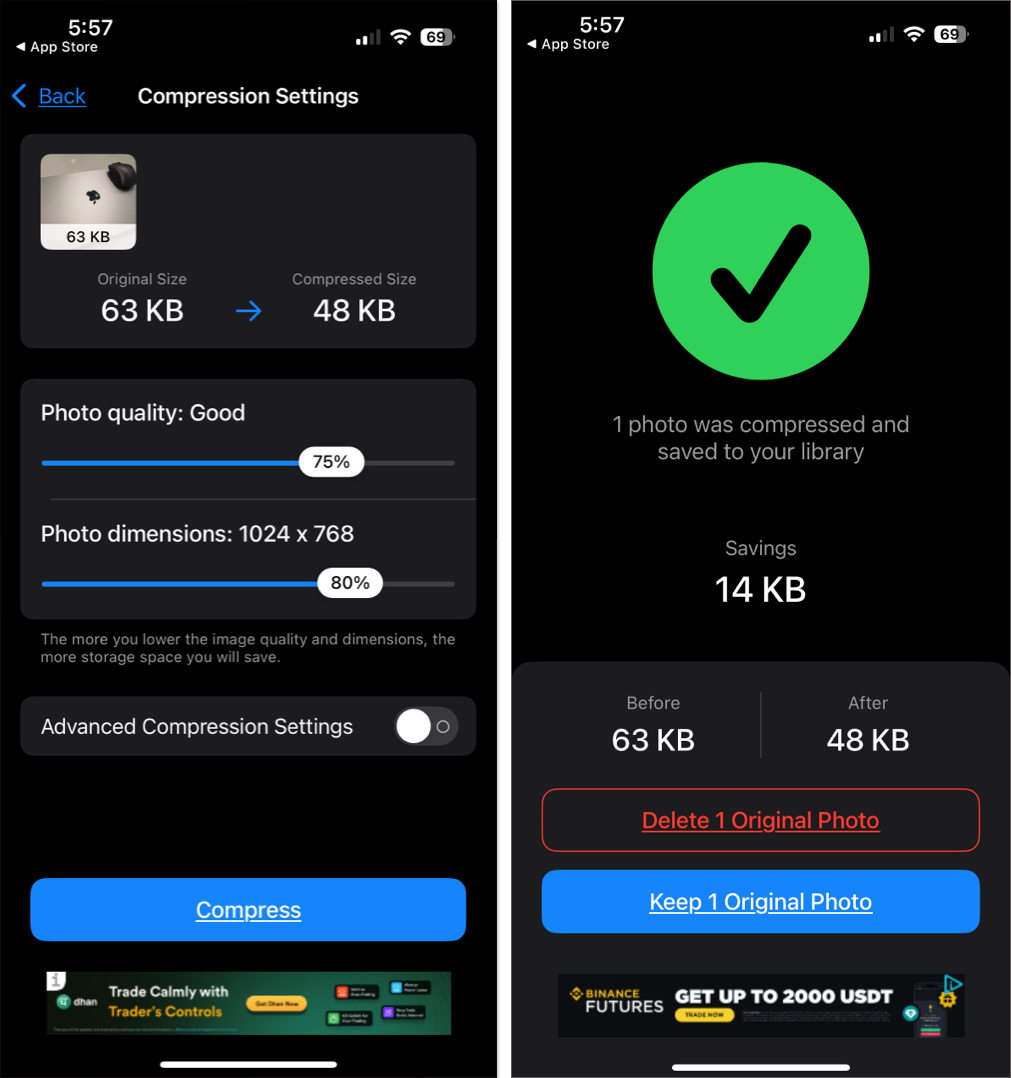
How to use (example with Compress Photos & Pictures):
- Download Compress Photos & Pictures from the App Store.
- Open the app and grant access to your photo library.
- Select one or more photos to compress. The app will display the current size of each photo.
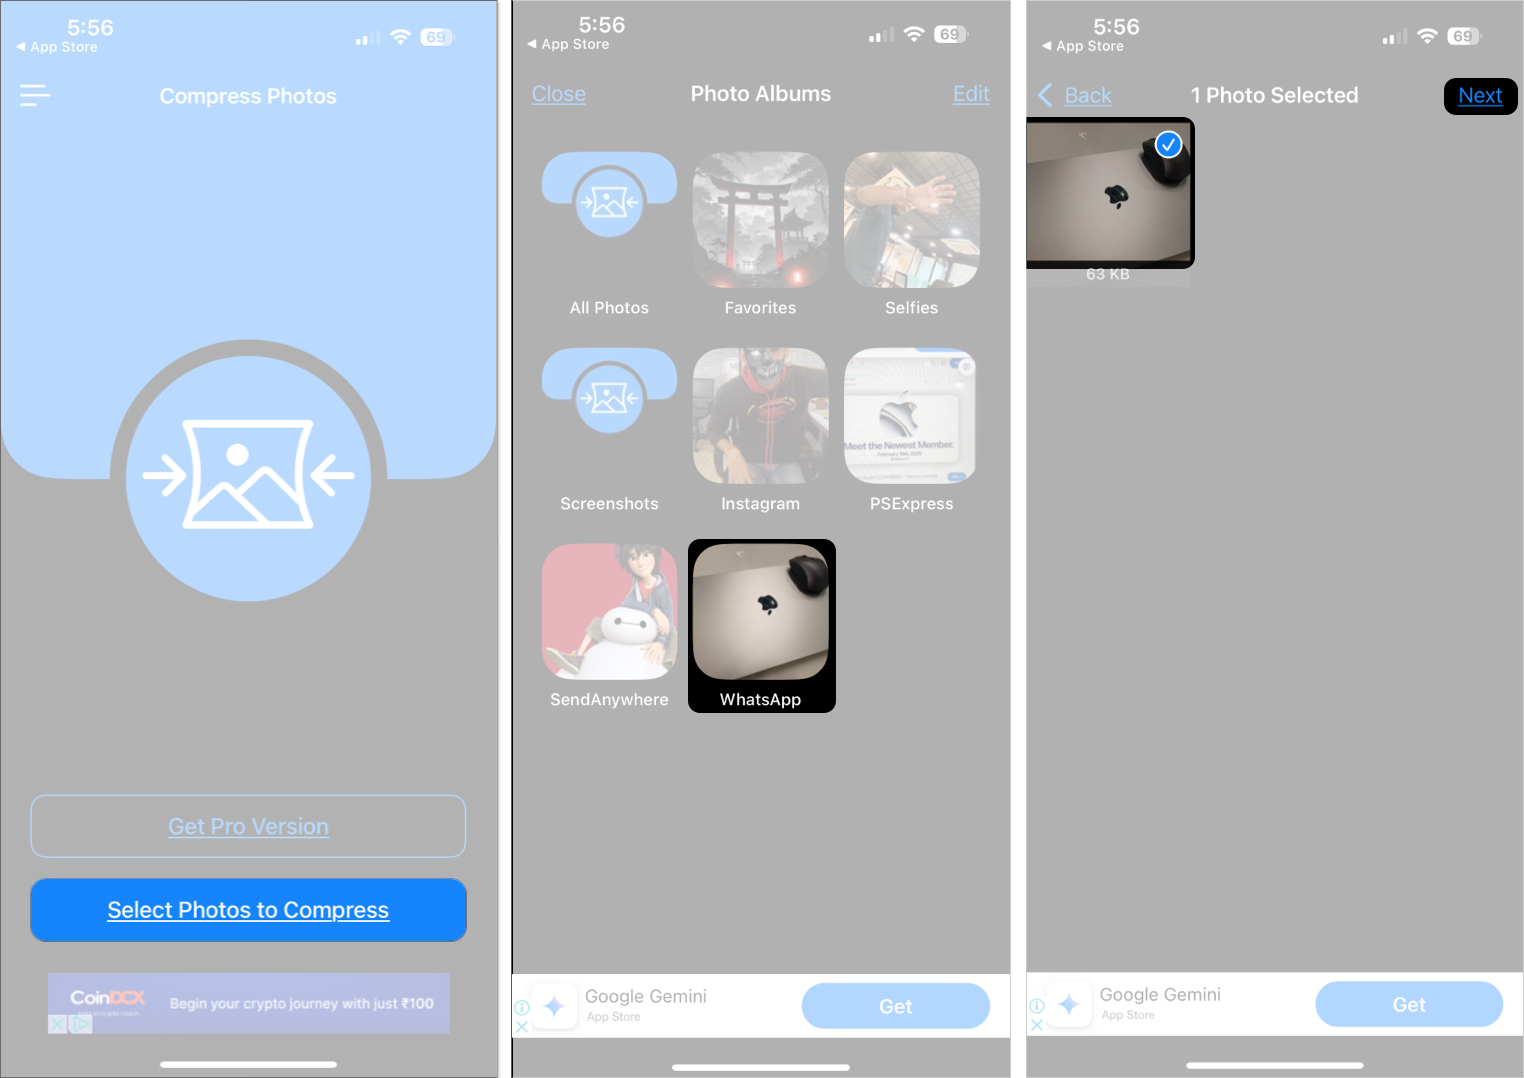
- Use the sliders to adjust compression quality and dimensions. Preview the estimated new file size.
- Tap Compress and choose whether to keep or delete the originals.
- Find your compressed photos in a dedicated album in the Photos app.
How to Choose a Safe and Effective App:
- Check the history of recent updates and user reviews in the App Store.
- Prefer apps with transparent privacy policies and clear in-app explanations of how your data is handled.
- Look for features like batch processing, adjustable compression, and options to keep/delete originals.
- Avoid apps with excessive ads, unclear permissions, or poor support.
Compare Alternative Methods: Which Is Best for You?
| Goal | Best Method(s) | Key Considerations |
|---|---|---|
| Quickest, no extra apps | Screenshot | Removes metadata, lowers resolution |
| Batch resize/automation | Shortcuts app | Requires setup, very flexible |
| Preserve some metadata | Mail app resizing | Limited to a few images at a time |
| Avoid installing apps | Web-based compressor | Privacy depends on site used |
| Maximum control, batch | Third-party compression app | May require purchase for full features |
| Reduce for messaging/social | Messaging app (WhatsApp, etc.) | Compression level varies, strips metadata |
Note:
Expert Insight: For those who regularly archive or print photos, keep a master copy of your originals—compress only the versions you intend to share or store in the cloud. This ensures you always have access to the highest quality when you need it.
Manage Storage Proactively
Keep your iPhone running smoothly by regularly reviewing and clearing unnecessary files, apps, and backups.
1. Optimize iPhone Storage with iCloud
Apple’s “Optimize iPhone Storage” feature stores smaller versions of your photos on your device and keseps full-resolution originals in iCloud.
How to enable:
- Open Settings > Apps.
- Tap Photos.
- Select Optimize iPhone Storage.

2. Remove Duplicates and Unwanted Photos
Free up space by deleting duplicates, screenshots, or blurry images. Apps like CleanMy®Phone, Gemini Photos, or other top cleaner apps can help automate this process.
Evaluate Trustworthiness Before Using New Tools
Always review privacy policies, recent updates, and user feedback before installing or uploading to a new app or web service.
Match Tools to Your Needs
- For one-off, privacy-sensitive tasks: Use web tools or screenshots.
- For frequent, large-batch jobs: Use a reputable app with batch processing and automation support.
- For maximum metadata retention: Test with a sample photo and check if EXIF/location info is preserved.
Track Compression Results
After compressing, review the file size and image quality. Keep originals of irreplaceable photos for archival or print needs.
Manage iPhone Storage with Smarter Photo Sizes
Shrinking photo file sizes on your iPhone isn’t just about saving space—it’s about making your digital life easier. Whether you want to share memories in a snap, breeze past upload limits, or keep your phone running smoothly, there’s a method here tailored for you. With all these options at your fingertips from clever built-in tricks to powerful apps, you’re in control. Pick what works best for your habits and priorities, and enjoy the freedom of a lighter, more organized photo library.
Frequently Asked Questions

Written by
Rachel Ann Tee-MelegritoRachel, an experienced Apple technology writer since 2021 and a long-time user since 2003, began her journey with a silver iPod Classic. Currently, she owns an array of modern Apple gadgets. At iGeeksBlog, her expertise shines through in the crafting of comprehensive how-to articles, informative guides, and well-curated roundups.
View all posts →More from How-to

Snapchat Parental Controls: How to Set Up Family Center and Keep Your Teen Safe
Snapchat’s Family Center lets parents monitor their teen’s friend activity and screen time without reading private messages. Here’s how to set it up and what to expect.

How to Block and Unblock Someone on Instagram
Instagram lets you block or unblock someone in seconds. Follow these simple steps to take full control of your privacy and online peace.

Apple Watch Not Responding? 8 Fixes That Actually Work
Is your Apple Watch unresponsive or stuck on a black screen? Here are 8 proven fixes to help you unfreeze it and get it working again quickly.