FaceTime Like a Pro
Get our exclusive Ultimate FaceTime Guide 📚 — absolutely FREE when you sign up for our newsletter below.

FaceTime Like a Pro
Get our exclusive Ultimate FaceTime Guide 📚 — absolutely FREE when you sign up for our newsletter below.
The newest iPhone models boast pristine, crystal-clear screens with high-resolution displays that make viewing a delight. Still, many people fear the potential for “screen burn-in,” where images remain permanently visible on your iPhone’s display.
If you’re worried about getting “ghost” images on your iPhone screen or already seeing some lingering, don’t fret—you can still get rid of most of them! I’ve compiled a list of possible solutions for iPhone screen burn-in. Read on to find out more!
Screen burn-in is a term that goes back to the days of cathode-ray-tube (CRT) TV. It is the appearance of a ghostly afterimage left on the digital display.
This happens because of organic light-emitting diode (OLED) technology. Each pixel has its own light source and produces light independently of other pixels. So when specific pixels are used more than others, these become overused and dim faster, causing them to display colors differently.
While the screen will still function, there will be noticeable discoloration in some areas of the display. However, the term “burn-in” is an umbrella term that refers to all kinds of ghosted images on the screen. But image retention is the most common form of burn-in seen in phones.
Compared to screen burn-ins, which tend to be permanent, image retention is often temporary discolorations that usually disappear once you switch to a different image or turn off your device for a while.
Many things can cause a screen burn-in on your iPhone. Keeping your screen brightness too high for too long and leaving your phone sitting on an image or the Home screen for extended periods of time are the common culprits.
According to Apple’s support page, “image persistence is temporary and disappears after a few minutes of normal use. Burn-in can occur in more extreme cases, such as when the same high-contrast image is continuously displayed at high brightness for prolonged periods of time.”
Apple explains that these slight visual changes are “expected behavior” of OLED displays, especially with extended long-term use.
The iPhone models with Super Retina Display and Super Retina XDR all use OLED technology. Compared to traditional OLED displays, these displays are enhanced to produce wide color support, incredible color accuracy, and high brightness to provide the best viewing experience.
Models that use these displays include:
Now that we have understood the problem, let’s navigate and find solutions.
One way to fix screen burn-in on your iPhone is by playing fast-paced videos with many color changes. Another option is to use a moving screensaver. Displaying videos or a moving pattern ensures that you do not continuously illuminate the same pixels, preventing burn-in.
Most of the time, the overused pixels just need some rest, and turning the device off can sometimes fix the issue. If the screen burn-in is minor, the pixels are more likely than not to recover.
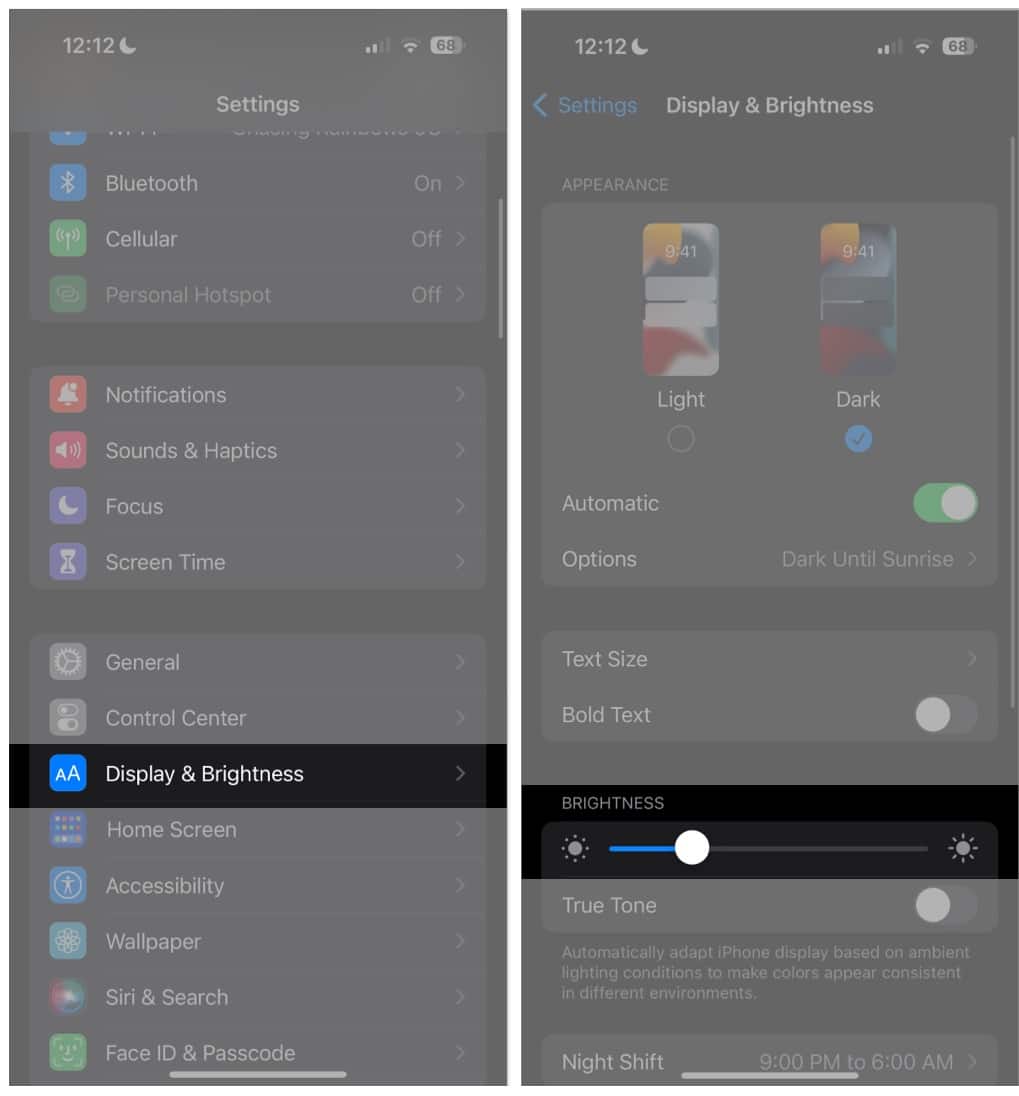
The higher your screen’s brightness, the harder pixels need to work, which can lead to a screen burn-in. You may also be using an app that keeps your display on even when you’re not actively using your device. In this case, adjusting your screen brightness can help reduce the risk of a burn-in. To change your screen’s brightness:
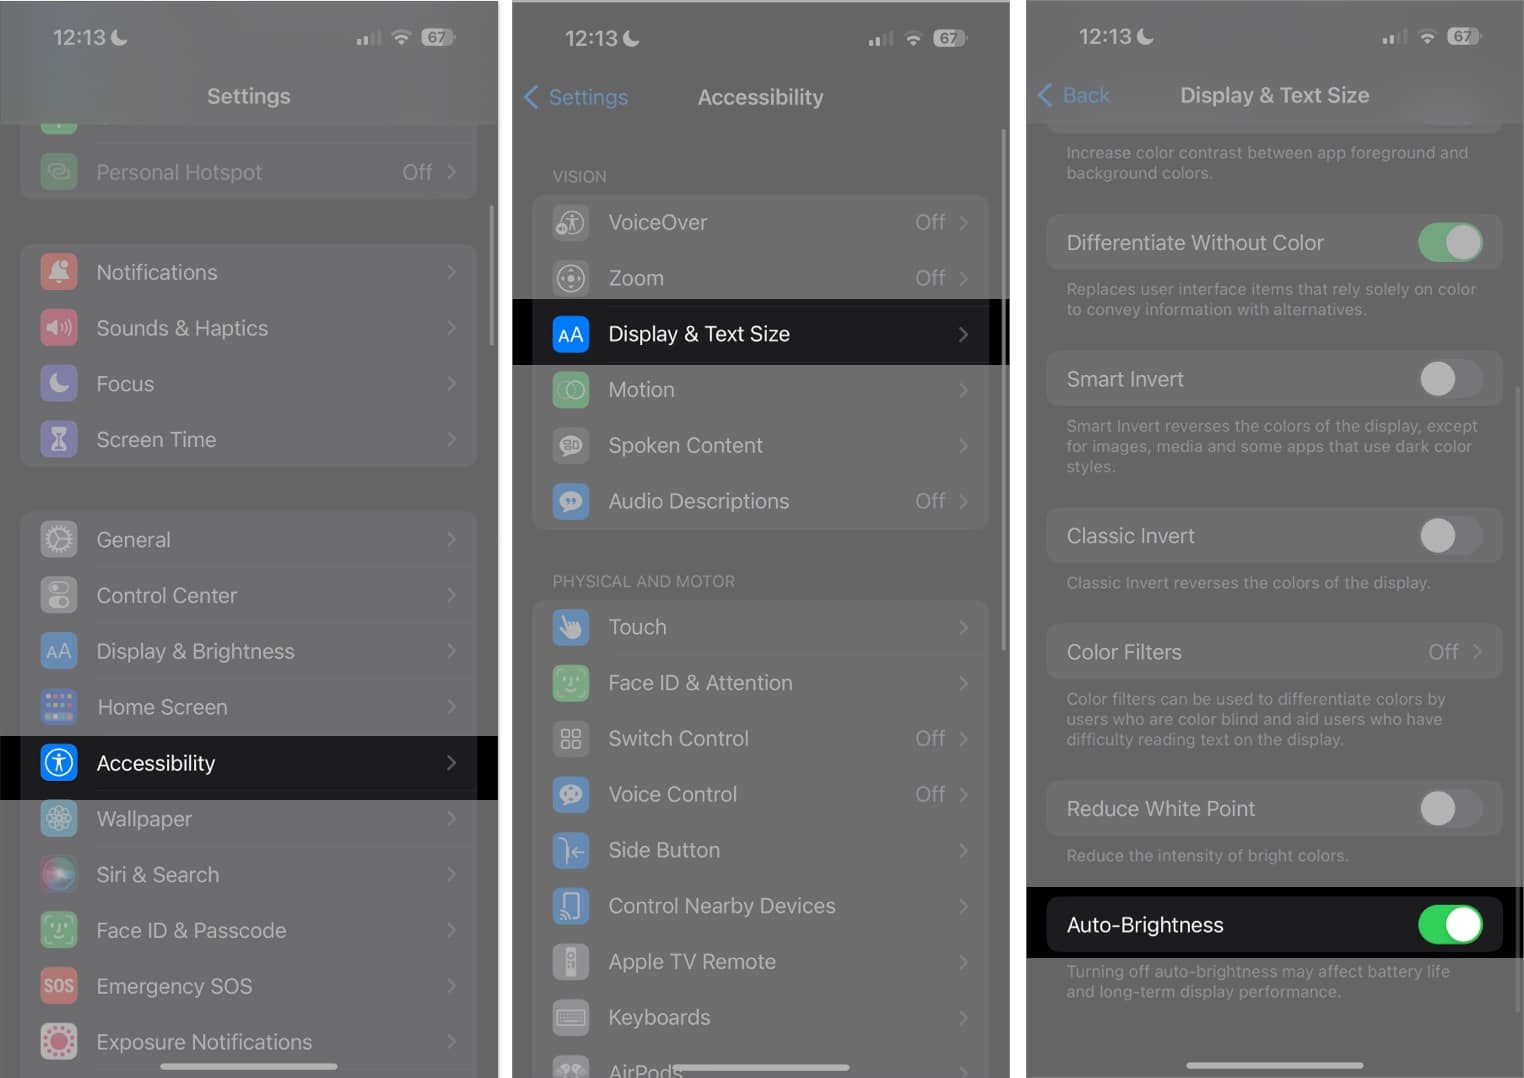
You may also enable Auto Brightness, which adjusts your iPhone’s screen brightness depending on current light conditions. This setting is enabled by default. To check if this is enabled on your device:
While this may not solve a screen burn-in, enabling dark mode on your iPhone can help reduce this risk, especially when you tend to keep using your iPhone at maximum brightness levels.
Here’s the simplest way to enable Dark Mode: go to Settings → Display & Brightness, then tick Dark. Toggle the Automatic button if you want your iPhone to switch to Dark Mode at a particular time automatically.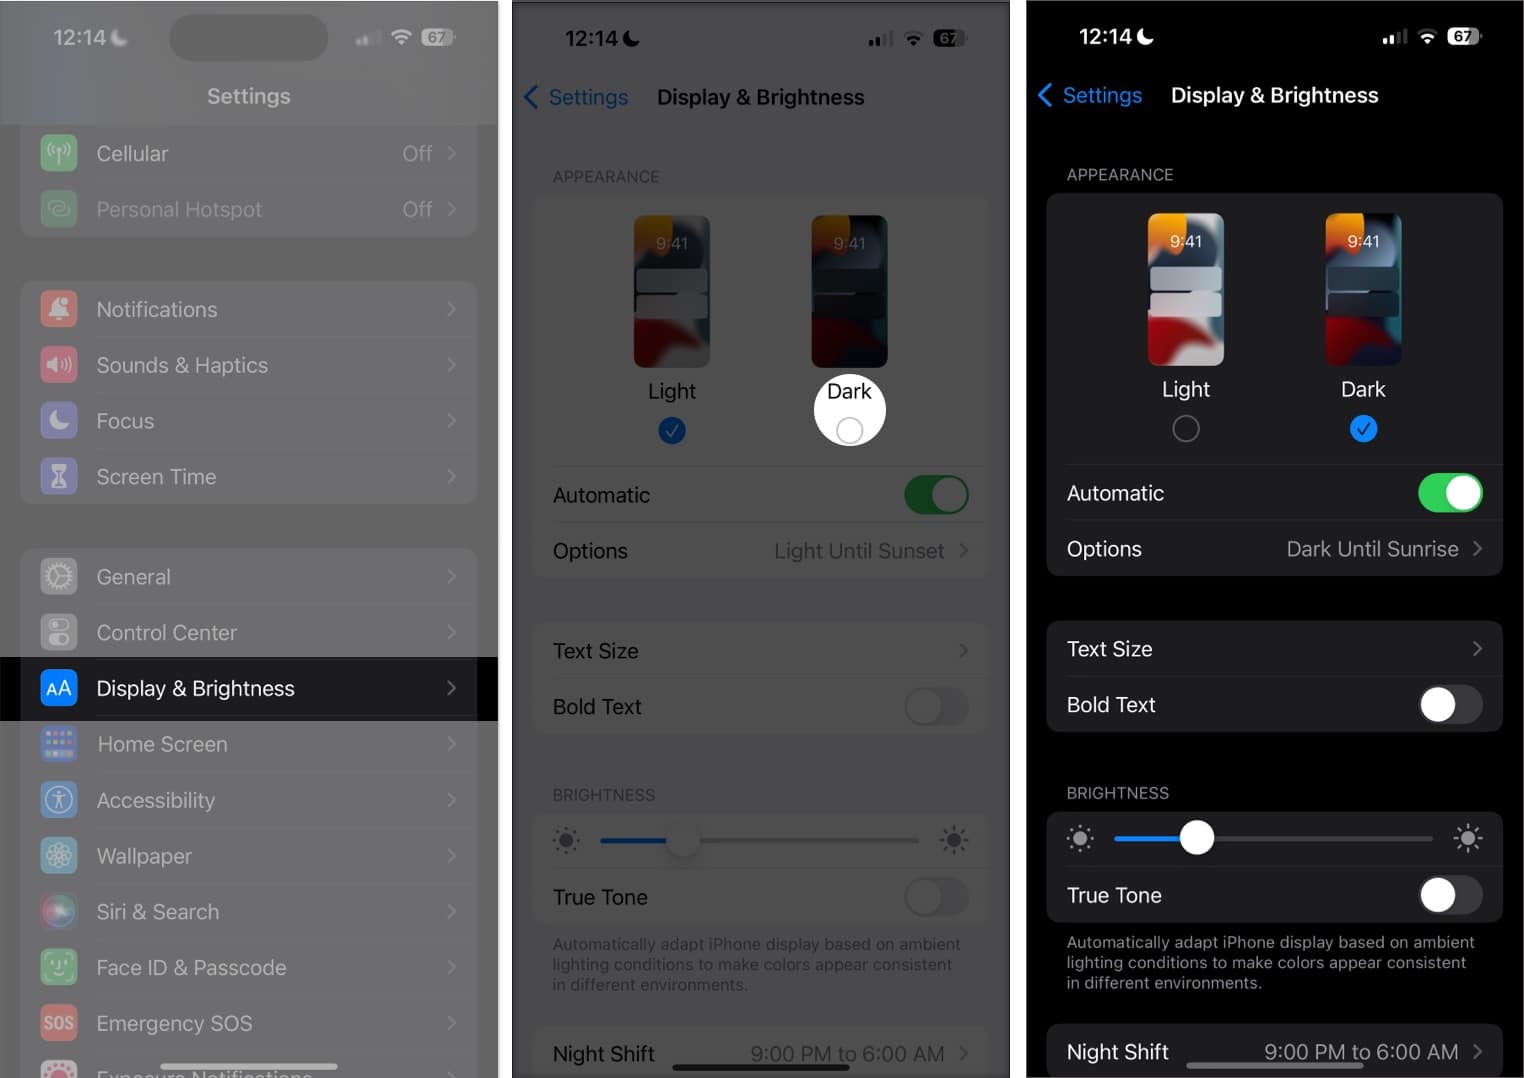
The screen lock time feature is not only beneficial for keeping your iPhone’s battery health in the best condition, but it can also protect your pixels by turning off your display when you’re not using it.
To do so, head to Settings → Display & Brightness → Auto-Lock, then choose the time interval you prefer, but I recommend that you choose 30 seconds.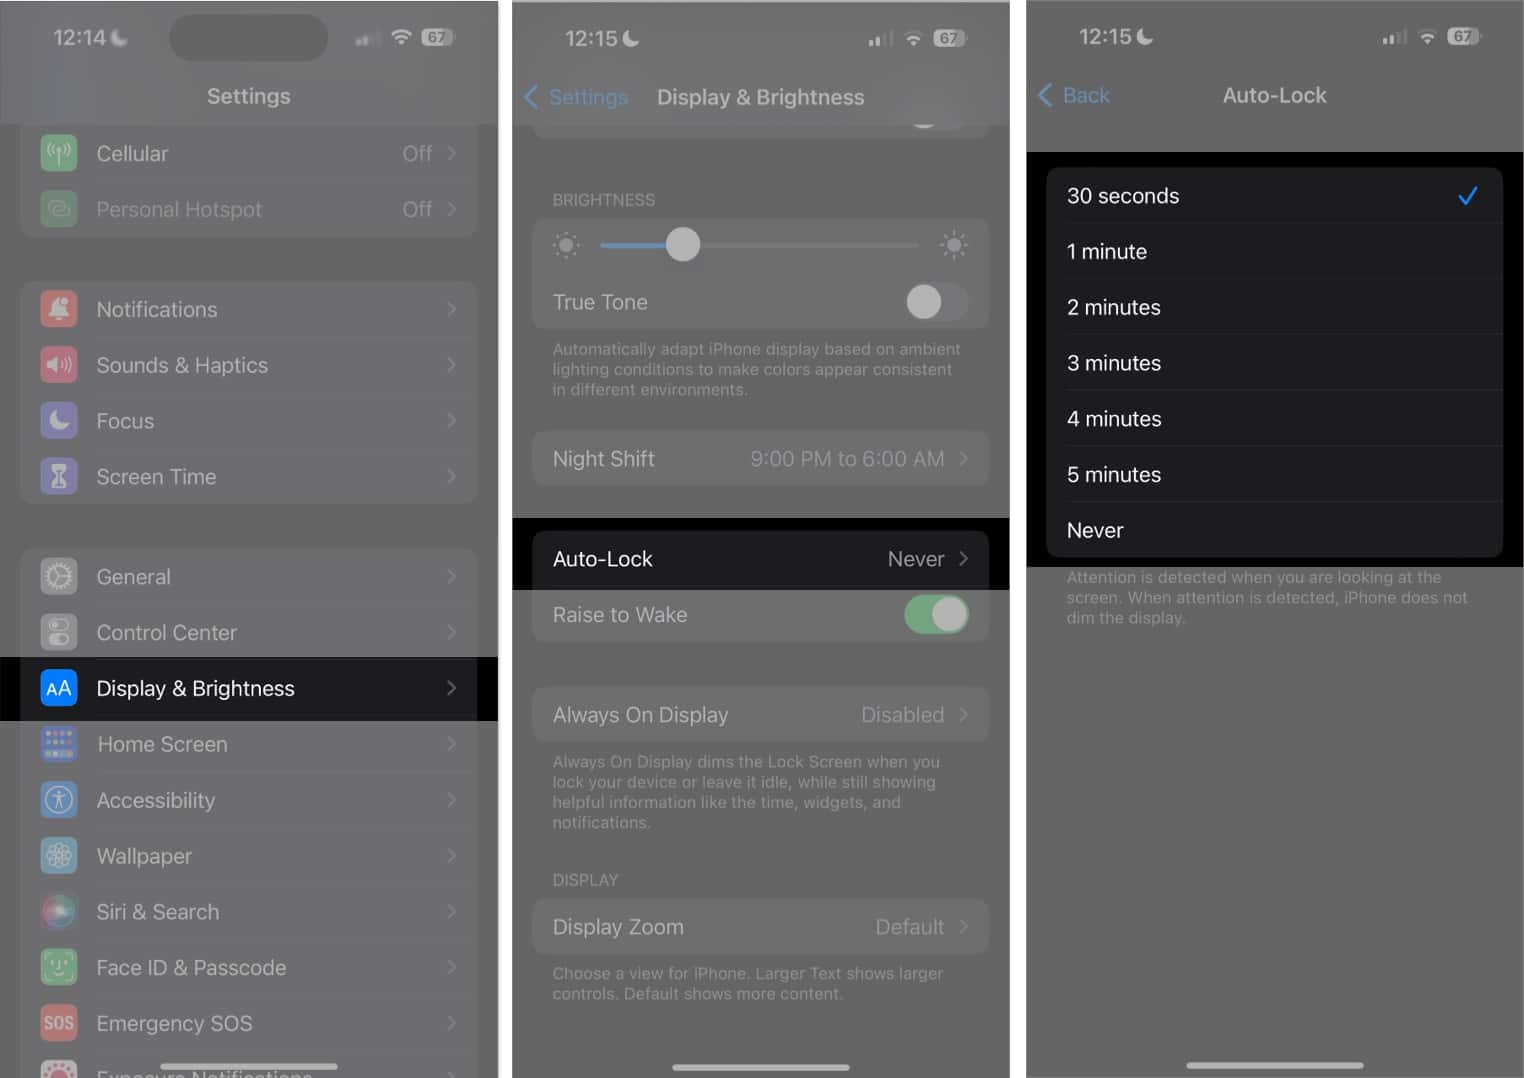
Sometimes, minor software glitches can also result in issues with the screen, like screen discolorations. Force restarting your iPhone should be able to delete these minor software glitches.
The latest version of iOS helps your iPhone minimize the effects of long-term screen use. To update your iPhone to the most recent iOS version, head to Settings → General → Software Update, then tap Download and Install.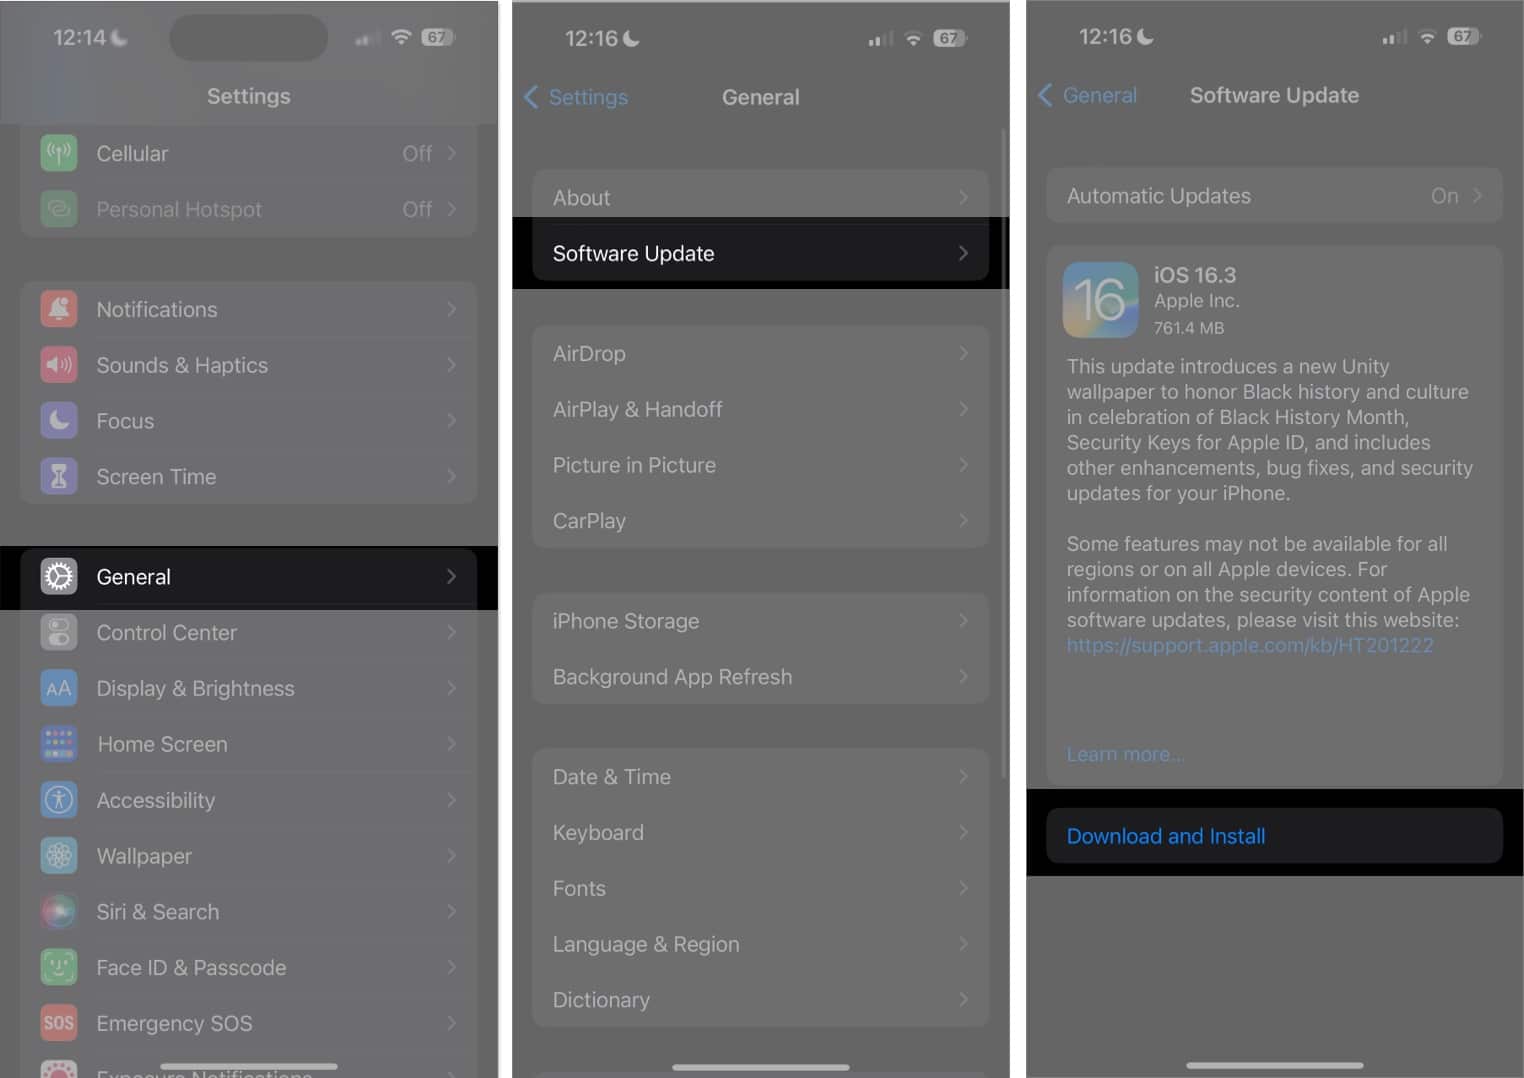
If you think the issue is due to some alterations in your settings, resetting your iPhone settings can help your iPhone revert to its default settings. To do this:
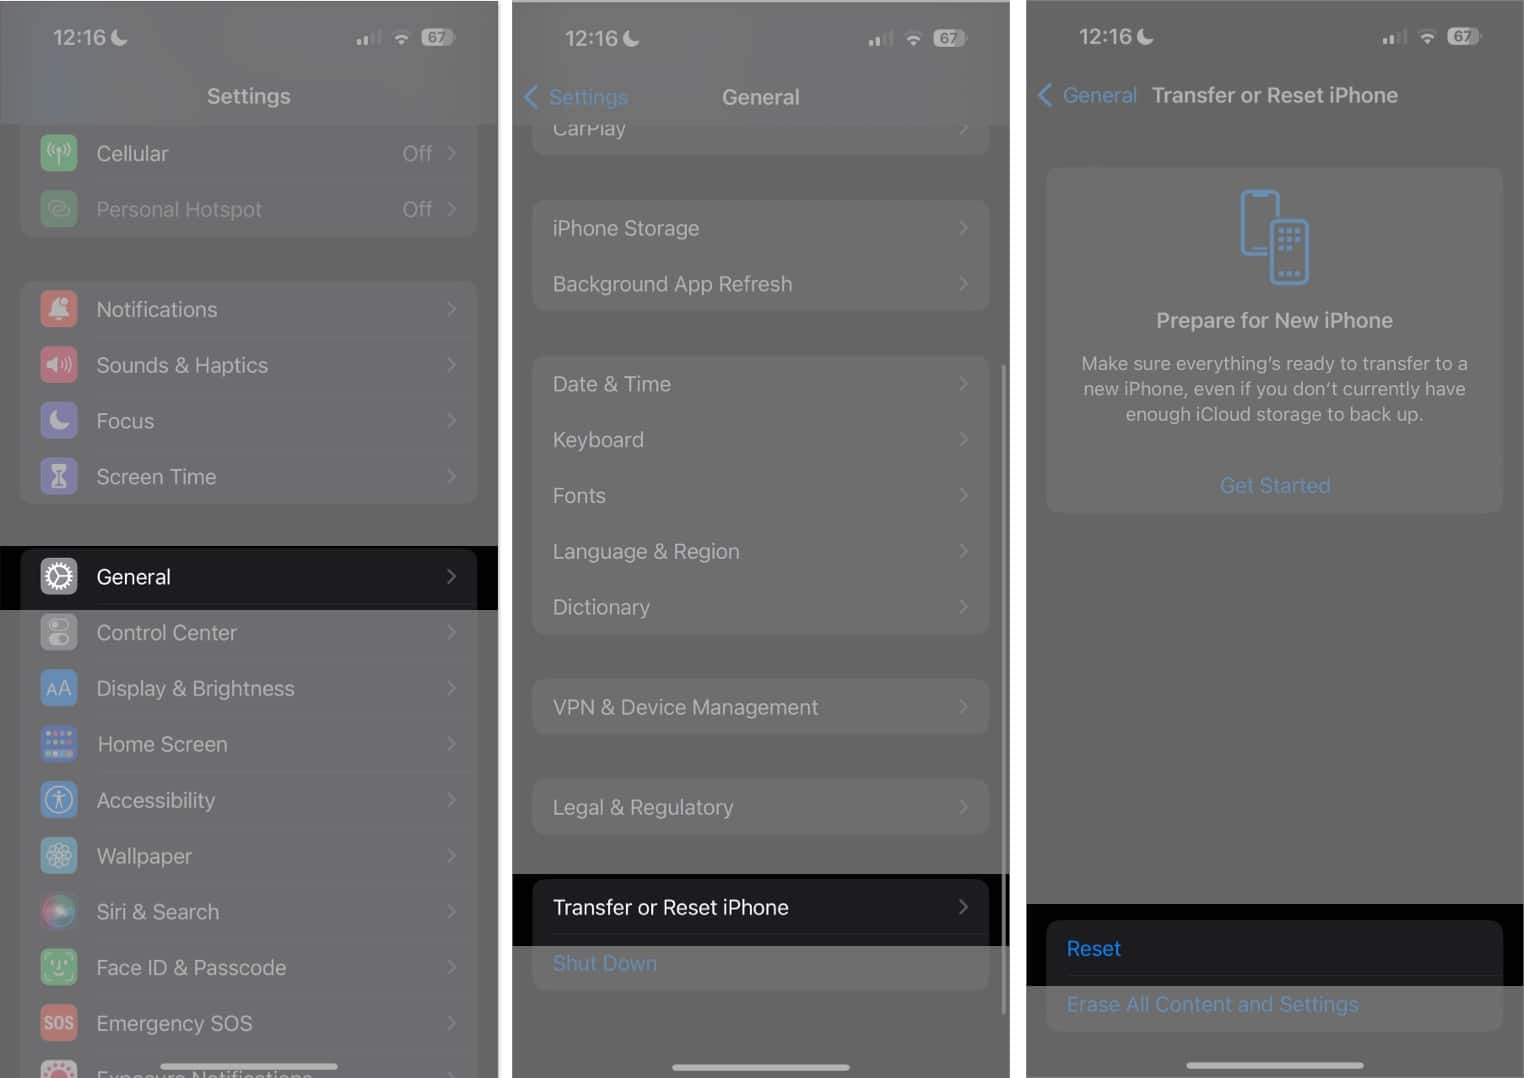
Note that this resets all your settings, including your network settings, keyboard dictionary, Apple Pay cards, privacy settings, and location settings. However, this doesn’t erase any data or media, so a backup may not be necessary.
There are several apps designed to “fix” screen burn-ins. These apps let you visually check for signs of burn-ins and “fix” the image persistence by displaying a sequence of colors on your display to train the pixels to use different colors. An example is Doctor OLED X, which costs $0.99 on the App Store.
If all the above methods fail to eliminate the burn-in on your iPhone’s display, it’s probably permanent. In that case, the only solution is to replace your screen.
Get in touch with Apple and ask for their recommendation. Check your iPhone’s warranty to see if an iPhone replacement or a screen replacement service is covered.
You may also opt for a third-party service provider as long as they’re reputable.
If any of the methods above worked, great! But that doesn’t mean that it won’t happen again. To keep your screen display in its crisp, crystal-clear condition, you must practice some good habits:
Wrapping up…
Burn-ins, or image retention, are often temporary display issues that can become permanent if left unresolved. Practicing good habits like adjusting your screen brightness and turning off your display when not in use can help reduce the risk of burn-in issues on your iPhone.
Did any of these fixes work for you? Let us know in the comments!
Read more: