
Apple spent plenty of time talking about AI features in the WWDC keynote, but the update I ended up using first wasn’t powered by Apple Intelligence at all. It was a surprisingly useful upgrade hiding inside the Photos app.
Apple has quietly transformed the old slideshow feature into something people will actually use. Instead of creating a slideshow that’s only meant for viewing, iOS 27 now lets you customize it, add music, and export it as a proper video in the Photos app. Here’s how to save a slideshow as a video on an iPhone.
Apple finally offers a slideshow maker in the iOS 27 Photos app
One of the most surprising additions I found in iOS 27 is something Apple users have wanted for years—a proper slideshow maker built directly into the Photos app. It sounds small, but after trying it, I realized it removes the need for third-party apps for creating quick memory videos.
Previously, the Photos app could play selected images and clips as a temporary slideshow, but there was almost no creative control or a built-in way to save them as a video. If I wanted to make something worth sharing with friends or family, I had to switch to editing apps like CapCut, Canva, or iMovie. With iOS 27, Apple finally closes that gap.
And here are the things you can now do:
- Create slideshows from selected photos and videos
- Adjust transition style between slides and playback duration
- Add background music from Apple’s curated library
- Preview everything before exporting
- Save the finished slideshow as a video directly into your Photos library
The best part is that everything happens inside the Photos app. There won’t be any need to use some special slideshow maker or editor. So now I can easily turn travel photos, family moments, or event highlights into a polished video in just a few taps.
How to export a slideshow as a video in iOS 27
I tested the feature using several travel photos and videos, and the entire process took less than a minute.
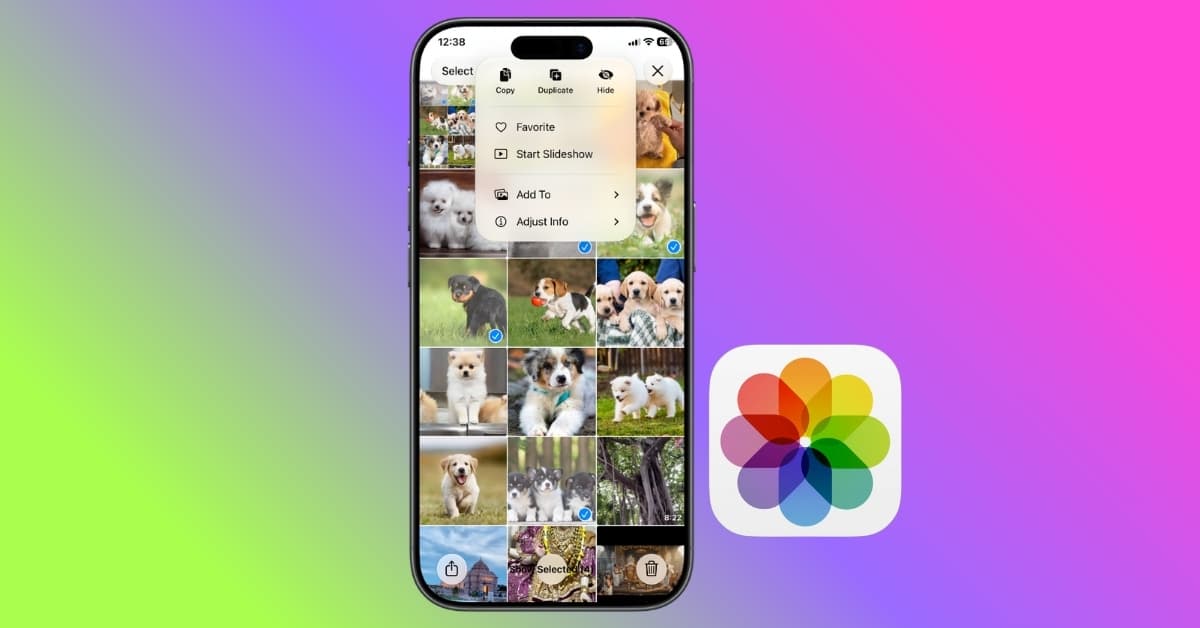
- Open the Photos app, tap Select, and choose the images or videos you want in your slideshow.
- After selecting your files, tap the three-dot button in the top-right corner.
- From the menu, choose Start Slideshow. Immediately, Photos generates a full-screen slideshow.

- Tap the screen and a large Customize button appears below the slideshow. Inside it, I found options for,
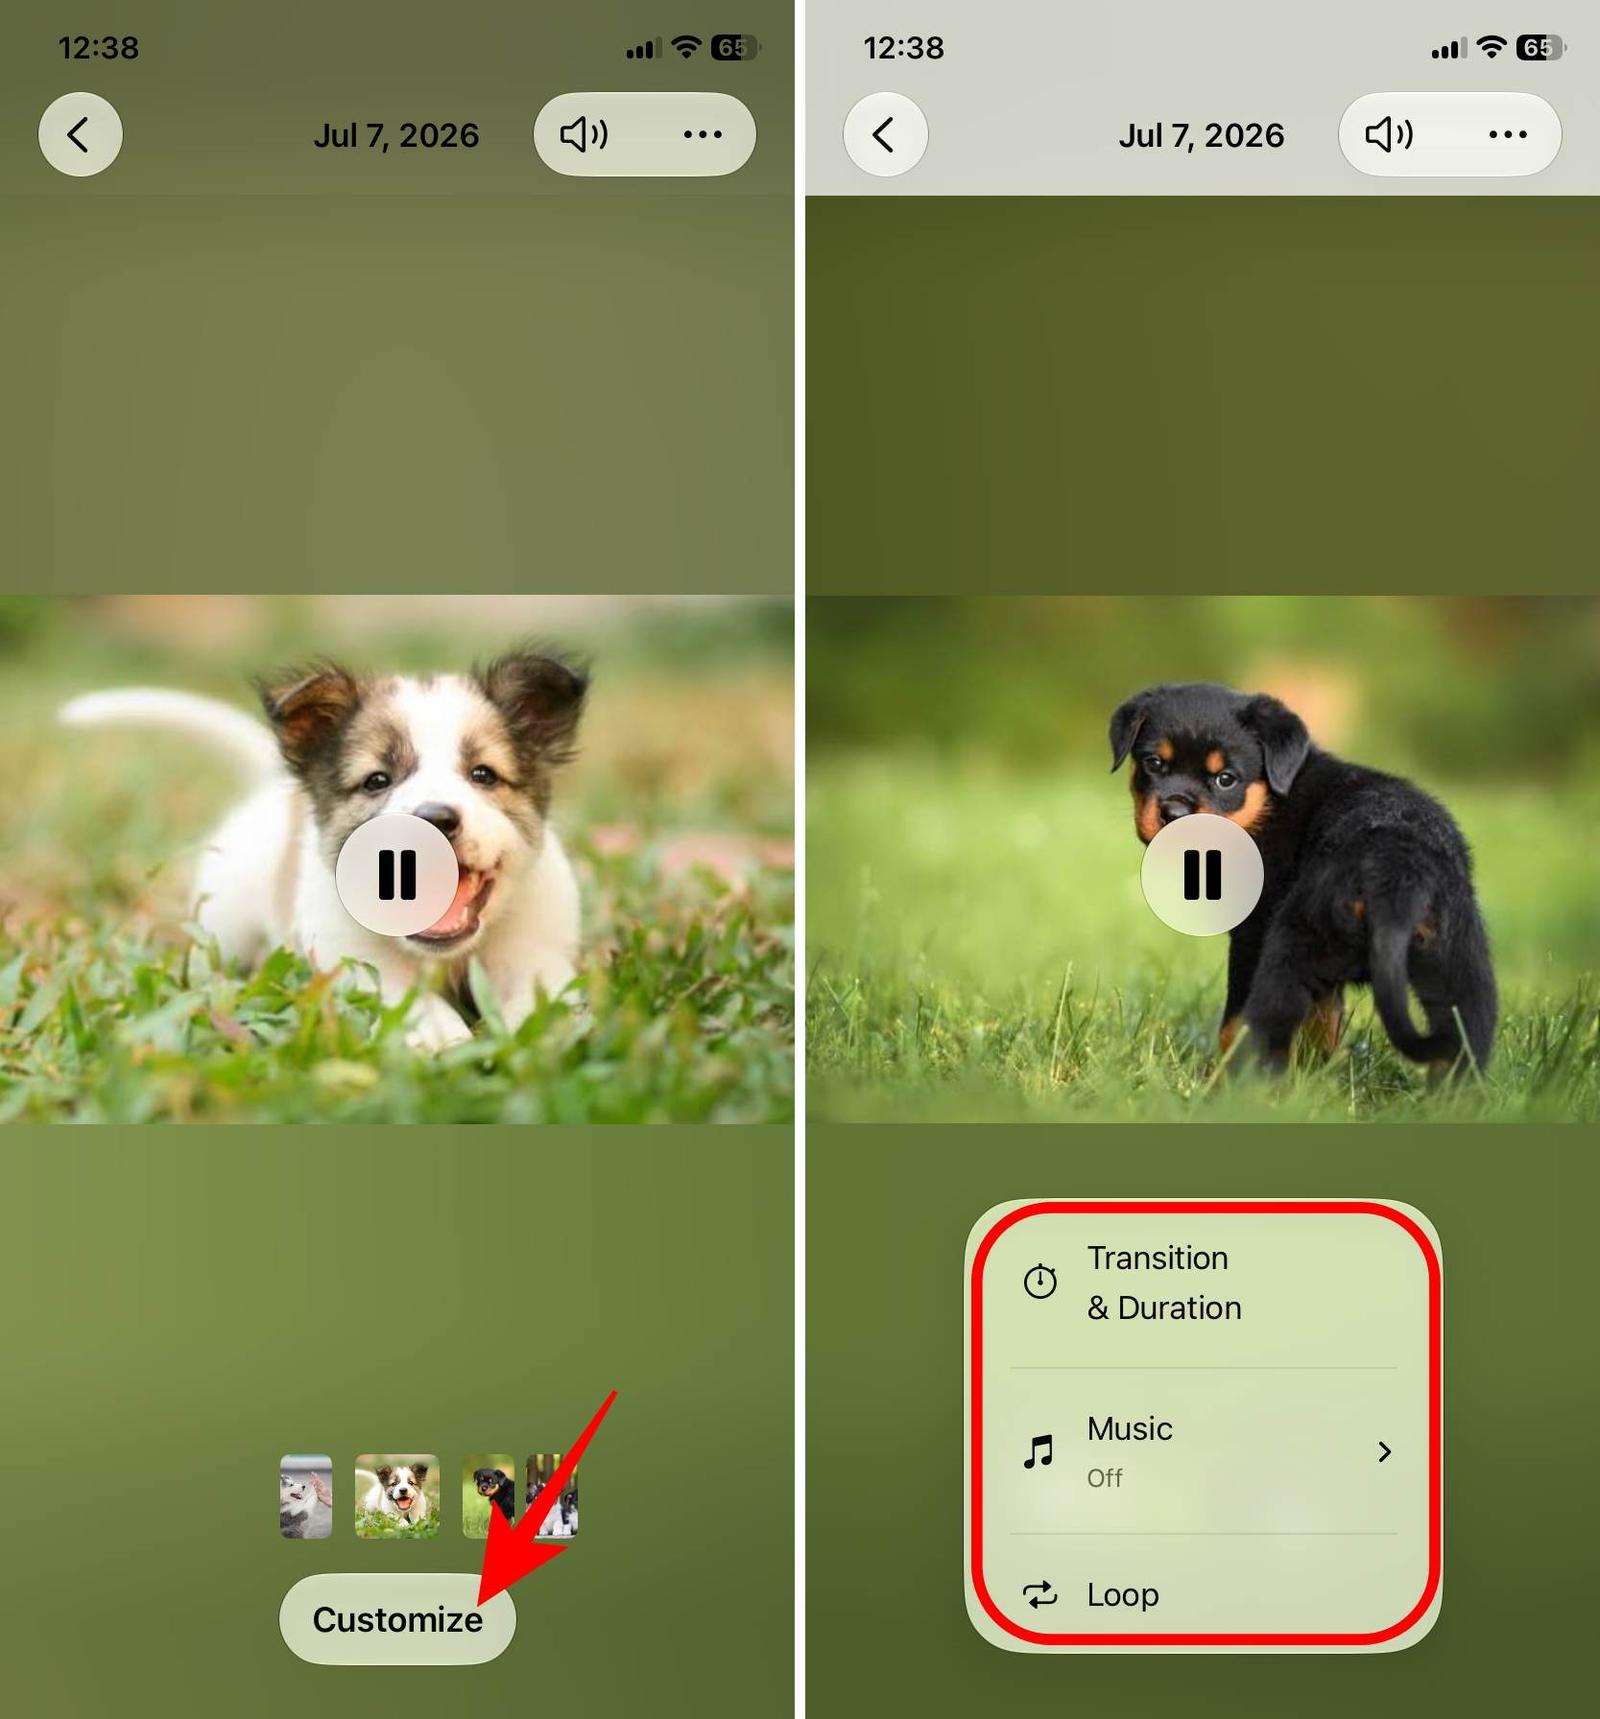
- Transition & Duration: Change the transition style between slides and set the duration per photo to adjust the total length. Once done, tap the checkmark.

- Music: Select Choose Song and browse curated soundtrack suggestions organized into categories. If you don’t want music, keep it as Off.
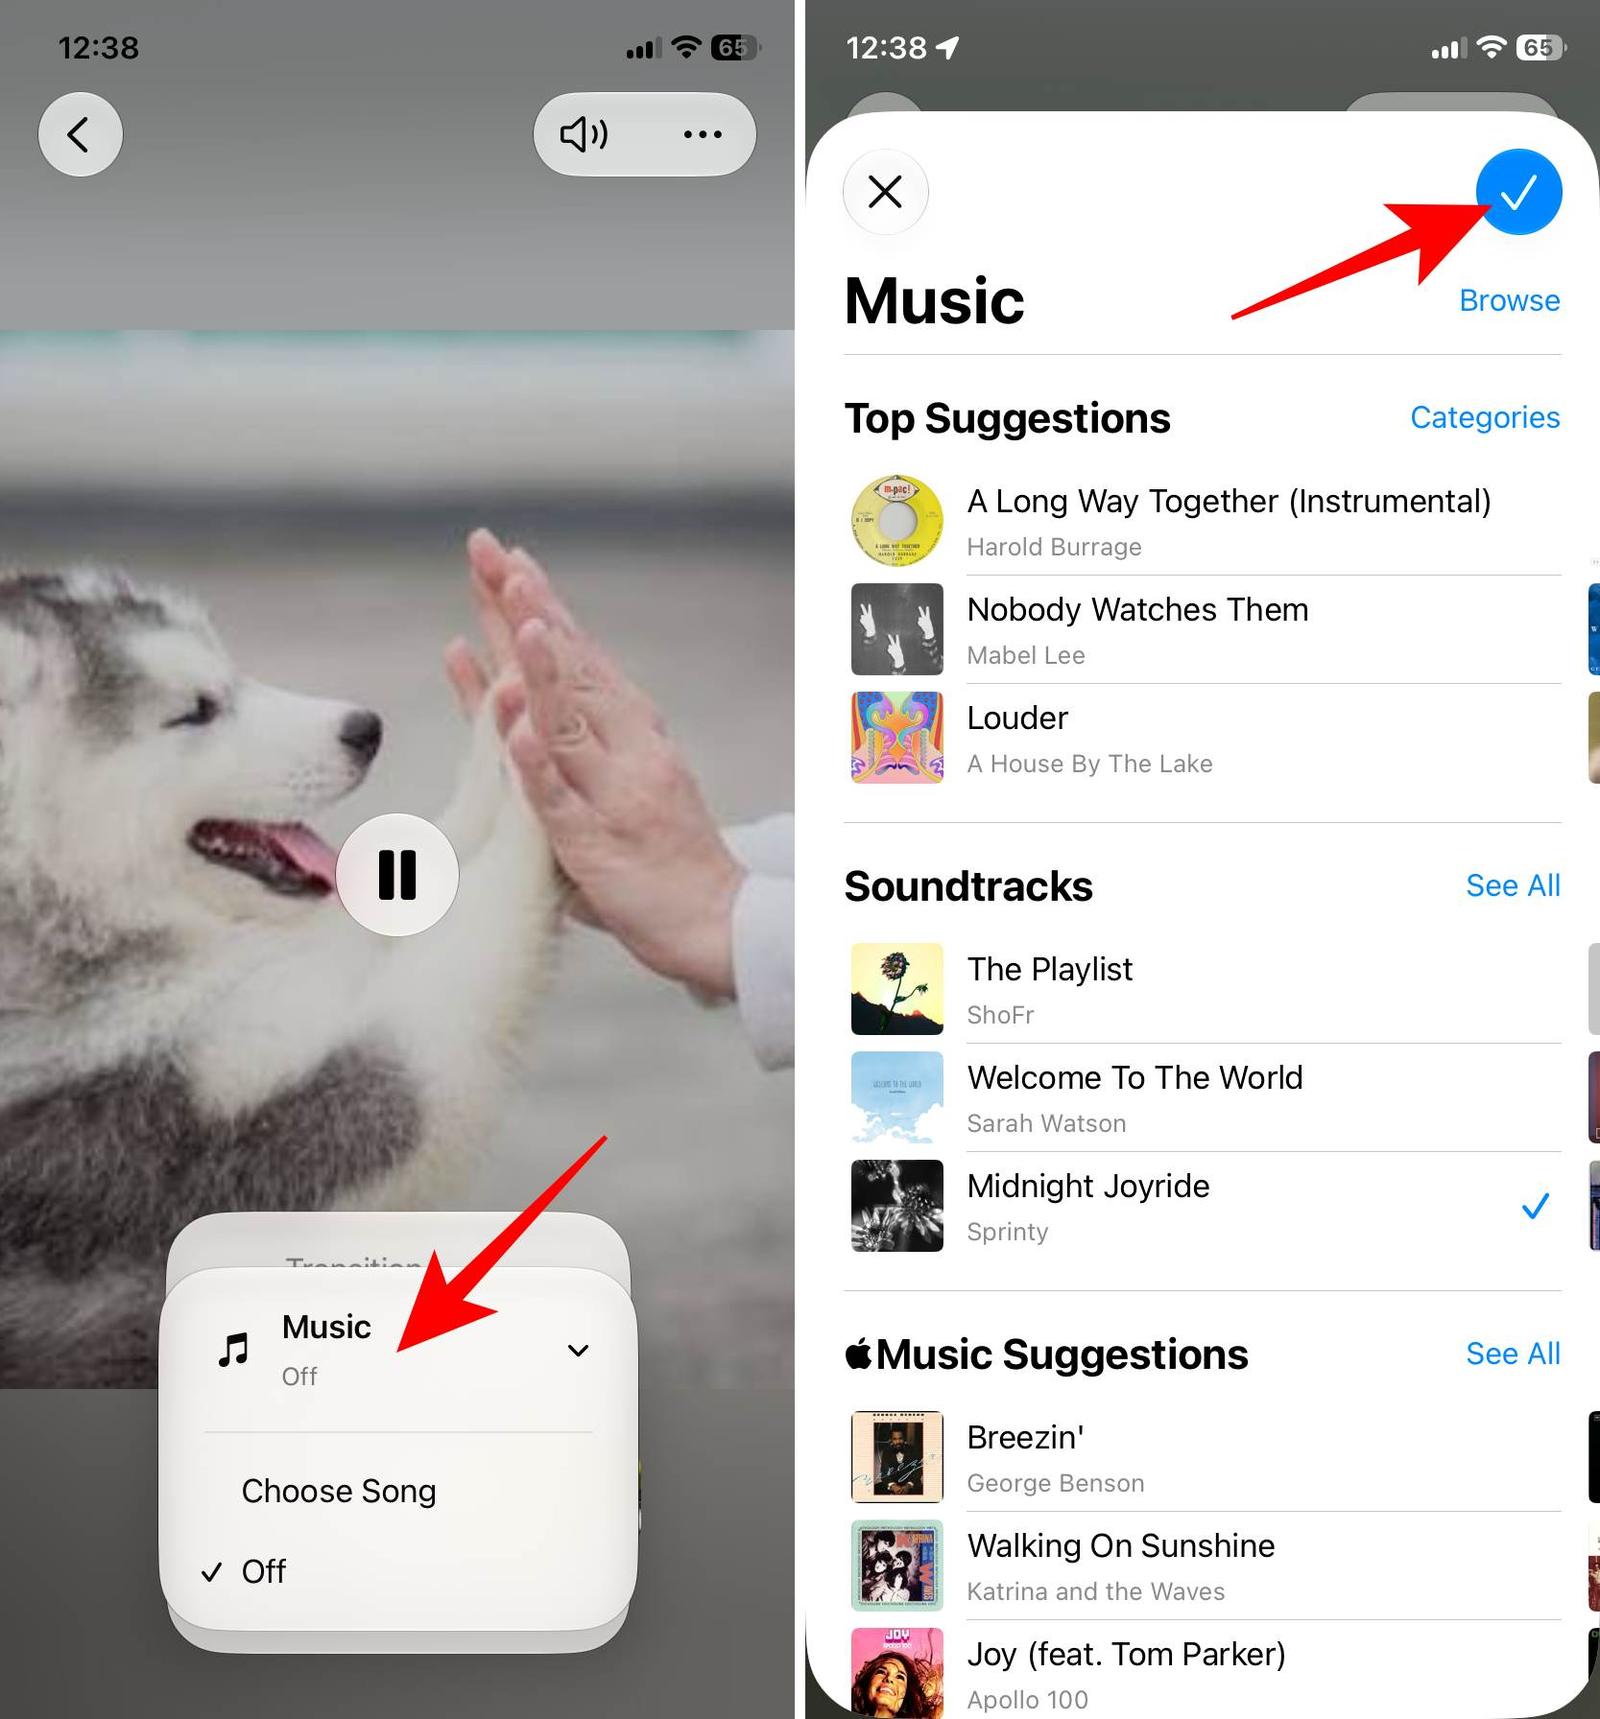
- Loop: Enable to keep the slideshow repeating.
- Transition & Duration: Change the transition style between slides and set the duration per photo to adjust the total length. Once done, tap the checkmark.
- Once you are happy with the slideshow, tap the three-dot button > Share.
- It will open the Share Sheet. Scroll and tap Save Video or send it directly via AirDrop, Mail, WhatsApp, etc. You can tap Options to change orientation and aspect ratio.
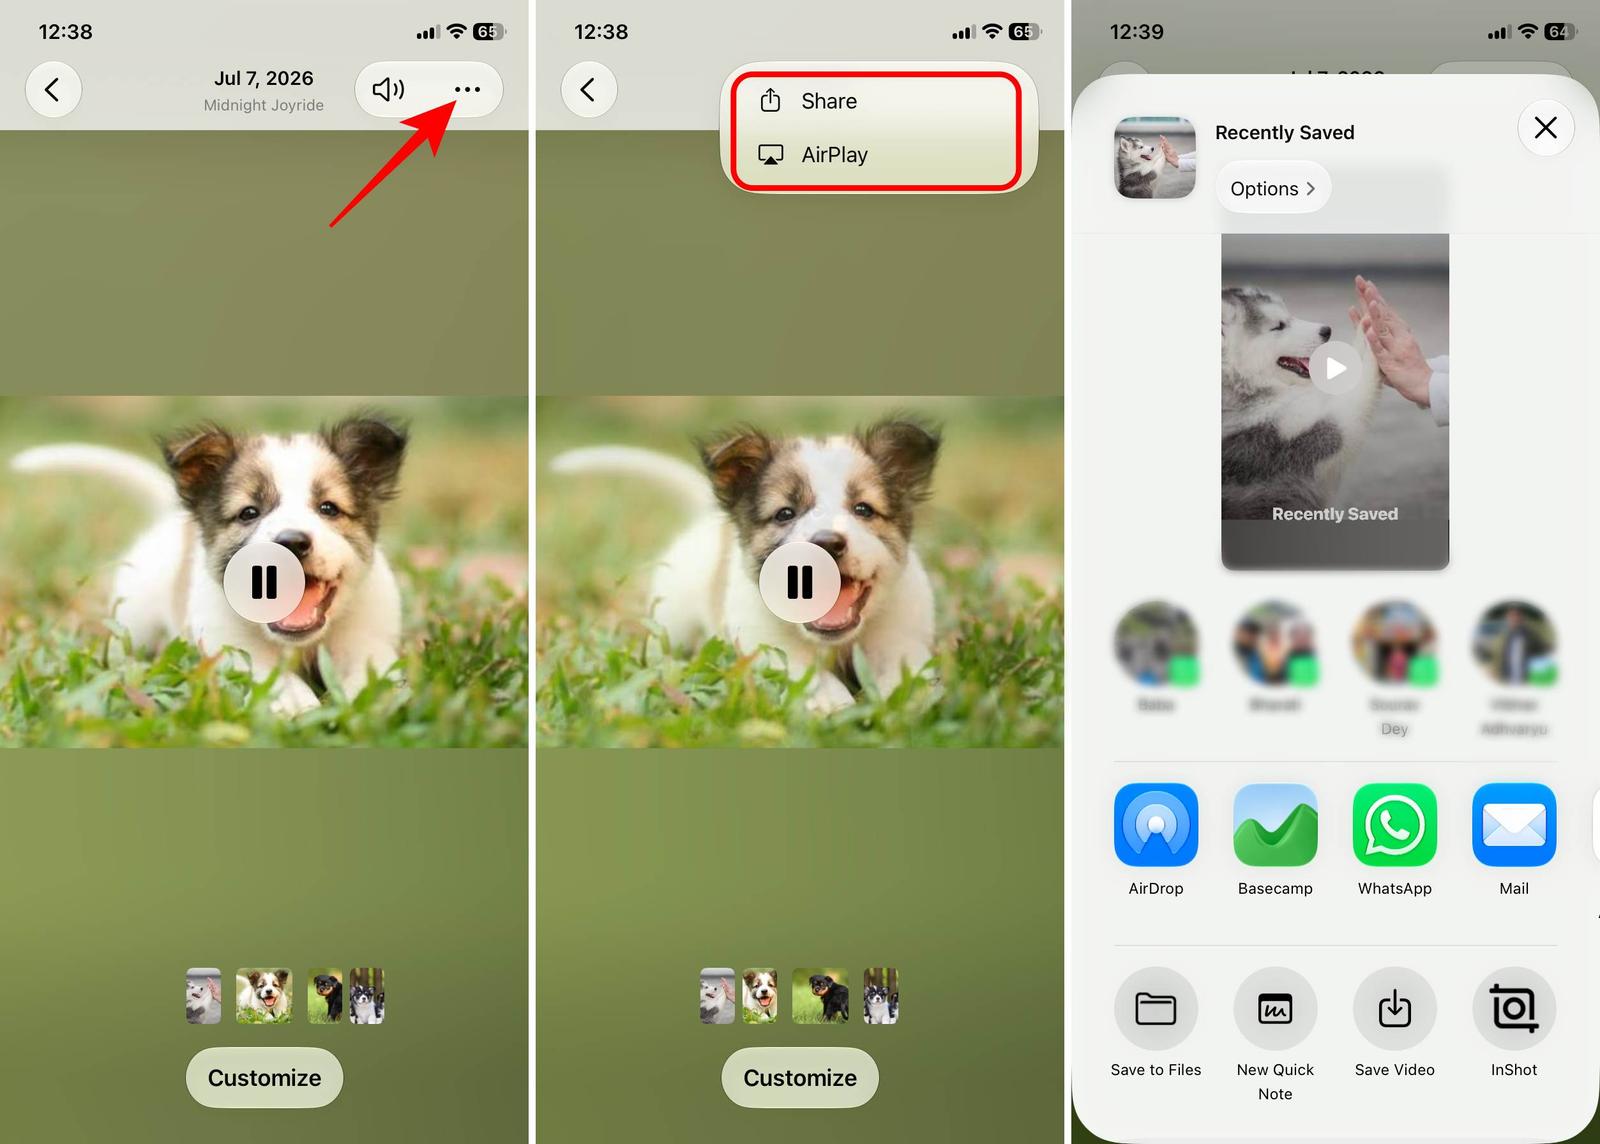
It renders the slideshow into a movie file and automatically saves it back into your Photos library. You can edit the video later or upload it to your social media.
Tip:
While testing the feature, I came across an alert that I can’t save/share Memories that contain Apple Music songs. To choose a new soundtrack, tap Edit Music and select a song from the Soundtracks section. They are not DRM-protected.
Save a slideshow as a video on Mac
If you want to create a slideshow on your Mac, worry not; the steps are kind of similar.
- Open the Photos app on your Mac and go to your Library or any album.
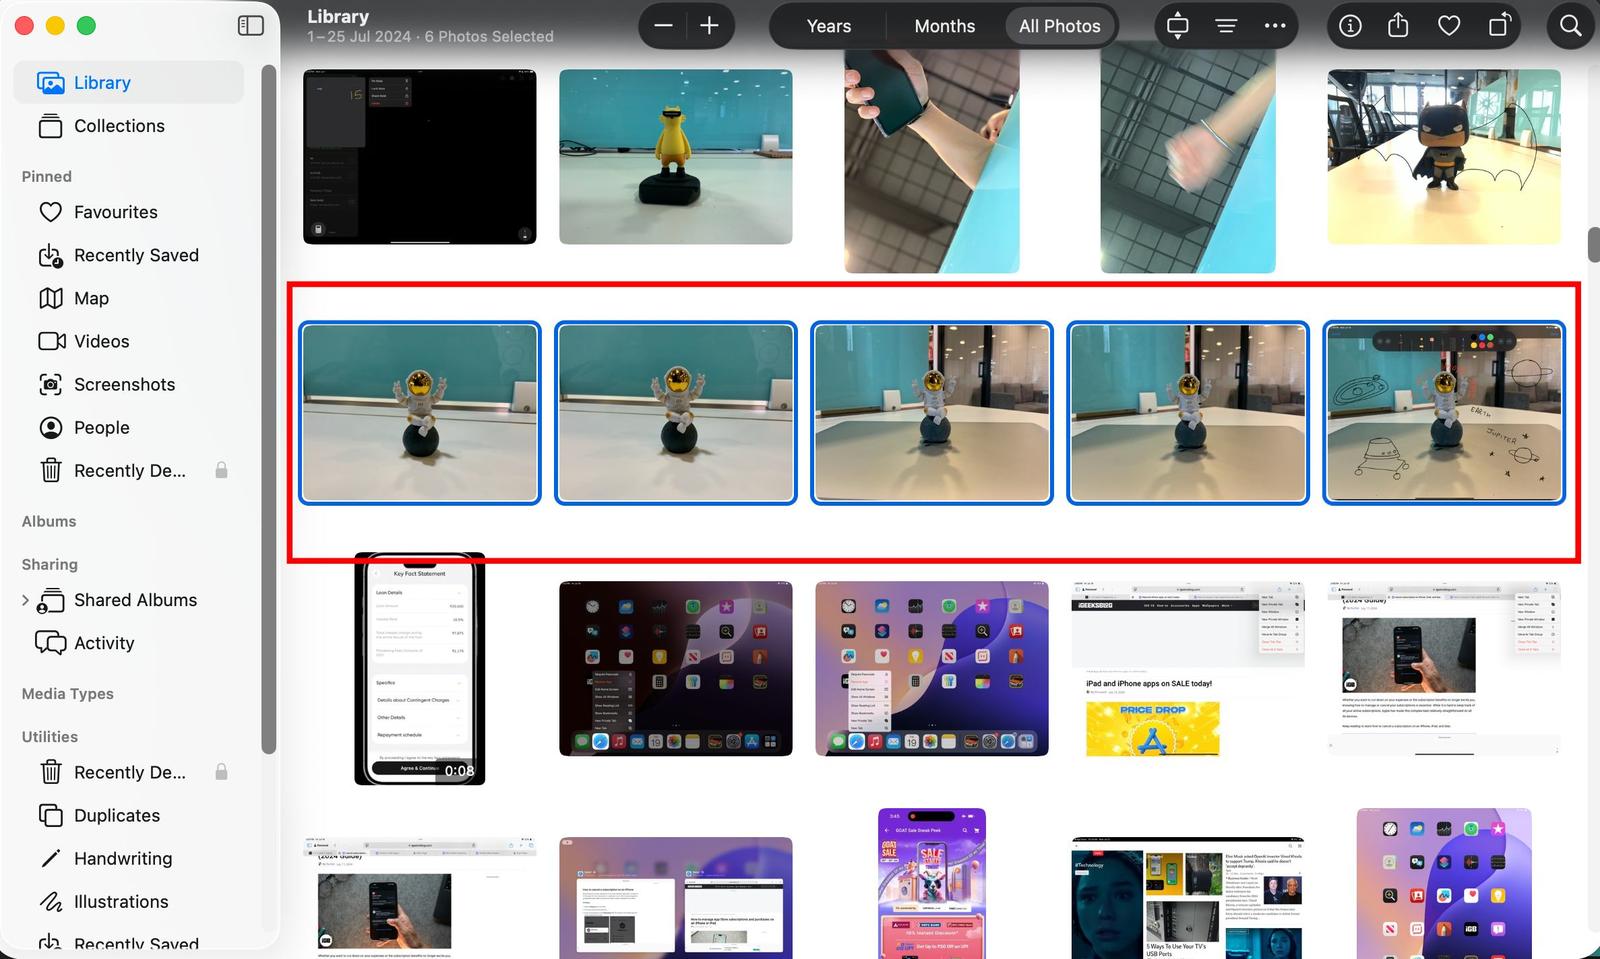
- Select the photos you want to include. Hold the Command (⌘) key to pick multiple images, or press Command + A to select everything in the current view.
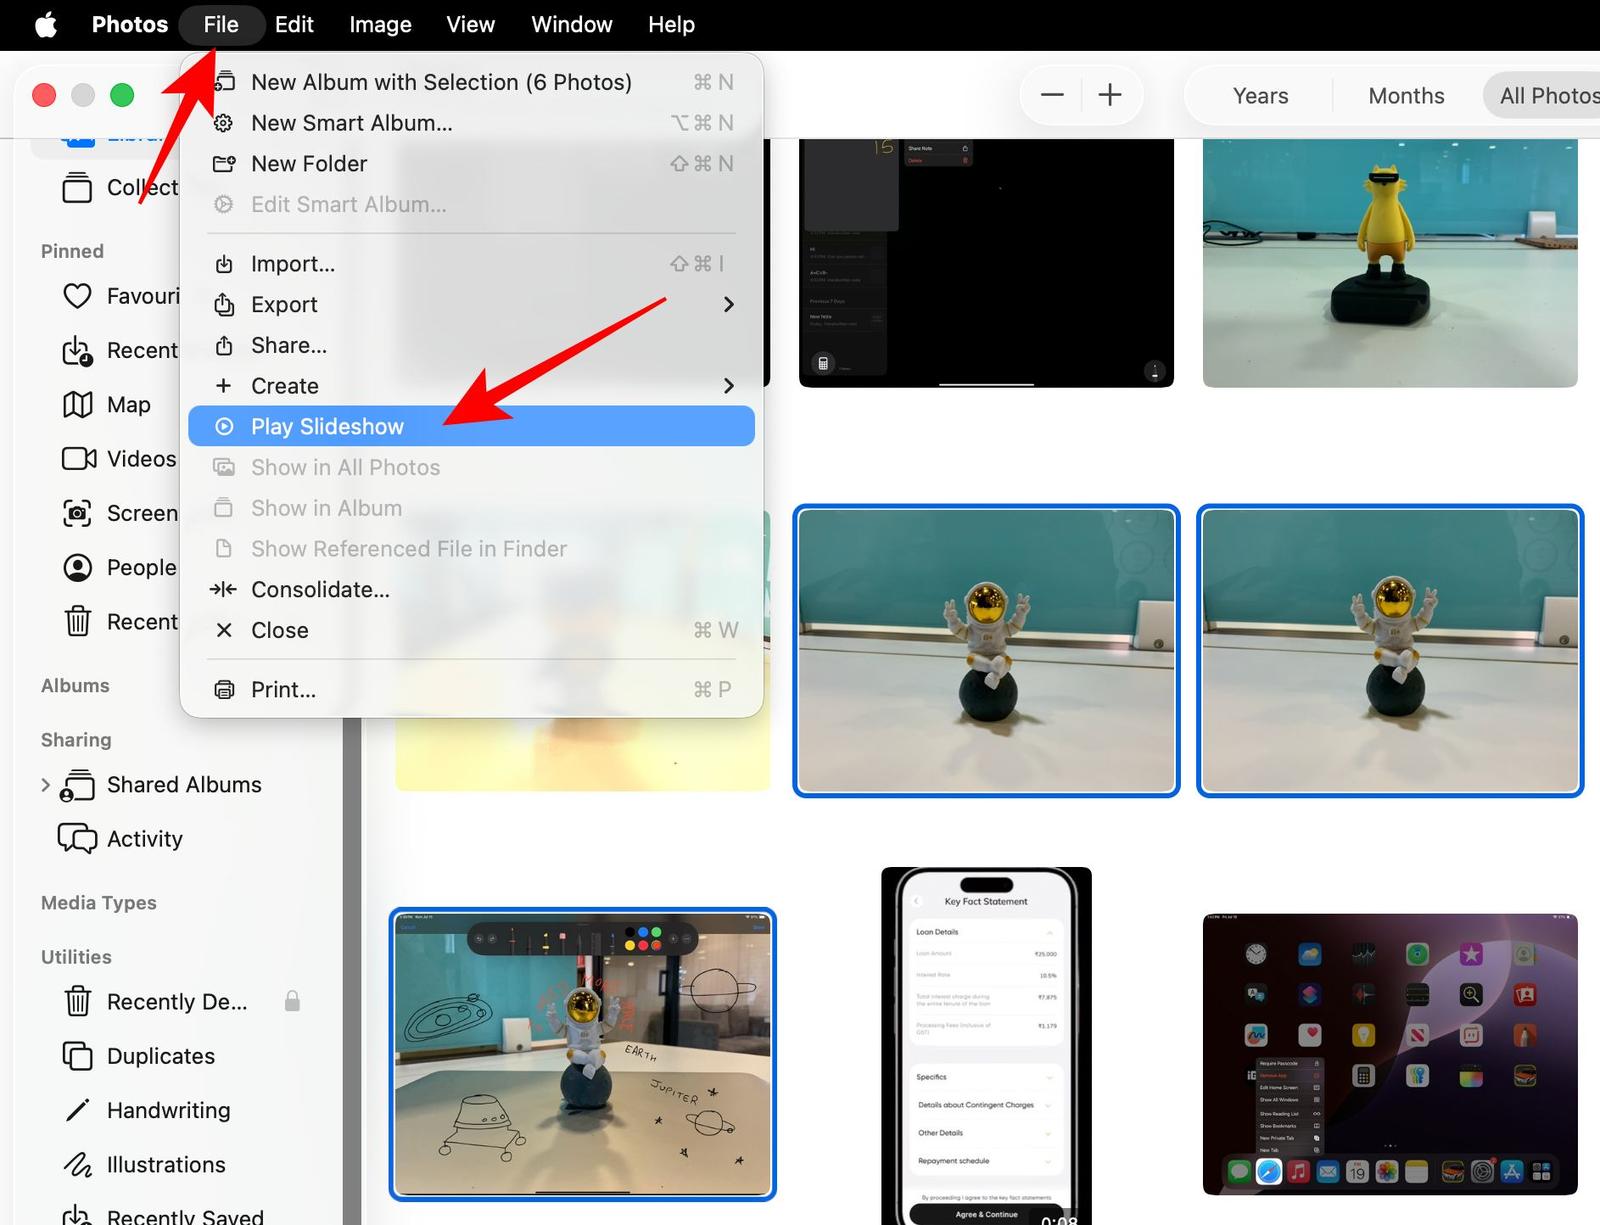
- From the menu bar, click File and select Play Slideshow.
- Select Customize to personalize your slideshow. Here, you can:
- Choose transition effects. Set how long each photo stays on screen. Add background music.
- Once you’re happy with the slideshow, click File and select Export > Export Slideshow Video from the menu bar.
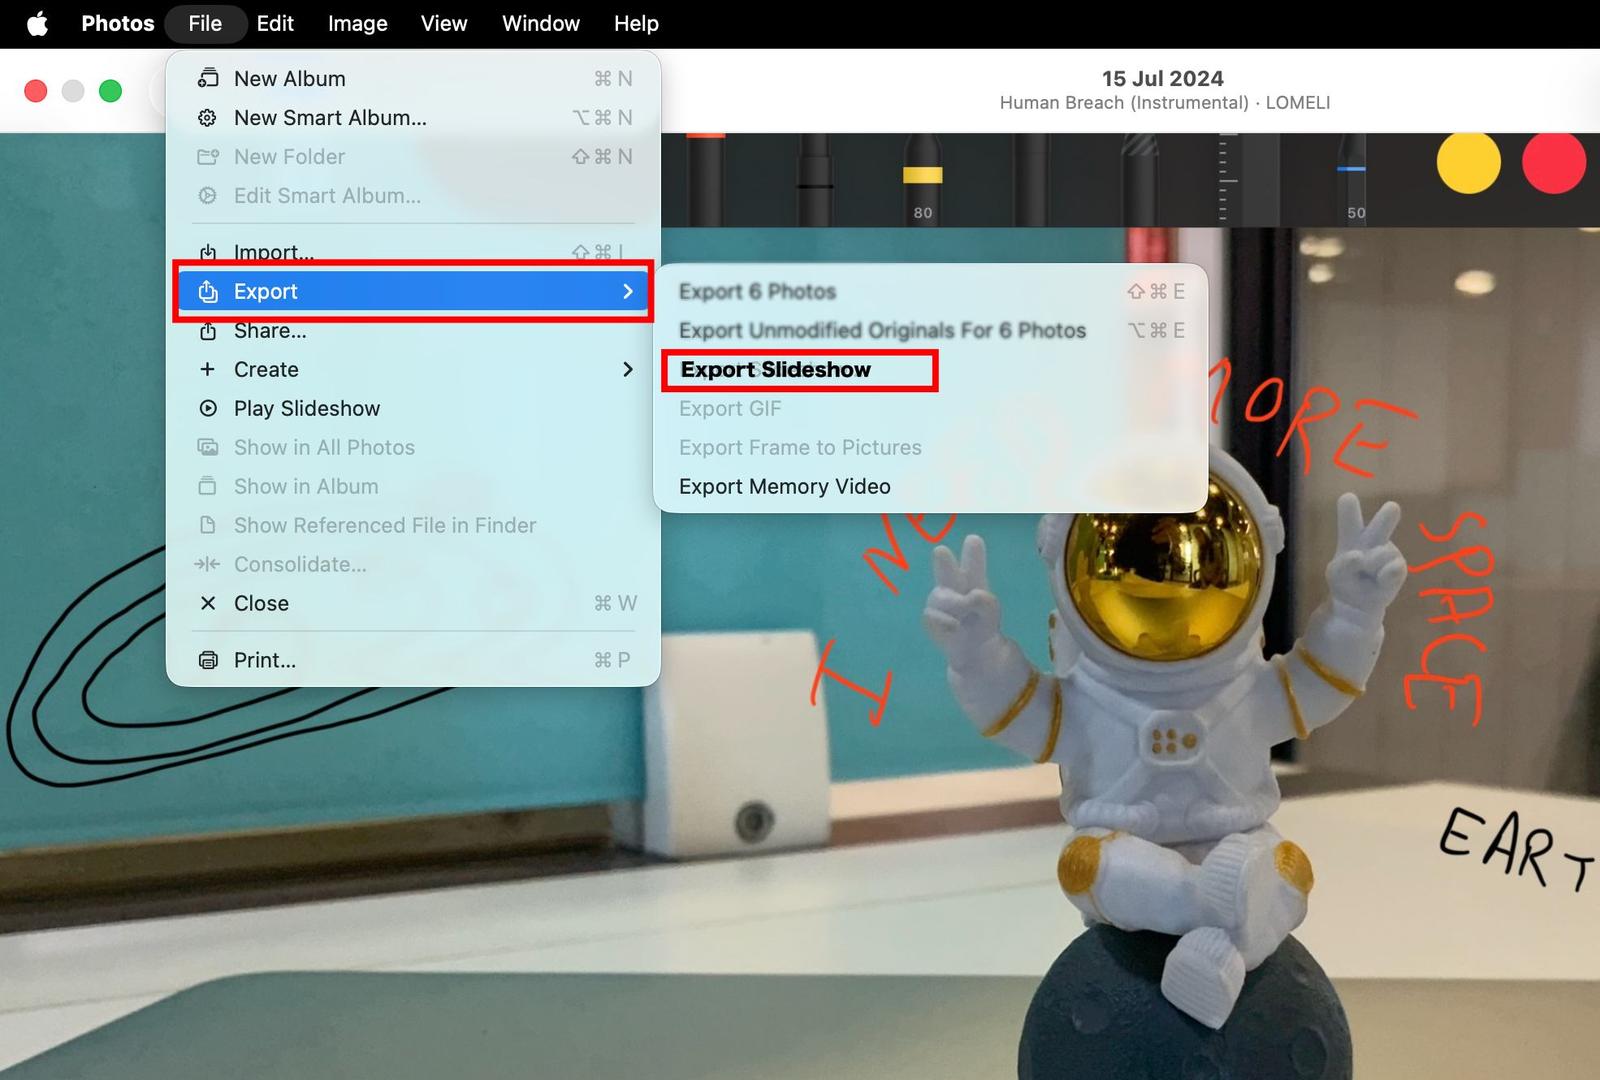
- Give the video a name, choose where to save it, adjust the orientation or aspect ratio if necessary, and click Save.
The Photos app will export your slideshow as an MOV video file. You can watch it on QuickTime Player, share it via AirDrop, upload it to cloud storage, or edit it further in a video editor if needed.
It’s not iMovie, and that’s exactly why I like it
Some people will probably compare this feature to iMovie. I don’t think they should.
Apple clearly isn’t trying to replace a video editor here. There are no timelines, layers, text animations, or trimming individual slides.
Instead, this feels designed for moments when you simply want to tell a story with photos without spending twenty minutes editing. That’s exactly why I think it works.
Most people don’t need professional tools every time they return from vacation or attend a birthday party. They just want something they can share.
Things I noticed during testing
After spending some time with the feature, a few details stood out.
- The process seemed extremely fast. From picking the photos to getting the final video exported took no more than a minute. For casual users, that’s probably the biggest advantage.
- The music selection is better than expected. Apple includes plenty of built-in soundtrack suggestions, so you don’t have to hunt through your own music library.
- Export quality looks clean. The saved video looked sharp, and the transitions were smooth without noticeable quality loss.
- It works well for product showcases. I tested it using product photos instead of vacation pictures, and it actually worked surprisingly well.
Small businesses could easily create quick product previews for WhatsApp Status, Instagram Stories, or Facebook without opening a dedicated editing app.
Who will get the most value?
This feature isn’t just for family photo albums.
I can see it being useful for:
- Parents sharing birthday memories
- Travelers creating quick vacation recaps
- Students making event highlights
- Small businesses showcasing products
- Content creators posting simple photo montages
- Anyone who wants a polished video without learning video editing
If your goal is speed rather than creative control, this feature hits the sweet spot.
A few limitations
The Photos app slideshow maker is not perfect yet.
During testing, I noticed there are still some limitations.
- You can’t rearrange individual slides from the slideshow editor.
- Text overlays aren’t available.
- There are also no special effects or manual animation tools
- Editing options remain intentionally minimal.
If you need cinematic edits or social media effects, apps like iMovie or Final Cut Pro still make more sense.
Final thoughts
Sometimes the best iOS features aren’t the ones Apple spends twenty minutes demonstrating during a keynote. This slideshow exporter is a perfect example. It takes a feature that has existed for years, fixes its biggest limitation, and makes it genuinely useful.
Will it replace professional video editors? Absolutely not. Will it save millions of iPhone users from downloading another editing app just to turn a handful of photos into a shareable video? I think it will.
If you’re updating to iOS 27, don’t overlook the Photos app. Hidden behind a tiny three-dot menu is one of the most practical upgrades Apple has added this year.
More to explore: