20+ Tips to use Apple Notes app on Mac
The built-in note app on macOS may not have all the fancy features various third-party note-taking apps offer. But it’s straightforward and user-friendly, providing what you need to take notes like a champ. In this article, I’ll share some handy tips for using the Apple Notes app on your Mac like a pro!
1. Organize notes into folders on Mac
Managing your daily to-dos is tough, but sorting out those in your Mac’s Notes app can make things easier. I’ve got some simple steps to help you tidy up your notes by putting them into folders on your Mac.
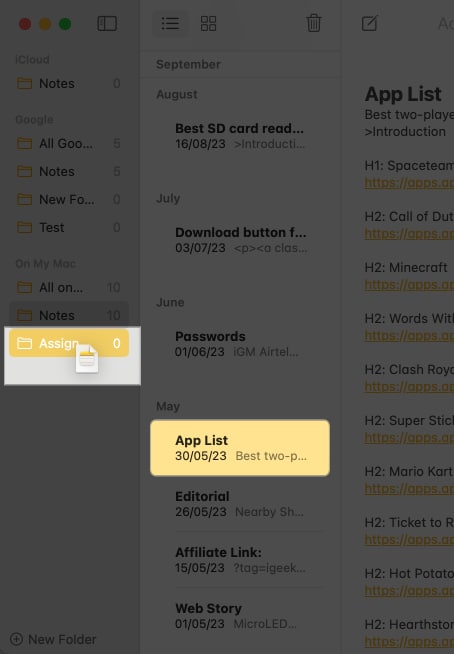
- Open the Notes app.
- Click the Sidebar button at the top.
- Select iCloud or On My Mac.
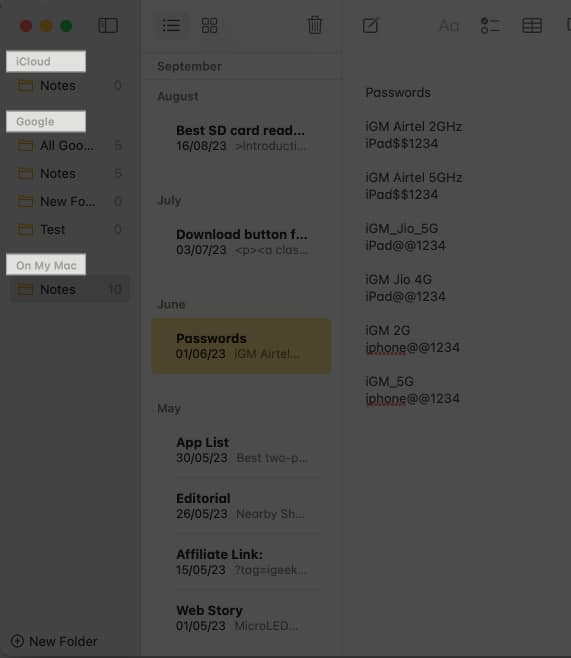
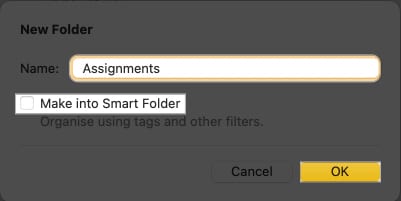
- Click the New Folder button.
You can also convert it into a Smart Folder.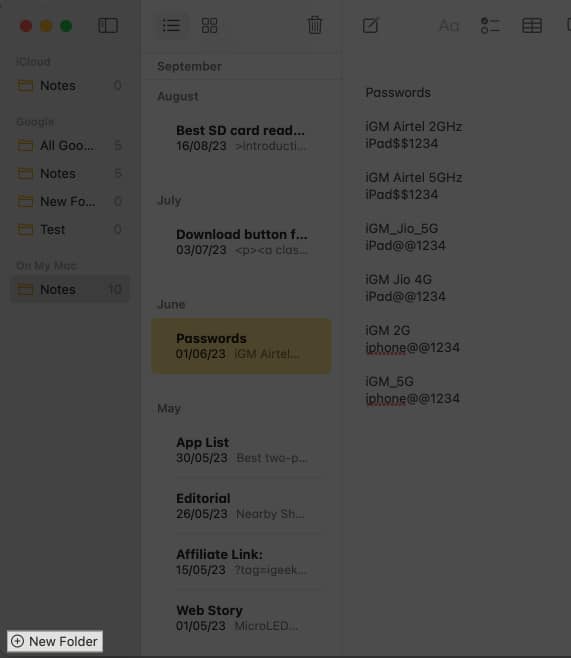
- Enter a name for the folder.
- Click OK.
- Drag the notes you want to organize into the folder.
2. Use bullet points and numbered lists
Bullet points are handy for keeping your notes tidy. They can also help you structure your notes, whether listing steps for a task or arranging the order of things you need to do.
- Write down your notes.
- Select the notes you want as bullets.
- Click the formatting button (Aa icon).
- Choose one of the following:
- Bulleted List
- Dashed List
- Numbered List
3. Add headings to structure notes on Mac
Adding headings to your notes is like giving your notes a little road map.
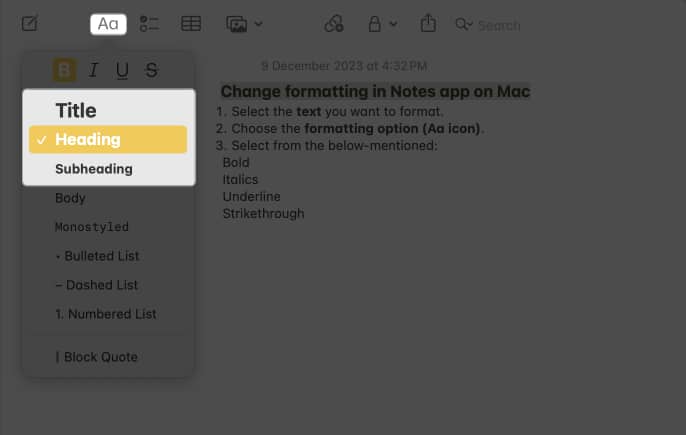
- Select the text you want to turn into a heading.
- Click the format button (Aa icon).
- Choose Title, Heading, or Subheading.
Trust me, it’ll make finding stuff in your notes a breeze. There is no need for fancy terms here; just click and type your way to organized note nirvana!
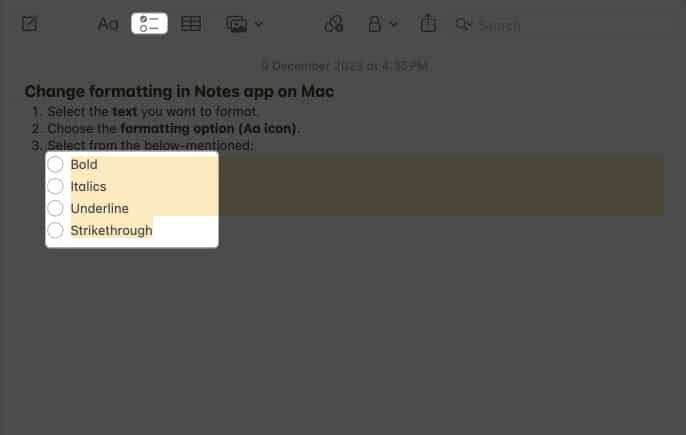
4. Format text in Mac Notes app
Formatting text is crucial for distinguishing headings, paragraphs, bullet points, and other elements. Apple gets this and offers a way to format your text as you like it. However, you can use paragraph styles only in upgraded iCloud notes or notes stored on your Mac.
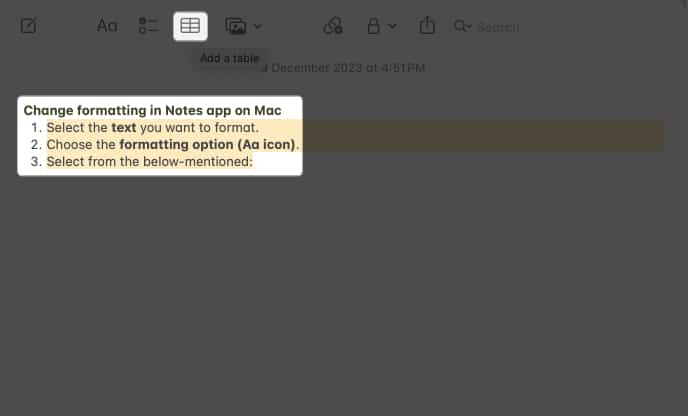
Change formatting
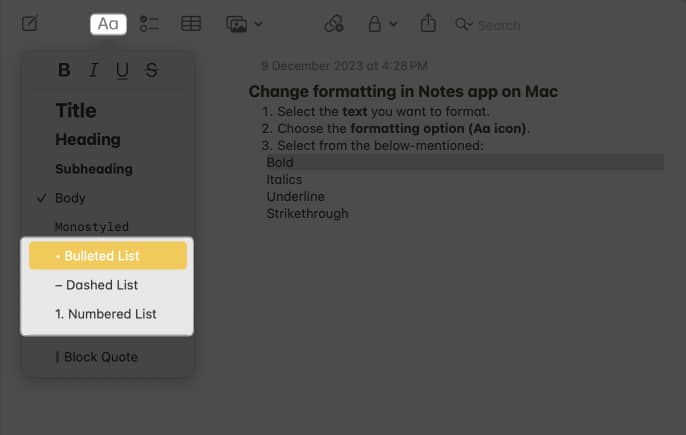
- Select the text you want to format.
- Choose the formatting option (Aa icon).
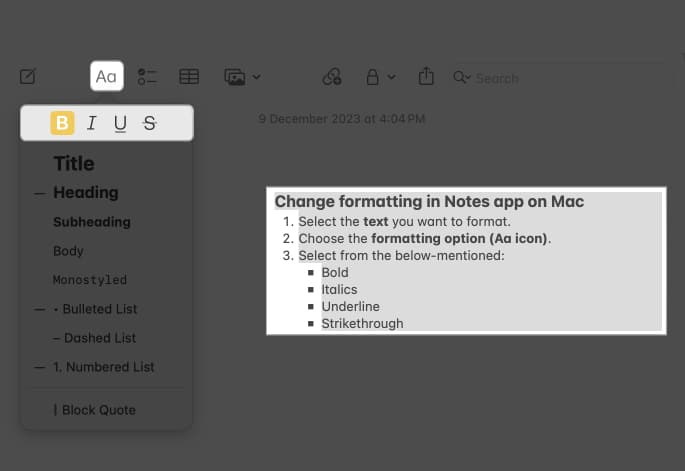
- Select from the below-mentioned:
- Bold
- Italics
- Underline
- Strikethrough
Modify text font, color, size, and more
- Select the text you want to change.
- Right-click the selection.
- Choose Font → Select Show Colors.
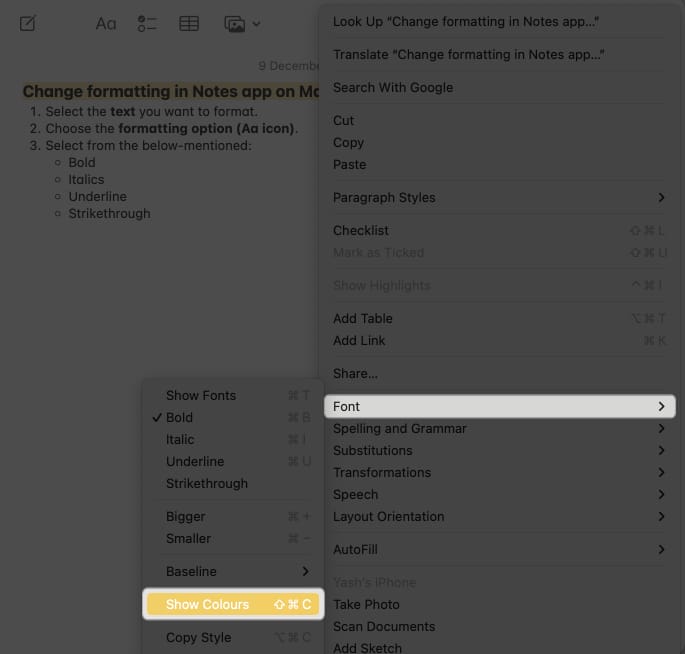
Now, perform any font style customization you prefer.
Change the default title paragraph style
- Go to the Notes menu.
- Select Settings.
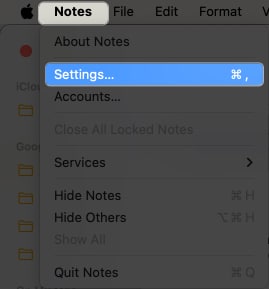
- Click the New notes start with the menu.
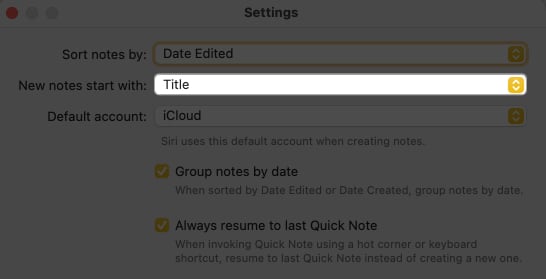
- Choose your preferred default paragraph style from the options available.
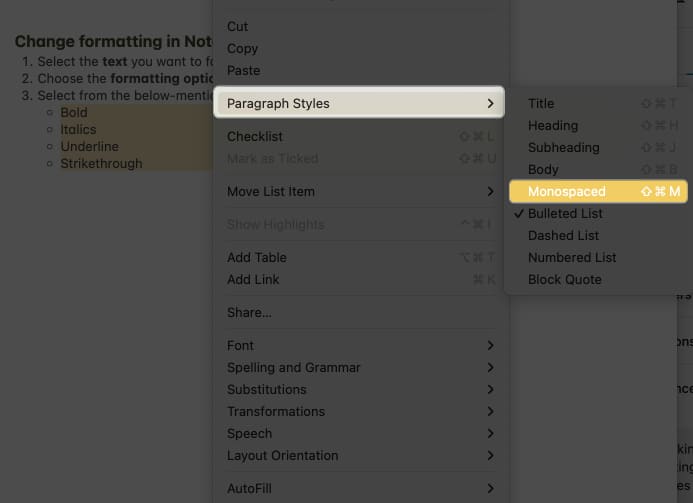
Add block quotes
You can use the block quote feature in Apple Notes when adding a citation to your note. Also, you may use the Monostyle format to add a grey background to the paragraph. For that,
- Select the text you want to highlight in Notes.
- Right-click the text → Select Paragraph Styles.
- Choose Monospaced.
Besides, you can get formatting options from the Format option on the menu bar.
5. Highlight important information with colors
When utilizing the Apple Notes app on your Mac, one valuable tip to enhance your organization and productivity is highlighting important information with colors. This feature allows you to visually categorize and prioritize your notes, making locating crucial details at a glance easier.
Whether you’re flagging essential to-do items in a checklist, emphasizing key points in a meeting summary, or distinguishing between personal and work-related notes, the ability to apply colors adds an extra layer of organization and clarity to your digital workspace.
- Select the text you want to highlight.
- Right-click on the text → Select Font → Choose Show Colors.
- Pick a color of your choice.
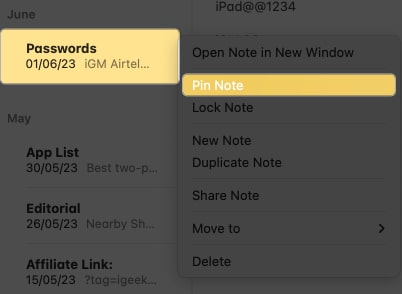
6. Pin important notes
Like sticking a note on your fridge, you can pin important notes at the top. This way, you won’t have to scroll or search for your essential grocery list or the inspiring quote that motivates you.
- Select the note you want to keep at the top.
- Right-click on the note.
- Choose Pin Note.
7. Share notes with others and tag them for collaboration
Sharing your notes with others for excellent collaborative editing is one of my favorite features of the Apple Notes app. It’s like a virtual team huddle for your notes. No more endless email chains or confusing versions of your notes. It’s all right there in one place.
Also, while editing, you can tag any recipients on the Note. So they can know which area you want them to focus on. So, go ahead, share the knowledge, and make your notes better together.
8. Create Quick Notes
Quick Notes is a convenient tool for capturing your ideas on the fly or quickly jotting down important information without opening the Notes app. This feature is perfect for swiftly recording brief thoughts, saving web content, noting phone numbers, and more.
9. Copy-and-paste styles
One valuable tip when using the Apple Notes app on your Mac is to make the most of the copy-and-paste styles feature. This feature allows you to effortlessly maintain consistency and formatting throughout your notes.
- Select the text you want to copy style from.
- Right-click and choose Copy Style.
- Now, highlight the text you want to format.
- Right-click on the text → Select Paste Style.
10. Use Checklist feature for task management in Notes app
Remember the handy Checklist feature when managing your tasks with the Apple Notes app on your Mac. It’s like your digital to-do list buddy you need when doing work, school assignments, or making sure you complete a set of tasks.
- Choose the text you want to turn into a checklist.
- Click the checklist icon.
And there you have it! You’ve got yourself a checklist right there in your note. Now, you can simply click the check box next to your completed tasks. The cool part is that it automatically sorts the list.
11. Attach files and images to Notes
Don’t forget the magic of attaching files and images when jazzing up your Apple Notes game on your trusty Mac. It’s like giving your notes a superpower! To attach a photo to your Apple Notes, simply.
- Click the image icon in the menu bar.
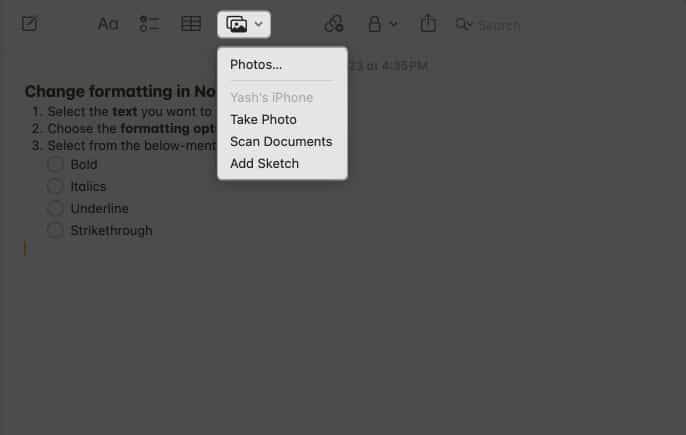
- Choose one of the following options:
- Photos
- Take Photo
- Scan Documents
- Add Sketch
Alternatively, you can drag and drop images or files onto the note to which you want to add them.
12. Create links and add them to other notes
Apple Notes keeps getting better with each macOS update. In the latest iteration of macOS, the makers added a feature many folks have been asking for: the ability to link related notes together. Now, you can hop between different notes, even if they’re tucked away in separate folders within the Notes app. Check out our handy guide to learn how to link notes with one another in iOS 17 and macOS Sonoma.
13. Use tags to categorize and find notes easily on Mac
Tags make it easy to sort and tidy up your notes on your Mac. Using tags in the new Notes app is a breeze. When making a note, just put a hashtag symbol (#) followed by the word you want to use as a tag. For example, #newtag. It’ll turn yellow, which means your tag is good to go.
Next, head over to the folders section and scroll down to find your tags (Apple calls this the Tag Browser, fancy, right?). Then, just tap on a tag to see all the notes with that tag. You can also tap multiple tags to see notes with all those tags simultaneously.
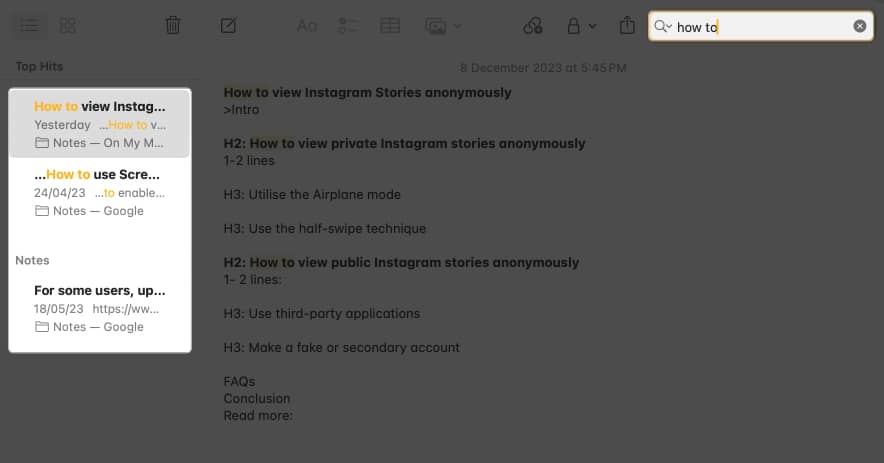
14. Use search function
Sometimes, you might have many notes and can’t find a specific one because you forget where to put them. Don’t worry, though! The Notes app has a handy search feature that can save the day. Here’s what you do.
- Open the Notes app.
- Click the magnifying glass icon in the top right corner.
- Type in the name of your note or some words from it.
- You’ll see a list of all the notes that match your search.
- Choose the one you want to open.
15. Lock sensitive notes on Mac
You can’t lock apps on a Mac by default without needing a third-party app. However, Apple offers a convenient feature for securing your Notes with a password or Touch ID, providing added protection and simplifying the process on your Mac.
Go through our detailed guide to lock Notes on your Mac.
16. Create notes with Siri
One handy tip to optimize your use of the Apple Notes app on your Mac is to harness the power of Siri to create notes effortlessly with voice commands. Siri is Apple’s virtual assistant that seamlessly integrates with the Notes app, making it a breeze to jot down thoughts, reminders, or ideas.
- Simply activate Siri by saying, “Hey Siri,” or clicking the Siri icon in your menu bar.
- Instruct it to Create a new note or Add a note to my [specific folder] in Notes.
- Siri will promptly open the Notes app and transcribe your spoken words into a new note.
You can do more with Siri on your Mac. If you’re curious about all the cool stuff Siri can do with the Notes app, feel free to comment below, and I’ll spill the beans.
17. Use tables for structured data
Tables are like the unsung heroes of the organization. They play a crucial role in maintaining order and organization, whether you’re documenting your monthly expenditures, monitoring your fitness routines, or coordinating a communal meal. To create a table,
- Head to a note → Select the text you want to place in the table.
- Click the table icon in the Notes menu.
18. Change default account for new notes on Mac
Imagine having various accounts configured, such as iCloud and Gmail, and the desire to ensure that your notes are directed to the correct destination. Here’s the scoop on changing the default account for new notes in Apple Notes on your Mac.
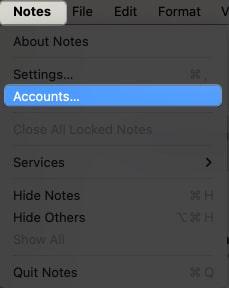
- Head to your Notes app.
- Click on Notes in the menu bar → Select Accounts.
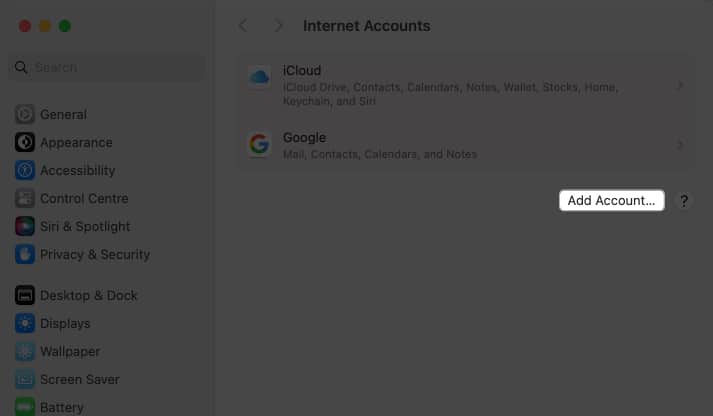
- Choose Add Account → Follow the on-screen instructions.
19. Create keyboard shortcuts
If you’re tired of clicking a lot to do simple things on your Mac’s Note app, there’s a way to make it easier. You can use simple Keyboard shortcuts to do things faster. You can even make key combinations for things you do a lot.
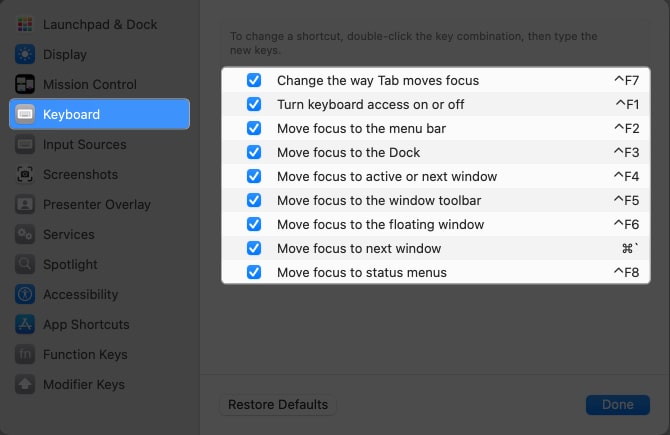
- Click the Apple logo () → Pick System Settings.
- Head to Keyboard → Select Keyboard Shortcuts.
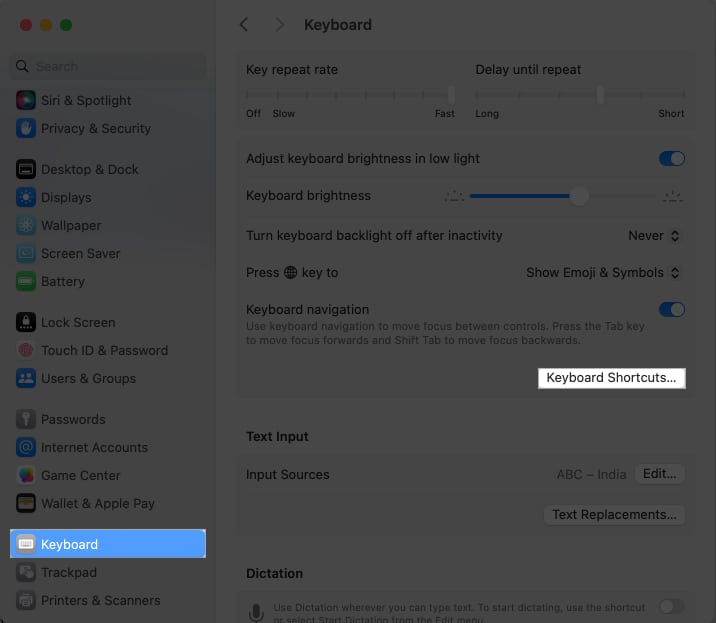
- Choose Keyboard → Change the actions with your favorite combination.
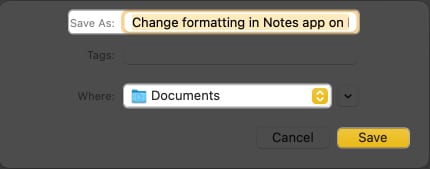
20. Export notes as PDF or text files
Whether you need to send a detailed report, share meeting minutes, or simply want to create a backup of your notes, the export feature simplifies the process. You can do so by exporting your Notes as a PDF.
- Launch the Notes app.
- Click the Files option in the menu bar → Select Export as PDF.
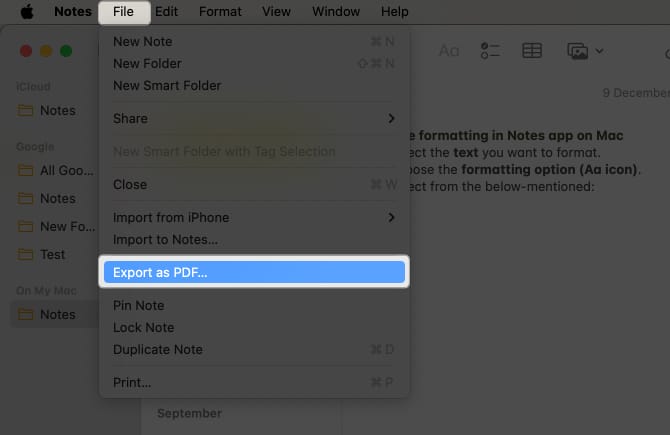
- Type the name of the file → Choose a location to save the file.
- Finally, click the Save button.
Also, you can open and go through PDFs in the Notes app on macOS Sonoma.
21. Set reminders for notes on Mac
Remember to use reminders for your notes with deadlines. It’s similar to having a virtual sticky note that reminds you when it’s time to do something.
22. Backup notes to iCloud or a local storage
Backing up your Notes app on a Mac keeps you from worrying when something unexpected happens. It makes your valuable information remain safe and sound. You have two main options: iCloud or keeping them on your Mac.
If you go with iCloud, your notes are securely stored in the cloud, and you can access them easily from all your Apple devices. On the other hand, if you opt for local storage, your notes stay right on your Mac’s hard drive. You’re in control; your data doesn’t leave your computer.
Yes, you can seamlessly sync your notes across your Mac, iPhone, iPad, and other Apple devices. This can be achieved by activating iCloud sync within the Notes settings.
If you’ve enabled iCloud sync, your notes will remain accessible on your Mac, even offline and not connected to the internet.
You can quickly recover your deleted notes on your Mac if they are not permanently deleted from iCloud.
Use notes on Mac like a pro!
I hope these Apple Notes tips for your Mac have been super helpful in leveling up your note-taking game. Do you have any more cool tricks up your sleeve that you’d like to add to this list? Don’t hesitate to drop them in the comments section!
Read more:
Frequently Asked Questions

Written by
Dhvanesh AdhiyaThe founder of iGeeksBlog, Dhvanesh, is an Apple aficionado, who cannot stand even a slight innuendo about Apple products. He dons the cap of editor-in-chief to make sure that articles match the quality standard before they are published.
View all posts →