The Reminders app on the iPhone is a powerful tool for staying organized, managing tasks, and boosting productivity. Whether you’re scheduling daily chores or setting location-based alerts, the app offers a range of features to help you stay on top of everything.
With iOS 26, Reminders has received a significant upgrade. The new Liquid Glass design gives the interface a fresh look, while Apple Intelligence now suggests reminders and auto-organizes your tasks based on context and behavior. Let’s explore how to use the Reminders app and customize it to fit your needs.
Table of Contents
- What's New in Reminders in iOS 26
- How to Set Up the Reminders App on iPhone or iPad
- How to Create a Reminder
- How to Customize Your Reminders
- How to Create Subtasks
- How to Complete a Reminder
- How to Use Lists in the Reminders App
- How to Use Smart Lists
- How to Create a Grocery Shopping List
- How to Use List Templates in Reminders
- How to Group Reminders and Lists using Tags
- How to Share and Assign Reminders
- How to Delete a Reminder in the Reminders App
- Bonus Tips on Using Reminders on iPhone
What’s New in Reminders in iOS 26
iOS 26 introduces a refreshed user experience and AI-driven enhancements to the Reminders app:
- Liquid Glass Design: A new sleek interface aligns with iOS 26’s overall visual language.
- ‘New Reminder’ Control: Create reminders directly from:
- Control Center: Add reminders without launching the app.
- Action Button: Set it to quickly capture tasks on the go.
- Lock Screen Shortcut: Add reminders without unlocking your device.
- AI-Powered Smart Lists: Apple Intelligence categorizes and prioritizes reminders based on context and usage.
- Suggested Reminders: iOS 26 scans messages and emails to suggest tasks.
- Call‑Back Reminders: Swipe over recent calls in the Phone app to create a callback reminder instantly.
These features make Reminders more intuitive. Now, let’s find out how you can access and use the Reminders app to leverage these features.
How to Set Up the Reminders App on iPhone or iPad
To start using Reminders:
- Go to Settings on your iPhone or iPad.
- Tap your Apple ID profile → iCloud.
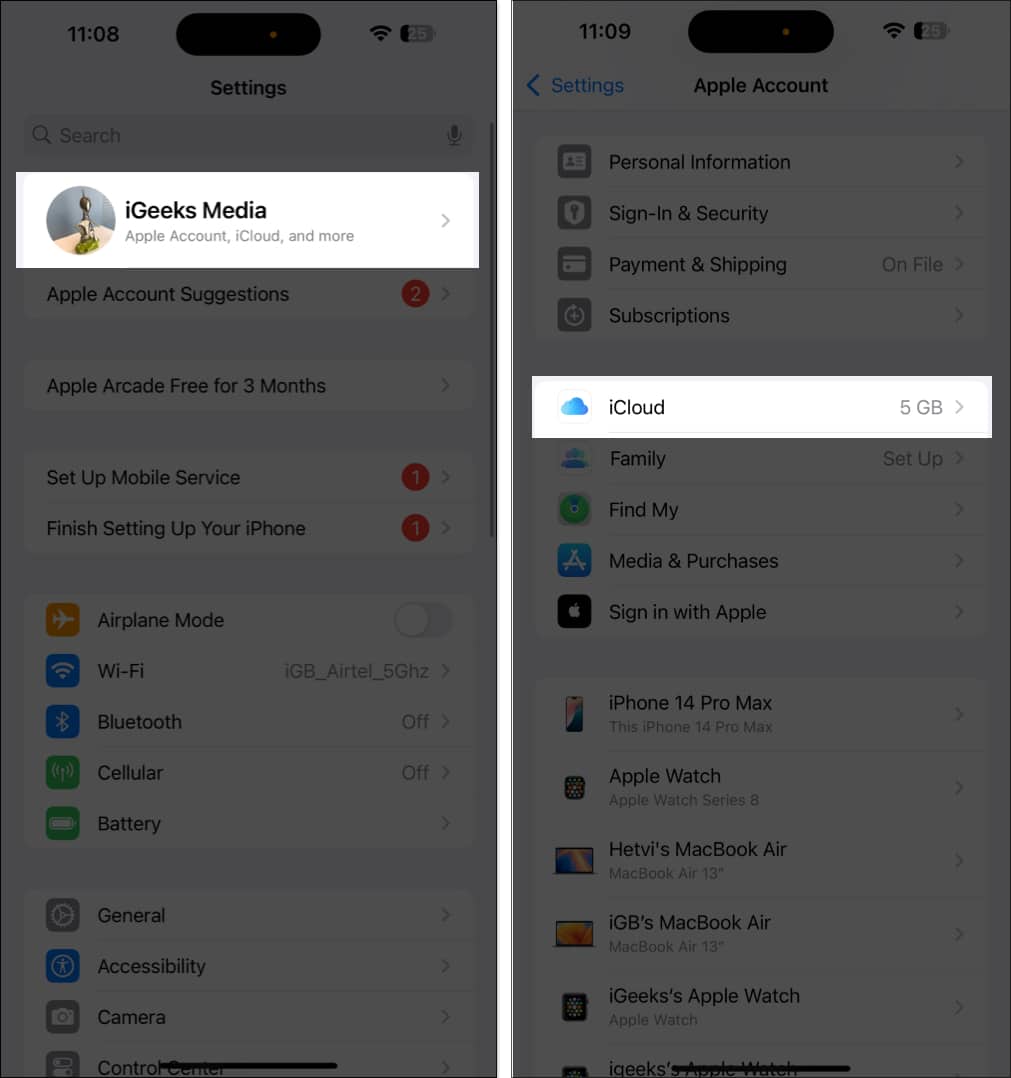
- Tap See All under Saved to iCloud.
- Scroll down and toggle on Reminders.
This enables syncing across your Apple devices.
How to Create a Reminder
In several ways, you can create a reminder in the Reminders app on an iPhone. Each method has its own benefits, allowing you to choose the one that best suits your needs.
Method 1: Using the Reminders App
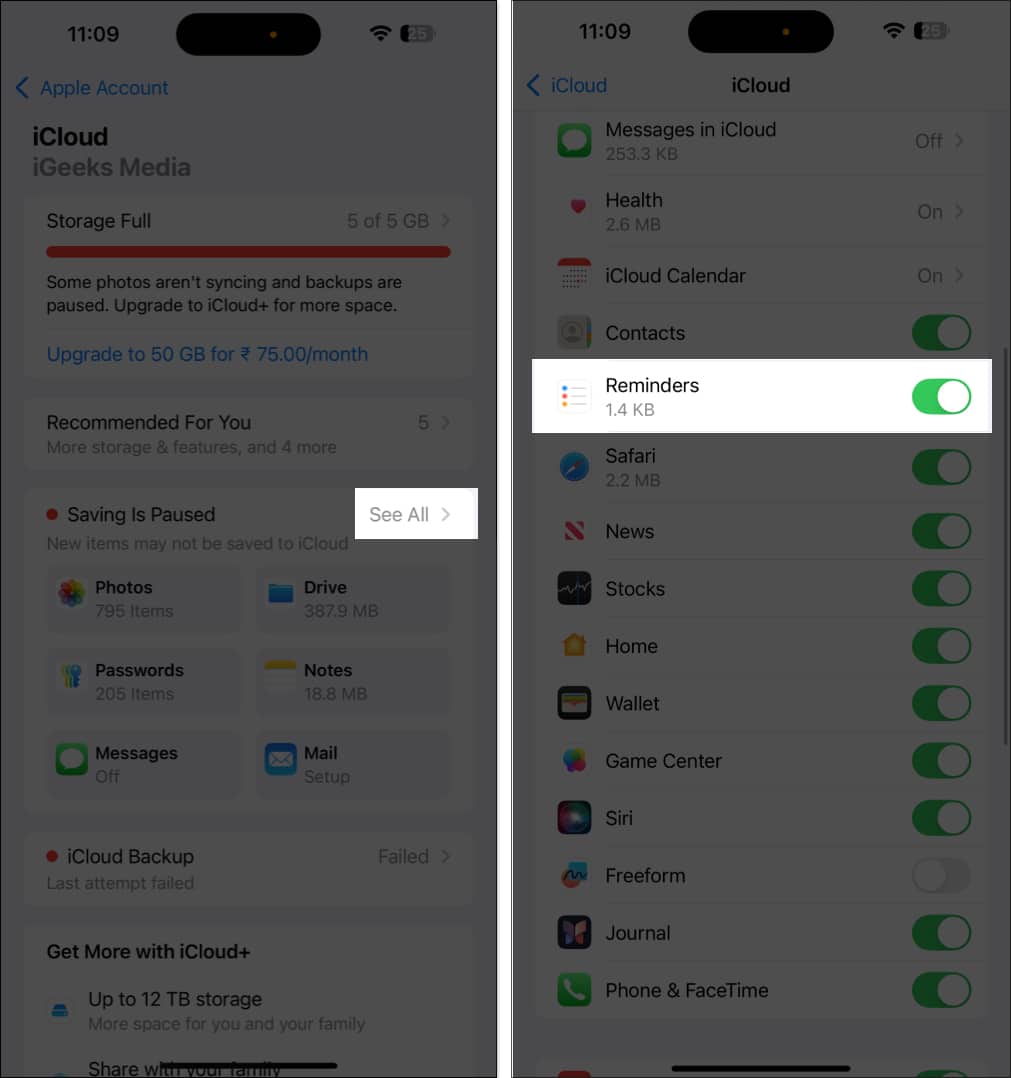
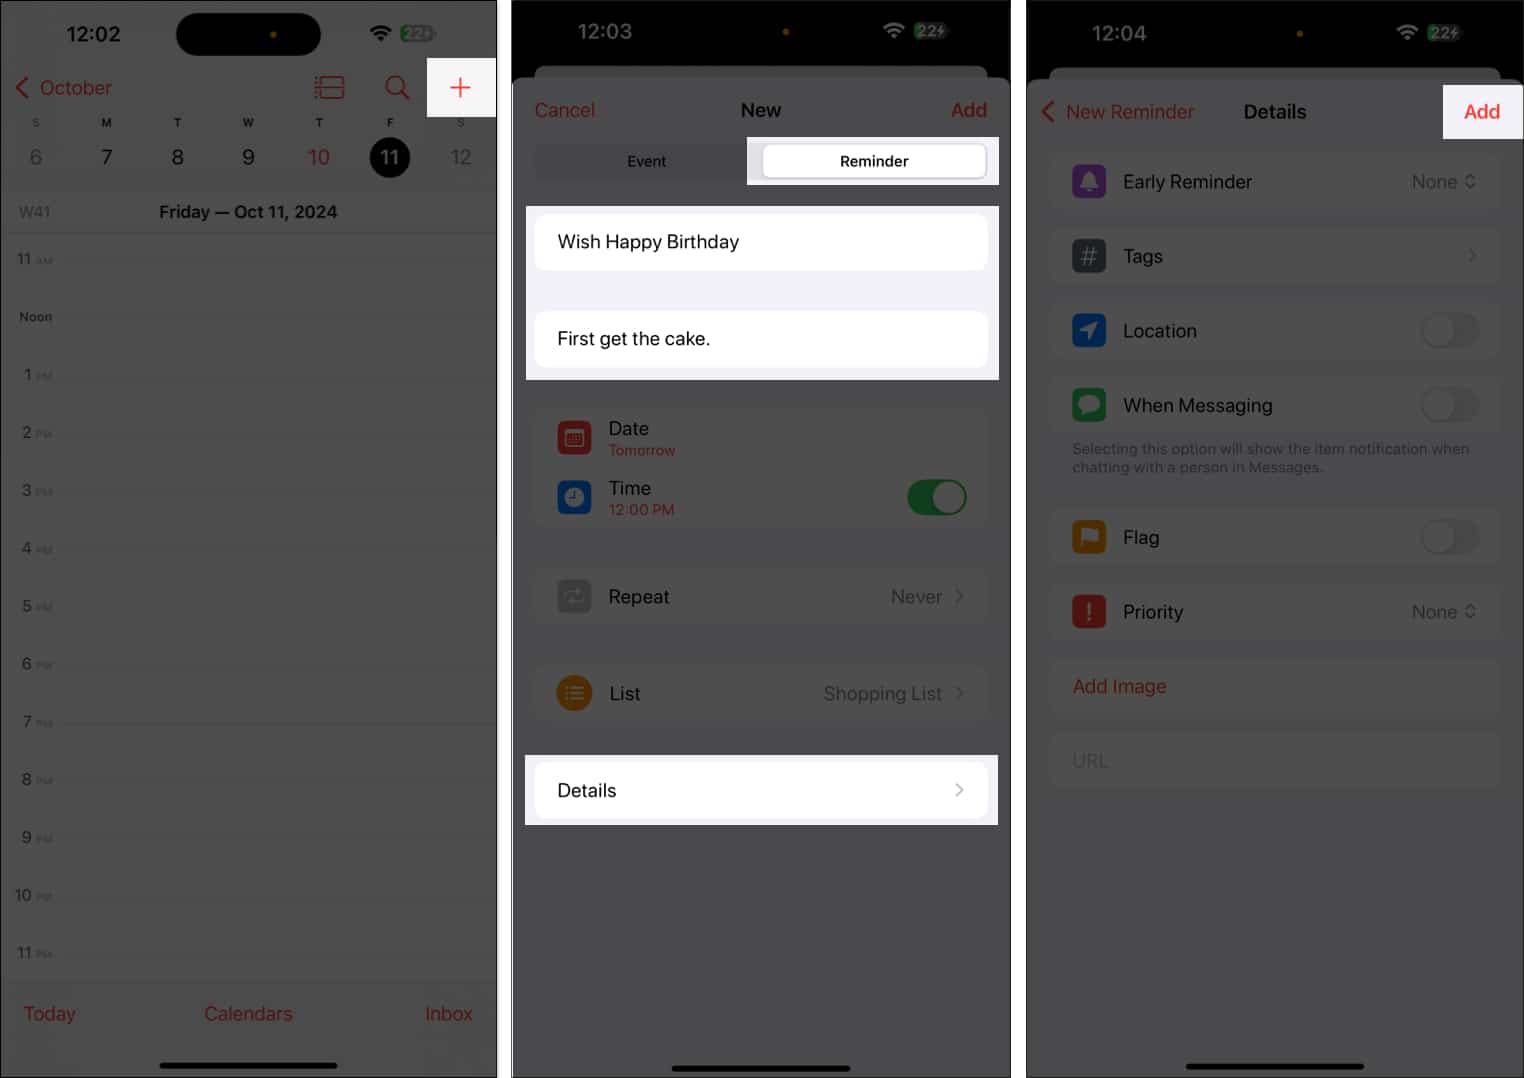
- Open Reminders on your iPhone.
- Tap New Reminder in the bottom-left corner.
- Give the reminder a title, like “Wish Happy Birthday.”
- Add some information about the reminder, like “Get the cake first,” in the Add Note text field.
- Now, tap Details, and, based on your requirements, set the date, time, location, and more for the reminder. We’ll discuss this further in the later section.
- Finally, tap Add to create the reminder.

You can also set a date, time, and location or add images from the quick toolbar options at the top of the keypad. Note that third-party keyboard apps, such as SwiftKey, may not support this functionality.
- Date and time: Setting the exact date and time is crucial for any reminder. Select ‘Today’, ‘Tomorrow’, or ‘Date & Time’ to customize it. If you only set a date without time, you will get a notification at 9 a.m. by default. Go to Settings > Apps > Reminders > Time under All-Day Reminders to adjust this setting. Select a preferred time.
- Add a location: Tap the icon that looks like an arrowhead. Select an option or tap ‘Custom’ and search for an address.
- Flag a reminder: Select the flag icon to mark a reminder as essential. All flagged reminders are displayed in the smart list section on the app’s home screen.
- Add an attachment: Tap the camera icon. From here, you can add media to the reminder. Choose an existing image from the Photo Library or scan a document.
- Assign a reminder: To do this, you will need to create a shared list. Once you have done this, tap the assignment button to assign the reminder to the person you want.
Method 2: In the Calendar App
- Open the Calendar app on your iPhone or iPad.
- Tap the + icon in the top-right corner.
- Go to the Reminder tab.
- Enter the title and notes and select a time or date for the reminder.
- Tap Details to customize the reminder more.
- Hit Add to save it.
This reminder syncs with the Reminders app.
Method 3: Using Siri
You can also ask Siri to create reminders for you.
Simply say, “Hey Siri, remind me to [task].” To add time and date to your request, you can say, “Hey Siri, remind me to buy cake on December 24 at 9 pm.” Next, you’ll hear Siri reply with, “Ok, I added it.“
Asking Siri to create reminders is best when you want to be reminded of an article or an email. Siri supports adding attachments or links to a reminder from native apps, such as Notes, Safari, Mail, Maps, and Photos. For example, open the article on Safari and say, “Hey Siri, remind me this at 7 a.m. tomorrow.”
Tip:
Method 4: From the Share Sheet
If you want to create a reminder from any third-party app, Siri can’t help. But worry not! I have a quick workaround. The iOS Share Sheet lets you add reminders from other apps. Here’s how:
- Launch the app and open the content you want to get reminded of. Here, I am using a Facebook post.
- Tap the share icon. If it doesn’t show the Share Sheet, tap More.
- Select Reminders.
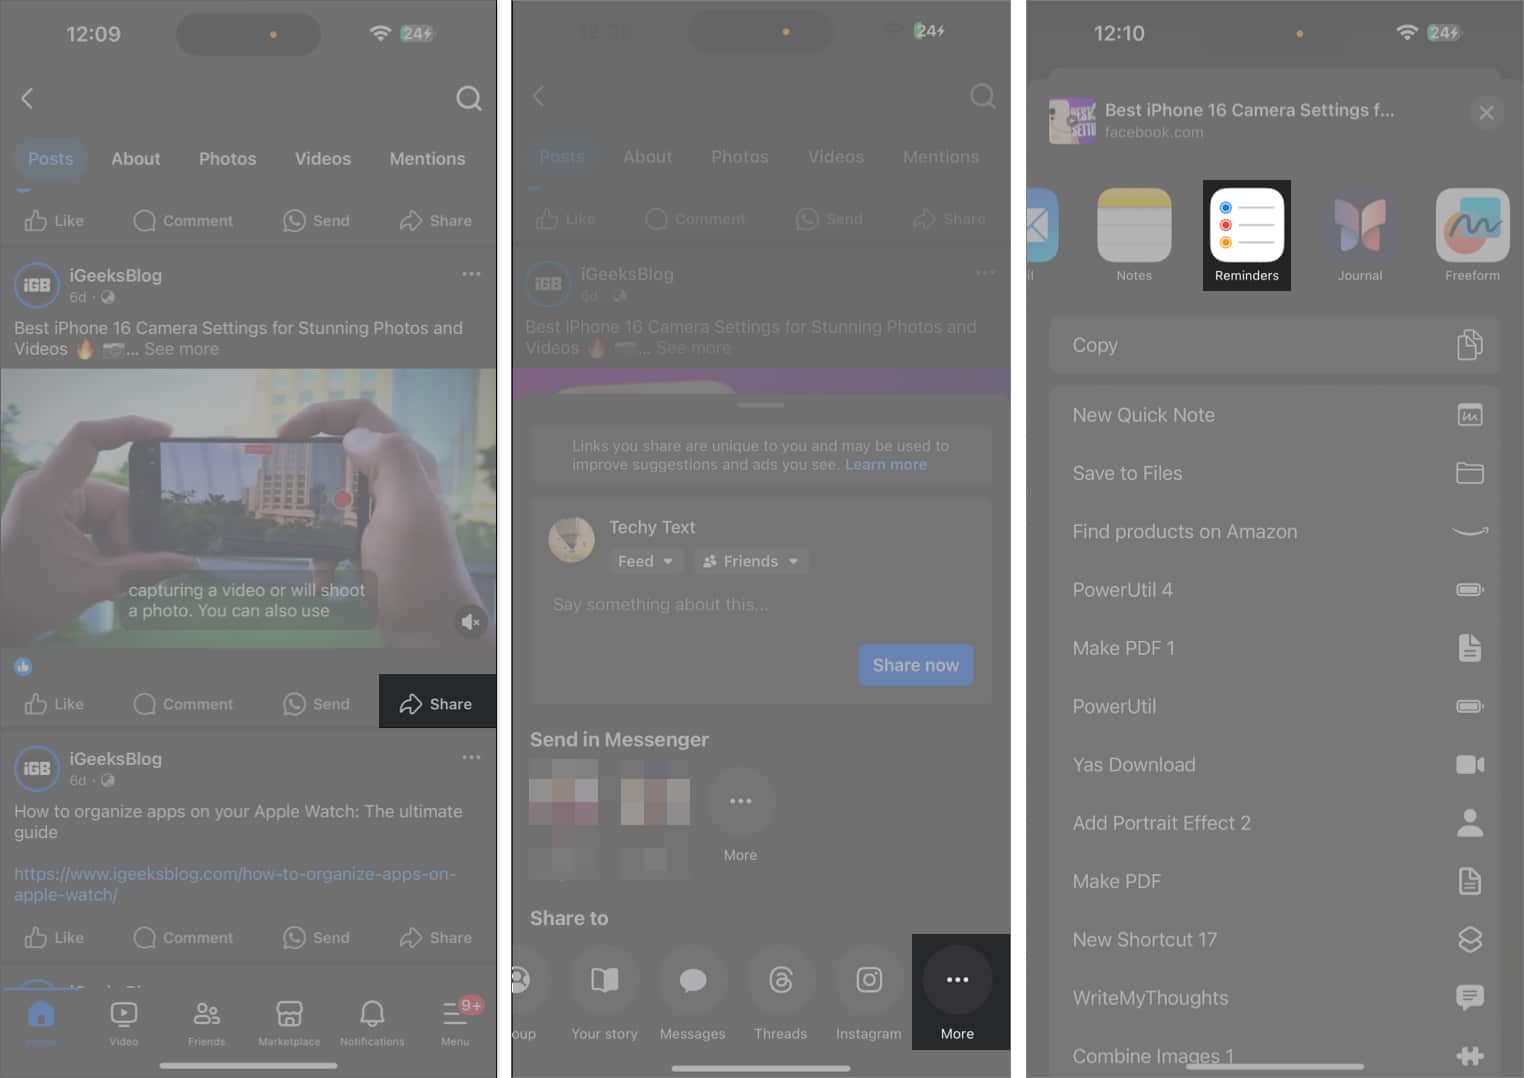
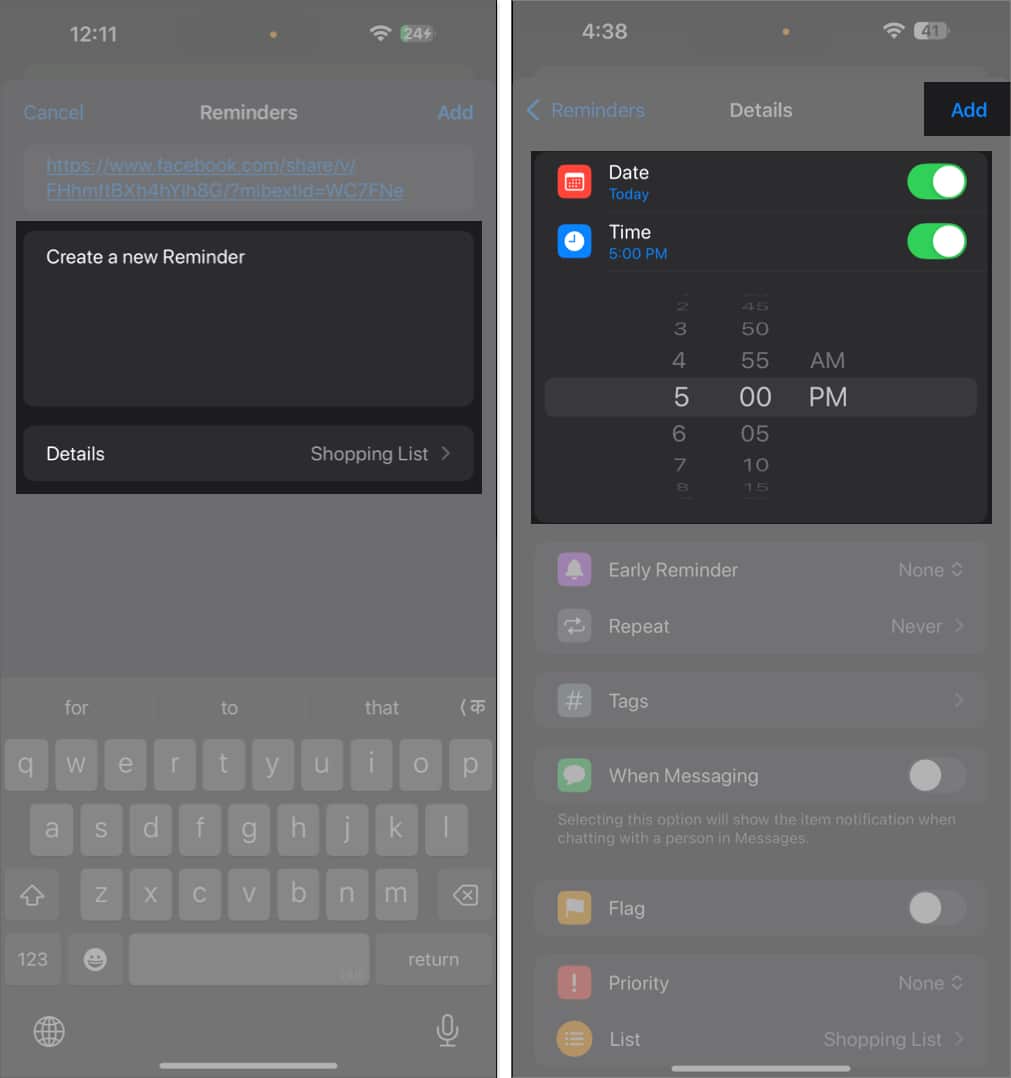
- Write a note if needed and tap Details to add date, time, and the likes.
- Finally, tap Add to create a reminder.

This method works for most apps. However, creating a reminder for a voice memo is somewhat challenging. The Share Sheet in the Voice Memo app doesn’t include the Reminders app.
To accomplish that, go to the Notes app and tap the pen icon to create a new note. Now, tap the attachment icon and select Record Audio. Next, record the voice memo and hit Done. Finally, tap the share icon, select Reminders, add details, and tap Add.
If you have any existing voice memos, open the Voice Memo app, tap on the recording, and select the three-dot icon. Then, tap Share and select Notes. Now, create a reminder for that note.
Bonus: Reuse Past Reminders
As you type a new task, Reminders will suggest similar past entries, helping you save time. It may also auto-fill dates and times based on your habits.
How to Customize Your Reminders
Now that you have created your desired reminder, let me show you how to customize it to boost your productivity. Let’s look at how to do this:
- Open the Reminders app on your iPhone or iPad.
- Go to the reminder you want to customize.
- Tap on the title and select the Info icon to the right.
This will open the Details page. Here, you can edit the title and add a note and a URL to the reminder. You may also set or change the date and time of the reminder. In addition to these basic settings, you can access advanced reminder features, as we’ll discuss below.![]()
Set location-based reminders
You can set reminders that trigger when you arrive at or leave a specific location. Simply toggle on Location on the Details page and select a recommended location.
To set a different location, tap Custom and search for it. Select a location from the search list and choose between Arriving and Leaving.
Get reminders in Messages
The Reminders app can alert you when interacting with specific contacts in Messages.
To enable this, toggle on When Messaging on the Details page. Then, tap Choose Person and select the contact from the list.
Set early reminders
For time-sensitive tasks, you can set early reminders. This will notify you earlier than the due time, allowing you to prepare better.
On the Details page, tap on Early Reminders and select the time frame from the drop-down list. You can also select Custom to set your preferred due time.
Add images to your reminders
I have already shared that you can create reminders from the Photos app. However, you can also add an image or document to an existing reminder.
Go to the Details page and tap on Add Image at the bottom. Now, select Photo Library and choose an image. This helps in providing visual references for tasks.
Make reminders recurring
You don’t need to create the same reminder multiple times if you have a task that recurs weekly or monthly. From the Details page, select Repeat (the reminder must have a date) and choose the frequency.
Set priority
To manage your tasks more efficiently, you can assign a priority to each task. Tap on Priority on the Details page and choose between Low, Medium, and High.
Reorder today list
Starting with iOS 18, you can rearrange your tasks in Today’s list. By default, the Today list displays overdue reminders first, followed by all-day reminders, and then timed reminders grouped by Morning, Afternoon, and Evening.
You can reorganize these by dragging and dropping tasks to ensure the most important tasks are at the top. Other lists also support this gesture. However, be careful not to create subtasks accidentally.
Tip:
How to Create Subtasks
Subtasks are valuable because they allow you to stash reminders under a parent reminder. For example, if the parent reminder is “Monthly Grocery Shopping,” its sub-reminders can include items such as toothpaste, tissue paper, soap, and dog food, among others.
You may add as many subtasks as you want. Moreover, the subtasks now appear in the List view in iOS 18 for improved task management.
You can create a subtask in three ways.
- Method 1: Tap (i) while adding a new reminder. Or tap an existing one to see the (i) button. Next, tap Subtasks > Add Items. Once you finish adding subtasks, tap Details to go back. Then, finally, tap Done.
- Method 2: Long-tap an existing reminder and swipe it to the right. Then select Indent. This reminder becomes a subtask of the reminder above it. Similarly, to remove the subtask, long-tap and swipe it to the right corner of the screen. Then select Outdent.
- Method 3: Touch and hold a reminder and drag it over the other. The dragged reminder will become a subtask of the other.
How to Complete a Reminder
You will receive a notification for the reminder according to your set date and time. Once you have completed it, you can mark it as complete.
- Method 1: In the Notification Center, tap and hold the reminder notification on your iPhone and select Mark as Completed. You may also postpone it.
- Method 2: Inside the Reminders app, tap the radio button (circle) to the left of a reminder.
View completed reminders
Once you’ve marked a reminder as complete, it goes to the Completed folder on the app’s home screen. You can view all your completed reminders here. This is useful for tracking progress or future reference.
You can undo a reminder if you have accidentally marked it as complete. Tap the gray circle beside the task to mark it as incomplete. To remove the completed entries, tap Clear and select All Completed.
You may also see your completed tasks in the list view. Open the list under My Lists, tap the three horizontal dots at the top right and choose Show Completed.
How to Use Lists in the Reminders App
We have discussed the basic tasks in reminders so far. Let’s now move on to the advanced features, including lists and templates.
A list is an excellent way to organize your tasks. It’s handy for quick access to related reminders without cluttering them.
Create or Edit a List
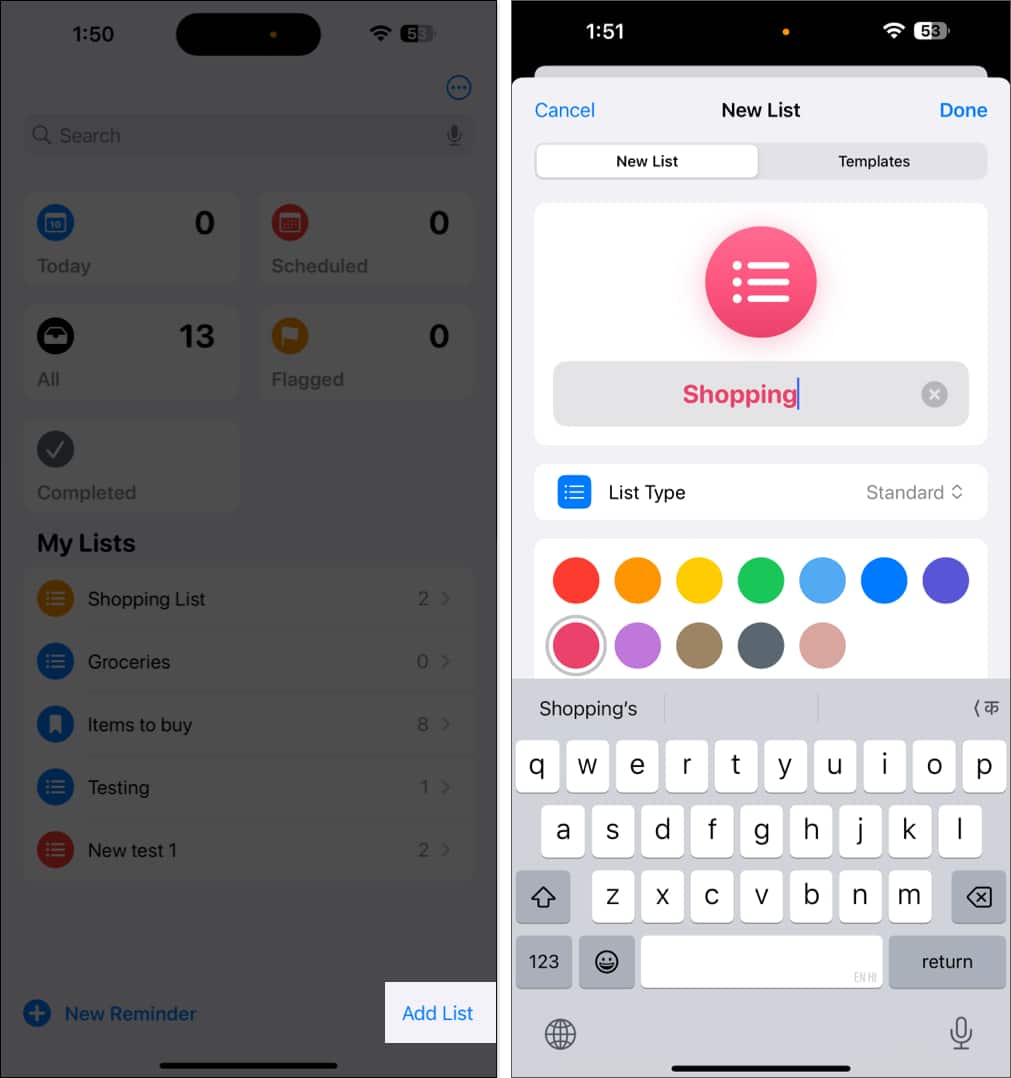
- Open the Reminders app and tap Add List.
- Give it the desired name and choose a preferred color and icon.
- Finally, tap Done in the top-right corner.
To edit a list: tap the list name, tap the three horizontal dots in the top-right corner and choose Show List Info.
Customize it and tap Done to save.
You can also rearrange the tasks on the list. Tap and hold an item to place it in the desired position.
Create Sections in a List
Lists can be divided into sections. For example, you can create Work and Personal sections within a single list.
To start, open the list, tap the three-dots icon, and select New Section. You’ll see the ‘Manage Sections’ option if your list already has sections. Tap it and select New Section.
Write a title for the section and tap Return on the keyboard to save it.
After creating sections, you can view your list in a horizontal view. In the list, tap the three-dot icon and select View as Columns. Now, you can swipe right to access the sections.
Group Lists
You can combine your lists in a group to keep all related tasks organized in one place. It will also clear the clutter from the Reminders app home page.
To group related lists together, tap and hold the list and drag it over another. This will prompt you to enter the group name. Do it and tap Create.
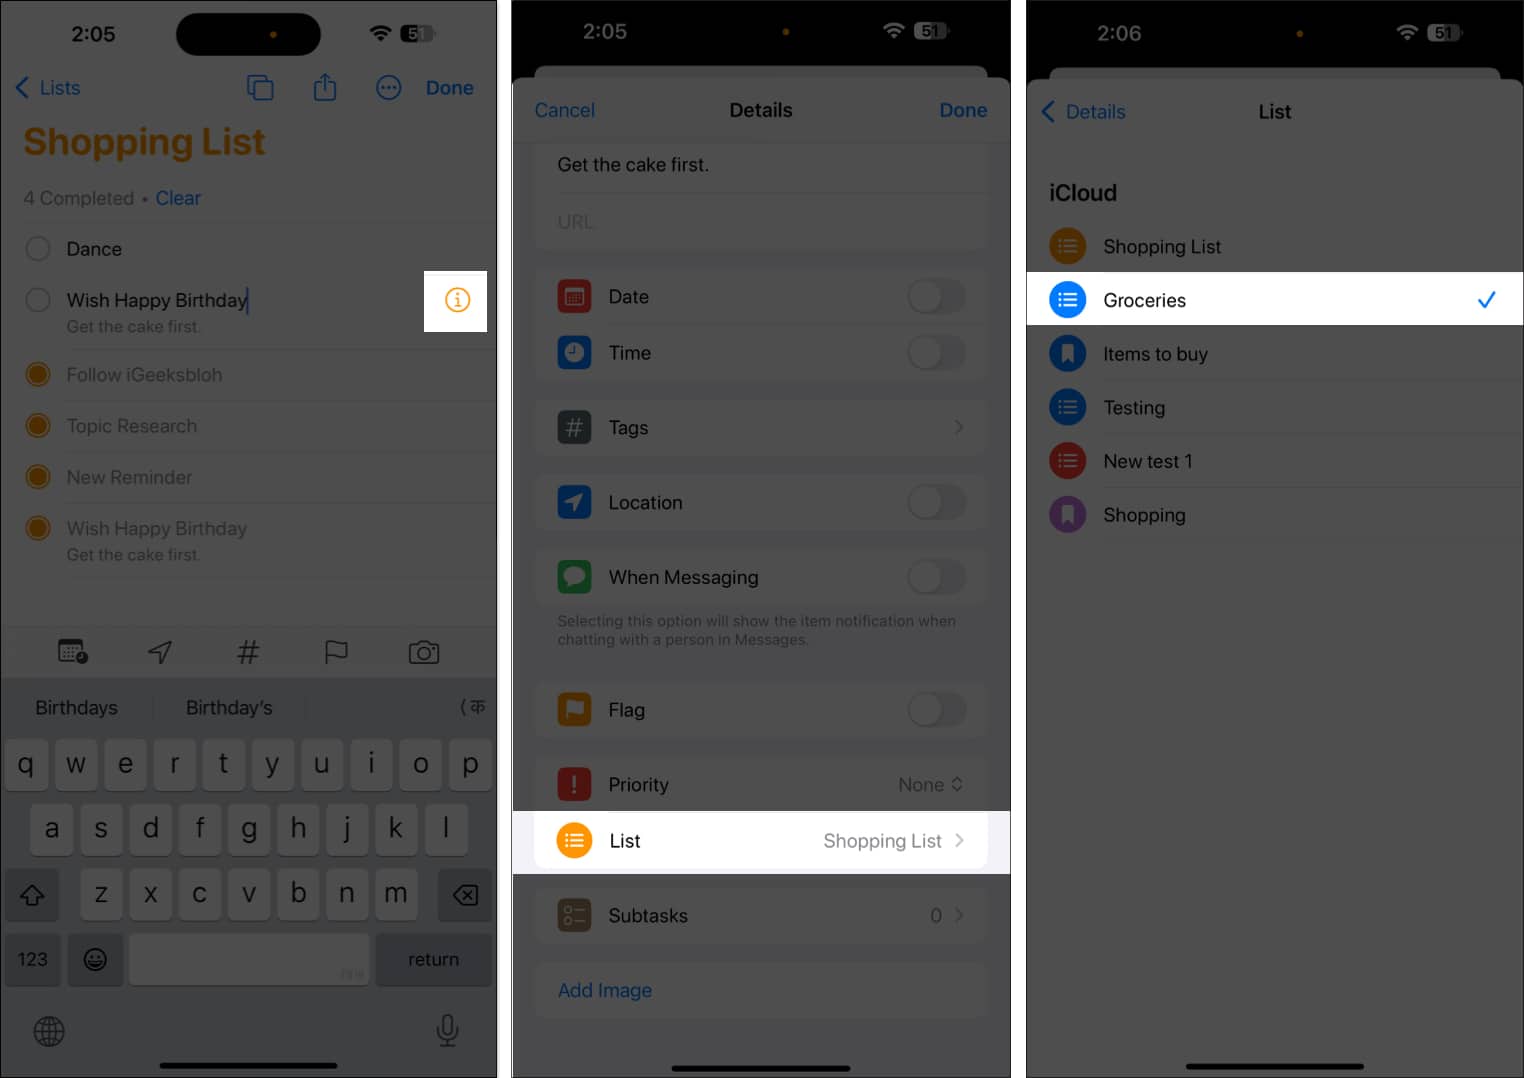
Move a Reminder to a Different List
- Tap an existing reminder and then tap the (i) icon.
- Scroll down and tap List.
- Now, choose a different list.
Pro Tip: You can also drag and drop reminders between lists. Touch and hold a reminder until it lifts a bit. Now, with another finger, tap Lists to go back and drop the reminder on the desired list.
Pin a list
You can pin your most frequently used lists to the top to quickly access them. Tap and hold the list and select Pin. Similarly, you can unpin any list.
How to Use Smart Lists
Smart Lists in the Reminders app allow you to easily filter items across all your lists. Rather than creating a standard list, you can create custom Smart Lists that include tags, dates, times, places, flags, and priority. Whenever you create a reminder that matches those criteria, it will be automatically added to that Smart List.
View Default Smart Lists
Smart Lists automatically categorize your reminders by priority, due dates, or location. Open the Reminders app, and you’ll see folders like Today, Scheduled, All, Completed, Assigned to Me, Siri Suggestions, and Flagged. Select one to view reminders in these lists.
All these names are self-explanatory. Flagged, for instance, has all the most important reminders you have flagged. The Assigned to Me Smart List has all the reminders that others have assigned to you. Siri Suggestions shows suggested reminders that the app thinks you should create based on your email and messages.
Create a Custom Smart List
- Tap Add List from the Reminders app home screen.
- Write a list name and select Smart List under List Type.
- Tap on Edit Filters and select the parameters, such as Date, Time, Location, Priority, and Flag, that best suit your needs.
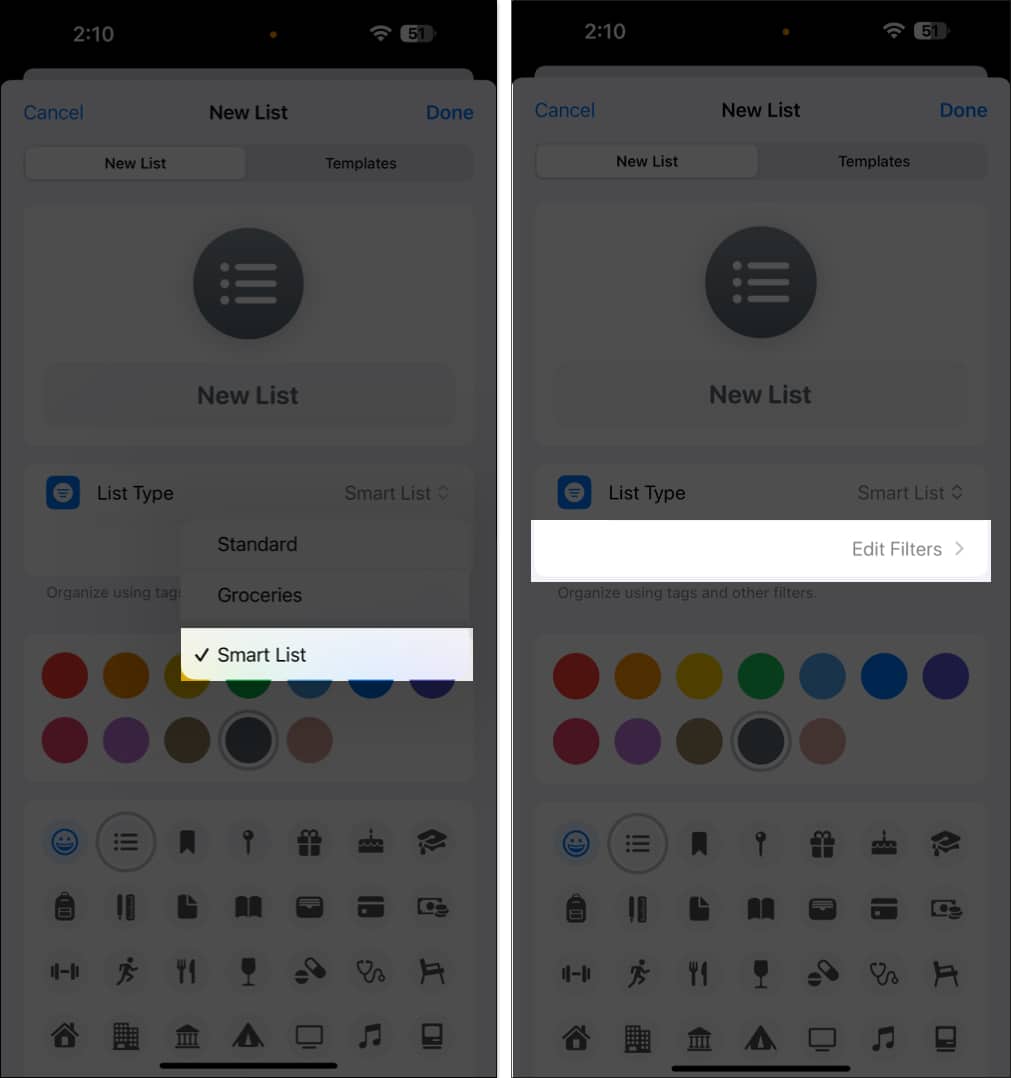
- Select a color and an icon or emoji to make the list distinguishable at a glance.
- Finally, hit Done.

You can also make your existing list into a Smart List. Open the list, tap the three-dot icon, and select Show List Info. Now, tap Convert to Smart List at the bottom. However, note that you can’t revert this change.
Show or Hide Smart Lists
You can choose to show or hide a smart list in the Reminders app based on your preference. When you hide a list, it no longer appears on the Reminders home screen. Similarly, you can make a hidden list visible.
Once you open the Reminders app, tap on the three-dot icon and select Edit Lists in the top-right corner. To hide a Smart List, uncheck the blue checkmark to its left. Similarly, you can make a hidden list visible. Tap Done in the top-right to save the view.
How to Create a Grocery Shopping List
The Reminders app features an auto-categorization function for grocery items. When you add items like “bread” or “milk,” the app automatically places them under the appropriate categories. You may even change the category or add a new one. Here’s more on creating a grocery shopping list in the Reminders app.
How to Use List Templates in Reminders
If you have recurring tasks, such as packing lists or meeting agendas, you can save them as templates to reuse later. You can customize the template to make new lists.
You may also share your template or download templates that others have shared with you. When you change a shared template, anybody who has downloaded it must re-download it to receive updates.
Moreover, earlier downloads of the template are unaffected if you delete it. To learn more, read this guide on how to use templates in Reminders.
How to Group Reminders and Lists using Tags
Tags help you to organize tasks automatically using keywords in the Reminders app. For instance, you can tag some reminders under the “#Christmas” category, put some under “#grocery #Christmas,” and so on. This way, you can easily search and filter reminders across lists.
Create a Tag
- Go to the Details page for a reminder.
- From here, select Tags.
- Tap the Add New Tag field and write the tag keyword. Say, “Cooking,” for instance. Press return on your keyboard to add it to your tag list.
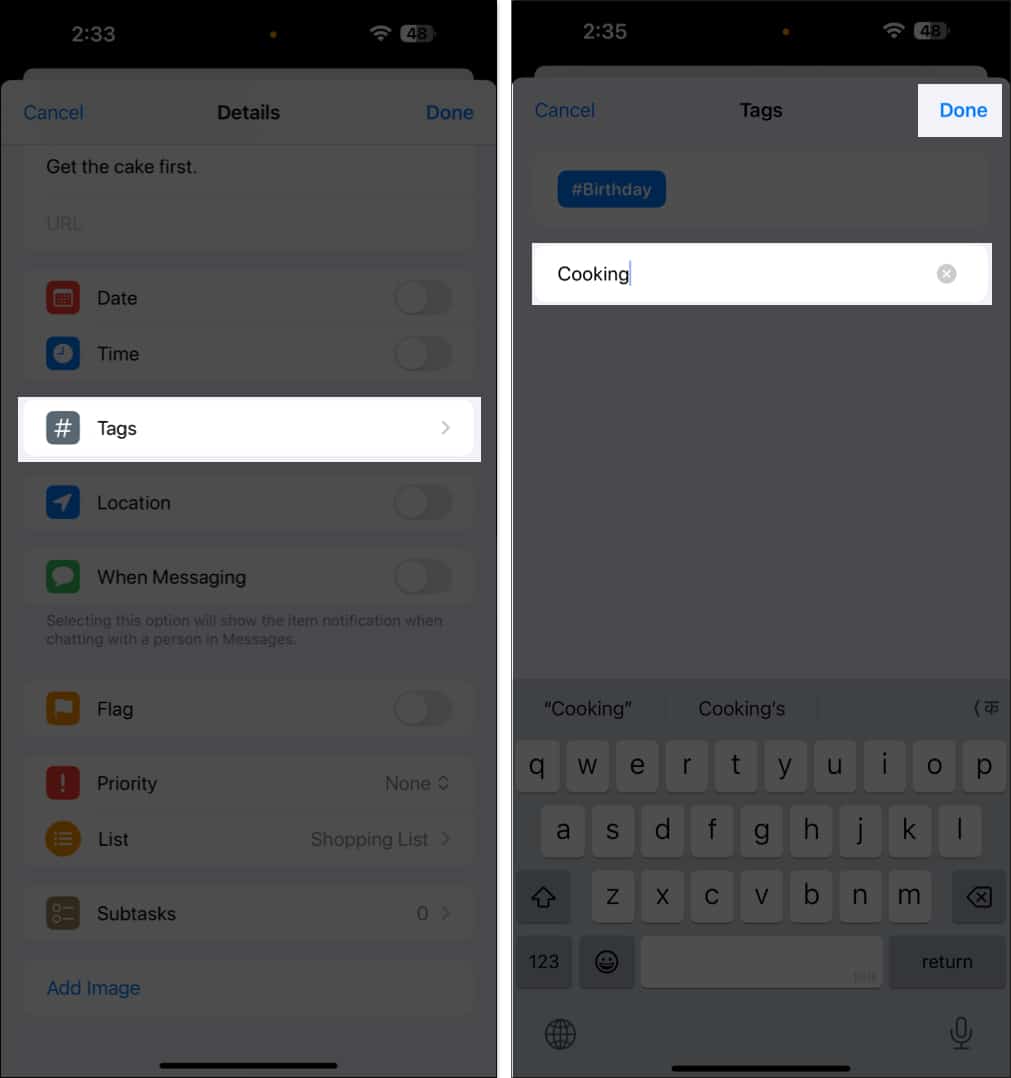
- Tap Done in the top-right to save the reminder.

View Reminders with Certain Tags
You can filter reminders across all of your lists by tagging keywords. Simply select the desired tags from the Tags section below. This will provide you with a list of reminders that have that tag. To add a reminder with this tag, tap on + New Reminder in the bottom-left corner.
At the top of the list, you’ll see all tags currently applied to your reminders. A tag won’t be visible in the tag browser if it is no longer in use.
Add a Tag to Multiple Reminders at Once
If you have multiple related tasks, you can add tags to them at once, saving you time and effort.
- Open a list and tap the three-dot icon.
- Tap Select Items and choose the reminders.
- Now, tap the More icon in the bottom-right corner and select Add Tag.
- Choose an existing tag or create a new one.
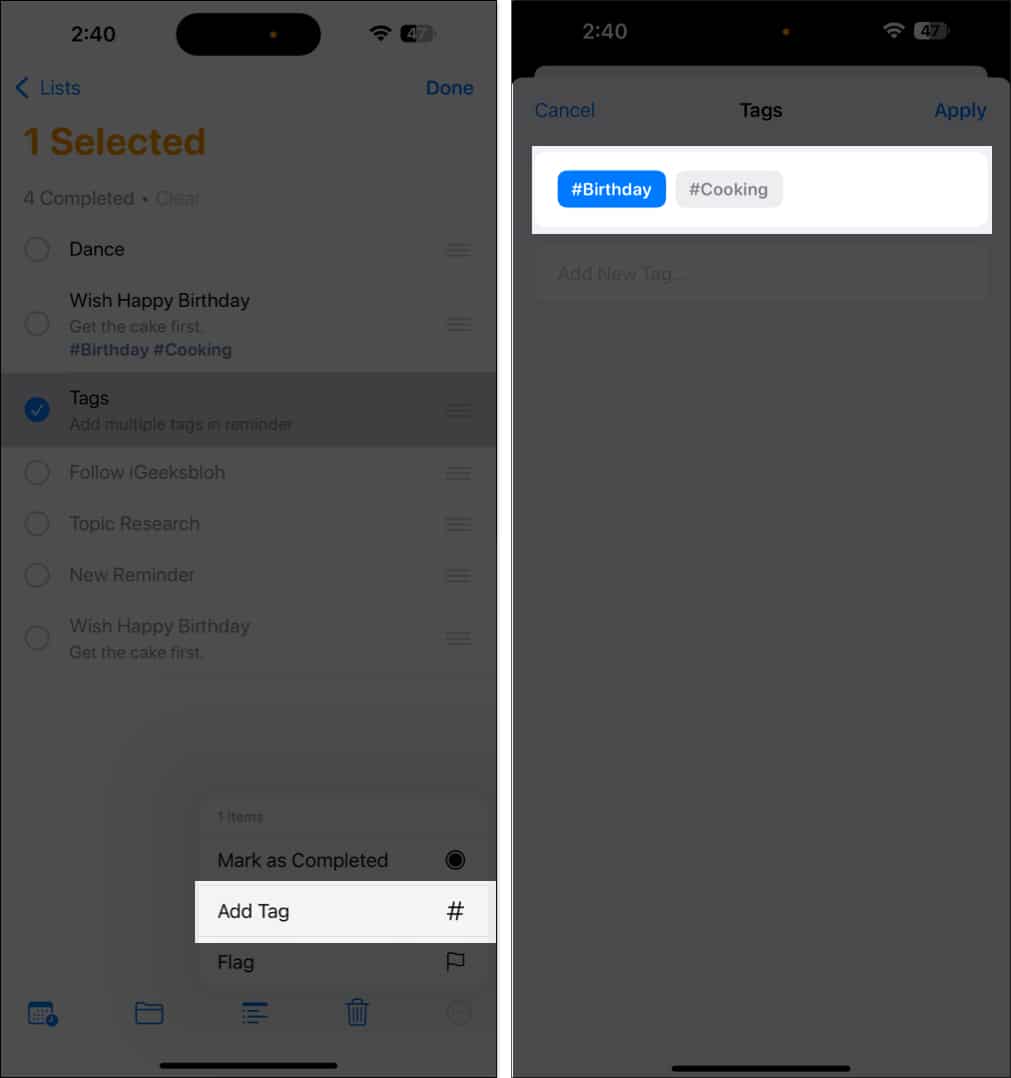
- Finally, tap Done.

Remove a Tag From a Reminder
You can quickly remove a tag from a task. Open the list, tap on the tag under the reminder you want to delete and press the Delete key on your keyboard. Tap Done to save the changes.
Edit or Delete a Tag
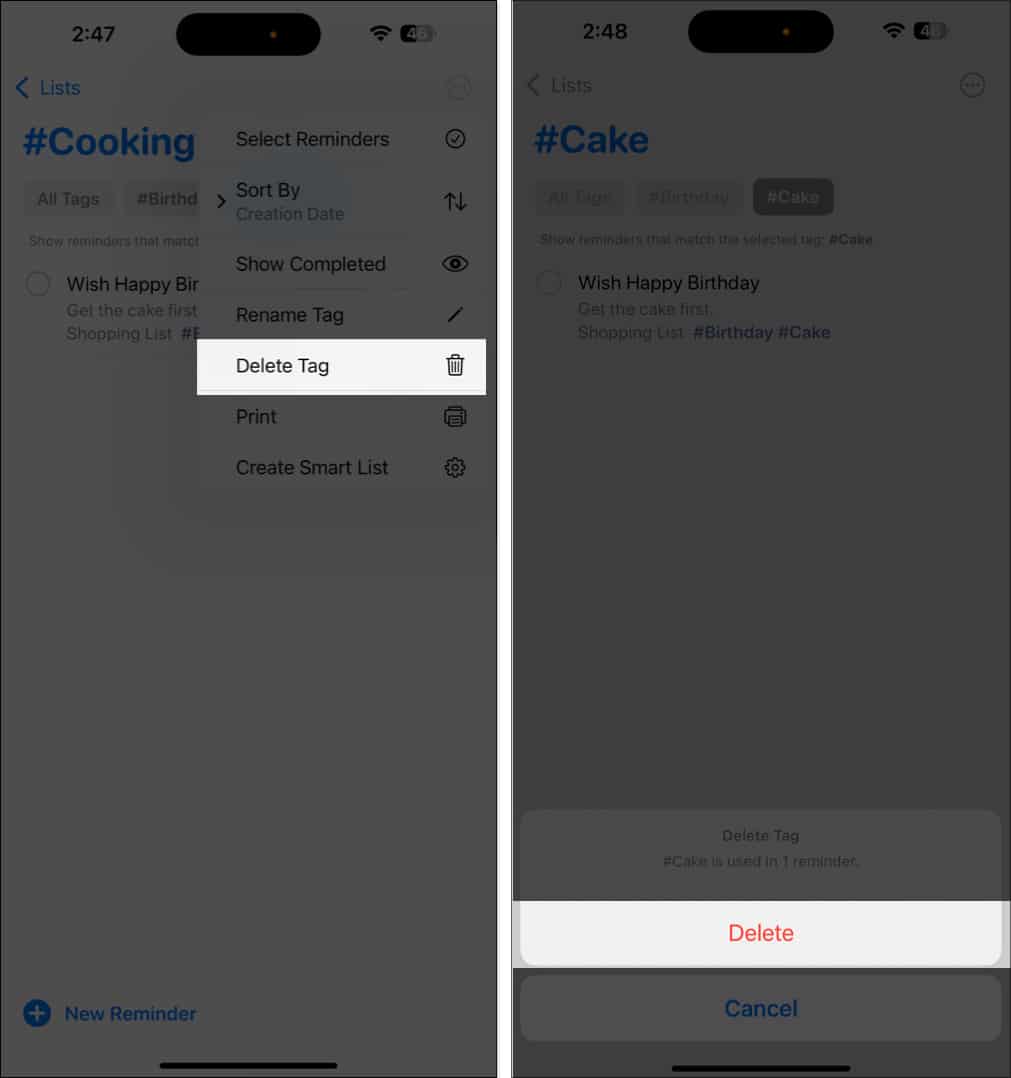
- Select the tag you wish to delete or rename from the Tags section at the bottom.
- Tap the More button.
- To change the tag keyword, choose Rename Tag.
- Write the new keyword and tap OK to save.
- If you want to remove the tag, select Delete Tag and tap Delete to confirm.

When someone sends you a reminder with tags, you’ll see the marked word, but it will not be in your Tags section until you create one with the same keyword.
How to Share and Assign Reminders
The Reminders app allows you to share your reminder lists with others and assign tasks to them. You can delegate tasks or grocery items and receive notifications about deadlines or activities.
Share Reminder Lists
- Open the desired list and tap the share icon.
- Now, use the desired app (e.g., Messages, Email, Slack, WhatsApp, etc.) to send the invitation to one or multiple people.
- Once they accept, they can view, add, delete, or mark reminders as completed.
Note:
Assign a Reminder in a Shared List
You can assign reminders to different people. Let’s assume you’re going camping and have a reminder list. You can allocate a reminder, say, to bring a blanket to one friend, take a stove to another, and so on.
Here’s how to assign reminders:
- Tap a reminder inside a shared reminder list (see how to make one above).
- Tap the assignment button (person icon) above the default iOS keyboard.
- Now, select a person and tap Done.
You may not see the assignment button if you use a third-party keyboard. In this case, tap the reminder, select the (i) icon and choose Assign Reminder.
To remove an assignee or reassign them, tap their profile picture next to the reminder and select the appropriate option.
The Reminders app lets you manage your shared lists more efficiently. Open the shared list, tap the Collaborate button, and select Manage Shared List. Here, you can change notification settings and give permissions to others. If you no longer need the shared list, tap Stop Sharing at the bottom.
How to Delete a Reminder in the Reminders App
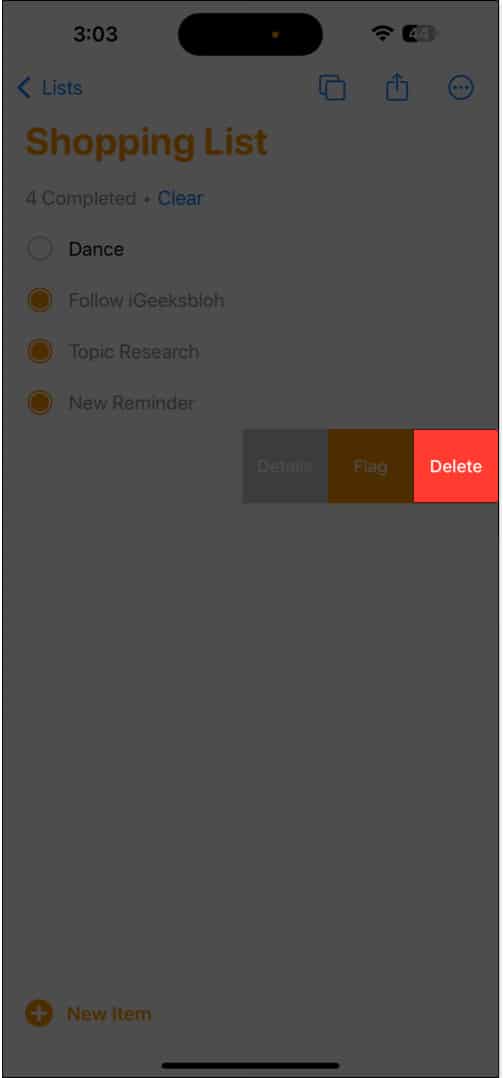
At any point, if you want to delete a reminder, follow these steps:
- Open the Reminders app on your iPhone or iPad.
- Go to the reminder you want to delete.
- Long-press the reminder or swipe it to the left.
- Select Delete.

To delete multiple reminders at once, tap the three horizontal dots in the top-right corner. Tap Select Items and choose the desired entries. Finally, tap the trash icon and select Delete X Items to confirm.
Note:
Permanently Delete Completed Tasks
To free up space, you can delete completed tasks. First, select All from the Reminders app home screen. Then tap the three horizontal dots in the top-right corner and choose Show Completed. Finally, long-tap the ticked reminder or swipe it to the left and select Delete.
Delete a Reminder List
If you no longer need a task list, you can remove it to declutter your Reminder app view. To do so, go to the home page of the Reminders app. Then, swipe right to left on the list under My Lists. Now, tap the red trash icon.![]()
Alternatively, tap a list, select three horizontal dots in the top-right corner and choose Delete List.
Note:
Bonus Tips on Using Reminders on iPhone
Now that you’re familiar with its features, here are some tips to make the most of the Reminders app on your iPhone.
Use the Reminders Widget
You can add the Reminders widget to your iPhone’s Home Screen for quick access to your tasks. Simply press and hold the Reminder app icon on the Home Screen and select the widget size, and the app icon will be converted into a widget.
Enable App Badge for Reminders
You can turn on notification badges for the Reminders app. The app icon displays the number of overdue or due reminders.
To do so, go to Settings → Apps → Reminders and toggle on Include Due Today.
Add Languages to Your Grocery List
If you prefer to add items to your shopping list in your regional language, you can configure it accordingly. This way, the app will automatically detect the language and add the item to the appropriate category.
- Navigate to Settings → Apps → Reminders.
- Scroll down and select Add Language under Grocery Categorization.
- Toggle on Set Automatically. It will detect the language according to your current location, keyboard, and language and region settings.
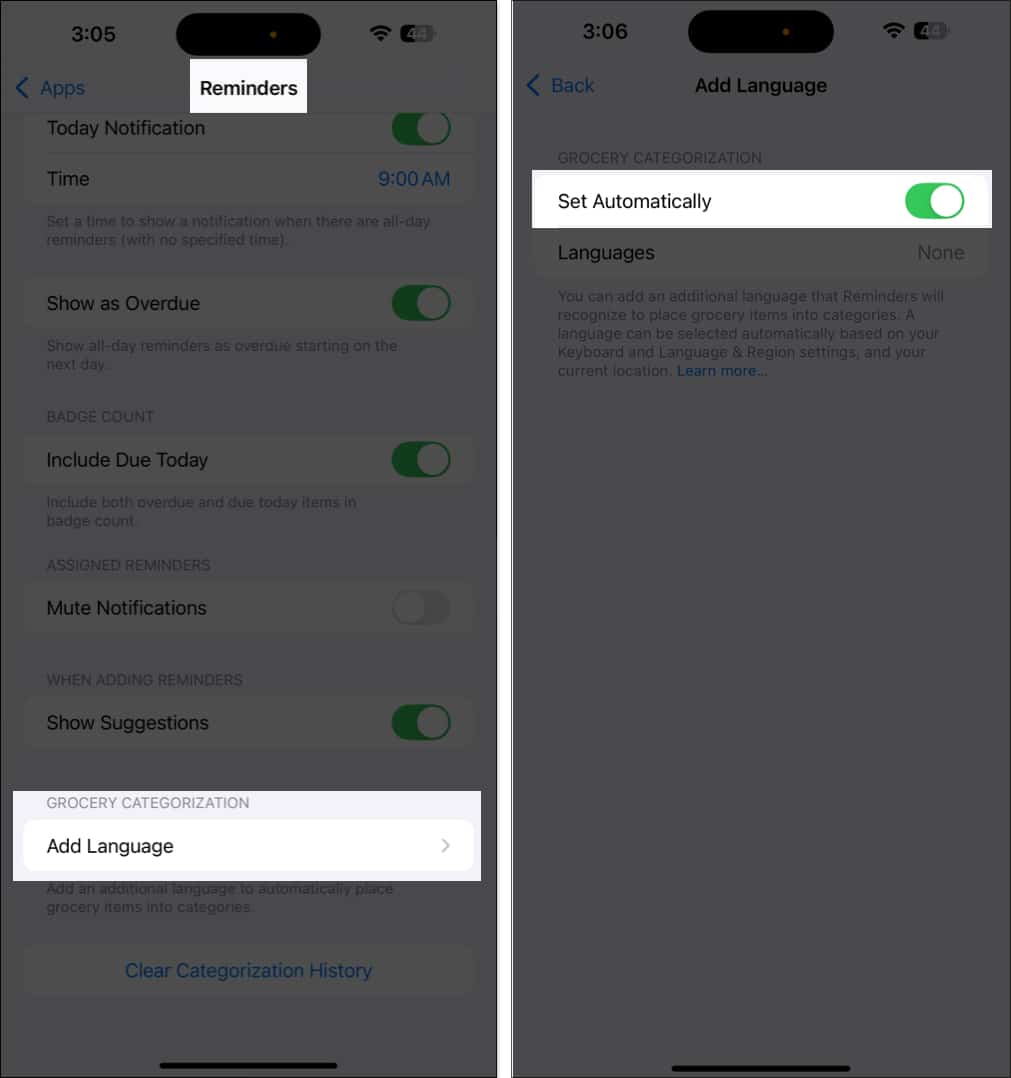
- Toggle off Set Automatically and select Languages if you use any specific language.
- Choose a language and get back.

Use Shortcuts for Reminders
For power users, the Shortcuts app offers several automations for the Reminders app.
- Go to the Shortcuts app and head to the Gallery tab.
- Search for Reminders. Now, you can see the Reminders’ shortcuts.
I find the Batch Add Reminders shortcut very useful. It allows you to create multiple reminders from a paragraph. For example, consider you are browsing a recipe. Select the ingredients list on the page and tap Share. Then, select the shortcut from the Share Sheet, and it will convert each item into a reminder item.
Set Up Medication Reminders
You can set medication reminders directly through the Health app, which syncs with the Reminders app. To explore this feature in detail, read our guide on how to set medication reminders.
Signing off…
The Reminders app on iPhone and iPad is more than just a simple to-do list. It’s your all-in-one productivity assistant. With features like Smart Lists, Siri integration, Apple Intelligence, and list sharing, staying organized has never been easier.
Do you use Reminders regularly? Let us know your favorite features in the comments below.


