Ever opened your iPhone and thought you were staring at a sea of random apps? Over time, we install dozens of apps, forget about old folders, and somehow still have that one game from 2021 lying around. It adds up—and suddenly, your Home Screen feels more chaotic than useful. But organizing it all is easier than you think.
In this guide, I’ll show you how to set up your apps in a way that actually works for you. Whether you prefer a clean, minimal layout, quick access to daily essentials, or just want to clear the mess—we’ll show you how to get started.
What Does It Mean to Organize Apps on an iPhone?
Organizing apps on your iPhone simply means arranging them in a way that’s easy for you to find and use them. It could be as simple as moving apps around, creating folders by category, adding useful widgets, or even hiding apps you rarely use. A clean Home Screen saves you time and reduces the clutter that can make using your phone feel overwhelming.
How to Organize iPhone Apps
Keeping apps on your iPhone organized is easy. Here are different ways to organize apps to make your iPhone less cluttered and easier to use.
Rearrange Apps on the Home Screen
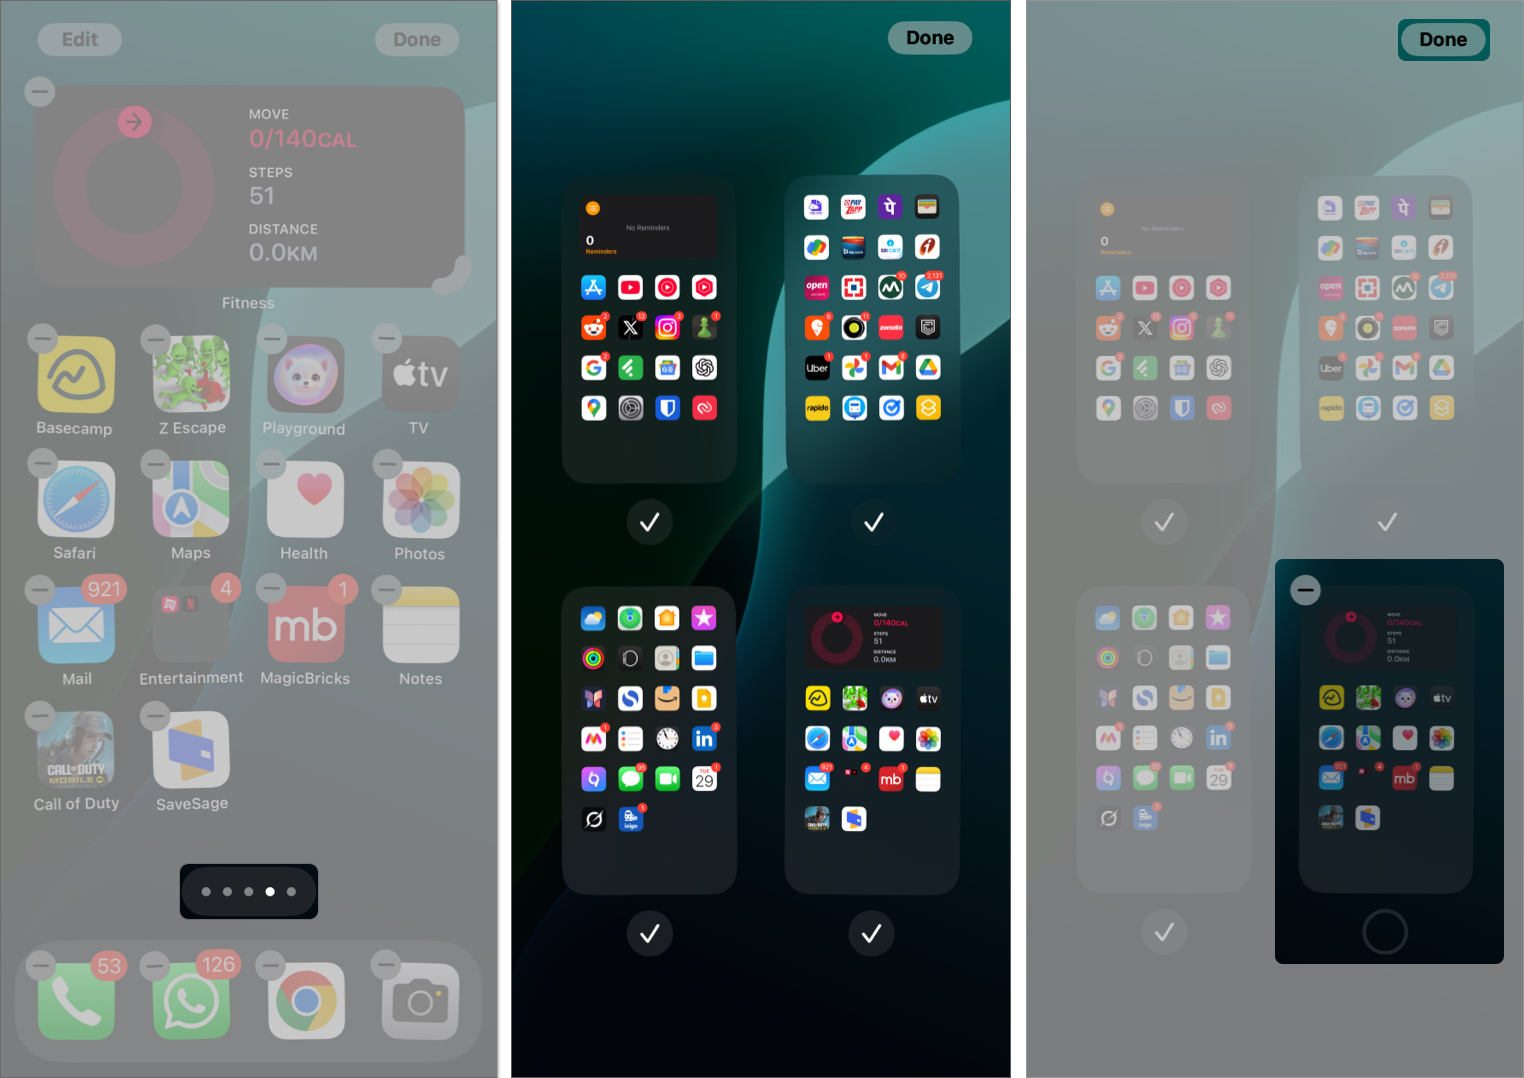
Start by moving your most-used apps to the first few rows, where you can reach them easily. Less important apps can go to the next pages. You can also group apps by categories like Work, Social, Entertainment, or even by matching app icon colors if you want a more aesthetic look. Here’s how you can move an app:
- Touch and hold an empty area on the Home Screen until the apps begin to jiggle.
- Drag the app to any position you prefer. Starting from iOS 18, you can now place the apps anywhere on the Home Screen, even leaving space between them.
- Move it to a different page by dragging it to the edge of the screen. If you’re on the last page, it creates a new one.
- Press Done in the top-right corner when you’re finished arranging to save the layout.
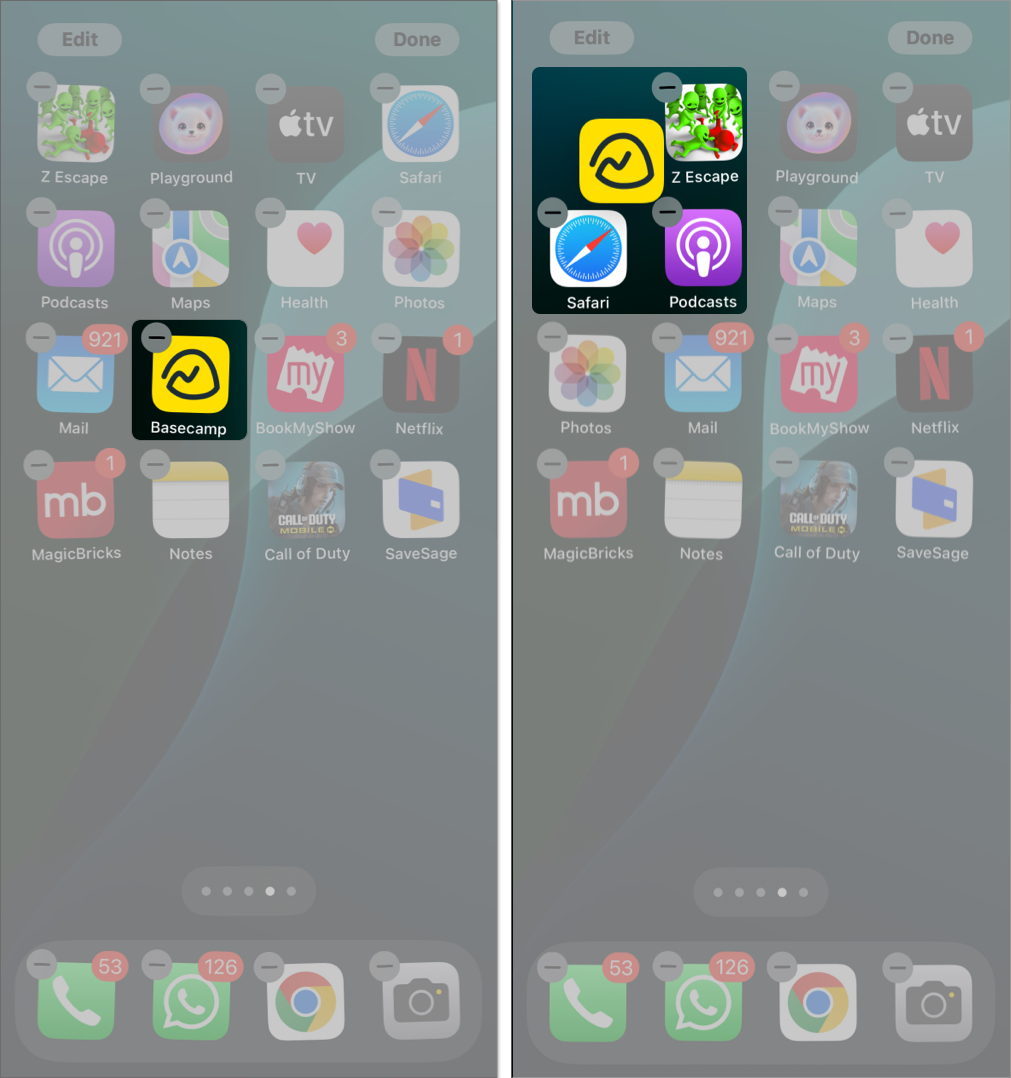
You can also move multiple apps at once. In jiggle mode, start moving one app, and while still holding it, tap on other apps to select them too. You may need to use two hands to select and move multiple apps at the same time.
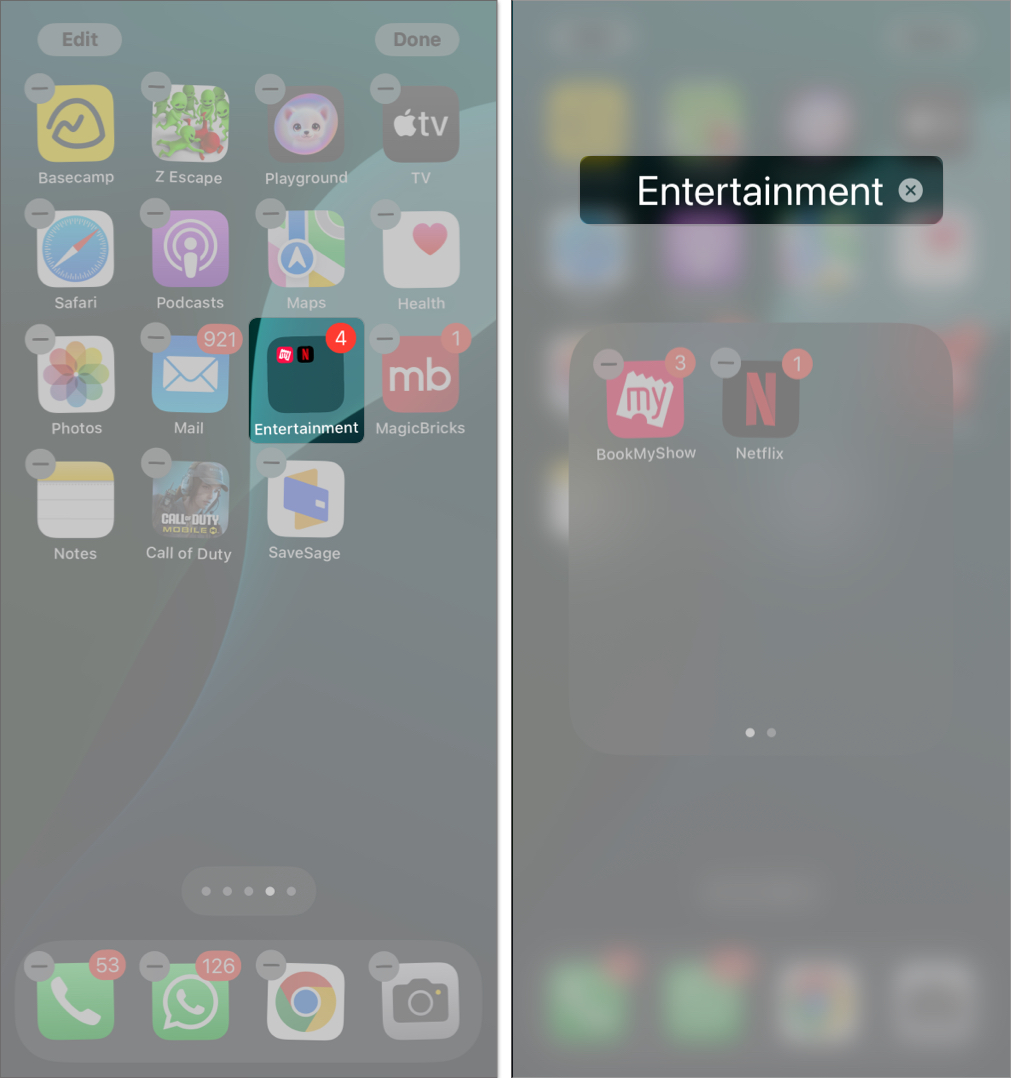
Create Folders and Put Apps Into Them
Instead of just placing apps loosely based on categories, you can create folders to group them neatly. This way, you can fit more apps on a single page, making everything easier to access. It’s especially helpful if you have lots of apps, so you won’t have to swipe through endless pages just to find the one you recently downloaded.
- Put the apps on your iPhone Home Screen into jiggle mode.
- Drag one app over another app you want to group with.
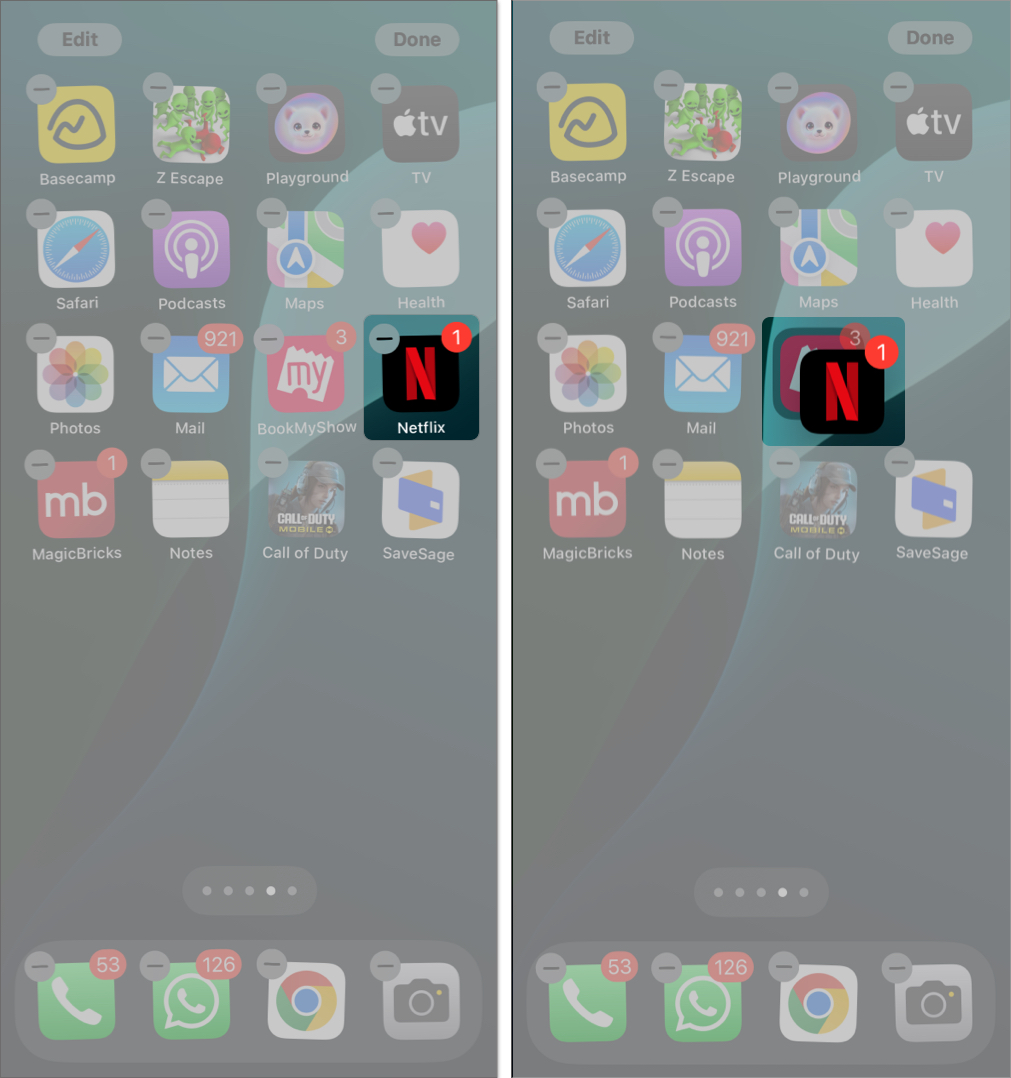
- A folder will be automatically created. Tap on it to open the folder.
- Tap the folder name to rename it. Choose something simple like “Games,” “Work,” or “Shopping.”
- Drag more apps into the folder if you want.
You can also move apps out of a folder in a similar way. To remove a folder, long-press the folder and select Remove Folder. However, removing a folder will not just unpack the apps, it will remove all the apps inside that folder from the Home Screen too. You can still find them later in the App Library.
Remove Apps from the Home Screen
Your iPhone now has an App Library, which means not every app needs to take up space on your Home Screen. You can remove apps you use less often from the Home Screen without deleting them. Here’s how to do it:
- Tap and hold the app you want to remove on the Home Screen.
- Select Remove App.
- Then, choose Remove from Home Screen.
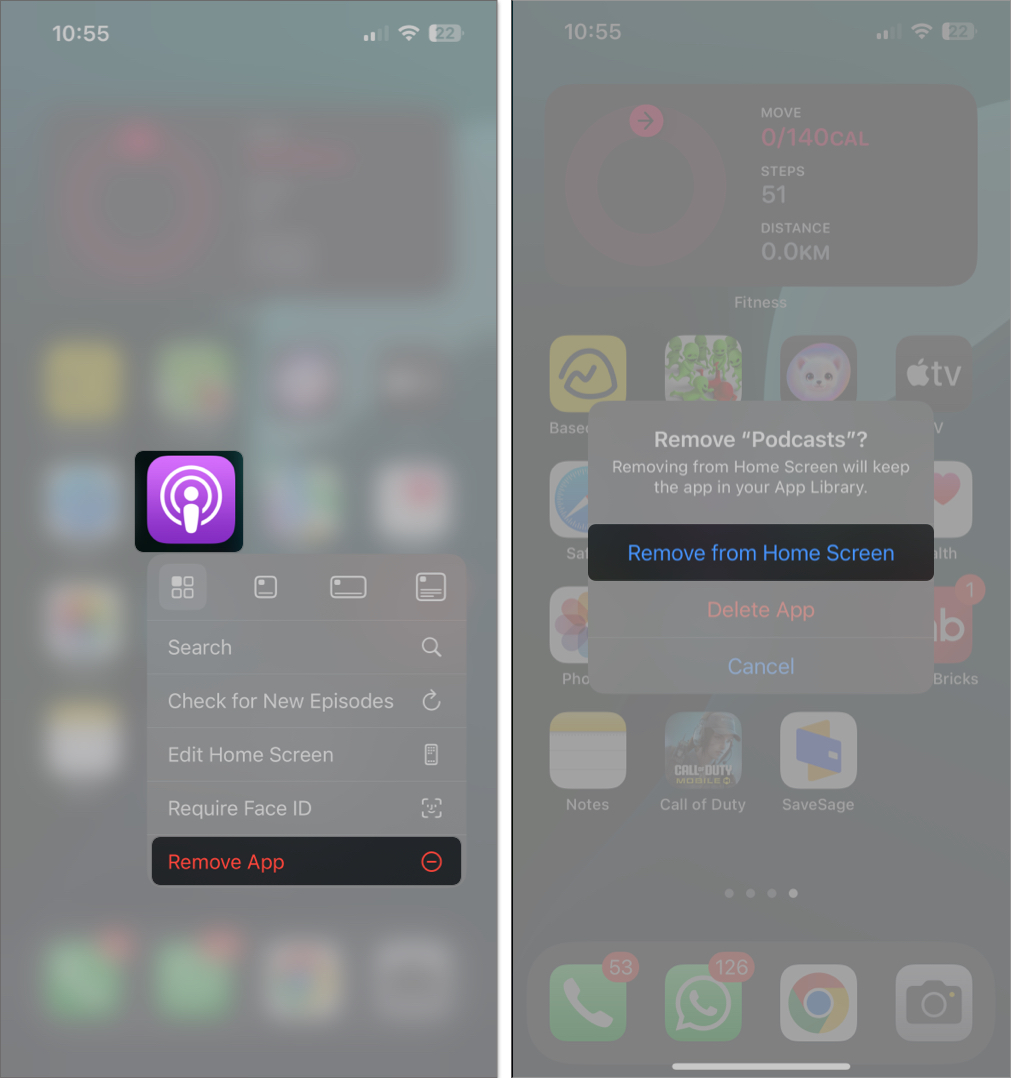

To add the app back later, simply search for it in the App Library, then drag the app icon onto your Home Screen.
Hide Home Screen Pages
Sometimes, you want to remove an entire page of apps. Instead of removing each app one by one, you can hide the entire page in a few taps. Here’s how:
- Tap and hold an empty area until the apps jiggle.
- Tap the dots at the bottom of the screen.
- Uncheck pages you want to hide or check them to bring them back.
- Press Done to save changes.

This will not permanently remove the page; rather it hides the pages from the current view. You can enable the page again to make it visible. To delete the page, after unchecking the page, you can also tap on the minus icon at the top of the page to delete it permanently.
Lock Apps on the Home Screen
You might have some apps that you prefer to keep safe. Either you want to keep your chats private or block your kids from using finance apps. You can lock an app on an iPhone like this:
- Tap and hold on an app that you want to lock.
- Then select the Require Face ID option.
- On the next pop-up, again select Require Face ID to lock the app.
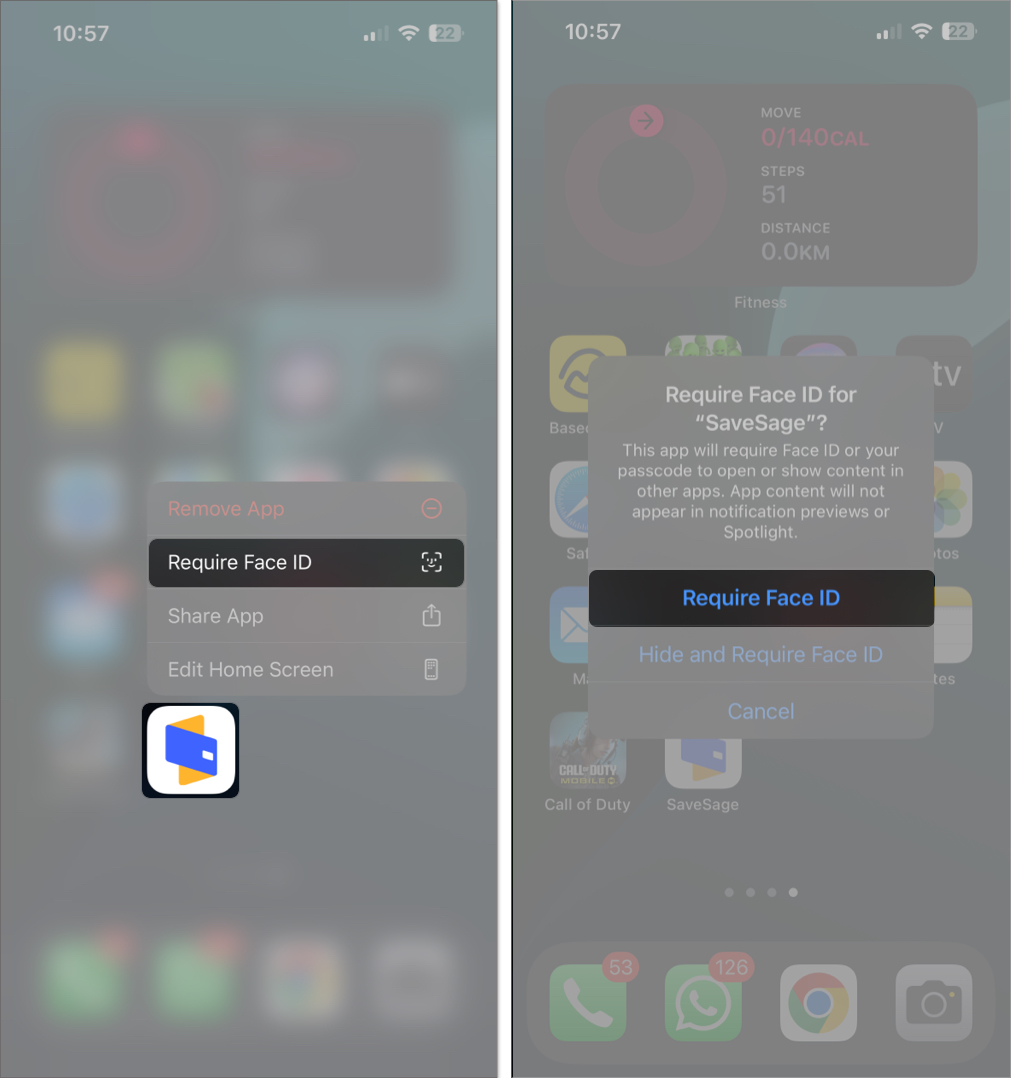

If you’re using an older iPhone and the iPhone SE models that have a fingerprint scanner, the option will be called Require Touch ID. Now, every time you open these apps, you need to authenticate them with your biometrics. To remove the lock, tap and hold the app again and select the Don’t Require Face ID option.
Hide and Unhide Apps
Not just the pages, you can also hide specific apps. This option will lock the app and then remove the apps from the Home Screen, App Library, and even the search. You can only access it by opening the Hidden folder in the App Library. This is how to hide an app on your iPhone:
- Tap and hold the app that you want to lock.
- Then select the Require Face ID option.
- On the next pop-up, again select Hide and Require Face ID to lock the app and hide it.
- In the pop-up, tap on Hide App.
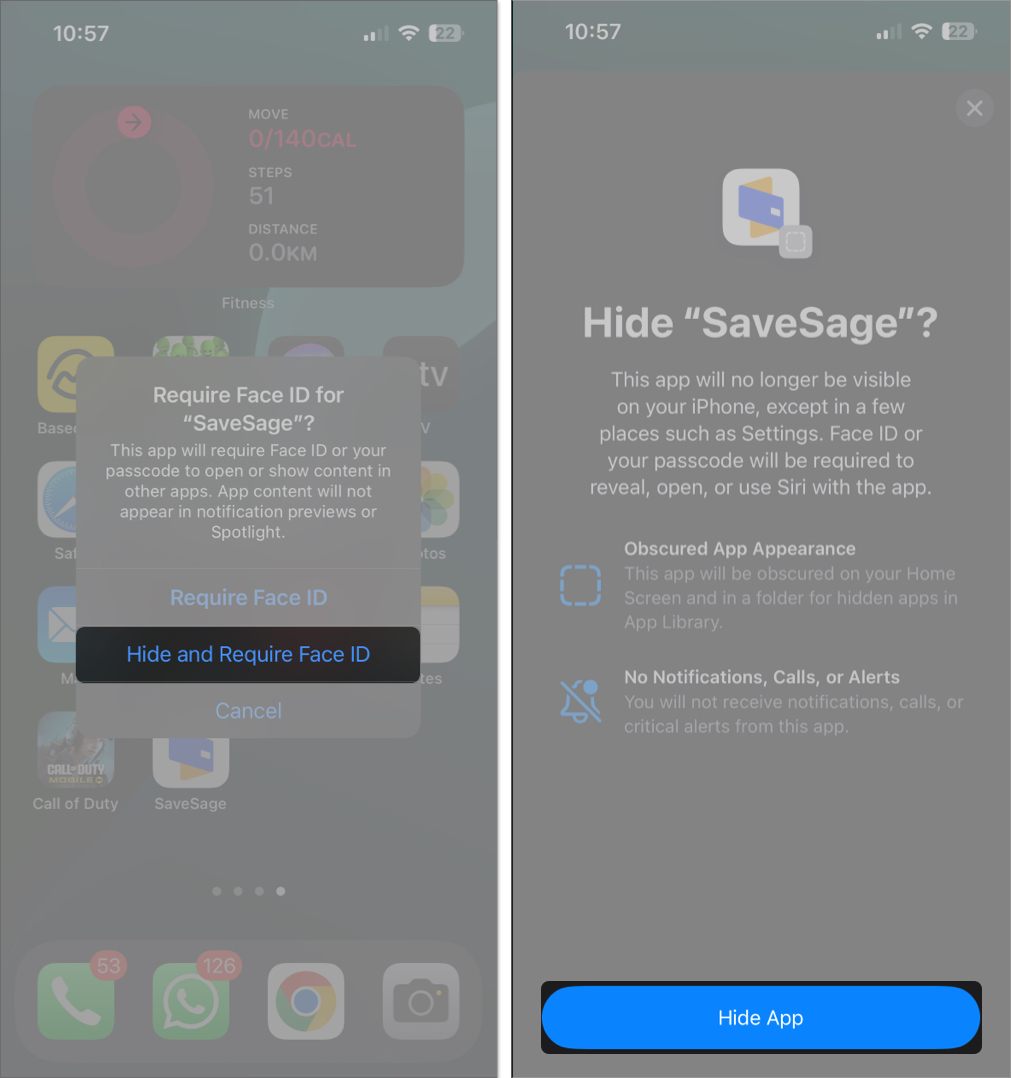

This will not only hide the app, it will also remove the app appearance from everywhere including Battery and Screen Time settings, and you will not even receive notifications, calls, or alerts from this app anymore. To unhide the app, open the Hidden folder in the App Library, tap and hold the app, and select the Don’t Require Face ID option.
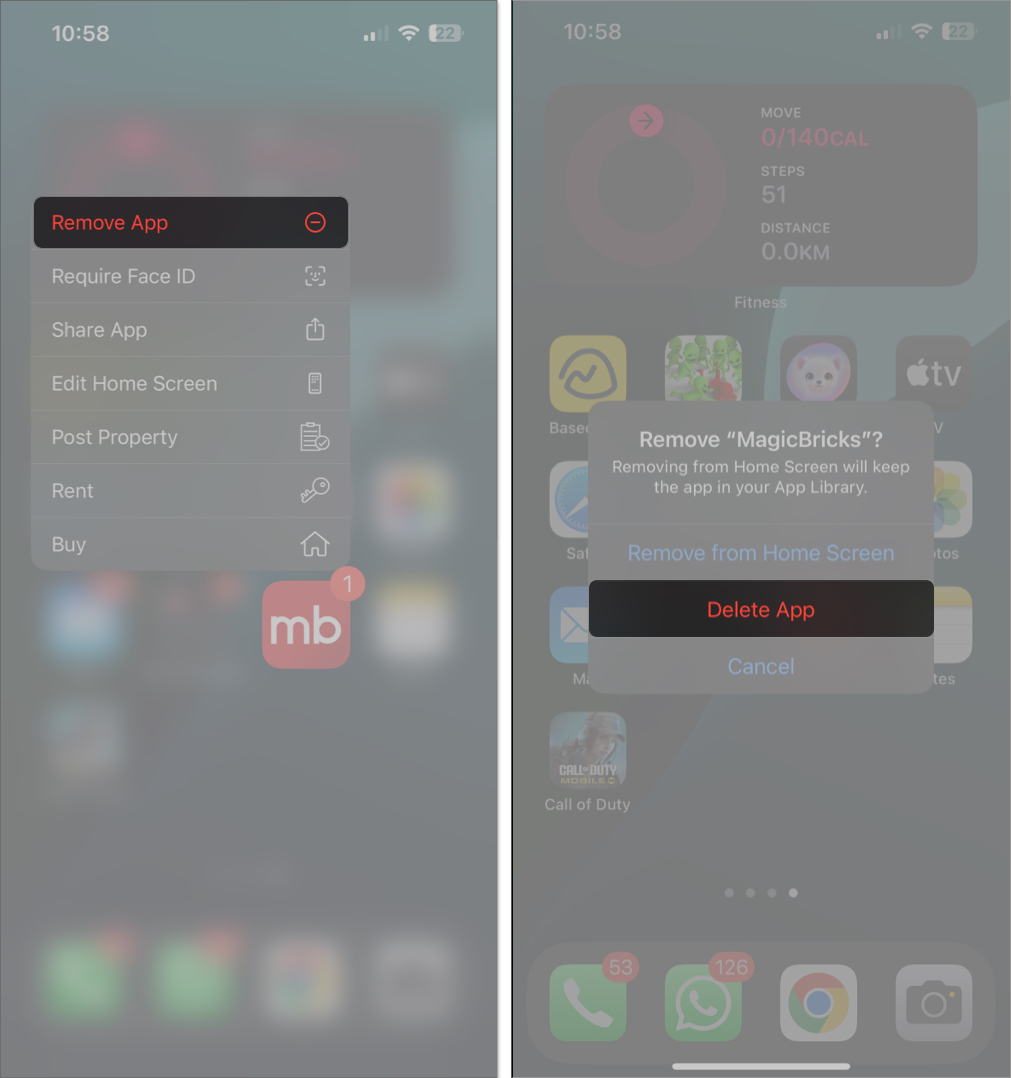
Delete Apps from the Home Screen
If the app is no longer useful, you can delete it altogether. This will remove the clutter on your phone and can even help save battery and storage on your iPhone. You can delete an app like so:
- Tap and hold on the app that you want to delete.
- Select Remove App.
- Then, select Delete App to uninstall the app.

Use Focus Mode for App Organization
This is where we get into the advanced category. Instead of creating the same Home Screen all the time, we can create a different Home Screen according to your current Focus mode. For example, when you’re in the office, you can set your iPhone Focus mode to Work and keep only work-related apps on the Home Screen. Here’s how:
- Open Settings and select Focus.
- Create a new Focus mode like “Work” or “Personal.”

- Now, under the Customize Screens option, choose the pages you want to be visible when in this Focus mode.
- Now, when you enable this Focus mode, only the pages you have selected will be visible.
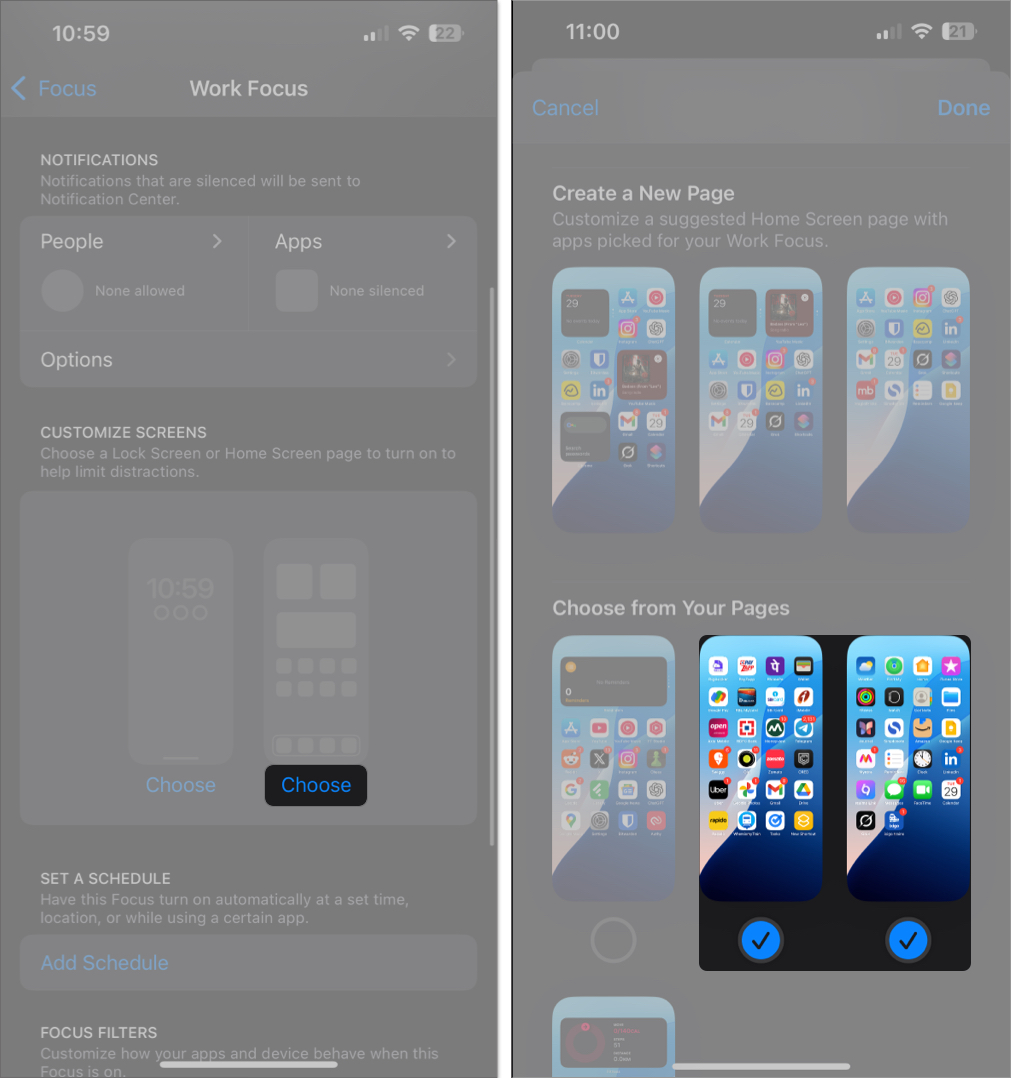


Remember that this feature is not available for Driving Focus mode.
Reset to Default Layout
If you ever feel like your iPhone Home Screen is too messy and you want a fresh start, you can reset the layout to its default setting. This will organize all the built-in apps back to their original places and put the rest of your apps in alphabetical order. It won’t delete any of your apps. Follow the steps below to reset your iPhone’s Home Screen layout:
- Open Settings and go to General > Transfer or Reset iPhone > Reset.
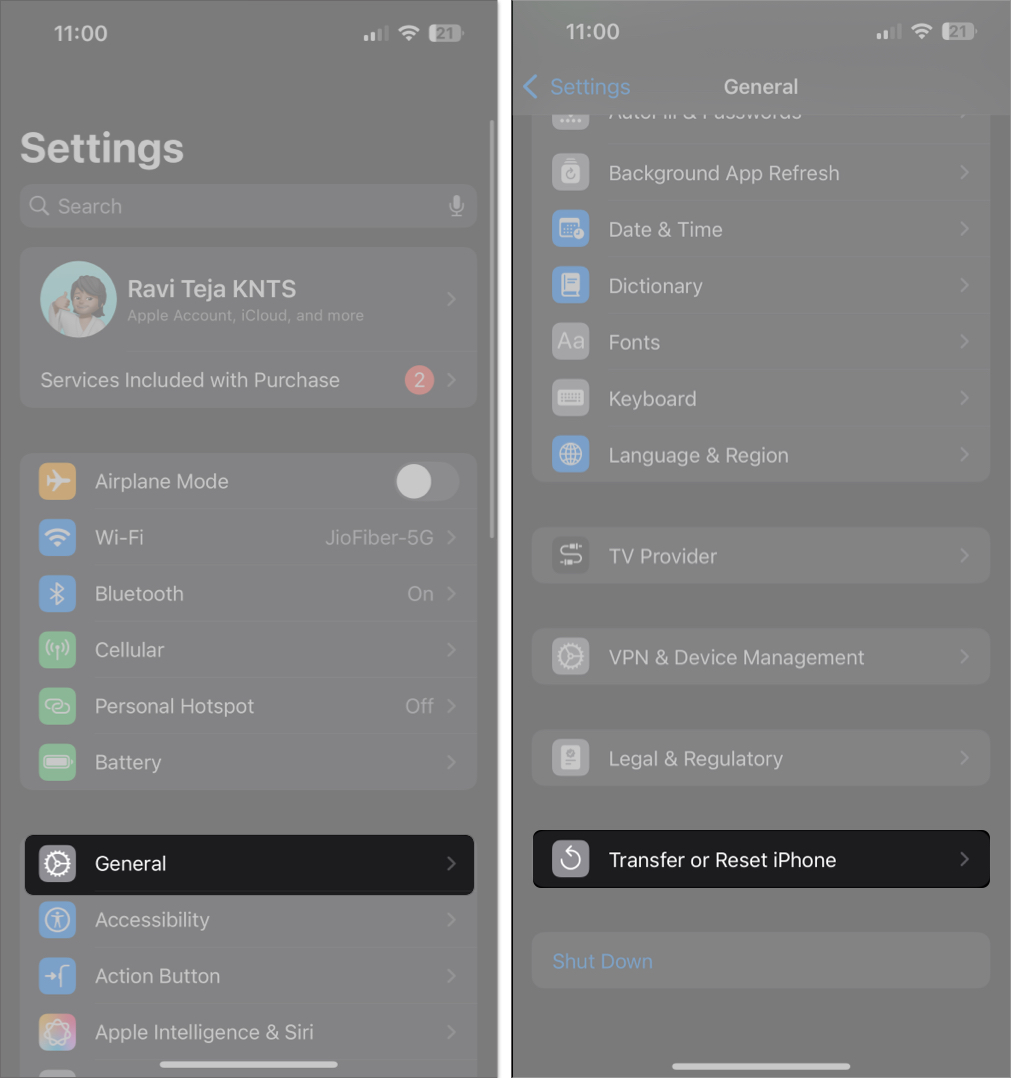
- Tap on Reset Home Screen Layout.
- Confirm your choice.


This is a quick way to clean up if reorganizing manually feels overwhelming. However, this is a non reversible action.
Bonus: Add Widgets and Widget Stacks
For your most-used apps or the ones you check often at a glance, using widgets on your iPhone is a smart idea. For example, I use a widget for the Fitness app to quickly view my daily step count without opening the app. Similarly, you can add a Photos widget to see your latest pictures or a Calendar widget to stay updated with upcoming events right from your Home Screen. To add a widget, follow these steps:
- Put the apps into jiggle mode.
- Tap the Edit button in the top-left corner and select Add Widget.
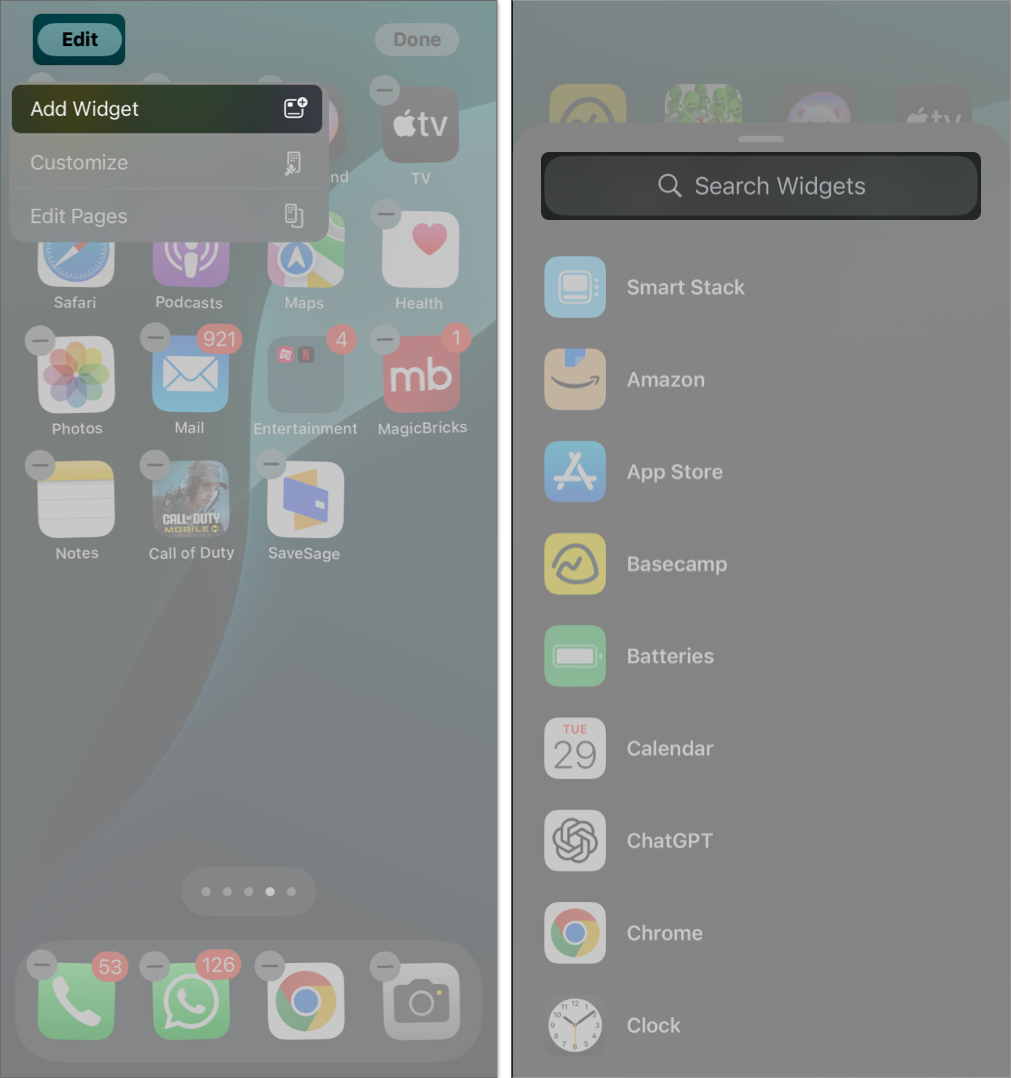
- Choose a widget (like Weather, Calendar, or Reminders) and tap Add Widget.
- You can stack widgets by dragging one on top of another. This creates a Widget Stack that you can swipe through.


Alternatively, you can tap and hold any app on the Home Screen, and if that app supports widgets, you’ll see widget options in multiple sizes that you can tap to instantly turn the app into a widget.
Tips to Keep Your iPhone Organized Long Term
Once you’ve cleaned up your Home Screen, these tips will help you maintain a neat and easy-to-use layout.
- Use Spotlight instead of endless swiping: Just swipe down from the middle of the Home Screen to open Spotlight and type the name of the app. This helps to find any app faster instead of checking in a grid of app icons.
- Delete unused apps regularly: Keep deleting the apps that you don’t want to use anymore. This frees up storage and reduces clutter.
- Use App Limits or Screen Time for better app awareness: Go to Settings > Screen Time and set limits for app categories to be more mindful of your actual use.
Reduce Clutter and Improve App Accessibility on Your iPhone
Organizing your iPhone doesn’t have to be a one-time task. With a little setup and regular check-ins, your phone can stay clean, efficient, and actually enjoyable to use.
Related articles worth reading:


