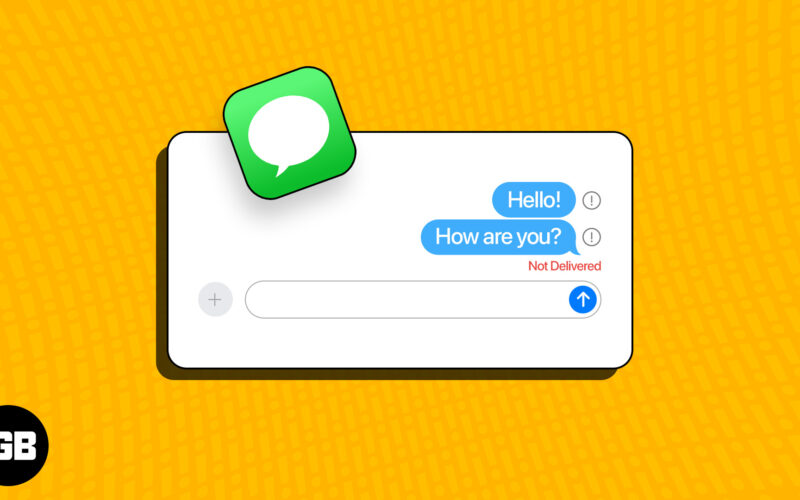
It’s very annoying if your iPhone is not sending text messages; thankfully, the solutions to fix this problem are easy and quick.
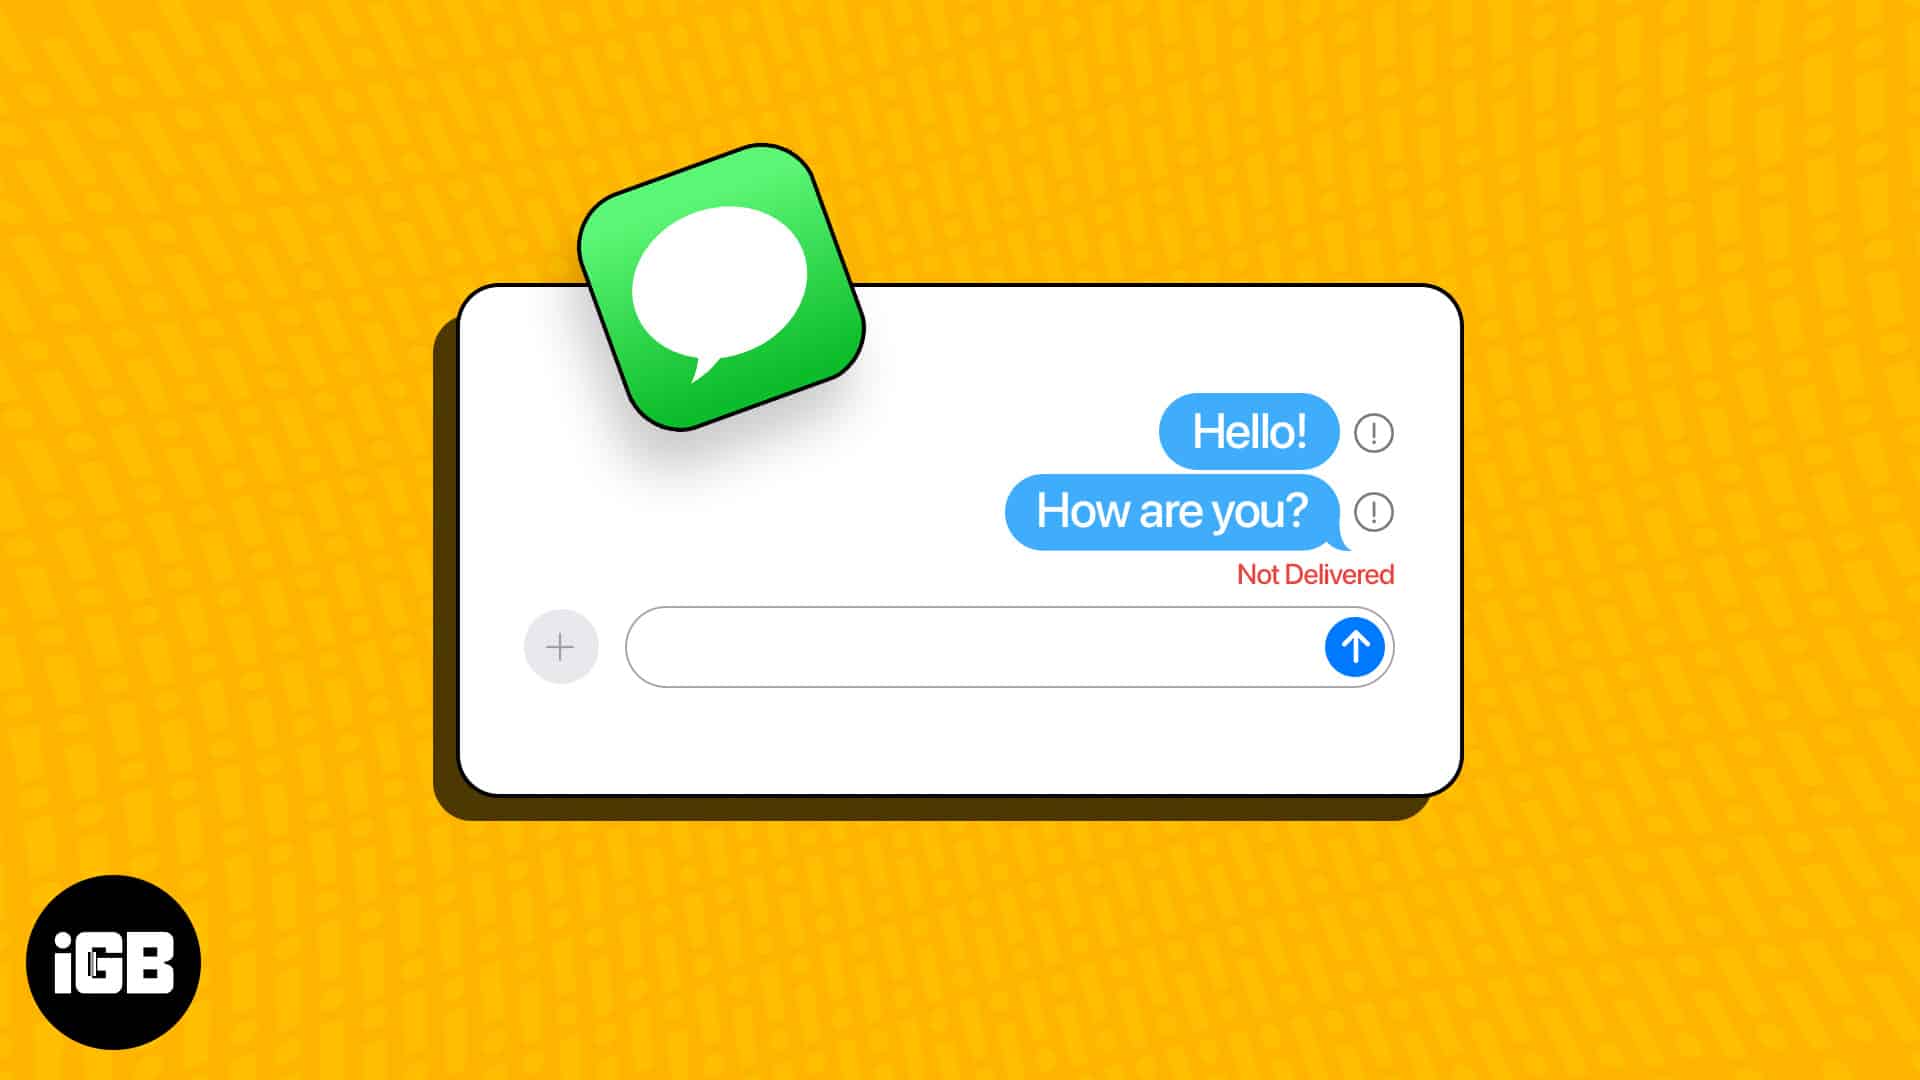
You may not be able to send regular text messages better known as SMS from your iPhone and see a red ❗️ Exclamation mark icon due to an unusual bug or temporary glitches. Before you contact your carrier or visit an Apple Store, look at all these straightforward fixes to this issue. By the end, you will get the answer to ‘why is my iPhone not sending text messages?’
How to fix iPhone not sending text messages
First of all, make sure you are allowed to send SMS from your carrier’s end. If you are a prepaid user, ensure you have enough balance. And if you are on a postpaid plan, make sure there are no outstanding bills or limitations on your account.
If these fixes solve your issue, that’s great. If not, check these troubleshooting steps to identify why your iPhone can’t send text messages and fix the same.
1. Restart your iPhone
If your iPhone’s text messages are not getting delivered, a simple restart can often fix the issue.
To restart an iPhone X or later, hold the Side button and the Volume button. Then slide to power off. However, if you have an older iPhone, you have to hold either the Top or Sleep/Wake button to access the power off menu.
2. Quit and reopen Messages app
If you’re having trouble sending text messages from your iPhone, a simple fix may be to close and relaunch the Messages app. This can sometimes clear up minor glitches or issues that are preventing messages from being sent.
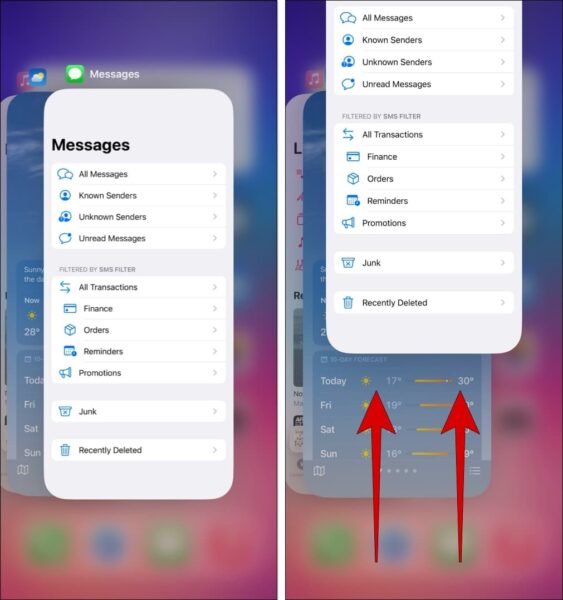
On iPhone with Home Button, double press it to see all open apps. On iPhone without Home Button, swipe up from the bottom of the screen and pause.
Now, drag the Messages app card to top to force quit it. You may also close other running apps. Reopen the Messages app and try sending a text messages.
3. Turn on/off Airplane mode
If you have poor cellular reception on your iPhone, you can try moving to a different room or location to see if that helps.
But if you keep experiencing issues, follow the steps below to reconnect your iPhone to cellular services.
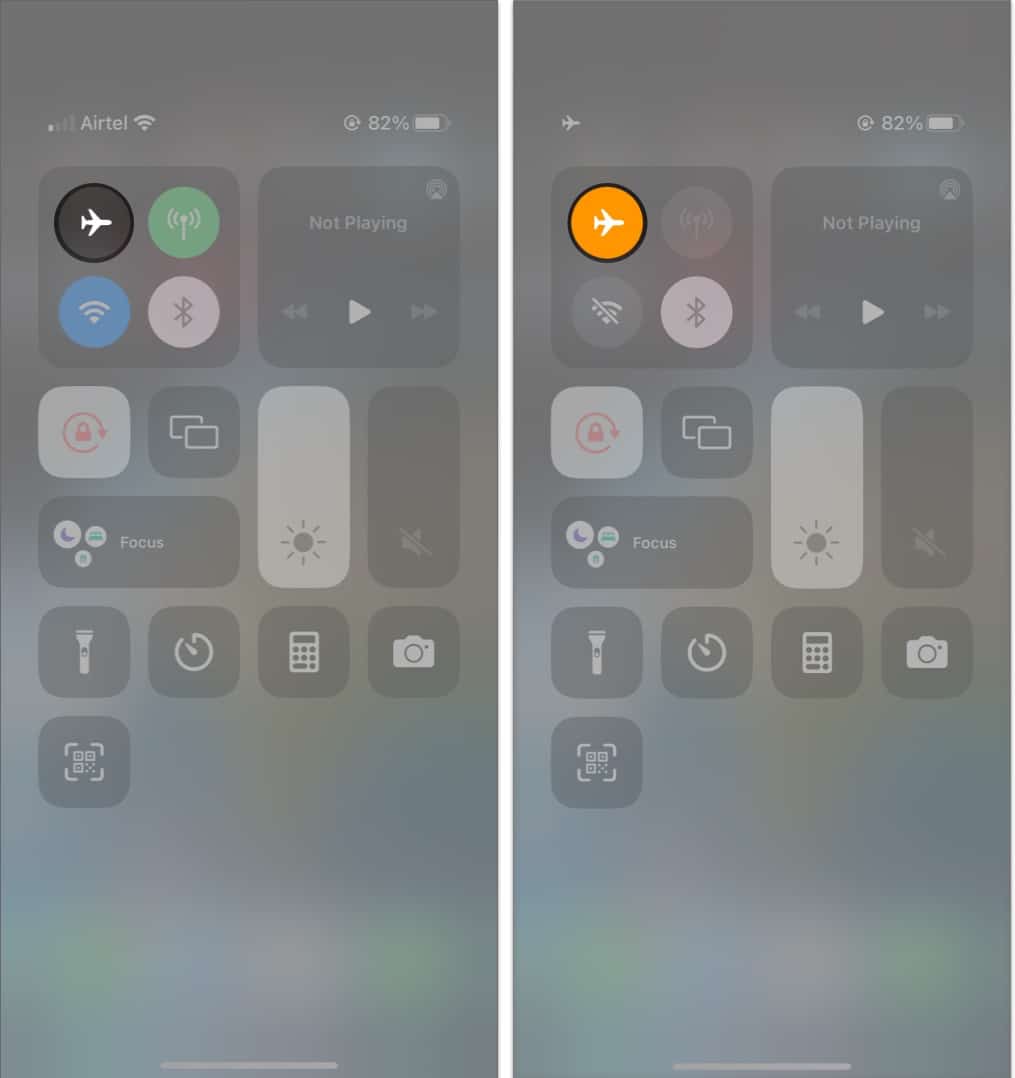
- Open the Control Center on your iPhone.
- Tap and enable Airplane mode for a few seconds → Then turn it off.
4. Check recipient’s phone number
Chances are slim, but I would advise that you check the phone number of the person whom you are sending the text. If you see a wrong country code or digits missing from the number, please correct it and try to send the text message again.
5. Delete the conversation and start a new message
If your iPhone can’t send text messages to a specific contact, deleting and starting a new message thread might be the solution.
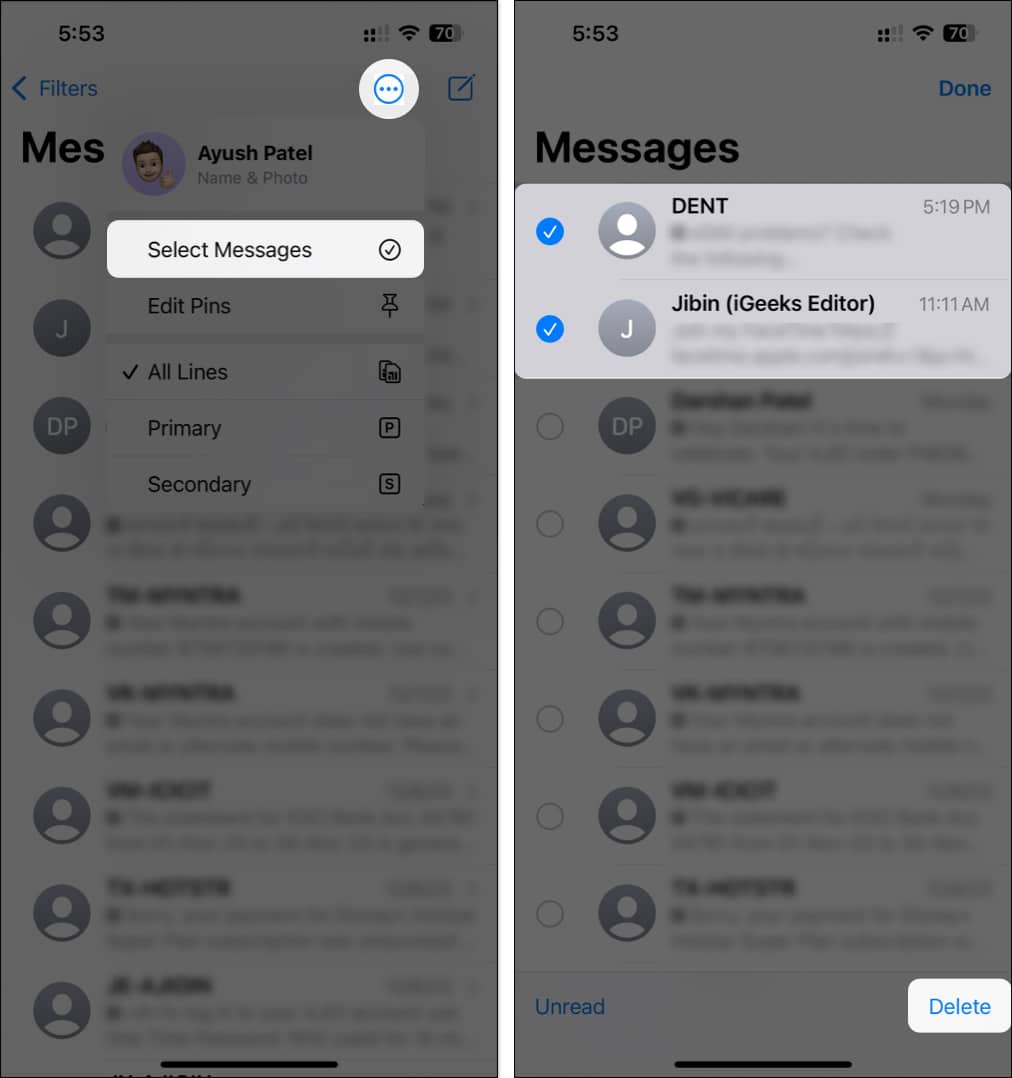
- Open Messages → Tap the three-dot menu → Select Messages.
- Select the message threads you would like to restart → Tap Delete.
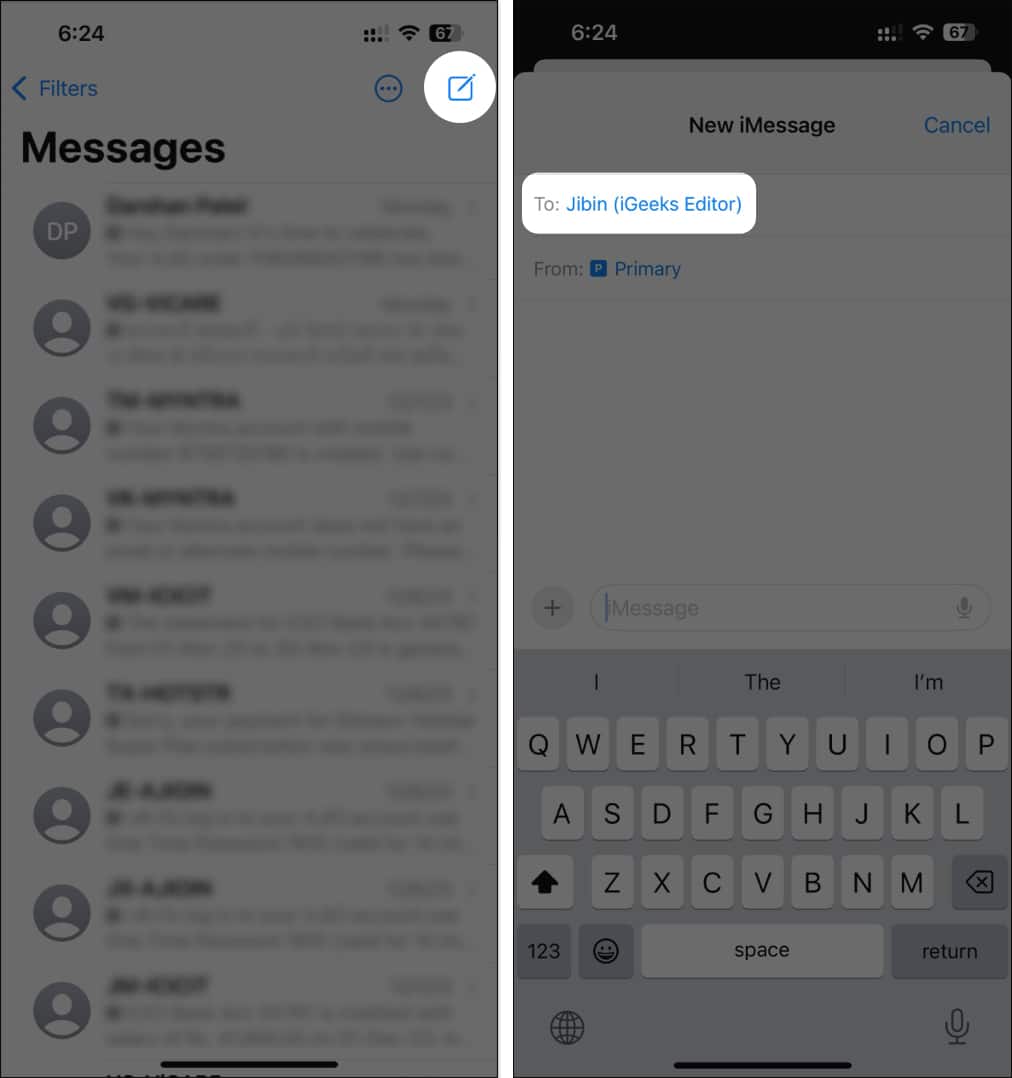
- Tap the Compose button in the top right corner → Add the recipients.
6. Ensure the correct SIM is selected
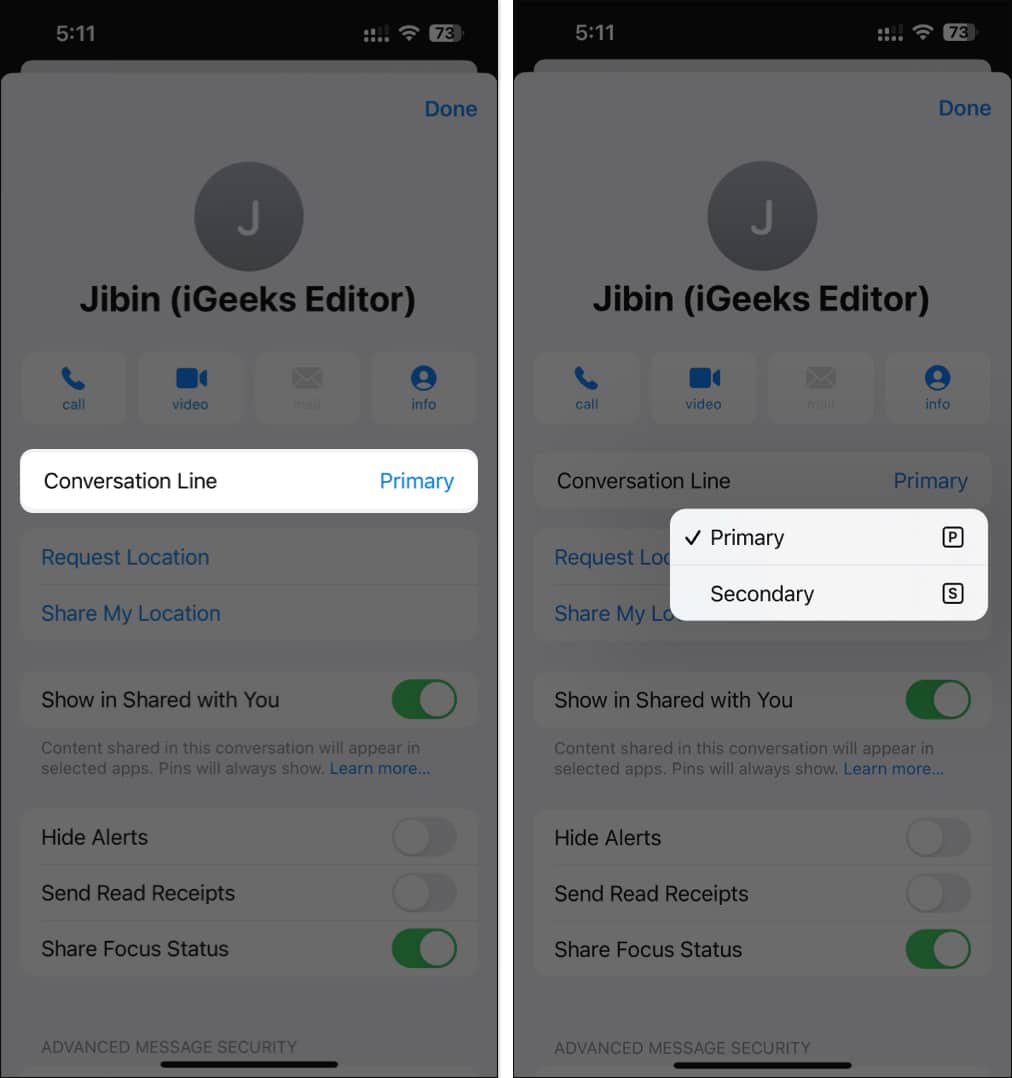
Suppose you are using dual SIM on your iPhone, wherein only one SIM supports texting and the other SIM is only reserved for data. In that case, you should ensure that you’ve selected the correct SIM or conversation line that can be used for sending texts.
If the wrong line is selected, your iPhone’s text messages won’t be delivered.
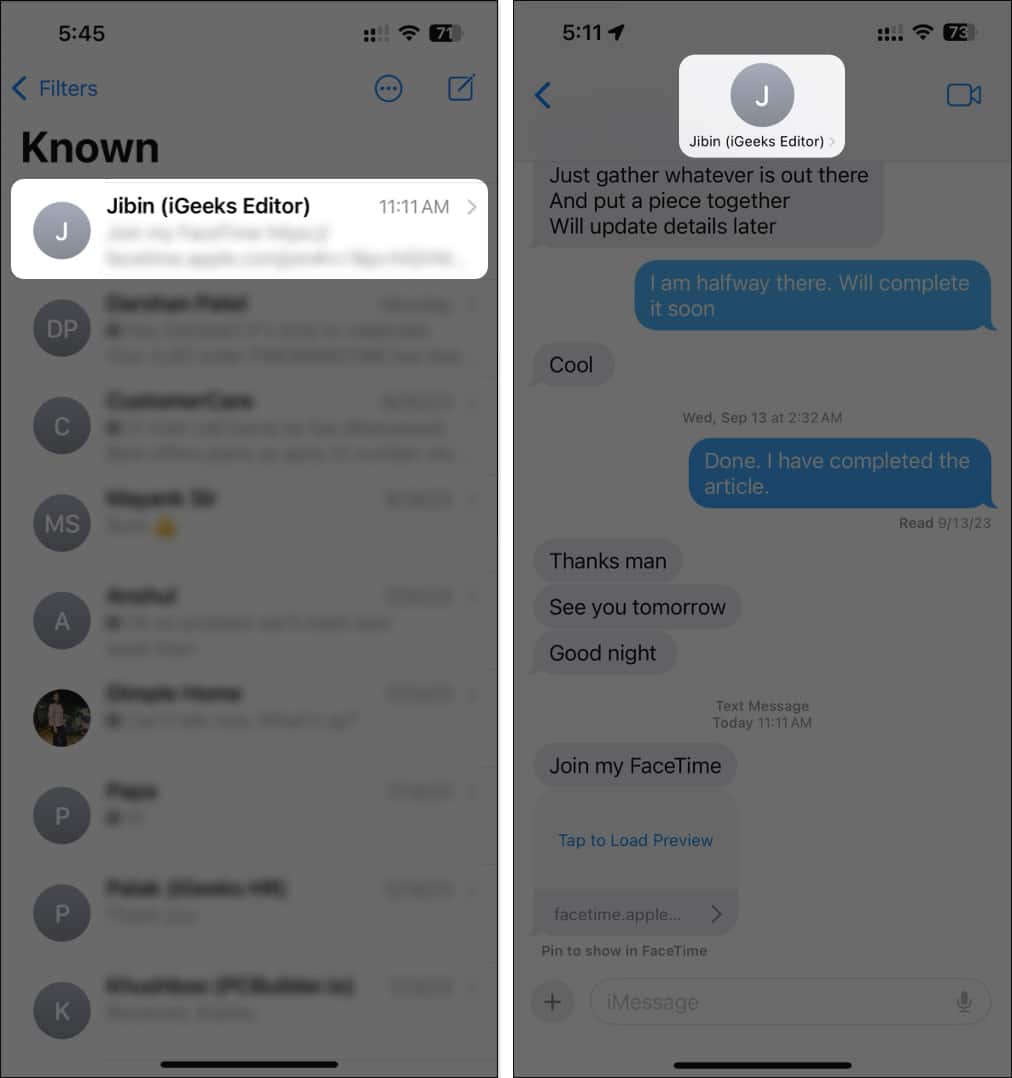
- Open the Messages app → Then, open any message thread.
- Tap the contact’s name at the top.
- Tap Conversation Line → Select your preferred SIM.
7. Ensure SMS are turned on
It is a good idea to ensure that your iPhone can send a message as a regular text message when iMessage isn’t available. To do that:
- Go to Settings → Messages.
- Scroll down and toggle on Send as SMS.
8. Turn off Text Message Forwarding on iPhone
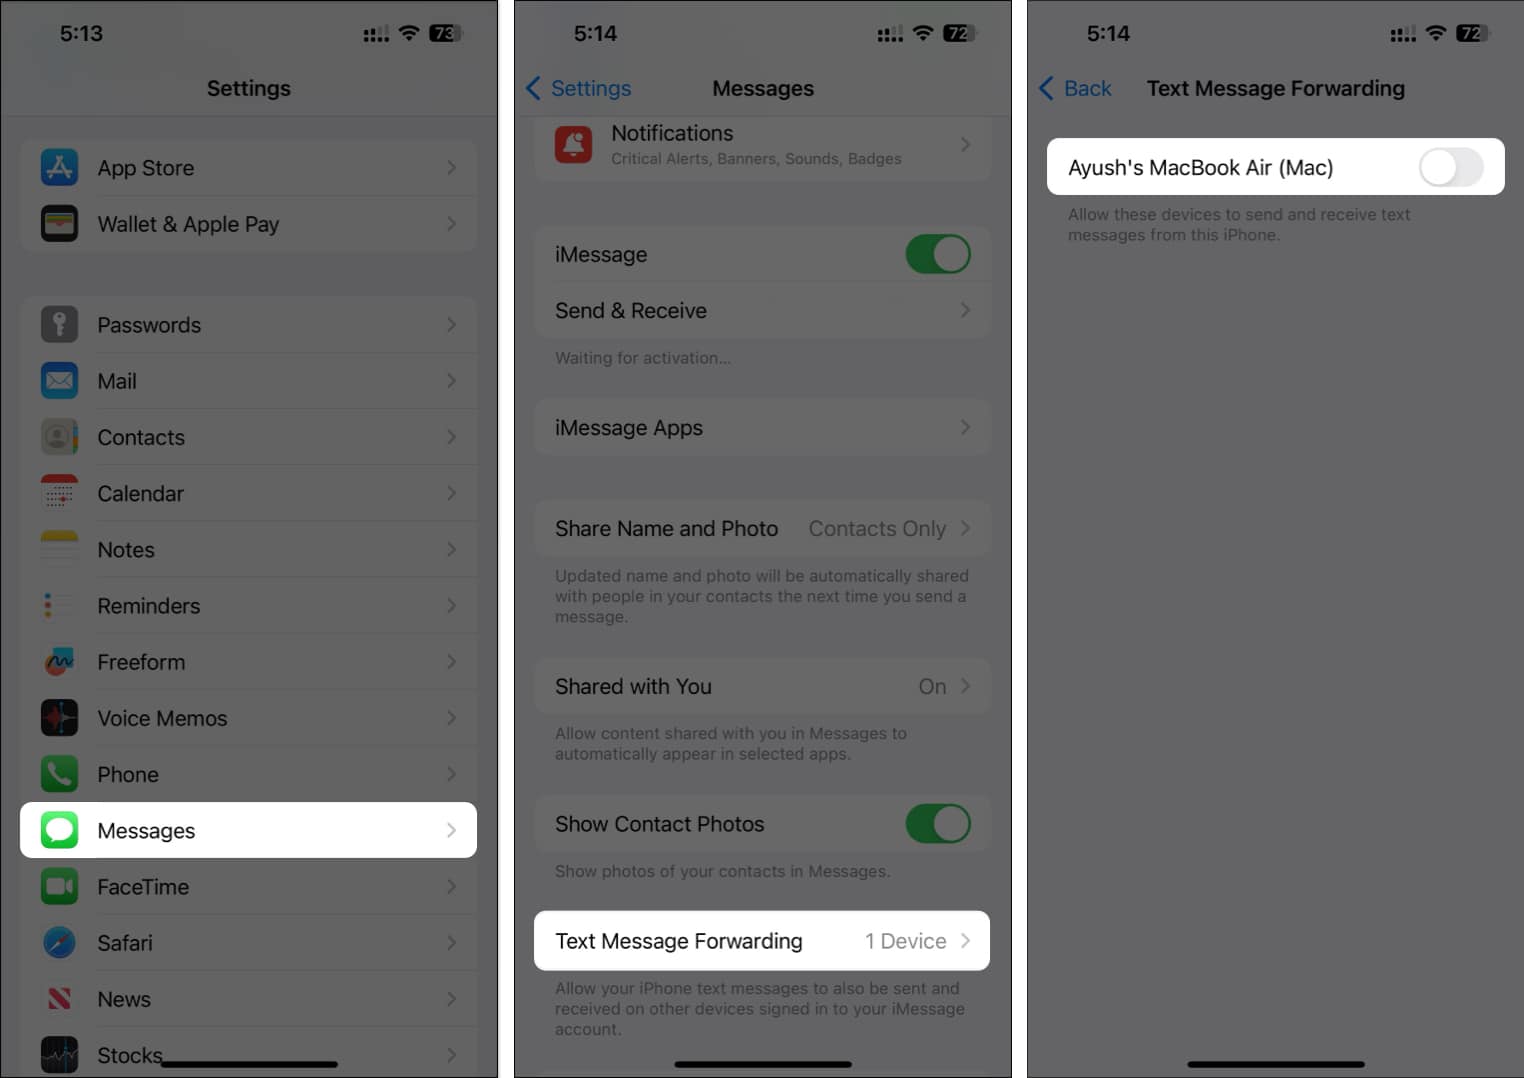
This feature allows you to receive and send SMS/MMS messages from your iPhone on connected Apple devices like Macs or iPads. However, this feature can be glitchy and prevent you from sending texts.
- Navigate to Settings → Messages.
- Scroll down and tap Text Message Forwarding.
- Turn off the toggle next to the connected Apple devices.
9. Check date and time settings on iPhone
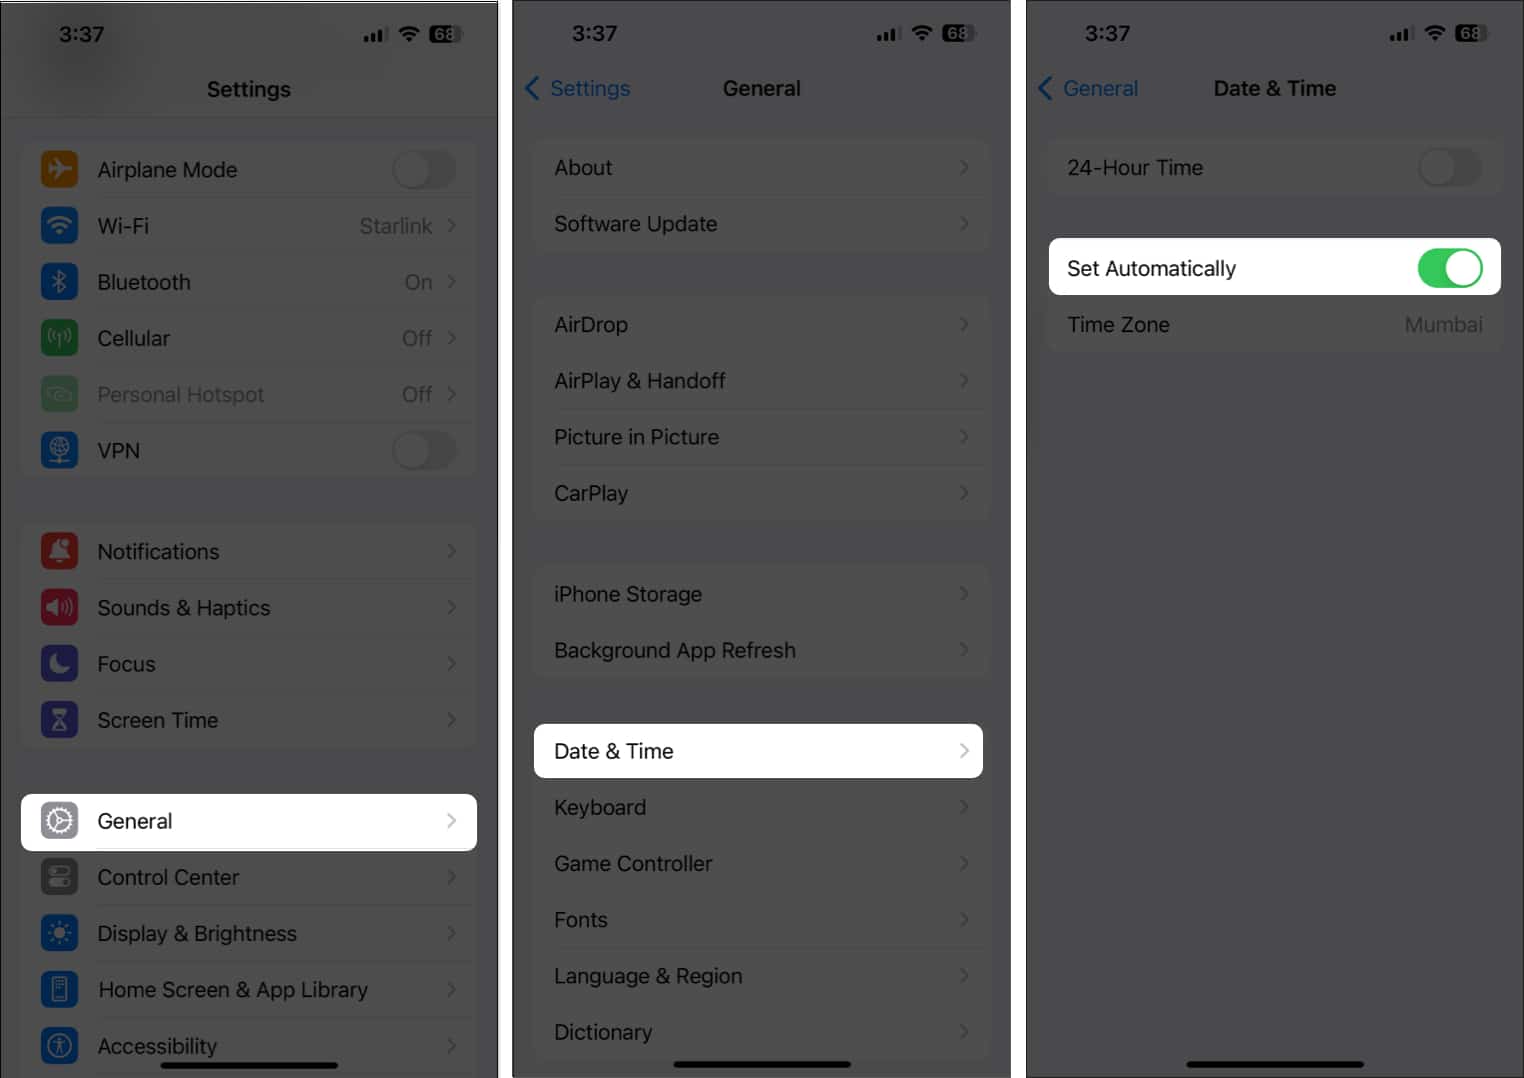
While this may seem trivial, Incorrect date and time settings on iPhones can also prevent you from successfully sending text messages.
This is because cellular services rely on accurate date and time settings for delivering text messages and ensuring proper synchronization between the devices.
- Navigate to Settings → General.
- Select Date & Time → Toggle on Set Automatically.
10. Check for carrier updates
Outdated carrier settings can also result in your iPhone not sending text messages.
You should regularly install these updates as they affect various aspects of your cellular network, including SMS/MMS functionality.
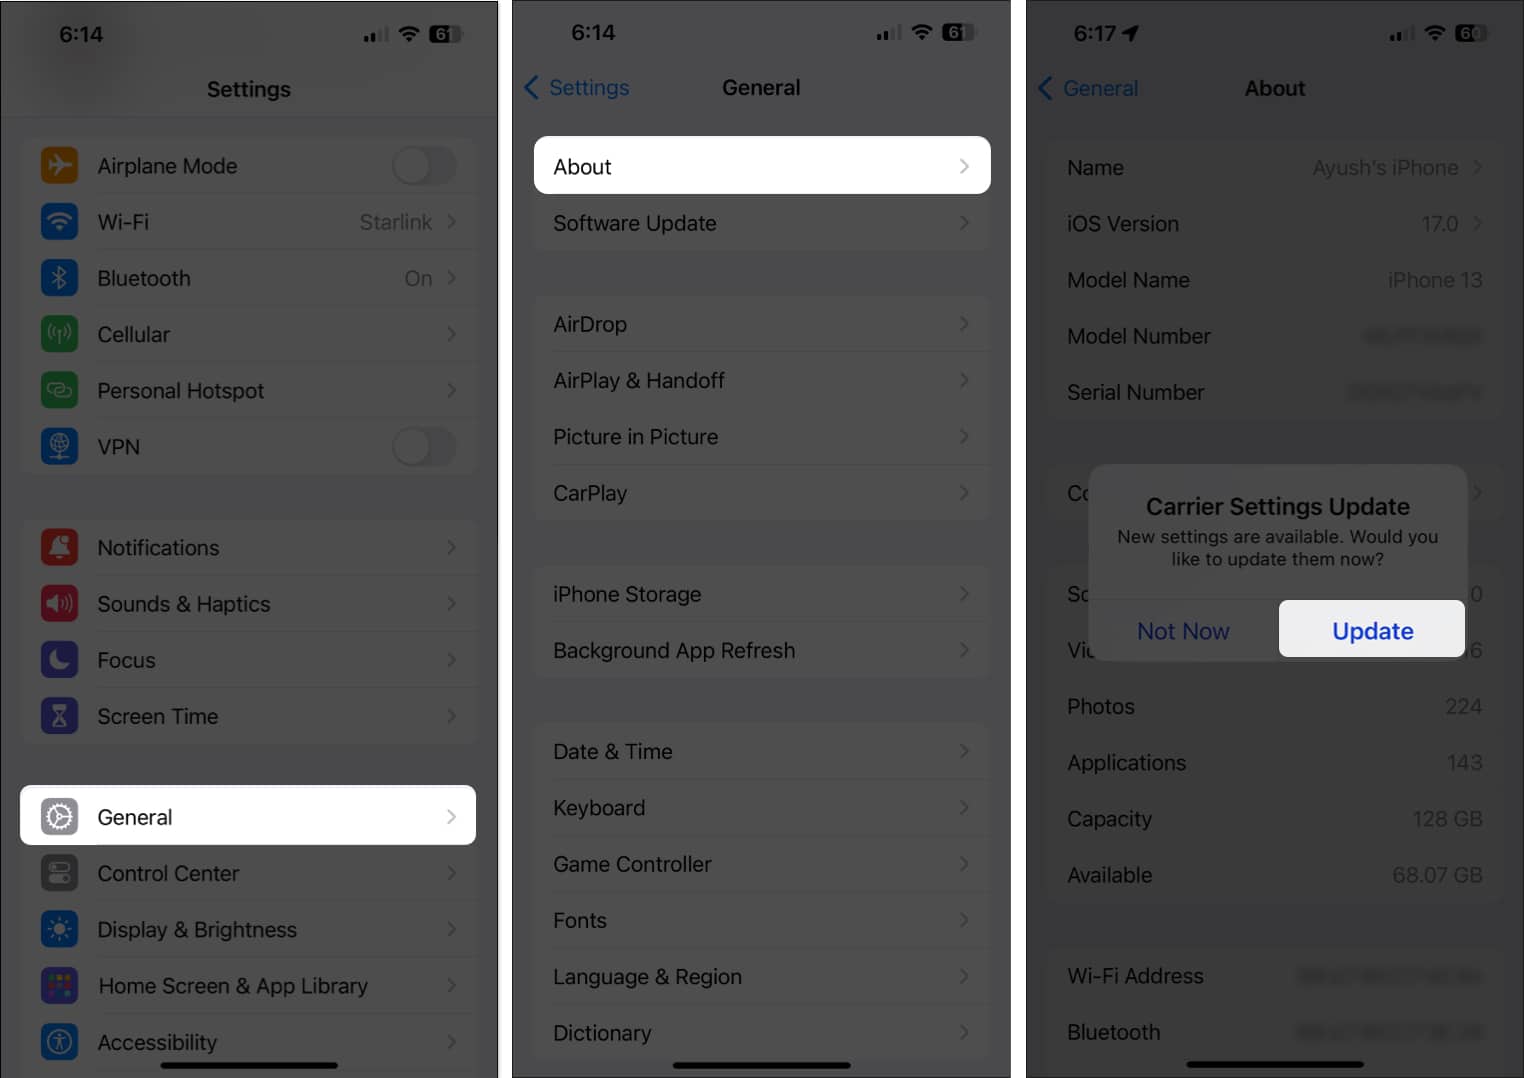
- Navigate to Settings → General → About.
- If a Carrier Settings Update dialog pops up → Tap Update.
11. Remove and reinsert the SIM card
Struggling to send or receive text messages on your iPhone? A simple trick that often works wonders is removing and re-inserting your SIM card. This can sometimes resolve issues caused by poor contact between the card and your iPhone’s internal reader, leading to communication disruptions.
Apart from the iPhone 15 and 14 models sold in the United States, all iPhones have a physical SIM card slot on the left side. Use the ejector tool or a pin to remove the SIM card. Then, clean it with a soft, dry cloth before reinserting it.
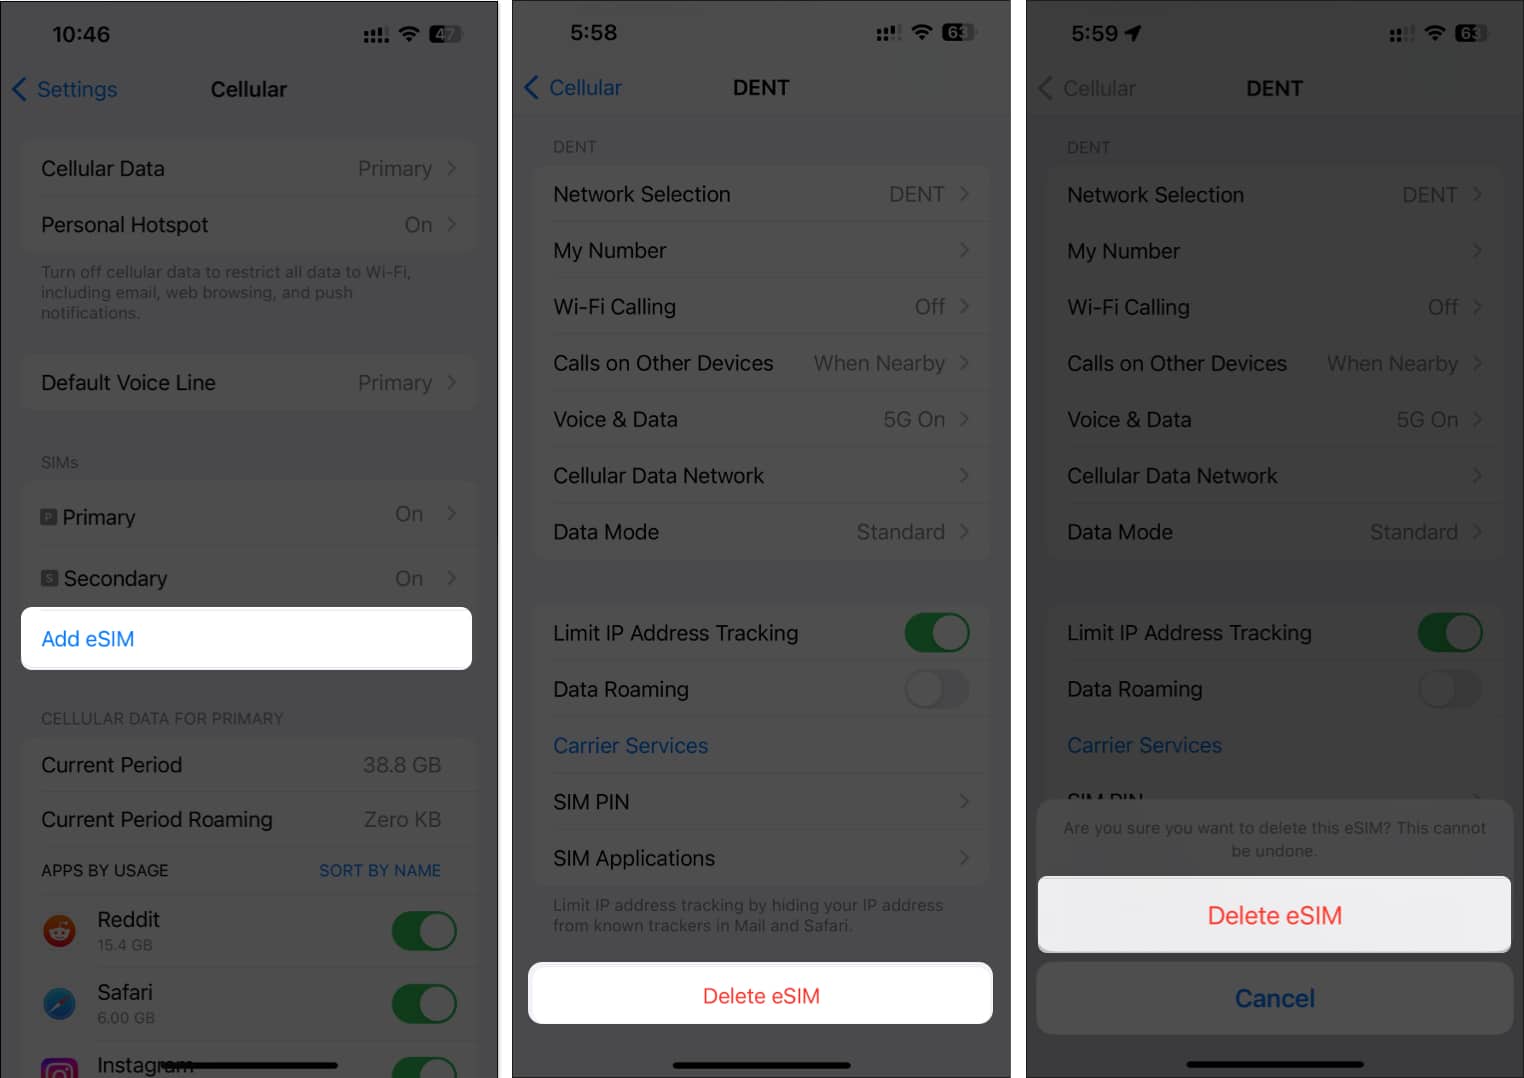
In case your iPhone uses an eSIM, follow these steps to delete and re-add it:
- Go to Settings → Cellular.
- Select the eSIM you want to Delete → Tap Delete eSIM.
- Tap Delete eSIM again to confirm the action.
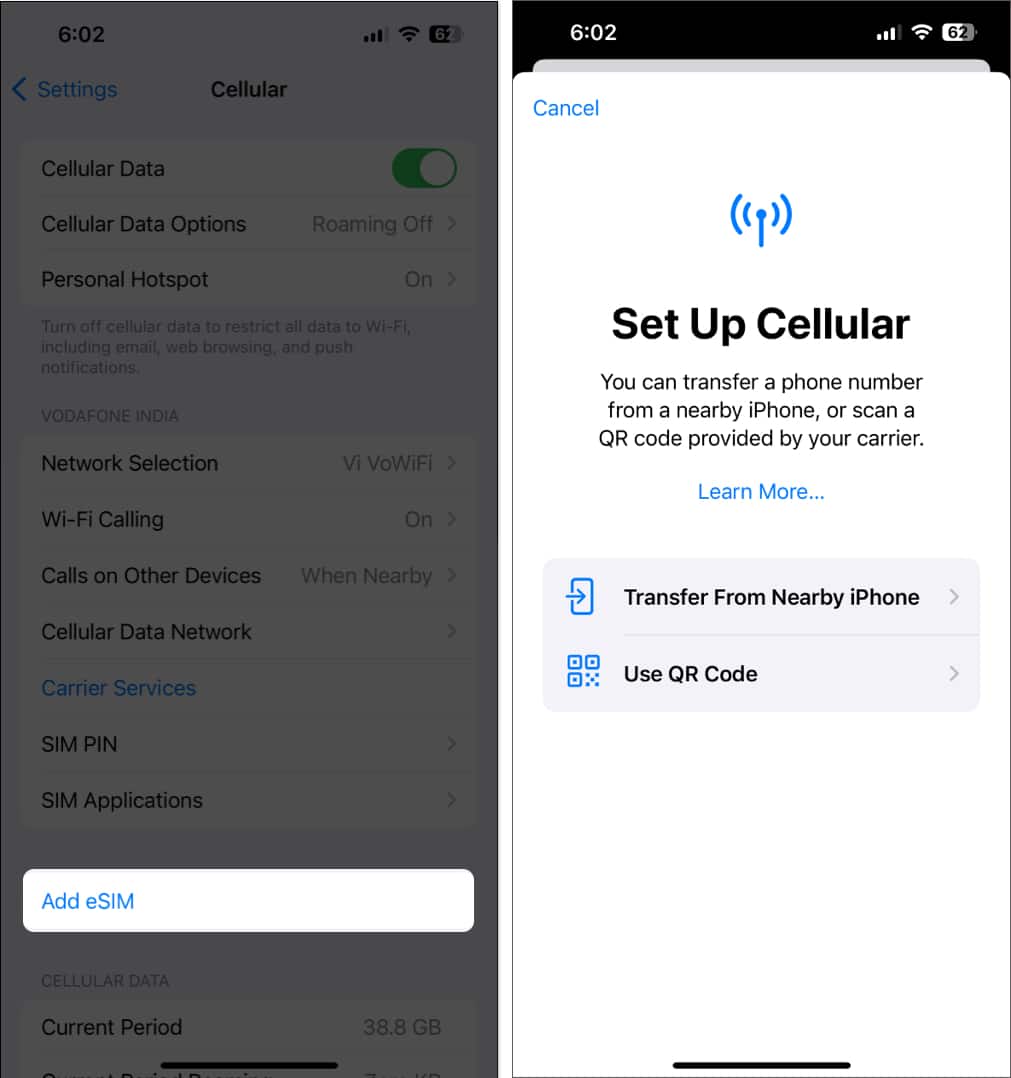
- Tap Add eSIM → Follow the instructions to set up the eSIM again.
12. Install the latest iOS update
Installing the latest iOS update can be a convenient solution to make the iPhone send text messages again.
Updates include bug fixes and improvements that address various issues, including those related to text messaging.
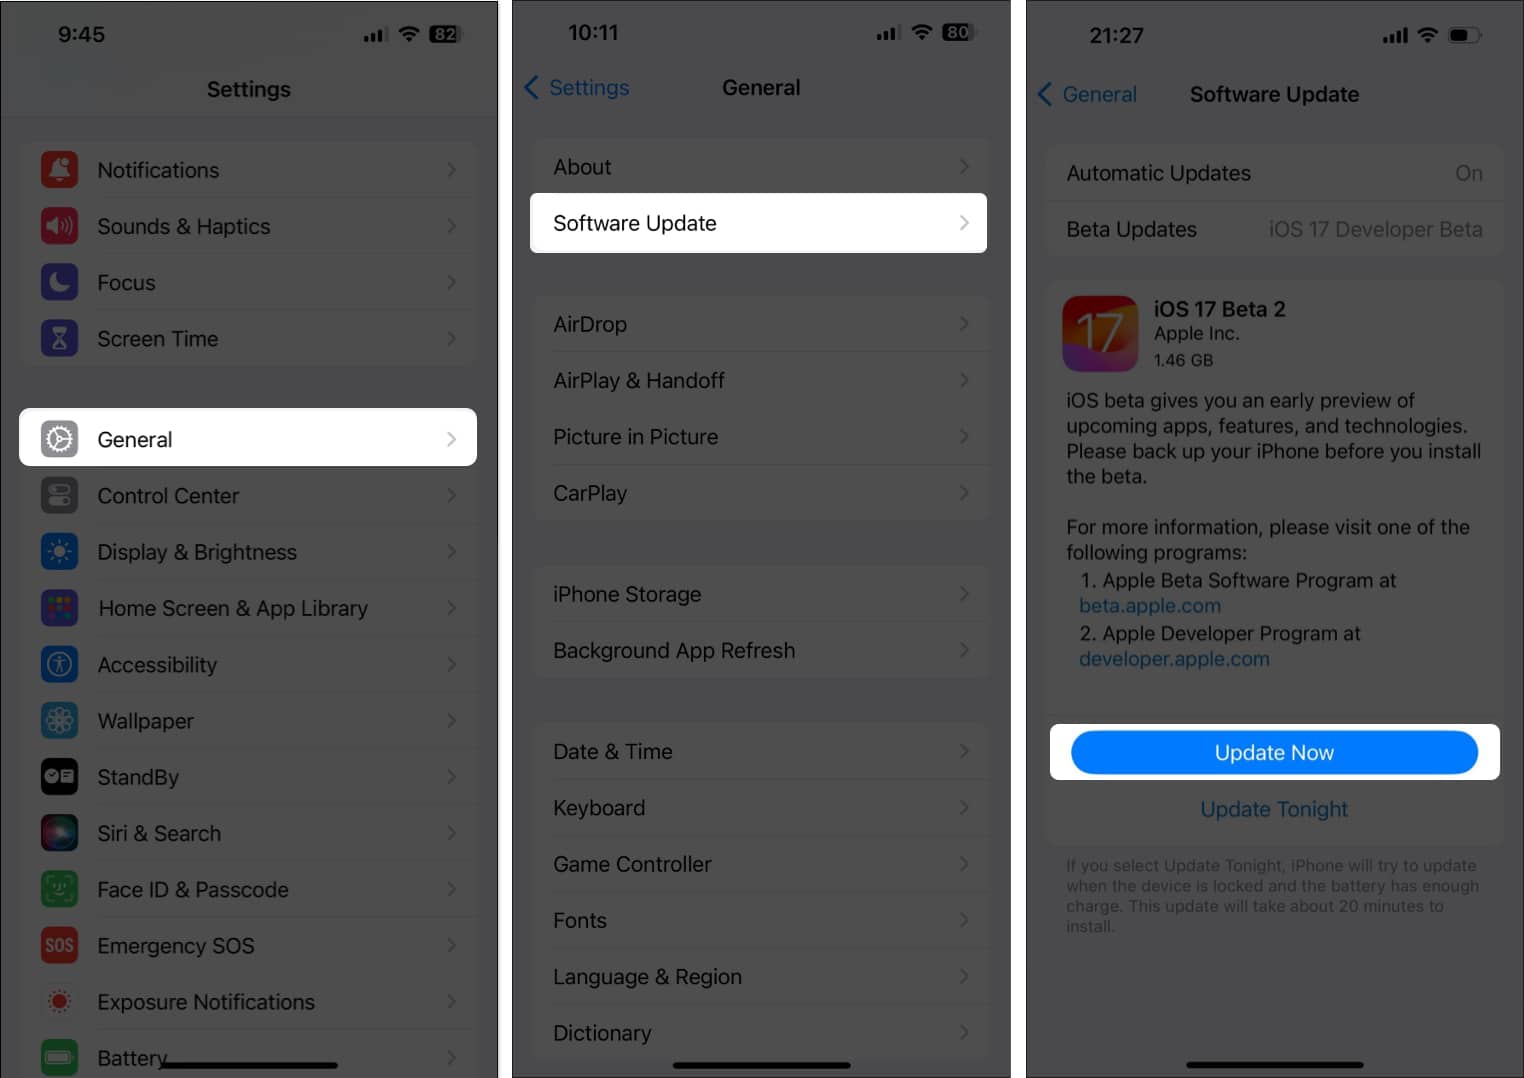
- Navigate to Settings → General → Software Update.
- Tap Update Now if a software update is available.
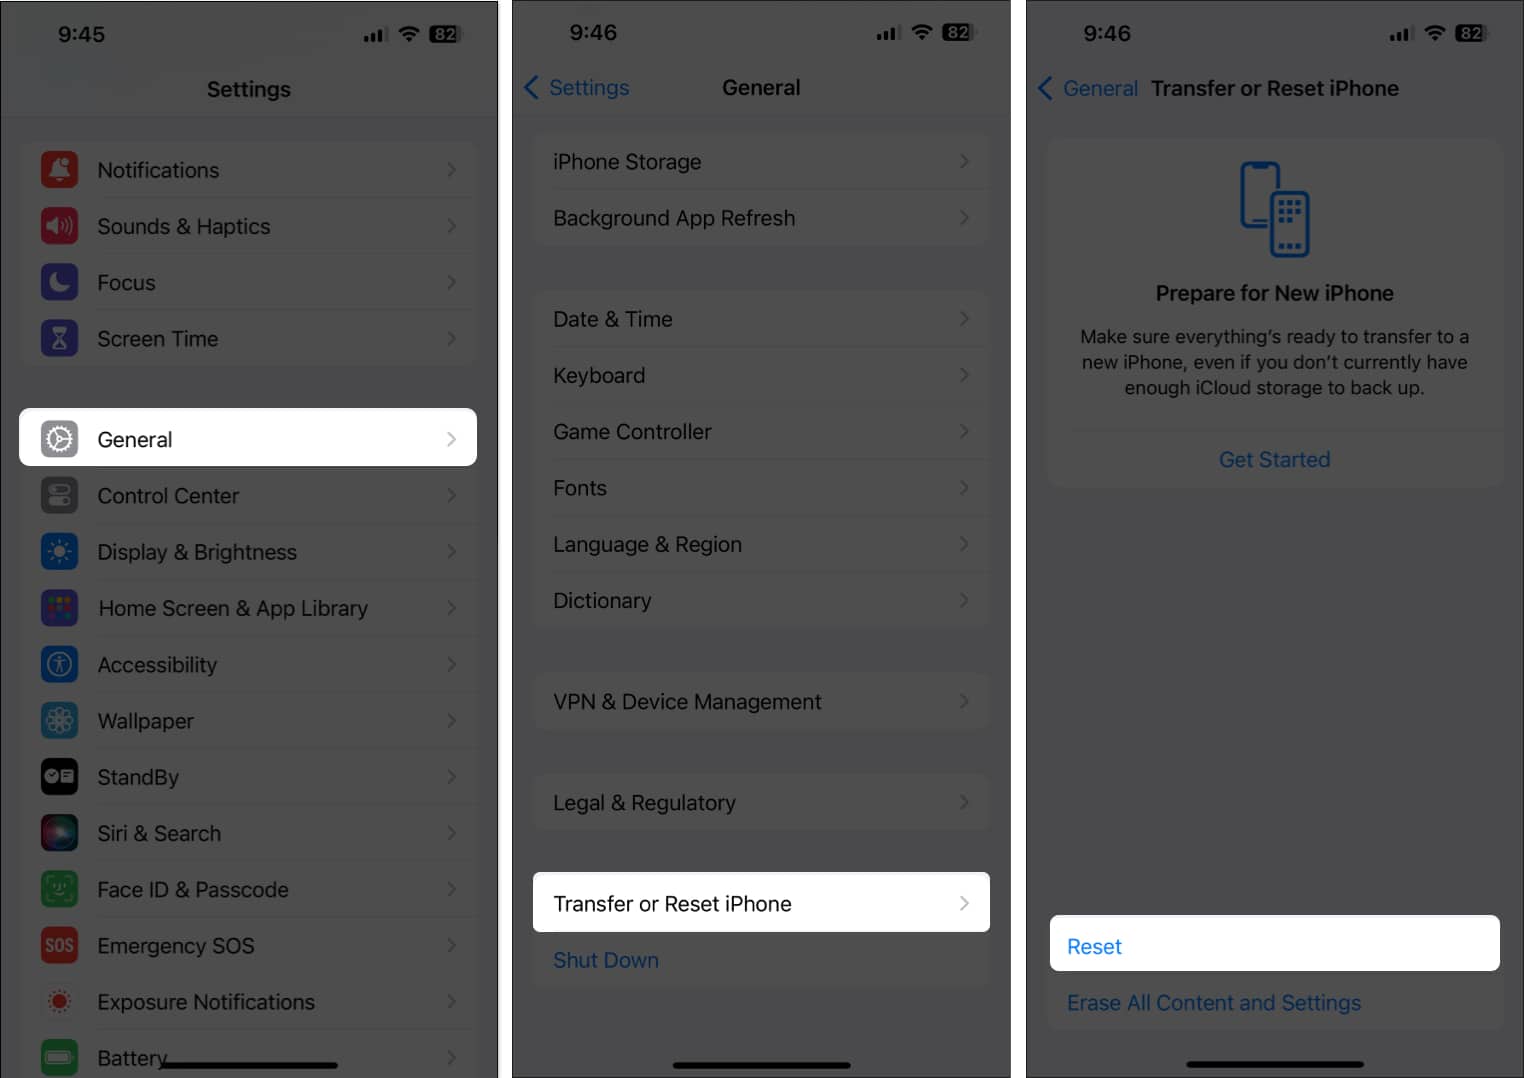
13. Reset your iPhone’s network settings
Resetting the network settings will reset all network-related settings to their default values, which can sometimes resolve issues caused by incorrect network configurations.
- Navigate to Settings → General → Transfer or Reset iPhone.
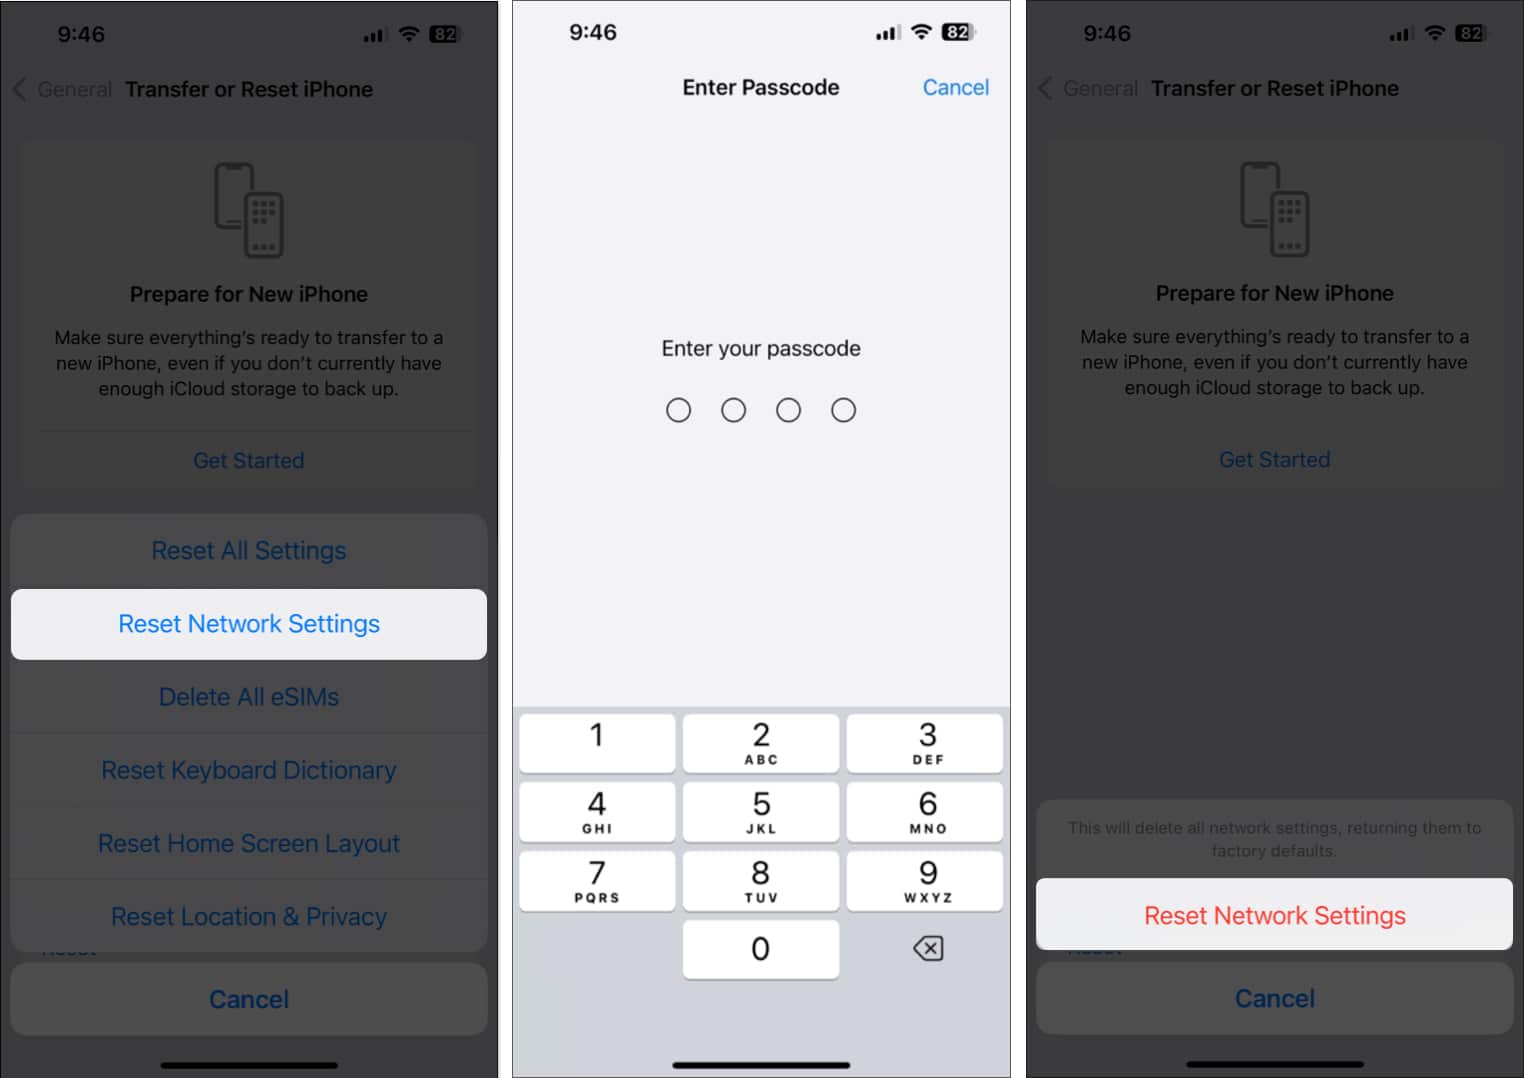
- Tap Reset → Reset Network Settings.
- Enter your iPhone’s passcode.
- Tap Reset Network Settings again to complete the process.
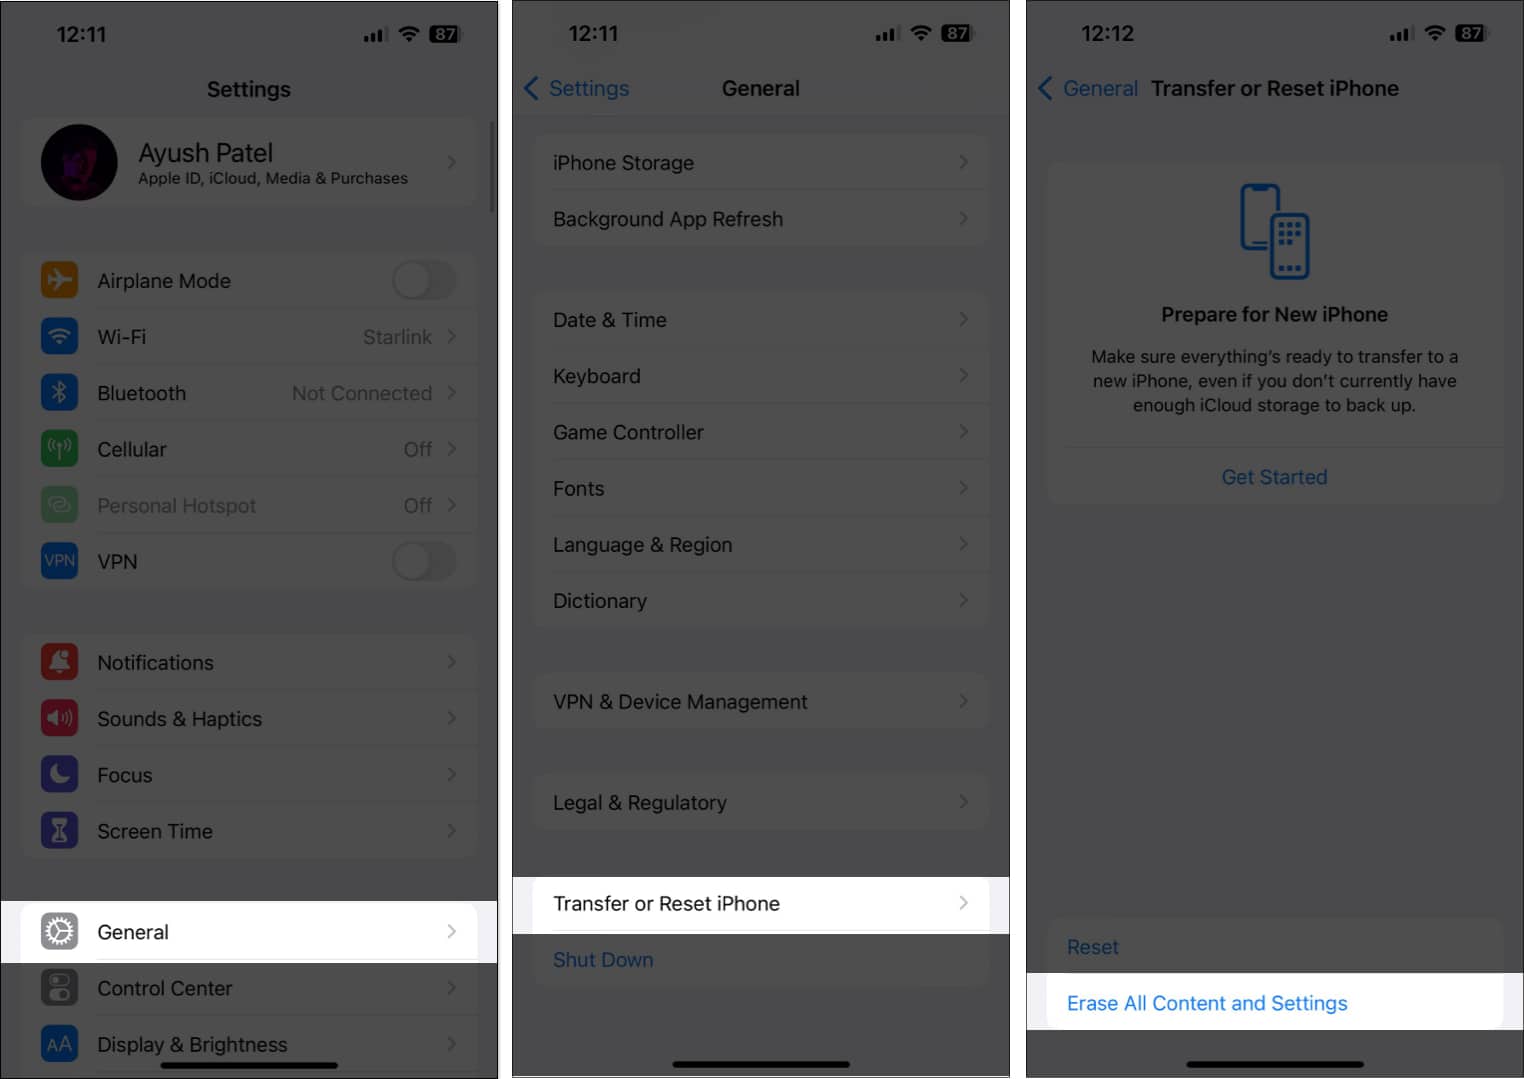
14. Erase all content and settings on iPhone
If your iPhone is still unable to send text messages, erasing all content and settings might be your last resort.
This will restore your iPhone to its factory state and wipe away all your data. While it’s not ideal, it can be a powerful solution for resolving issues caused by software glitches or corrupted files.
- Navigate to Settings → General → Transfer or Reset iPhone.
- Choose Erase All Content and Settings.
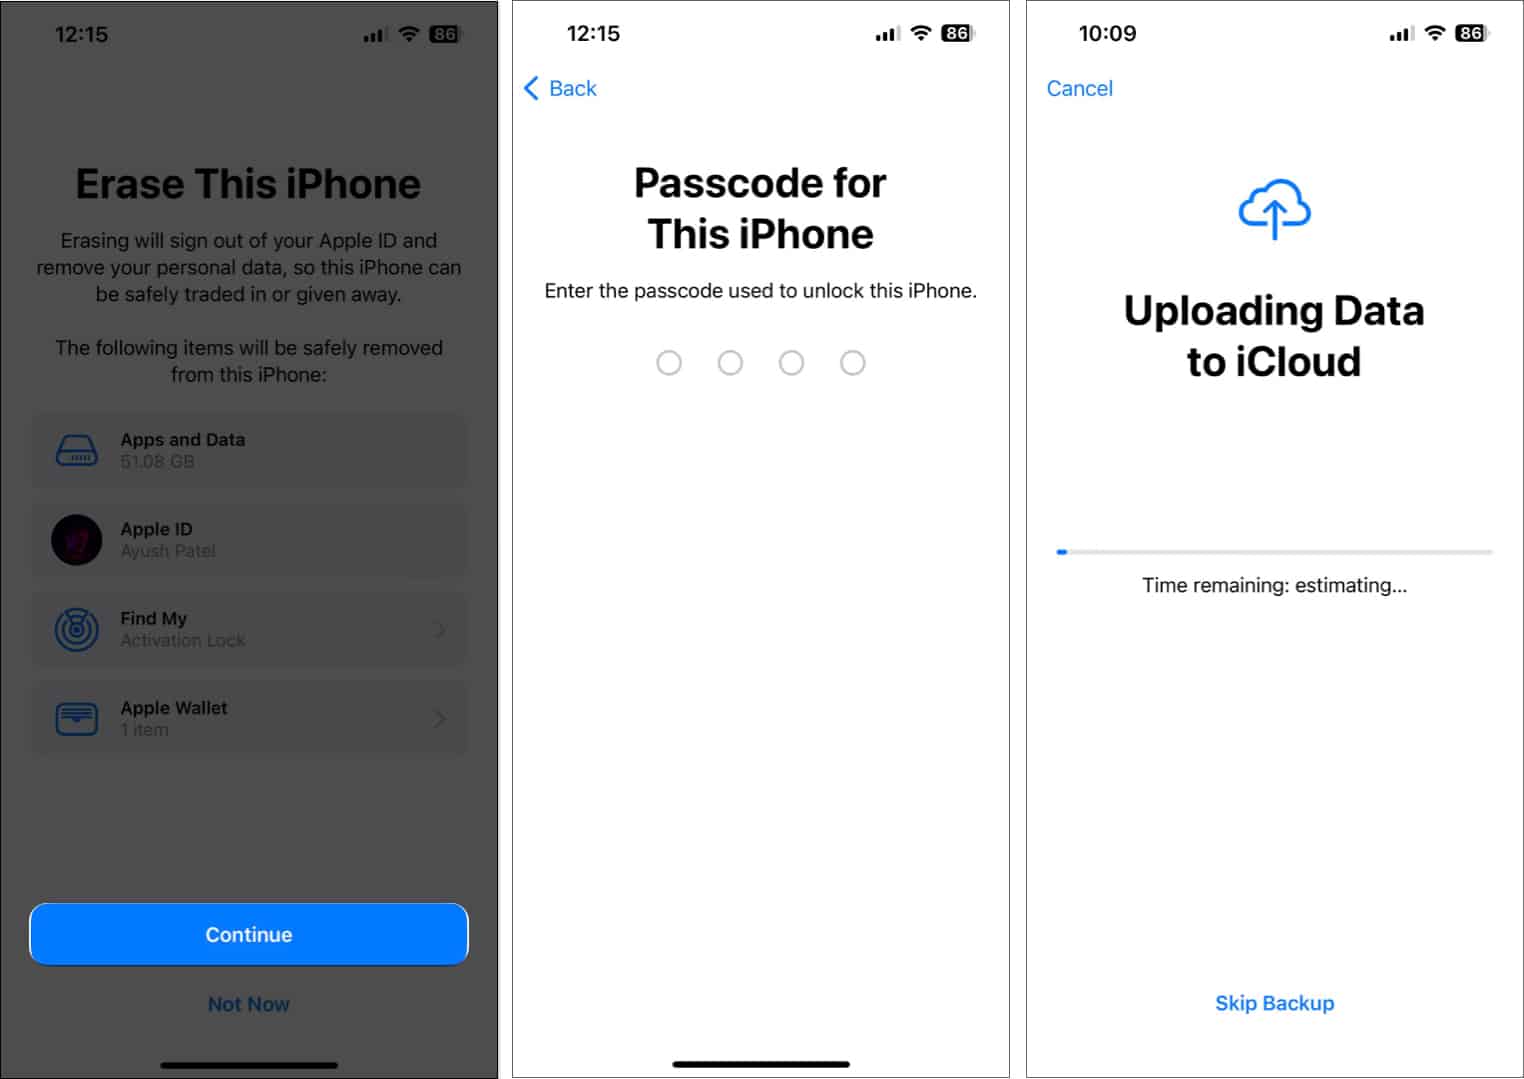
- Tap Continue → Type the iPhone Passcode.
- Follow the given instructions once the iCloud backup is complete.
Contact Apple or the carrier for support
If you’ve tried all the fixes and your iPhone is still not sending text messages, it’s time to call in the experts. Contacting Apple or your carrier’s customer support can provide the expertise needed to diagnose and fix the issue.
Wrapping up…
By following the tips in this guide, you should have successfully revived your iPhone’s texting capabilities. Now, you can continue sending and receiving messages without any hiccups. If this guide was able to help you resolve the problem, we would love to hear which solution did the trick for you.
Also read:

