Many people think you can’t sync an iPhone to non-Apple laptops or computers. That’s not true! It doesn’t really matter if your computer is a Mac or Windows. You can seamlessly transfer and store your files from your iPhone to a computer.
Want to know how to sync your iPhone to a computer? You’ve got several methods to choose from, so read on.
- Sync iPhone to a computer using iTunes
- Sync iPhone to computer using iCloud
- Use Windows File Explorer
- Use Windows AutoPlay
- Use Bluetooth
- Use a third-party software or service
Sync iPhone to a computer using iTunes
The primary method of syncing an iPhone to a PC is through iTunes. The process we’ll discuss below is the same for those with Macs running on macOS Mojave or earlier. The process is slightly different if you want to sync an iPhone with a Mac.
Before starting, be sure to install or update to the latest version of iTunes on your computer. You can download it from the Microsoft Store or Apple’s website. Similarly, ensure that your computer’s software is updated to the latest version.
When syncing via iTunes, you can sync using a USB cable or a WiFi connection. Let’s discuss both.
What can you sync with iTunes?
Before proceeding, you must know what items you can sync through your devices using iTunes.
- Photos and videos
- Contacts
- Calendars
- Music albums, playlists, and songs
- Movies and TV shows
- Podcasts
- Books and audiobooks
Note: Whenever you sync, an updated version of these items are backed up on the computer.
How to sync using a USB cable
To begin syncing using a USB cable, do the following steps:
- Connect iPhone to PC using the USB cable (preferably the original cable).
- The iTunes app might open automatically. If it doesn’t, launch iTunes.
- Select the small iPhone icon from the top left.
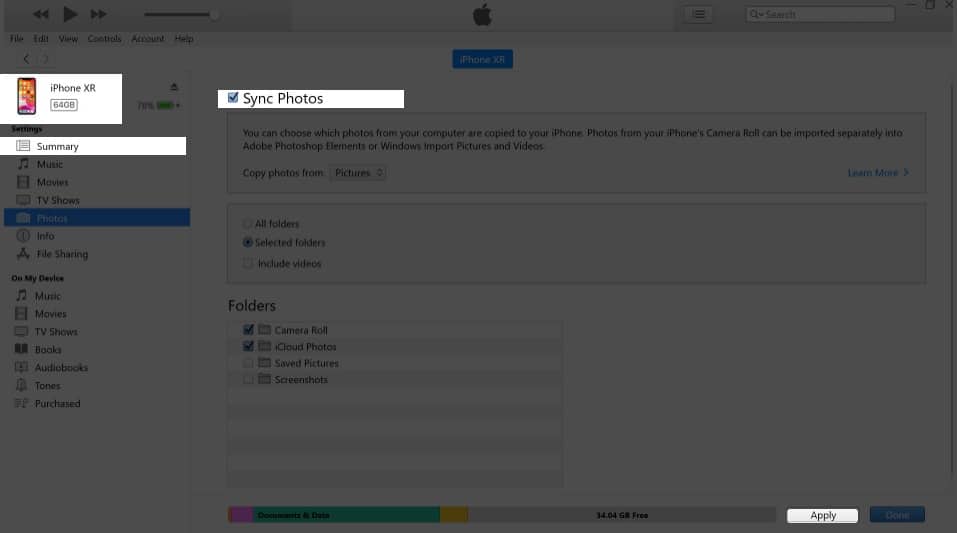
If iTunes doesn’t recognize your iPhone, try this troubleshooting guide. - Under Settings (from the sidebar), select the type of item you wish to sync.
- Tick the checkboxes next to the items that you want to sync.
- Click Apply in the lower right corner of the window. Syncing should start automatically. If it doesn’t, click Sync.
Note: Your device can only sync with one iTunes library at a time. If you previously connected your iPhone to another iTunes library, you’ll see a message that your iTunes is connected with another iTunes library. You’ll find the option Erase and Sync. All the items you select under your chosen type of content will be erased and replaced with the content from the iTunes library on the new computer.
Usually, as soon as you plug your iPhone into the computer, iTunes will start syncing automatically. If you find this irritating, you can always prevent iTunes from auto-syncing your iPhone or iPad.
How to sync iPhone using iTunes WiFi
Here’s what you must do to enable iTunes sync over WiFi,
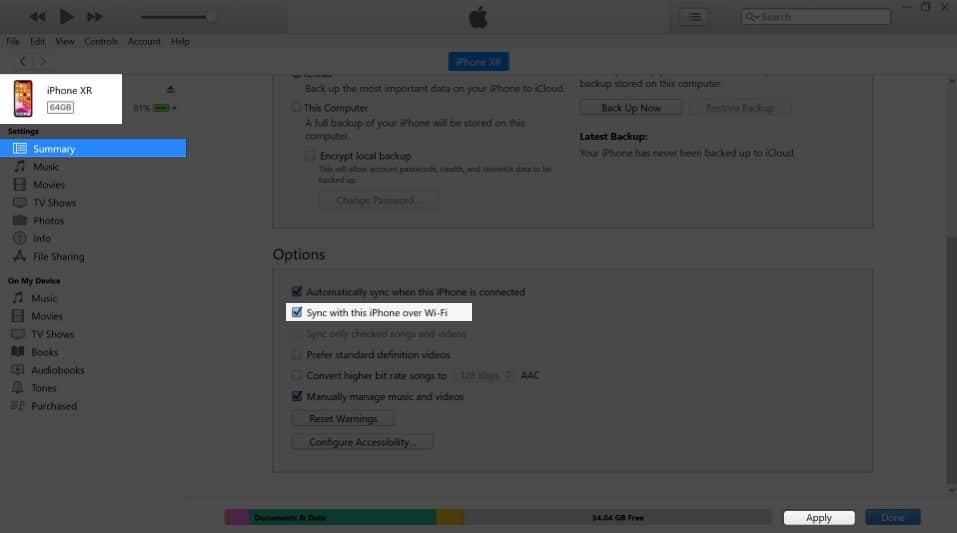
- Connect the iPhone to your computer via USB and open iTunes.
- Select the iPhone icon → choose Summary.
- Click Sync with this [device] over WiFi.
- Click Apply.
Now that they are synced, your device will appear on the computer’s iTunes whenever both are on the same WiFi network. The devices will also automatically sync when your iPhone is plugged into a power source and iTunes is open on your computer.
To sync manually, ensure iTunes is open on your computer and the iPhone is connected to the same WiFi. Now:
- Go to the Settings app on iPhone → General.
- Scroll down and tap iTunes WiFi Sync.
- Tap Sync Now.
Sync iPhone to computer using iCloud
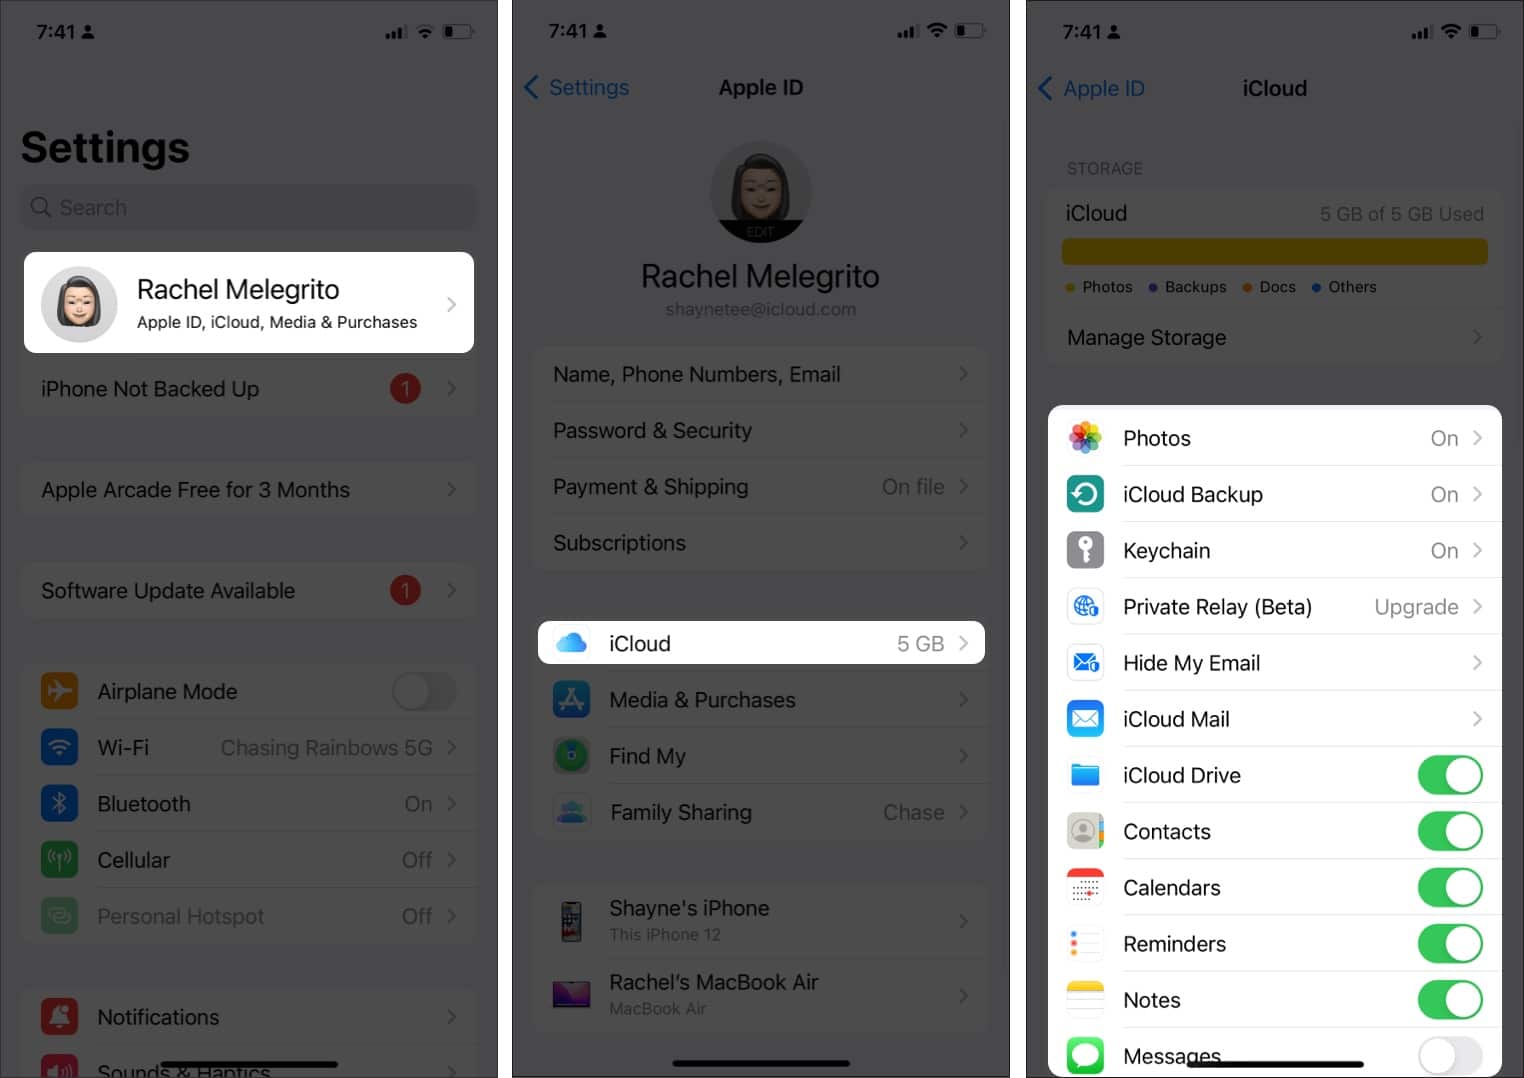
If you want to sync your iPhone to a computer without iTunes, the answer is through iCloud. Before starting, ensure that all the files you want to sync through iCloud are enabled. To be sure:
- Go to Settings → tap [your name] at the top of the screen.
- Tap iCloud → toggle on all files you wish to sync to your iCloud.
Now that that’s done, you can access all this data from your iCloud. Again you can download iCloud to your PC or open the web version to sync the iPhone to your computer. Let’s discuss both processes below.
Use iCloud for Windows
There is a dedicated iCloud app for Windows PCs; it enables faster syncing between your iPhone and Windows PC. To begin, download iCloud for Windows (If your PC is running Windows 10, you can download it from the Microsoft Store.)
Now, open the app and sign in with your Apple ID. You should see the following options in the iCloud app:
- iCloud Drive: syncs files and documents
- Photos: syncs photos, videos, and shared albums.
- Mail, Contacts, and Calendars: syncs your mail, calendars, events, and all the contacts saved on your iPhone to your Windows PC. However, you might not see this option if you don’t have Microsoft Outlook on your PC.
- Bookmarks: syncs your bookmarks with Firefox and Google Chrome
- Passwords: allows you to access your iCloud Keychain from Google Chrome or another browser
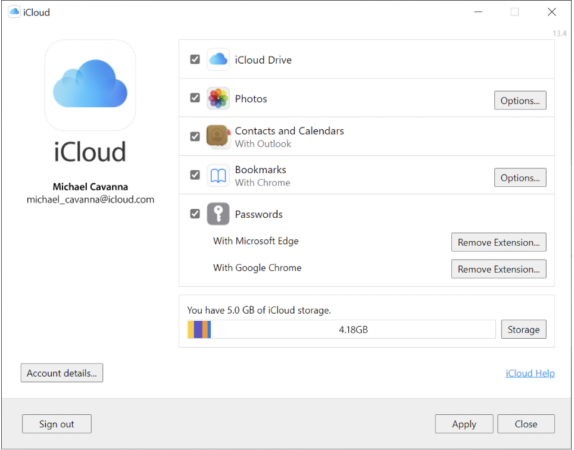
To begin syncing and enable Apple’s iCloud storage on your PC, tick the box beside iCloud Drive and select Apply. You can also click the iCloud icon on the System Tray. Or go to File Explorer and select iCloud Drive on the sidebar.
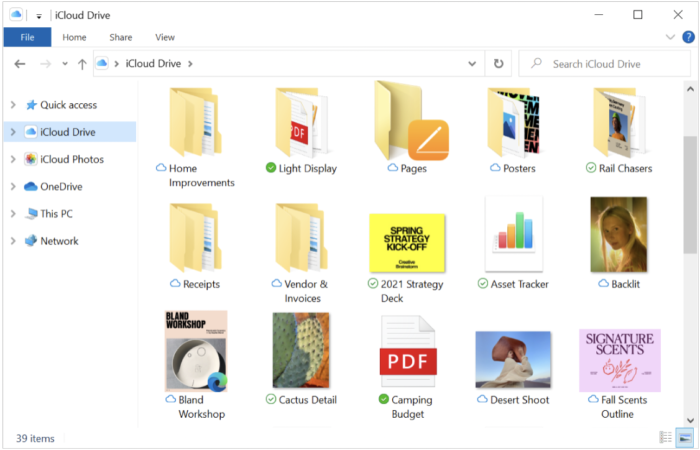
You can now add, remove, and move around the items on your iCloud Drive. Any modifications you do here will apply to your Apple devices.
You may also share iCloud files and folders with others. Just right-click the item you want to share, select Share with iCloud Drive, and choose who you want to share it with and the access options.
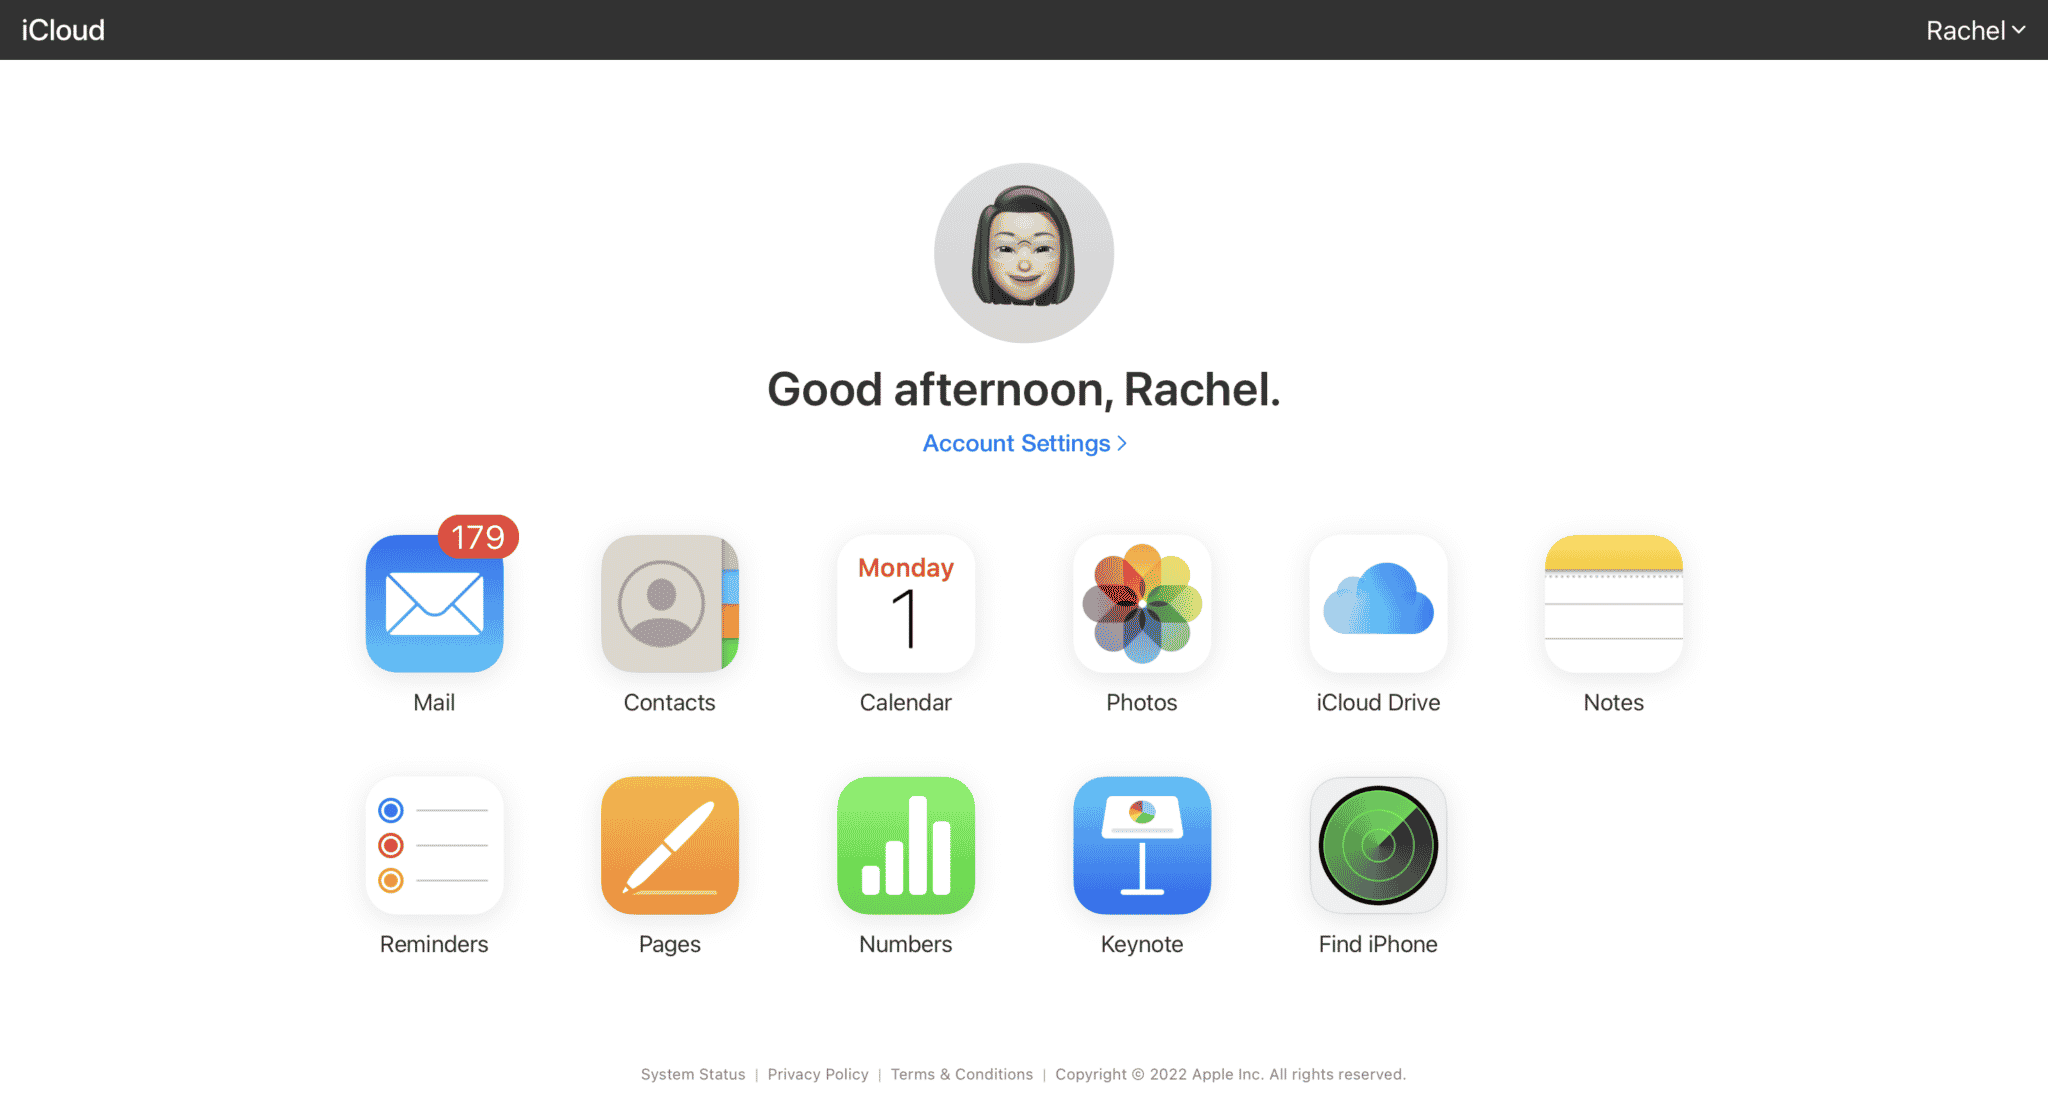
Using iCloud on a web browser
You can simply access iCloud through a web browser and sync files between your iPhone to your computer. To do this:
- Go to iCloud.com.
- Sign in using your Apple ID and password.
- If two-factor authentication is enabled for your Apple ID, you will receive a verification code on one of your trusted devices. Enter the code on your computer.
- Browse through the selection of apps on your iCloud.
- You can download photos and videos from the Photos app by selecting them and clicking the Download button.
- If you have keynotes, PDFs, pages, documents, and other files saved on your iCloud Drive, click iCloud Drive, select the file, or open folders to find files you want to sync and click the Download button.
Note: Upgrade your iCloud storage
Using iCloud to sync your files across iOS and Windows devices is easy. However, you only get 5GB of free data storage on your iCloud. So if you’re looking at syncing and storing many files, you may want to upgrade your iCloud storage.
Use Windows File Explorer
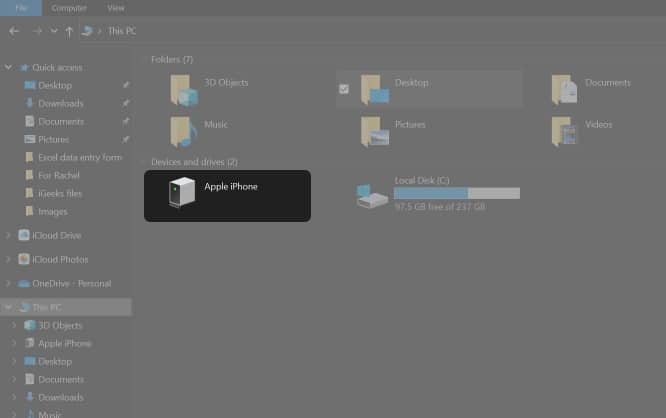
Note that this option only applies if you’re looking for a way to sync photos and videos on your Camera Roll. This method lets you quickly transfer your photos and videos to your PC using a USB cable without needing third-party software.
To begin:
- Connect the iPhone to your Windows PC using a cable.
- Unlock the iPhone. A prompt will appear. Tap Trust this computer.
- On your computer, go to This PC → select [your iPhone’s name] → Internal Storage.
- Select DCIM → 100APPLE.
- Manually copy everything you want to transfer from your iPhone to your PC.
Use Windows AutoPlay
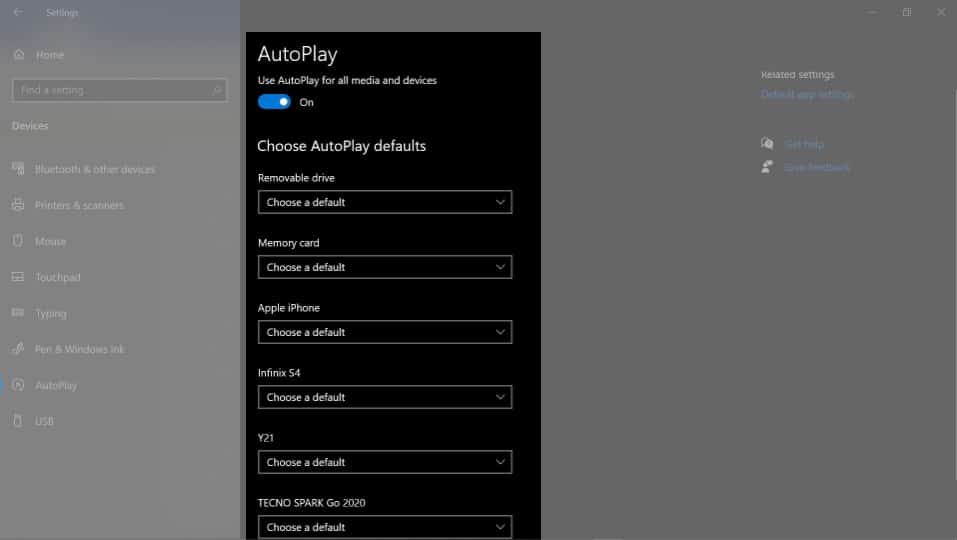
Windows AutoPlay gives you a little bit more control when it comes to where you want your files to be stored on your PC. Here’s what you need to do:
- Plug your iPhone into your PC using a USB cable.
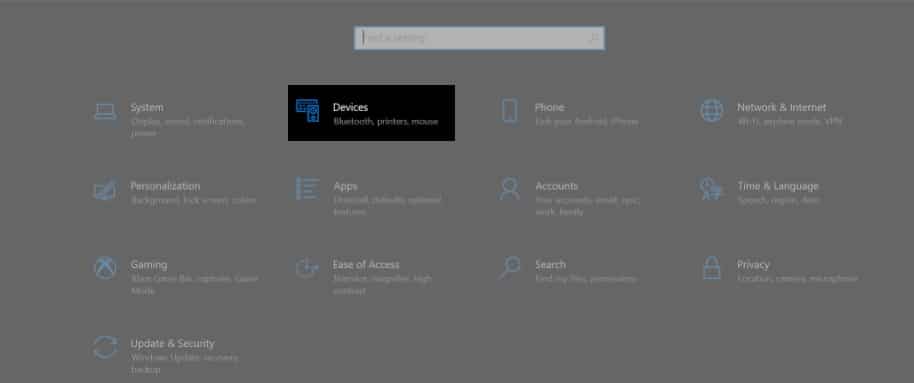
- Go to Settings on your PC → click Devices.
- Select AutoPlay on the left side of the screen → click Choose AutoPlay Defaults so you can tell your PC where you want to save your files.
Use Bluetooth
You can use Bluetooth to transfer files to and from your iPhone and PC. Here’s what you need to do:
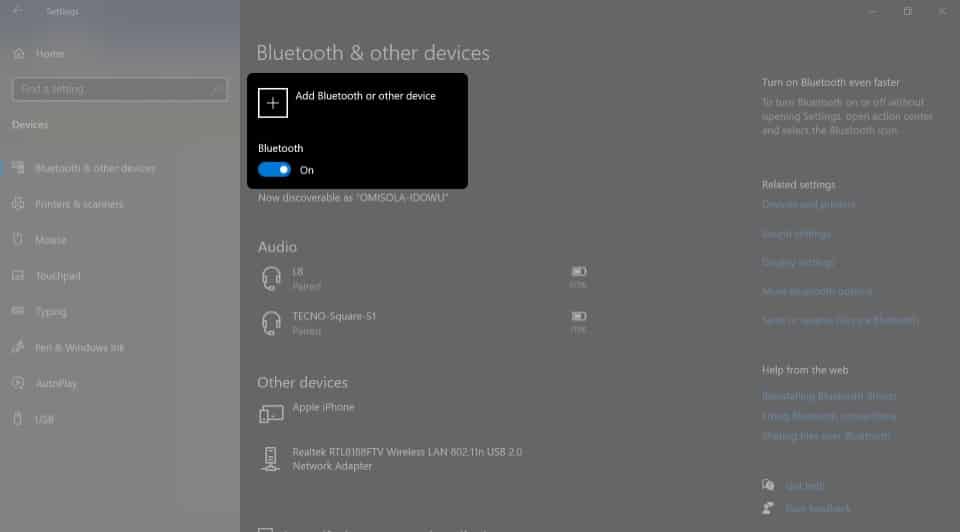
- On your computer, go to Devices → Bluetooth and Other Devices. Enable Bluetooth and make sure that it’s discoverable.
- On your iPhone, head to Settings → Bluetooth. Toggle it on and make sure that it’s discoverable for everyone.
- From your PC, look for your iPhone. You may need to authenticate the connection by typing the one-time generated code.
- Approve the connection.
That’s pretty much it. You can now send files across devices through the connection.
Use a third-party software or service
If you don’t want to have a hard time tinkering with your settings, you can opt to use a third-party app that lets you easily sync across devices. Apps like EaseUS’s Mobimover or MobileTrans can help you. However, they do have associative privacy risks.
Alternatively, you can use third-party cloud-based storage services like Dropbox, Google Drive, or OneDrive to help you store your files and access them anytime, anywhere—using any device.
Many reasons may affect the syncing between your iPhone and your computer. First, check if your cable is defective. If you’re using WiFi to sync using iTunes, ensure both are on the same network.
If these fail, you may try resetting Sync History on iTunes. To do this: head to iTunes → Preferences → Devices → Reset Sync History.
The easiest way to wirelessly sync an iPhone with a computer is through iCloud. If you’re using iTunes, you must initially set up syncing via cable and enable syncing via WiFi. You may also send your iPhone files via Bluetooth.
Wrapping up…
Many iPhone owners sync and back up their photos, videos, and other important files to their PCs. It can be tedious, especially when attempting to sync with non-Apple computers. However, doing so ensures that your files are safe, constantly updated, and accessible.
I’ve listed a lot of options that you can try to sync your iPhone and computer. With so many options available for you, syncing will now be as easy as 1-2-3! Which of the following methods works best for you? Share them below.
More awesome reads from iGeeksBlog:

