If you are planning to sell, give, or trade your old Mac, the first thing you’d want to do is factory reset it. However, if you’ve used your Mac for a while, you surely have all sorts of data, including sensitive ones, stored in it. And you definitely don’t want to lose your precious data or, worse, pass it on to someone else
So before I teach you how to reset your MacBook, here’s a list of 11 things to do to protect your data and ensure a nice transition for its new owner.
Quicker reset for Macs running macOS Sonoma
If you own a Mac with Apple silicon or a T2 security chip, you don’t have to go through the laborious process outlined below before selling your MacBook.
You can easily use the Erase All Content and Settings feature. It allows you to securely and quickly erase all your data while retaining the current OS so that you don’t need to reinstall it.
However, before you erase everything, save and back up all your important data, which you can restore on your new device. Also, remember to cancel your AppleCare+ plan for that Mac. If you have a new Mac, you may transfer the plan.
We’ve already written how to factory reset a Mac. Basically, you just need to click the Apple logo → System Settings → General → Transfer or Reset → Erase All Content and Settings, then follow the onscreen prompts.
Older models do not have a quick function like macOS Monterey. However, while there’s a lot to do, they’re pretty straightforward.
Let’s jump to the list!
- Backup your files
- Migrate files to a new Mac
- Deauthorize your Mac from Apple Music, Apple TV, and Podcasts
- Sign out of iCloud and Apple ID
- Sign out of all your accounts and apps
- Unpair all your accessories
- Sign out of iMessage and FaceTime
- Disable File Vault
- Erase your Mac and reinstall macOS
- Reset NVRAM/PRAM
- Remove Mac as a Trusted Device
1. Backup your files
It is crucial to back up your data to avoid the risk of losing them while resetting your device. It also allows you to readily restore all your data with a few clicks once you have your new device. Here are different ways to back up your Mac:
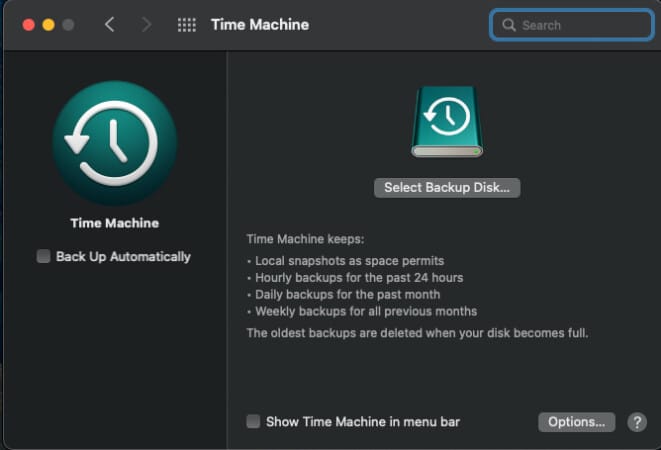
Time Machine
Time Machine is a built-in backup feature that automatically backs up all of your personal data on your Mac. However, you’d need an external storage device, like a USB, FireWire, or Thunderbolt port.
Store files in your iCloud and iCloud Drive
iCloud is Apple’s own cloud storage and computing service that allows you to store and sync all your photos, files, music, notes, contacts, and more across all your Apple devices.
This service works across the Apple ecosystem so that if you have an iPhone or an iPad, you can also back up your data from your iPhone or iPad on your iCloud. Note that each Apple ID only has 5GB of free iCloud space. You would need to upgrade your iCloud account for higher storage space.
External storage
While iCloud seems to be the best option for an Apple user, you can also use other cloud-based storage devices to store your data online.
However, like iCloud, backups done through external cloud storage are pretty limited compared to Time Machine backups that allow you to store all your Mac’s data.
2. Migrate files to a new Mac
If you upgraded to a new Mac, you could use the Migration Assistant to migrate data from your old Mac to your new MacBook. This includes all your settings, apps, user accounts, and documents.
The process varies depending on the OS the Macs are running. But generally, you’ll need to plug both devices into a power source and connect them to the same WIFI network or cable.
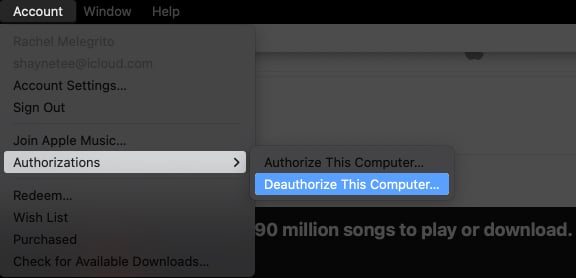
An authorized device has access to all your Apple Music content. Apple allows you to authorize up to five devices under an Apple ID. Forgetting to deauthorize means you lose one slot from the five devices for your account. More importantly, you’d risk giving the new Mac owner access to your Apple Music content.
To deauthorize your Mac:
- Open the Music app.
- Click Account from the menu bar.
- Click Authorizations → Deauthorize This Computer.
Similarly, you should also deauthorize your old Mac from your Apple TV account. Just open the app, and head to Account → Authorizations → Deauthorize This Computer. For Podcasts, just open the app, click Account, then select Sign Out.
4. Sign out of iCloud and Apple ID
As mentioned earlier, iCloud syncs everything across your Apple devices. So, if you’re using it, you must log out of your account. This ensures that your old Mac can no longer access all your files and the new owner’s data is not syncing to your cloud.
Signing out of iCloud automatically signs you out of the App Store, iMessage, and FaceTime.
Note: Turn off Find My Mac before signing out. Go to your Apple ID → iCloud → Show More Apps → Find My Mac → Click Turn Off.
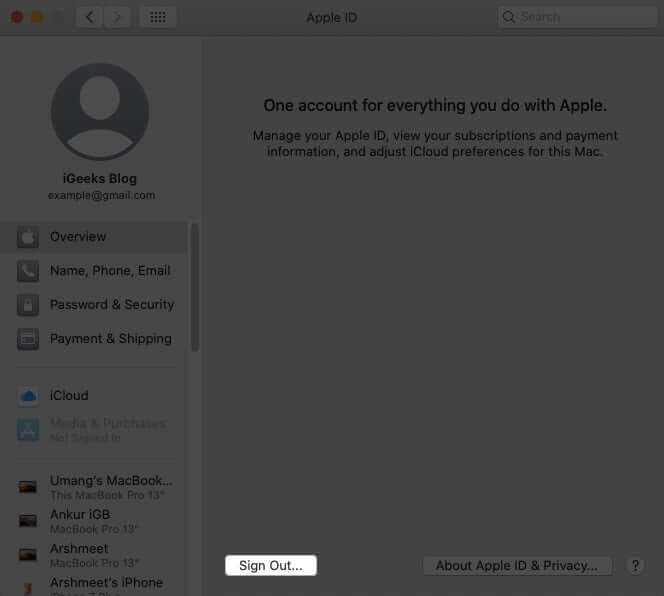
- Click the Apple logo → System Settings.
- Select Apple ID in the sidebar.
- Click Sign Out below the window.
On Mac running macOS Mojave or earlier:
- Click the Apple logo → System Preferences.
- Choose iCloud, then select Sign Out.
You’ll be asked if you want to keep a copy of your Calendars, Keychain, and Contacts before signing out. Unselect them because you don’t want to leave any data from your old Mac that you intend to give away or sell.
Don’t worry—all of your iCloud data will remain in iCloud and on your other Apple devices signed in on iCloud with your Apple ID.
5. Sign out of all your accounts and apps
Aside from the Apple services, be sure to log out of all the other apps that you own before you even uninstall them. This is especially true for software licensed to you. Not doing this can lead to complications if the new Mac owner ever decides to download and install the same apps or software.
Make sure to sign out of all your other internet accounts, especially if your emails and calendars are synced to your Mac. Go to System Settings → Internet Accounts, select an account in the sidebar, and click Delete Account at the bottom to remove it.
6. Unpair all your accessories
If you’re using Bluetooth devices with your Mac, it’s ideal to unpair all of them, especially if the one you’re selling your old Mac to is a peer or family member you often spend time with. You don’t want your devices to connect to your old device accidentally.
Go to System Settings → Bluetooth. You should see a list of paired devices. Click the info button beside the device and click Forget This Device to unpair it. A prompt will appear; select Forget Device.
7. Sign out of iMessage and FaceTime
Suppose you use your Mac to send and receive texts and calls through iMessage or call peers and family through FaceTime. In that case, you should sign out of both services to prevent the new owner from accidentally gaining access to your private conversations.
To turn off iMessage on Mac:
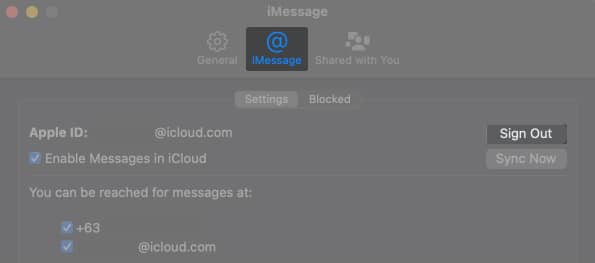
- Open the Messages app.
- On the menu bar, select Messages → Settings, then click the iMessage tab.
- Click Sign Out. Select Sign Out again from a pop-up that will appear.
To turn off FaceTime:
- Open FaceTime and click Facetime → Settings in the menu bar.
- Click Sign Out in the General tab.
8. Disable File Vault
File Vault is a feature that encrypts all the information on your Mac. This prevents hackers from stealing or hacking your data or gaining access to your device.
If you previously encrypted your file contents, you need to turn this off to decrypt your disk. If you don’t do this, your old Mac will ask for your password, leaving the new owner unable to set up their new Mac.
To do this:
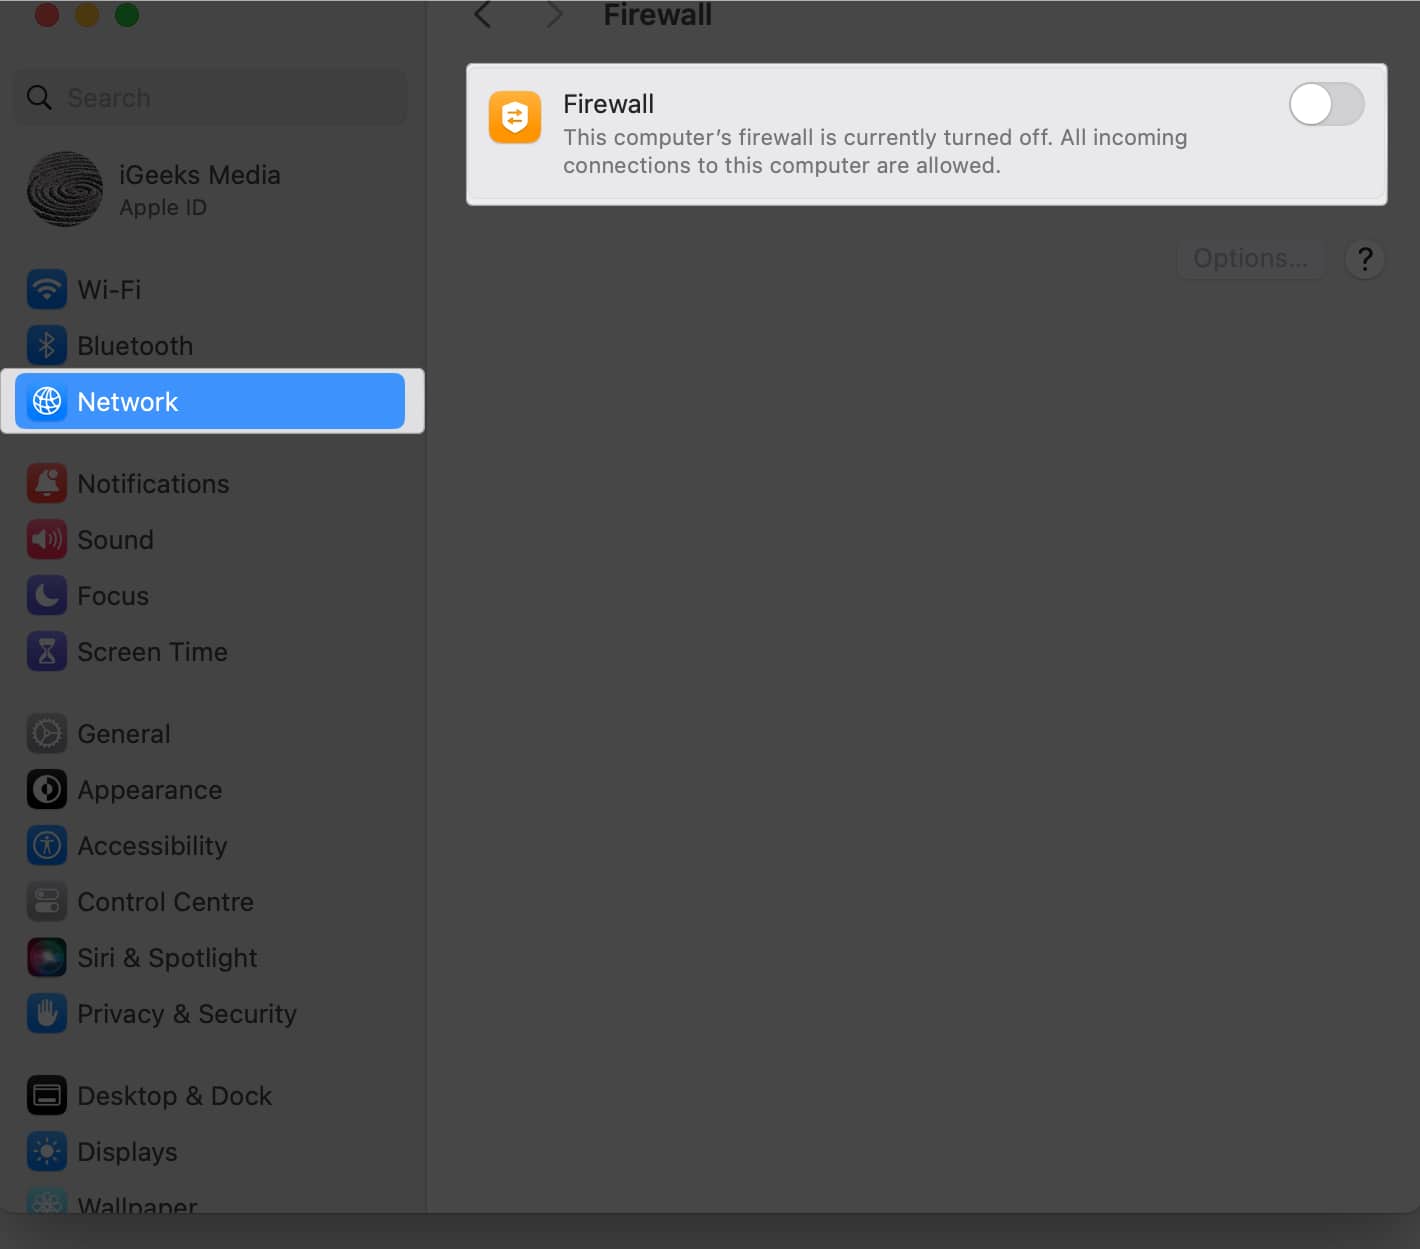
- Head to System Settings → Network.
- Select the FileVault tab, then toggle off FileVault.
9. Erase your Mac and reinstall macOS
Now that you’ve wiped your old Mac clean of any remaining personal and sensitive data, it’s time to erase your hard drive.
The exact steps to reset a Mac depend on the model and the OS it is running on. For a more comprehensive dive, read our article on how to reset a MacBook or any Mac.
Simply go to the Apple menu → Shut Down. Now start Mac in Recovery mode and select Disk Utility. Choose your hard disk and hit Erase. Follow the instructions to reset your Mac. Once done, exit Disk Utility and select Reinstall macOS from the Recovery page.
10. Reset NVRAM/PRAM
The NVRAM, short for non-volatile random-access memory, stores OS-related settings, startup disk selection, and other configurations. Apple suggests resetting your NVRAM before selling your MacBook.
Note: This step only applies to Intel Macs.
Resetting NVRAM can restore security features that may have been changed or if the Mac is running weirdly. Resetting this also clears user settings, ensuring that your Mac is ready for its new owner.
11. Remove Mac as a Trusted Device
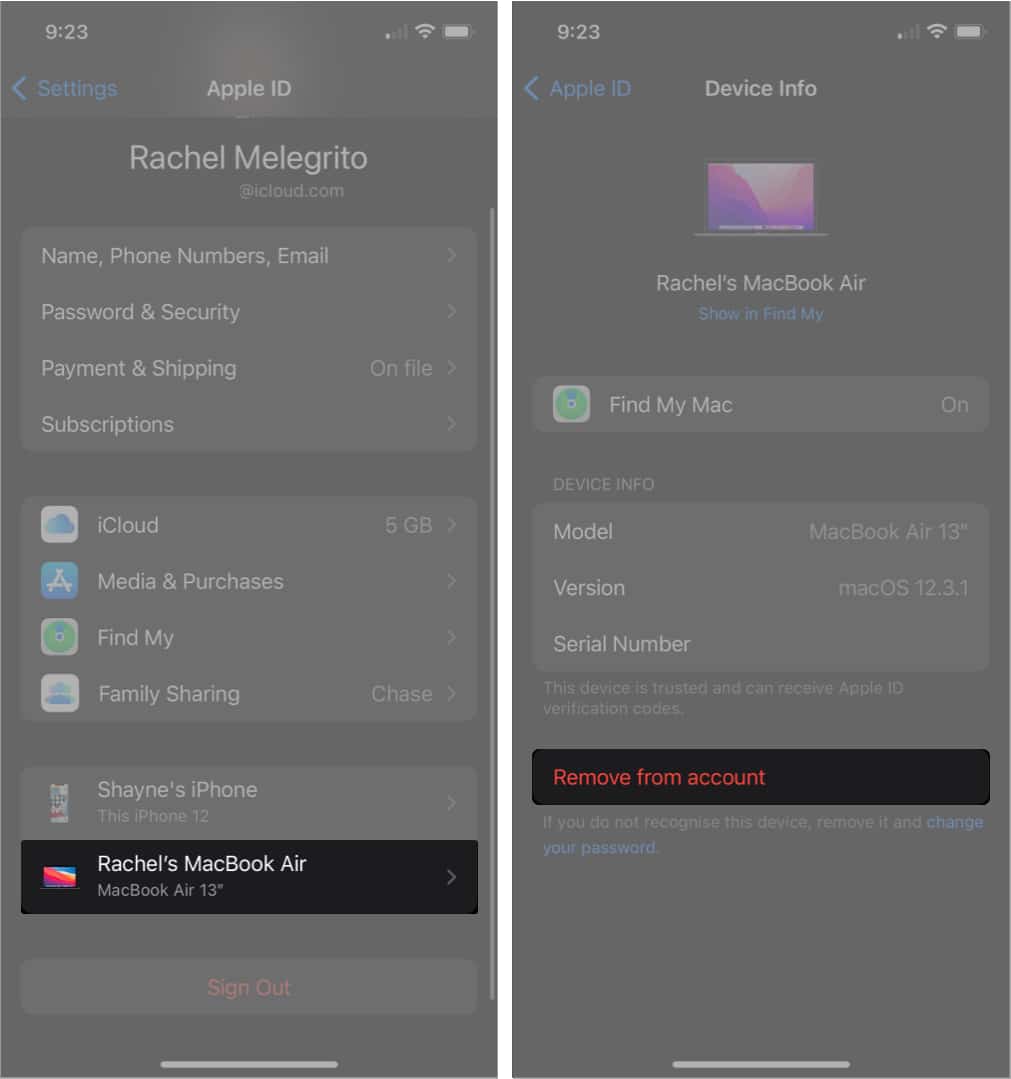
If you have set your Mac as a Trusted Device for your other devices, check your other devices and remove your old Mac from your list. This prevents your devices from accidentally sending verification code requests to your old Mac.
On your iPhone or iPad:
- Head to Settings, then tap your name.
- Tap your old Mac. You’ll know that it is a trusted device if you see the statement This device is trusted and can receive Apple ID verification codes.
- Tap Remove from the account.
Wrapping up
Whether you plan to sell, give away, or trade-in your Mac to upgrade to a newer model, protecting your personal data is crucial. This also makes your old Mac ready for its new users and ensures that they won’t encounter problems while setting it up.
Related Reads:


