Setting up emergency contacts on your iPhone or Apple Watch can be lifesaving in most situations. Whether you’re dealing with a medical emergency, an accident, or a situation where you can’t speak, your Apple devices can automatically notify your loved ones and share your location.
In this guide, you’ll learn what emergency contacts are, how they work, and exactly how to set them up on both iPhone and Apple Watch. So, let’s get started!
What Are Emergency Contacts on iPhone and Apple Watch?
Emergency contacts are trusted people stored in your iPhone’s Medical ID within the Health app. When you trigger Emergency SOS, your device:
- Calls local emergency services
- Alerts your chosen emergency contacts
- Sends your real-time location
- Updates them if your location changes
This feature works on iPhone, Apple Watch, and Apple Watch Cellular, making it one of the most important safety tools in the Apple ecosystem.
Also read: iPhone security and emergency features
Why Emergency Contacts Matter for Your Safety
Many iPhone users never set up their emergency contacts, but this feature can be critical. Here’s why you shouldn’t skip it:
- You may not be able to talk during a medical emergency.
- Emergency responders can access your Medical ID even if your iPhone is locked. They don’t need your passcode.
- Your contacts get an automatic SOS alert with your exact location and movements. They’ll also be notified if you manually stop sharing your location
- It works globally, making it essential for travel.
Therefore, setting this up gives you peace of mind every day. Your family or friends also remain informed without you having to make a single call.
Method 1: Add Emergency Contacts From Health App
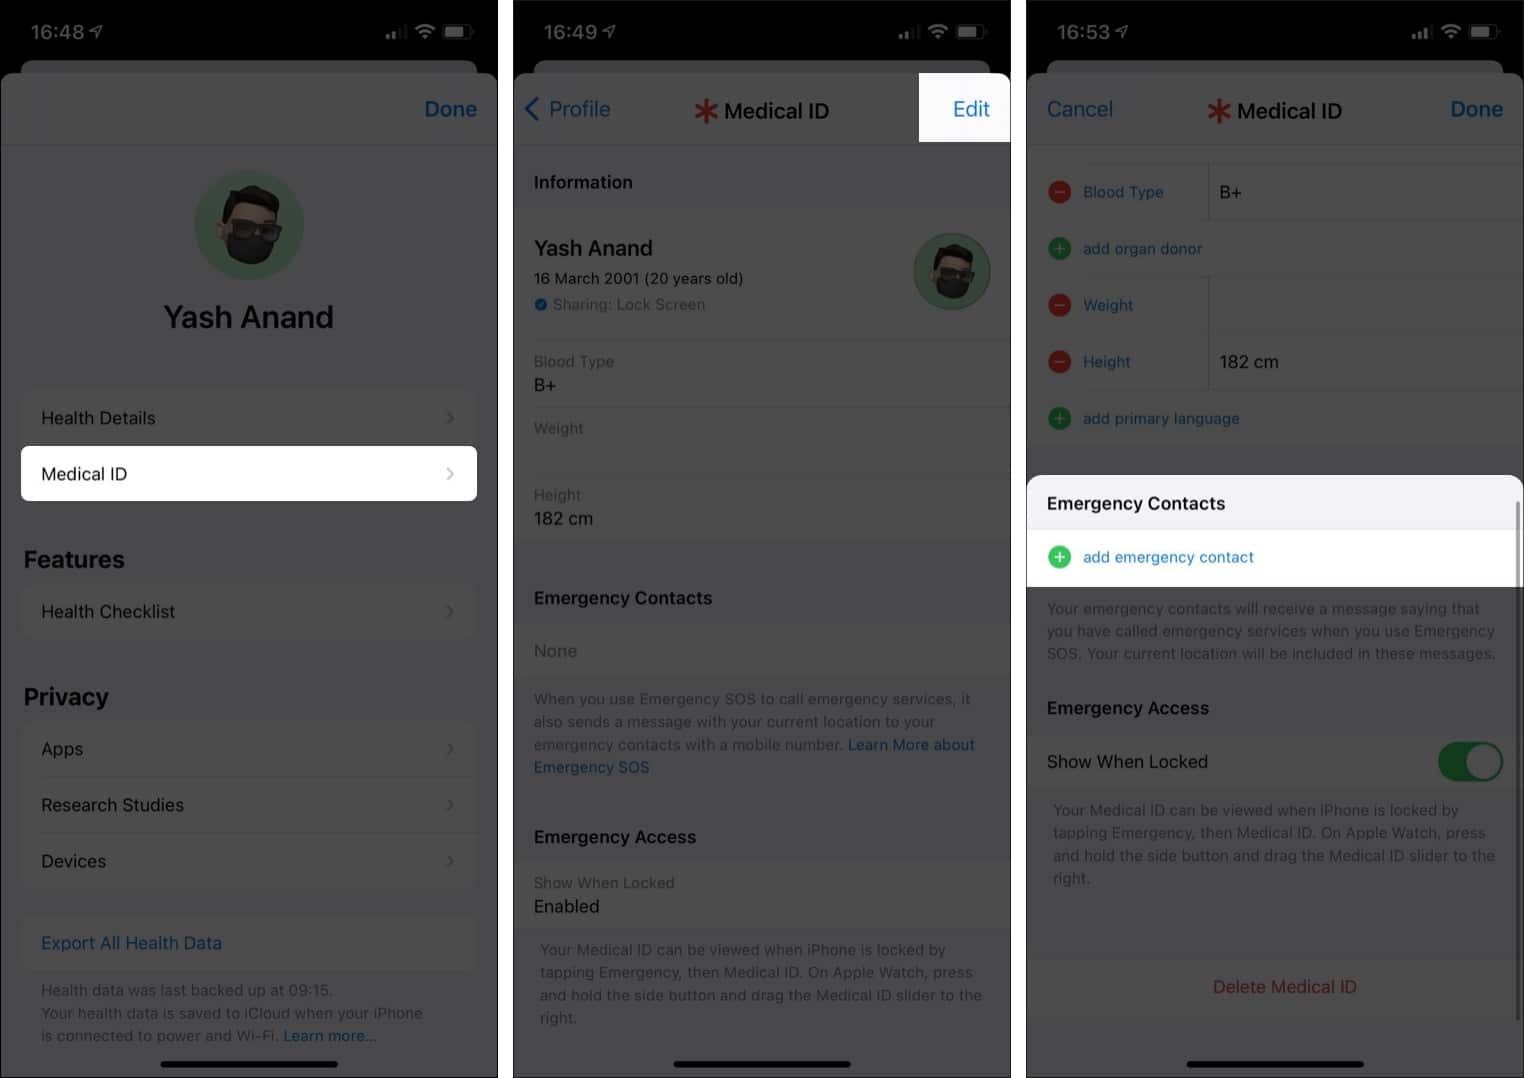
Emergency contacts live inside the Medical ID section of the Health app along with your medical conditions, allergies and medications, blood type, date of birth, etc.
- Open the Health app.
- Tap your profile icon and select Medical ID.
- If you haven’t set up your Medical ID yet, tap Get Started and fill in your details.
- Scroll down and tap Add next to Emergency Contacts.
- Tap Add Emergency Contact.
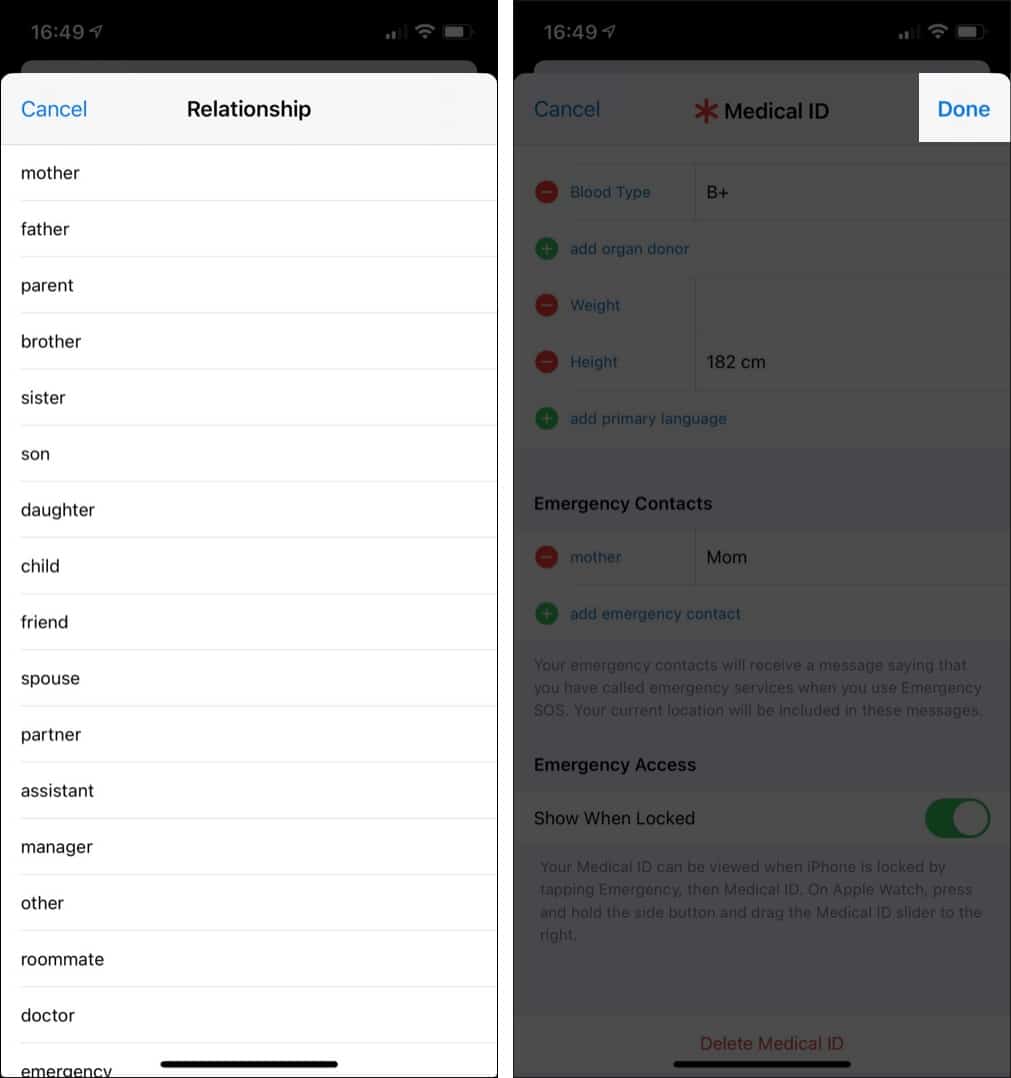
- Choose someone from your Contacts app and select their relationship.
- Tap the checkmark at the top right corner.
That’s all! Your Apple Watch will also use the same emergency contacts you’ve added to the Health app. The Apple Watch with cellular connectivity can even call Emergency SOS even if your iPhone isn’t nearby.
Method 2: Add Emergency Contacts Using Phone App
- Go to the Phone app and tap the Contacts tab at the bottom.
- Now, tap on the contact’s name you want.
- Scroll down and select Add to Emergency Contacts.
- Choose their relationship with you and tap the checkmark to save.
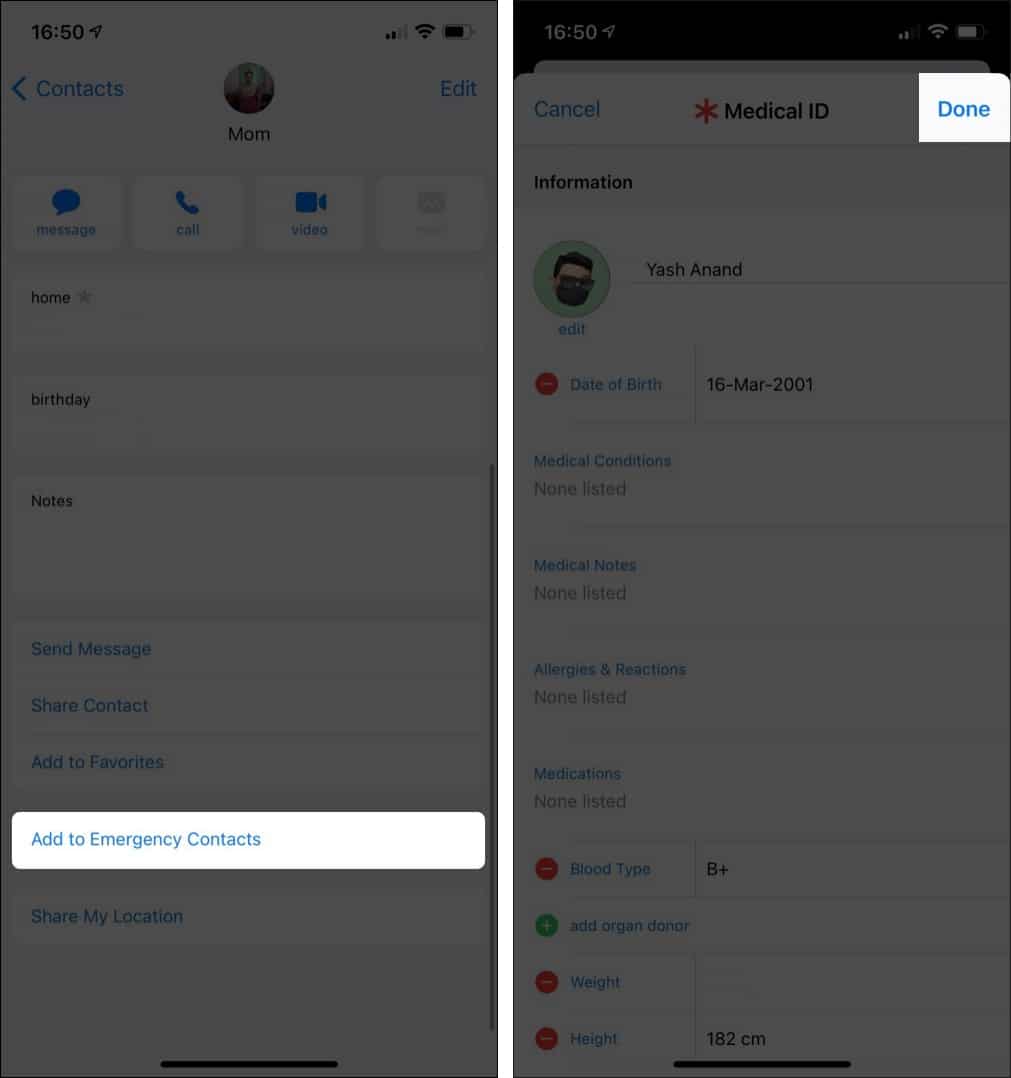

A red star mark will appear next to their name. Follow the same steps to add another contact.
How Emergency Contacts Work on iPhone
When you activate Emergency SOS, Fall Detection, or Crash Detection, your iPhone automatically calls emergency services and sends an alert to your contacts. You can also display the Medical ID on your Lock Screen, so emergency responders can contact your family.
- Press and hold the Side and Volume buttons.
- Drag the Medical ID slider.
- Tap on the contact under Emergency Contacts to call them.
Pro Tip:
Tips for Choosing the Right Emergency Contacts
To get the most out of the feature:
- Choose someone who picks up calls faster.
- Add at least two contacts.
- Tell your contacts you’ve added them.
- Update contacts regularly, especially when phone numbers change.
These easy steps make your emergency setup more reliable.
How to Remove or Update Emergency Contacts
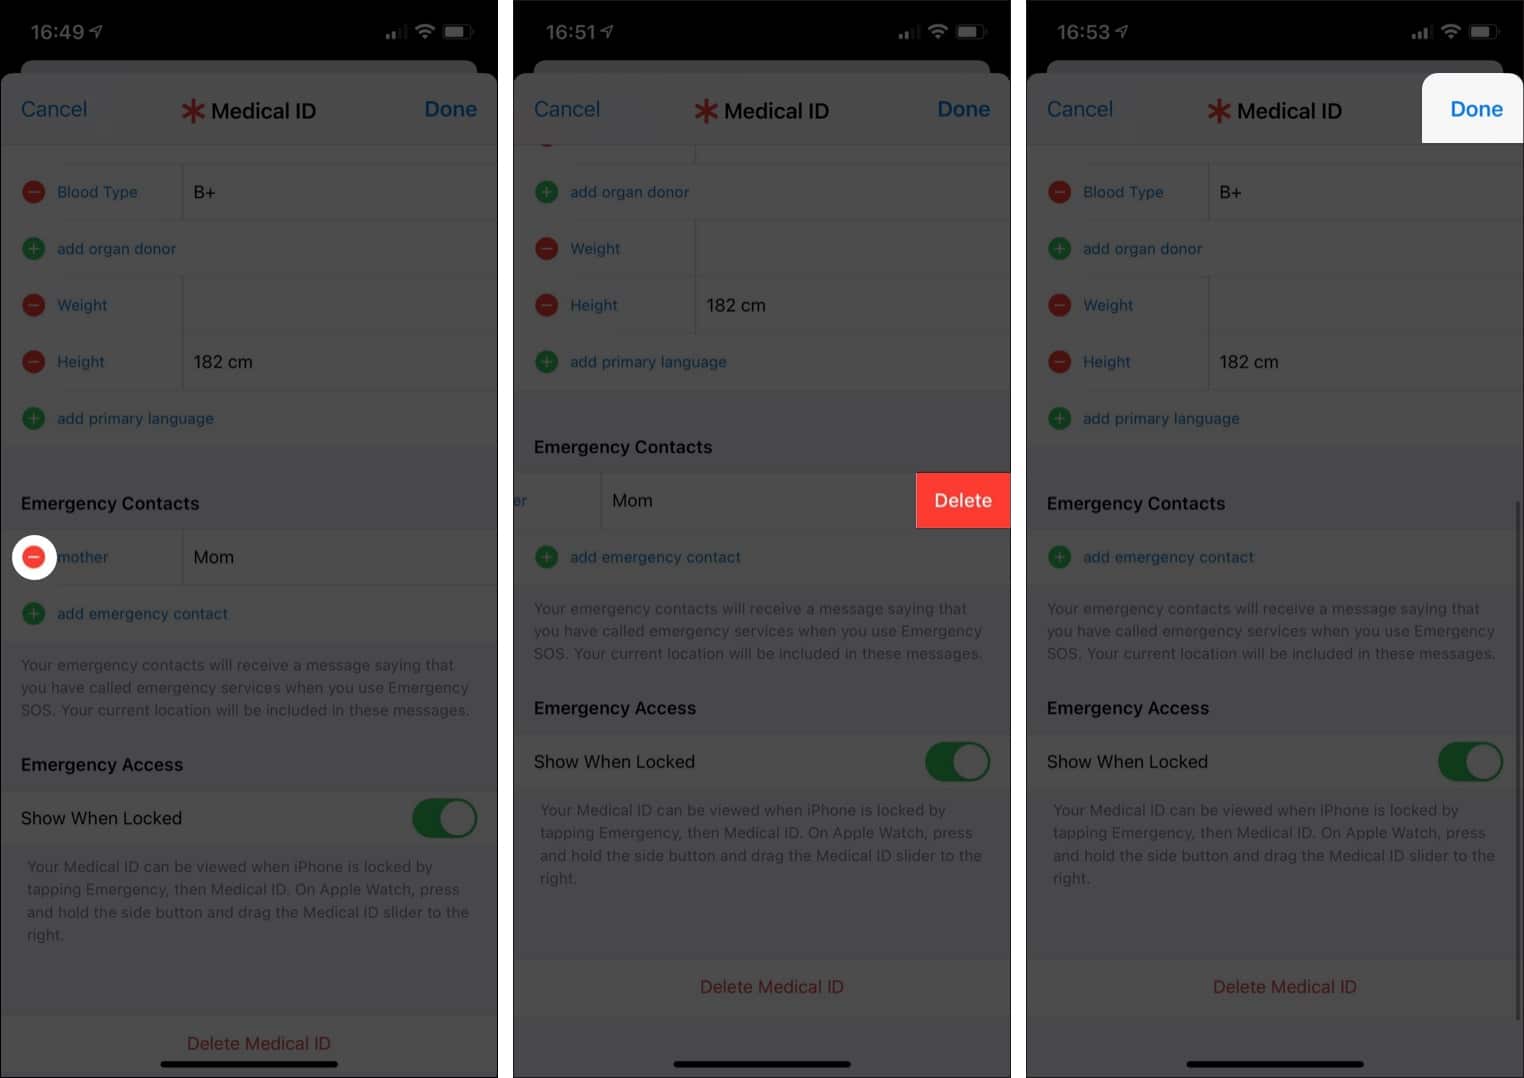
If something changes, here’s how to edit or delete emergency contacts:
- Open the Health app.
- Tap your profile > Medical ID.
- Select Edit next to Emergency Contacts.
- Tap the minus sign beside the contact you want to remove.
- Tap the bin icon to delete it.
- Tap the checkmark to save.

Updating these details ensures the right people get notified when it matters. You can also remove them from the Contacts app using the same steps you used to add them.
Set Up Emergency Contacts Today
Setting up emergency contacts on your iPhone or Apple Watch only takes a few minutes, but it could make a lifesaving difference. With Emergency SOS, automatic alerts, and real-time location sharing, Apple’s safety features give you extra protection no matter where you are.
If you face any issues, let us know in the comments below. I’d be happy to help!


