Apple’s AirPods are known for their versatility and innovation, making them a premium choice in the earbuds market. Given the hefty price tag, it’s reasonable to expect flawless performance. A frequently reported concern among users is the problem of AirPods being connected but not playing sound. While you can’t disassemble your AirPods, plenty of troubleshooting tips exist to fix the issue. Let’s dive in!
- Put AirPods back in the case
- Refresh app on iPhone
- Check app settings
- Turn off automatic ear detection
- Manage volume and Reduce Loud Sounds feature
- Check for damage or dirt
- Charge your AirPods
- Turn off Bluetooth and turn it back on
- Check the Audio Balance
- Check for interference
- Re-pair your AirPods
- Reset your AirPods
- Update your AirPods’ firmware
- Restart your Apple device
- Update your device
1. Put AirPods back in the case
One of the first things you should do whenever you encounter any issue with your AirPods, whether that’s your AirPods not connecting to your iPhone, a red exclamation point on the AirPods, or AirPods saying connected but no sound is coming out, is to put the AirPods back in its case.
This is equivalent to refreshing the device; it automatically turns them out and lets you reconnect with your device again. Here’s what you need to do:
- Place both AirPods back into the case.
- Close the lid to force them to turn off.
- Open the lid. If you use yours with an iPhone, iPad, or Mac, open the case beside your device.
- Take them out and reconnect your AirPods with your device.
2. Refresh app on iPhone
When you’re using AirPods for streaming music or videos and encounter sound issues, it’s often an app-specific problem. Users have found that simply refreshing or restarting the app can resolve this hiccup.
3. Check app settings
When using music services such as Pandora, Spotify, or Apple Music that allow you to alter your output device, the app may override your audio output settings. This can lead to a scenario where your AirPods are connected but not playing sound because they haven’t been chosen as the playback device, which also stops them from being used for other functions.
To resolve this, go into the app’s settings and ensure that your AirPods are selected as the output device rather than the speakers of your Apple or non-Apple device.
4. Turn off automatic ear detection
AirPods has an automatic ear detection feature, a built-in technology that senses when the buds are inside your ear. What it does is once detected, it starts sending audio from your device.
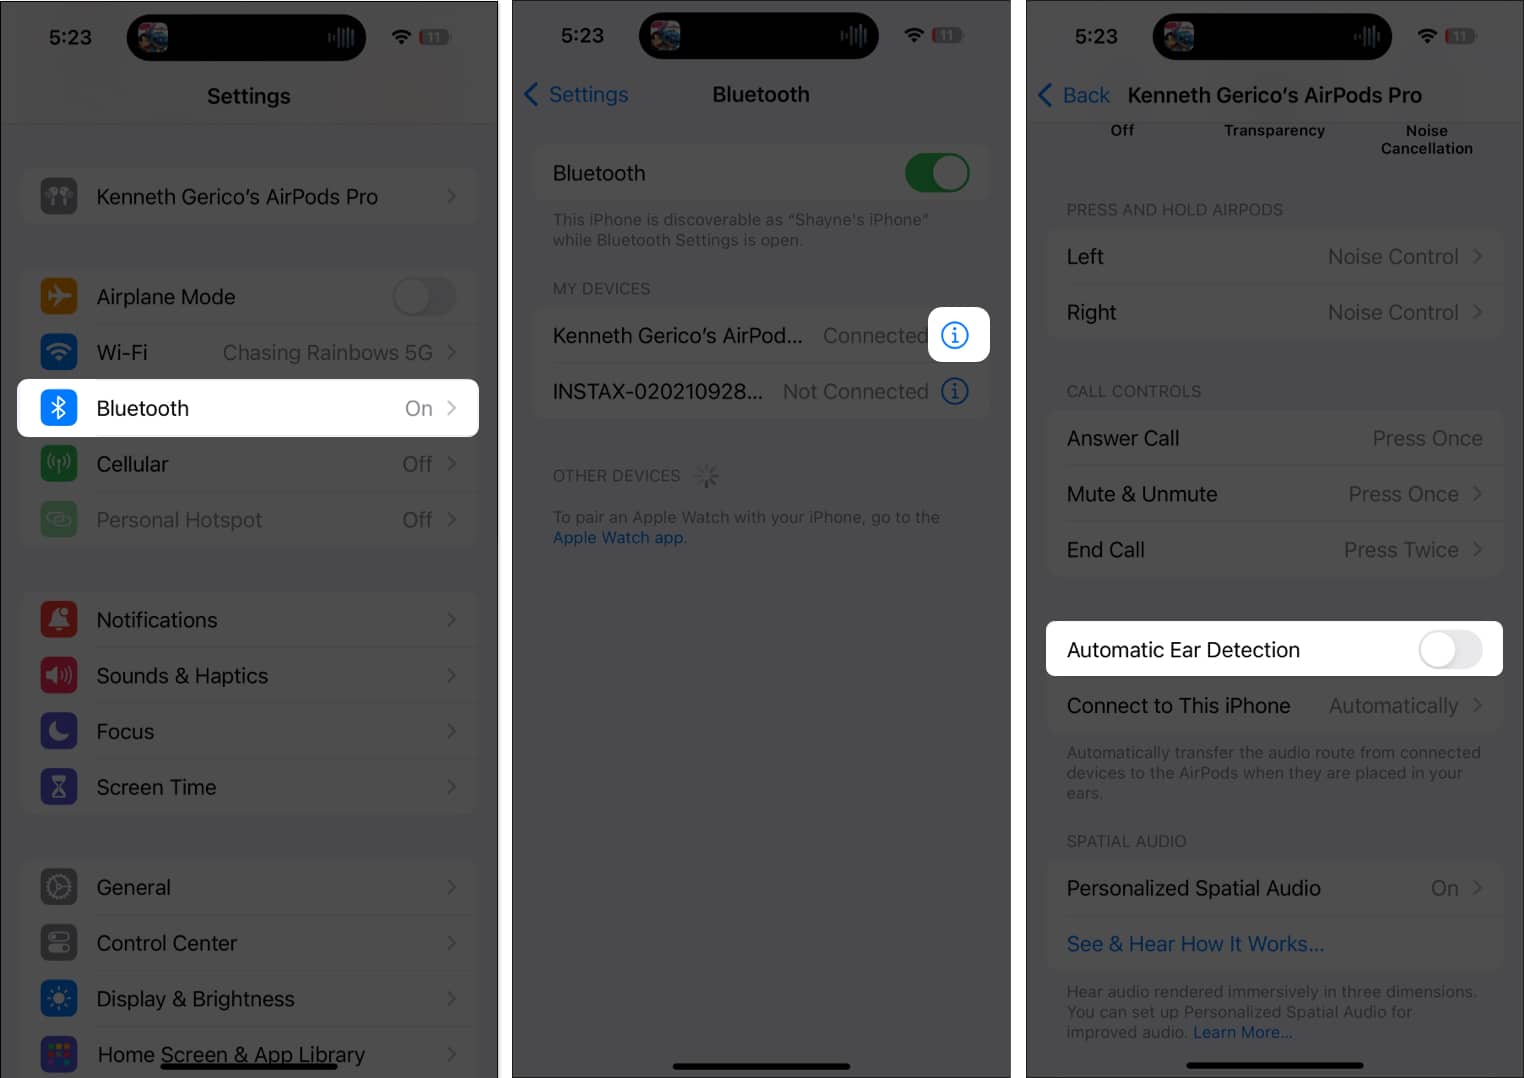
An issue with this feature prevents your device from connecting with your AirPods (since it fails to detect that you’re already wearing them). You can turn off this feature by doing the following on your iPhone:
- Go to Settings → Bluetooth.
- Tap the info (i) button next to your AirPods.
- Scroll down and toggle Automatic Ear Detection off.
Alternatively, when you go to Settings, you should see the AirPods listed under your Apple ID.
5. Manage volume and Reduce Loud Sounds feature
Most devices have an automatic volume leveling or volume limit feature that lowers the audio output when you switch from your device’s speakers to headphones. This aims to prevent sudden loud sounds upon listening on your headphones.
That said, check your volume first to ensure it’s not too low.
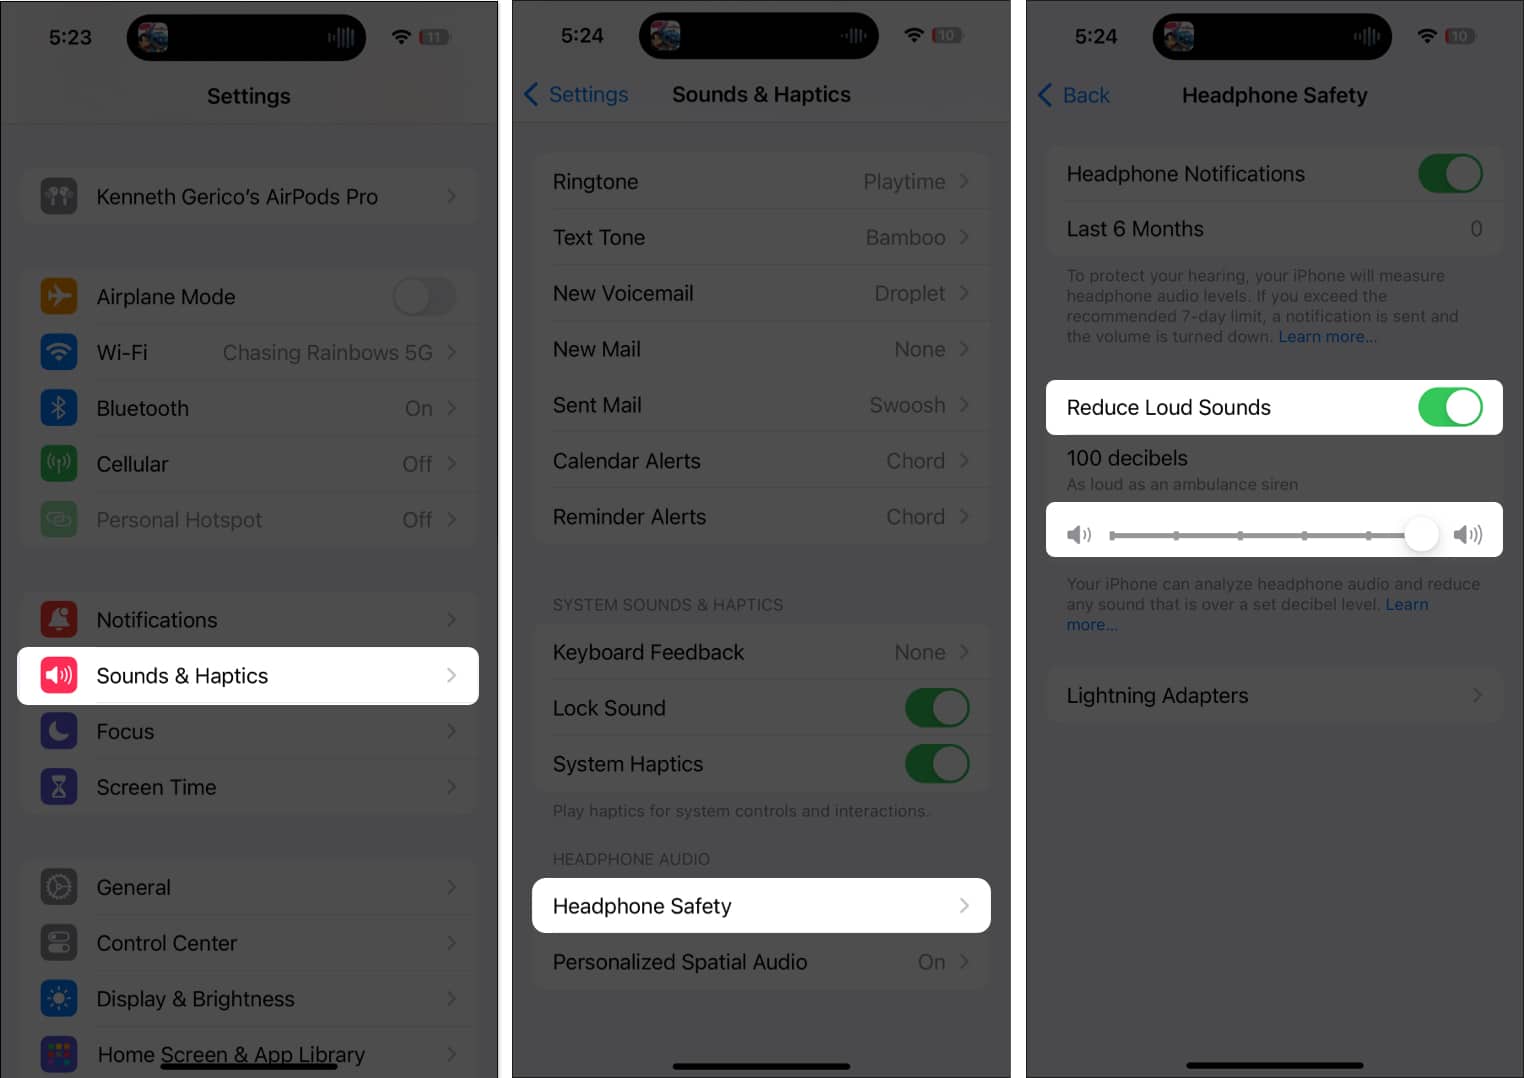
- Using an iPhone or iPad, you can go to Settings → Sound & Haptics → Headphone Safety.
- If Reduce Loud Sounds is enabled, adjust the maximum volume by dragging the slider.
6. Check for damage or dirt
If your AirPods are connected but not working, it could be a hardware problem. Check for any visible cracks or damage. It’s common for sounds to be faint, distorted, or absent if dirt, earwax, or grime has built up on the speaker grill.
Use a clean, dry cloth to gently wipe the speaker grooves and the surface of the AirPods. You should also clean the metal tip of your AirPods and the charging contacts inside the charging case.
7. Charge your AirPods
If your AirPods are running low on battery, you might notice a drop in sound quality — the microphone may stop working or result in AirPods that say connected but not working. To remedy this, it’s best to charge your AirPods for approximately 20 to 25 minutes.
8. Turn off Bluetooth and turn it back on
As your AirPods rely on Bluetooth to connect to your device, resetting the Bluetooth connection can often solve the issue.
- Turn it off on your iPhone or iPad by going to Settings → Bluetooth. Toggle Bluetooth off.
- On your Mac, click the Bluetooth icon and toggle Bluetooth off.
9. Check the Audio Balance
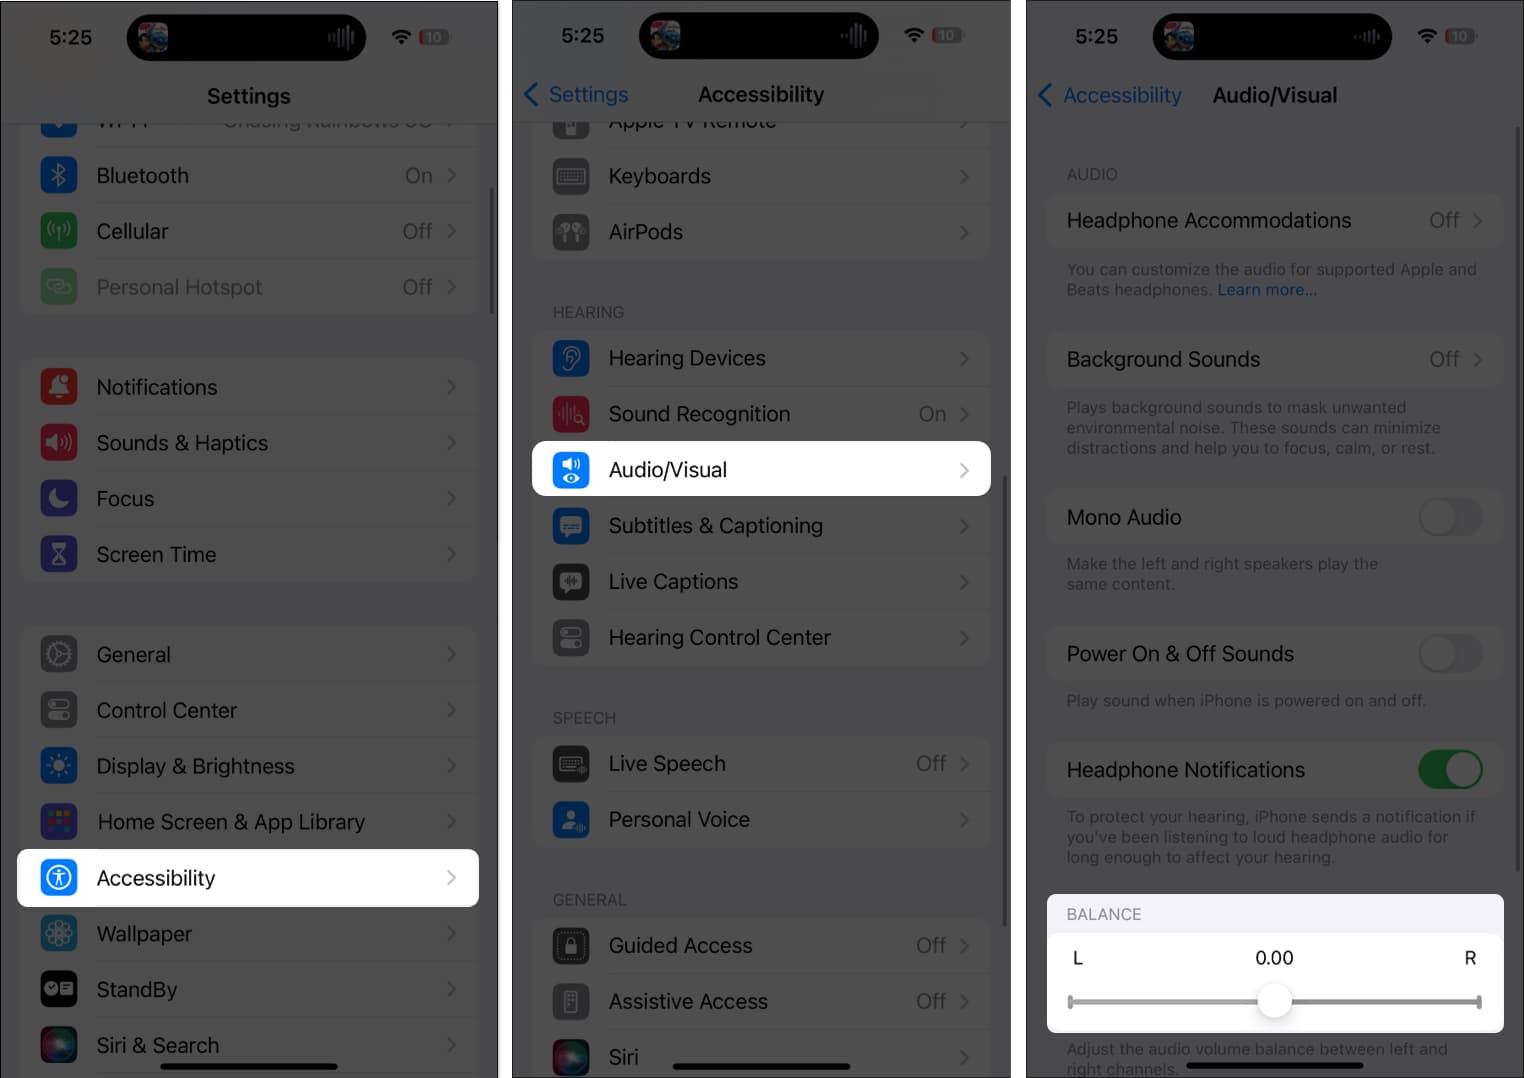
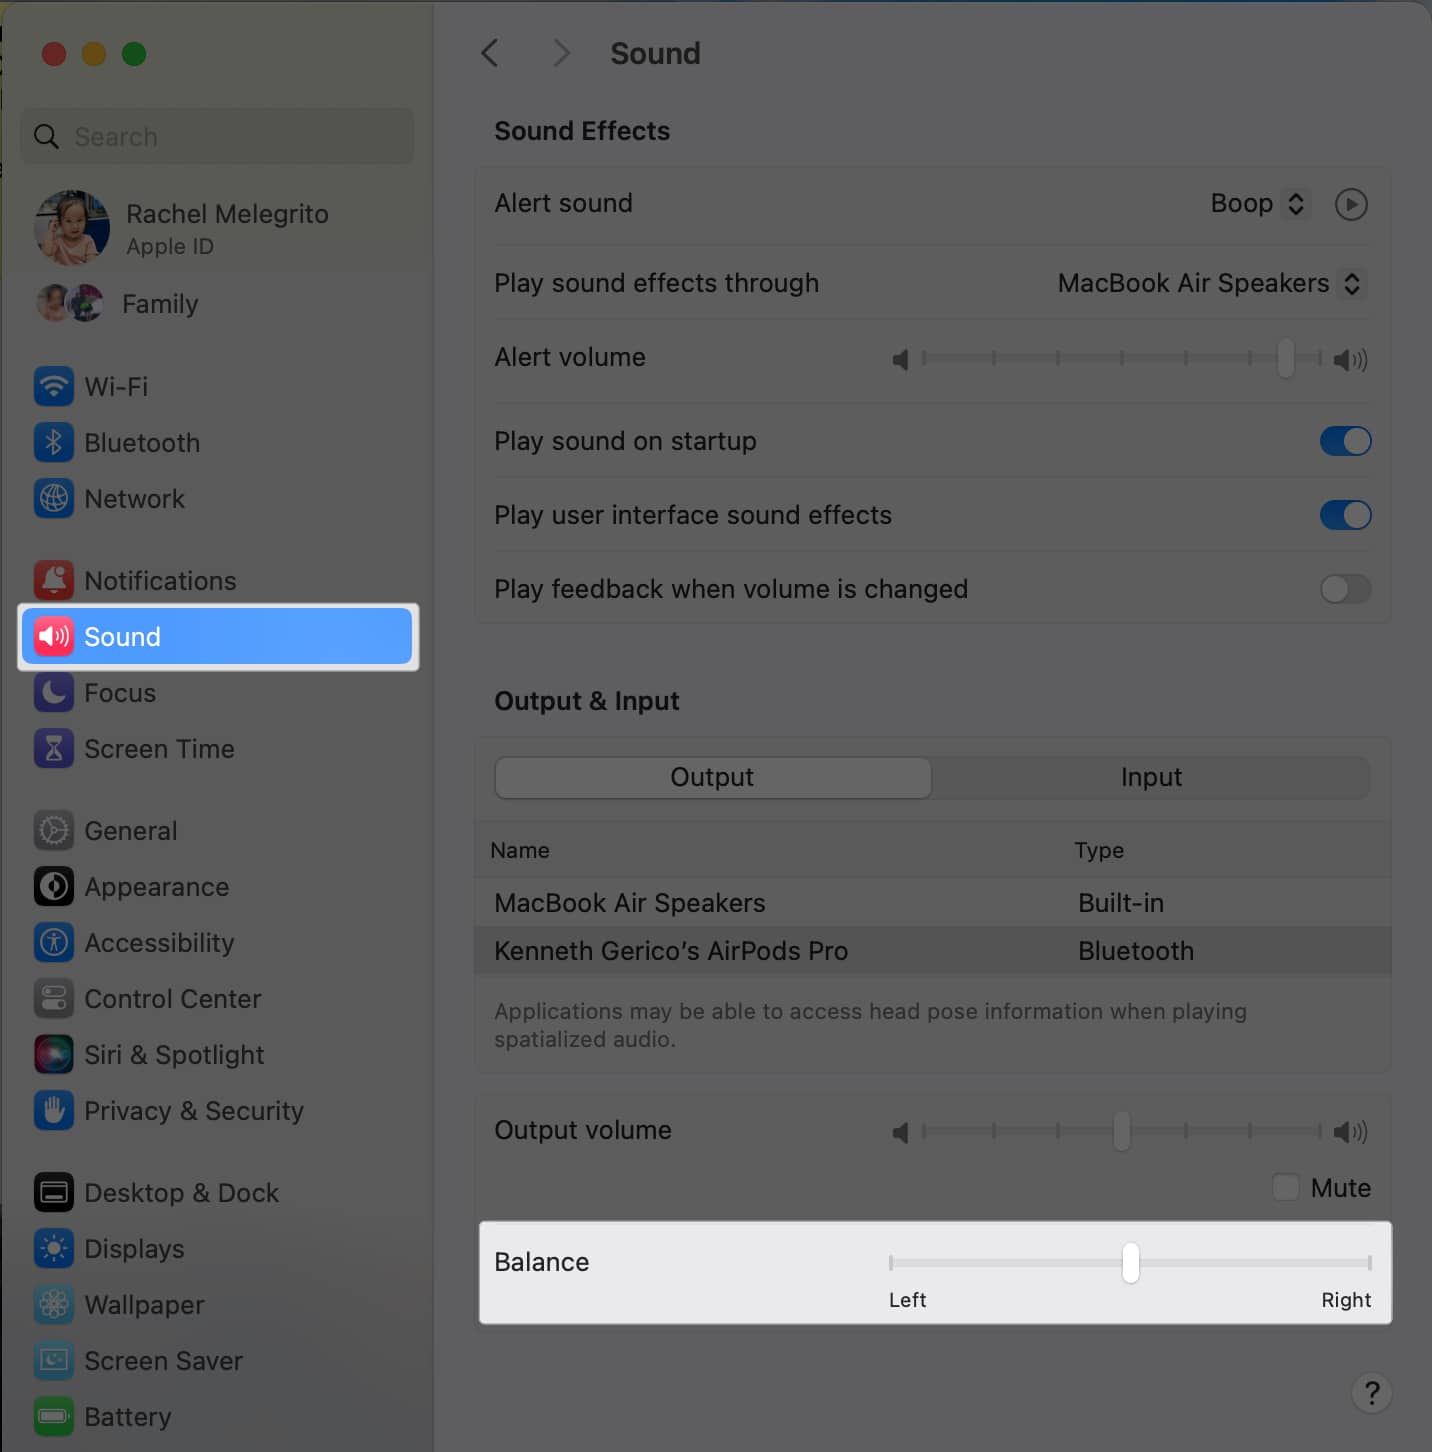
If one AirPod sounds louder than the other, it could be due to the Audio Balance feature, which lets you manage how you want the sound distributed between both earpieces. Typically, this setting is balanced to provide equal volume to each ear.
Many devices have this feature. If you’re experiencing the issue of AirPods connected, but no sound is produced on your Mac, Windows, or smartphone, you should check the device’s settings for Audio Balance.
- On your iPhone/iPad: Head to Settings → Accessibility → Audio/Visual. See if the slider is not at the center.
- On your Mac: Open System Settings → Sound. Check the Balance slider and make sure it’s at the center.
10. Check for interference
If you’re having trouble with your AirPods, it could be because other Bluetooth gadgets connected to your device are messing with the connection. Try turning off or disconnecting other Bluetooth stuff to see if that helps.
For instance, quite a few folks who use AirPods and have a Tile tracker paired to the same device have noticed some Bluetooth interference. So, if you’ve got a Tile, ensure it’s updated.
Also, believe it or not, even your Apple Watch can sometimes get in the way of your AirPods working smoothly. What you can do is to put your Apple Watch in Airplane mode while using your AirPods.
11. Re-pair your AirPods
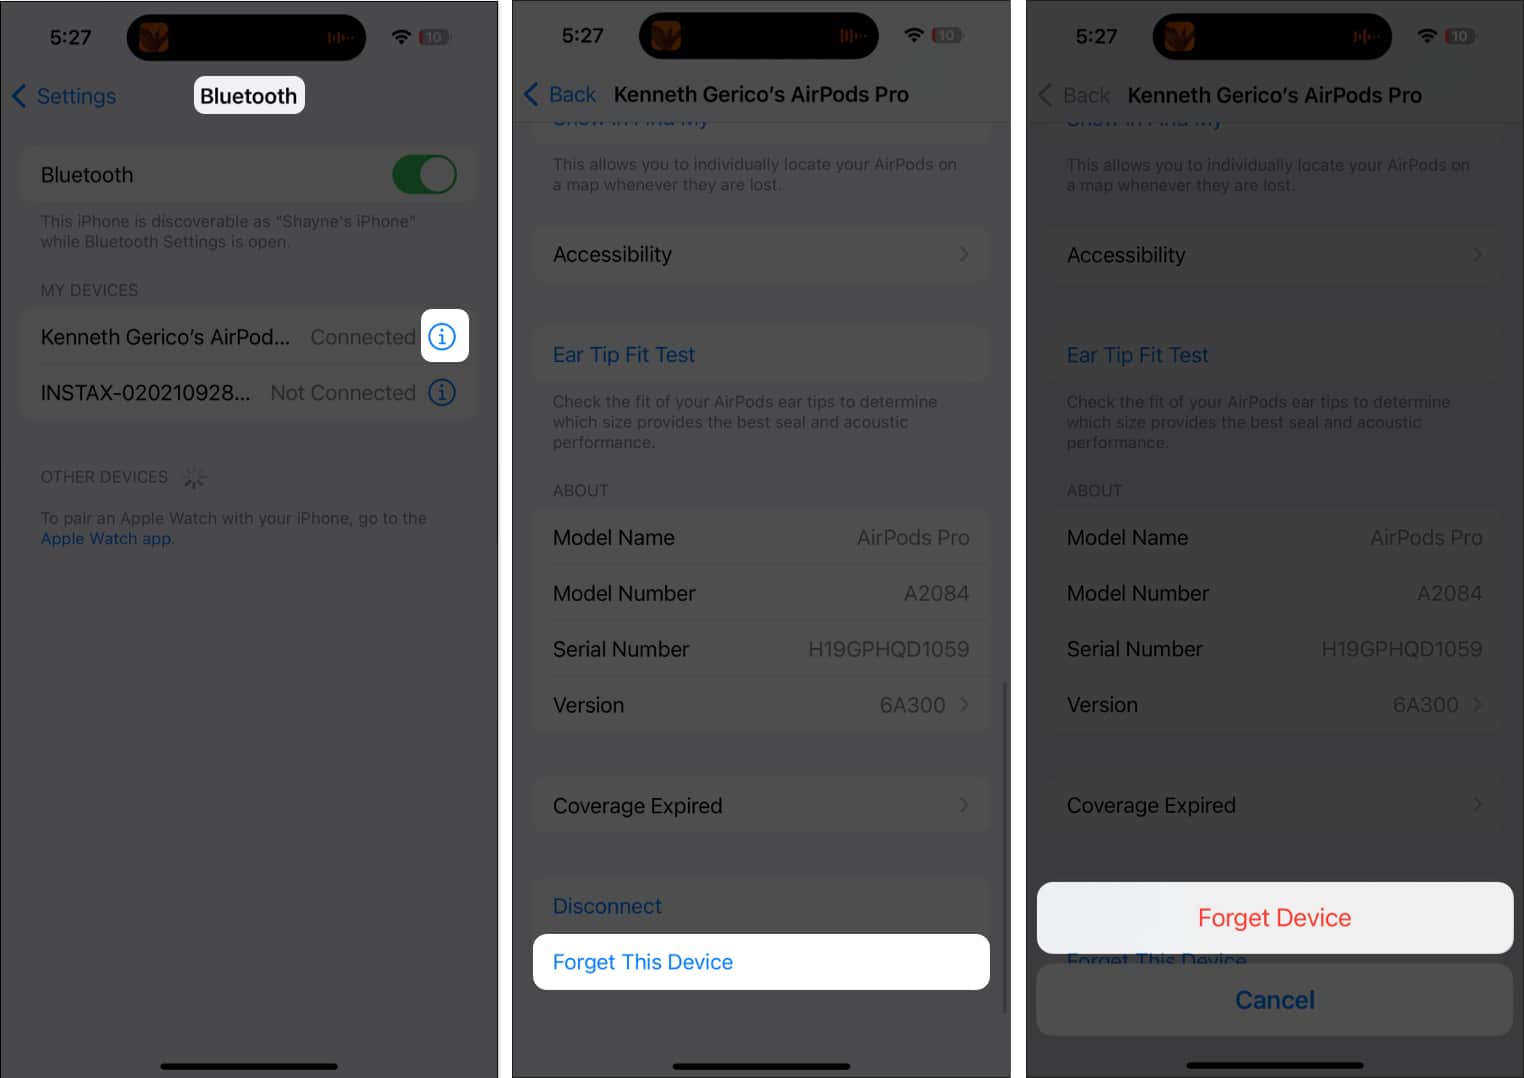
A simple trick to sort out those Bluetooth hiccups is to forget and reconnect your AirPods to your device. Before you start, play something on your device and turn the volume down (to ensure you’re not messing with the ringer volume by mistake).
- After that, go to Settings → Bluetooth. Select your AirPods → Forget This Device.
- After this, pair your AirPods again.
12. Reset your AirPods
If nothing seems to work, your next step should be to reset your AirPods. All you need to do is place them back in the charging case, open the lid, and hold the button at the back until it flashes amber and then white.
13. Update your AirPods’ firmware
Unlike your iPhone, iPad, or Mac, where you have a say in when you update, Apple takes a different approach with your AirPods — they update automatically, with no prompts or buttons to click. But sometimes, they might skip a beat and not update.
It’s a good idea to keep an eye on what firmware your AirPods are running and make sure they’re up to date.
14. Restart your Apple device
We all know how valuable and powerful a quick Restart is when fixing many issues. That said, if refreshing the app and restarting your AirPods don’t do the trick, you should try restarting your device.
- Read our guide on how you can restart your iPhone or iPad.
- If you’re using a Mac, click the Apple menu and select Restart.
15. Update your device
Lastly, if you’re using a device running on an outdated operating system, chances are it’s laden with bugs and other issues. Software updates bring enhancements and bug fixes to help solve the AirPods saying connected, but no sound problem.
- Here’s how you can update your macOS on your Macbook.
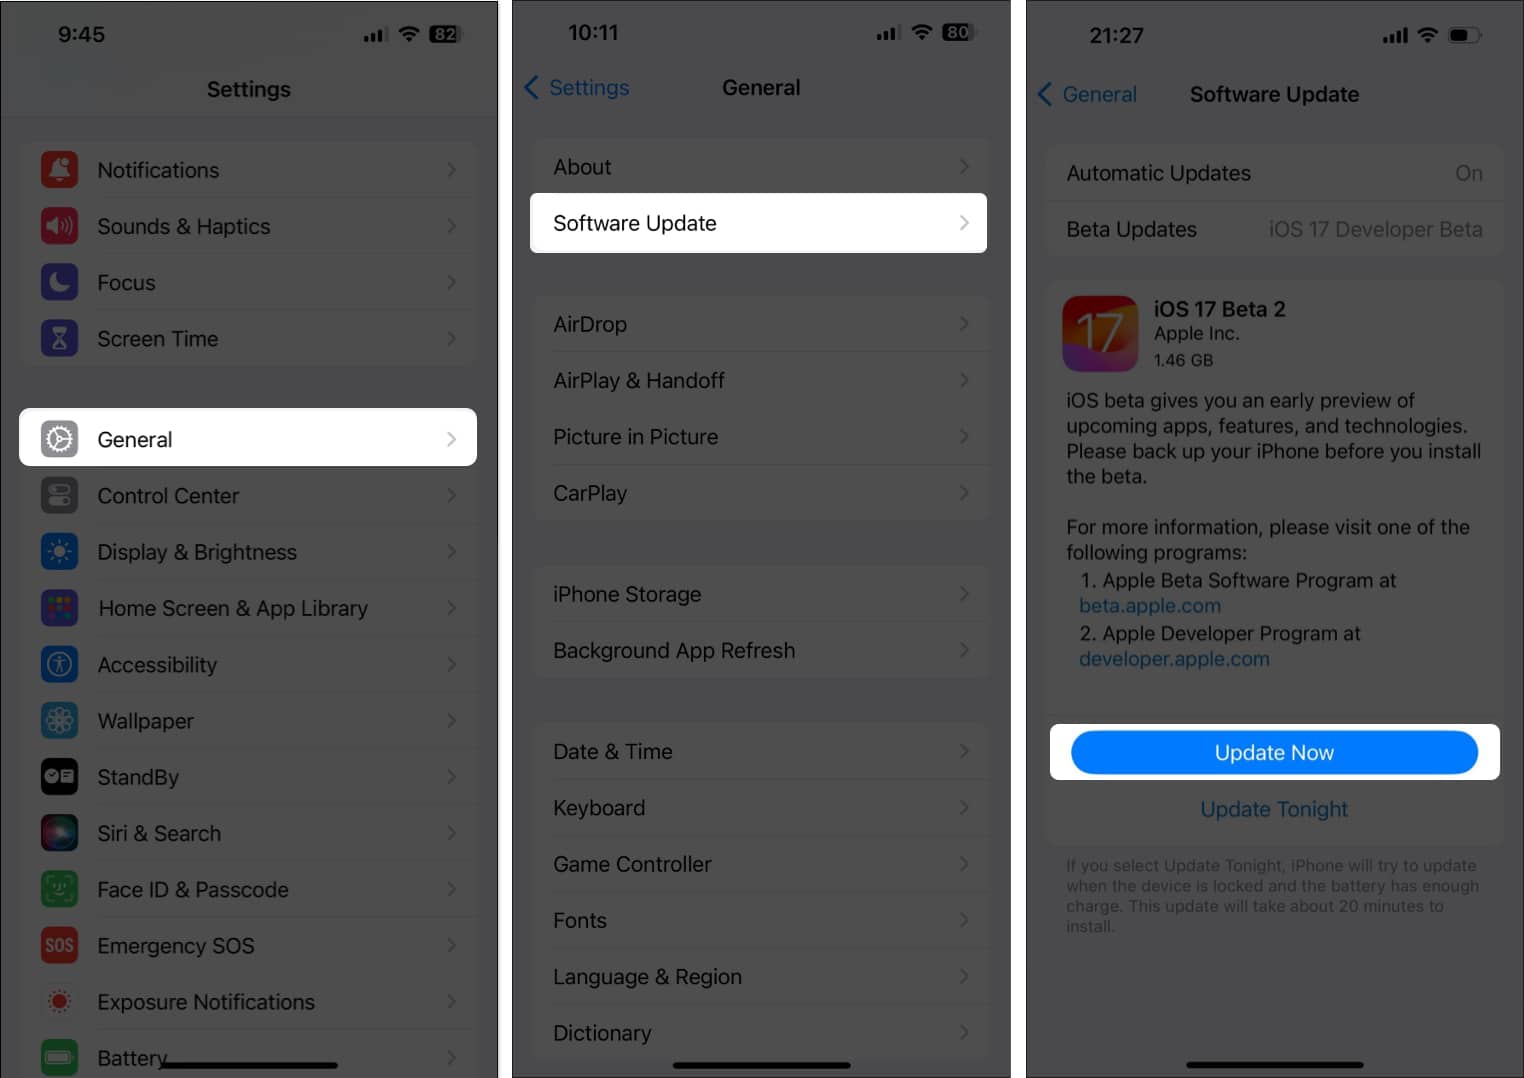
- To update your iPhone or iPad, go to Settings → General. Select Software Update. If there’s an update available, tap Update Now and update your device.
Wrapping up…
It’s super annoying when your AirPods say they’re connected but just won’t work—it’s frustrating and can hold you up from what you need to be doing. Since this glitch can happen for many different reasons, there are quite a few things you can try to fix it.
Did any of these solutions work out for you? Drop a comment and let us know!
Read more:

