If you haven’t yet had the epiphany that you’re holding a powerful tool when holding an Apple Pencil, you’re certainly missing something. Don’t worry. These Apple Pencil tips and tricks will help you connect the dots. And even if you already love the iPad stylus, this article can help you see what you’re missing. Let’s not waste any more time and get on with it.
Basics to know about Apple Pencil
Apple Pencil will greatly ease your day-to-day work, whether you are an artist or a businessman. It could aid in drawing, note-taking, digital signatures, relaxation, and more. But before we dip into that pool, let’s get the basics out of the way.
Connect your Apple Pencil to the iPad
- Apple Pencil (1st Gen) – Unlock iPad → connect via Lightning pair → tap Pair.
- Apple Pencil (2nd Gen) – Unlock iPad → Attach the pencil to a magnetic strip → tap Pair.
If you face any issues with pairing, check out this guide for step-by-step tutorials.
Note:
Most tips mentioned work for both Apple Pencil 1st and 2nd generation. If a trick does not support both, it will be clearly mentioned.
Best Apple Pencil tips and tricks for drawing
For many, the iPad and Apple Pencil are only for designers (graphic, interior, jewelry, fashion, etc.) or artists who need to draw, sketch, color, render, etc. And while not limited to these people, Apple Pencil makes their jobs much smoother.
And if you’re a budding or established designer/artist or new iPad user, here are some hacks to improve your drawing skill and speed.
1. Achieve perfect shading
The ‘pencil’ in its name is more than a namesake. And at times like this, it behaves like a real-life pencil. When you are drawing or sketching, tilt the Apple Pencil to shade.
Furthermore, it also responds to the pressure, so you can darken or lighten the stroke accordingly, like a real-life pencil. While it works amazingly smoothly, you might have to practice to get the hang and master the skill.
2. Draw perfect shapes
A part of the Scribble feature introduced in iPadOS 14. It enables the supported app to recognize the shape you’ve drawn via Apple Pencil and correct it, whether it’s a circle, square, star, heart, or hand.
- Open the app and select the pen tool.
- Start drawing the desired shape, but pause before you finish the shape.
- iPad will get the signal and replace the shape with a perfect one.

Notably, if you do not pause before completing the shape, it will not be corrected and will remain as is. This allows users to draw random, rough shapes if they want to. And if you pause too early, the shape might not be recognized and hence not corrected.
3. Use Markup to draw a straight line
Drawing a super-straight line could be difficult, no matter how steady your hand is. But it’s a child’s play if you know this hack.
- In a supported app, open the Markup tool.
- Now select the ruler tool from the options menu (bottom right).
- Place the ruler at the desired place and angle.
- Select the pen/marker and trace the ruler’s edge.

4. Trace drawings
Did you know that the iPad will register Apple Pencil strokes, even if a thin paper is on the screen? Well, it does, and you can use the feature to your benefit. Supposedly, you have a sketch that you need to transfer onto the iPad. You can either scan the sheet or:
- Open the drawing sheet (Notes or any other app you prefer).
- Select the pen or marker.
- Place the sheet on the iPad and use tape to hold the paper in place.
- Take your Apple Pencil and start tracing the sketch.
5. Stop finger interference
Have children or naughty colleagues who can interrupt or want the Apple Pencil to have full control? Try this hack. The setting will only allow the Apple Pencil to draw and won’t register the finger moments.
Notably, this is only applicable when the Apple Pencil is connected to the iPad. You can still scroll using your fingers but not draw or write something.
- Go to Settings → Apple Pencil.
- Toggle on Only Draw with Apple Pencil.

The setting works in Notes, Photos, or anywhere else you use the Markup tools. To disable the setting, follow the steps above and toggle it off.
6. Insert a drawing into the email
The feature has been part of the default Mail app since iOS 11 but is a bit hidden. So, many iPad users don’t know that it exists.
- Launch the Mail app.
- Compose new or reply to an existing mail.
- Double-tap with Apple Pencil anywhere to bring up the options menu.
- Tap the arrow to see more options.
- Select Insert Drawing.

You can also go to the Markup tools → choose the tool → draw or sketch → tap Done → tap Insert Drawing. To make any changes, tap the drawing in the email and the Markup icon.
Apple Pencil tips for note-taking
To know what you’re missing, go to Pinterest or YouTube and search for iPad note-taking. You’ll find some talented artists brewing frame-worthy notes. And while that might not be the target for you and me, we can make decent and quick notes with these tips.
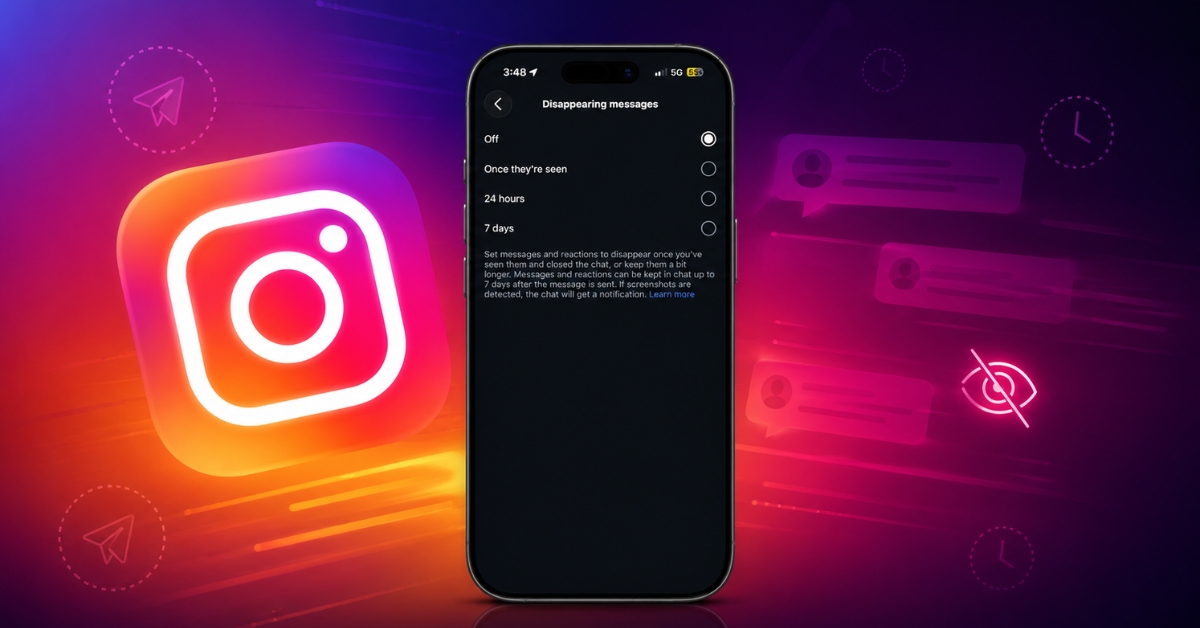
7. Use Apple Pencil even if the iPad is locked
While Quick Note is a boon, you also have a quicker way to jot down notes directly from the Lock screen. When you’re in a hurry, tap, hold (for a millisecond), and release the Apple Pencil on the Lock Screen. A fresh note will appear on the screen, so right or draw away.
To enable the feature:
- Go to Settings → Notes.
- Toggle On the switch next to Access Notes from the Lock Screen.

Incredibly, while you can create a new note without unlocking the device, you won’t be able to access the previous notes. So, rest assured all your data is secured.
8. Quick Note
Introduced in iPadOS 15, Quick Note allows you to call upon a fresh or existing note anytime by swiping inward from the bottom right corner of your iPad screen. Notably, it works over any and all apps, so you don’t have to leave the current app to make a note.
And the best part is that Quick Note is aware of the app you’re using. So, when you open Quick Note alongside Safari, an Add Link button appears. Or, when you long-press the selected text, an Add to Quick Note option is available in the menu.

Check out our complete guide on using Quick Note to make the most of this feature.
9. Master Scribble
Scribble has manifold the power and ease of the Apple Pencil. I’ve already introduced how it helps you draw the perfect shape, which is just the tip of the iceberg.
Convert handwriting to text
As the name suggests, the feature lets you scribble out things using Apple Pencil. And the iPad auto-converts your handwriting to typed text. Incredibly, it’s not just limited to a single app. In fact, you can scribble in any text field like the Safari address bar, online forms, messages, etc.

For text fields, simply write the text with Apple Pencil. However, for taking Notes, select the Markup toolbar and the Handwriting tool.
Bonus:
Tip: Have previously handwritten notes you want to convert into text?
- Pick the selection tool from the Markup tools and encircle the text.
- Long-press to invoke the options menu and select Copy as Text.
Scribble gestures
You can not just write but also edit or manage the text with some simple gestures:
- Select a word – Double-tap or circle the word.
- Select text – Underline or circle the text.
- Insert text – Long-press in the text area and write in the space that opens.
- Delete – Scratch the word out.
- Join or separate characters – Draw a vertical line between them.
- Select a paragraph – Triple-tap any word within the paragraph or slide the Apple Pencil from the start to the end.
Moreover, Scribble can recognize handwritten addresses, phone numbers, dates, etc. It will give them a yellow underline as a sign of recognition.
When you tap the underlined text, a contextual menu with connecting actions will pop up. For instance, call or message a phone number, add the date to the calendar, etc
10. Markup screenshots and documents
While taking screenshots on an iPad is super simple (and I have a special trick for that mentioned below), marking them is quite easy, thanks to the built-in Markup tools.
Simply tap the Markup tool, select the pen/marker you prefer, choose the color and write or draw away.
11. Sign documents on the go
You’ll probably know that you can scan documents via the Notes and Files app on an iPad. But that’s not it. Using the Markup tool, you can digitally sign the document wherever and whenever.
- Open the document in Photos, Notes, or Files.
- Tap the Markup tool icon.
- Select + icon and then Signature.
- Now, use your Apple Pencil to sign the document.

You can also save multiple signatures and use them as required, check out this article to learn everything you can do with the feature.
12. Search handwritten notes
While not really an Apple Pencil hack, but worth mentioning in the section. A smart-on-device intelligence allows the iPad to search almost anything in notes, whether handwritten text, text in scanned documents, tags, mentions, and objects within images.
How to get the most out of my Apple Pencil
13. Take a screenshot with Apple Pencil
Oh yes! Your Apple Pencil can do that too. Swipe up from the bottom left corner of the screen using the Apple Pencil, and tada!

Notably, you can resize, Markup/annotate, share, use Live text, and easily manage the screenshot’s opacity. Once finished, tap Done and save the screenshot to Photos/Files or Delete it.
Furthermore, if you take a screenshot of a Safari page, you can tap the Full Page option from the top to capture the complete webpage and save it as a PDF.
14. Change Apple Pencil quick gestures
Swipping in from the left side for screenshots and the right side for Quick Note is the iPad’s version of the Hot Corners. But if you’re a leftie/rightie and want to interchange the quick gestures, here’s how you can:
- Go to Settings → Apple Pencil.
- Under Pencil Gestures, select the Quick Gesture you want.

You can choose to turn off the gestures entirely; just select Off.
15. Customize double-tap features
Like AirPods, the Apple Pencil 2nd Gen has a sensor near its tip. You can perform certain actions when you double-tap the sensor. By default, it switches you back to the last used tool. However, you can change the setting.
- Go to Settings → Apple Pencil.
- Under the Double Tap section, choose one of the following
- Switch between current tool and eraser
- Switch between current tool and last used
- Show color palette
- Off
Notably, The double-tap feature is limited to supportive apps like Notes.
Works with:
- 1st Gen ❌
- 2nd Gen ✅
16. Adjust Palm Rejection
By default, the Palm Rejection is turned on with Apple Pencil, i.e., if your palm touches the screen while using Apple Pencil, that won’t be registered.
However, that might not be befitting of your writing/drawing posture. The good news is that you can adjust the setting for third-party apps like Procreate, Good Notes, etc. Just go to the settings section of the app to adjust it.
17. Switch the tip regularly
When writing/drawing with a regular pencil, you need to sharpen its tip for best performance. Similarly, a lot depends on the tip of your Apple Pencil. While you don’t have to change it too frequently, heavy users are advised to change the tip within 6 months.
The best way to know is if the tip feels rough while writing or sketching. We have covered the whole procedure in detail.
Check out this article on when and how to replace your Apple Pencil tip.
18. Manage Apple Pencil battery efficiently
How tragic would the situation be that it is out of battery when you need the Apple Pencil the most? While you can go to Settings → Apple Pencil to check its battery, the best way is through the battery widget.

Long-press any app → select Edit Home Screen → In the jiggle mode, tap + from the upper-left corner. Here, find and add the battery widget to the Home Screen.
19. Keep your Apple Pencil securely
If you have a case or cover for the iPad that houses the Apple Pencil, it is a win-win situation. However, if that’s not the case or your iPad is fixed on a stand on your desk, you might need extra protection for the Apple Pencil.

If you’re looking for the perfect accessory for your Apple Pencil, our guide can help you find the right case, cover, or sleeve.
You might also consider adding a comfortable Pencil Grip for improved handling. And don’t forget a stand or holder to keep your Apple Pencil safe and organized when it’s not in use.
20. Find a lost Apple Pencil
While I don’t hope such a scenario happens, we should always be prepared for the worst. Unfortunately, Apple doesn’t support Find My, so that’s a sad Tweet.
However, there are some tricks and third-party apps that can help you out. For detailed, step-by-step instructions, check out this article.
That’s all, folks!
That’s all the tricks, tips, and suggestions for Apple Pencil that I have up my sleeve. Is there something I am missing, or do you have any questions regarding something? Feel free to connect with me in the comment section below.
Want more great iPad hacks? Check these links out: