Apple Music has come a long way, and with iOS 26, it’s smarter, faster, and packed with features many users never notice. From AI-powered AutoMix to real-time lyric translations, simplified navigation, and deeper personalization, the app feels smarter, smoother, and far more intuitive.
In this guide, I’ll discuss the latest tips and features for getting the most out of Apple Music on your iPhone.
Table of Contents
- 1. Getting started with Apple Music
- 2. Enable DJ-Like AutoMix
- 3. Pin Your Favorites
- 4. Get Lyrics Translation and Pronunciation
- 5. Enjoy Animated Album Art on Lock Screen
- 6. Use Karaoke Mode in Apple Music Sing
- 7. Ambient Music feature
- 8. Take Advantage of Radio Stations
- 9. Add Tracks to the Queue
- 10. Transfer Playlists from Spotify and Other Services
- 11. Create Collaborative Playlists
- 12. View Song Credits
- 13. Get Music Haptics
- 14. Check Out Premade Playlists
- 15. Automatically Add Songs to Your Library
- 16. Hear More of What You Like (and Less of What You Don't)
- 17. Get Music Information on Apple TV
- 18. View your Apple Music Replay
- 19. SharePlay with Everyone
- 20. See What Your Friends are Listening To
- 21. Sing, Search, or Share with Song Lyrics
- 22. Create and Share playlists
- 23. Make Smart Playlists
- 24. Listen to Apple Music Without the Internet
- 25. Enhance the Sound
- 26. Watch Music Videos on Apple Music
- 27. Receive Music notifications
- What’s Your Favorite Apple Music Feature?
1. Getting started with Apple Music
If you’re new to Apple Music, getting started is simple. After opening the Apple Music app, you can sign up for a free trial or choose a subscription plan. Here is a brief overview of the Apple Music plans:
- Individual: $10.99/month
- Family (up to 6 people): $16.99/month
- University Student: $5.99/month (includes Apple TV)
After successfully setting up your account, Apple Music will personalize your musical tastes by asking about your preferred genres and artists. This is important because it helps the app generate playlists and song suggestions tailored to you.
After this, you may proceed to explore the Music app to learn its features.
- Listen Now: See your recently played songs, mixes made for you, recommended radio stations, and suggestions based on your listening history.
- New: Get personalized recommendations for new music or artists by Apple Music editorial staff. You can explore sections such as New Releases, Latest Songs, and Updated Playlists.
- Radio: Described further in the next section, you can head to the Radio tab to listen to a station.
- Library: This contains all of your music playlists, albums, songs, compilations, and downloaded items.
- Search: Use the Search box to find artists, songs, albums, radio stations, shows, and more. Type your request or use the microphone icon to speak it.
Use The Shortcut Menus
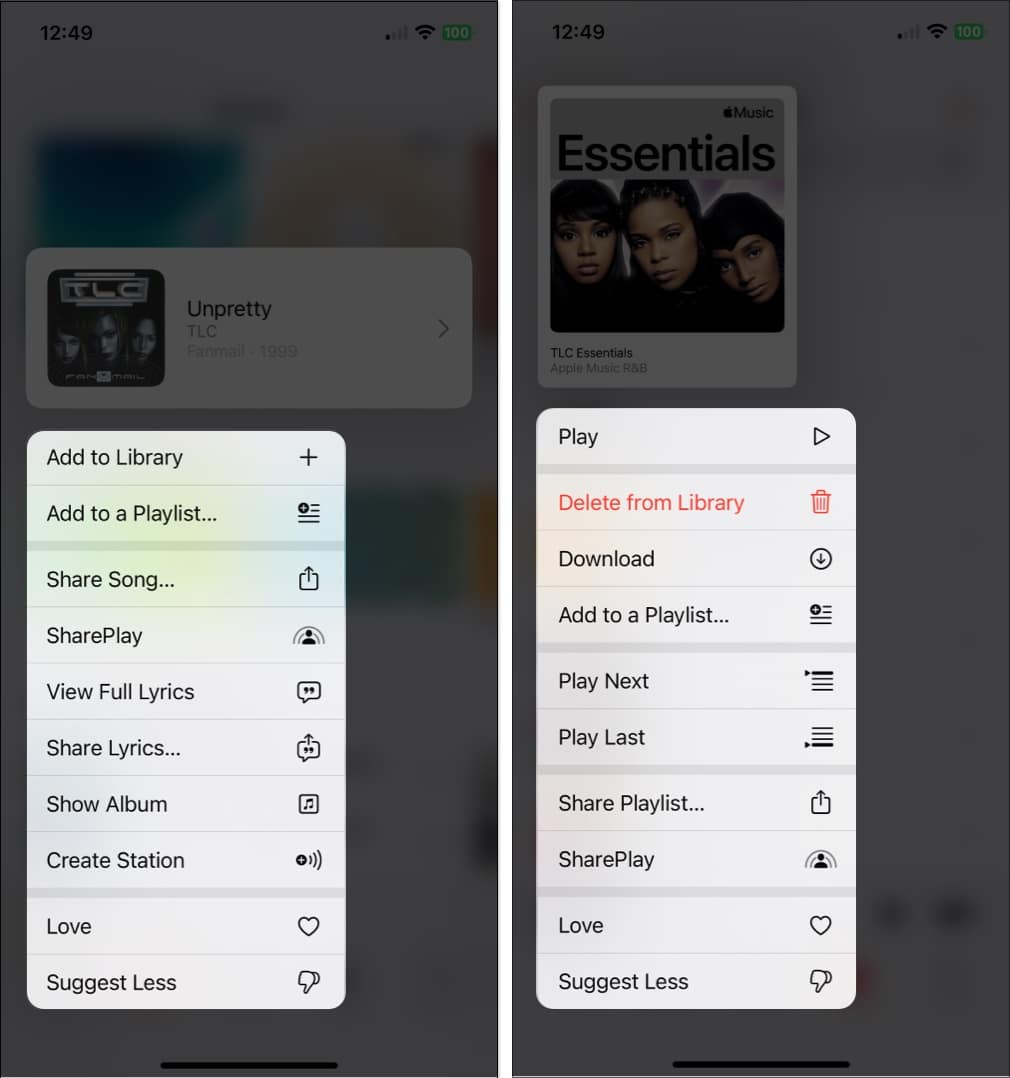
You can also access a list of handy shortcuts by long-pressing (tap and hold).
- Long-press a song: Along with the other items you’ll see, you can long-press a song to create a station with it.
- Long-press an album: You can long-press an album or a playlist to add it to your listening queue, either at the beginning or the end.
2. Enable DJ-Like AutoMix
AutoMix is Apple’s new feature that replaces Apple Music’s old Crossfade. It analyzes the tempo and key of the songs you’re playing and uses beat-matching and time-stretching to create smooth, DJ-style transitions.
So instead of fading one track out and then playing the next, AutoMix keeps the flow going without awkward pauses. For example, if you’re playing a fast-paced song, the tempo may slow down slightly to match the next slower-paced track.
To enable Apple Music AutoMix:
- Open the Apple Music app.
- Start playing any playlist or station like “Today’s Hits” or “Lo-Fi Chill.”
- On the Now Playing screen, tap the List icon to view upcoming songs.
- Tap the AutoMix button located near Shuffle and Repeat to turn it on.
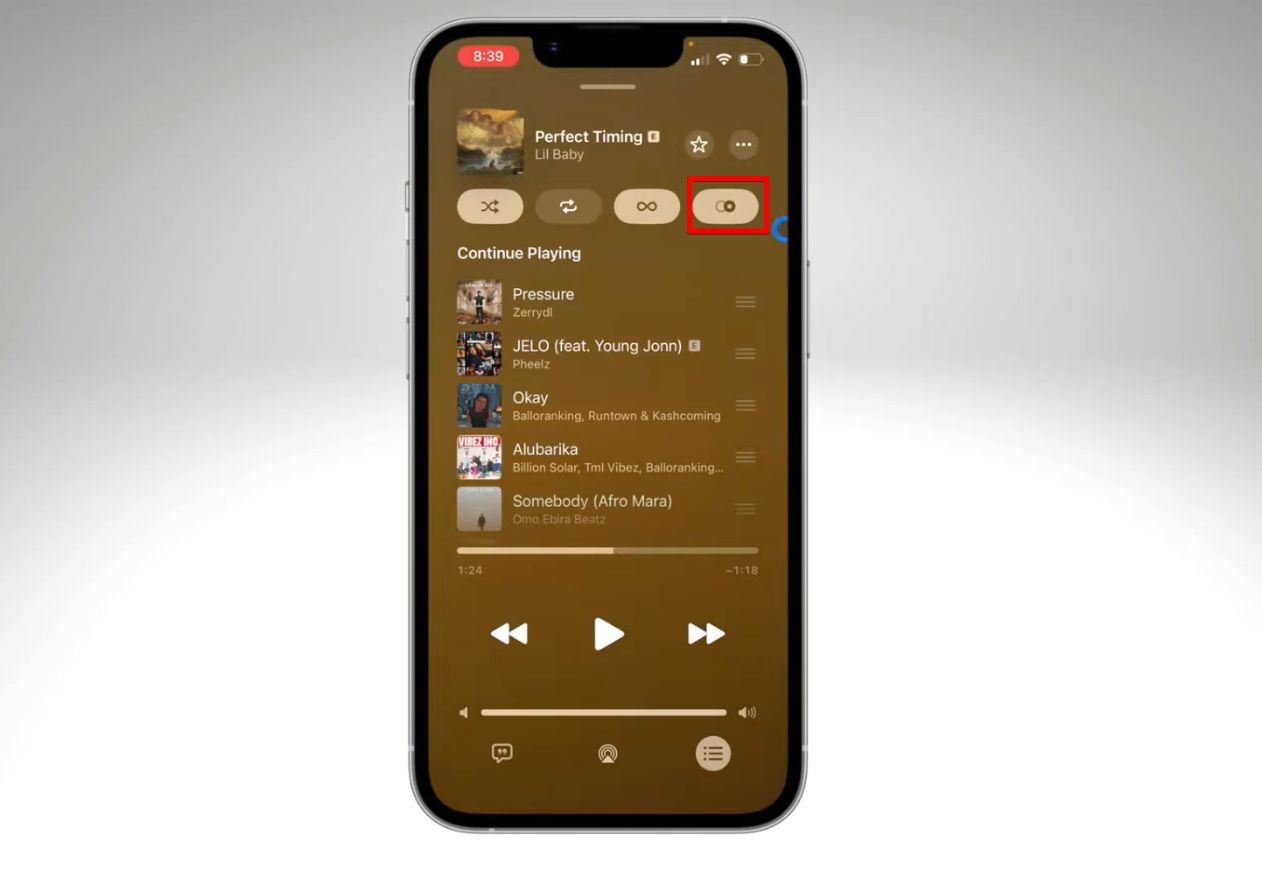

Once it’s enabled, your songs will start blending automatically. So, just play your playlist and enjoy smooth, DJ-style transitions.
3. Pin Your Favorites
The Pin Favorites feature lets you save your favorite songs, artists, albums, or playlists at the top of Apple Music for quick access. So, it’s always easy to find and play, instead of scrolling through your library.
- Open Apple Music and go to Library.
- Find a song, album, or playlist you love.
- Long-press it and tap Pin. You can pin up to six items in total, any combination of playlists, albums, or artists.
Pinned items appear at the top of your Library and in Home Screen widgets too.
4. Get Lyrics Translation and Pronunciation
Love a song in another language? Apple Music in iOS 26 can translate song lyrics into your iPhone’s default language, so you can finally understand what that French ballad or Korean pop song is about.
Even better, Apple added support for pronouncing lyrics in non-Roman scripts. You’ll see Romanized versions of lyrics (Latin alphabet) so you can sing along more confidently, without mispronouncing the words.
- Open Apple Music and play a song in another language.
- Tap the Now Playing screen, then tap the Lyrics button at the bottom.
- You will see translations and pronunciation beneath synced lyrics, highlighting each line as it plays.
- If it doesn’t appear, tap the translation icon above the playback slider.
- For songs in another language (like Spanish or Korean), tap Show Translation.
- Tap Show Pronunciation to see a phonetic guide (like “kah-rah-oh-kay” for karaoke) to help you sing along.
5. Enjoy Animated Album Art on Lock Screen
The Animated Album Art feature brings your iPhone’s Lock Screen to life when you play music, adding a fun visual touch.
- Play a song in Apple Music.
- Lock your iPhone (press the Side button).
- Now tap the album art on the playback banner to view it full-screen in motion.
- The Liquid Glass style makes the art look glossy and see-through, blending with your wallpaper.
It makes listening to music feel more exciting, turning your Lock Screen into a mini music video.
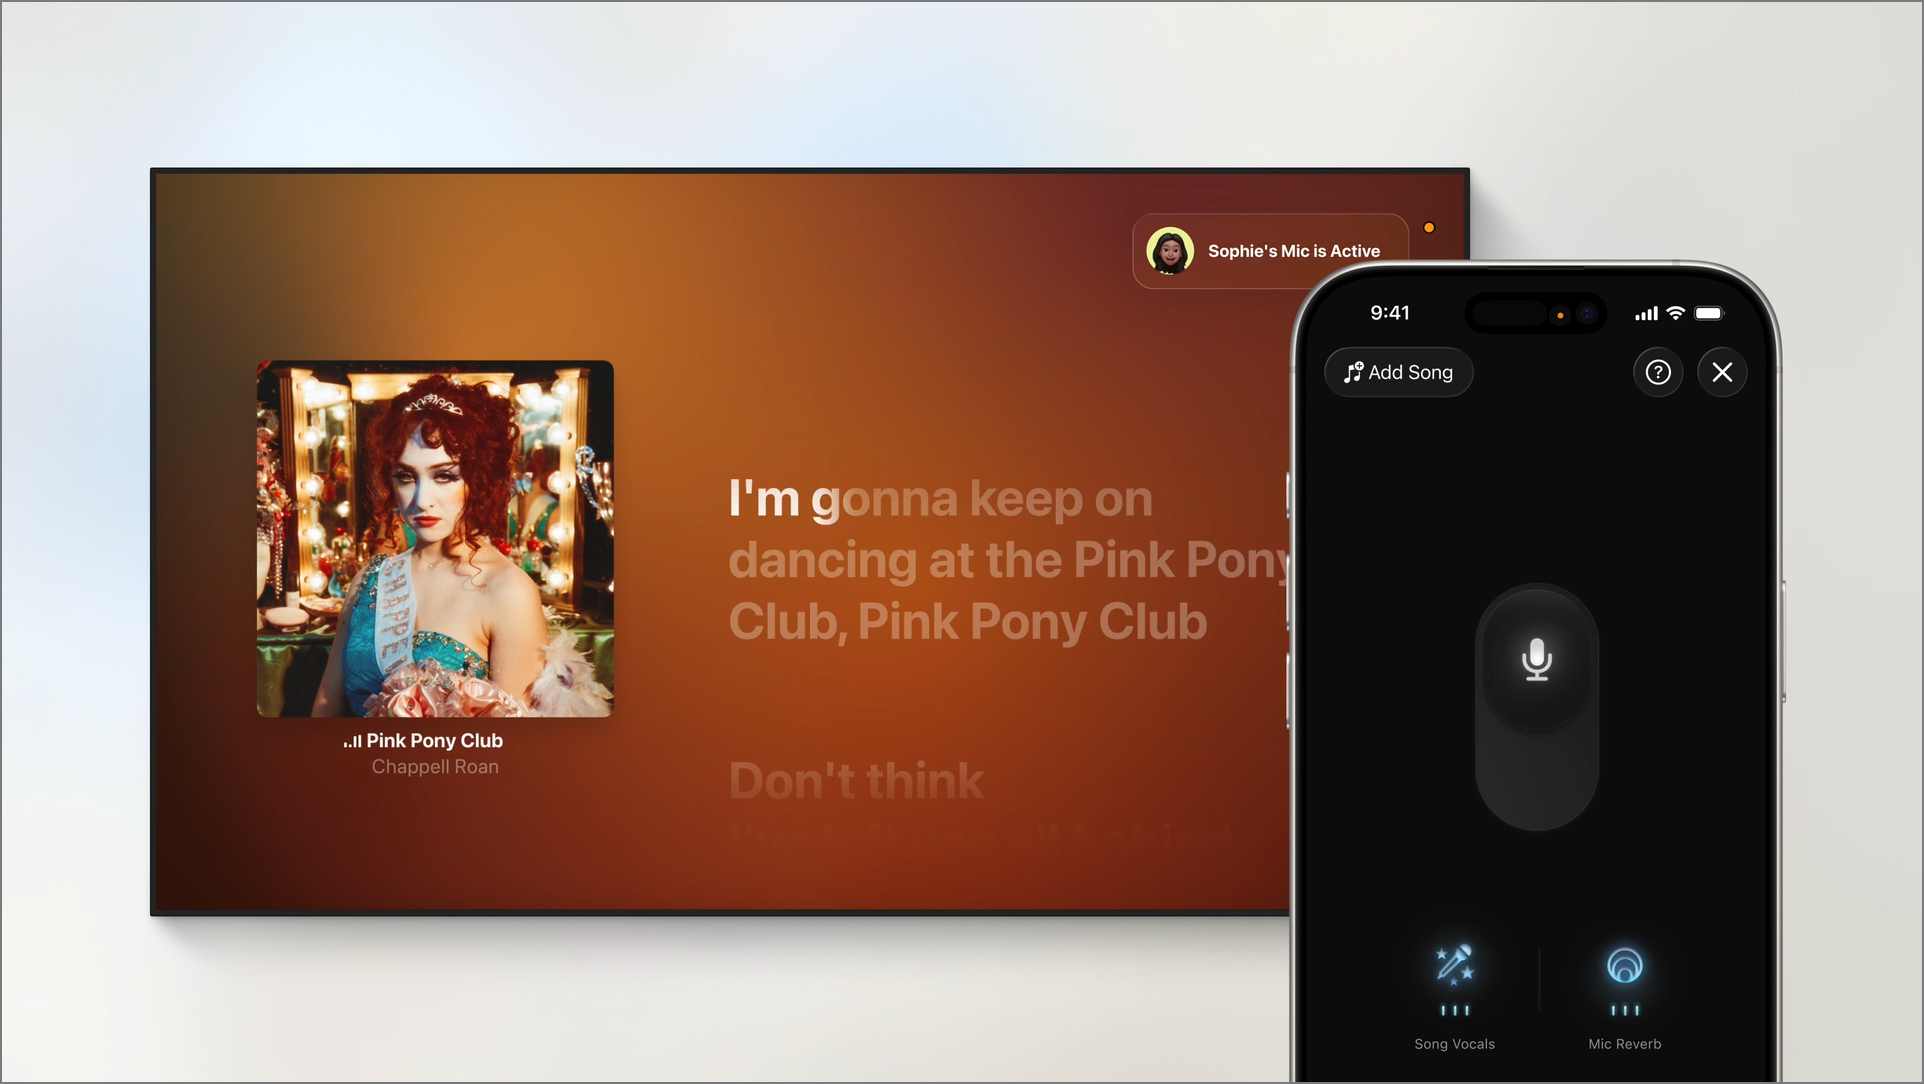
6. Use Karaoke Mode in Apple Music Sing
With iOS 26 and tvOS 26, Apple Music Sing is now even better. It lowers the vocals in a song so you can sing the lead, with lyrics shown on the screen. Your iPhone works like a mic, so you can sing along to songs like you’re at karaoke.
- Ensure your Apple TV 2022 is using the TV speakers or a wired audio system.
- Open the new Sing app from your Apple TV Home Screen. It’ll launch Apple Music’s Sing tab.
- Now, browse through the curated playlists and tap Start Singing to play a song. Not all songs support this feature.
- From the Now Playing screen, tap the Sing button (a microphone with a plus icon).
- It will show a QR code. Scan it with your iPhone.
- Now, slide the Mic icon upwards on your iPhone to use it as a microphone. Your voice will get amplified through the TV speakers.

7. Ambient Music feature
You can find Ambient Music Controls in the Control Center, on the Lock Screen, or even in the Action button on your iPhone. Apple gives you four categories with preset playlists of instrumental music:
- Chill – Perfect for unwinding.
- Sleep – Helps you relax before bed.
- Productivity – Keeps you focused while working.
- Wellbeing – Tunes for meditation and self-care.
You can control the playback from the Control Center itself. Also, if you have a personal study playlist or morning vibes mix, you can set it up for quick access without even opening the Music app.
8. Take Advantage of Radio Stations
The Radio stations in Apple Music are awesome for background music while you work or play. They offer a continuous stream of songs, shows, and podcasts so you can just relax and listen without lifting a finger.
- Tap the Radio tab at the bottom of the app.
- You can then browse through various stations.
- Listen to a radio show with your favorite host or artist, recent episodes of that new podcast, or artist interviews.
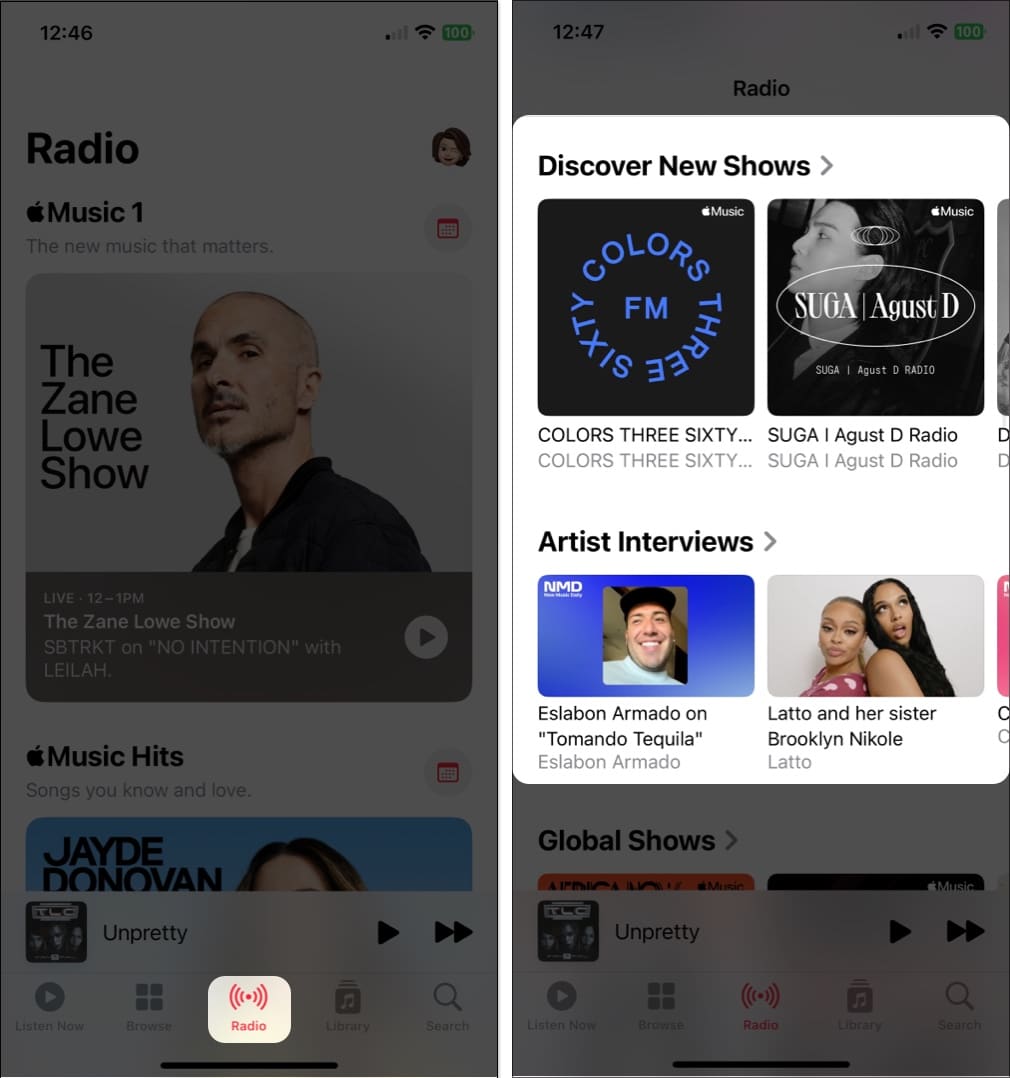

You can also browse music stations by genre, listen to Apple Music hits, or hear songs from around the world. Apple also lets you stream stations for free on TuneIn.
9. Add Tracks to the Queue
iOS 26 refines how your queue works. The Play After now clearly shows what will play next. Also, a dedicated Queue button is always visible on the Now Playing screen.
You just need to long-press a song, select Play After or Add to Queue, or tap the three-dots icon on the Now Playing screen.
Pro Tip:
10. Transfer Playlists from Spotify and Other Services
Switching to Apple Music doesn’t mean you have to rebuild your playlists from scratch. With iOS 26, moving your favorite songs and playlists from Spotify or other streaming services is easier and faster.
- Open Settings and go to Apps → Music.
- Scroll down to the Transfer Music from Other Music Services to find a list of supported music services.
- Select the music service and choose what you want to transfer: playlists, albums, or individual songs.
11. Create Collaborative Playlists
Apple Music lets you create Collaborative Playlists with your friends and family. All the participants can add, remove, or reorder songs to the playlist. Pretty fun, right? Making themed playlists for group long drives and house parties is useful.
- Go to the Library tab and select Playlists.
- Tap the plus icon, then choose Create New Playlist or an existing one.
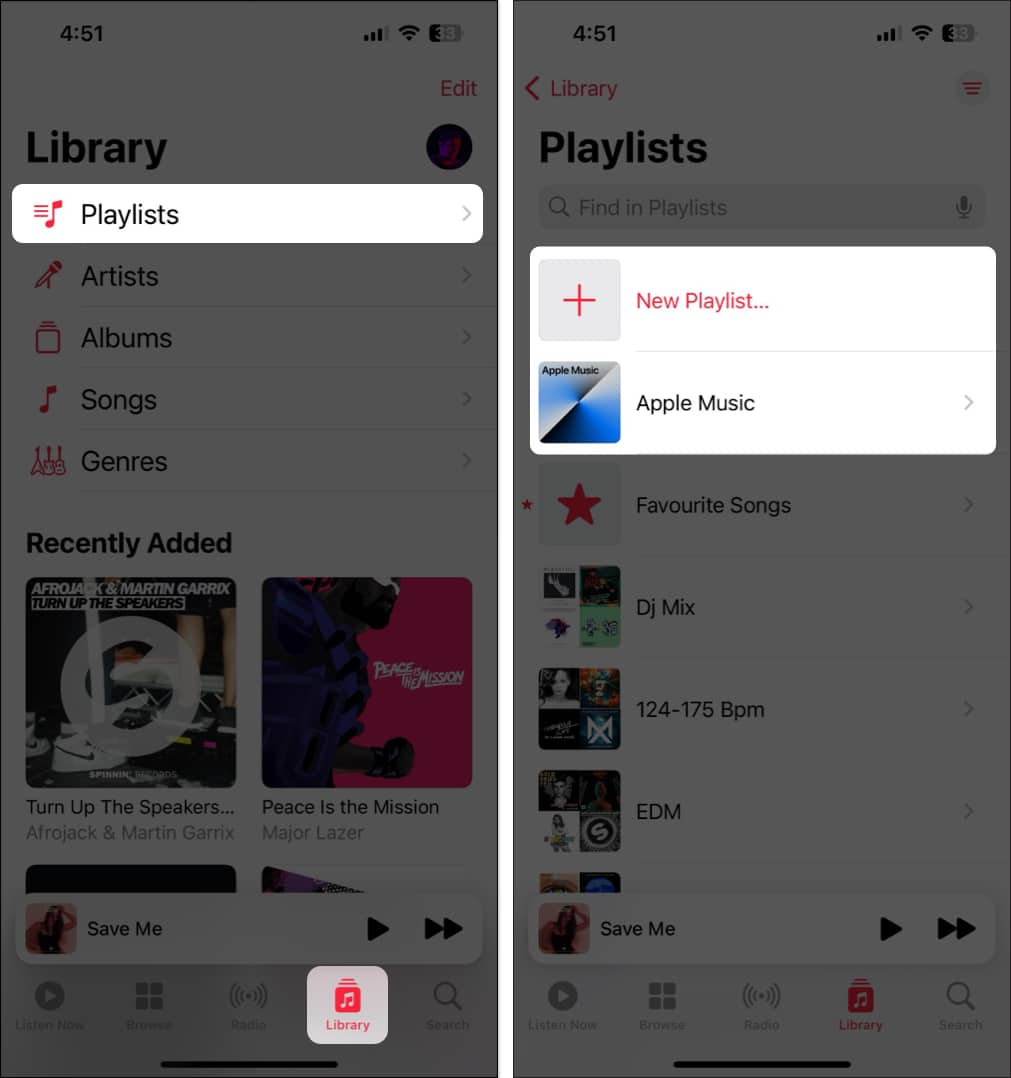
- Now, tap the three-dots icon and select Collaborate.
- Toggle on Approve Collaborators and tap Start Collaboration.
- Finally, share the playlist link with the people you want to give access to.
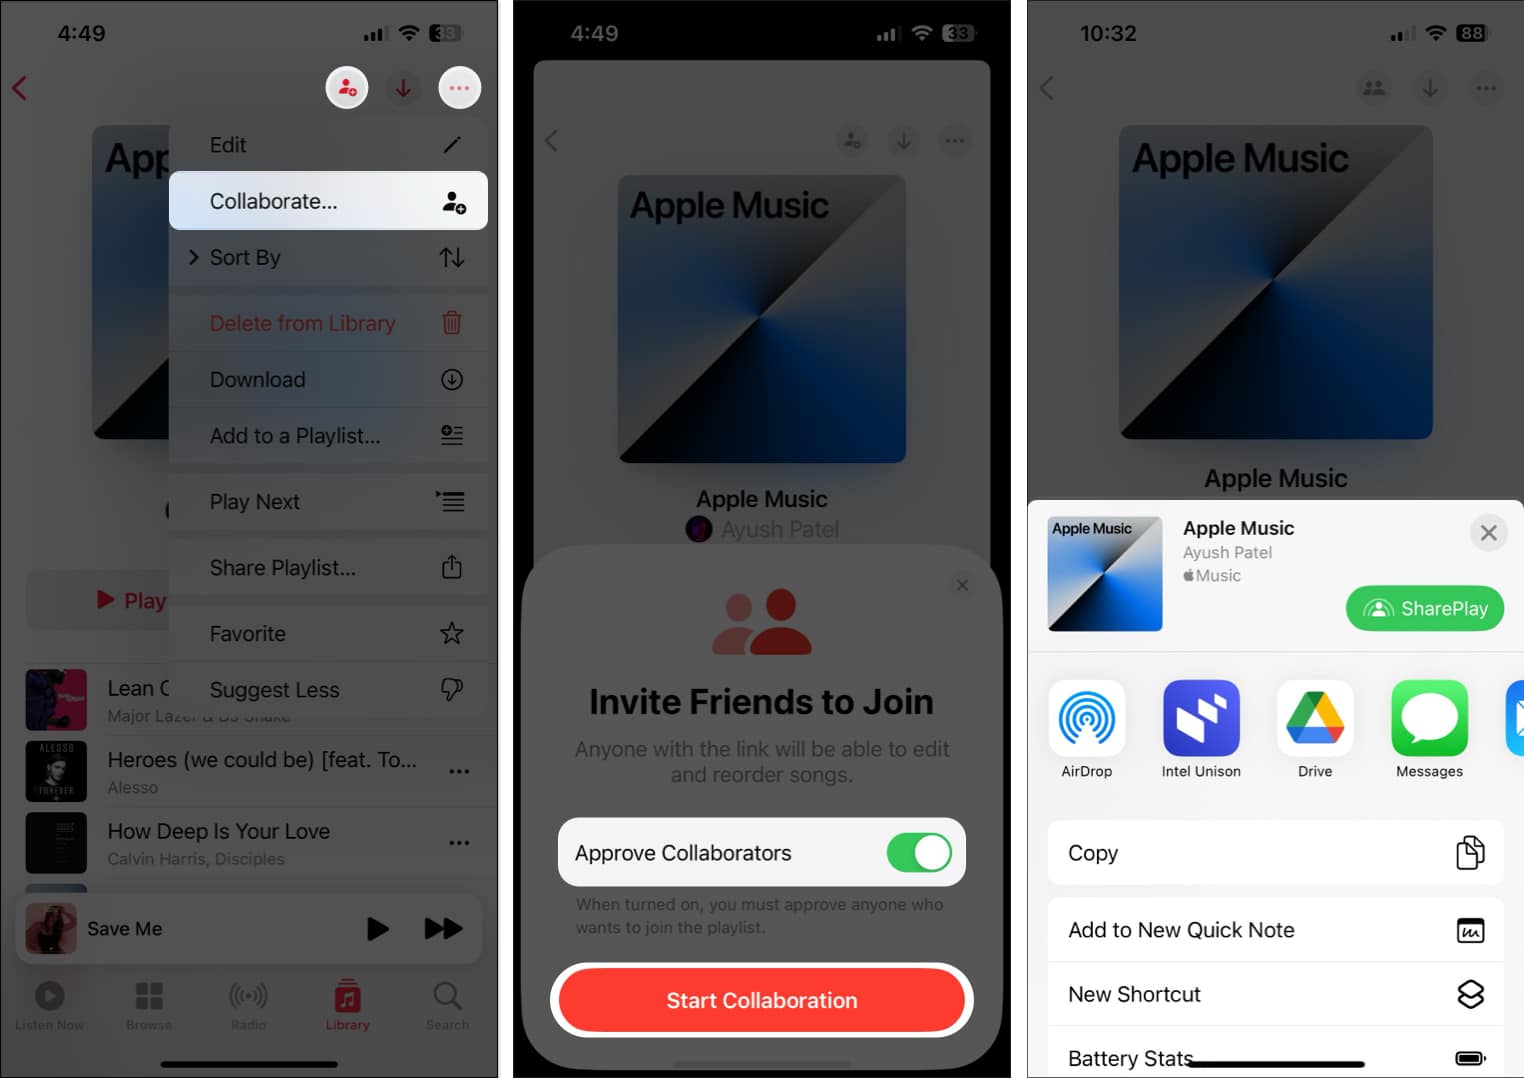


Once everyone joins the playlist, they can add, remove, and react to the songs.
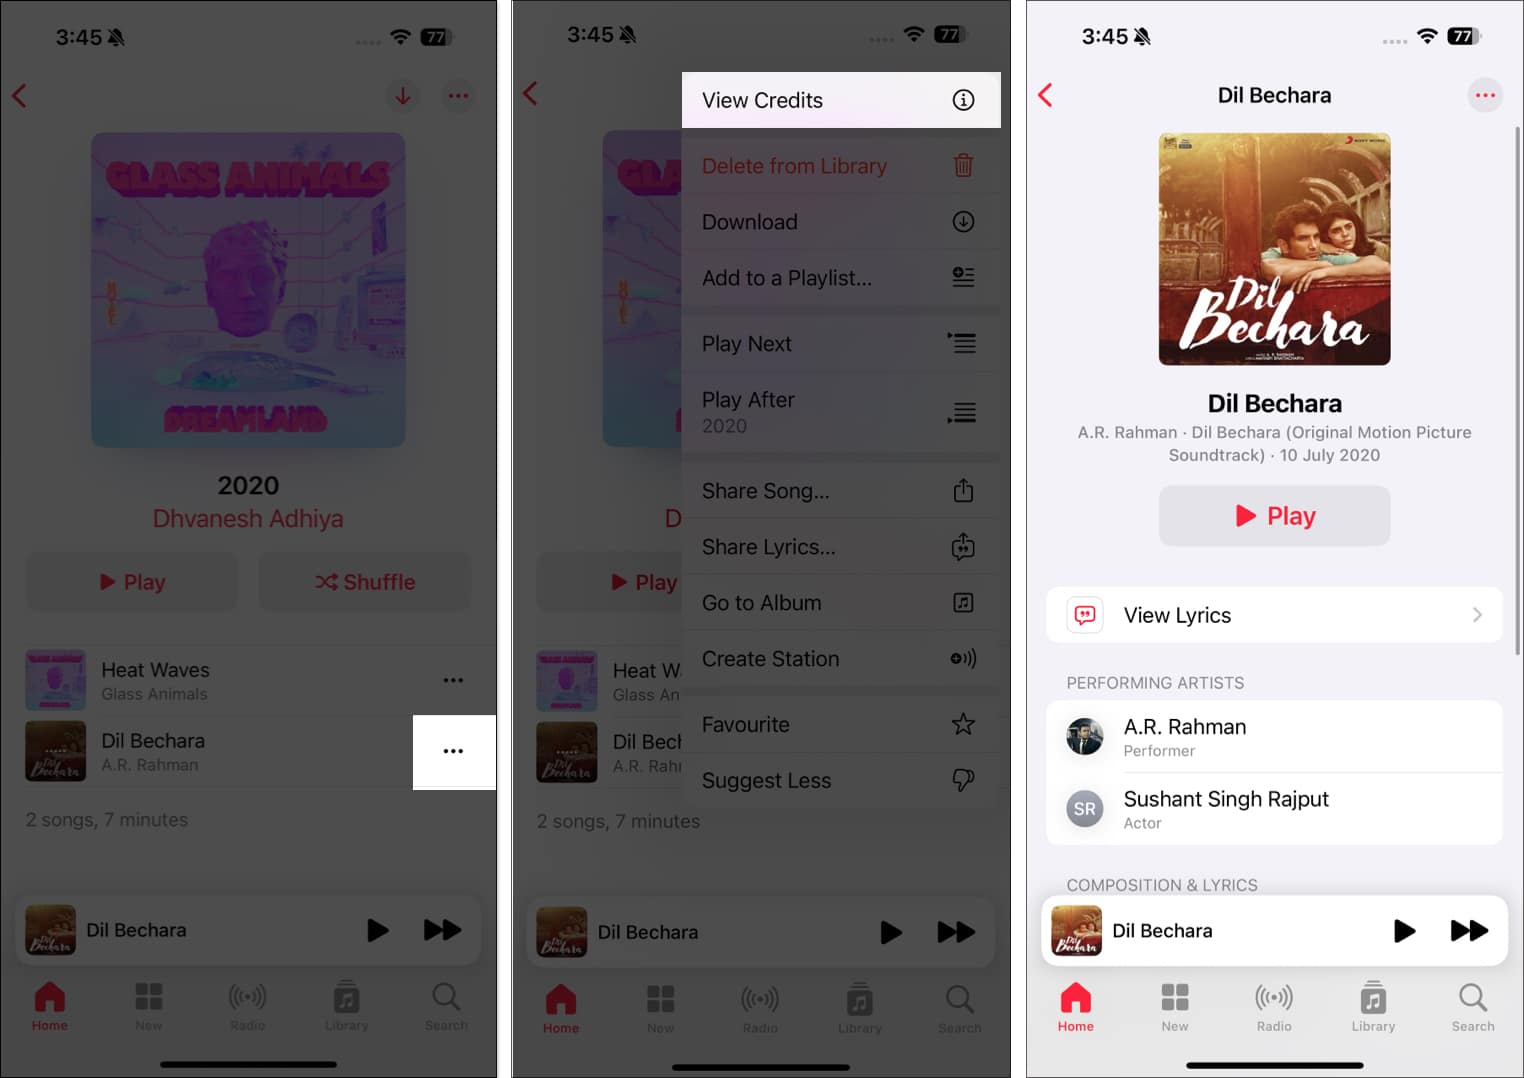
12. View Song Credits
Explore the geniuses behind your favorite tracks from the Apple Music Credit page. You will get information about all the performing artists, composers, producers, lyricists, and sound engineers who worked on the song.
Here’s how you can view song credits in Apple Music on your iPhone or iPad:
- Open the music page you are listening to.
- Tap the three-dot icon next to the song name.
- From the pop-up menu, select View Credits.

13. Get Music Haptics
A cool new feature introduced is Music Haptics. When you’re listening to music, your iPhone can provide subtle vibrations that sync with the song’s beat. So, it is useful for people with hearing impairments.
- Go to Settings and select Accessibility.
- Scroll down and tap Music Haptics.
- Toggle on Music Haptics.
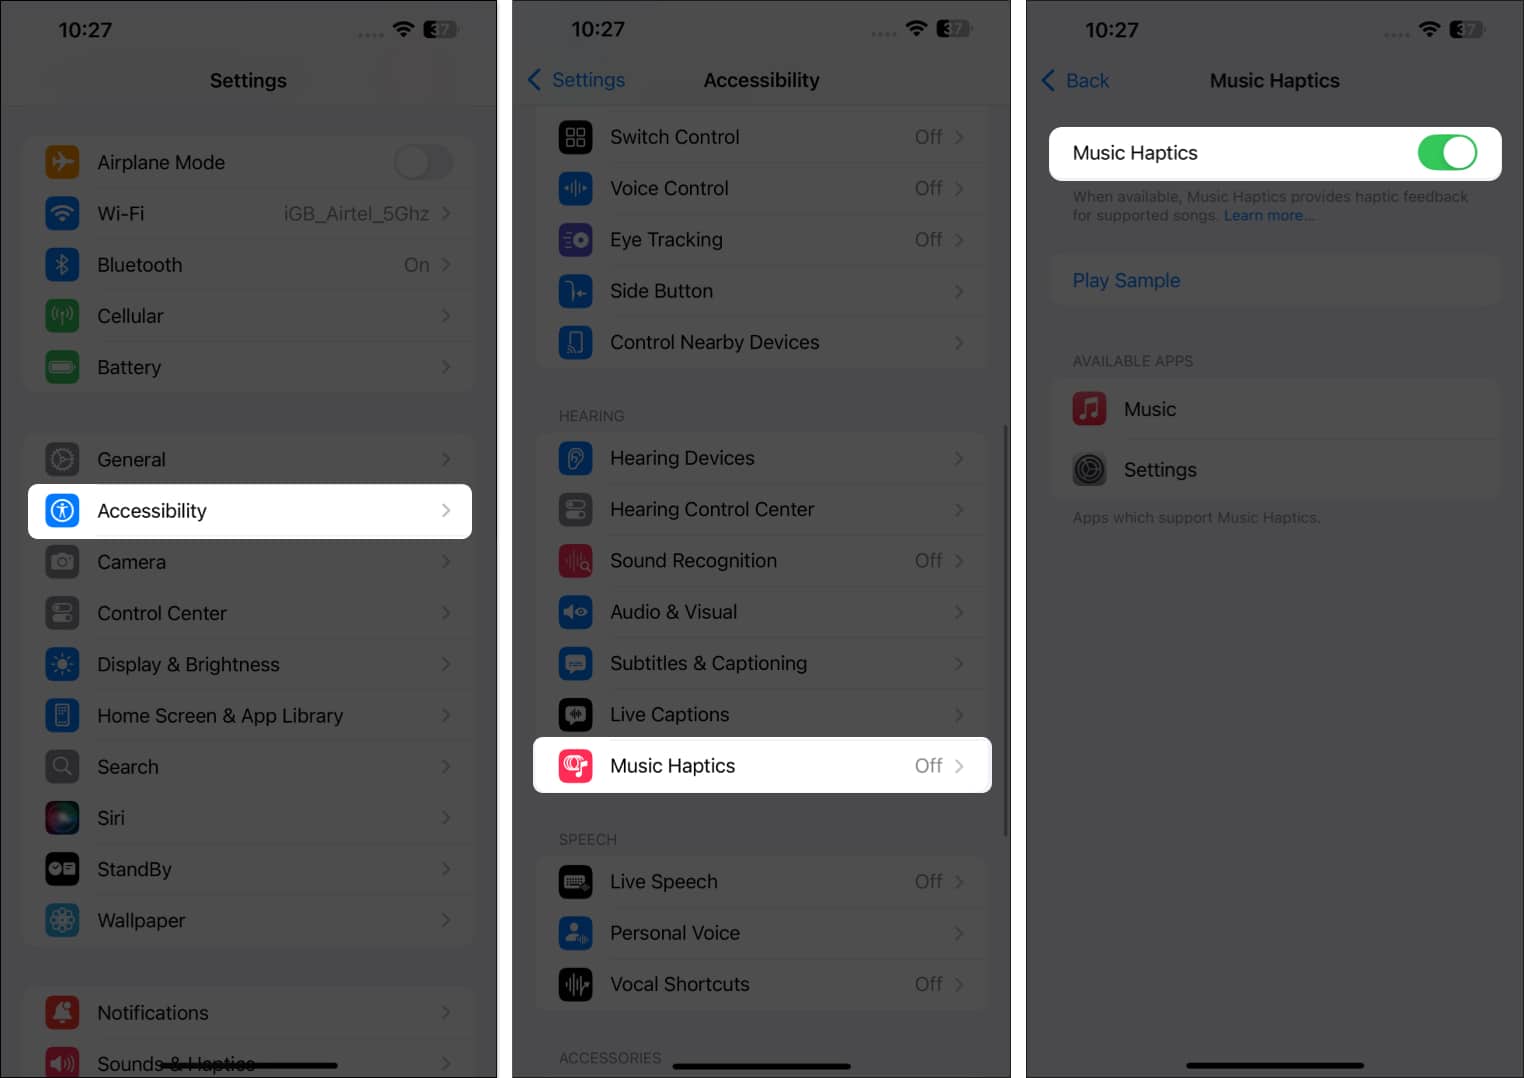

Here, you can adjust the vibration intensity to your preference.
14. Check Out Premade Playlists
If you want to try something new, why not one of the premade playlists in the Music app? The songs are assembled for you, and you can simply skip over the tunes you don’t like. You can pick a playlist for a specific genre, mood, like alone time or a workout, a year, like the 90s, etc.
- Tap the New tab at the bottom of the home page in the Music app.
- Scroll down to the More to Explore section.
- Now, choose an option. Here, I selected Moods and Activities.
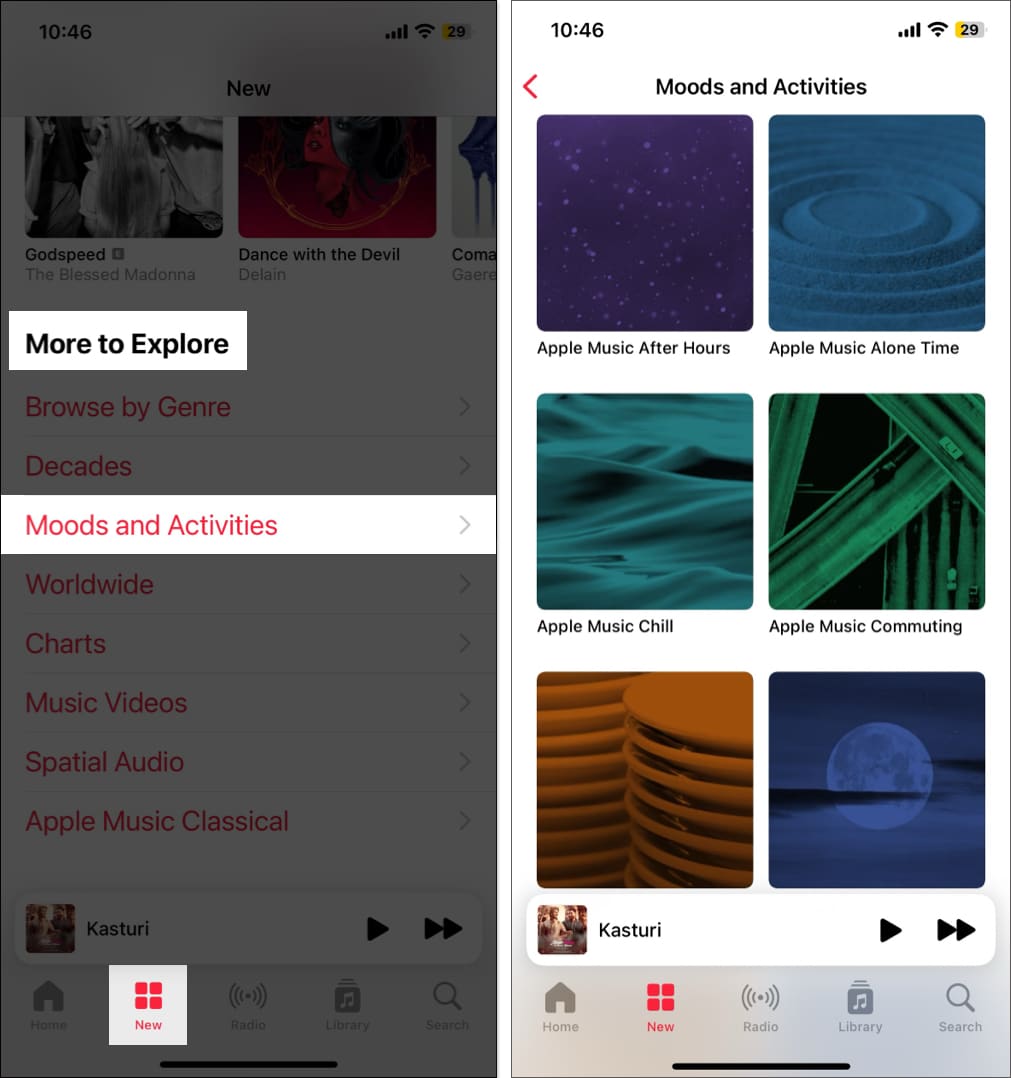
- You will see premade playlists like Apple Music Chill, Apple Music Commuting, etc. Choose the playlist you want to hear, tap the Play button, and you’re set.

If you discover a song you want to hold onto, tap the three dots to the right of it and then add it to your library or one of your own playlists. Tap the plus sign in the top-right corner to add the entire playlist to your library.
15. Automatically Add Songs to Your Library
When you find a song you want to add to a playlist or save as a favorite, you can also automatically add it to your music library. This means that the song is always available to you, even if you delete the playlist.
- Open the Settings app → Go to Apps and choose Music.
- Then, toggle on Add Playlist Songs and Add Favorite Songs.

- Head to the Library tab to locate the song or use the Search tab to find it fast.

Moving forward, any song you add to a playlist or mark as Favorite will also appear in your library.
Tip:
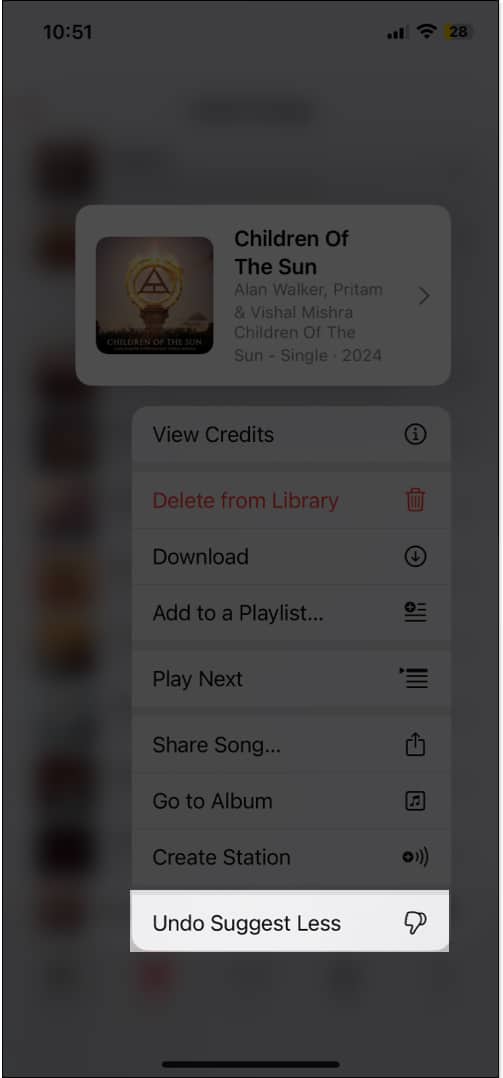
16. Hear More of What You Like (and Less of What You Don’t)
Whether you’re discovering a new genre, artist, or style, you can teach Apple Music what you like and dislike. Using the Suggest Less features, you can hear less of what you don’t want with a simple tap.
- When you see a song you want to mark, long-press it until the shortcut menu appears. You can also use the three dots to the right of a song to open the menu.
- Then, tap Suggest Less if you don’t like a tune. Apple Music then attempts to keep similar songs from appearing in its suggestions.
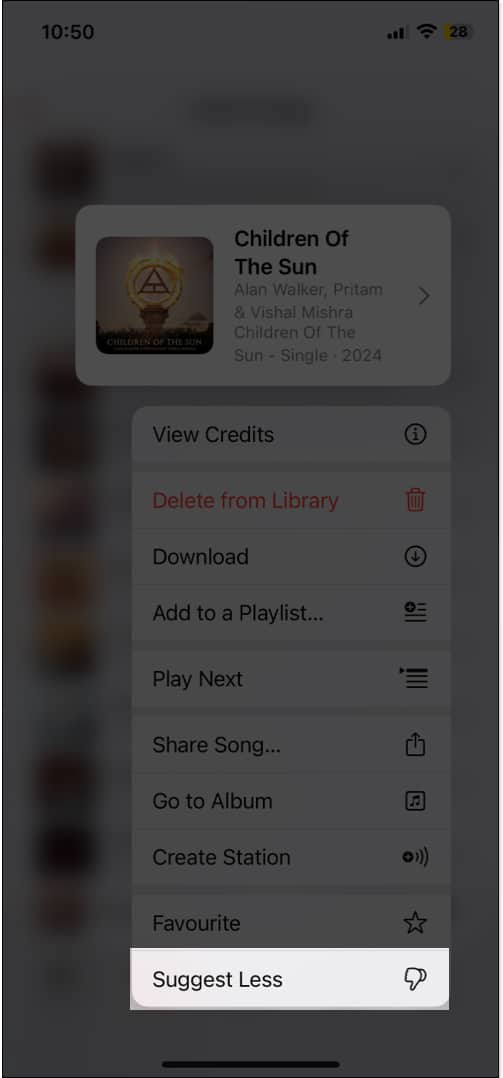
- If you change your mind, follow the same process and tap Undo Suggest Less.


If you can add tracks to your library quickly, select the Favorite option.
Additionally, you can enable listening history for the Music app to see your recently played songs and receive replay mixes. Open Settings → Apps → Music, then toggle Use Listening History on.
17. Get Music Information on Apple TV
Suppose you watch a show or movie on Apple TV and wonder about its title track. Now, you can view which music is playing in the show from the Insight option.
- When watching a show or movie, pause it to see the playback controls.
- Tap on InSights.
- Now, swipe left to see the cast, crew, and music tracks.
- Tap the plus icon on the music tile to add it to your library.
- Go to the Music app’s Library tab and open the Saved Songs album.
18. View your Apple Music Replay
After using the Music app for a while, you’ll find a playlist of the songs you listened to the most over a period of time. Automatically generated for you, Apple Music Replay lets you easily access songs you played more than any others.
- Go to the Listen Now tab and scroll to the very bottom.
- You should see a section titled Replay: Your Top Songs by Year with a playlist for each.
- Select one to review, then tap Play to listen.
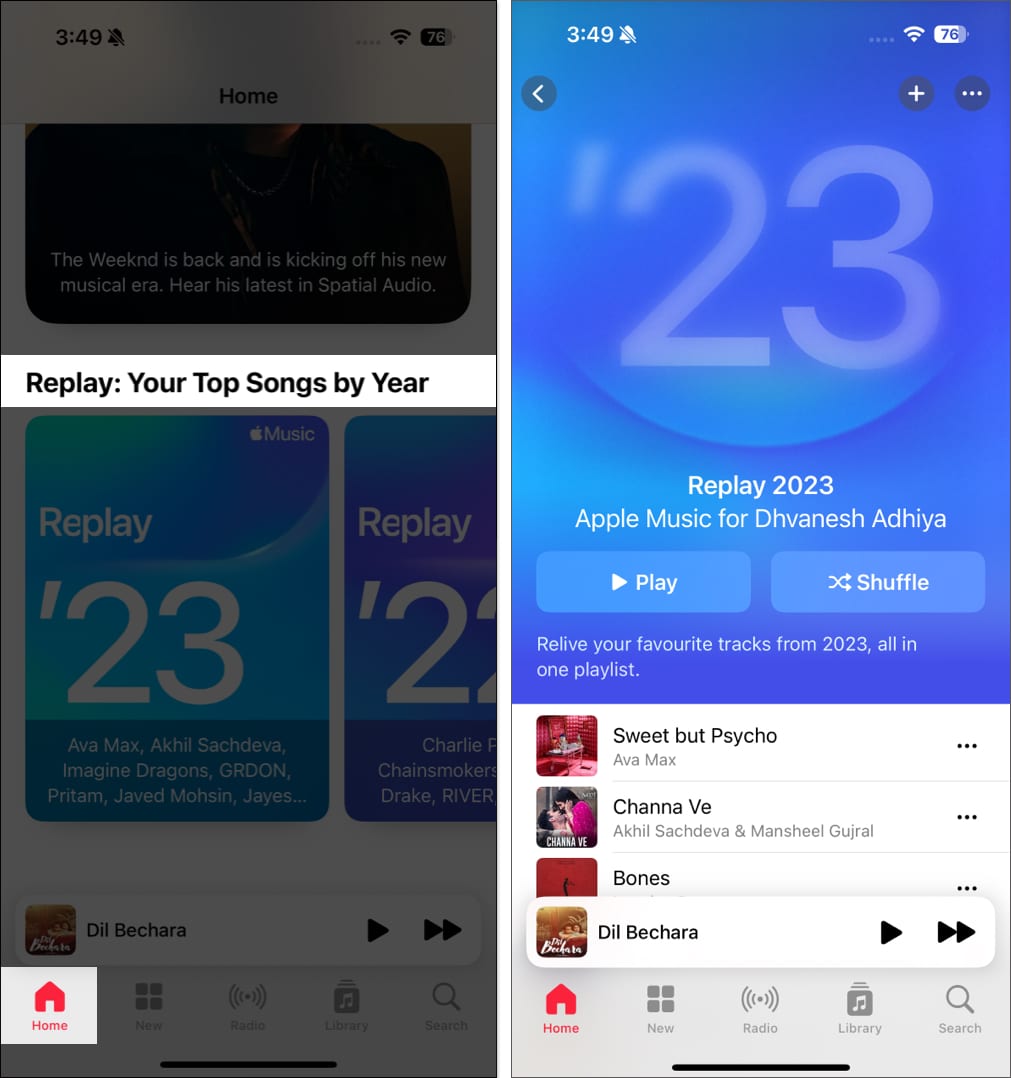

If you ever wondered what your most-streamed songs on Apple Music were in 2025 or even 2020, Apple Music Replay lets you know.
19. SharePlay with Everyone
SharePlay lets users share their music experience more easily, without requiring everyone to have an Apple Music subscription.
Anyone nearby can join in on the fun when playing music through a HomePod, Apple TV, or any compatible Bluetooth speaker. They can scan a QR code displayed on your device to access and control the playback queue.
This feature is also integrated with CarPlay. It allows every passenger in the vehicle to add tracks to a queue or play/pause and skip a track without connecting to the AUX cable.
Whenever you start a SharePlay session with CarPlay, other nearby Apple devices can join the session by simply tapping a notification on the lock screen or scanning a QR code. They don’t need an active Apple Music subscription.
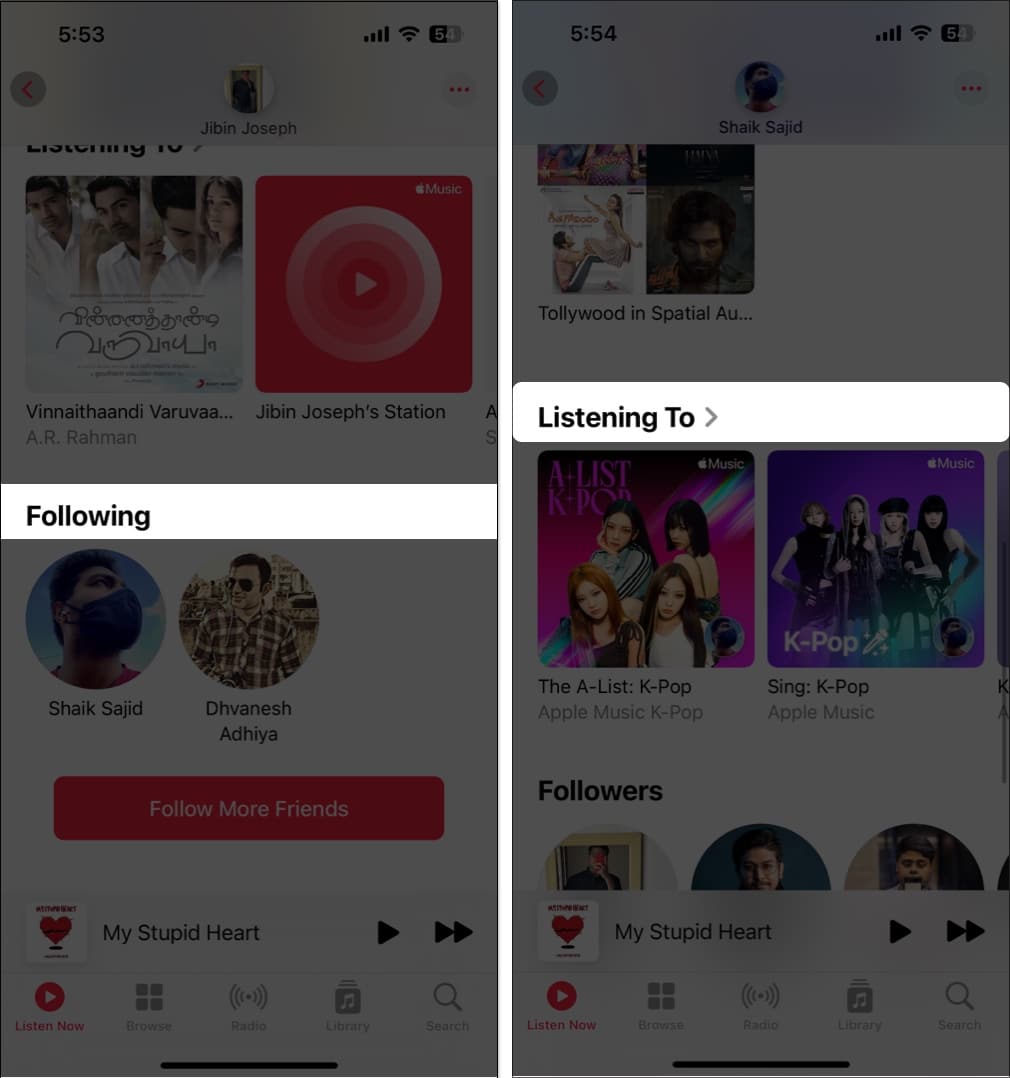
20. See What Your Friends are Listening To
If you and your pals share your music tastes, it’s fun to find out what they’re listening to at the moment. This is a terrific way to hear something different or chit-chat over that upbeat new tune.
- To get started, create an Apple Music profile by tapping your profile icon on the top right.
- You can then share your profile with friends, let others find you, and decide what you want to share.
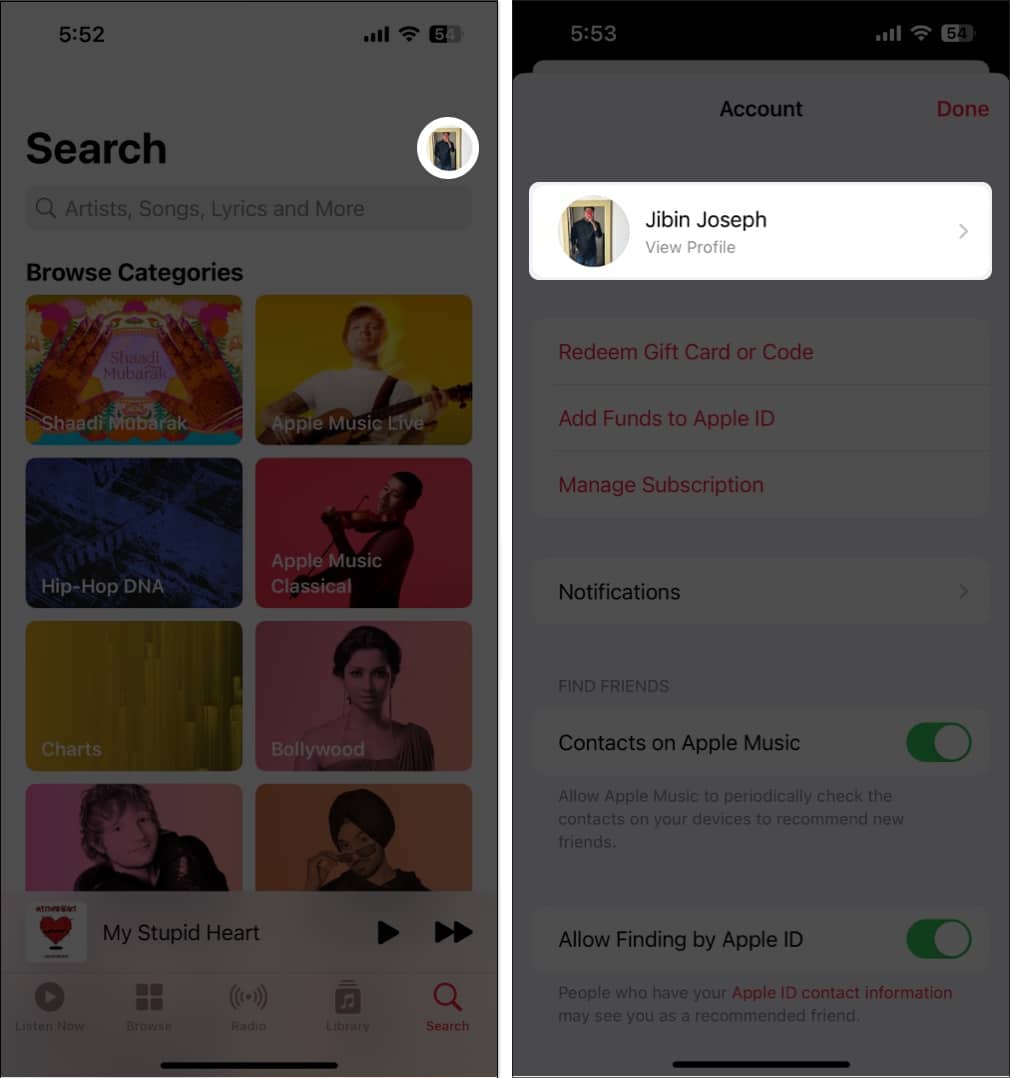
- Next, find and follow friends who have also set up Apple Music profiles. You can do this when you set up your own profile or later by selecting Follow More Friends on your profile screen.
- To see which songs your pals are playing, head to the Listen Now tab and Friends Are Listening To section.


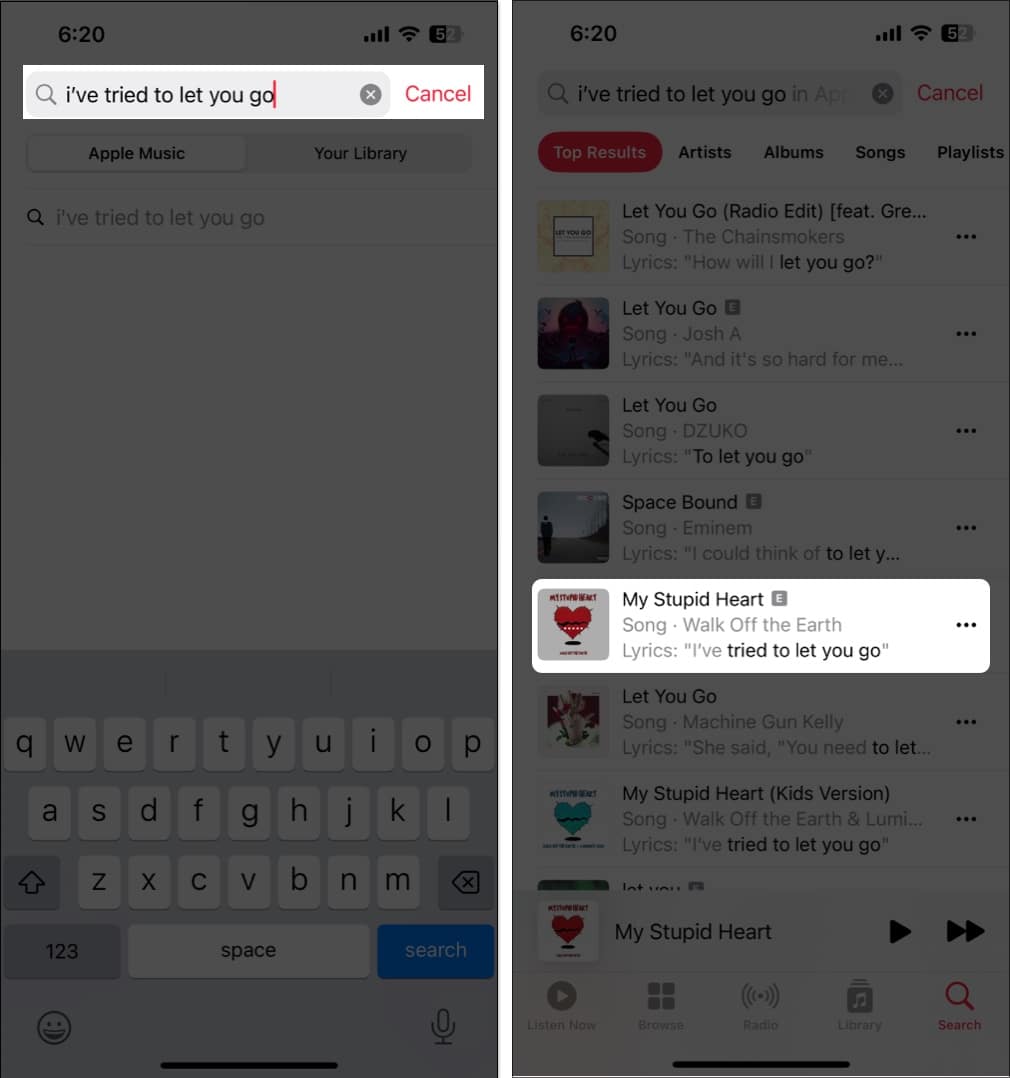
21. Sing, Search, or Share with Song Lyrics
You can see song lyrics in the Music app, making it a great way to sing along. But you can do more with Apple Music’s lyrics than that. You can search for a song using a particular lyric and share specific lyrics with others.
View Song Lyrics
- While a song is playing in the Now Playing bar, tap the Lyrics icon.
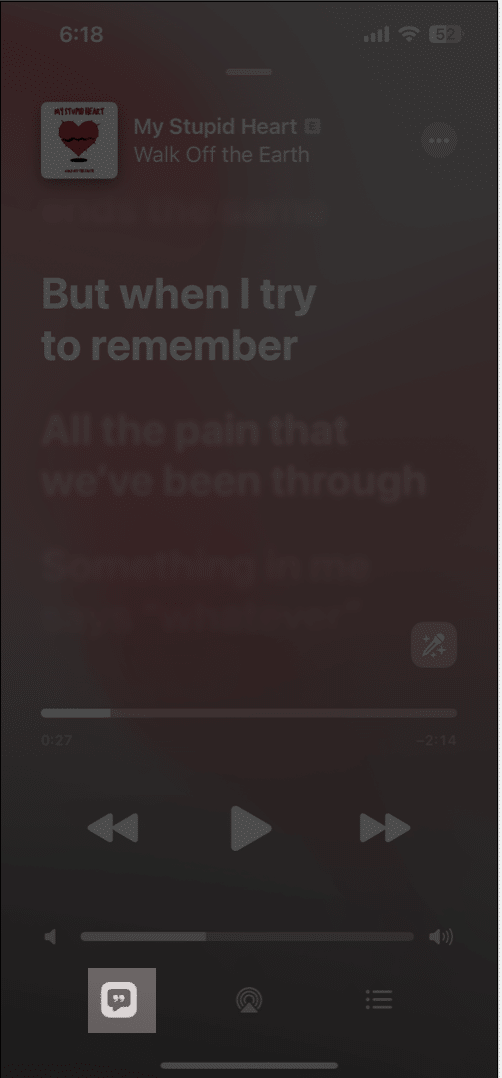
- You’ll see the synced lyrics move as the song continues. Simply tap to display the playback controls if necessary.
Search With Lyrics
- Head to the Search tab and type or use the microphone to speak the song lyric.
- You can choose between Apple Music and Your Library to find the song with the matching lyrics.

Share Lyrics
When you view the lyrics for a song playing as described above, long-press one of those lyrics you want to share. You’ll then see it pop up on a separate screen, where you can share it via AirDrop, Messages, or on social media.
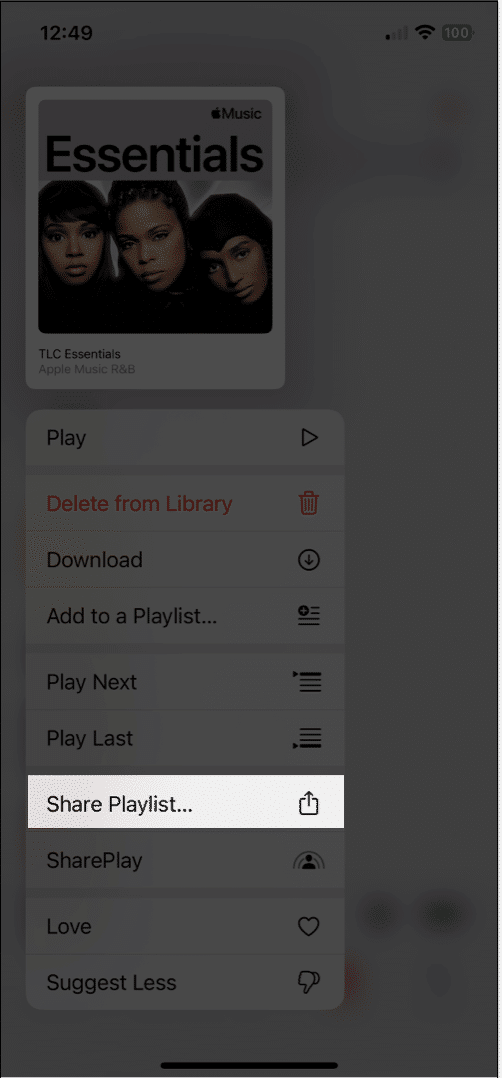
22. Create and Share playlists
Similar to seeing what your friends are listening to, you can create and share a playlist directly with them. This is super for creating a compilation of songs you know they’ll love.
- To create a new playlist from Scratch: Go to the Library tab → Select Playlists, and tap New Playlist at the top. Then, follow the prompts.
- To create a playlist based on a song: Long-press the song or tap the three dots → Pick Add to Playlist. Then, pick New Playlist and follow the prompts.
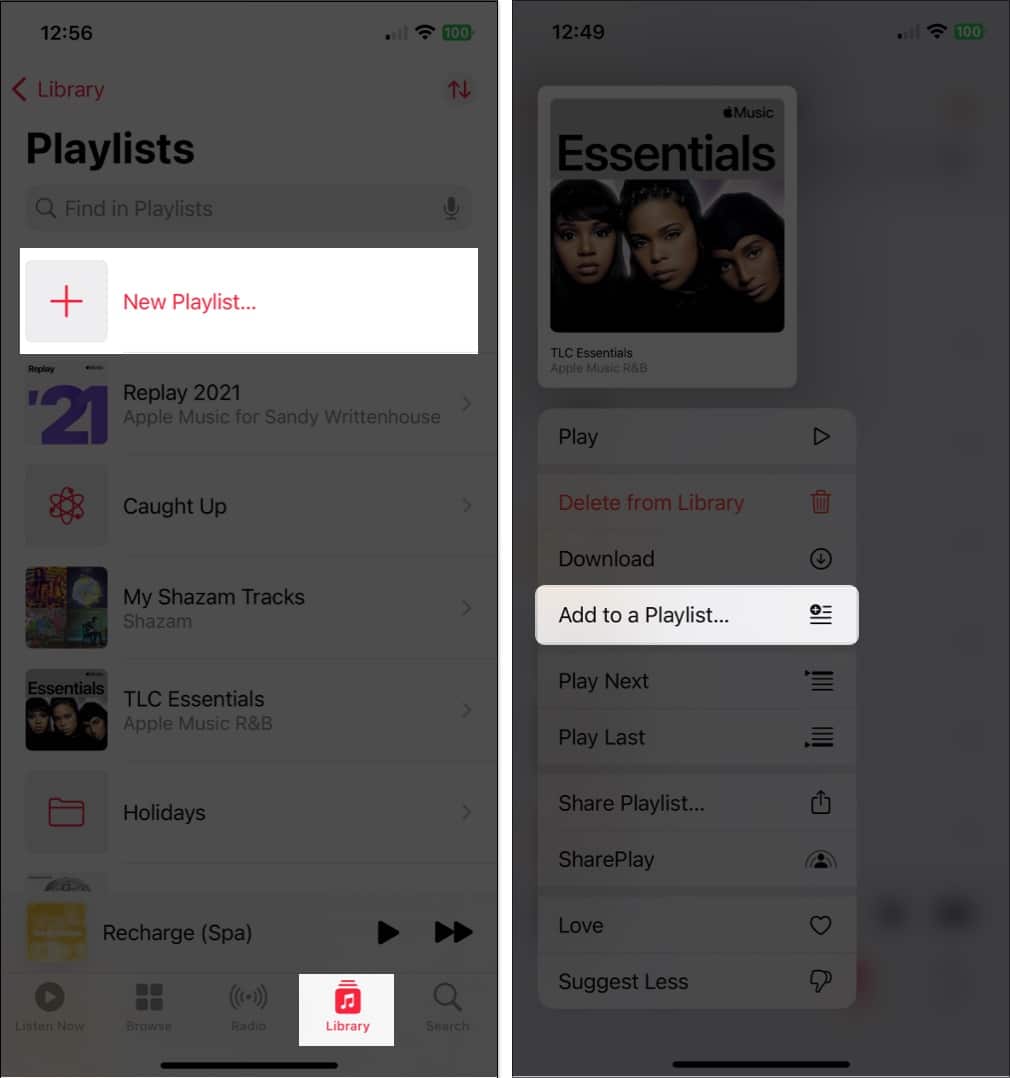

Once you create, it’s time to share!
- To share a playlist via Messages, Mail, AirDrop, or a similar service: Long-press the playlist, then tap Share Playlist. Then, choose your sharing option and follow the prompts.
- To share a playlist via SharePlay: Long-press the playlist, then tap SharePlay. Select a contact, then choose Messages or FaceTime, and follow the prompts.

For more details on how to share playlists on Apple Music, check out our how-to.
23. Make Smart Playlists
Like a playlist you create in Apple Music, Smart Playlists are automatically assembled. You just set up the criteria for the songs you want to add. Then, when a new song lands in your library that matches those criteria, it’ll pop into the Smart Playlist, ready for you to listen to.
Although the Music app on iPhone doesn’t currently support creating Smart Playlists, you do have options. First, you can make the Smart Playlist on your Mac and sync it with the Music app for access on your iPhone. A second option is to create a shortcut on your iPhone to set up the Smart Playlist.
Take a look at our tutorial for creating a Smart Playlist to set one up on an iPhone using one of these methods.
24. Listen to Apple Music Without the Internet
If you travel somewhere with weak or no internet, did you know that you can listen to Apple Music offline? Just download the songs you want, and you’re ready when that “no signal” message comes into view.
- In order to download a song, you’ll need to add it to your library or a playlist.
Long-press or tap the three dots to the right of the song to select one to add to the Library or a playlist. - Once you’ve added the song, open your library or playlist to select it.
- Then, long-press or tap the three dots, then tap Download.
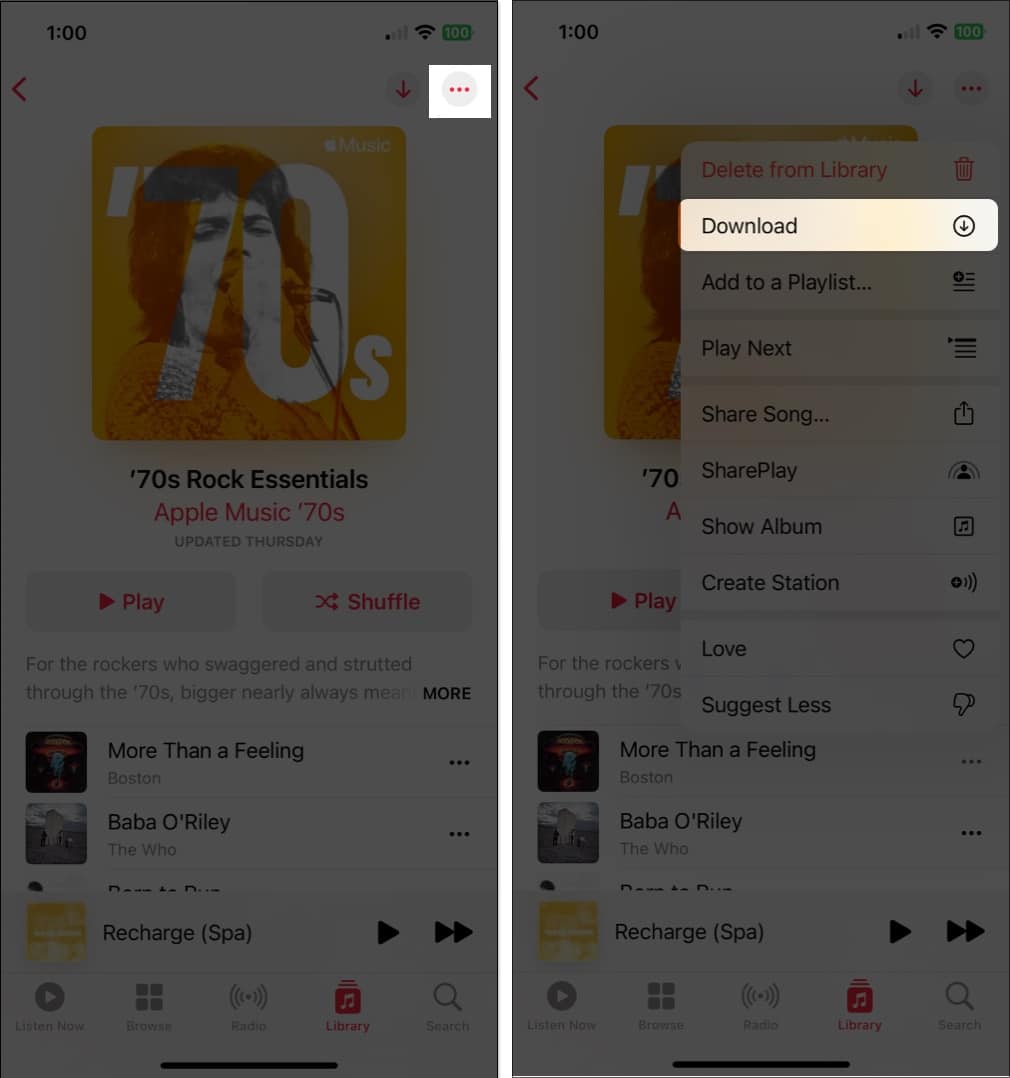
To download one of your playlists, select it to open it. Then tap the Download button (the down arrow) in the top right.
If you’d like to see your downloaded music and how much space it takes up, go to Settings → Apps → Music and select Downloaded Music.
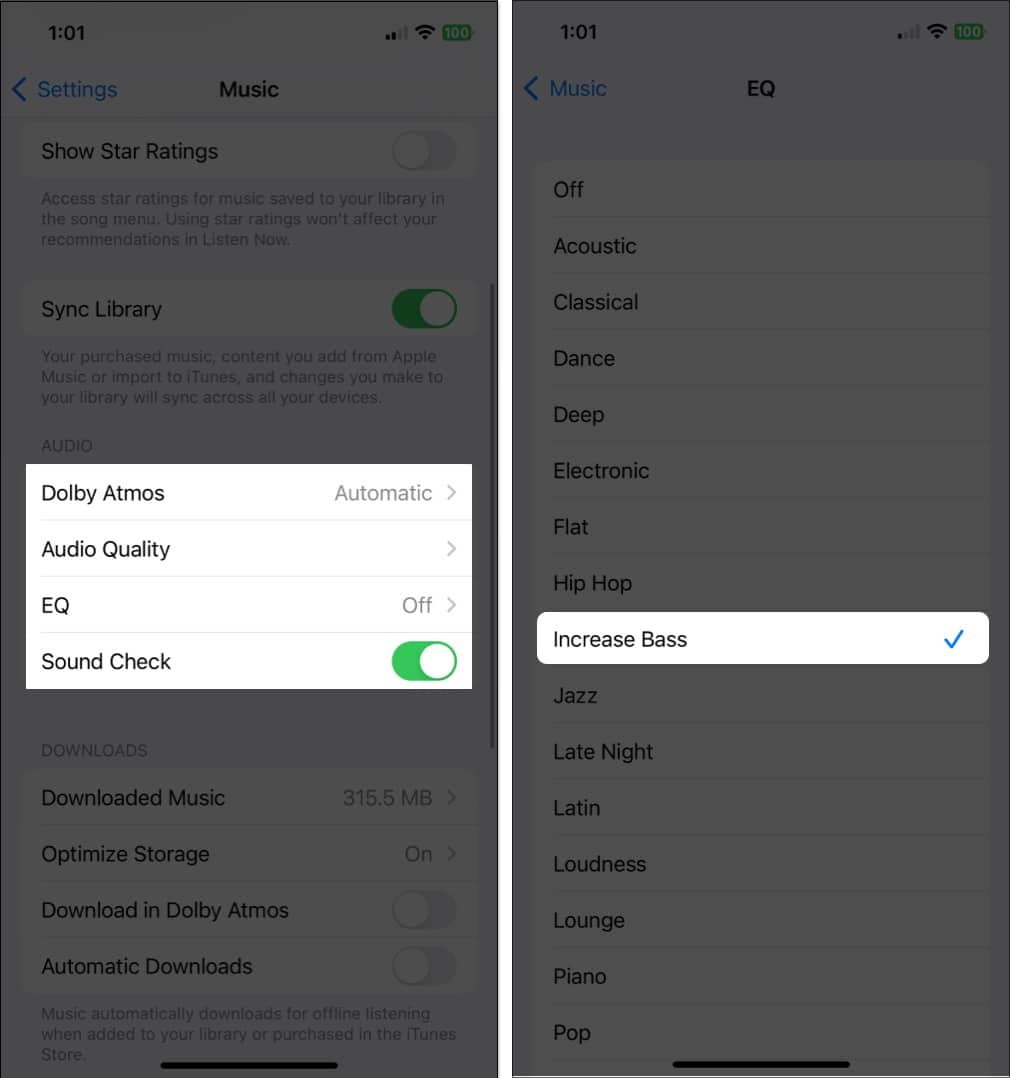
25. Enhance the Sound
Do you love songs with booming bass, a toned-down instrumental background, or where the guitar stands out? You can enhance the sound of songs you listen to in the Music app with a few simple steps.
Open the Settings → Apps → Music. Then, move down to the Audio section to adjust the following sound options.
- Dolby Atmos: This is set to Automatic by default, and it uses spatial audio for supported songs. But you can change it to Always On if you like, which uses Dolby Atmos even if your earphones don’t support it.
- Audio Quality: If you enable the Lossless Audio toggle, you’ll get the high-quality sound you enjoy. Just note that, as the setting describes, this can lead to higher data consumption.
- EQ: You can choose from various EQ presets to adjust the audio for bass, dance, piano, pop, rock, and other types of music. If you would like to adjust the equalizer without preset options like these, you can also look at EQ apps for iPhone.

26. Watch Music Videos on Apple Music
You may not realize it, but the Music app has an entire section of music videos for you to enjoy.
- Go to the Browse tab.
- Scroll to the bottom below More to Explore.
- Tap Music Videos.
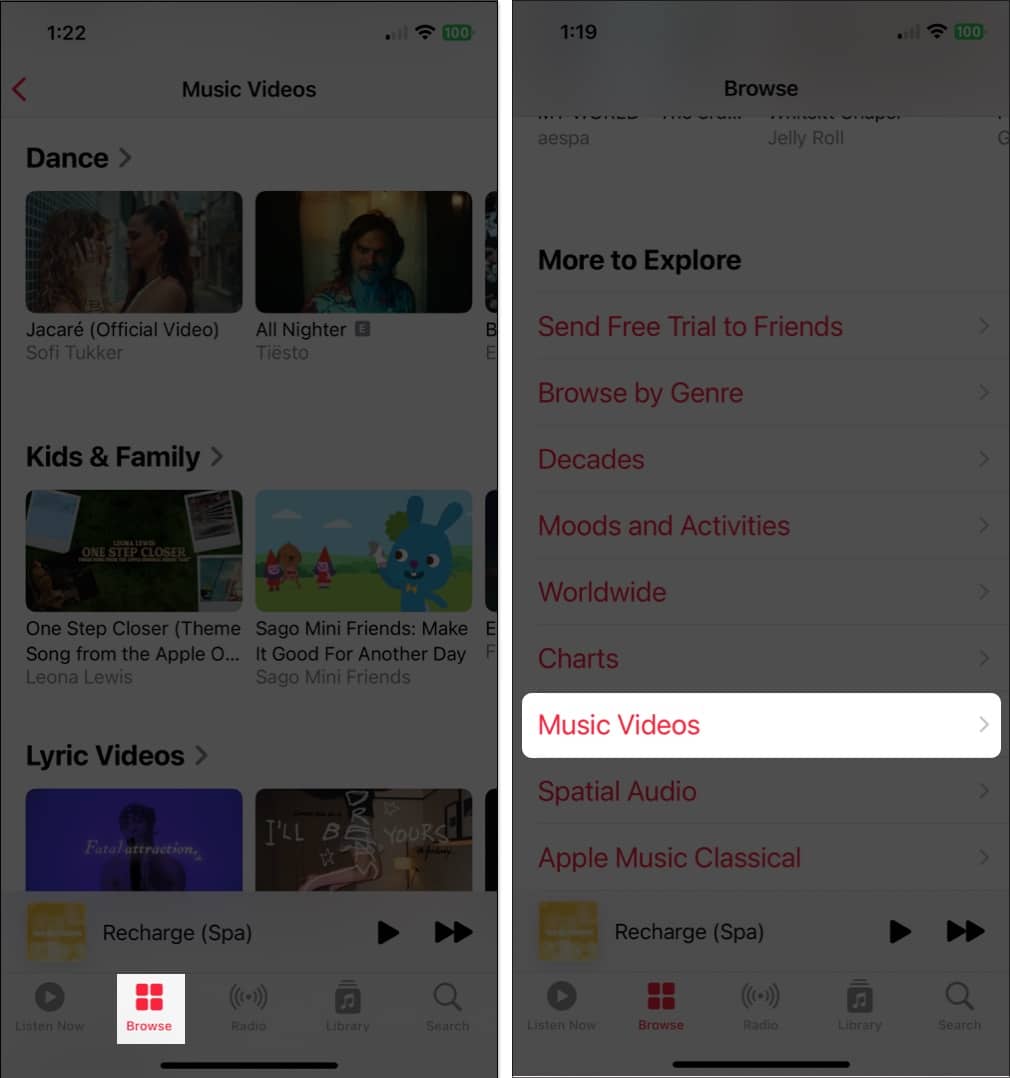

You’ll then see a great selection of videos, video playlists, and everything from new music to songs by genre to options for kids and families.
27. Receive Music notifications
If you never want to miss that new song by your favorite artist or when a friend follows you, you can enable these notifications in the Music app.
- Select your profile icon in the top-right corner.
- Then, on the profile screen, choose Notifications.
- Enable the toggles for New Music and Friend Activity.
Also, make sure your iPhone Notifications are enabled for the Music app.
Go to Settings → Notifications → Music and turn on the toggle for Allow Notifications. 
What’s Your Favorite Apple Music Feature?
With these Apple Music tips, you should be set. Whether you want to view song lyrics, sing karaoke, or make your most-loved tunes sound even better, you’ll surely enjoy the Music app even more.
Let us know which of these features, or others not mentioned here, are your Apple Music favorites!
Read more: