The Voice Memos app has always been one of the handiest tools on the iPhone. In iOS 26, it’s more powerful than ever with upgraded features like smart transcription, enhanced noise reduction, improved editing tools, and Spatial Audio support.
Whether you want to capture a quick thought, record a meeting, or save audio for a creative project, it lets you capture audio on the fly using your iPhone’s built-in mic, a Bluetooth headset, or even an external microphone. In this guide, I’ll share everything you can do in the Voice Memos app on your iPhone. So, let’s get started!
What’s New or Improved in iOS 26
iOS 26 introduces several useful enhancements, including:
- AI-powered transcription with higher accuracy and speaker detection.
- Enhanced Noise Reduction to achieve cleaner recordings in noisy environments.
- Spatial Audio recording support on newer iPhone models.
- Smarter auto-naming, based on location.
- Enhanced Sharing includes your applied settings (like layered audio) for a consistent listening experience on other devices.
- Improved collaboration with Notes, allowing recording Voice Memos inside a note.
- Audio Input Control lets you select external mics (like USB mics) for recordings.
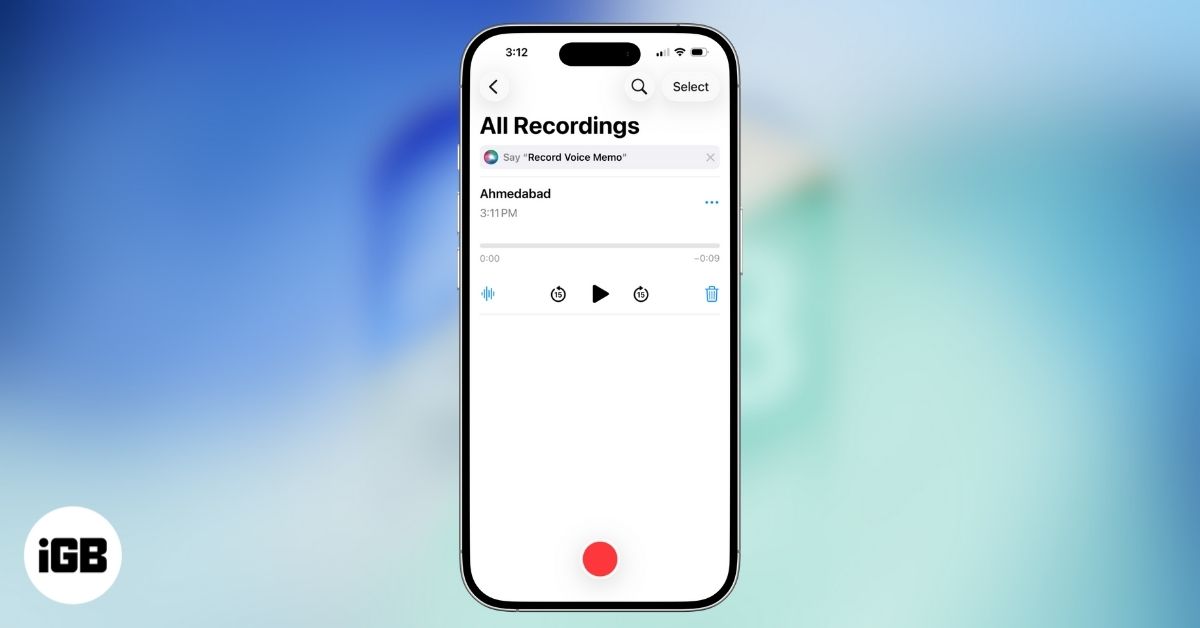
Getting Started: Understanding the Voice Memos Interface
When you open Voice Memos, you’ll see a clean interface built around simplicity:
- Record button (big red circle) at the bottom
- List of your recordings displayed above
- A search button to quickly find old memos
- Pressing the back button takes you to the home page, where you can access your folders.
Tapping any recording reveals options to play, edit, enhance, or delete it.
How to Record a Voice Memo on iPhone
Taking a voice recording is super easy. You can use your iPhone’s built-in microphone, a supported headset like AirPods, or an external microphone.
Basic Recording
- Open the Voice Memos app.
- Tap the red Record button. It starts instantly, showing a live waveform as you speak.
- Hold your iPhone mic-up (about 6-12 inches from your mouth) and speak clearly toward it.
- When done, tap the red stop button.
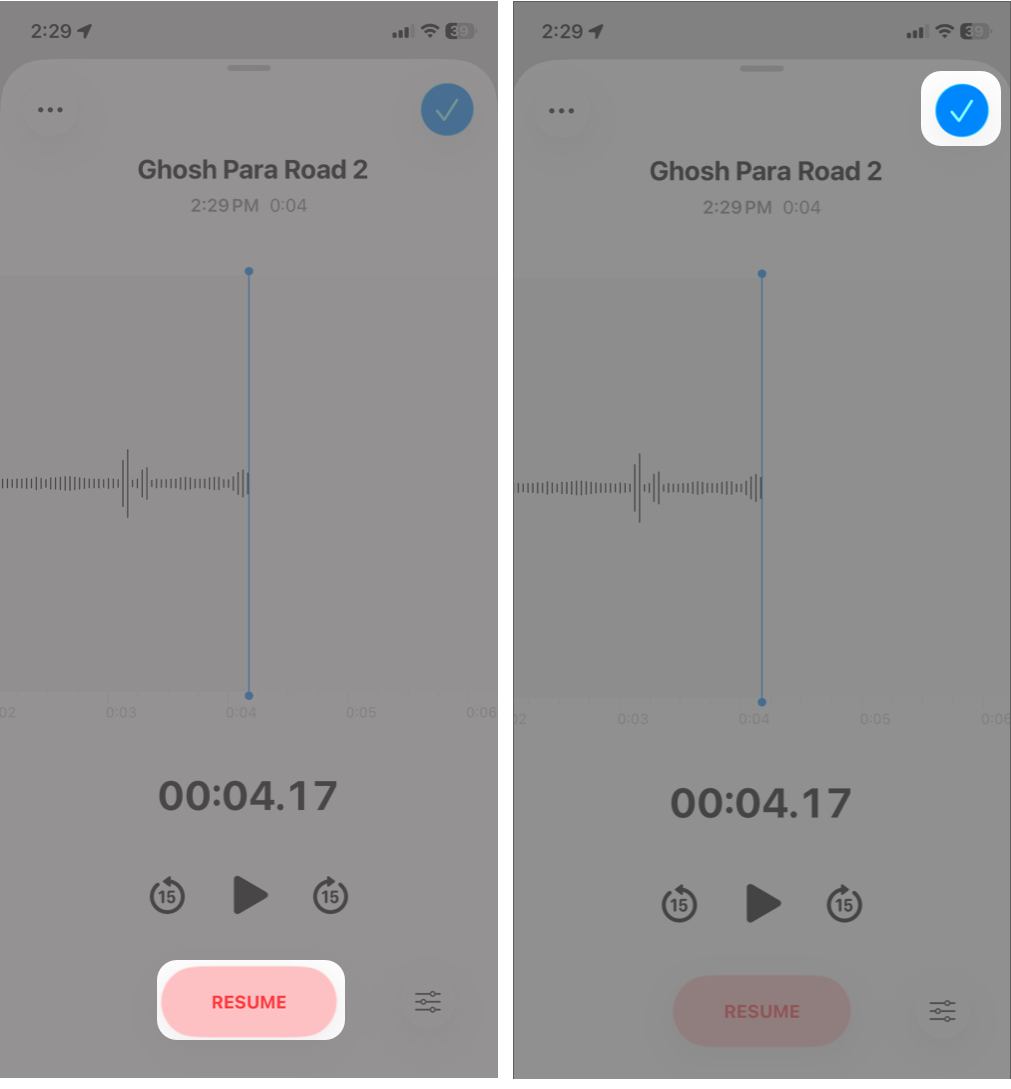
- If you want to stop recording temporarily, swipe up the recorder tab and tap the Pause button.
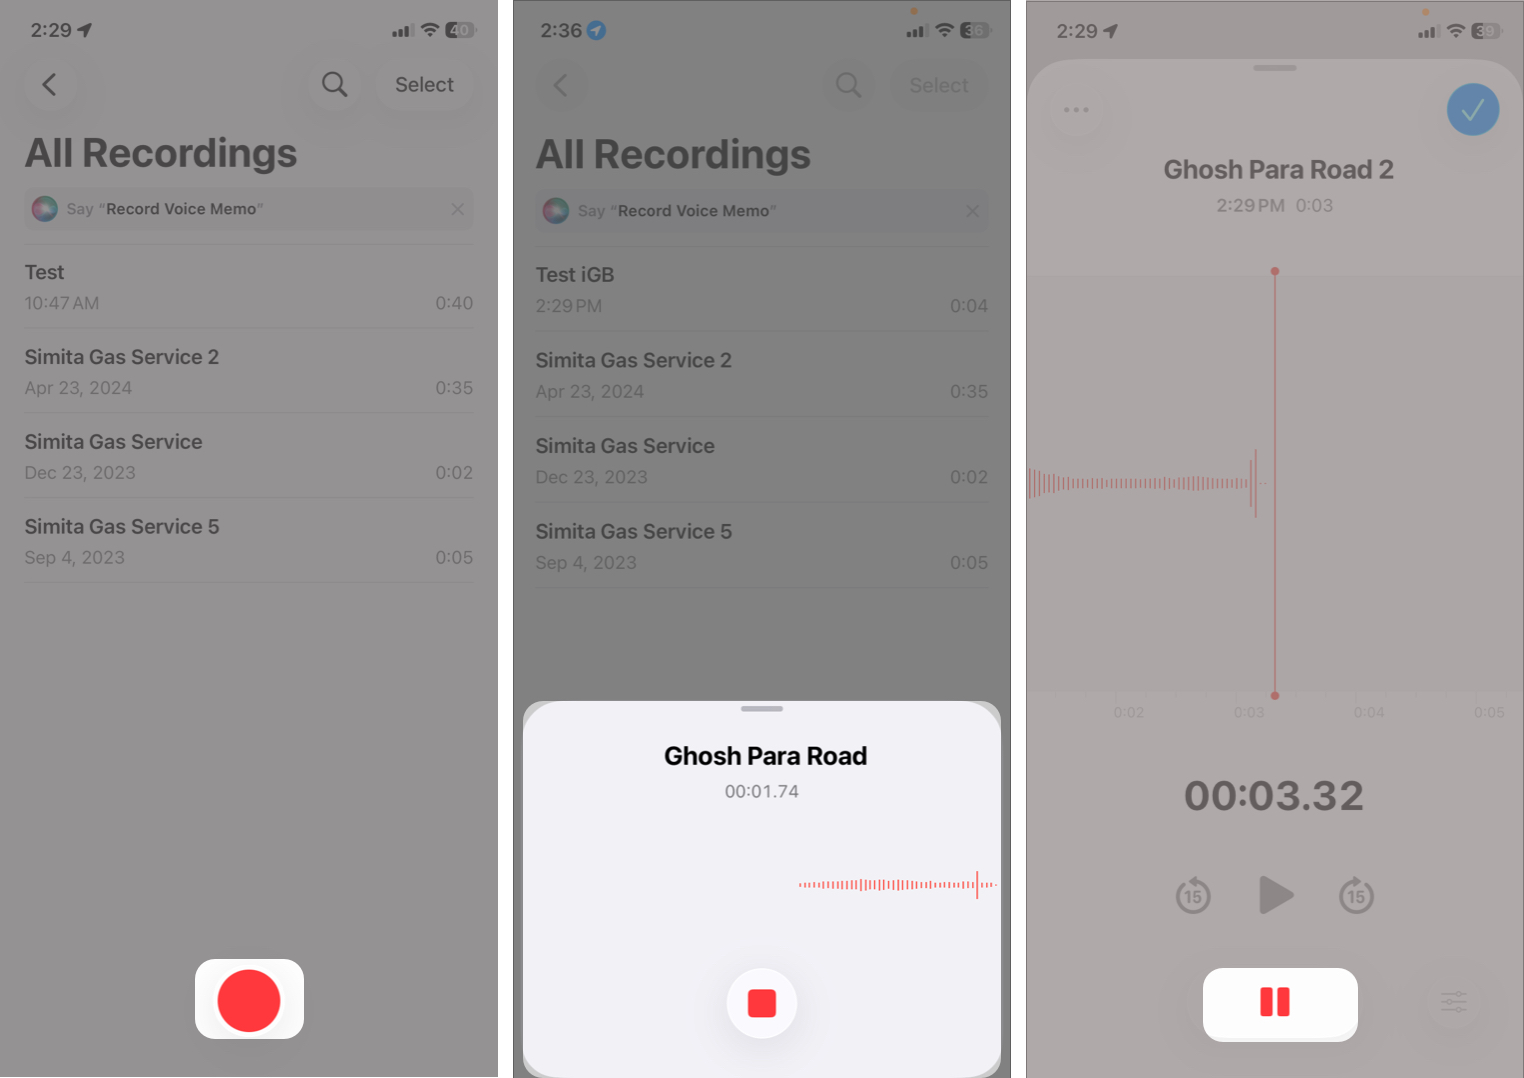
- Hit RESUME when you wish to start recording again.
- To review your recording, tap the Play button.
- Tap checkmark to finish. Your memo saves automatically with your location name.
While taking a voice memo, you can go to your home screen and use other apps as long as no other audio plays. You will see the recording progress on your Dynamic Island. Tap on it to return to the Voice Memo app.
If you are bothered by the recording start and stop tones or want to record secretly, enable Silent mode on your iPhone.
Record in Stereo, Mono, or Spatial Audio
Depending on your iPhone model, you can choose different recording formats:
To change recording settings:
- Go to Settings > Apps > Voice Memos.
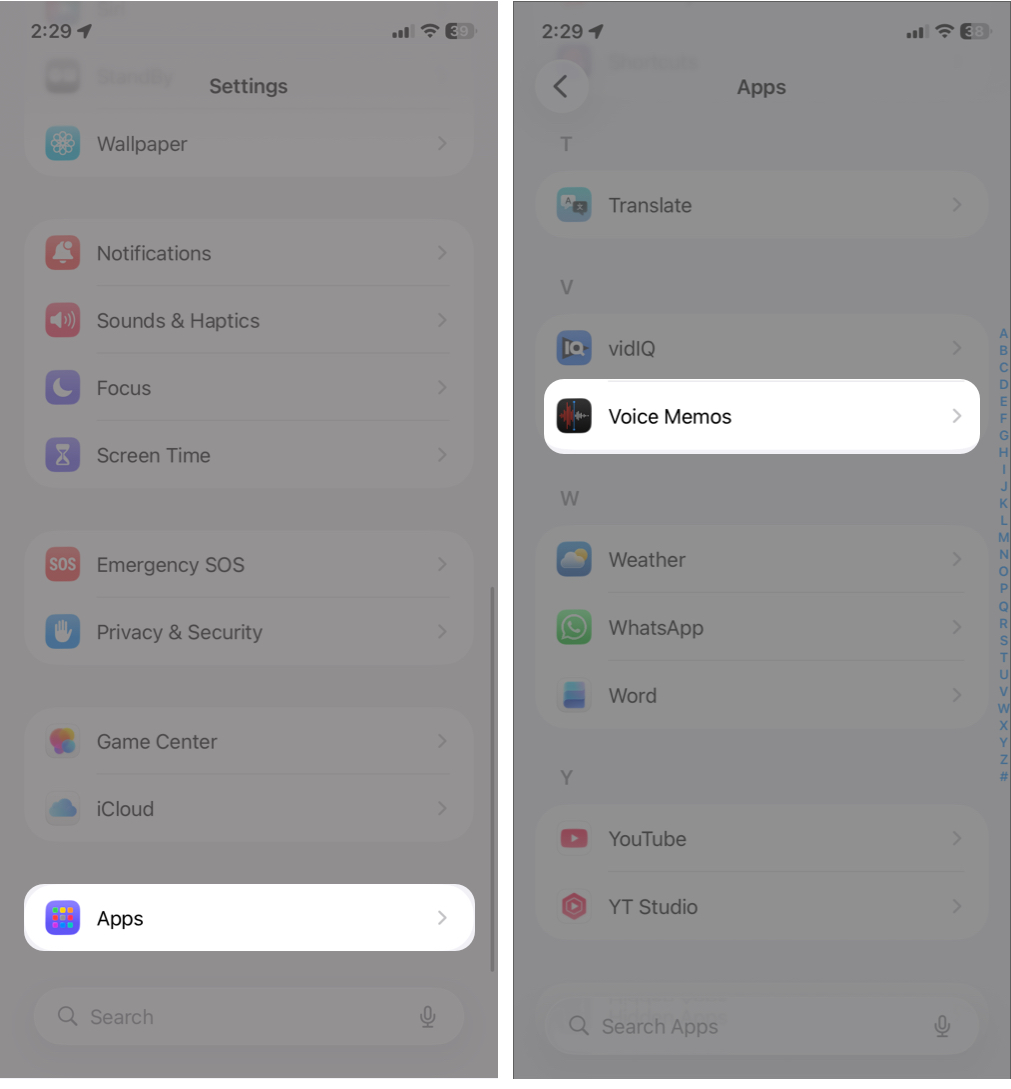
- Tap Recording Mode.
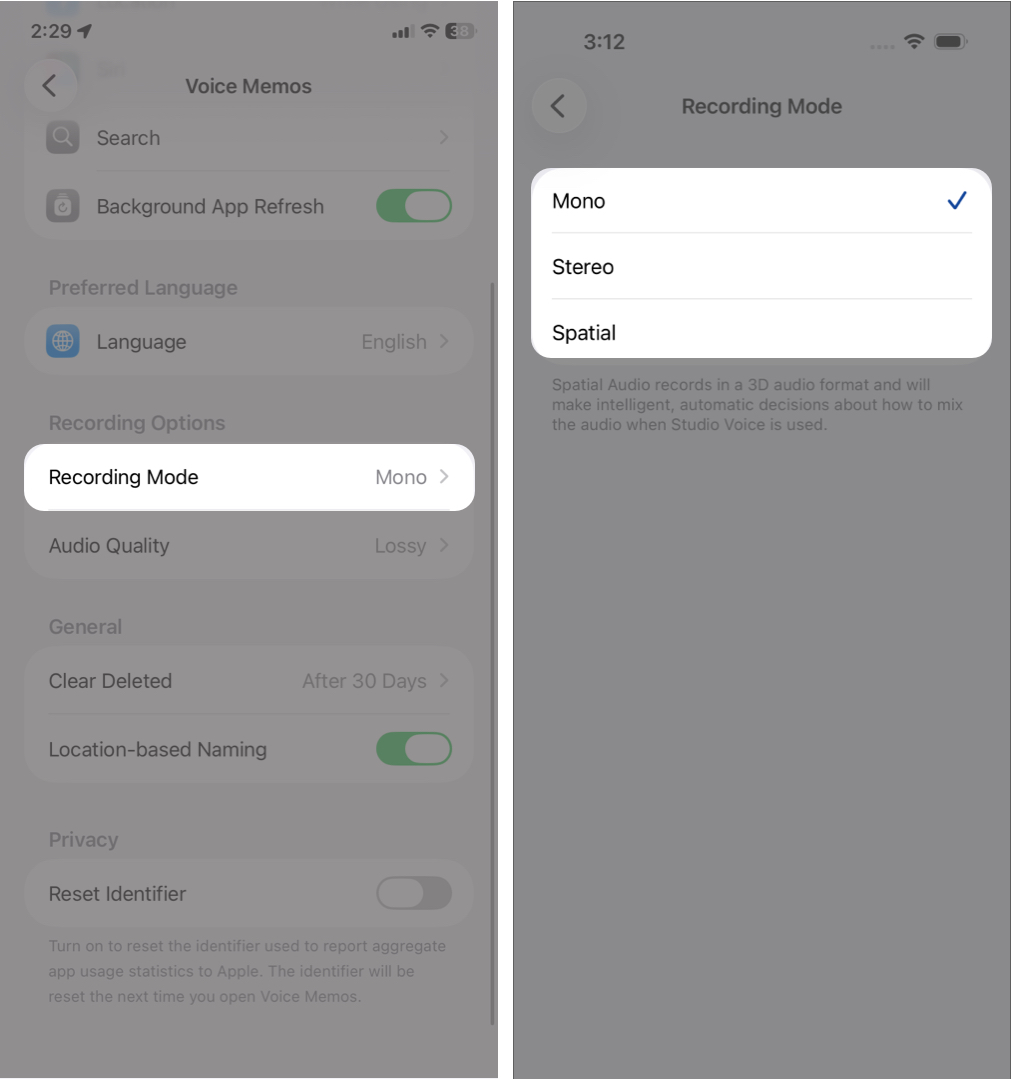
- Select from:
- Mono: Small file size, good for voice notes. Audio playback is the same in both ears.
- Stereo: Records separate left and right channels for richer sound.
- Spatial Audio: Creates immersive 3D audio, ideal for musicians or ambient sound capture .
On supported iPhone models, Spatial Audio is enabled by default. Voice Memos utilizes several microphones on your iPhone in this mode.
You can also change the recording quality from Settings > Apps > Voice Memos > Audio Quality. Here, choose between Lossy and Lossless.
Listen to a Voice Memo and View Its Transcript
To play a recording, simply go to Voice Memo, tap the recording you want to listen to, and hit the Play button. Use the forward and backward buttons to skip 15 seconds.
In iOS 26, voice recordings with speech now include automatic transcripts, letting you read along while listening. You can access it on iPhone 12 and later in selected languages like English, Spanish, French, German, etc.
- Go to Voice Memo, tap a recording, and select the waveform icon. Else, start a recording and swipe the waveform tab.
- Now, tap the transcript icon in the left corner to view the transcription live. Each word will be highlighted as the recording goes on.
- To save the recording, tap the checkmark and select Transcript.
The feature allows you to search inside transcripts to find specific words or moments. It’s especially useful for students, journalists, and content creators.
How to Edit Voice Memos on iPhone
You can trim parts you don’t need, replace sections with new audio, and even enhance the recording for better clarity without leaving the app.
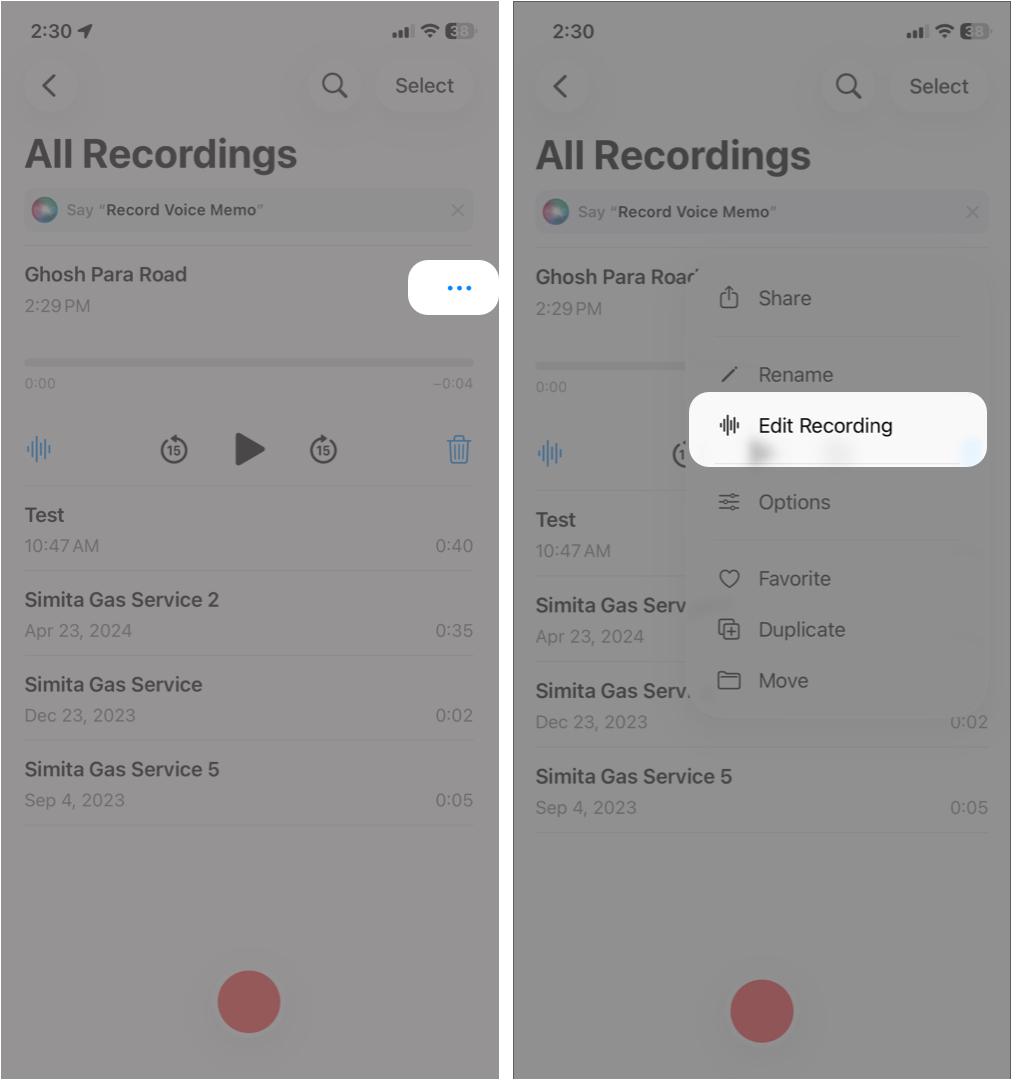
- Open Voice Memos and tap the recording you want to fix.
- Tap the More button (three dots ⋯) to open options.
- Choose Edit Recording to enter the editing interface.
Trim Unwanted Parts
Are you familiar with trimming videos using the Photos app? If yes, trimming voice memos will be familiar. It lets you cut out audio you don’t want from the beginning, middle, or end of a memo.
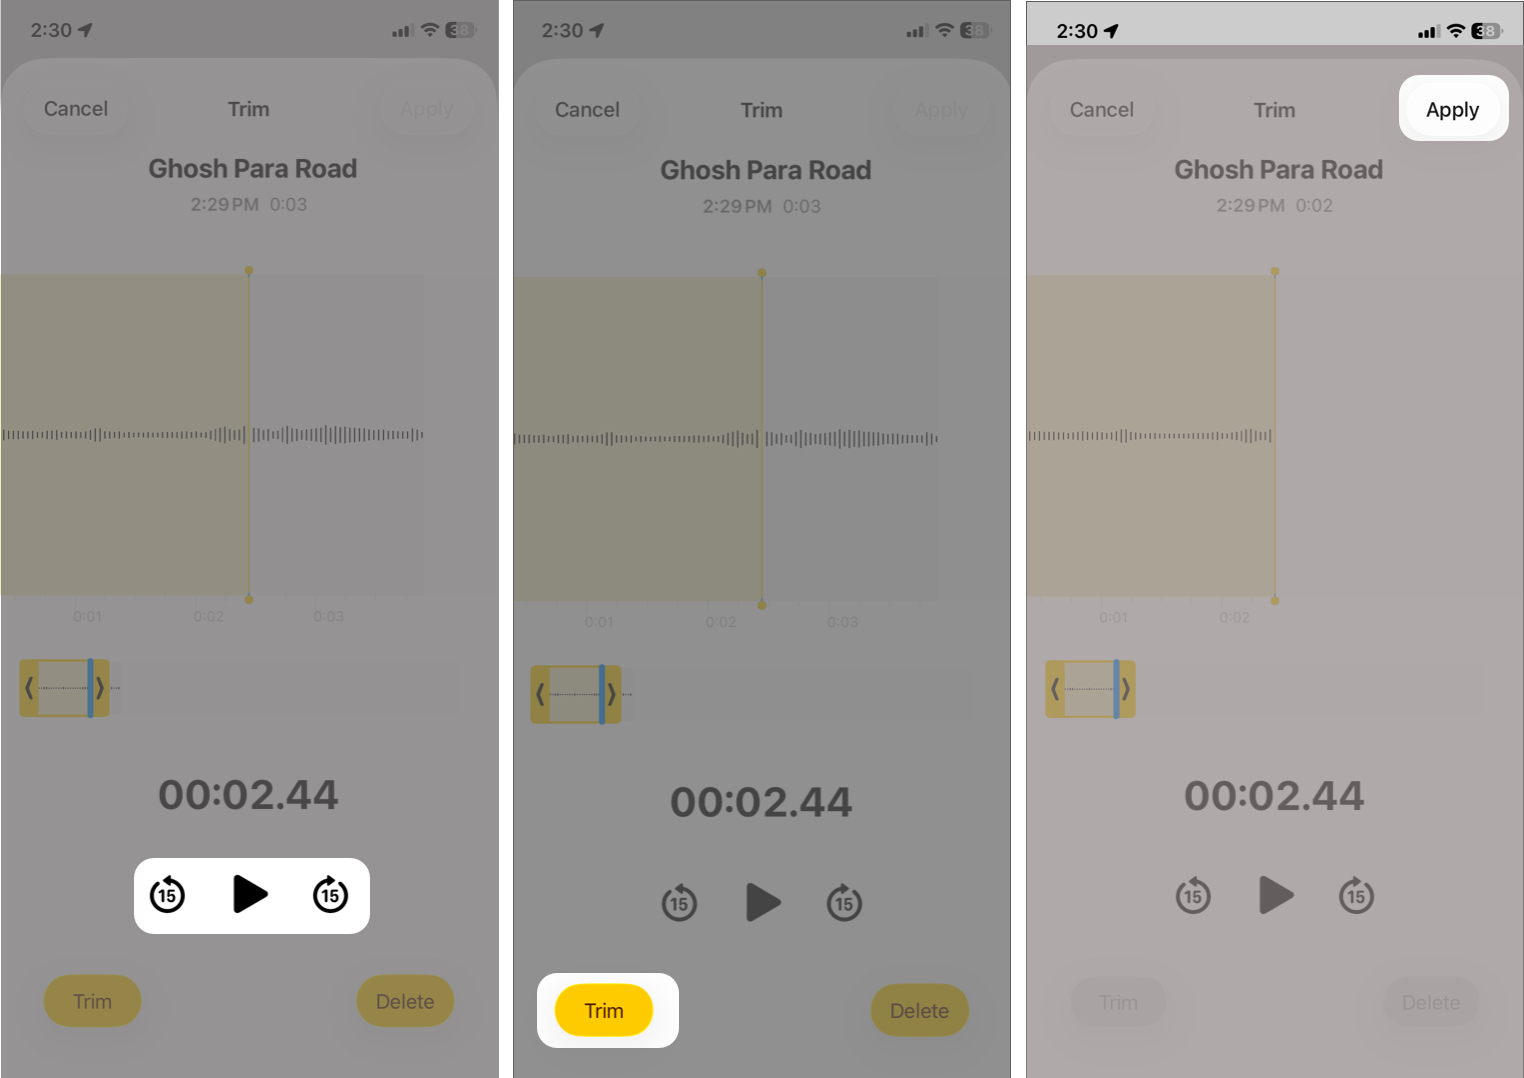
- Once in edit mode, tap the three-dot icon > Trim.
- You’ll see the audio waveform with yellow handles at the edges.
- Drag these handles inward to set the section you want to keep.
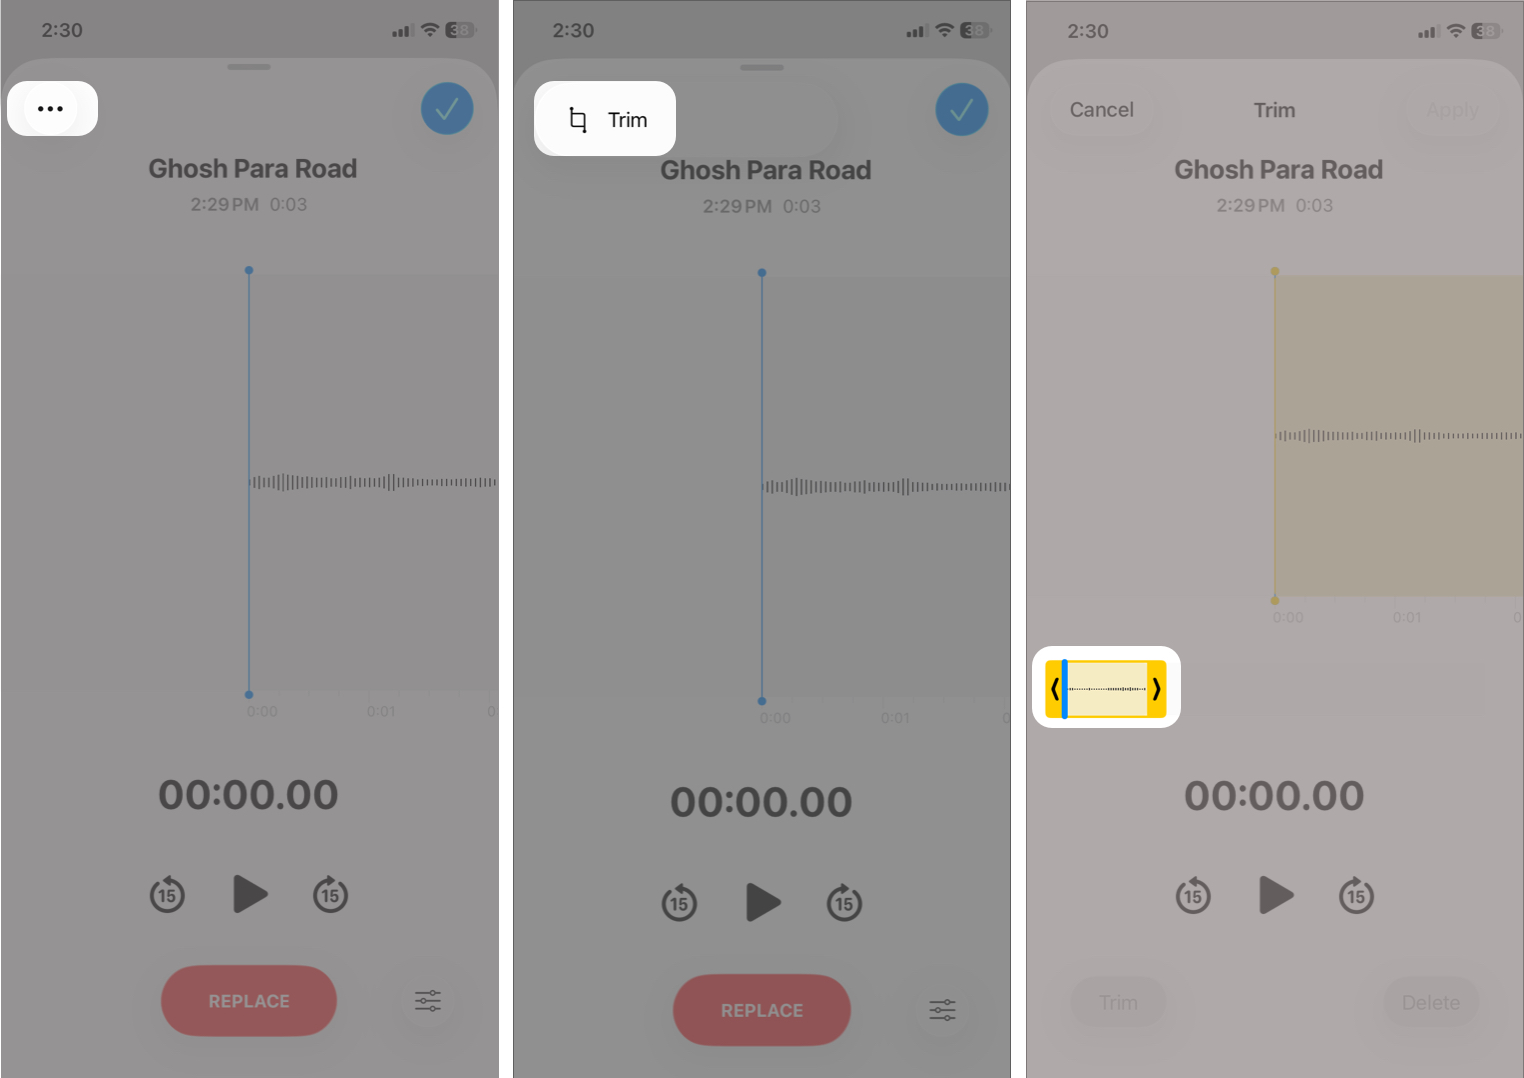
- Use the Play button to preview the selection.
- Tap Trim to keep only the chosen part and remove the rest.
- Tap Apply to save.
You can pinch to zoom in on the waveform for more precise control.
Replace a Section with New Audio
If you want to keep most of your recording but change one part:
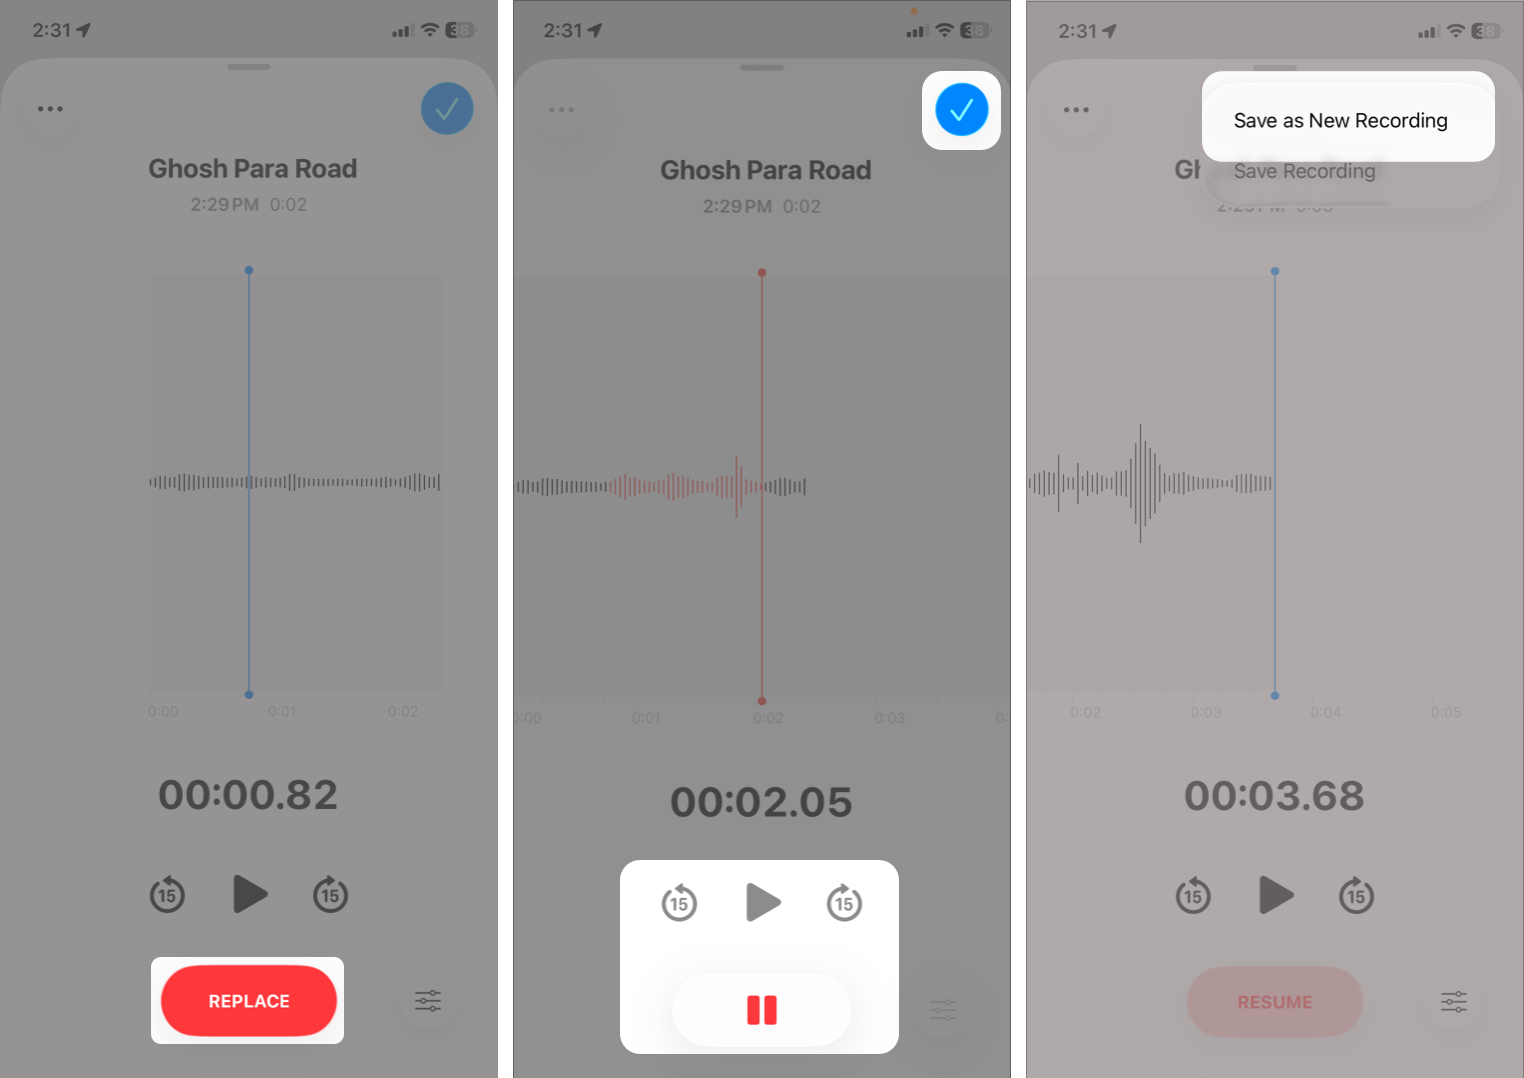
- In Edit Recording mode, position the playhead (the vertical line) at the start of the section you want to overwrite. Pinch zoom the waveform for precision.
- Tap Replace and speak your new audio.
- Hit Stop button when finished. The new audio replaces the old part automatically.
- Now, tap the checkmark and select between Save as New Recording or Save Recording (changes in the existing memo).
This is perfect when you want to correct a mistake without re-recording the whole memo.
Enhance and Clean Up Sound
In iOS 26, Apple added easier ways to make your recordings sound clearer:
- Go to the editing mode, tap the control button at the bottom right corner.
- Toggle on Enhance Recording.
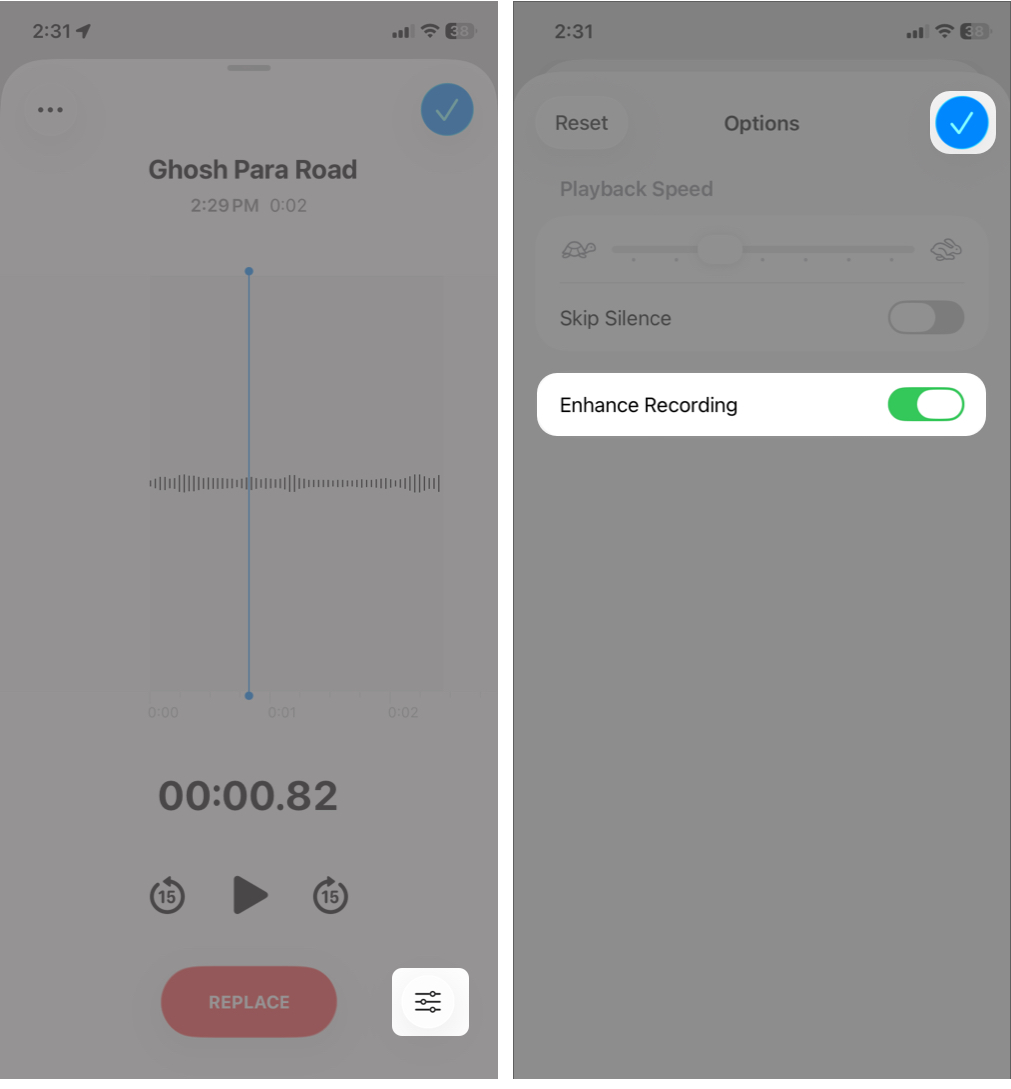
This reduces background noise and echo so your voice stands out clearer in Mono and Stereo recordings.
There is also a playback option called Skip Silence that helps you focus on the important parts when listening back.
Change Playback Speed
Voice Memos also lets you slow down or speed up playback so you can listen more efficiently or clearly.
- From the editing window, tap the control button.
- Drag the Playback Speed slider to adjust how fast or slow the audio plays.
- Going towards turtle means a slower speed. This is useful for lectures, complex explanations, or unclear audio.
- Sliding towards rabbit increases the playback speed.
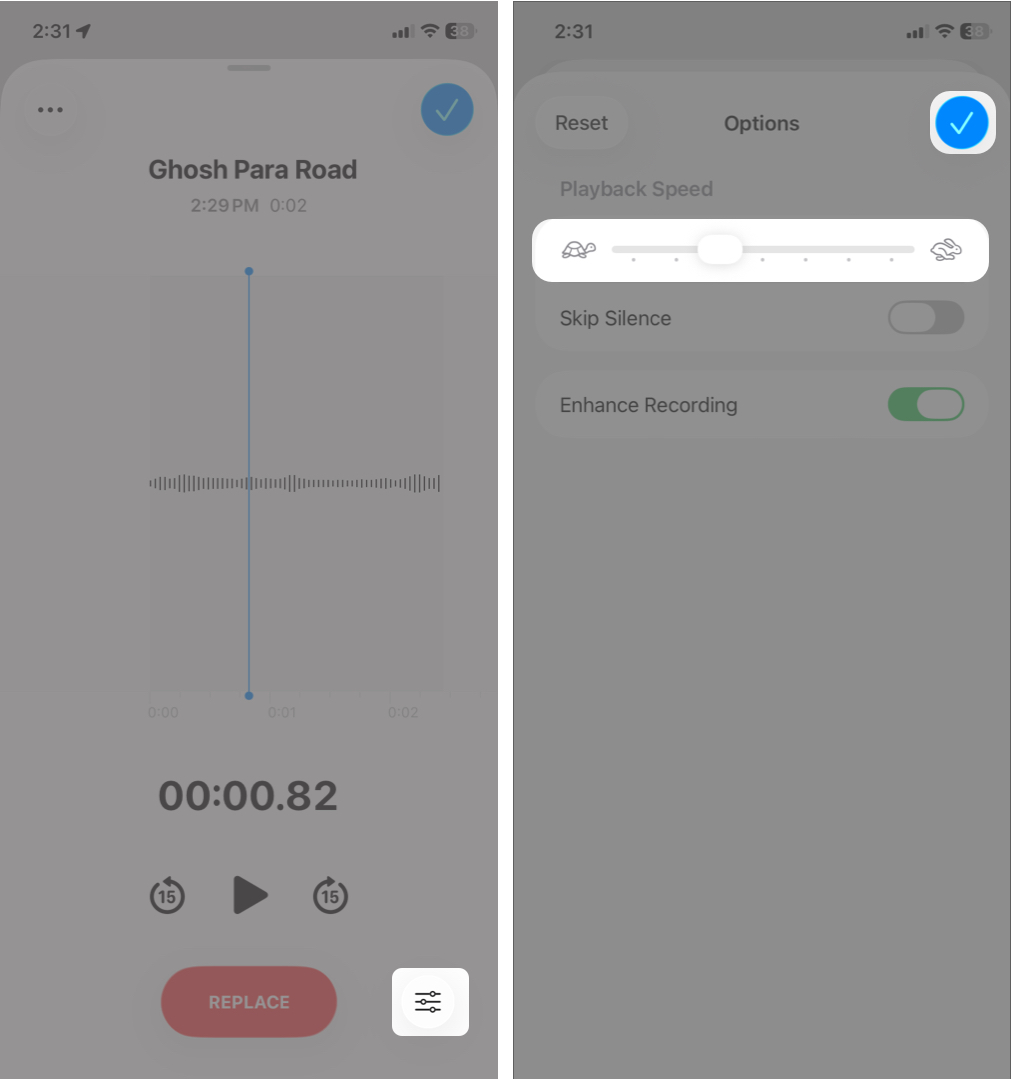
The change applies instantly, so you can hear the difference right away.
Organizing Your Voice Memos
If you regularly take voice recordings, your library can become messy quickly. Here’s how to organize them:
Rename Recordings
By default, memos are named by location to group recordings made at the same place, like classrooms or offices. To rename:
- Tap the recording you want to rename.
- Select the recording name and tap the backspace on the keyboard.
- Enter a custom title and hit the return key to save it.
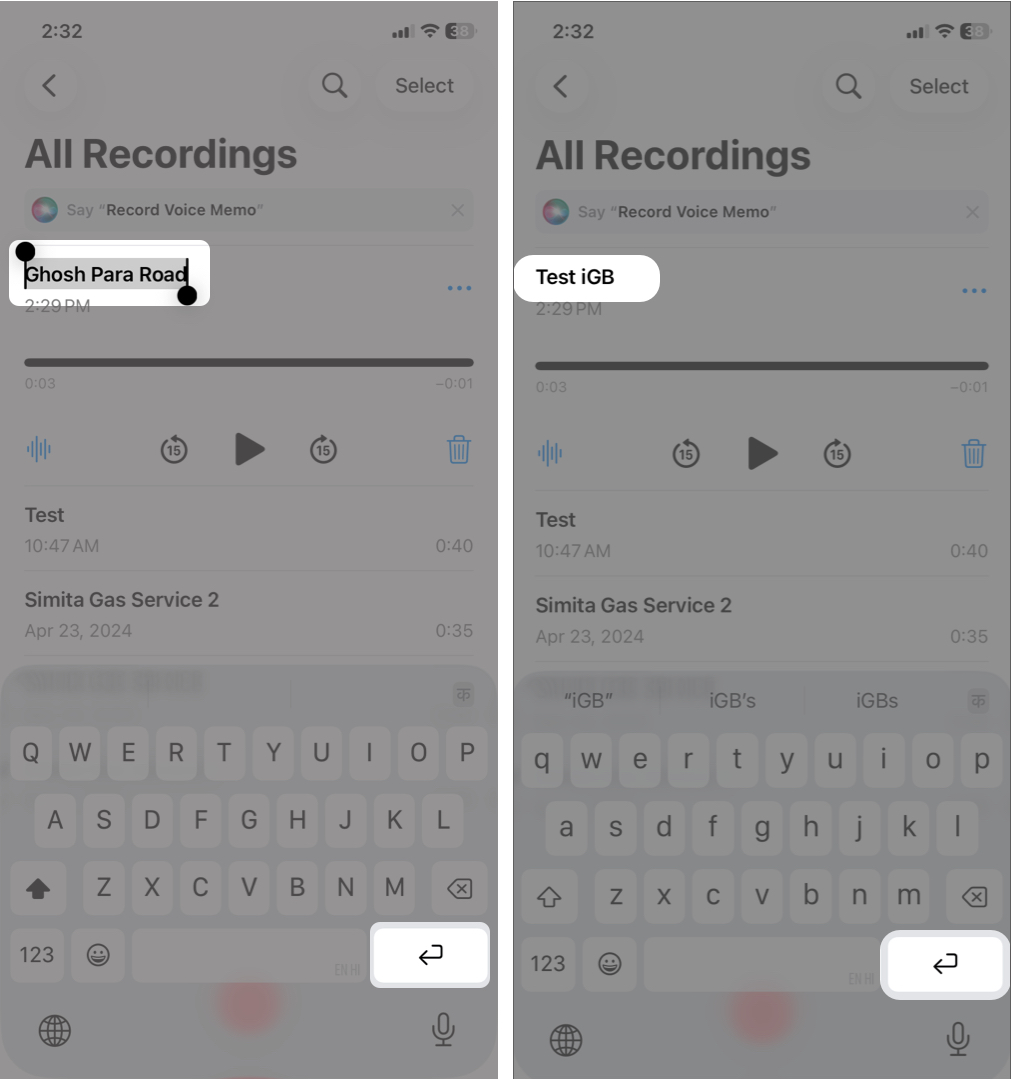
Clear names make your recordings easier to find later.
Create & Use Folders
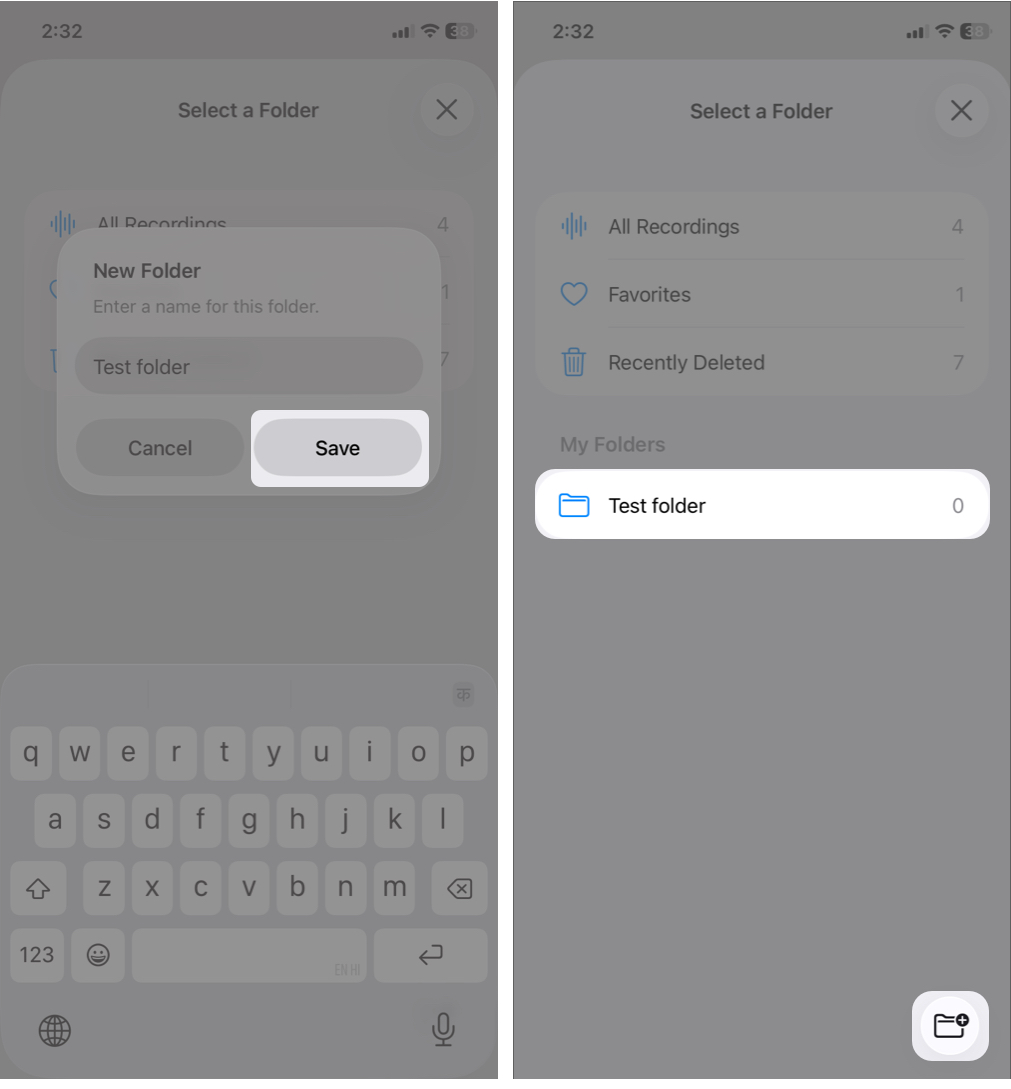
Folders help keep your related memos in a specific group:
- Select a voice memo and tap the three-dot icon.
- Tap Move from the context menu.
- If you are using folders first time, it will prompt you to enter a name. Tap Save to create the folder.
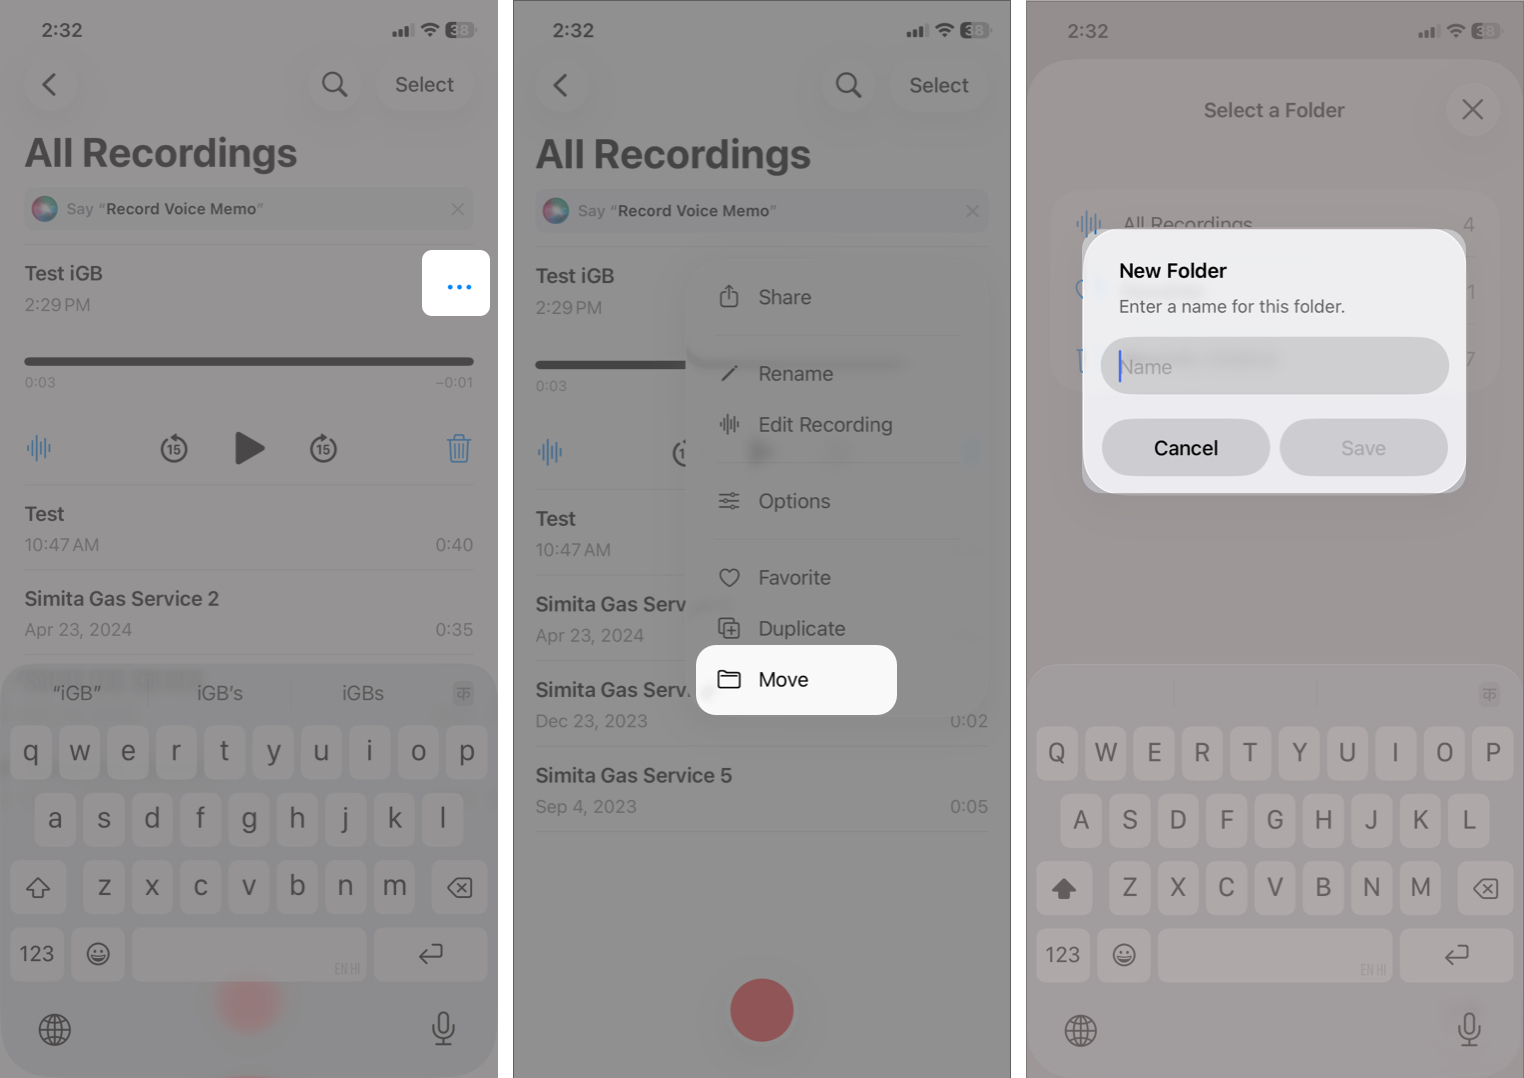
- Now, select the folder where you want to move the memo.
- Next, tap the left arrow at the top left corner to see all your folders. From here, tap the plus icon to create new folders as well.
To rename or sort your folders, tap Edit on the home page. Use the hamburger icon to drag a folder up or down to reorder. Additionally, tap the three-dot icon next to the folder to Rename or Delete it.
Sharing & Exporting Voice Memos
Voice Memos makes it easy to share your recordings with others or export them to different apps and locations.
To share a recording:
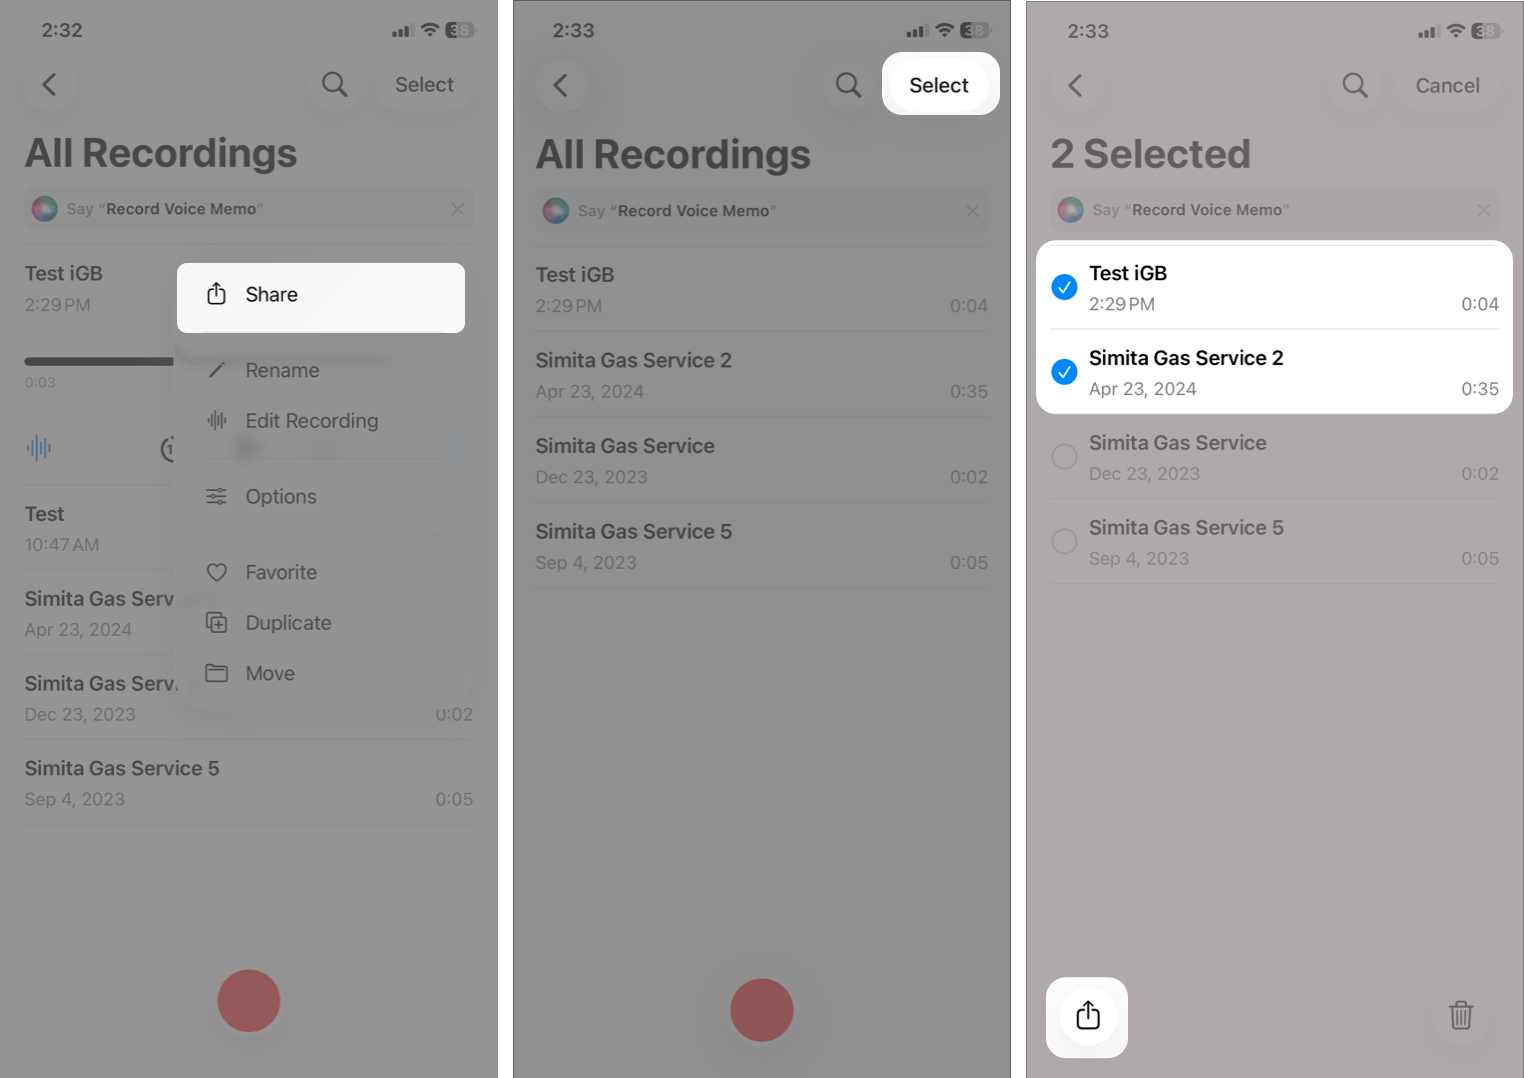
- Open the Voice Memos app.
- Tap the recording you want to share.
- Tap the More button (three dots ⋯) and select Share.
- For multiple recordings, tap Select at the top, choose the memos, and hit the Share button.
You’ll now see the standard iOS Share Sheet, where you can choose between Messages, Mail, AirDrop, WhatsApp, etc. apps to share the memo. The recipient receives the voice memo as an audio file that can be played on most devices.
Export to Files and Other Apps
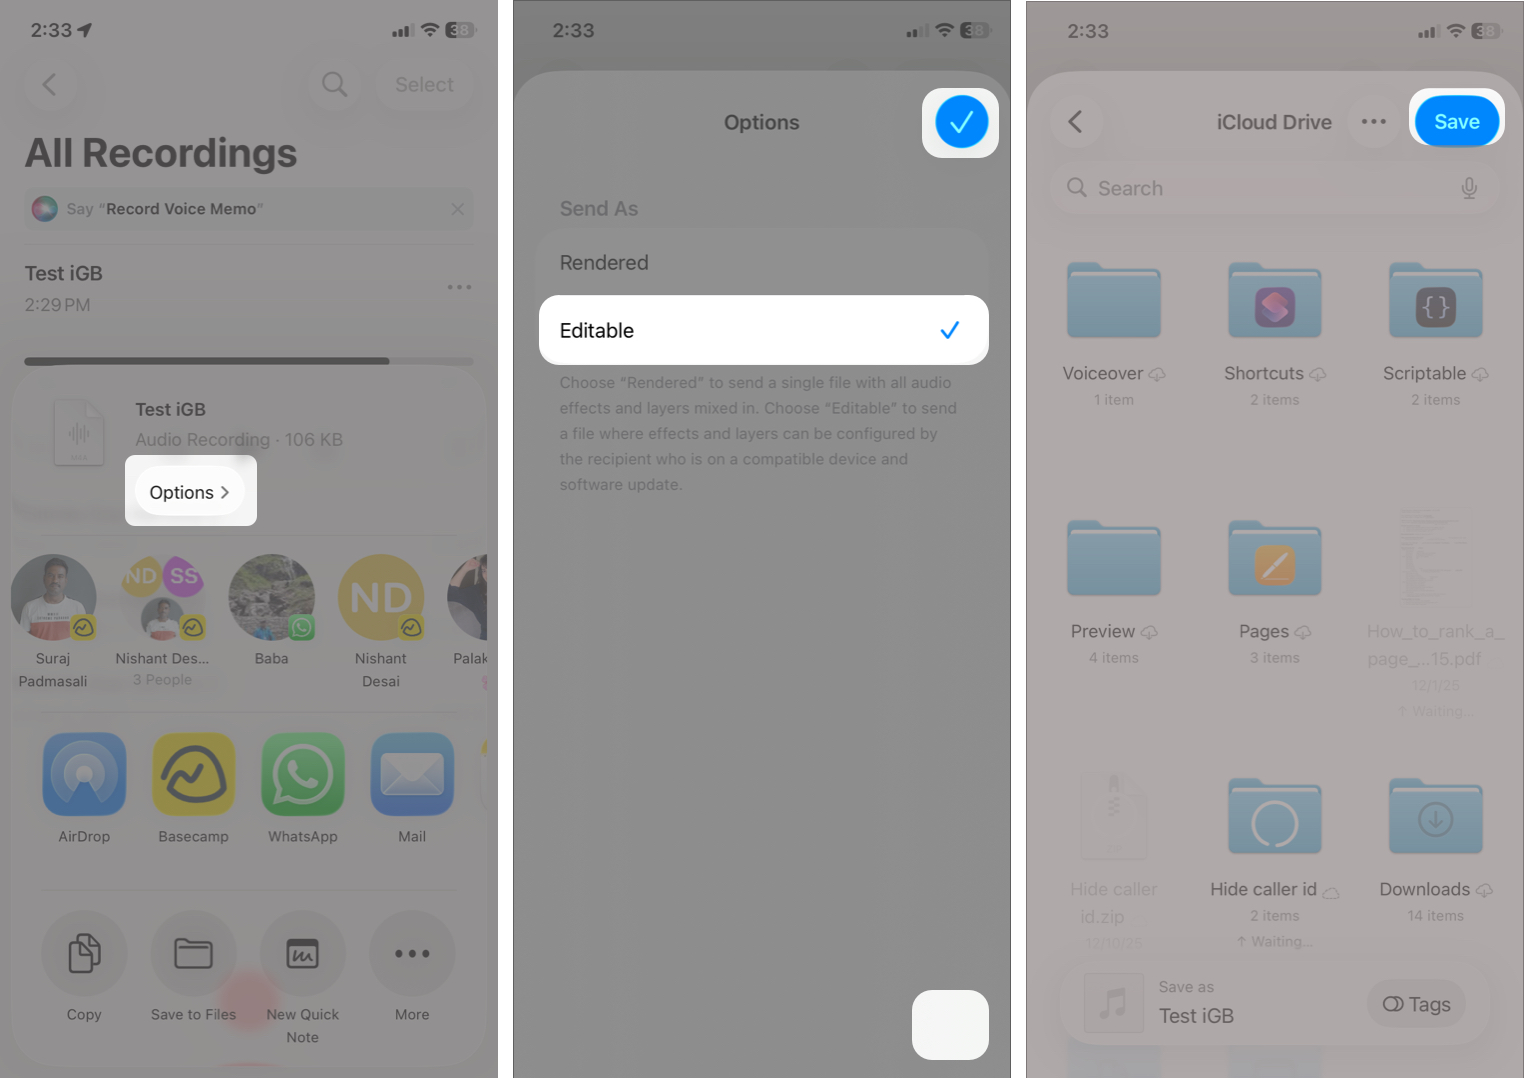
When you send a recording, it exports as an .m4a file. So, the other person can’t enjoy the Spatial Audio or layered recording. To keep the audio effects intact:
- Tap the three-dot icon next to the recording and select Share.
- Now, tap Options under the file name.
- Select Editable and tap the checkmark.
- From the Share Sheet, tap Save to Files and choose a location.
This is useful if you plan to edit the audio further or keep long-term backups.
Syncing Voice Memos Across Devices
Voice Memos works seamlessly with iCloud, so your recordings stay up to date across your iPhone, iPad, and Mac. All the edits, renames, and deletions also sync in real time.
To enable syncing:
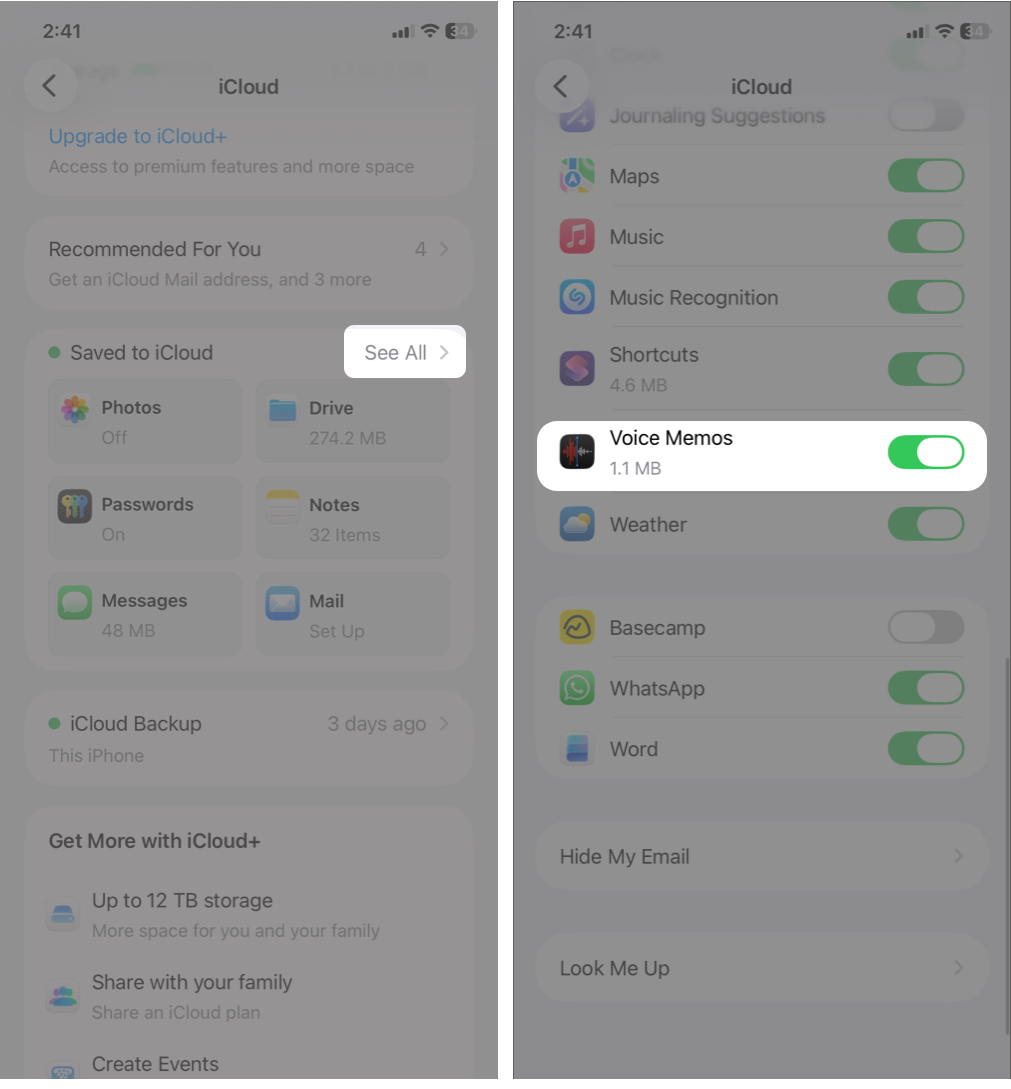
- Go to Settings > [your name] > iCloud.
![Go to Settings click at [your name] and iCloud](https://www.igeeksblog.com/wp-content/uploads/2025/12/Syncing-Voice-Memos-1.jpg)
- Tap See All next to Saved to iCloud.
- Scroll down and toggle on Voice Memos
This ensures your recordings are always backed up and accessible, even if you change devices.
How to Delete a Voice Memo
To delete a recording:
- Swipe left on the voice memo
- Tap Delete icon.
Deleted recordings move to Recently Deleted, where they can be restored within 30 days. You may recover any recording before that time period. Tap the left arrow and go to the Recently Deleted folder. Tap Select, choose the recordings, and hit Recover.
Tips to Record High-Quality Audio on iPhone
To get the best sound quality:
- Try to record in a quiet environment.
- Keep the microphone close to the speaker to avoid traffic, wind, and room noise.
- Avoid covering the microphone with your hand or case.
- Enable Studio Voice for Spatial recordings. Tap the three-dot next to a recording, select Options, and turn on Studio Voice. Adjust the slider to control the background noise levels.
- Use an external mic with a wind muff.
This ensures clearer and more professional-sounding recordings.
Troubleshooting Common Issues
Here are quick fixes for common problems:
| Issues | Solutions |
| No sound recorded | Check microphone permissions in Settings |
| Poor audio quality | Clean microphone and enable Enhance Recording |
| Sync issues | Ensure iCloud is turned on for Voice Memos |
| Missing transcripts | Make sure your language is supported, and audio is clear |
Record Voice Anytime, Anywhere!
Voice Memos is a powerful yet simple tool that fits seamlessly into everyday life. With features like transcription, noise reduction, and cross-device syncing, it’s no longer just a basic recorder; it’s a smart audio companion.
Whether you’re a student, professional, musician, or casual user, mastering Voice Memos can save time, boost productivity, and help you capture important moments effortlessly.
Do you use Voice Memo on your iPhone? Let me know which feature you prefer!