- Siri is a virtual assistant on your Mac that can understand your commands and perform tasks accordingly.
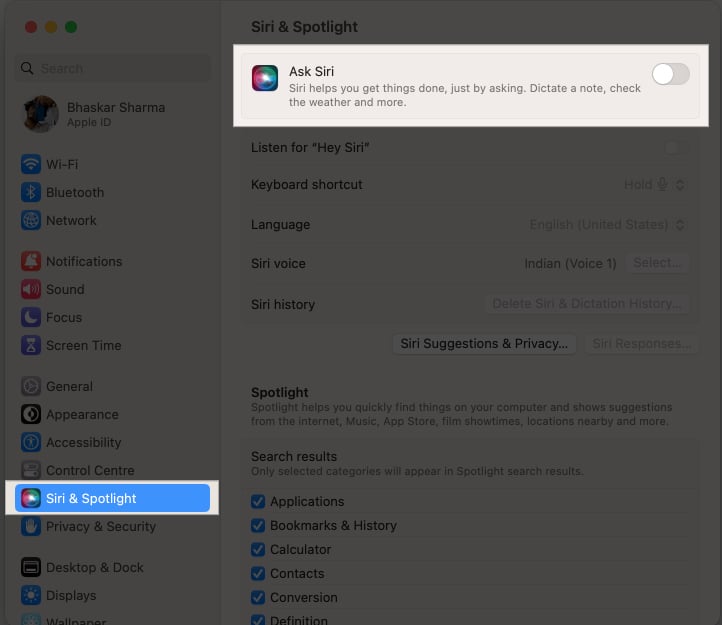
- To enable Siri on macOS Sonoma or Ventura, go to System Settings > Siri & Spotlight > Toggle on Ask Siri.
- Users can customize Siri’s voice and interactions with the apps to increase productivity.
Do you know you can complete many tasks on Mac without exerting physical effort? Yes, you can quickly enable the intelligent voice assistant Siri on your Mac and use it to carry out your commands.

Siri can accomplish several tasks, including setting reminders and managing smart home devices. This article has all the information you need to use Siri on a Mac effectively if you’ve never used it before.
- How to enable Siri on Mac
- How to activate Siri on Mac
- How to customize Siri on Mac
- How to use Siri results on Mac
- Most useful Siri commands
How to enable Siri on Mac
Before you turn on Siri, ensure your Mac has an active internet connection. Siri can’t perform tasks without the internet.
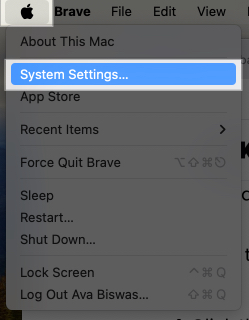
- Click the Apple logo () in the menu bar → Select System Settings.
- Choose Siri & Spotlight → Toggle on Ask Siri.
- Click Enable on the prompt.
How to activate Siri on Mac
There are many different ways to activate Siri on Mac, and each process is very straightforward. Any of the methods listed below can help you with that.
1. Invoke Siri by saying “Siri”
One of the easiest methods to activate Siri on your Mac is to use a voice command. However, ensuring the feature is enabled on your device before doing so is vital.
- Navigate to the System Settings → Siri & Spotlight.
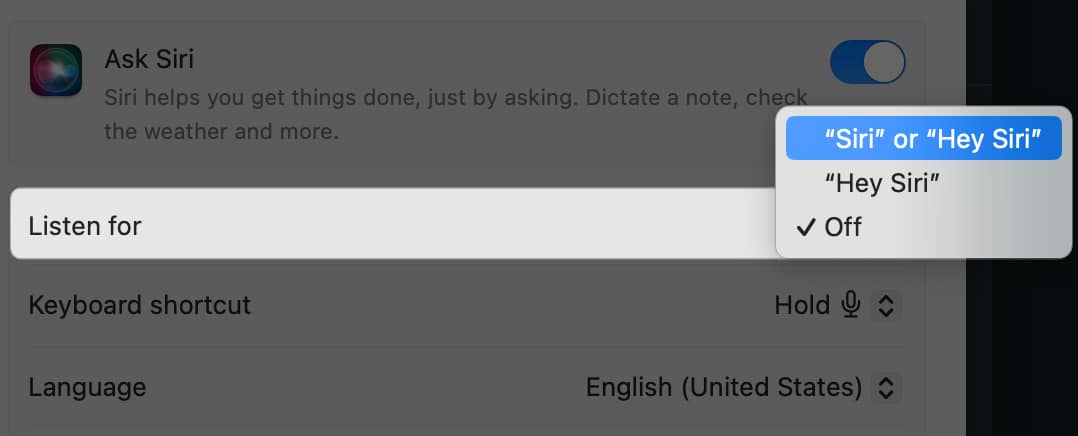
- Click the dropdown next to Listen for → Choose “Siri or “Hey Siri.”
Once enabled, you will be prompted to repeat a few phrases so Siri can learn your speech patterns and catch your pace.
After setting up Siri, if you are using macOS Sonoma, you can activate it by saying “Siri.” Then you can provide the command of your choice.
To ensure that Siri is functioning correctly, you should hear a sound like “ahan” when you invoke the assistant without giving it a command. This sound indicates that Siri is ready to receive your input.
Additionally, check the Siri icon under the menu bar. It changes when you interact with the assistant. If voice commands are not your thing, move to the methods to activate Siri on Mac.
2. From the menu bar
There is another simple way to activate Siri on Mac if Hey Siri is not working properly. Simply select the Siri icon from the menu bar.
If you’re having trouble finding the Siri icon on the menu bar, go to System Settings → Control Centre → Click the dropdown beside Siri → Select Show in Menu Bar.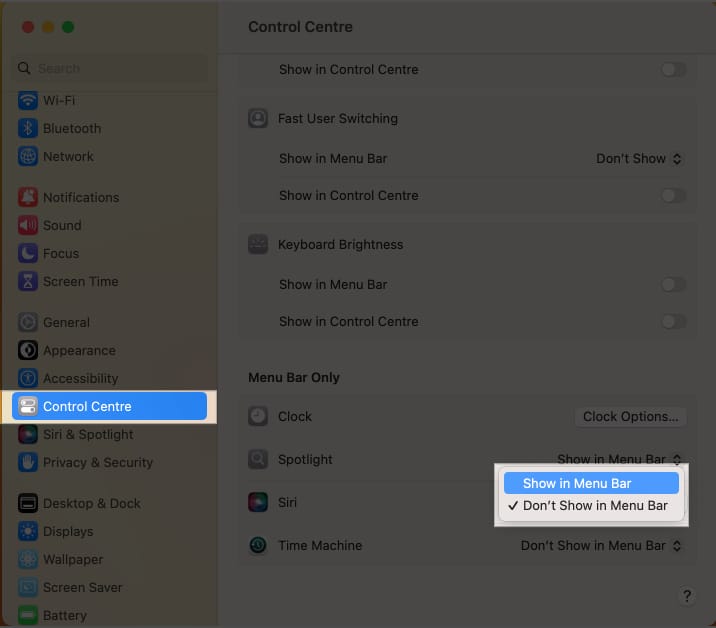
3. Using keyboard shortcut
There is a way to use Siri with your keyboard if you cannot activate Siri using voice commands or from the menu bar. You can invoke Siri by holding down the F5 key, which has a microphone icon, until the Siri icon appears below the menu bar.
Moreover, you can also read our article to find out how to use Type to Siri on your Mac, which will eliminate the need for you to use voice commands to access the assistant’s features.
4. Activate Siri with the touch bar
Apple has further simplified activating Siri for you if you own a Mac with a Touch Bar. All you need to do is tap the Siri icon on the Touch Bar, which is next to the Mac’s power button.
How to customize Siri on Mac
Now that you have a firm grasp on activating Siri on Mac, it’s worthwhile to check how you can tailor the intelligent assistant to meet your needs.
Change Siri’s voice
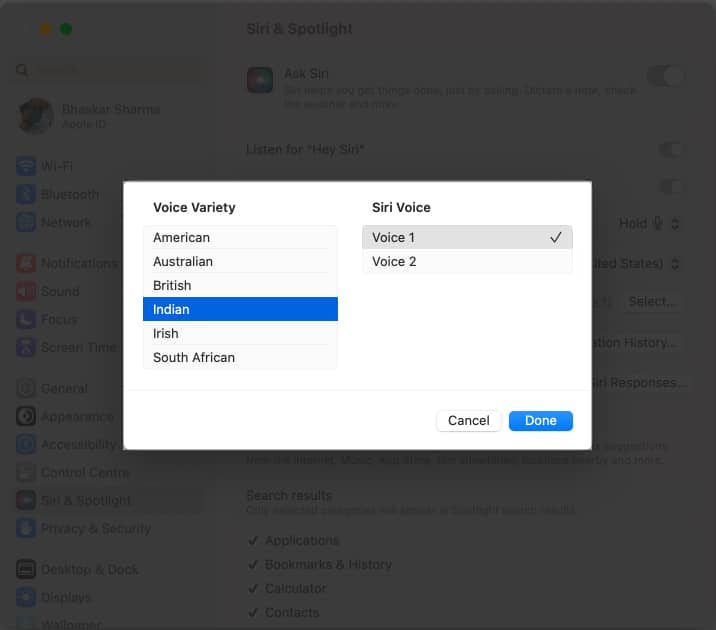
Siri offers a variety of voices, including male and female options with different accents. To change Siri’s voice,
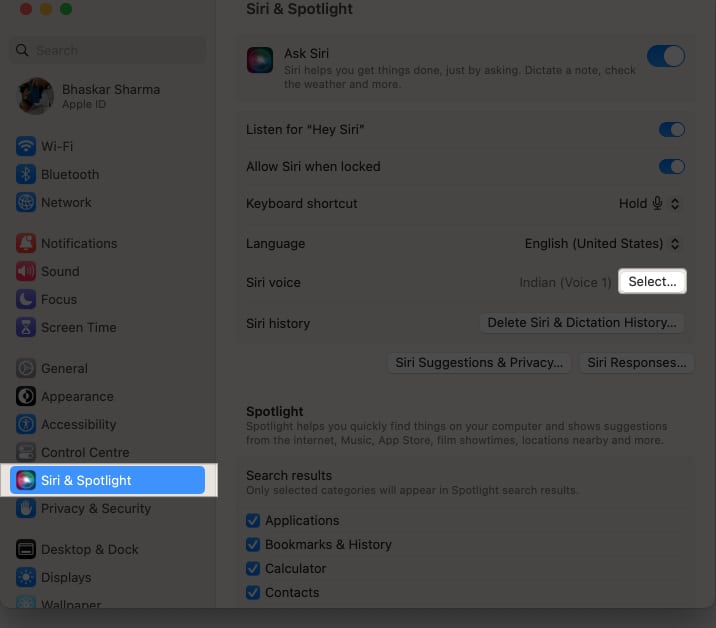
- Head to System Settings → Siri & Spotlight.
- Click the Select button next to Siri Voice.
- Choose the voice you’d like to use for Siri → Click Done.
Correct Siri’s pronunciation
Once you’ve taught Siri how to pronounce a name on your iPhone correctly, the pronunciation will automatically be synchronized to your Mac. However, if Siri still mispronounces names, quick methods are described below to correct them on your Mac.
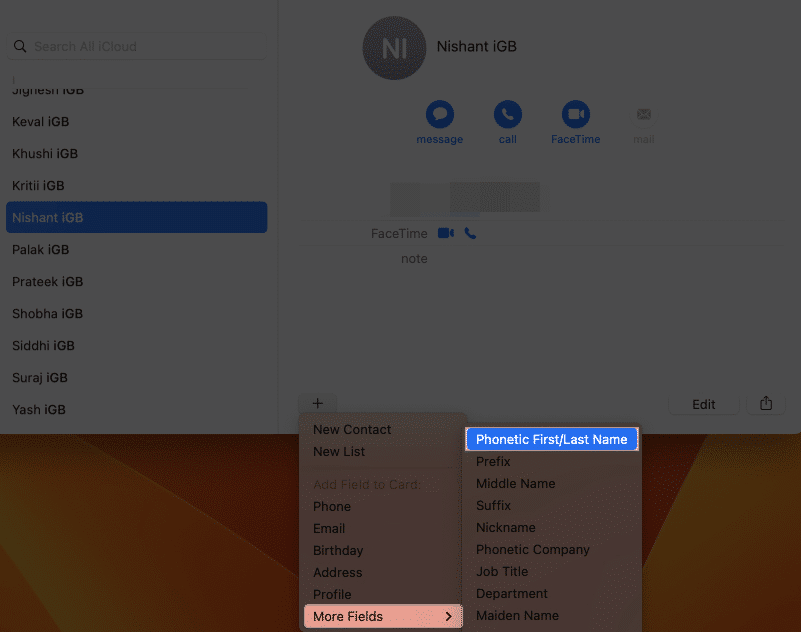
- Open the Contacts app → Search for the contact name you wish to correct the pronunciation.
- Click the plus icon (+).
- Go to More Fields → Select Phonetic First/Last Name.
- Enter the correct phonetic spelling of the contact → Click Done.
Note: Siri may take a while to grasp the phonetic name as the assistant is inconsistent in pronouncing them.
Additionally, to correct Siri’s pronunciation of your name, simply say Siri → Ask Who Am I → Tap your Profile Picture → follow steps 2-4 from above.
Customize Siri’s language
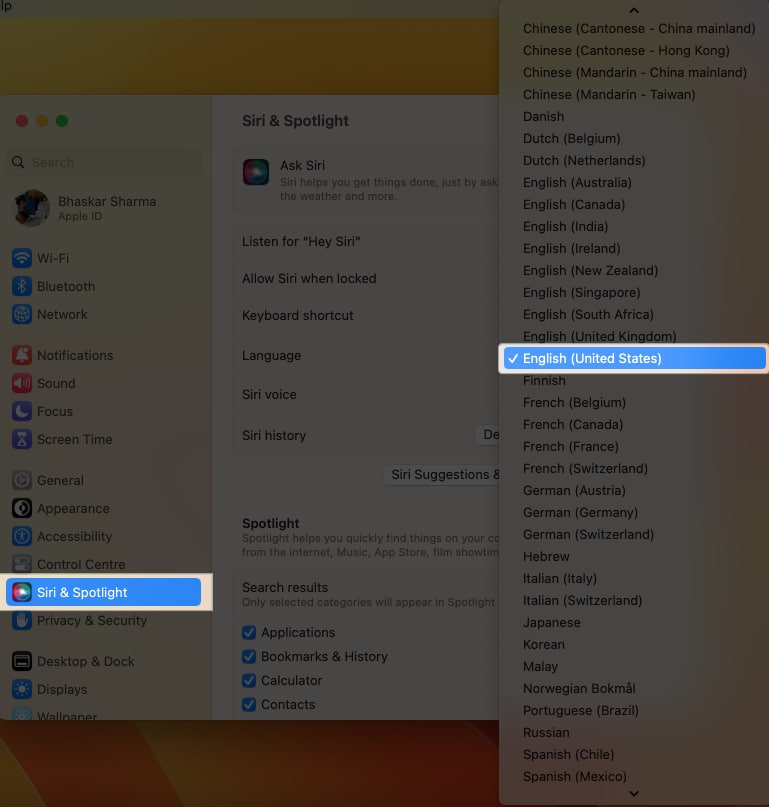
Siri can recognize and carry out voice commands in several different languages. If your preferred language is supported for Siri by default, you can configure Siri to recognize and respond in that language.
- Go to System Settings → Siri & Spotlight.
- Click the dropdown next to Language.
- Select your preferred language from the list.
Enable or disable Siri suggestions
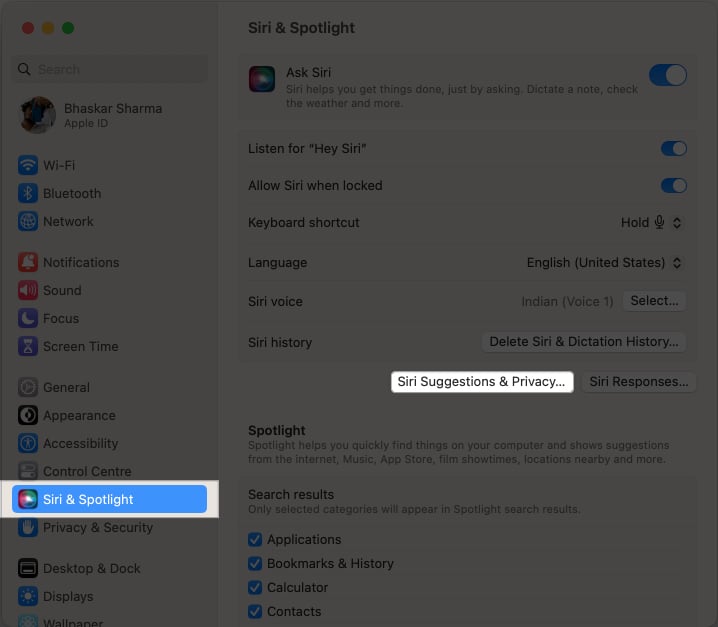
Based on your behavior, Siri can offer a wide range of recommendations for apps and short actions to help you increase productivity and make it easier to complete more tasks. Here’s how you can enable or disable this feature.
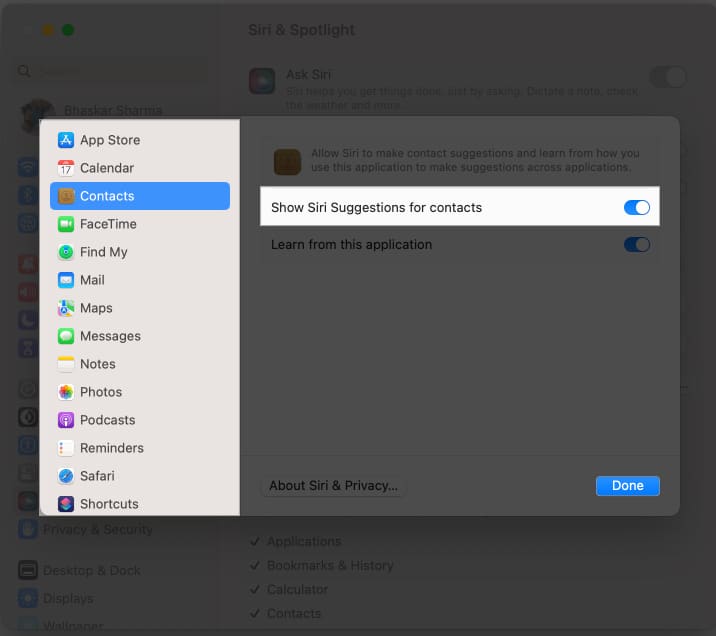
- Navigate to System Settings → Siri & Spotlight → Click Siri Suggestions & Privacy.
- Select an app from the left pane → Toggle on or off Show Siri Suggestions in [app name] → Click Done.
Note: Some apps don’t allow showing Siri Suggestions in the application.
Control what Siri can access
Siri can access various information on your device, such as contacts, calendars, and locations. However, Apple offers an easy way to control what Siri can access. You can adjust your privacy settings by following the steps below.
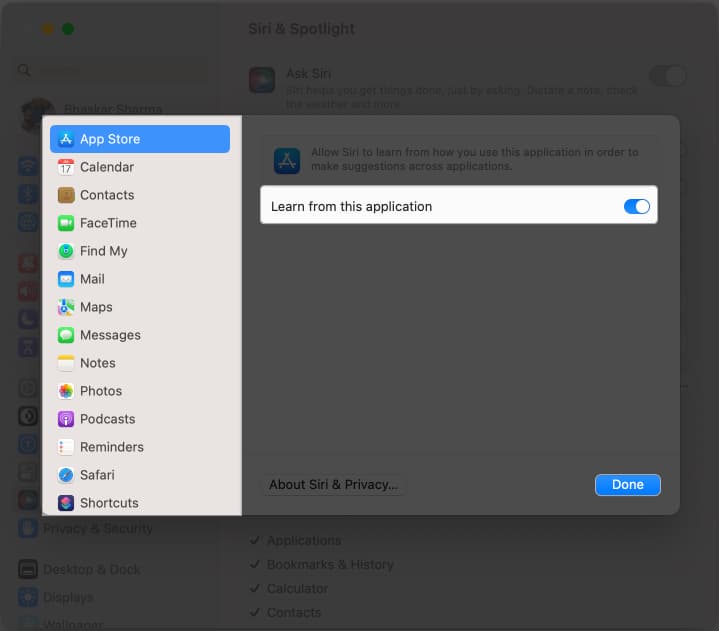
- Head to System Settings → Siri & Spotlight → Select Siri Suggestions & Privacy.
- Choose the app from the left pane → Toggle off Learn from this application → Choose Done.
How to use Siri results on Mac
Siri results are easily accessible through the Siri window and can be used in various formats, including emails and documents. There are several ways to make use of Siri results on your Mac.
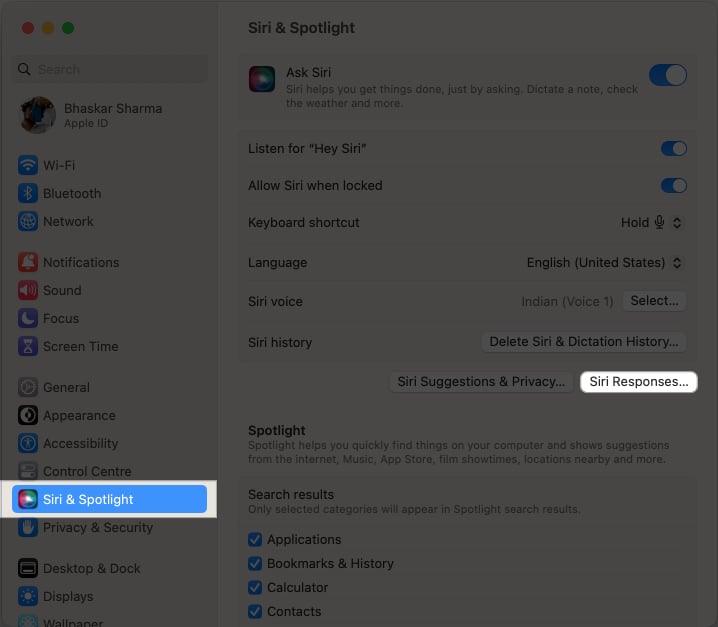
- Launch System Settings → Go to Siri & Spotlight → Select Siri Responses.
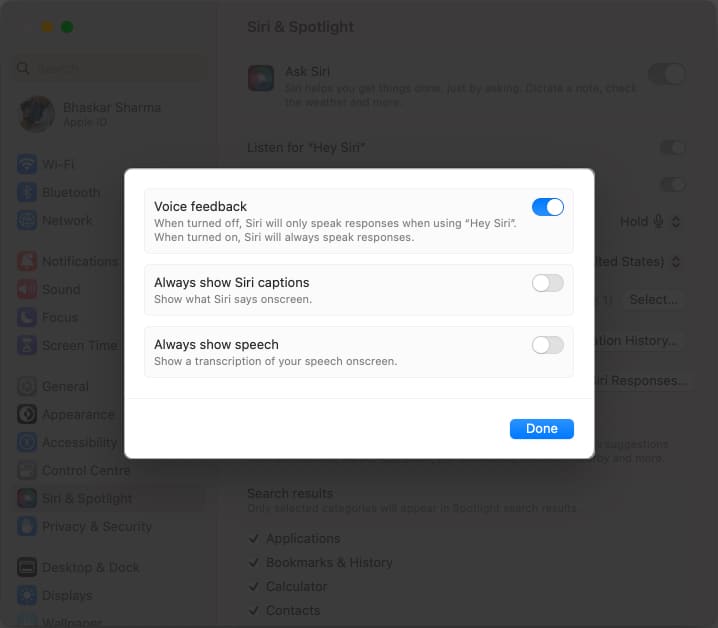
- Toggle on the below-mentioned features and click Done:
- Voice feedback: If you want Siri to invoke in multiple ways mentioned above, enable this.
- Always show Siri captions: You will see Siri’s response in text format on the screen.
- Always show speech: With Siri’s response, you may see your commands onscreen.
If Siri responds with a website link or a file based on your command, double-click that to open in the associated Mac application. You can use the Quick Look feature to preview a result by force-clicking it.
This will show it in a separate window for convenient viewing. Besides, you may drag and drop Siri results into an email, document, or desktop to include pertinent text or locations.
Most useful Siri commands
Now that you are aware of how to enable and activate Siri on Mac, let’s learn the capabilities of the assistant and examples of ways to use Siri on Mac.
You can activate Siri using any of the techniques above and have the assistant carry out your commands. For instance, my preferred strategy is to ask Siri to perform the task using the “Hey Siri” command.
| Ability | Command |
| Mark your calendar | Schedule a meeting tomorrow at 10 AM |
| Set a reminder | Remind me to drink water at 3 PM |
| Start a timer | Set a break timer for 10 minutes |
| Set an alarm | Wake me up in 1 hour |
| Take a quick note | Note that “Earth revolves around the Sun” |
| Make a list | Create a to-do list and add it to charge Mac in the to-do list |
| Use a calculator | What is 10% of 41,320 |
| Siri as the translator | Note that “Earth revolves around the Sun” |
| Location reminders | Note that “Earth revolves around the Sun” |
| Send an email to iGeeksMedia about my evaluation and a request to discuss a pay | |
| Play Music | Translate ‘How are you?’ into Korean |
| Find a place to eat | Recommend a good dine-out restaurant |
| Check traffic | Check the traffic condition around me |
| Post to Facebook or Twitter | Get directions to Jibin’s house and remind me to give him the file when I arrive. |
Yes, several third-party apps, including Spotify, Microsoft Office, and others, can be controlled by Siri on the Mac. Ask Siri to open the app or carry out a task inside the app to see if it is compatible with Siri.
Siri on Mac can access some of your personal information, including contacts, calendar events, and emails, to carry out specific tasks. However, Apple takes user privacy seriously and has several security measures to safeguard your information.
You can provide feedback regarding Siri to Apple on the feedback website.
Hey Siri, what can you do?
If you have doubts about what tasks the smart assistant can perform, simply say, “Hey Siri, what can you do?”. Furthermore, if you are dissatisfied with Siri, turn off Ask Siri from System Settings.
What are your thoughts on Siri? Please share them in the comment section below.
Read more:

