How to Use FaceTime on iPhone, iPad, and Mac?
Master FaceTime on iPhone, iPad, and Mac, from setup to group calls, screen sharing, and pro tips in one easy guide.

- Initial Setup: Set up FaceTime by signing in with your Apple ID and enabling it in your device’s settings.
- Key Requirements: To use FaceTime, you need a compatible Apple device, a stable internet connection, and an Apple ID.
- Making Calls: Start calls by selecting a contact in the FaceTime app; you can answer or decline incoming alerts.
- Advanced Features: Enhance calls with screen sharing, Memoji, video reactions, and background blur for more interactive chats.
- Troubleshooting: Fix common issues by checking your internet connection, updating your device, or verifying FaceTime settings.
FaceTime is Apple’s built-in video and audio calling app that lets you stay connected with friends, family, and colleagues across iPhone, iPad, and Mac. With recent updates, FaceTime now includes fun and practical features such as screen sharing, reactions, and the ability to invite non-Apple users.
In this guide, I’ll walk you through setting up and using FaceTime, exploring its best features, and troubleshooting common issues.
How do I set up FaceTime on iPhone/iPad or Mac?
| Device | Steps | Notes |
|---|---|---|
| iPhone/iPad | Settings > Apps > FaceTime > Toggle ON; Open FaceTime app > New FaceTime > Enter Contact > Call | Needs Apple Account; iOS 18+ |
| Mac | Open FaceTime app > New FaceTime > Enter Contact > Audio/Video Call | Sign in with Apple ID |
| Android/Web | Receive and join FaceTime via web link (from an Apple user) | Join via supported browser |
Prerequisites for Using FaceTime
Before using FaceTime, make sure you have:
- An iPhone, iPad, or Mac running iOS 18, iPadOS 18, or macOS Sequoia. Older versions (like iOS 17) work but might miss some newer features.
- An Apple ID. If you don’t have one, create it for free at appleid.apple.com.
- A stable internet connection (Wi-Fi or cellular) for smooth calls.
- Access to camera and microphone (enabled in Settings).
- FaceTime must be available in your country (not available in UAE and some other regions).
Tip:
How to Set Up FaceTime
Setting up FaceTime is quick and straightforward. Here’s how to do it on your iPhone, iPad, or Mac.
On iPhone or iPad
- Open the Settings app.
- Tap Apps and select FaceTime.
- Toggle FaceTime ON.
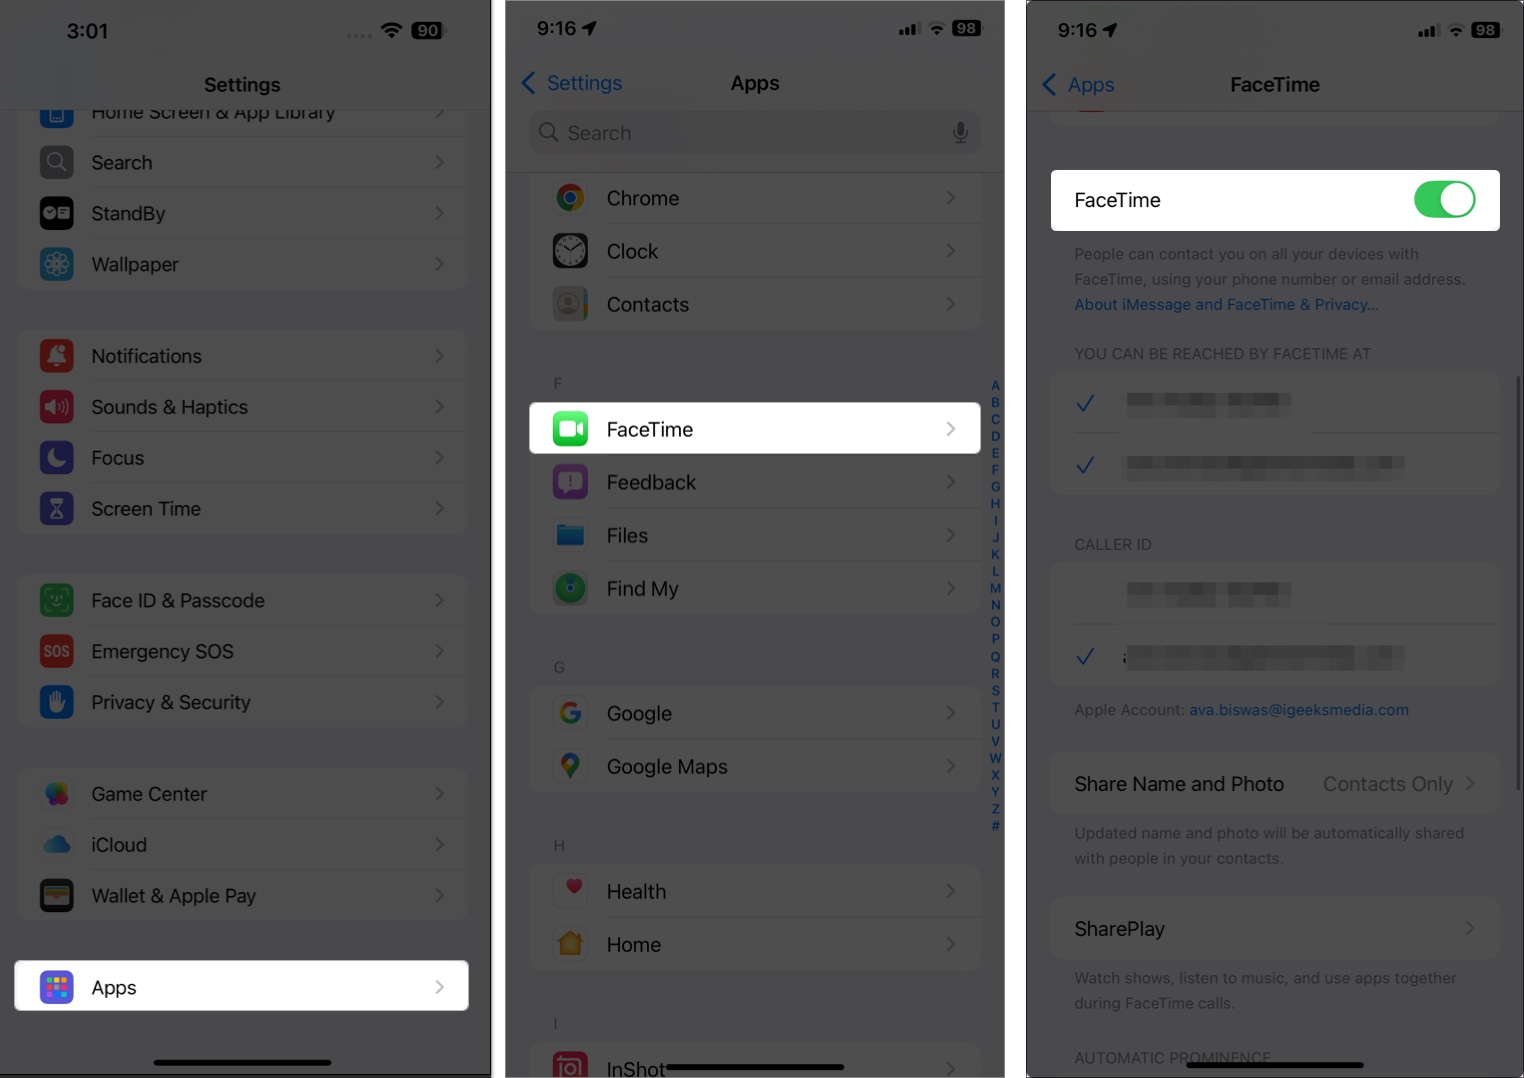
- Sign in with your Apple ID.
- Under “You Can Be Reached By FaceTime At,” choose your email or number.
If FaceTime doesn’t activate, wait a few minutes or check your internet connection. You may need to sign out and back in.
On Mac
- Launch the FaceTime app from Applications or via Spotlight.
- Sign in with your Apple ID.
- Click FaceTime in the menu bar → Settings.
- Choose your caller ID and ensure the internet connection is stable.

If you see the FaceTime Waiting for Activation error, ensure your internet connection is stable, and your Apple ID has been verified.
How to Make and Receive FaceTime Calls
Once FaceTime is set up, you can start making and receiving calls. Here’s how.
Initiate a Call
- Open the FaceTime app on your iPhone, iPad, or Mac.
- Tap or click New FaceTime.
- Enter a contact’s name, phone number, or email linked to their Apple ID. Otherwise, select the “+” button to open your contact list and select one.

- Tap the camera icon for video or the phone icon for audio. On Mac, click the camera icon for video call or click the down arrow next to it and select FaceTime Audio.
Quick Tips:
- In Messages, tap the video icon on the top-right to start a call.
- Use Hey Siri: “FaceTime [Contact Name]” for hands-free calls.
- Use the Contacts app to start FaceTime directly.
Using FaceTime Links
FaceTime links allow you to invite anyone, including users of Android or Windows devices, to join a call via a web browser. Here’s how:
- Open the FaceTime app and tap Create Link.
- Share it via Messages, Mail, or third–party apps.

- Others can join through a web browser.

To allow someone to join the call, click the right tick next to their name. If you want to remove a participant from the call once they have joined, click the remove button (gray cross icon) within 30 seconds.
Receiving Calls
- When someone calls you, you’ll see the Answer or Decline buttons. To join the video call, tap the camera icon and tap Join.
- On iPhone/iPad, tap the call banner for more options, like sending a message or setting a reminder.
- FaceTime also features the ability to ‘Hold & Accept’ calls. If you are on a FaceTime call, and a call — regular or another FaceTime — comes up, you can use the ‘Hold & Accept’ option to put the call on waiting.
- On Mac, click Accept or Decline in the notification. If you want to answer in audio instead of video, click the down arrow next to Accept and select Audio.
- If you have multiple Apple devices, you can answer a call on any device signed into the same Apple ID. For example, answer an iPhone call on your Mac.
Create Group FaceTime Calls
FaceTime supports up to 32 participants in a Group FaceTime call.
To start:
- Open FaceTime and tap New FaceTime.
- Add multiple contacts by typing their names, numbers, or emails.
- Tap FaceTime to start a video call or the call icon for an audio call.

- During the call, you can add more people from the info icon or sidebar.
You can also start a group call from a Messages group chat by tapping the FaceTime icon at the top and selecting FaceTime Video.
Explore FaceTime Features
FaceTime offers a range of fun and practical features to enhance your calls. Here’s a look at the best ones in iOS 18, iPadOS 18, and macOS Sequoia.
1. Capture Live Photos
You can snap a photo during a video call to capture a moment.
- Ensure Live Photos is enabled in Settings > Apps > FaceTime (iPhone/iPad) or FaceTime > Settings (Mac). Moreover, both participants must have Live Photos enabled.
- During a call, tap the shutter button (white circle) to take a photo.
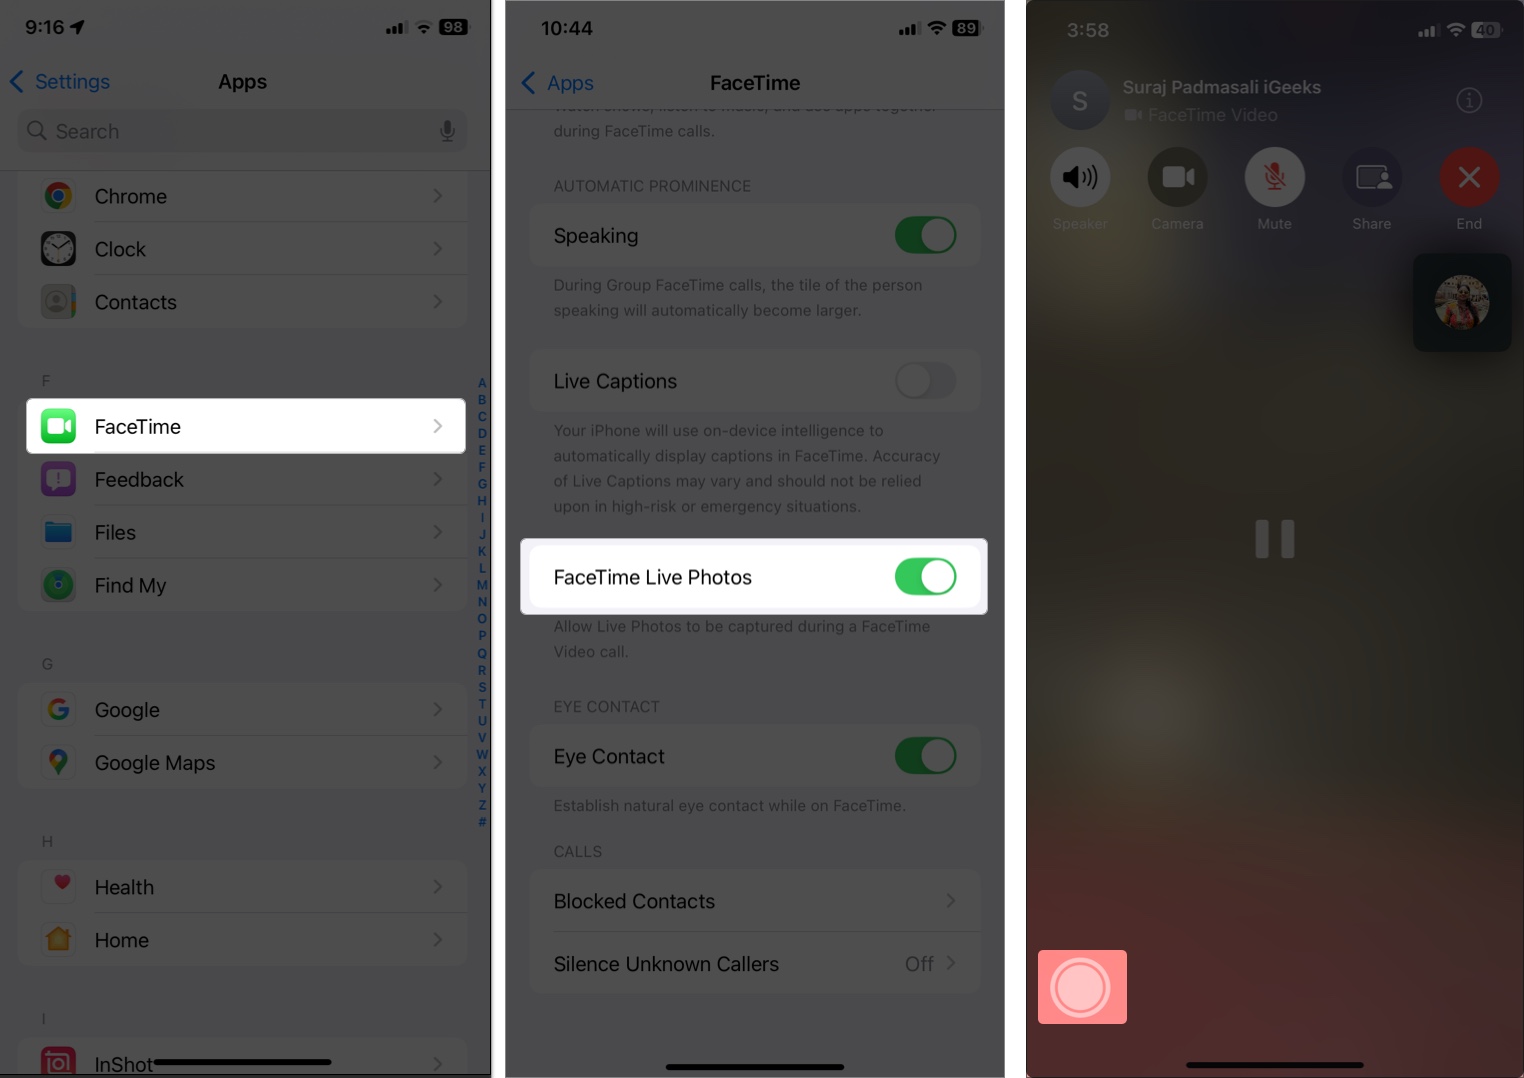
Your friend will now receive a notification about it. The Live Photos get saved to your Photos app.
2. Use FaceTime Filters
FaceTime offers fun visual effects like comic book or sepia tones on iPhone and iPad. It applies in real-time and works on both front and rear cameras.
- During a call, tap the screen, then tap the flower icon.
- Select the Filters icon and choose a filter from the menu.
- To remove the active filter, select the Original option and tap Close.
3. Add Texts, Stickers, and Shapes
Similar to Filters, you can add text labels, shapes, or stickers to your video feed. Perfect for playful calls or presentations.
- Tap the flower icon on your video feed during a call.
- To add a text label: Select the Aa icon. It will show different typefaces. Select one, enter your text, and place it in the desired place.
- For shapes: Tap the scribble icon and swipe up to get all available shapes. Tap any shape and adjust it.
- To add a sticker: Select the Stickers icon, tap a Sticker, and place it the way you like it.
4. Use Memoji during FaceTime call
If you are camera shy or want to have some fun, you can replace your face with an Animoji or custom Memoji character during a FaceTime call on iPhone and iPad. You can create your own Memoji avatar in the Messages app beforehand.
- Tap the flower icon and select the Memoji option.
- Pick any 3D avatar you like.

- Now, the receiver will hear everything you say, with Memoji doing the talking in real-time.
- Select None from the Memoji feature to remove the avatar.
- Tap Close to return to normal video call.
5. Fun with Reactions and Gestures
Sharing good news or wishing someone on FaceTime? You can fill their screen with 3D animated effects like hearts, confetti, or fireworks with FaceTime hand gestures.
- During a call, open Control Center, select FaceTime Controls, and ensure Reactions option is enabled. For Mac, click the video icon in the menu and select Reactions.
- Now, make hand gestures like a thumbs-up (for balloons) or peace sign (for confetti) and hold it for a few seconds to trigger the effect. Ensure your hands are away from your face.
- Disable Reactions in the same way if they’re distracting.
6. Blur Your Background During FaceTime Calls
Blurring your background during video calls helps keep the focus on you and hides any distractions behind you. This feature is known as Portrait Mode in FaceTime.
- Tap/click on your video tile to expand it.
- Select the Portrait Mode (ƒ) icon on your tile.
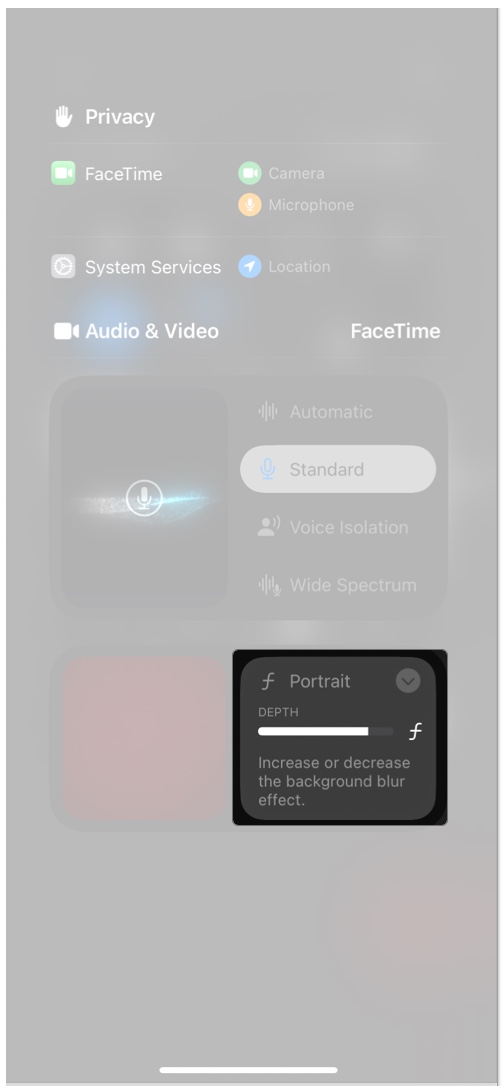
- Your background will instantly blur, keeping you focused.
To disable the blur effect, tap the Portrait Mode icon again.
You can also change the blurriness from Control Center > FaceTime Controls > Portrait and drag the Depth slider. On Mac, click the video icon on the menu bar, click the right arrow next to Portrait, and adjust the slider.
Tip:
On Mac, you can change your background and set a virtual image. Click the video icon on the menu bar, select Background, and choose a solid color or preset image. It also lets you use your own backdrop.
7. Video Effects (iPad & Mac)
FaceTime on iPad and Mac offers a suite of video effects that enhance your video calls, making them more engaging and expressive.
- Center Stage: It uses machine learning to keep you centered in the frame as you move. During a FaceTime call, click the video icon in the menu bar. Select Center Stage to enable or disable the feature. For iPad, go to Control Center > FaceTime Controls > Center Stage.
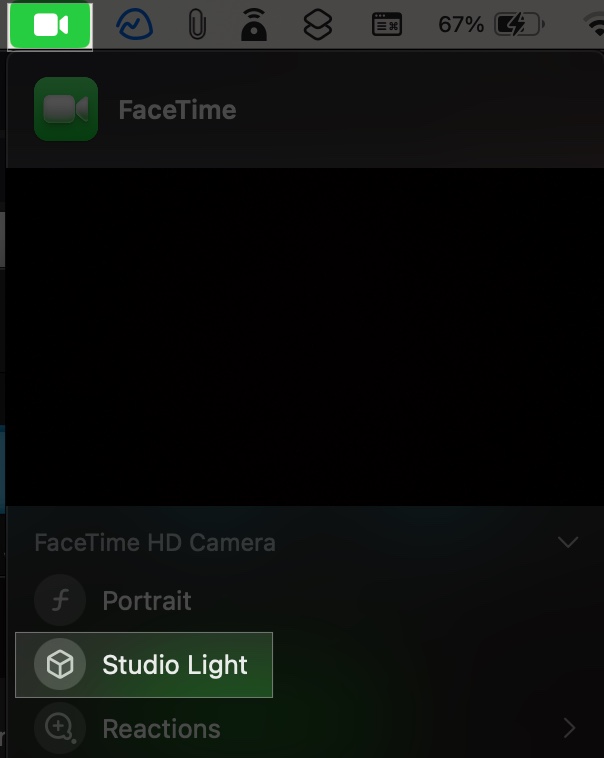
- Studio Light: This feature dims your background and illuminates your face for better visibility. Click the video icon in the menu bar and select Studio Light to toggle the effect. On iPad, go to Control Center > FaceTime Controls > Studio Light.
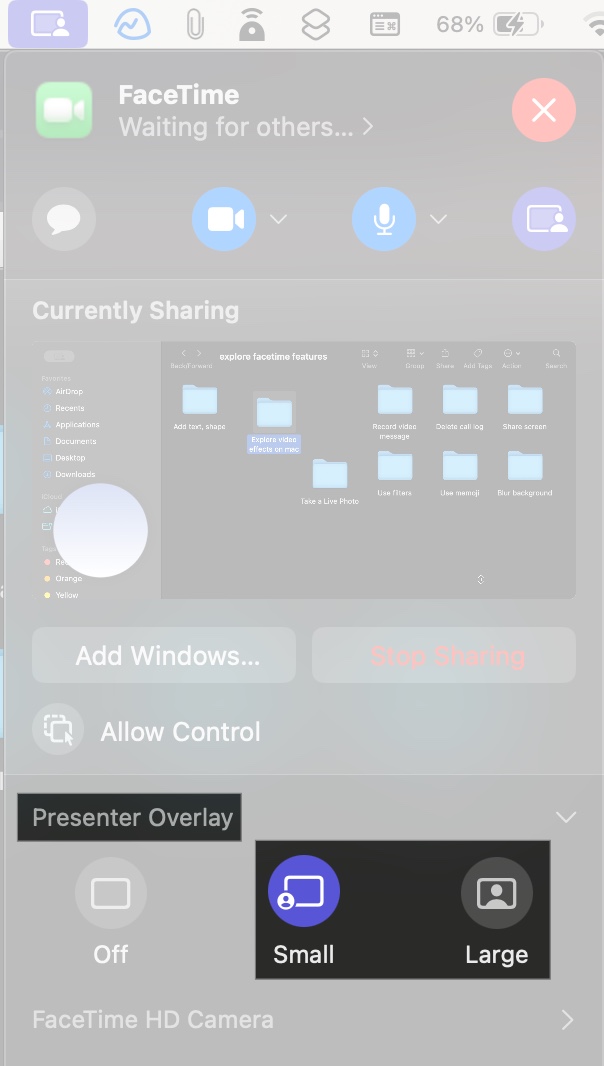
- Presenter Overlay: It allows you to appear alongside your shared content. During a call, click the Share icon and select Share This Window. It will start screen sharing. Click the share icon in the menu bar, select Presenter Overlay, and choose between Small or Large.
8. Share Screen with FaceTime
You can share your screen to show apps, photos, movies, or presentations thanks to the SharePlay integration. Moreover, it lets you play games over FaceTime calls.
- During a call, tap the screen, then tap the Share icon.
- Select Share My Screen. You can choose to share a specific screen on a Mac or iPad.
- If you want to watch content or play a game, select the suitable app under Listen and Play Together (e.g., Apple TV, Disney+).

9. Enable Eye Contact
Generally, when video calling, we’re either looking at the person or ourselves during the call. So, due to this, our eyes appear to be looking downwards.
FaceTime has a feature that ‘maintains eye contact’ during the call. In other words, the other person sees that you are looking at them instead of the screen, making your gaze more natural.
- On iPhone/iPad, enable it in Settings > Apps > FaceTime > Eye Contact.
- On Mac, it’s enabled by default on supported models.
10. Record Video Message
If someone doesn’t answer your call, you can leave a video message:
- When the call goes to voicemail, tap Record Video.
- The countdown will begin. Once recorded, tap the stop icon and hit Send.
- The recipient can view it in the FaceTime app.

11. Delete Call Log
If you frequently use FaceTime, your call history can be a mess. Clear it to save space:
- On iPhone or iPad: Open FaceTime, scroll down the call list and swipe left on a call to delete it.

- On Mac: Right-click a call and select Remove from Recents. To clear all calls, go to FaceTime > Settings > Remove All Recents.
How to Schedule FaceTime Calls
If you have an upcoming video conference planned, you can add a FaceTime call to your calendar:
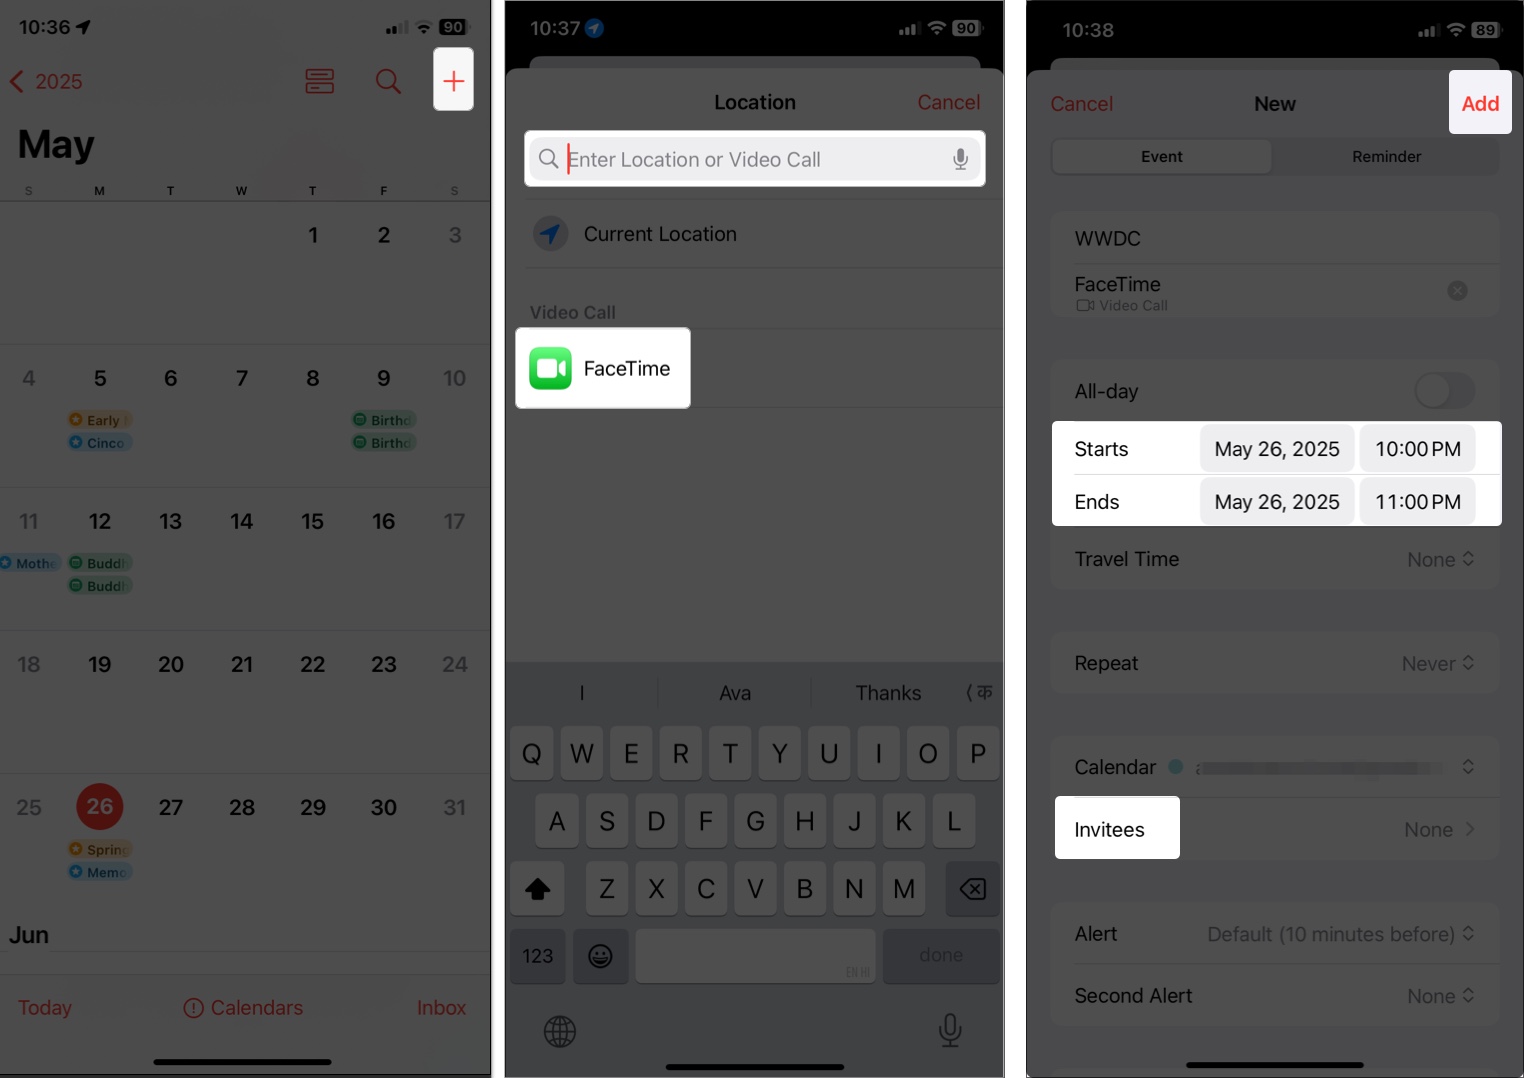
- Open the Calendar app and tap the plus icon to create a new event.
- Enter the event title, tap Location or Video Call, and select FaceTime.
- Specify the Date and Time to initiate the call.
- Tap Invitees and enter the email addresses of the participants.
- Finally, tap Add.
At the scheduled time, click the Join button to start the call.
You can also use third-party apps like Outlook to schedule calls with FaceTime links.
Advanced FaceTime Tips
FaceTime features are super convenient. However, you can take FaceTime to the next level with these features:
1. Remove Background Noise
During a FaceTime call, you can set the microphone to focus only on your voice, focus on others’ voices as well, or just behave normally.
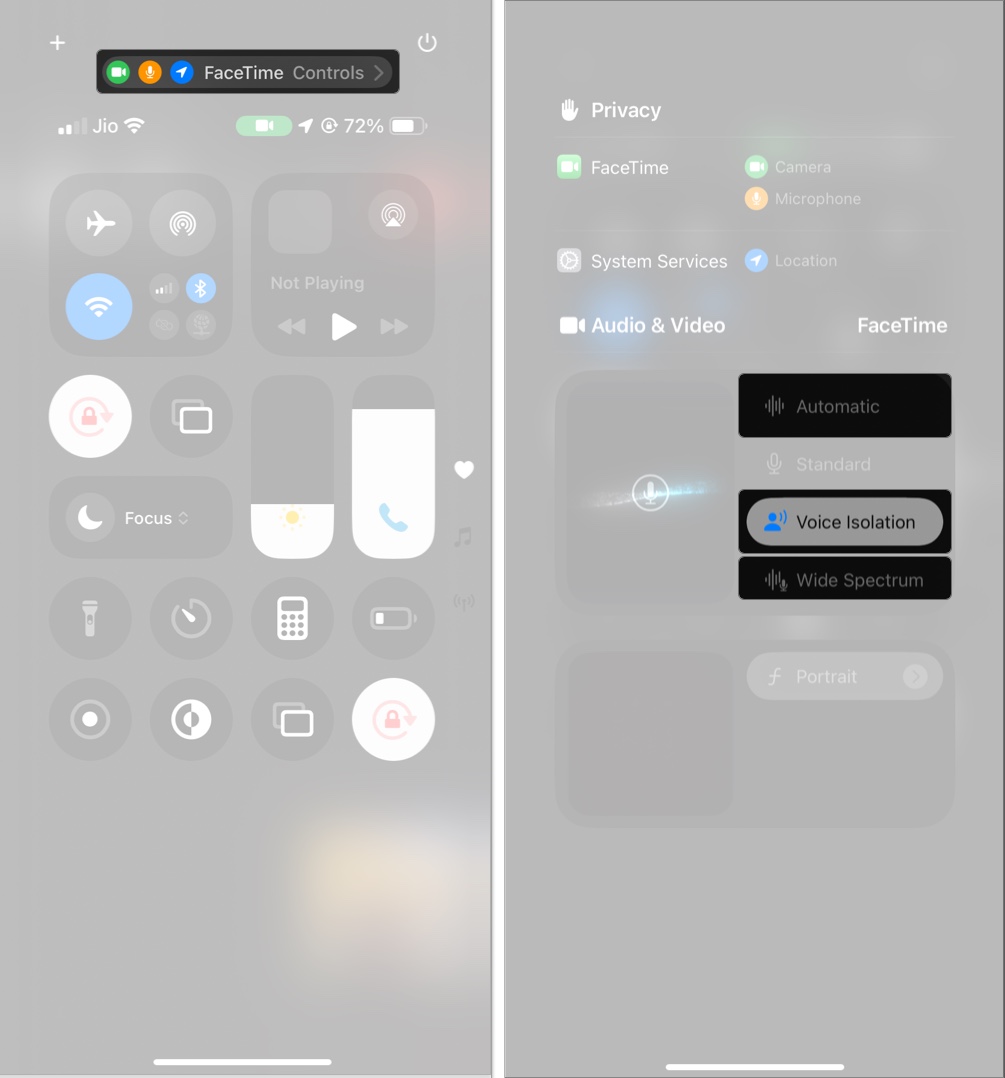
- To isolate your voice during a call, open Control Center, select FaceTime Controls at the top, and tap Voice Isolation. On Mac, click the video icon on the menu bar and select Mic Mode.
- If you want to include sounds around you, select Wide Spectrum. It turns on the far field on your mic.
- You may choose Automatic to let your iPhone decide which mic mode to enable.
2. Handoff Between Devices
Thanks to Apple’s Continuity features, you can easily switch FaceTime calls between devices seamlessly. Ensure your devices are signed in with the same Apple Account, have Bluetooth enabled, and are connected to the same Wi-Fi.
Now, whenever you start a call on your iPhone and bring it near your Mac, you will see a notification to Move Call to This Mac. Click the notification to continue on your Mac.
Otherwise, click the gray video icon on the menu bar and select Switch. This works similarly across Apple devices if requirements are satisfied.
Tip:
If you don’t want to receive calls on your other devices, go to Settings > Cellular > Calls on Other Devices and toggle off Allow Calls on Other Devices.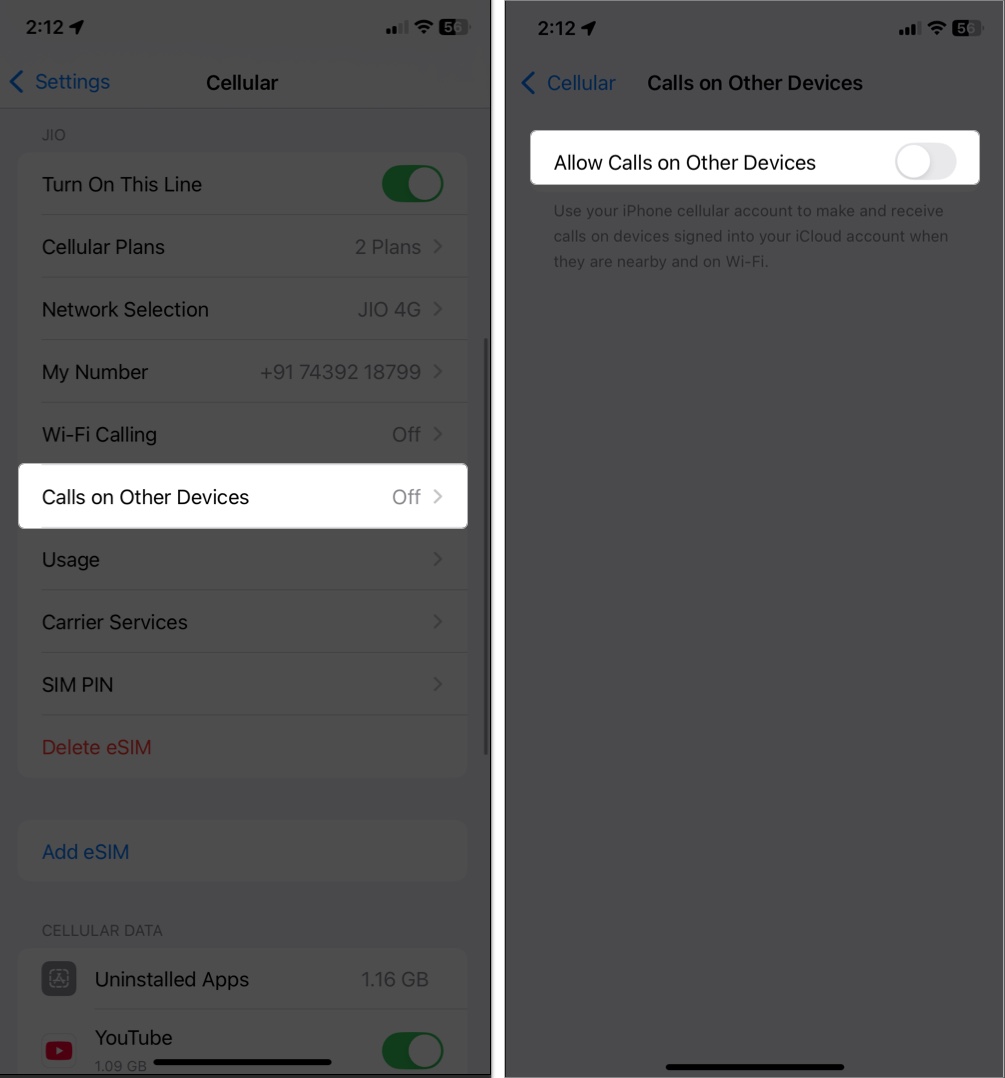
3. Use Live Captions
If you are in a noisy place and can’t hear what others are saying, you can turn on Live Caption. It uses on-device intelligence to show real-time transcriptions on your display.
On your iPhone or iPad, go to Settings > Apps > FaceTime and toggle on Live Captions. For Mac, access FaceTime > Settings and check the Live Captions box. Now, you will see a Live Captions box under the call controls.
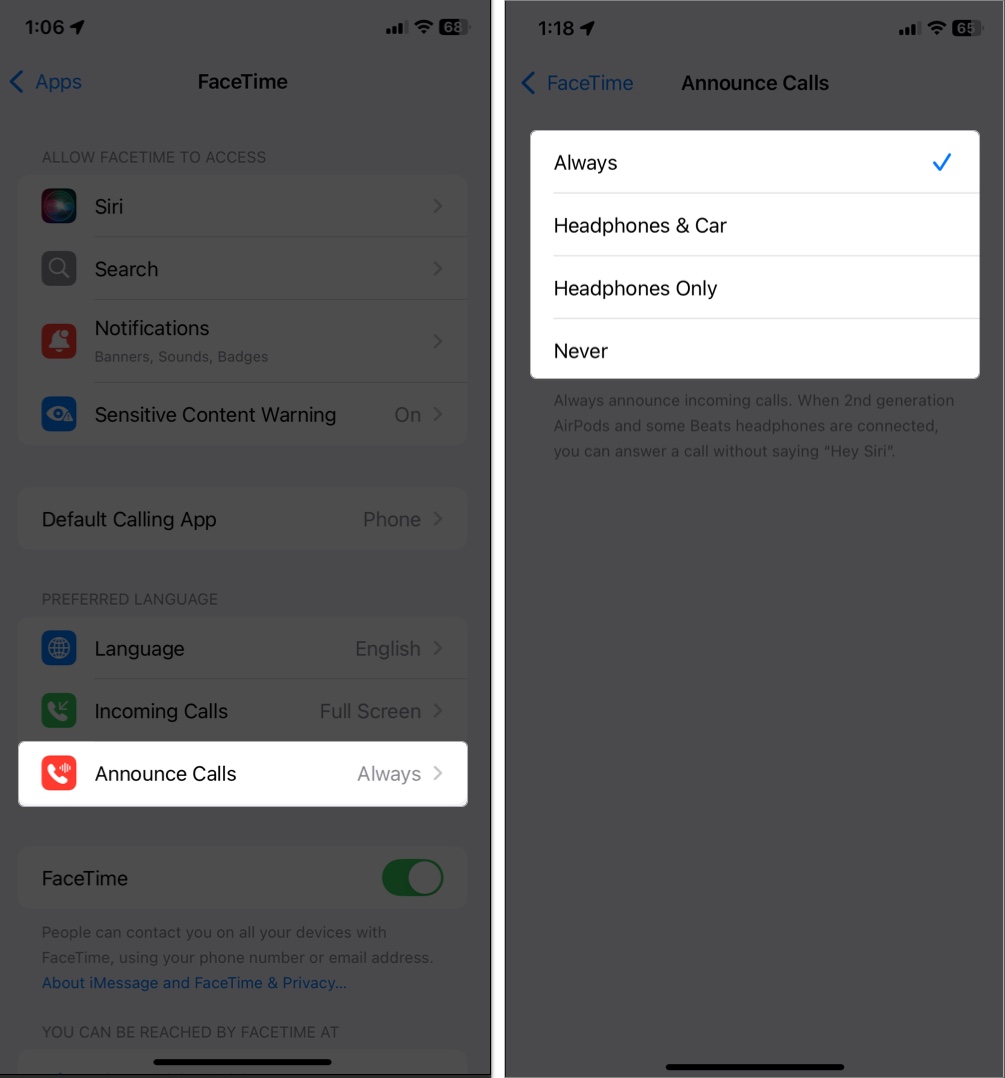
4. Announce FaceTime calls
You can set your iPhone to announce the caller’s name, making it easier to identify who is calling you. From the FaceTime settings, tap on Announce Calls and set it to announce the caller when connected to your car stereo, headphones, or both.
5. Record FaceTime Calls with Audio
Recording FaceTime calls can be useful for preserving memories, conducting interviews, or keeping records of important conversations. By default, you can’t record FaceTime video calls. So, we’ll be using the native Screen Recording feature.
During the call, open Control Center and select the Screen Recording icon to start recording. Then, tap and hold the control again and select Microphone to enable audio recording.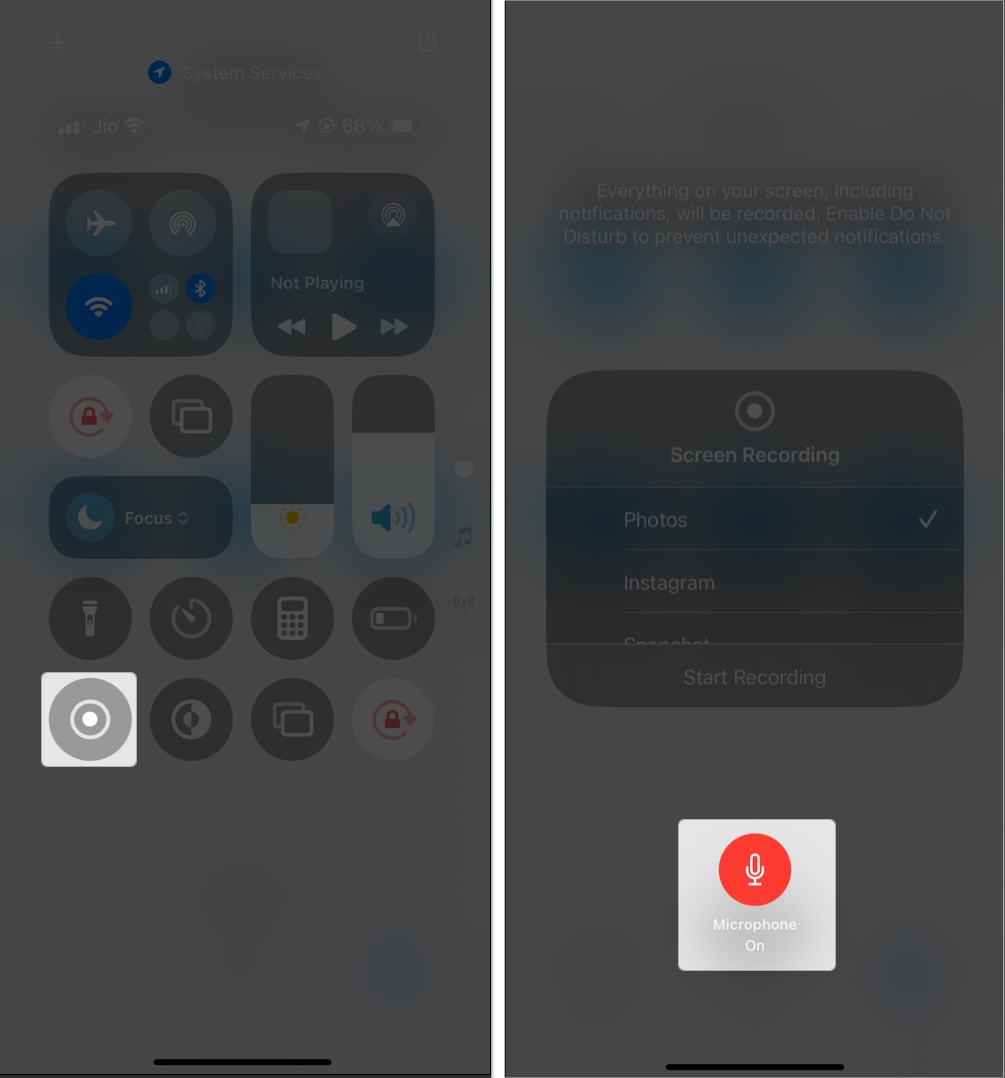
On Mac, press Command + Shift + 5 key together to access the screen recording toolbar. Select the entire screen recording icon, click Options, and select your Mac’s microphone. Finally, click Record.
FaceTime Privacy & Safety Tips
- Enable Sensitive Content Warning to avoid explicit video messages.
- If you want to prevent spam calls, toggle on Silence Unknown Callers. You may also block persistent callers from FaceTime Settings > Blocked.
- Test your camera and mic before important calls.
- Save data on cellular by switching to Wi-Fi-only calls. Go to Settings > Cellular > Show All and toggle off FaceTime.

- Ensure your correct email address is selected under “You Can Be Reached At.”
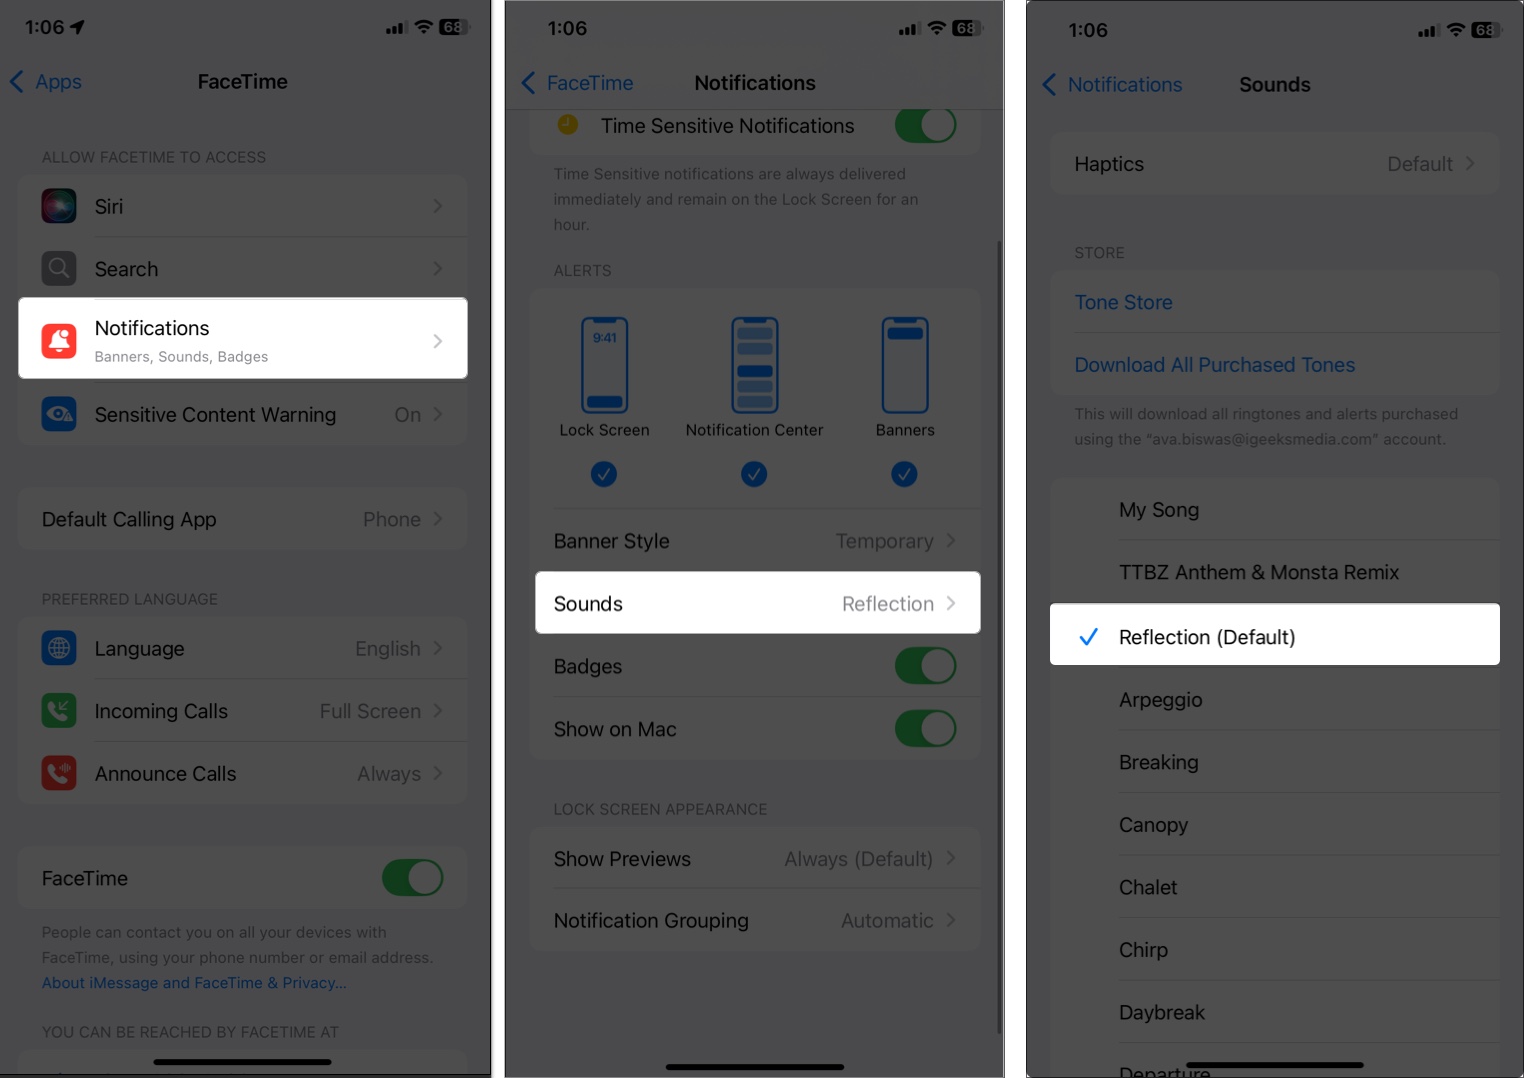
- To identify FaceTime calls, you can set a unique ringtone. From the FaceTime settings, select Notifications > Sounds and choose a tone.
Troubleshooting FaceTime Issues
Although FaceTime appears reliable, it can sometimes fail to work as expected. But worry not; you can easily fix it. Here are solutions to common FaceTime problems on iPhone, iPad, or Mac:
FaceTime Won’t Activate:
- Check your internet connection and ensure you’re signed in with your Apple ID.
- Go to Settings > General > Date & Time and enable Set Automatically.
- Restart your device.
- Although rare, confirm there is no FaceTime outage from Apple’s end on the Apple System support page.
Poor Video or Audio Quality:
- Switch to a stronger Wi-Fi network or move closer to your router.
- Check microphone/camera is working properly.
- Close background apps that might be using bandwidth.
- To solve the FaceTime issue on Mac, ensure the correct camera/mic is selected in the video icon on the menu bar > down arrow next to the camera.
Can’t Join a Call:
- Verify the FaceTime link is valid and not expired.
- For non-Apple users, ensure they’re using Chrome or Edge browsers.
Calls Keep Dropping:
- Update to the latest iOS/iPadOS/macOS version.
- Disable VPN or firewall temporarily to test connectivity.
If problems continue, toggle off FaceTime from Settings, restart your device, and enable it again. As a last resort, visit the Apple Store or call Apple Support.
Stay Connected with FaceTime!
FaceTime is more than just a video calling app—it’s your portal to stay connected, collaborate, and share moments with loved ones. From Live Reactions to screen sharing and scheduled calls, the possibilities are endless. Start exploring FaceTime now and make every call count.
Frequently Asked Questions
Topics

Written by
Ava BiswasAva is a die-hard Apple aficionado and seasoned writer with a knack for breaking down complex tech concepts into easily digestible content. Having honed her writing and editing skills over 4 years at renowned media houses like TechBurner, Ava crafts informative and engaging articles including troubleshooting guides, product reviews, editorials at iGeeksBlog. When not typing, you can find her exploring the latest Apple releases or pondering the future of tech innovation.
View all posts →More from How-to

Snapchat Parental Controls: How to Set Up Family Center and Keep Your Teen Safe
Snapchat’s Family Center lets parents monitor their teen’s friend activity and screen time without reading private messages. Here’s how to set it up and what to expect.

How to Block and Unblock Someone on Instagram
Instagram lets you block or unblock someone in seconds. Follow these simple steps to take full control of your privacy and online peace.

Apple Watch Not Responding? 8 Fixes That Actually Work
Is your Apple Watch unresponsive or stuck on a black screen? Here are 8 proven fixes to help you unfreeze it and get it working again quickly.