How to Use AirDrop on iPhone and iPad to Send Photos and Files
Want to quickly share photos and files with nearby Apple devices? Learn how to use AirDrop on your iPhone or iPad.
Do you need to quickly share photos, documents, or other files with different Apple devices near you? If yes, then AirDrop is all you need. Using it, you can easily transfer items among your devices or even send them to others without any problem.
Whether you’re a proficient user or a novice on Apple devices, the following guide will walk you through everything you need to know to use AirDrop on your iPhone. So, let’s get started!
How Does AirDrop Work?
AirDrop allows you to transfer files wirelessly between Apple devices. It uses a combination of Bluetooth and Wi-Fi to set up a secure peer-to-peer network for you to transfer files over.
The way it does this is that when you initiate an AirDrop transfer, your device emits a Bluetooth signal to detect other Apple devices (with AirDrop enabled) nearby. If a device is detected and you select it for file transfer, it creates a peer-to-peer Wi-Fi connection between the two devices. This connection is secured with TLS encryption to ensure the secure, private transfer of files. Once the receiver device accepts your AirDrop request, the file transfer begins.
Starting with iOS 17.1, you no longer have to be within the Wi-Fi range of someone to receive files over AirDrop. You can walk outside the range, and AirDrop will automatically switch to your device’s cellular network to complete the transfer. Follow these steps to turn on AirDrop on your iPhone or iPad.
How to Enable AirDrop on iPhone or iPad
- Open the Control Center by swiping down from the top-right corner of your screen.
- Long-press the network settings card (the box with the Airplane Mode, Wi-Fi, and Bluetooth icons). On iOS 18, tap the Connectivity tab from the sidebar.
- Tap AirDrop.
- Set your AirDrop receiving settings:
- Receiving Off: You won’t receive AirDrop requests.
- Contacts Only: Only your contacts can see your device.
- Everyone for 10 minutes: All nearby Apple devices using AirDrop can see your device. After 10 minutes, it will be automatically set to Contacts Only.
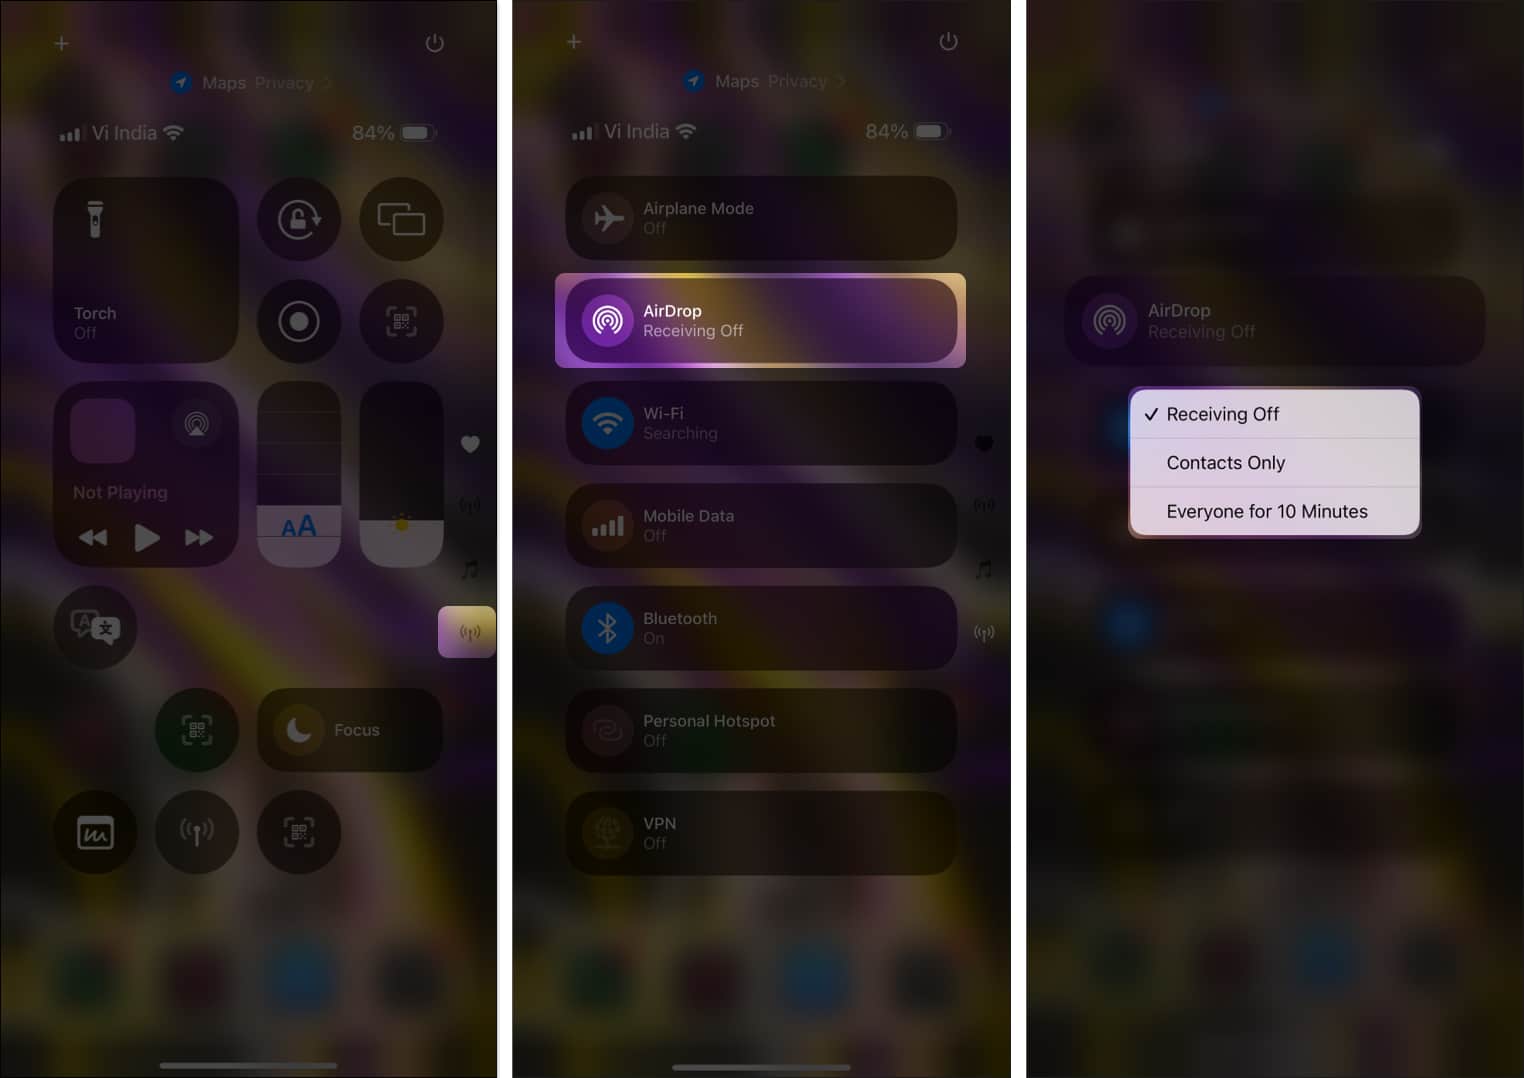
I suggest keeping the receiving settings to Receiving Off or Contacts Only. So, when you’re in the subway, bus, or public, you don’t get requests to accept unsolicited pictures, videos, and files from strangers.
How to AirDrop on iPhone and iPad to Send and Accept Photos and Files
With AirDrop turned on, let’s see how to use it to send and accept files. You must know that you’re not limited to photos and videos. Pretty much everything visible on a Share Sheet can be shared via AirDrop. This means you can AirDrop a website link, note, Apple Maps location, passwords, and more.
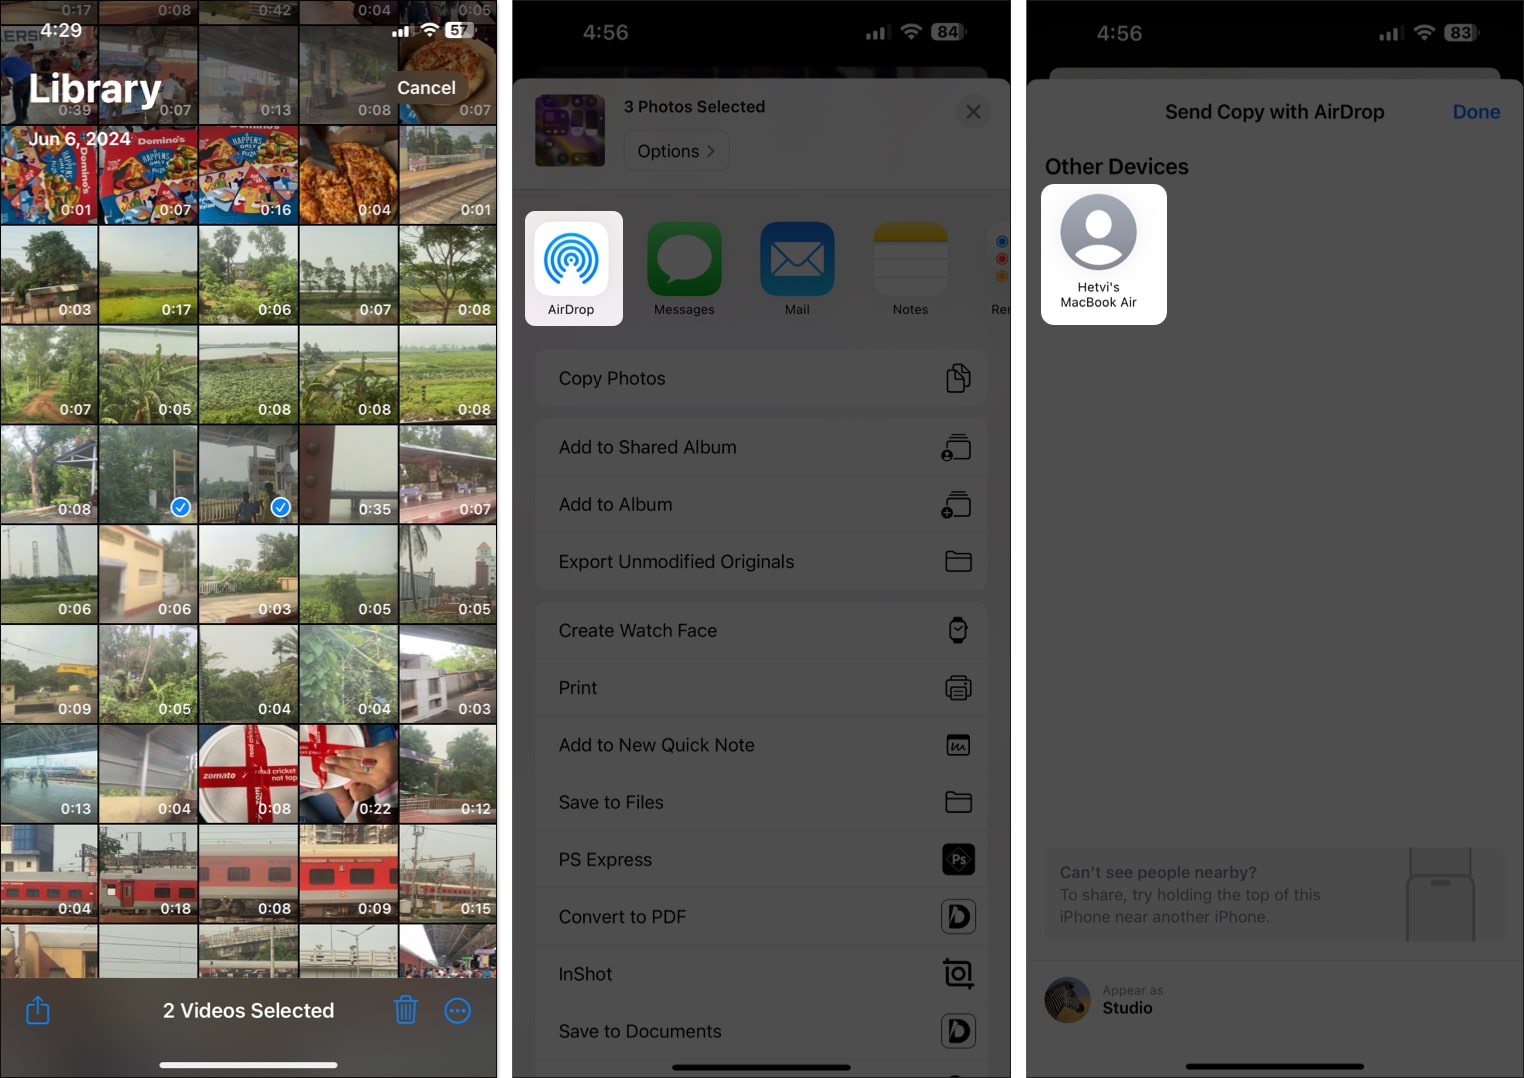
- Open the app that has the file you want to share.
- Select one or multiple items you want to share.
- Tap the Share button (a blue up arrow icon).
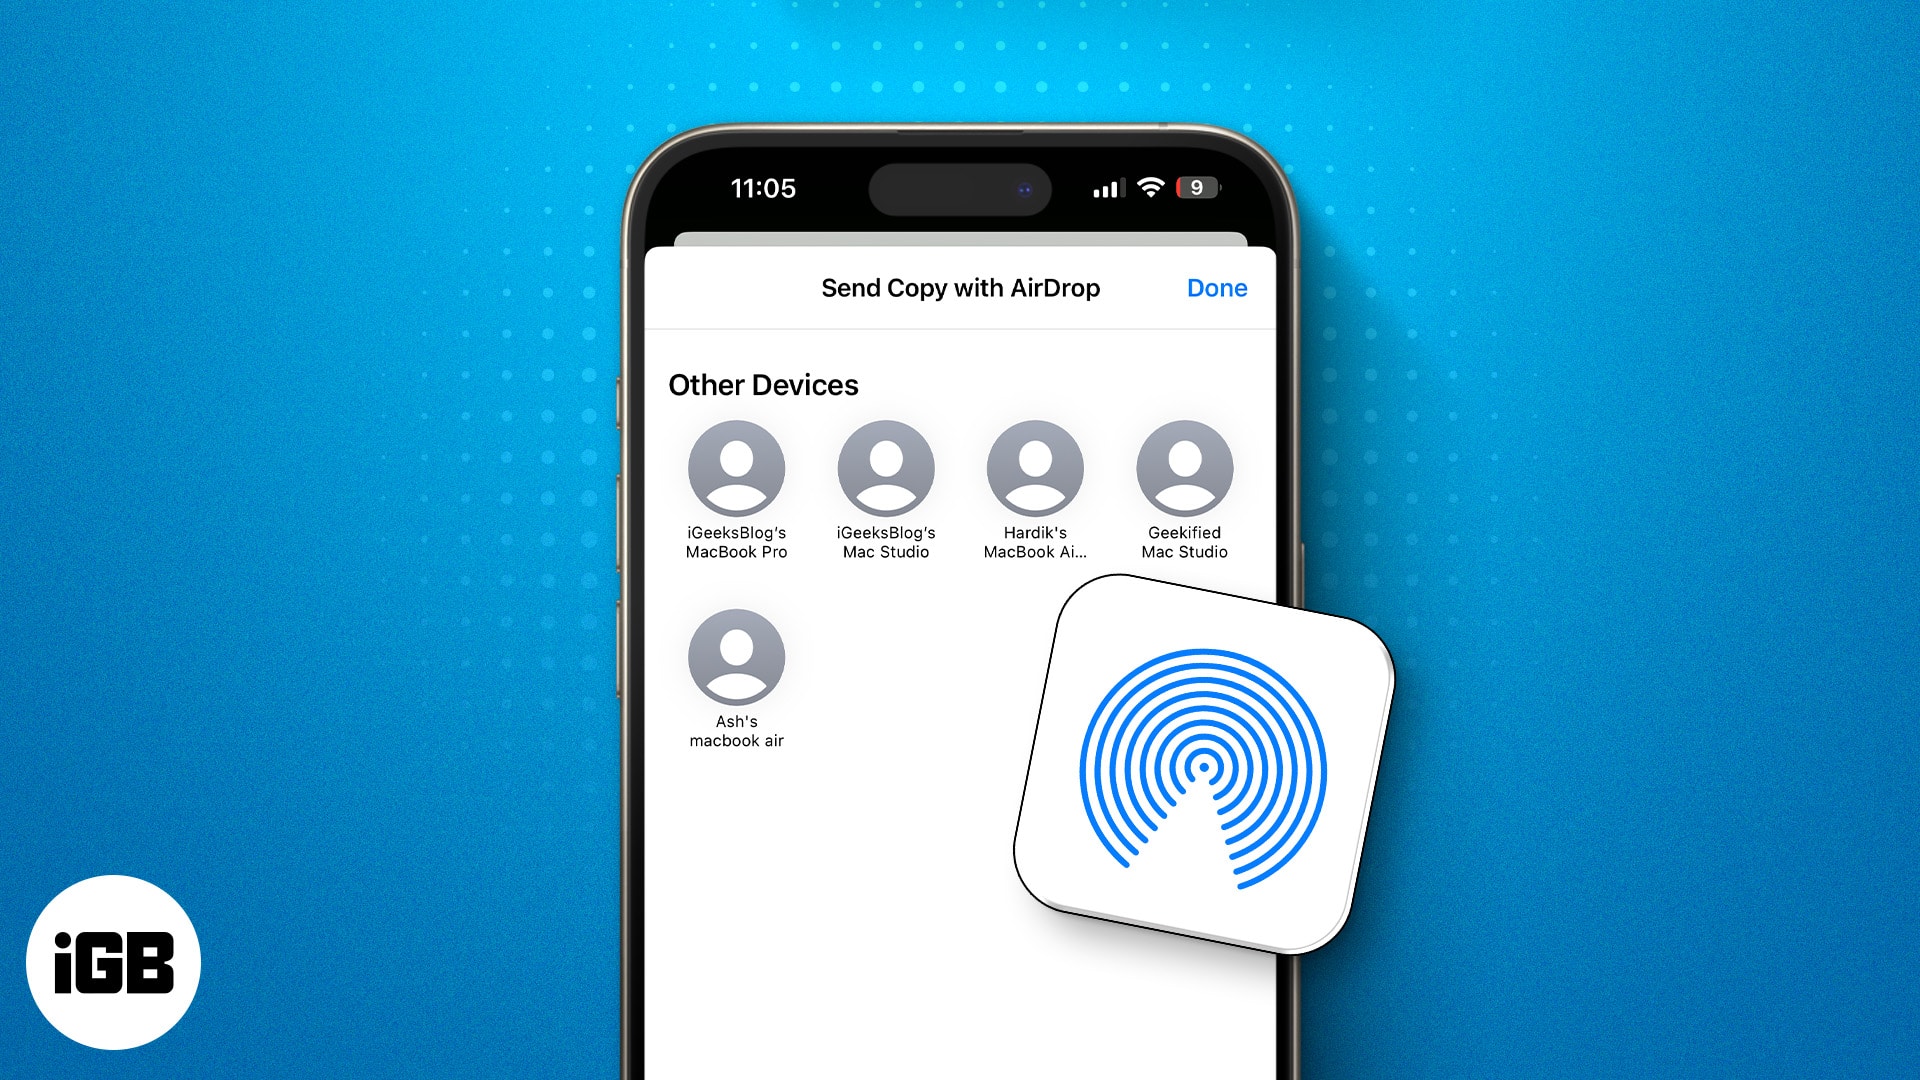
- Select AirDrop. You’ll see the device you often AirDrop at the top of the Share Sheet.
- Choose the device you want to share the file(s) with from the AirDrop list.
As soon as you do this, the recipient will get an alert on their iPhone, prompting them to accept the transfer. AirDrop transfer begins as soon as they accept the request.
Share an Item With an Airdrop Code
With iOS 26.2 or later, Apple has made AirDrop more secure. If the person you’re sending something to isn’t in your contact list, AirDrop will ask you to use an AirDrop Code to finish the transfer. This means AirDrop Code is the only option available for non-contacts.
This small extra step prevents random people nearby from spamming you with unwanted AirDrop requests, especially in public places.
To Share using an AirDrop Code (iPhone or iPad):
- Open the app where the item is saved (Photos, Files, Notes, Safari, etc.).
- Tap the Share button.
- Select AirDrop.
- If the other person is not in your contacts, tap Share with AirDrop Code.
- The receiver must tap Continue to view the AirDrop Code on their device.
- The receiver shares this code with you.
- Enter the code on your iPhone and send the item.
Once the code is verified, you’ll be able to share it with that person for up to 30 days without using another code.
Note:
How to Accept AirDrop on iPhone and iPad
When someone sends something to you via AirDrop, you’ll see a pop-up with a preview of the content. From here, you can accept or decline the transfer.
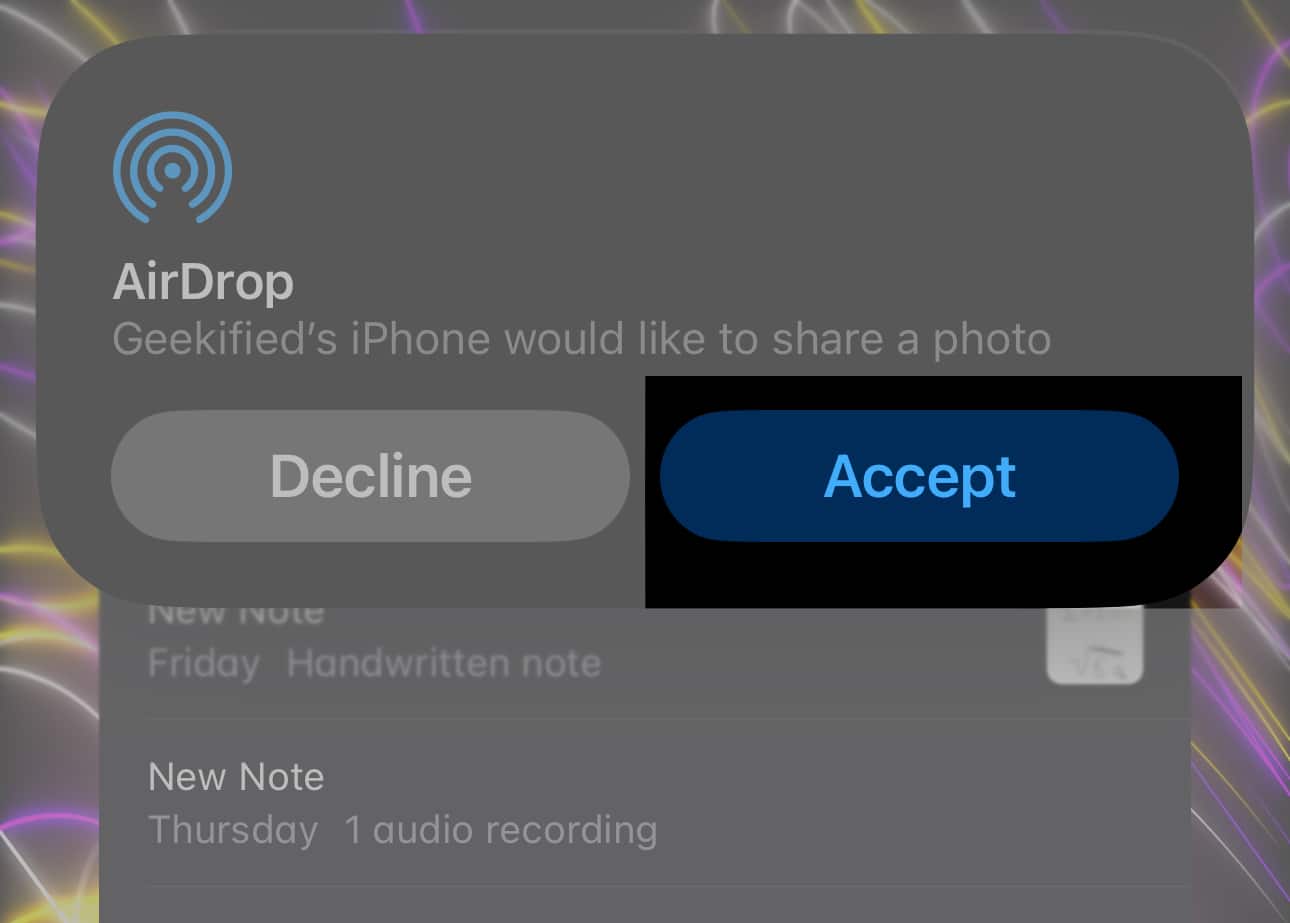
Accept AirDrop on iPhone
Tap Accept to receive the content, and it’ll open in the appropriate app. For example, photos and videos will open in the Photos app, and app links will open in the App Store, where you can download or purchase the app.
However, for some file types, such as PDFs, you may see multiple options for saving them. After the AirDrop transfer completes, a pop-up will appear asking where to open or save the file, such as in Books, Files, or another supported app. Tap the app name as desired.
Important (iOS 26.2 and Later)
Starting iOS 26.2, if the sender is not in your Contacts, you won’t receive a standard AirDrop request that you can directly accept. Instead, AirDrop will display an AirDrop Code prompt, and you must verify it to complete the transfer. This makes AirDrop more secure, especially in public spaces.
AirDropping to Your Own Devices
You won’t see the Accept or Decline option when you AirDrop something to yourself, such as sending a photo from your iPhone to your Mac. The file will transfer automatically, as long as both devices are signed in with the same Apple ID.
What Happens If You Tap Decline?
If you tap Decline, the AirDrop transfer is cancelled, and you won’t receive the file.
How to Change AirDrop Settings on iPhone
Just like other system features, you can customize AirDrop on your iPhone. Let’s jump in!
I’ve already shared how to change AirDrop receiving settings from the Control Center. You can also configure AirDrop from the system settings. Open Settings and go to General → AirDrop.
Toggle on Use Cellular Data to continue file transfer even if Wi-Fi is unavailable during AirDrop. This allows you to move your device away from the proximity range and complete the transfer over the internet.
Note:
-
You will be charged for cellular data used for file transfer. If you want to avoid exhausting your cellular data or roaming fees when traveling, toggle it off.
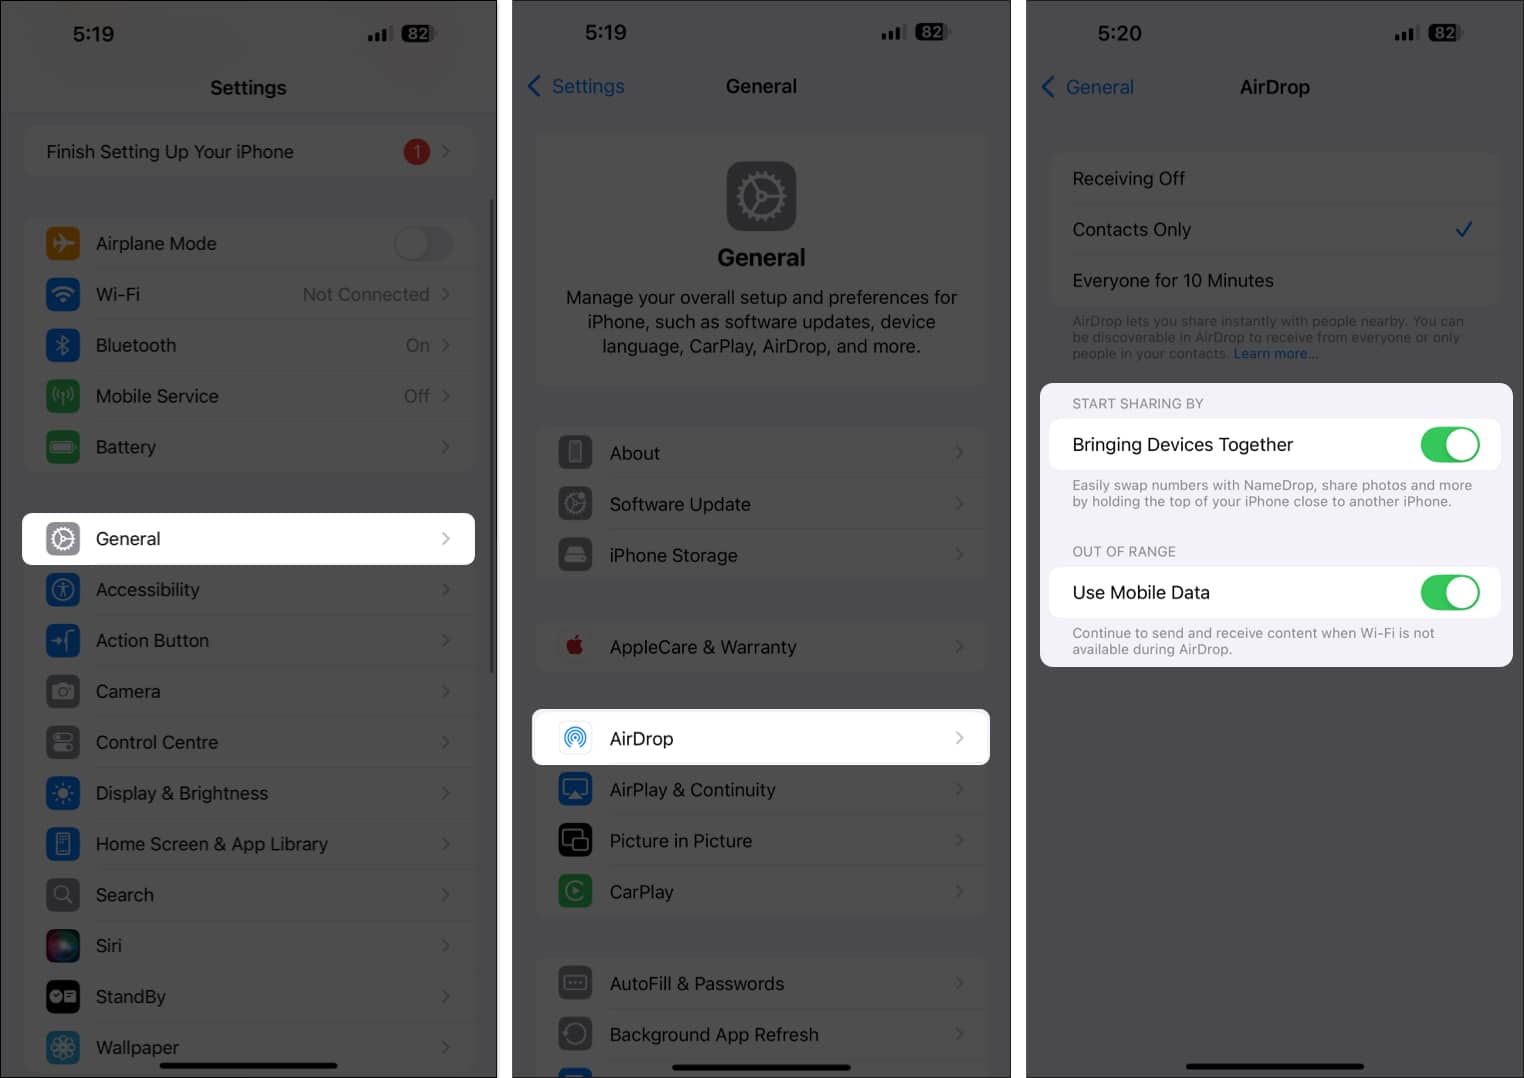
The Bringing Devices Together feature lets you share stuff with the contacts near you. Simply turn on AirDrop, open the media or file, and then bring the top of both iPhones together. This feature also enables the NameDrop feature that lets you share contacts similarly.
Moreover, you can change your AirDrop name to locate your device quickly while receiving files.
Is AirDrop Not Working? Try These Fixes
So far, AirDrop seems pretty amazing. But what if you can’t send or receive files on AirDrop? Here are a few things you can try to troubleshoot the issue:
- Ensure that AirDrop is enabled to receive files.
- Try turning Wi-Fi and Bluetooth off and back on.
- Perform a quick reboot of your iPhone.
- Make sure AirDrop isn’t restricted under Screen Time settings.
For more troubleshooting tips, check out our guide on AirDrop not working!
Signing Off…
AirDrop is a powerful tool that makes sharing between Apple devices quick and easy. By following the steps in this guide, you can ensure a smooth and secure experience. Give it a try next time you need to share something!
Frequently Asked Questions
Topics

Written by
Ankur ThakurI have been an Apple user for over seven years now. At iGeeksBlog, I love creating how-tos and troubleshooting guides that help people do more with their iPhone, iPad, Mac, AirPods, and Apple Watch. In my free time, I like to watch stand up comedy videos, tech documentaries, news debates, and political speeches.
View all posts →More from How-to
How to Turn Off Location on Snapchat (Step-by-Step Guide)
Want to stop sharing your location on Snapchat? This guide explains how Snapchat location sharing works and shows simple ways to turn off your location using Ghost Mode or phone settings. Stay in control of your privacy in just a few steps.

Snapchat Parental Controls: How to Set Up Family Center and Keep Your Teen Safe
Snapchat’s Family Center lets parents monitor their teen’s friend activity and screen time without reading private messages. Here’s how to set it up and what to expect.

How to Block and Unblock Someone on Instagram
Instagram lets you block or unblock someone in seconds. Follow these simple steps to take full control of your privacy and online peace.