
- Make sure both devices are unlocked and active—AirDrop won’t work if the screen is off or locked during the transfer attempt.
- Set AirDrop visibility to ‘Everyone for 10 Minutes’ or ‘Contacts Only’ to ensure your device is discoverable by the sender.
- Toggle Bluetooth and Wi-Fi on both devices to reset the AirDrop connection—both are required for transfers to work.
- Disable Personal Hotspot and check Mac firewall settings—Hotspot interferes with AirDrop, and firewalls can block incoming file transfers.
- Reset network settings if AirDrop still fails—this clears any persistent bugs but will erase saved Wi-Fi networks and VPN setups.
AirDrop lets you seamlessly share files, photos, contacts, and more in the original quality between Apple devices. However, like any other tech, it can also encounter minor hiccups that impact its performance.
If AirDrop isn’t working on your iPhone, iPad, or Mac, be it due to wrong AirDrop settings or compatibility issues, we’ve got you covered. Below are some effective solutions to troubleshoot AirDrop issues on your device.
Table of Contents
- 1. Ensure your device is powered on and unlocked
- 2. Adjust the AirDrop settings
- 3. Toggle Bluetooth and Wi-Fi
- 4. Turn off Personal Hotspot
- 5. Adjust your Mac's Firewall
- 6. Check AirDrop Restrictions
- 7. Restart your iPhone, iPad, or Mac
- 8. Turn off the VPN
- 9. Bring the two devices closer
- 10. Reset Network Settings
1. Ensure your device is powered on and unlocked
Discoverability is important for AirDrop to function properly. If your device is dead or locked, it may not be visible in the list of devices available for receiving AirDrop on other devices. As a result, neither the other person will be able to send files nor will you be able to receive them.
So, if you’re having trouble receiving AirDrop transfers, ensure your iPhone or Mac is powered on and unlocked. Similarly, ask the other person to ensure the same if you can’t discover their device on your AirDrop’s share list.
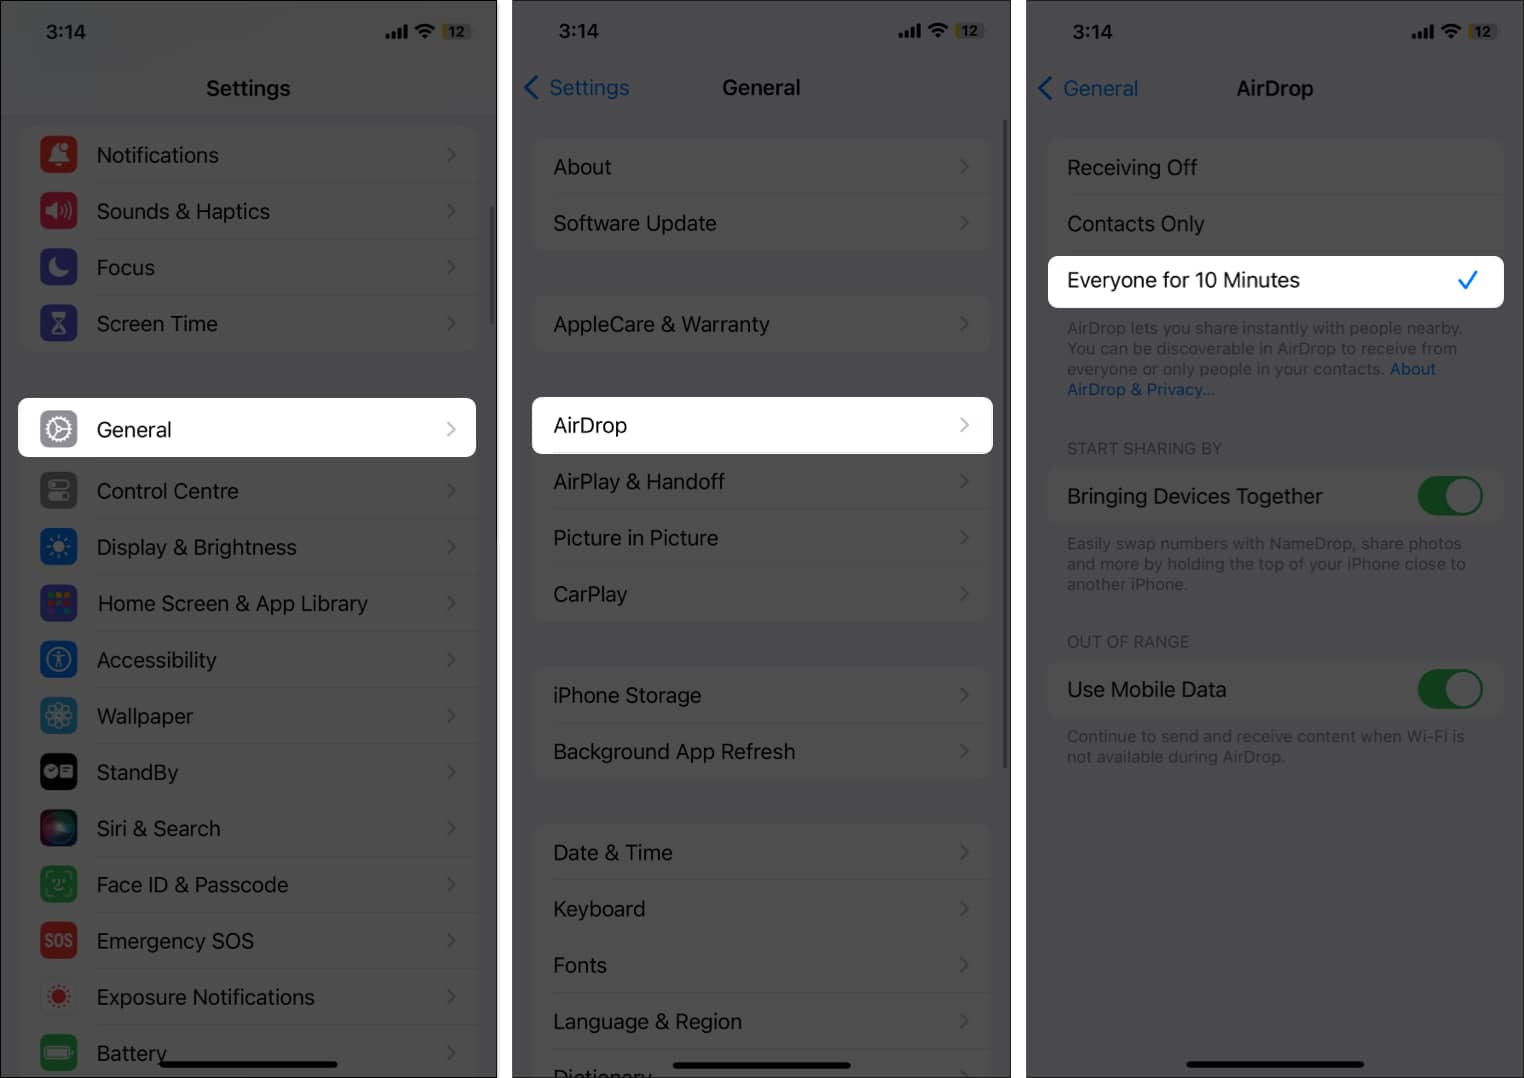
2. Adjust the AirDrop settings
If your iPhone or Mac is powered on and unlocked but still can’t receive files from unsaved contacts, you should check your AirDrop settings. There are a total of three levels of controls to limit the visibility of your device for AirDrop transfers:
- Receiving Off: Your iPhone or Mac won’t be discoverable. Hence, no one can send you anything via AirDrop.
- Contacts Only: Only your saved contacts can view your device and share files.
- Everyone for 10 Minutes: All nearby Apple devices can view and share files with you, whether it’s a saved contact or not.
Now that you know how each one of the three settings affects AirDrop transfers, here’s how you can adjust them on your iPhone or Mac.
On iPhone
- Open Settings and go to General → AirDrop.
- Here, select Everyone for 10 Minutes to receive from every nearby Apple device or Contacts Only to receive files from saved contacts.
- Alternatively, pull down the Control Center, press on the networks block in the top-left corner, long-press the AirDrop button, and select an appropriate option.
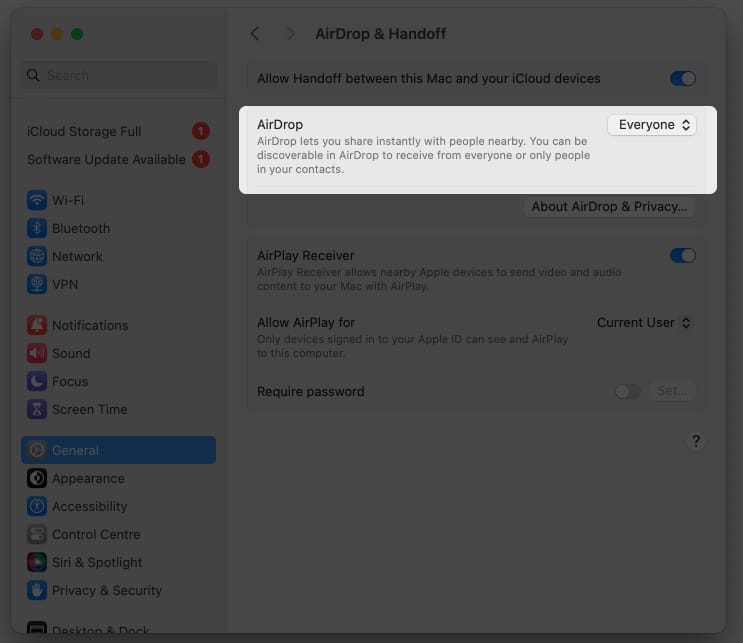
On Mac
- Open System Settings and go to General → AirDrop & Handoff.
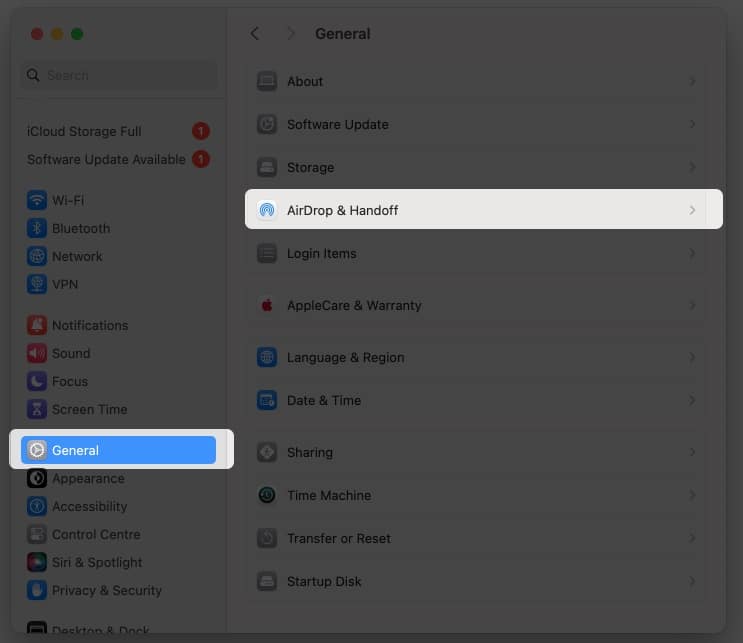
- Click the up-down arrow keys next to AirDrop and select the appropriate option.
- Alternatively, click the Control Center button in the menu bar, click on AirDrop, and toggle on the button. Then, select a discoverability option based on your preference.

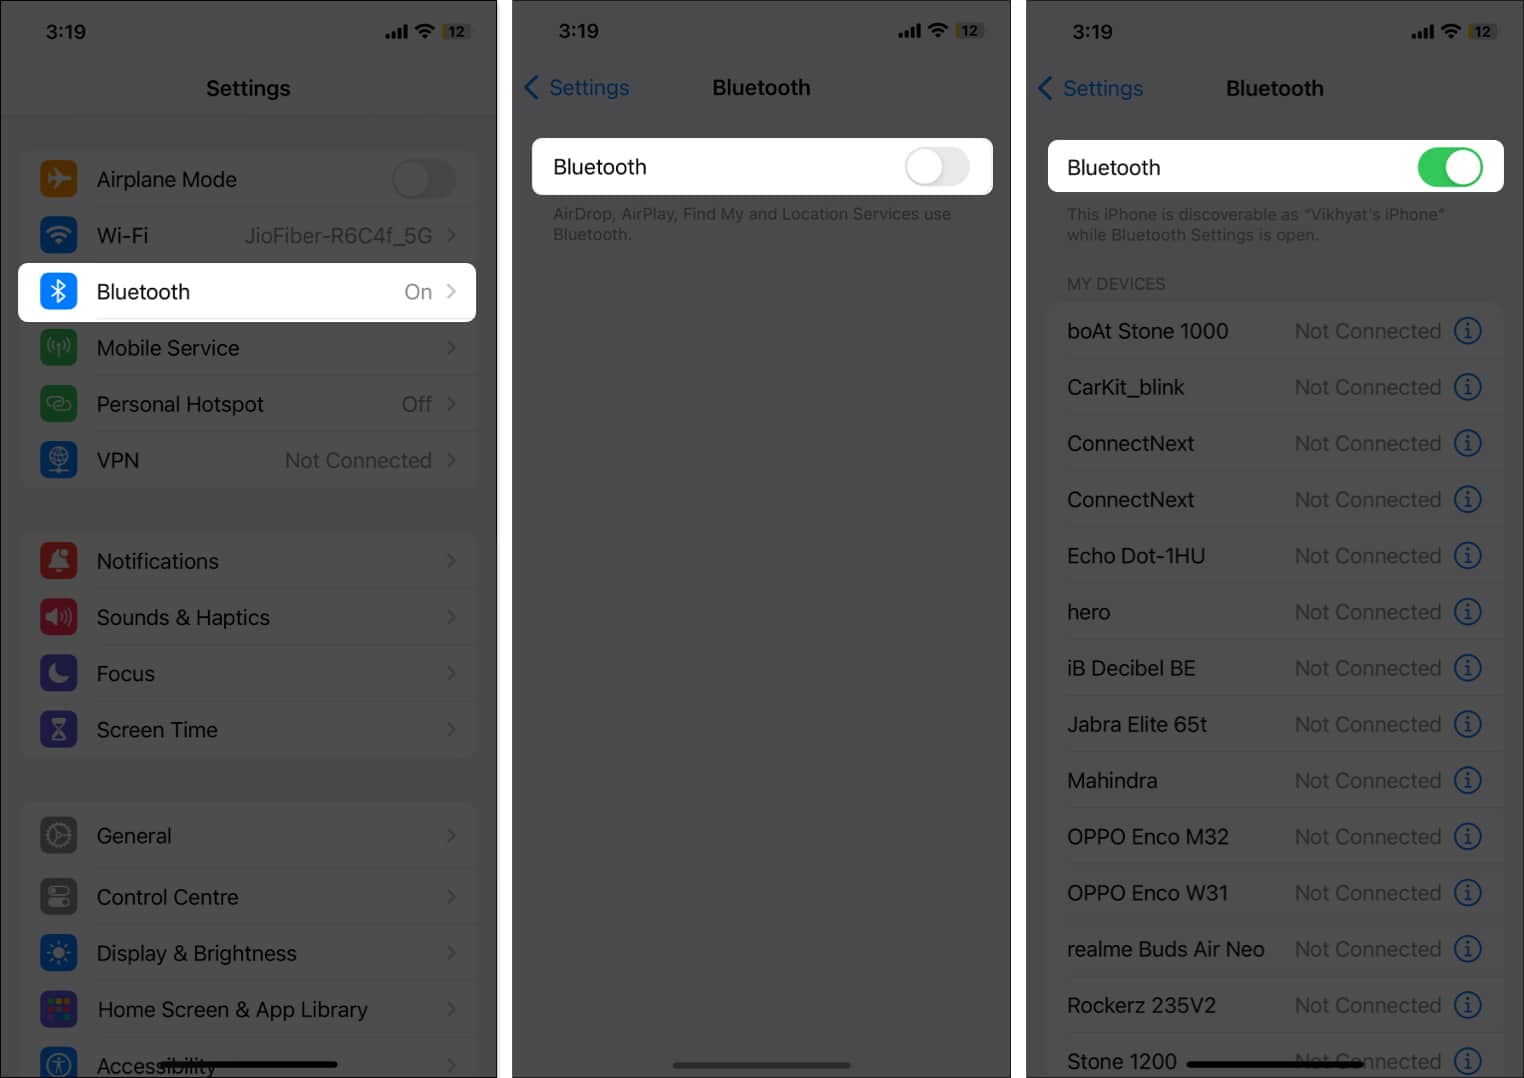
3. Toggle Bluetooth and Wi-Fi
AirDrop relies on Wi-Fi and Bluetooth networks to share files between Apple devices. Yes, Apple did introduce the AirDrop transfer over cellular data ability with iOS 17, but Wi-Fi is still needed to initiate the transfer process. So, if AirDrop isn’t working on your iPhone or Mac, I suggest you go into the Wi-Fi and Bluetooth settings and try toggling them off and on.
On iPhone
- Open Settings, go to Wi-Fi, and toggle off the Wi-Fi switch.
- Wait a few seconds, then turn the Wi-Fi back on.
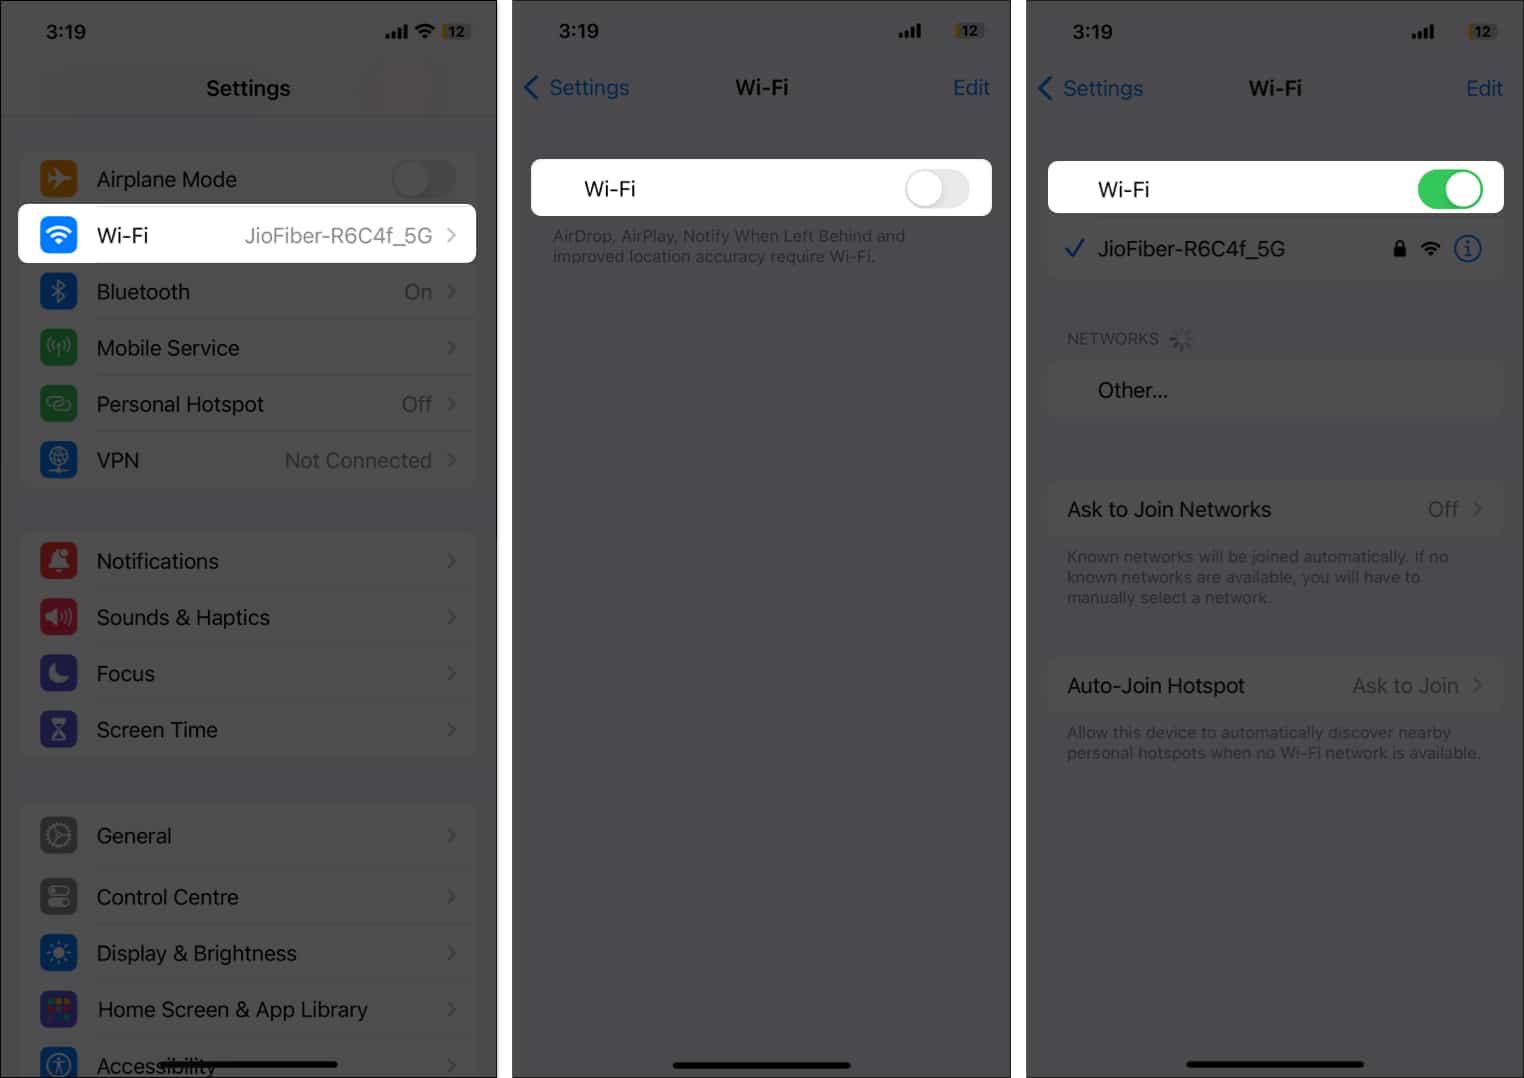
- Similarly, head to Bluetooth and toggle it off.
- Wait a few seconds, then turn Bluetooth on.


On Mac
- Open Settings, head to Wi-Fi, and toggle off Wi-Fi if it’s on.
- Wait a few seconds, then turn on the Wi-Fi again.
- Likewise, go to Bluetooth and toggle off the switch for Bluetooth.
- Wait a few seconds, then turn Bluetooth back on.
4. Turn off Personal Hotspot
When you enable the Personal Hotspot on your iPhone, Wi-Fi automatically shuts off, and the iPhone shares your mobile internet connection with another device. If you try to use AirDrop during this time, it may not work. Turn off Personal Hotspot first, and then try sending or receiving AirDrop again.
- Open Settings.
- Go to Personal Hotspot and toggle off Allow Others to Join.
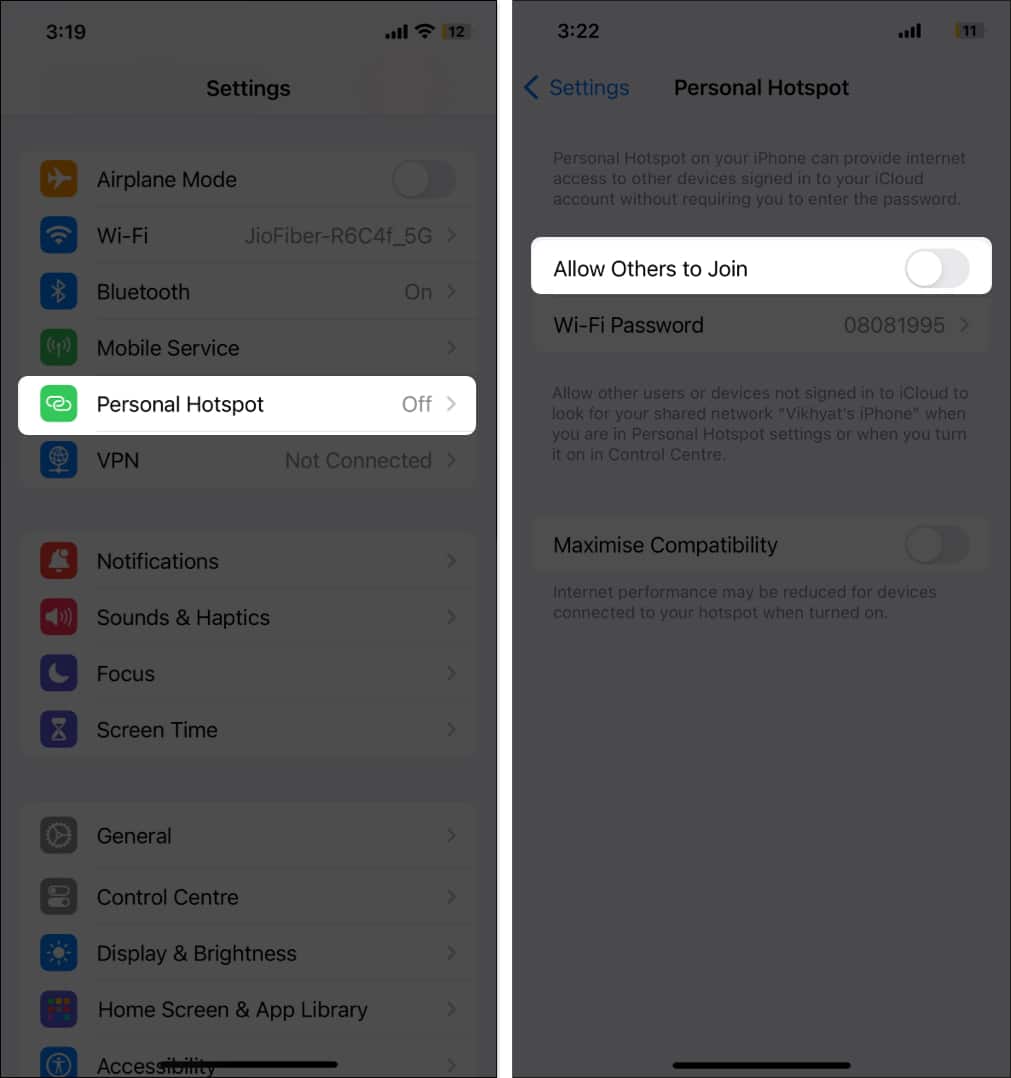
- Alternatively, head to the networks settings block in the Control Center and tap the Personal Hotspot button to turn it off.

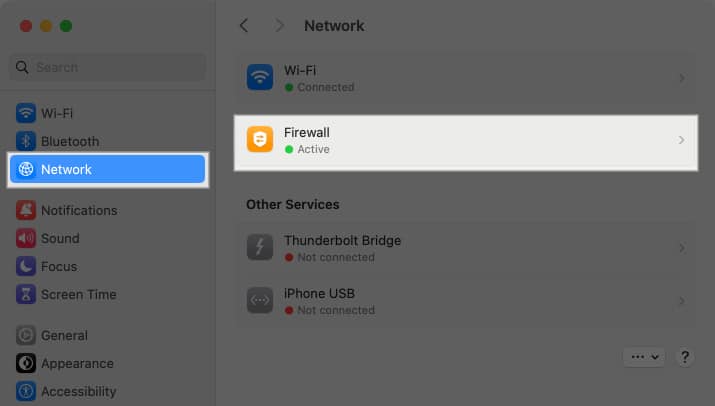
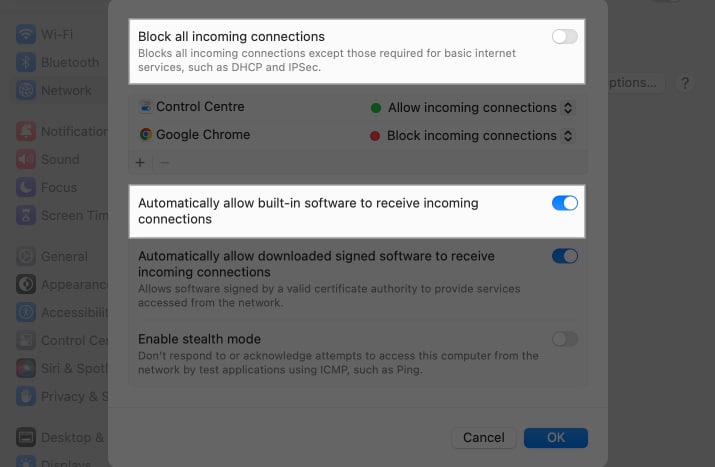
5. Adjust your Mac’s Firewall
The Firewall on your Mac is designed to monitor and control all outgoing and incoming network traffic. Simply put, the Firewall prevents unauthorized applications, programs, and services from accepting incoming connections. However, a too restrictive Firewall can mingle with the settings the AirDrop transfer relies on—Bluetooth and Wi-Fi—and prevent your Mac from being discoverable and receiving AirDrop requests.
So, to fix this AirDrop issue on your Mac, adjust the Firewall capabilities accordingly.
- Open Settings → Networks → Firewall.
- Click on the Options button.
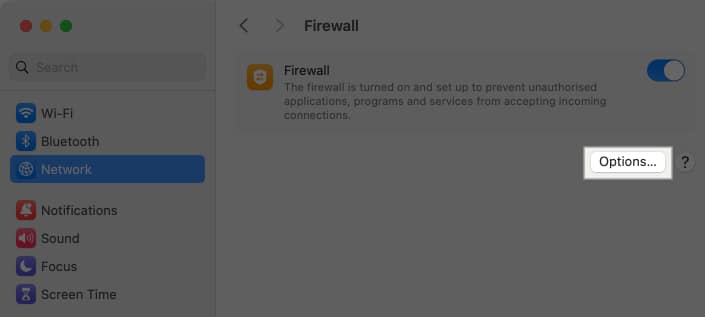
- Here, ensure that Block All Incoming Connections is toggled off.
- Next, toggle on Automatically allow built-in software to receive incoming connections if not already.


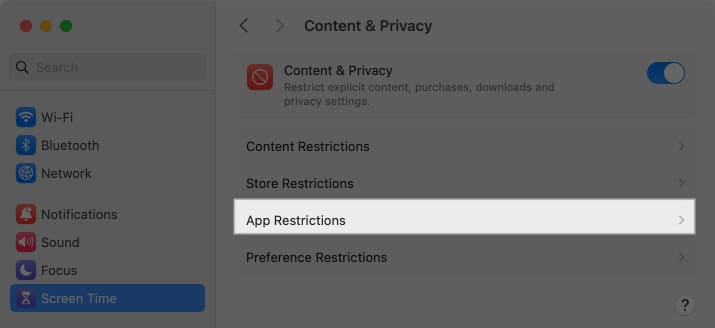
6. Check AirDrop Restrictions
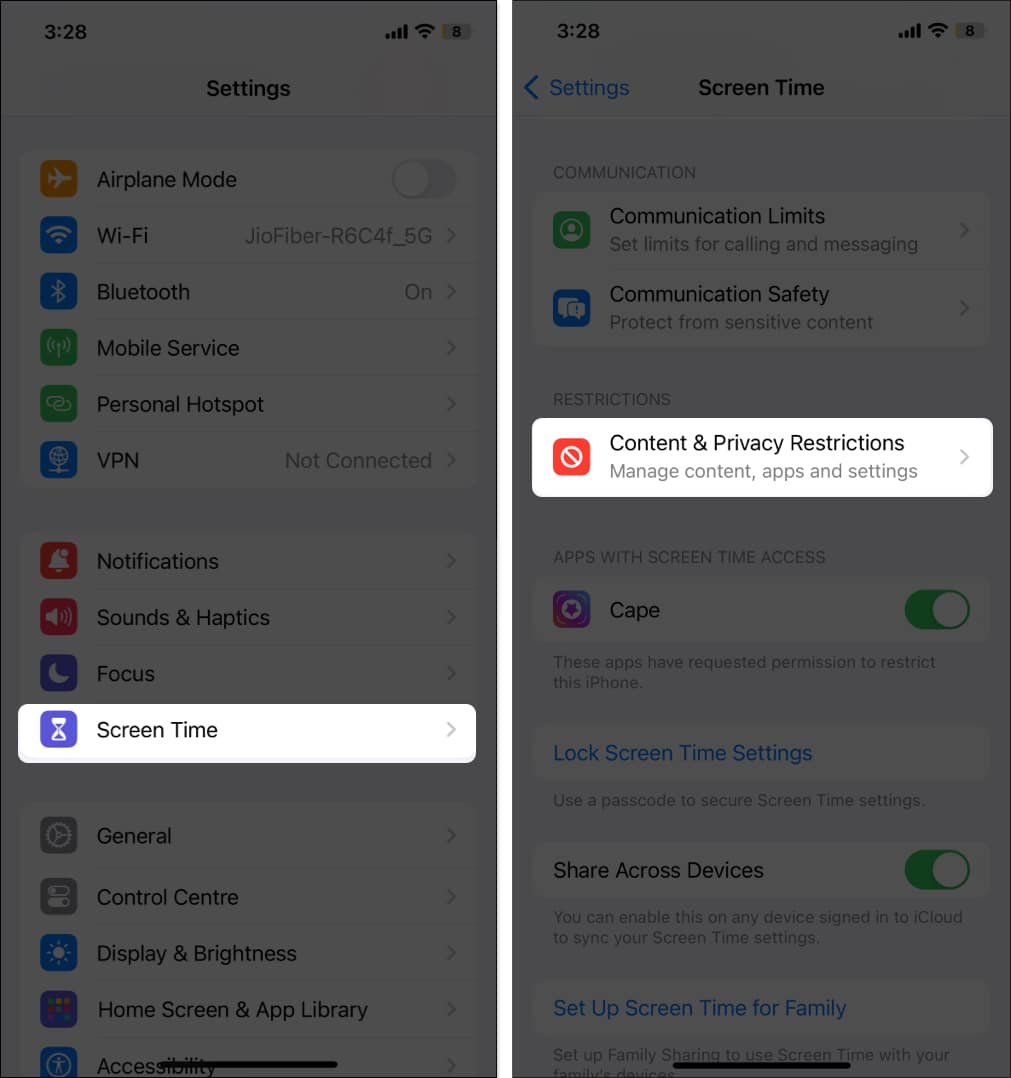
While the chances of this happening are slim, it’s possible that you may have disabled AirDrop using Screen Time restrictions on your iPhone for one reason or another. If this is the case, the AirDrop icon might look greyed out. You’ll need to use Screen Time on your Mac or iPhone to remove the content and privacy restrictions you previously enabled.
On iPhone
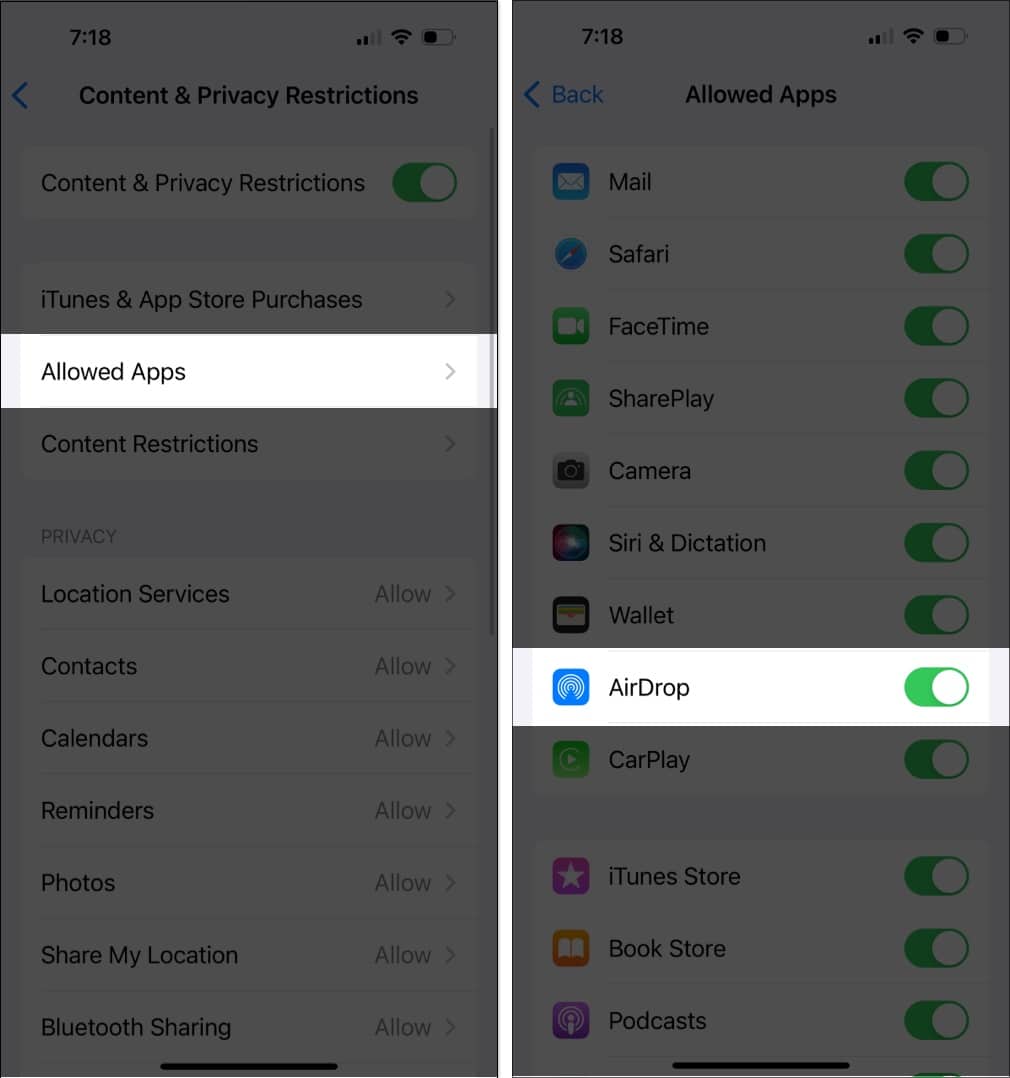
- Go to Settings → Screen Time → Content & Privacy Restrictions.
- Tap Allowed Apps, then toggle on AirDrop.


On Mac
- Open Settings and go to Screen Time → Content & Privacy.
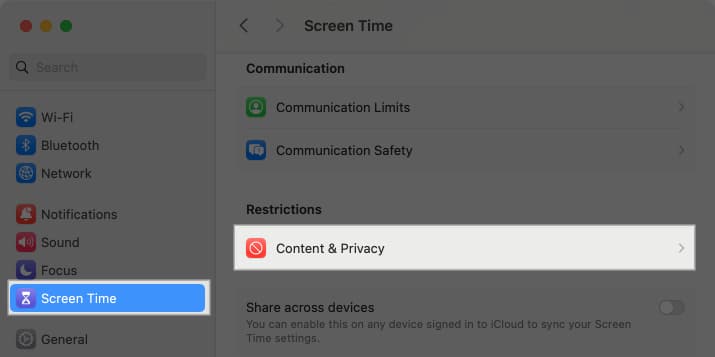
- Choose App Restrictions, then toggle on AirDrop under the Allowed in iOS section.


7. Restart your iPhone, iPad, or Mac
Although restarting your iPhone, iPad, or Mac can often fix minor software glitches or bugs, if it doesn’t, you can perform a hard reset.
- Press and release the Volume Up button.
- Press and release the Volume Down button.
- Press and hold the Side button until the Apple logo appears.
You can restart your Mac by clicking on the Apple menu > Restart.
8. Turn off the VPN
As discussed, AirDrop relies on the local network connection to transfer files between Apple devices. An active VPN assigns a different IP address to your iPhone and can alter network configuration, making it difficult for AirDrop to establish local network connections to other devices.
So, if AirDrop isn’t working on your iPhone or iPad, disconnect the VPN and try again.
- Open Settings.
- Go to VPN or VPN and Device Management.
- Toggle off the Status switch.


The steps to disable VPN on a Mac are also pretty similar.
9. Bring the two devices closer
While AirDrop transfer over cellular data is now possible, it still relies on the Bluetooth network to initiate the process. If the two devices aren’t in the Bluetooth range (10m), the other person’s iPhone won’t be visible on yours.
To avoid this, bring the two devices closer and try the process again.
Note:
When bringing the two devices closer, make sure they don’t contact one another, as this can force the NameDrop feature to activate.
10. Reset Network Settings
Tried everything, and nothing worked? Or did AirDrop start working, but the transfers are taking longer than usual? In that case, you can reset Network Settings to eliminate any glitch or bug hindering the AirDrop performance.
Wrapping up…
That’s it; these are all the tried and tested solutions that can help when AirDrop isn’t working on your iPhone, iPad, or Mac. However, if the issue persists, the Wi-Fi or Bluetooth hardware might be at fault, and seeking professional assistance is recommended in such cases.
If you have another solution that should be on this list, do share it with us in the comments.
Read more:


