How to Sync Music between Mac and iPhone, iPad
How do you sync Apple Music across devices? This ultimate guide will walk you through how to sync your music between your Mac, iPhone, and iPad.
Syncing music between iPhone/iPad and Mac is straightforward. With macOS Catalina, Apple removed iTunes, so we use Finder to sync music from Mac to iPhone. The process remains easy and fast.
If you are an Apple Music subscriber and have the same Apple ID on your Mac and iPhone, then you do not have to do anything. All your songs, playlists, ratings, etc., are automatically synced to all your Apple devices. The same happens if you are an iTunes Match subscriber.
Note:
The tutorial below is for iPhone users who do not use Apple Music. If you are an Apple Music subscriber, follow the methods only after turning off the option to Sync Library in Apple Music.
We have focused this post entirely on Macs running macOS Catalina. If you are using a prior version of macOS or Windows, the steps are the same; just that instead of Finder, you have to use iTunes.
How to Sync Music from Mac to iPhone or iPad
- Unlock your iPhone/iPad and connect it to Mac using a cable
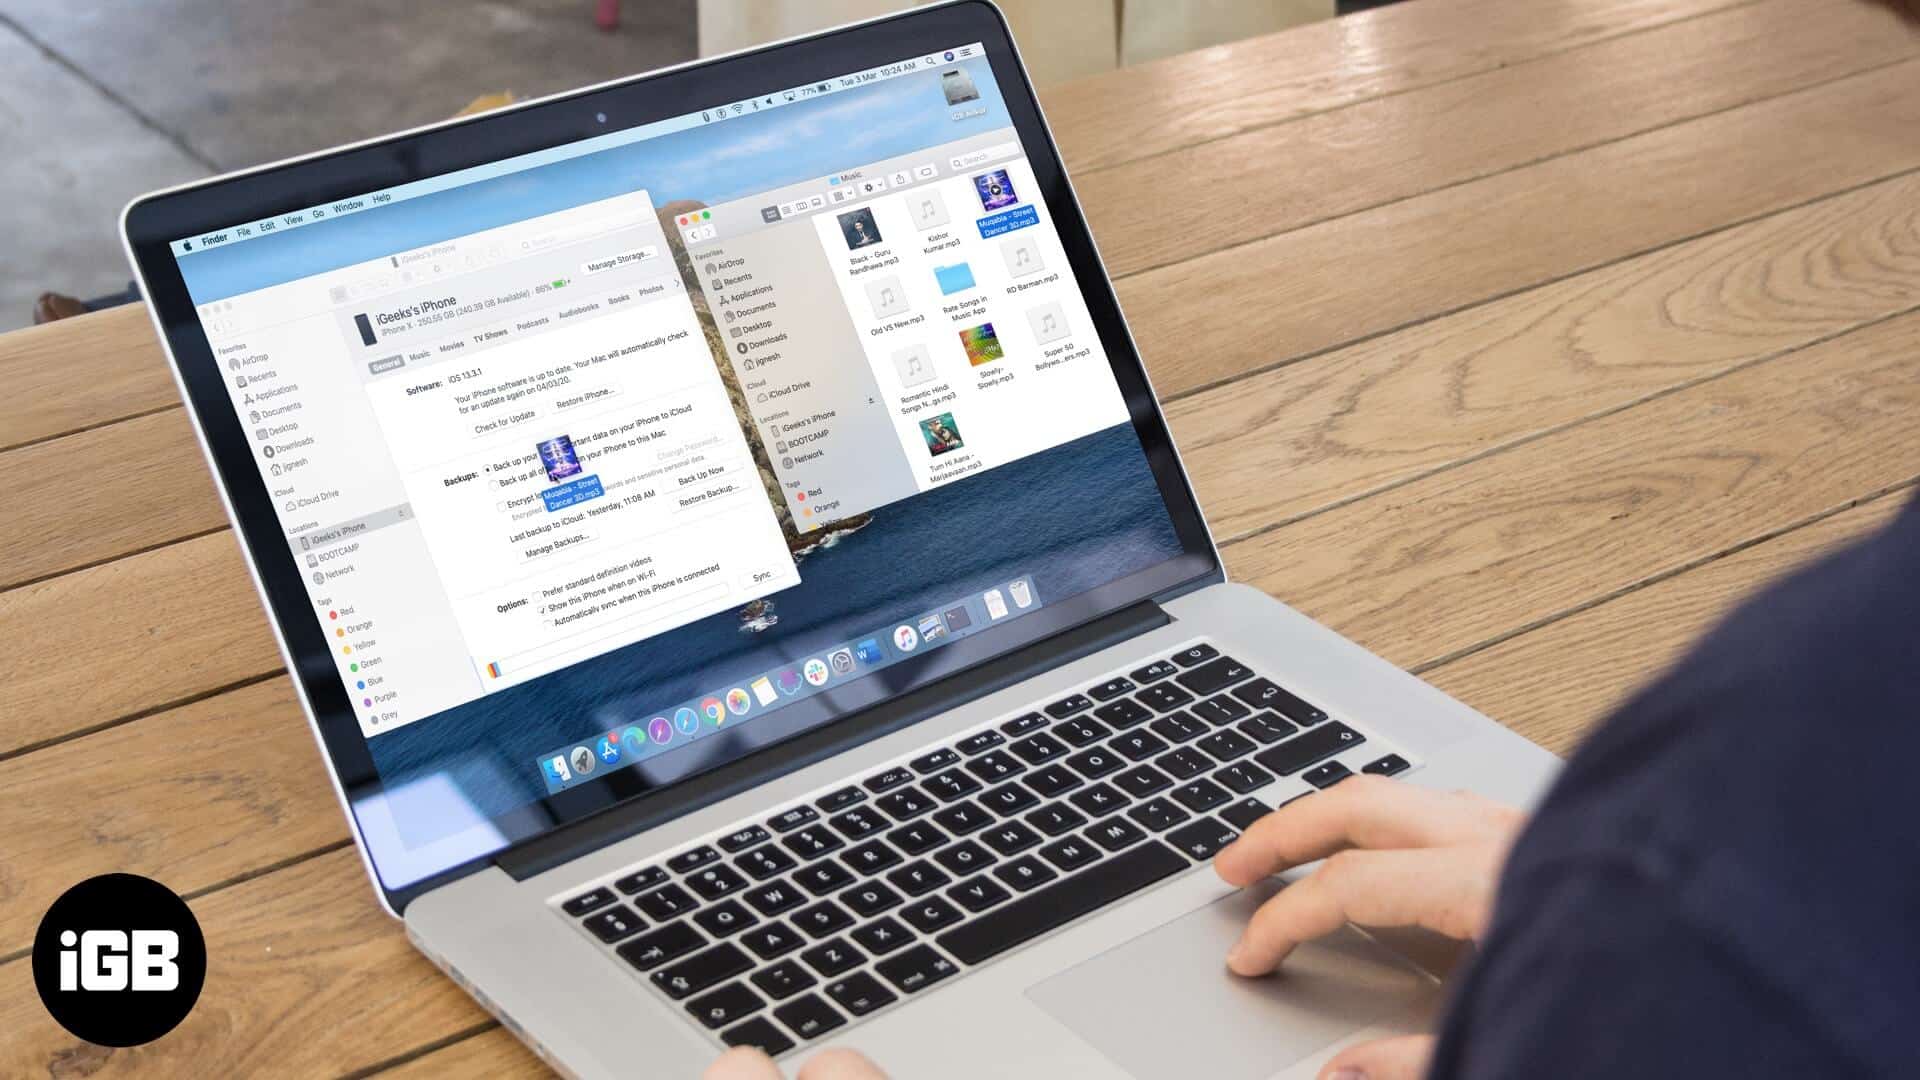
- Launch Finder from the Dock and click on your device from the left sidebar. If Finder asks Trust, click on that, and then see your iPhone and input the phone’s password.

- Click on Music tab and tick the box for Sync music onto [your iPhone name.]

- Here, you may see a pop-up that says, ‘Are you sure you want to remove existing music, films, TV shows and books from this iPhone and sync with this library.’ If you would like to remove them from the iPhone and sync media with the current Mac, click Remove & Sync.
- Now you have two options: Sync the entire music Library or Sync selected artists, albums, genres and playlists. Choose the one according to the size of your music library and space available on your iPhone/iPad
- If you choose selected artists, albums, genres and playlists, you will have to select them further from the box below. You may also choose to include videos if you have them and automatically fill free space on your device with songs. I used to use the latter option when I had an iPod Shuffle.
- Click on Apply at the bottom right. The transfer status will appear in the left sidebar next to your iPhone name.

- Once music sync is complete, click on the eject button from the left sidebar.

Remove Existing Music, Films, TV shows and Books from iPhone Sync with Library
At one time, an iOS or iPadOS device, such as an iPhone, iPad Touch, or iPad, can be synced with only one Finder/iTunes.
So, if you have previously synced your device to some other Mac/PC, then it asks for your permission to remove that content and sync your iPhone/iPad with media from the current Mac. This pop-up also appears if you are using the same Mac but earlier used manual management of music. (explained below)

If you click on Remove & Sync, your existing music, films, TV programs and books are removed, and what you choose to sync is transferred to your device.
Please note that this does not delete any photos or videos from your Photos app. It also does not affect your other apps and app data.
One solution to save your existing music is to follow our guide on how to transfer music from iPhone to Computer or vice versa. Once you have the existing iPhone songs on your Mac, you can open them in the Music app and then sync everything together.
How to Manually Sync Songs from Mac to iPhone
- Connect your iPhone/iPad to your Mac running macOS Catalina
- Open Finder and select your device from the left sidebar.
- Under Options: check the box for Manually manage music, films and TV programs.
- Click on Apply.

- Now from the top menu bar, click on File → New Finder Window.

Locate where songs are saved on your Mac. You may use the search bar, or open Spotlight Search, type .mp3, and click on Show all in Finder.
- Drag the two windows (one where your song is and another that has your iPhone) and place them side by side. If needed, place your mouse pointer to one of the corners of the window and decrease the size. You may also enable Split Screen
- Now drag music file(s) from one window to anywhere inside the General.

Sync Songs from Mac to iPhone using the Music App
For this to work, make sure you have enabled Manually manage music, films and TV shows from the Finder. (Steps explained above.)
- Open the Music app on your Mac and select your connected iPhone from the left sidebar.

- Now drag the song from Finder to your iPhone.

How to Sync Music from Mac to iPhone Wirelessly
Connect your iPhone to your Mac using the appropriate cable. In Finder, select your device and enable Show this iPhone when on Wi-Fi. Finally, click on Apply.

From now onwards, when your Mac and iPhone are on the same Wi-Fi network, it will appear in Finder.
You can sync Music wirelessly and perform other sync options. Wirelessly, you can also back up your device. You only need to connect it using a cable if you wish to update the iOS or restore your device.
How to Sync Music from Mac to iPhone without Cable using iCloud
If you are an Apple Music subscriber or if you use iTunes Match, you can sync all your music from Mac to iPhone automatically via iCloud. It is effortless.
To make sure that Sync Library with Apple Music is turned on, sign in to your Apple devices with the same Apple ID and follow the steps below.
On iPhone: Open Settings app → Music → Turn on Sync Library.
On Mac: Open the Music app → click on Music from the top bar → Preferences → Turn on Sync Library (your Apple ID.)
Do the same on your other Apple devices. Now, all the music you have added or purchased will sync to all your iOS, iPadOS, tvOS, and macOS devices.
How Do you Sync Music from Mac to iPhone Using Third-Party Apps
If you like to take a different route, you can use third-party applications to copy music from your Mac to your iPhone. Two apps we recommend are:
Remove Music from iPhone or iPad
- Connect your iPhone via cable or Wi-Fi. Open Finder → click on your iPhone from left sidebar.
- Now click on the Music tab and click inside the box that says Sync music onto [your iPhone name.]
- Click on Remove.

- Finally, click on Apply at the bottom right. All songs will be unsynced and removed from your device.

- If you have synced selected artists, albums, genres and playlists, you may choose to remove some of the music. To do so, uncheck the artist, album, genre, or playlist you wish to remove and click on Apply to let the changes take place.

- If you have manually synced songs, open the Music app on your Mac, click on your iPhone from the left sidebar and click on the song (or select multiple songs by holding the Command (⌘) key). Now press the delete key on your keyboard and click on Delete from the small popup.

That’s all, mate!
Summing up…
These were the easiest ways to transfer music from your Mac running macOS Catalina to your iPhone and iPad. Which method will you use? Share your thoughts in the comments below.
You may also like to read…
- How to Transfer Spotify Playlists to Apple Music
- How to Hide or Delete Purchased Music on iPhone, iPad and Mac
Topics

Written by
Dhvanesh AdhiyaThe founder of iGeeksBlog, Dhvanesh, is an Apple aficionado, who cannot stand even a slight innuendo about Apple products. He dons the cap of editor-in-chief to make sure that articles match the quality standard before they are published.
View all posts →More from How-to

Snapchat Parental Controls: How to Set Up Family Center and Keep Your Teen Safe
Snapchat’s Family Center lets parents monitor their teen’s friend activity and screen time without reading private messages. Here’s how to set it up and what to expect.

How to Block and Unblock Someone on Instagram
Instagram lets you block or unblock someone in seconds. Follow these simple steps to take full control of your privacy and online peace.
Apple Watch Not Responding? 8 Fixes That Actually Work
Is your Apple Watch unresponsive or stuck on a black screen? Here are 8 proven fixes to help you unfreeze it and get it working again quickly.