When you look at a file on your Mac, you may notice that it ends with .jpg, .pdf, or .txt. These abbreviations are called file extensions, and they tell you exactly what type of file it is. By default, macOS hides file extensions to keep things tidy, but showing them is useful, especially when troubleshooting or sorting files.
Keep reading, and I’ll walk you through different ways to show or hide file extensions on your Mac, be it for an individual file, several files, or all files at once.
What Are File Extensions?
File extensions are the short codes (generally three or four letters) at the end of a file name, like .docx for a Word document or .mp4 for a movie. They allow your Mac to know which app to use to open the file. For example, a .jpg file opens in the Preview app, whereas a .mov file opens in QuickTime Player.
Showing file extensions can be helpful in various scenarios:
- When you want to identify file types at a glance. Is the file a .png or .jpg image?
- If you accidentally change the extension of a file such as report.docx into report.txt, it may not open properly. When you can see the extensions, it’s clear what file you’re working with.
- You need to see file extensions to fix issues. For instance, is a .html file formatted correctly for a website?
- If you’re organizing many files, file extensions are needed to help you accurately sort or group them. For example, you might want to have all .pdf documents together and separate from .docx files.
On the other hand, hiding file extensions will keep your Finder windows looking clean and simple. And since the extensions are hidden, it makes it less likely that you’ll mistakenly change them to something else while renaming files.
Ultimately, you should know how to show and hide file types so that you have some flexibility and control over how they appear on your Mac.
How to Show or Hide Filename Extensions on a Mac
macOS makes it easy to view and manage file type extensions, whether you want to change the setting for one file, a group of files, or every file on your Mac. There are three ways to do this.
Show or Hide Extensions for One File
This method works well when you want to hide most of your extensions but not a particular one, like a .txt file you’re working on.
- Open Finder and navigate to the folder containing the file you want to modify.
- Control-click the file and choose Get Info, or select the file and use the Command (⌘) + I shortcut.
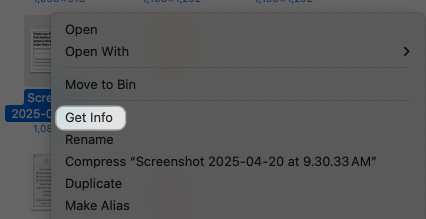
- Look for the Name & Extension field in the Get Info window. This will show the full file name along with the extension.
- You can check the box labeled Hide Extension if you want to hide it or uncheck it if you want to show the extension. For example, checking it changes “photo.jpg” to “photo” in Finder.
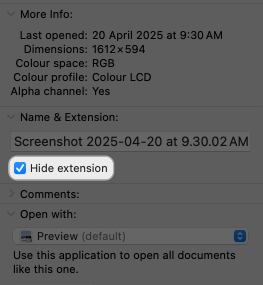
- Click the red button to close the Get Info window. The change applies immediately.
Note:
Show or Hide Extensions for Multiple Files
macOS doesn’t have a built-in batch option to show or hide extensions for several files at once. But you can use the following workaround:
- In Finder, hold the Command (⌘) key and click each file you want to change to select them.
- Press Command (⌘) + Option + I. This will open a Multiple Item Info window.
- Under the Name & Extension section, check or uncheck the Hide Extension box.

- This applies the change to all selected files immediately.
- Click the red X icon to close the window.
If you’re working with many files, consider organizing them in a single folder to make it easier to select them. I prefer this method when dealing with small batches of files.
Show or Hide Extensions for All Files
Do you want to show or hide extensions for every file on your Mac? Then you must change a system-wide setting in Finder, like this:
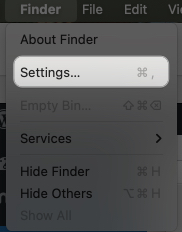
- Open Finder, then click Finder in the menu bar at the top and select Settings.
- Now, move to the Advanced tab and check the Show All Filename Extensions box to display extensions for all files or uncheck it to hide them.
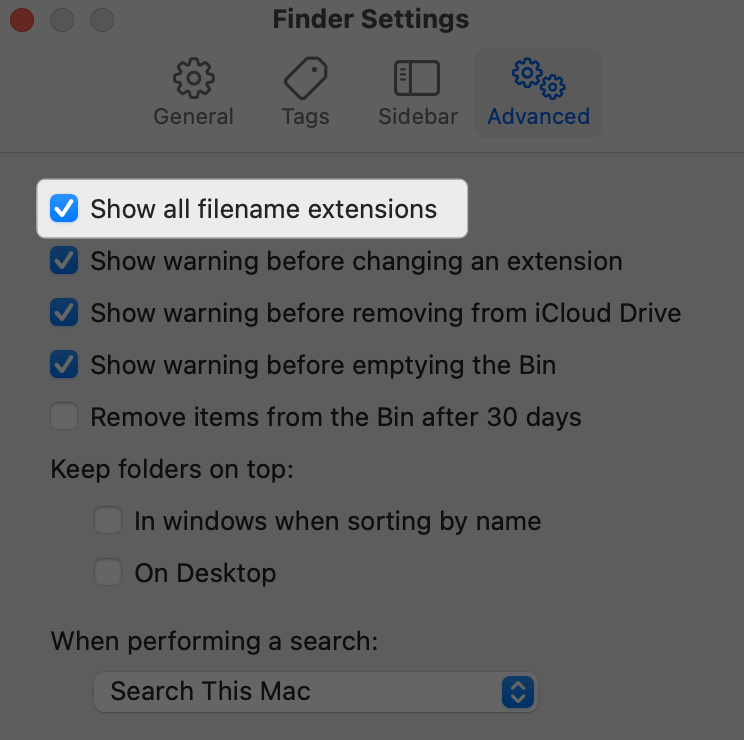
- Close the Finder Settings window. The setting updates instantly across all Finder windows.
Note:
Additional Tips for Working With File Extensions on a Mac
Here are some additional Finder tips to make working with file extensions smoother:
- If extensions are hidden, you can still check a file’s type by Control-clicking and selecting Get Info. The Kind field tells you what the file is.
- Changing a file’s extension can make it unrecognizable to its associated application. Always ensure the extension matches the file’s actual format.
- Showing extensions can help you avoid harmful executable files like the ones ending in the .app extension.
- Developers or designers often show extensions to avoid confusion when working with files like .html, .css, or .psd. Casual users might hide them for a cleaner look.
Mac Not Updating File Extension Changes? Try These Fixes
Sometimes, you might toggle a setting, but the changes don’t seem to apply, or Finder doesn’t reflect your updates. Here are some common fixes:
- To force close the Finder app, go to the Apple menu > Force Quit or press Command (⌘) + Option + Esc, select Finder and click Relaunch.
- Ensure the system-wide Show All Filename Extensions setting isn’t overriding individual file settings. Go to Finder > Settings > Advanced to verify.
- If Finder acts unresponsive or buggy, launch the Terminal app and type
rm -rf ~/Library/Caches/com.apple.finderand then press Return. This will clear out your Mac’s system cache data. Relaunch Finder afterward. - Ensure your Mac is updated to the latest version of macOS by navigating to System Settings > General > Software Update.
- If you’re unable to change a file’s extension visibility settings on macOS, make sure you have access to edit it. Control-click on the file and select Get Info. Check the Sharing & Permissions settings at the bottom of the Get Info window.
If nothing above fixes your issue, restart your Mac or contact Apple Support if you’re having unique issues or questions regarding your macOS version.
Control File Extension Visibility on Your Mac With Ease
There you have it! Showing or hiding file extensions on a Mac is a simple process that can help you better manage and identify your files. With the steps above, you can have a cleaner Finder interface or take more control over file types.
Related articles worth reading: