Getting a “Google Storage Full” warning can be frustrating, especially when you’re not sure what’s taking up all your space. When my Google account ran out of storage, Gmail stopped receiving emails, and Google Photos stopped backing up new pictures. At first, I thought I needed to pay for more storage immediately.
But before upgrading to Google One, I spent a few minutes checking what was actually using my storage. To my surprise, I was able to free up several gigabytes by removing old files, large email attachments, duplicate photos, and forgotten items sitting in the trash.
In this guide, I’ll show you the easiest way to free up Google Drive storage space instantly and explain when upgrading to Google One is actually worth it.
Why the Google storage full warning matters
Most people think a full Google account is just an inconvenience. It’s not. Google provides only 15GB of free cloud storage, and that space is shared across multiple services, including Gmail, Google Drive, and Google Photos. This means every email attachment, uploaded file, backup, and photo counts toward the same storage limit.
Upon hitting the 15GB quota limit, you may experience problems with sending and receiving emails in Gmail, uploading files to Google Drive, or backing up photos and videos from your devices. Backups of your Android device can also become less reliable.
Therefore, you should address the warning early to prevent service interruptions, keep your important data accessible, and ensure your Google account continues to function normally.
What was actually using my Google storage
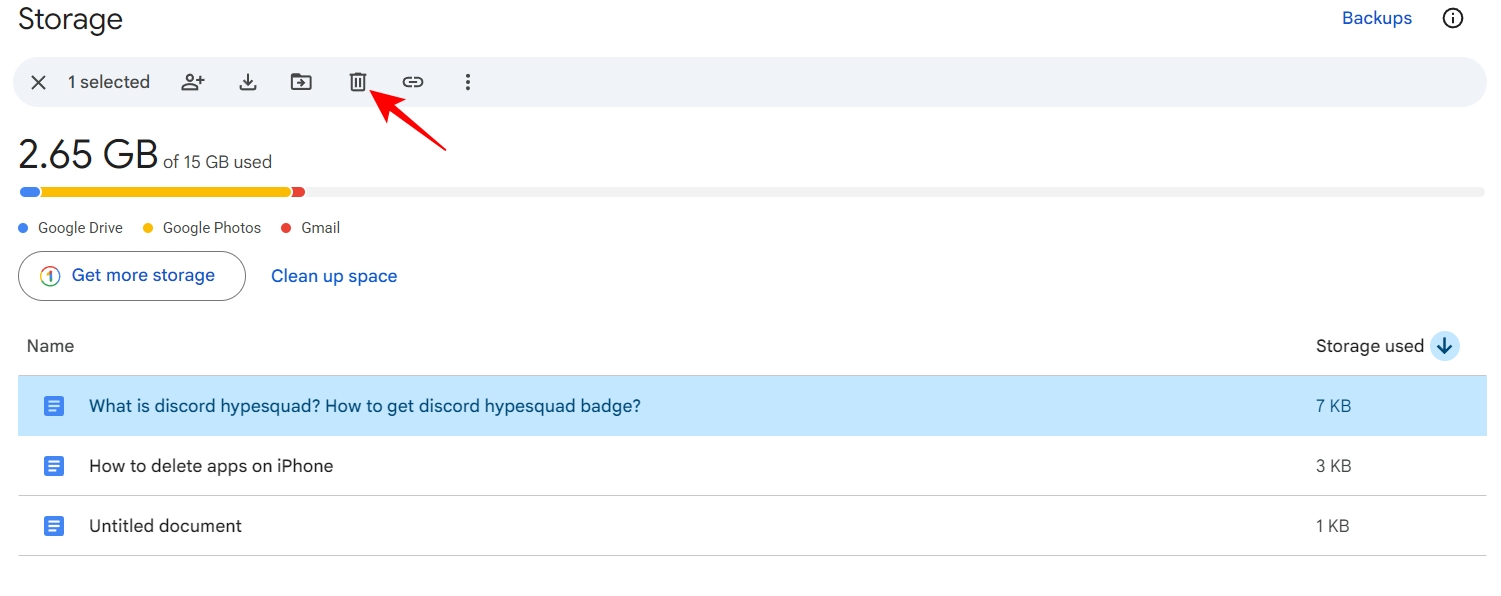
Before deleting anything, the first step is to check Google’s Storage Manager dashboard to understand what is hogging the space. I even do this when cleaning iCloud storage.
Google shows a progress bar with different colors and lists the storage used by services. The biggest surprise was discovering how much storage was being wasted by forgotten files rather than important ones.
I found:
- Years of promotional emails with large attachments
- Screenshots I never looked at again
- Duplicate photos backed up from multiple devices
- Large videos automatically uploaded to Google Photos
- Old ZIP archives sitting in Google Drive
- Files in the trash that I thought were already deleted
That’s why checking storage usage before deleting anything is important. Otherwise, you’ll be wondering where to start cleaning.
The fastest fixes that freed up Google Drive space instantly
After testing multiple cleanup methods, these delivered the biggest results the fastest.
1. Using Google’s Storage Manager
This should be your first stop. Instead of checking each Google service separately, Storage Manager provides a single dashboard that shows exactly what’s taking up space.
It also offers a Clear Up Space feature. I like it the most because it immediately highlights large emails, deleted files, spam content, large media, and unsupported videos.
- Open the Gmail app and tap on your profile picture.
- If your account is running out of storage, you will see the warning at the top. Tap Clear up space. It will redirect you to the Google One storage manager.
- Scroll down to see the clean-up suggestions such as:
- Large photos and videos
- Large Drive files
- Emails with large attachments
- Spam emails.
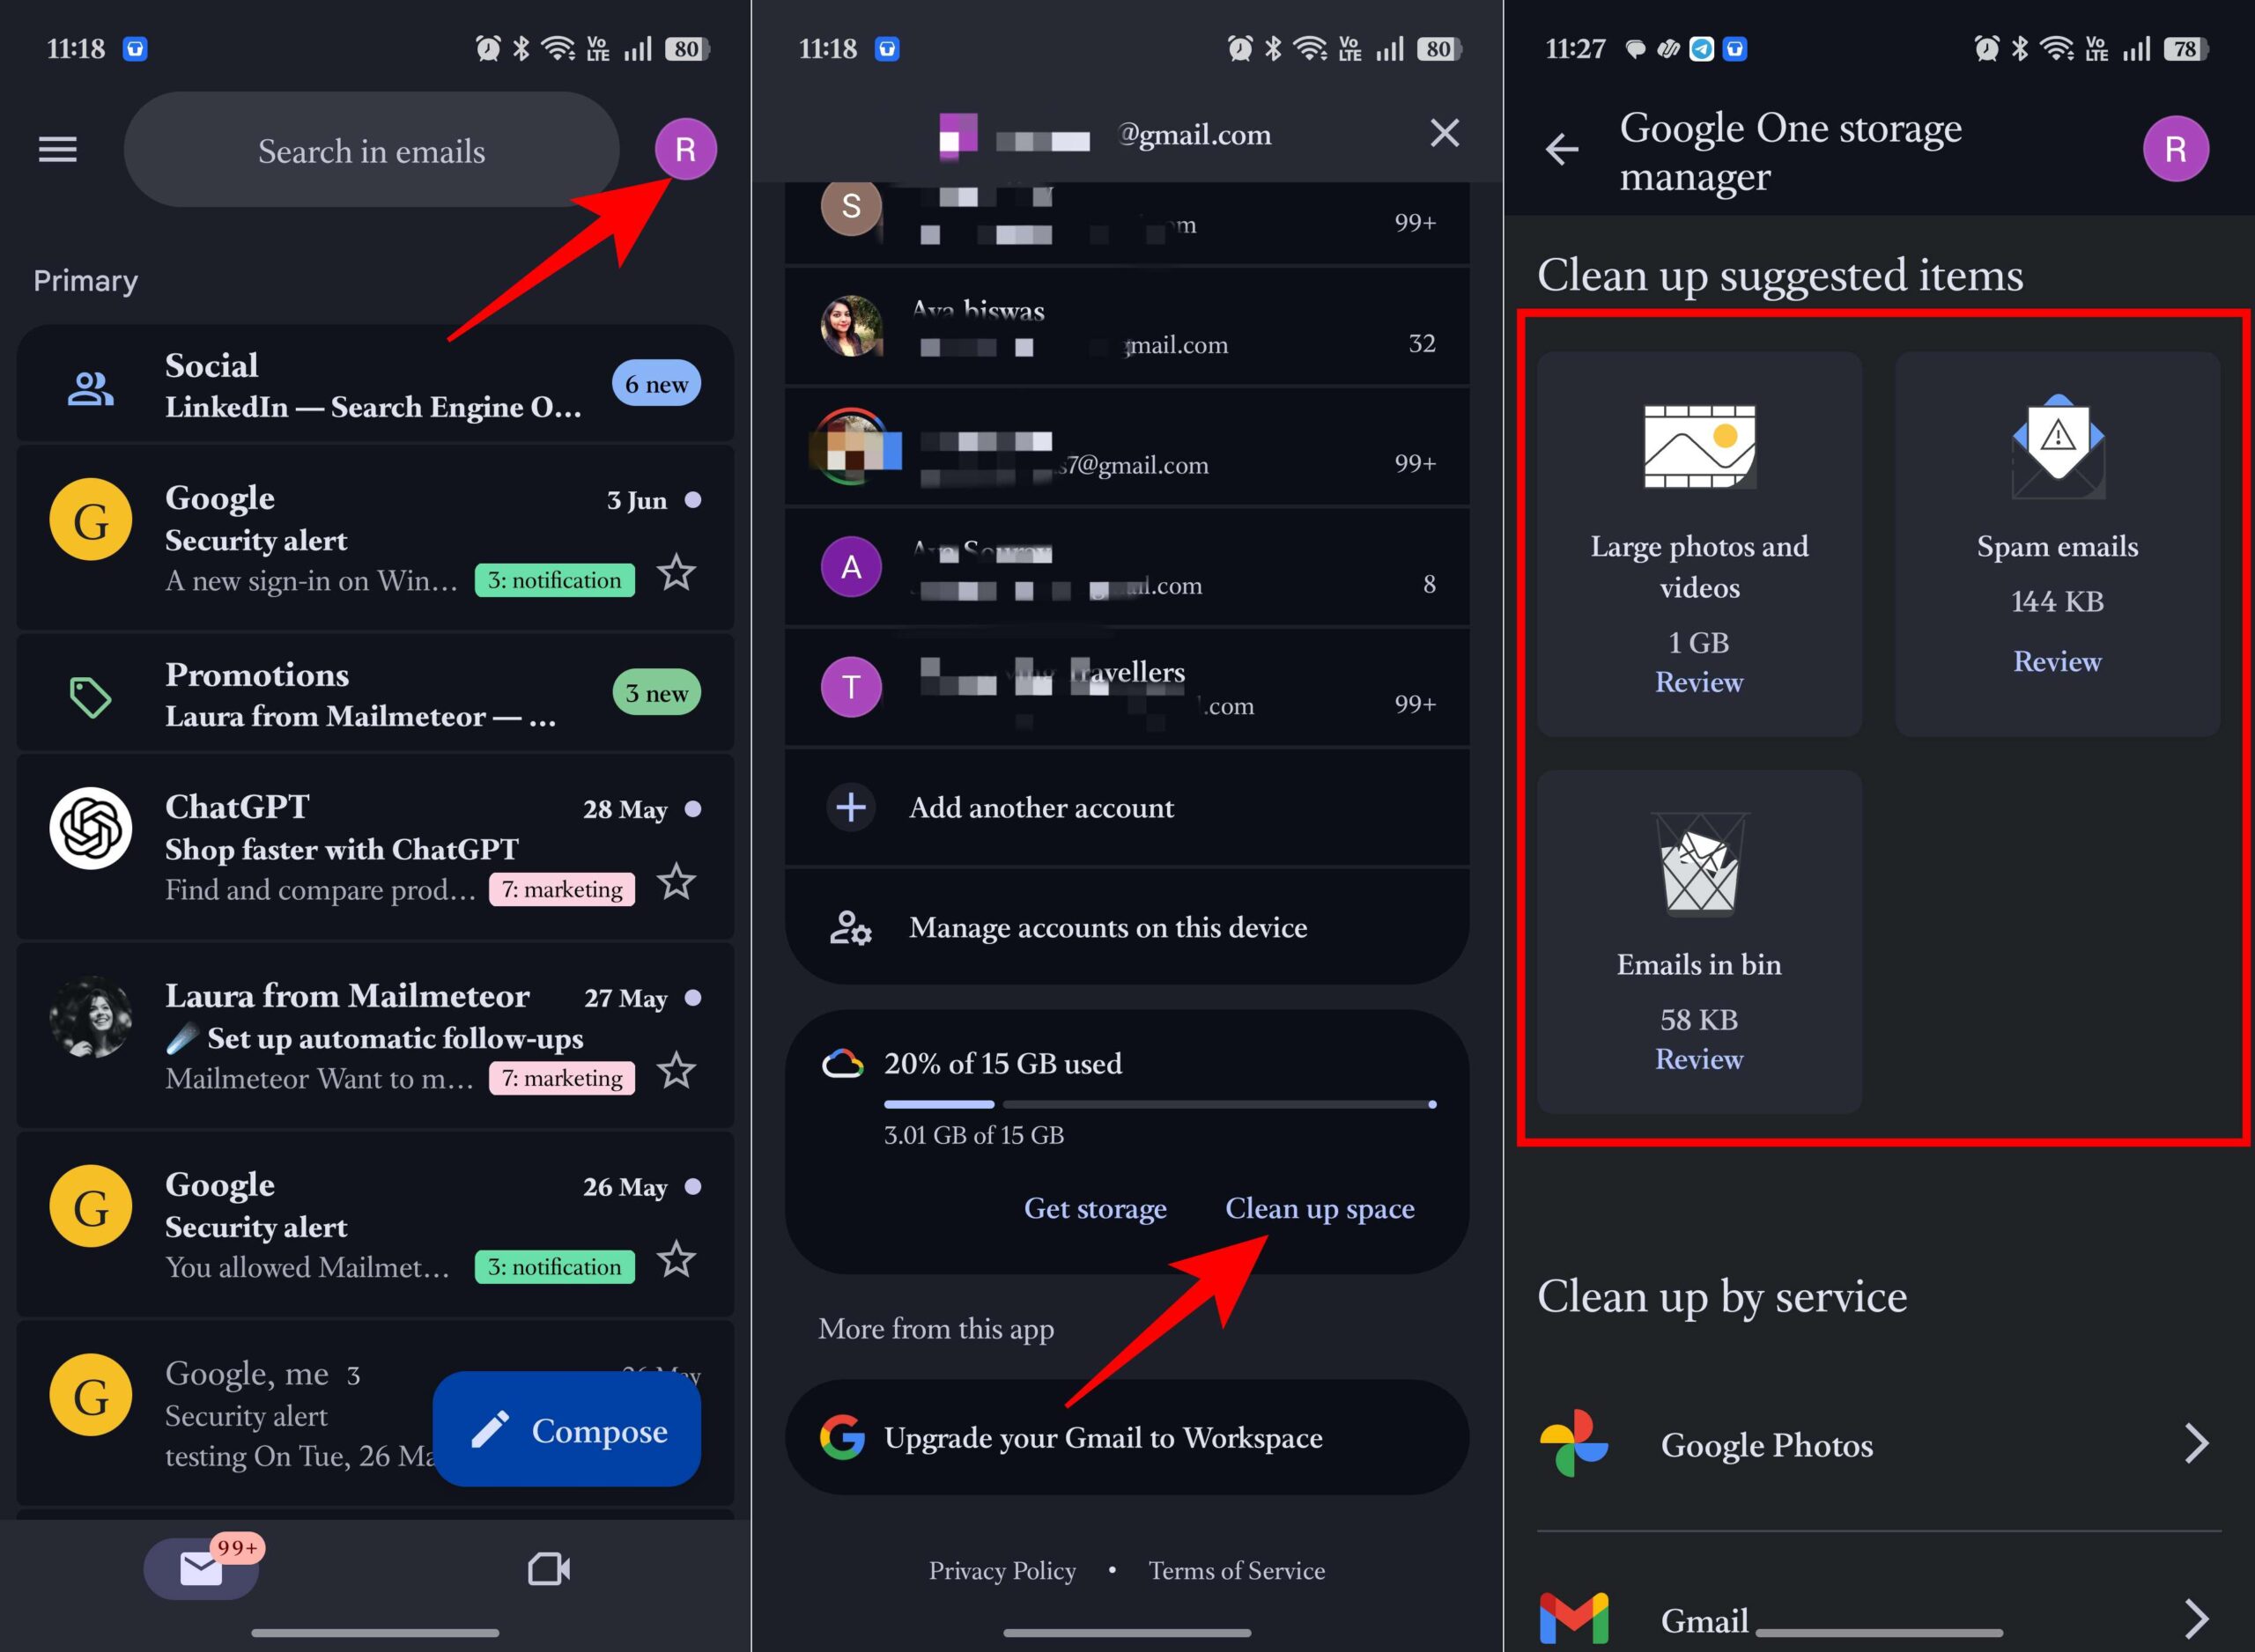
- Tap Review to see the items sorted by size.
- Select the files you no longer need and tap Delete.
- You can also Clean up by services like Google Photos, Gmail, and Google Drive.

After deleting items, empty the Bin folders in Gmail, Drive, and Google Photos to permanently remove the files. I recovered space within minutes just by following Google’s recommendations.
2. Emptying Google Drive trash and Gmail Spam folder
Like many people, I assumed that once I deleted a file or email, it was gone forever. That’s not always true. Files moved to Google Drive Trash and emails sitting in Gmail’s Spam or Trash folders can continue taking up storage until they’re permanently removed.
Empty Google Drive Trash
- Open Google Drive and tap the hamburger menu at the top.
- Select Bin from the left sidebar.
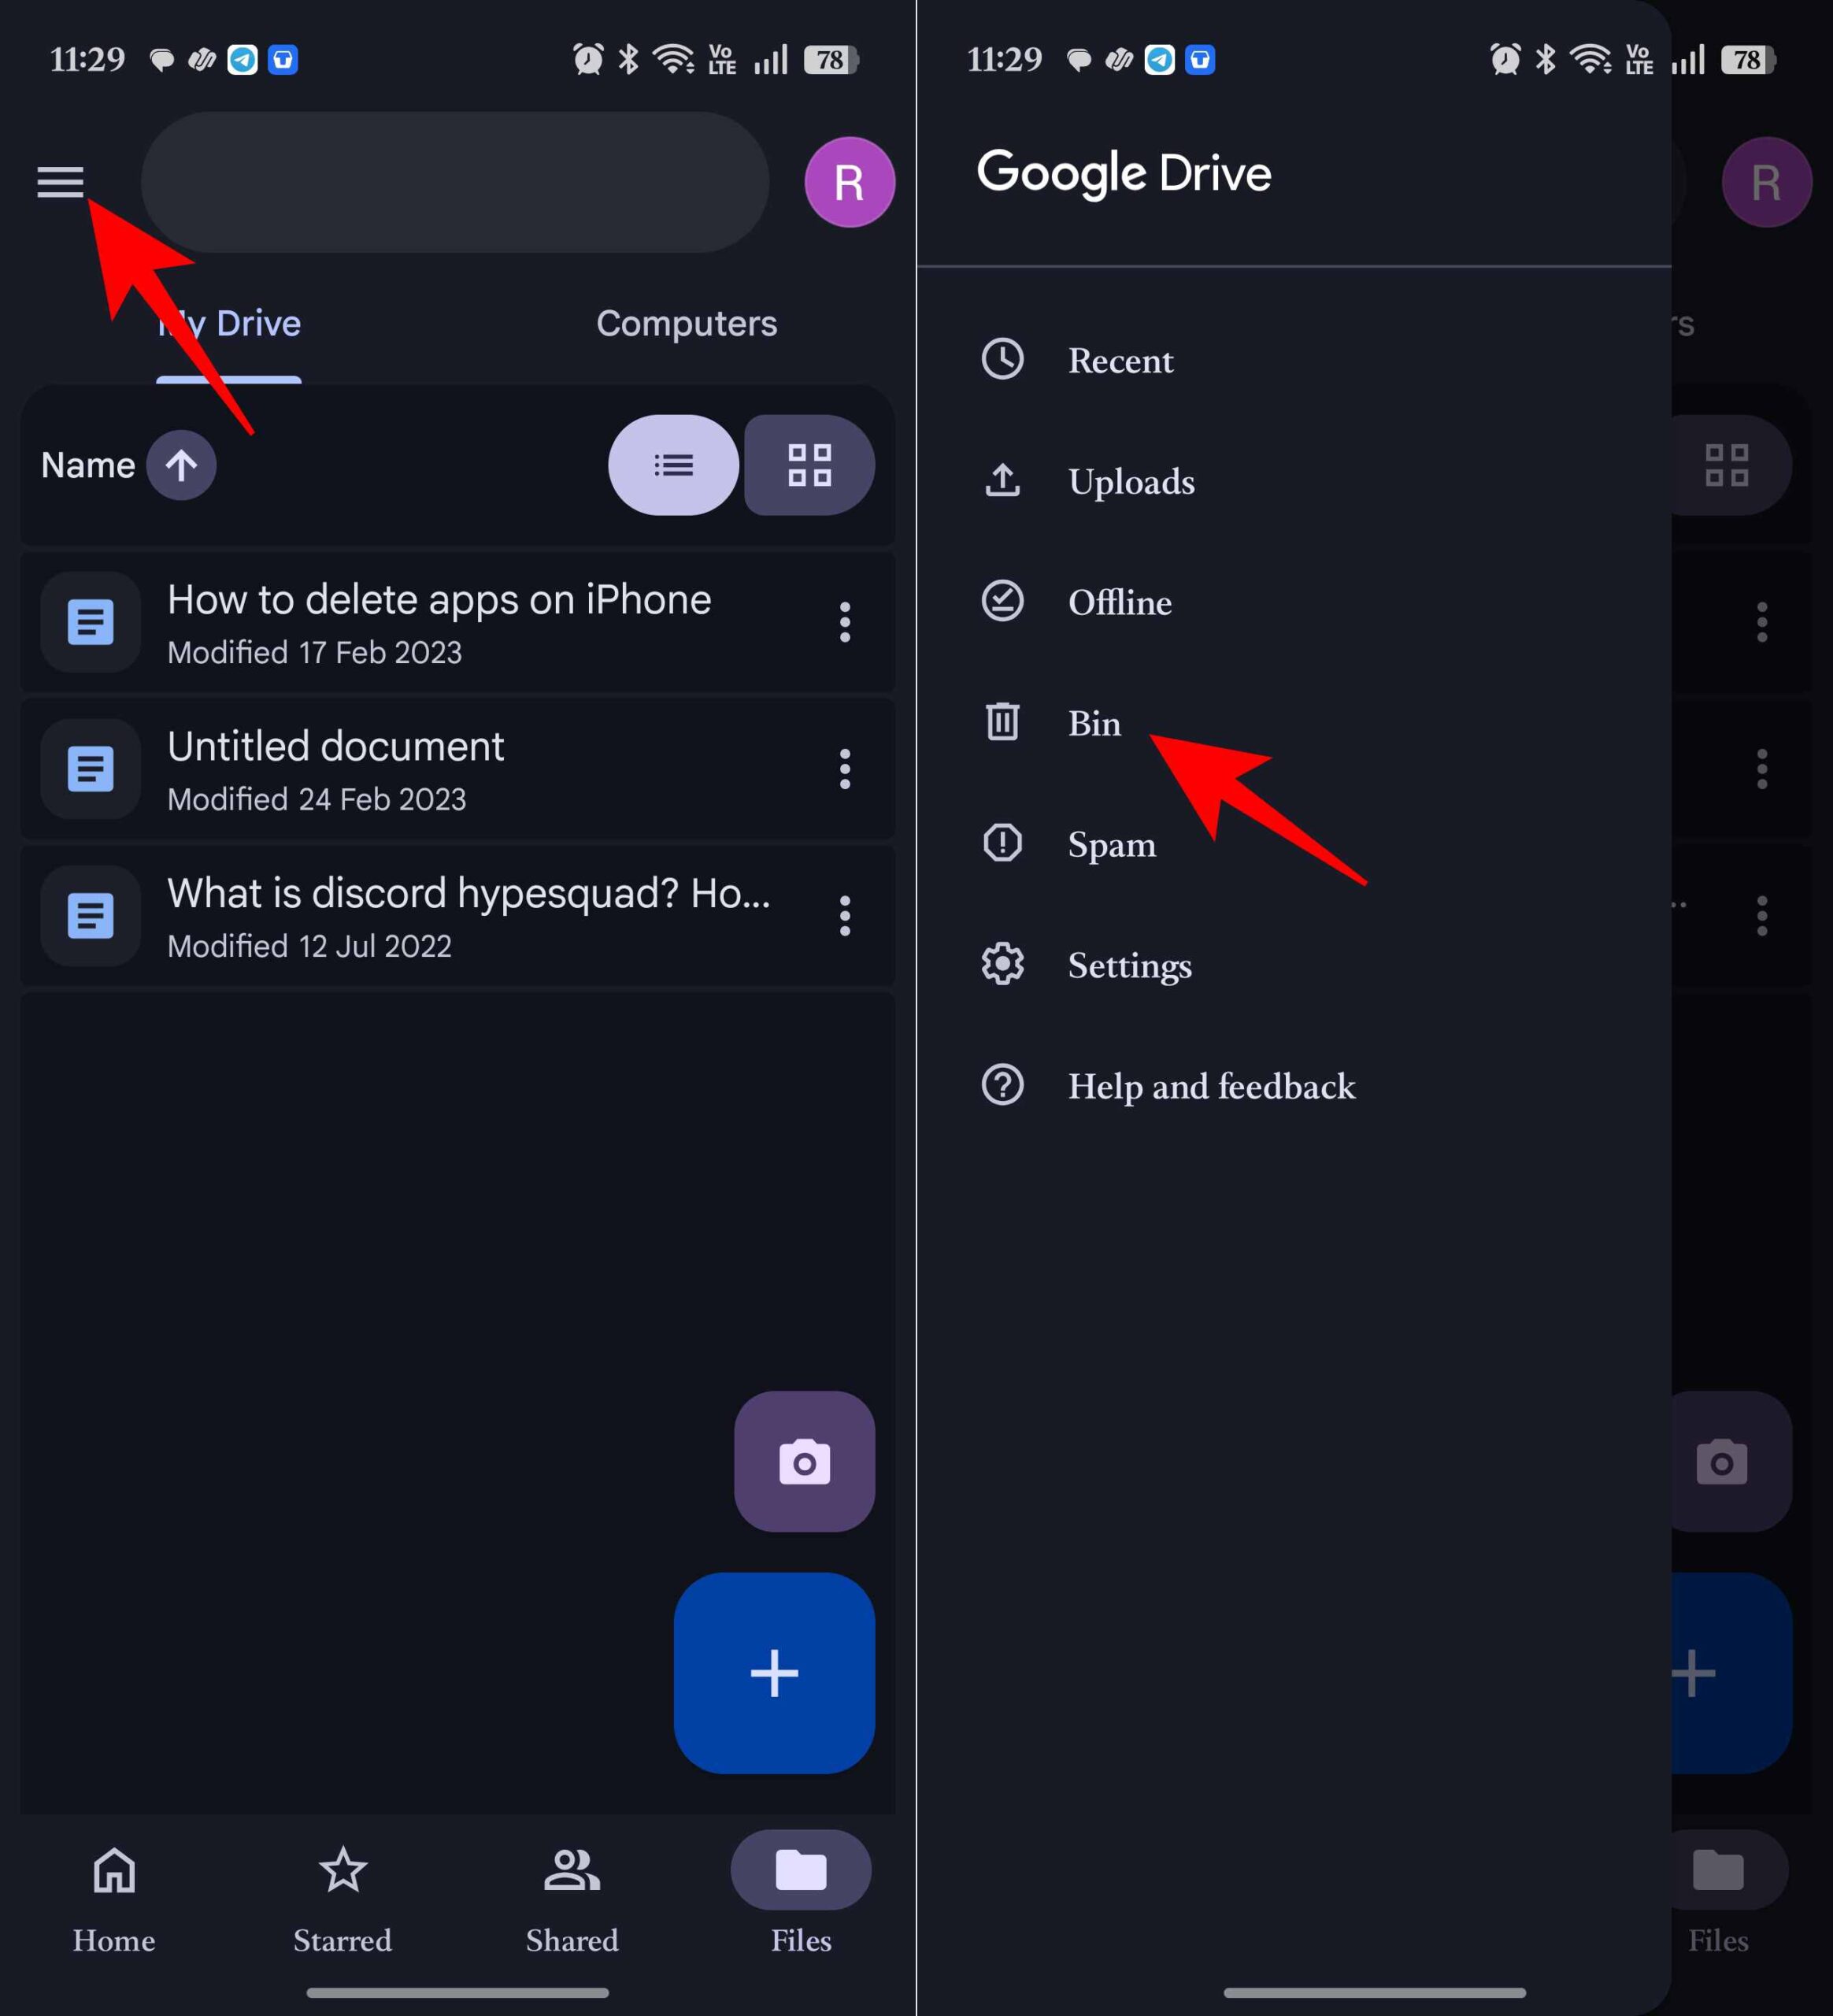
- Review the files to make sure you don’t need them.
- Click Empty Bin at the top and confirm the action.


If you’re comfortable deleting everything, this permanently removes all files in the Trash folder and frees up storage space.
Remove Gmail Spam and Trash
- Open Gmail and select the hamburger menu.
- In the left sidebar, tap Spam.
- It will show all the spam emails. Tap Empty spam now at the top and confirm.
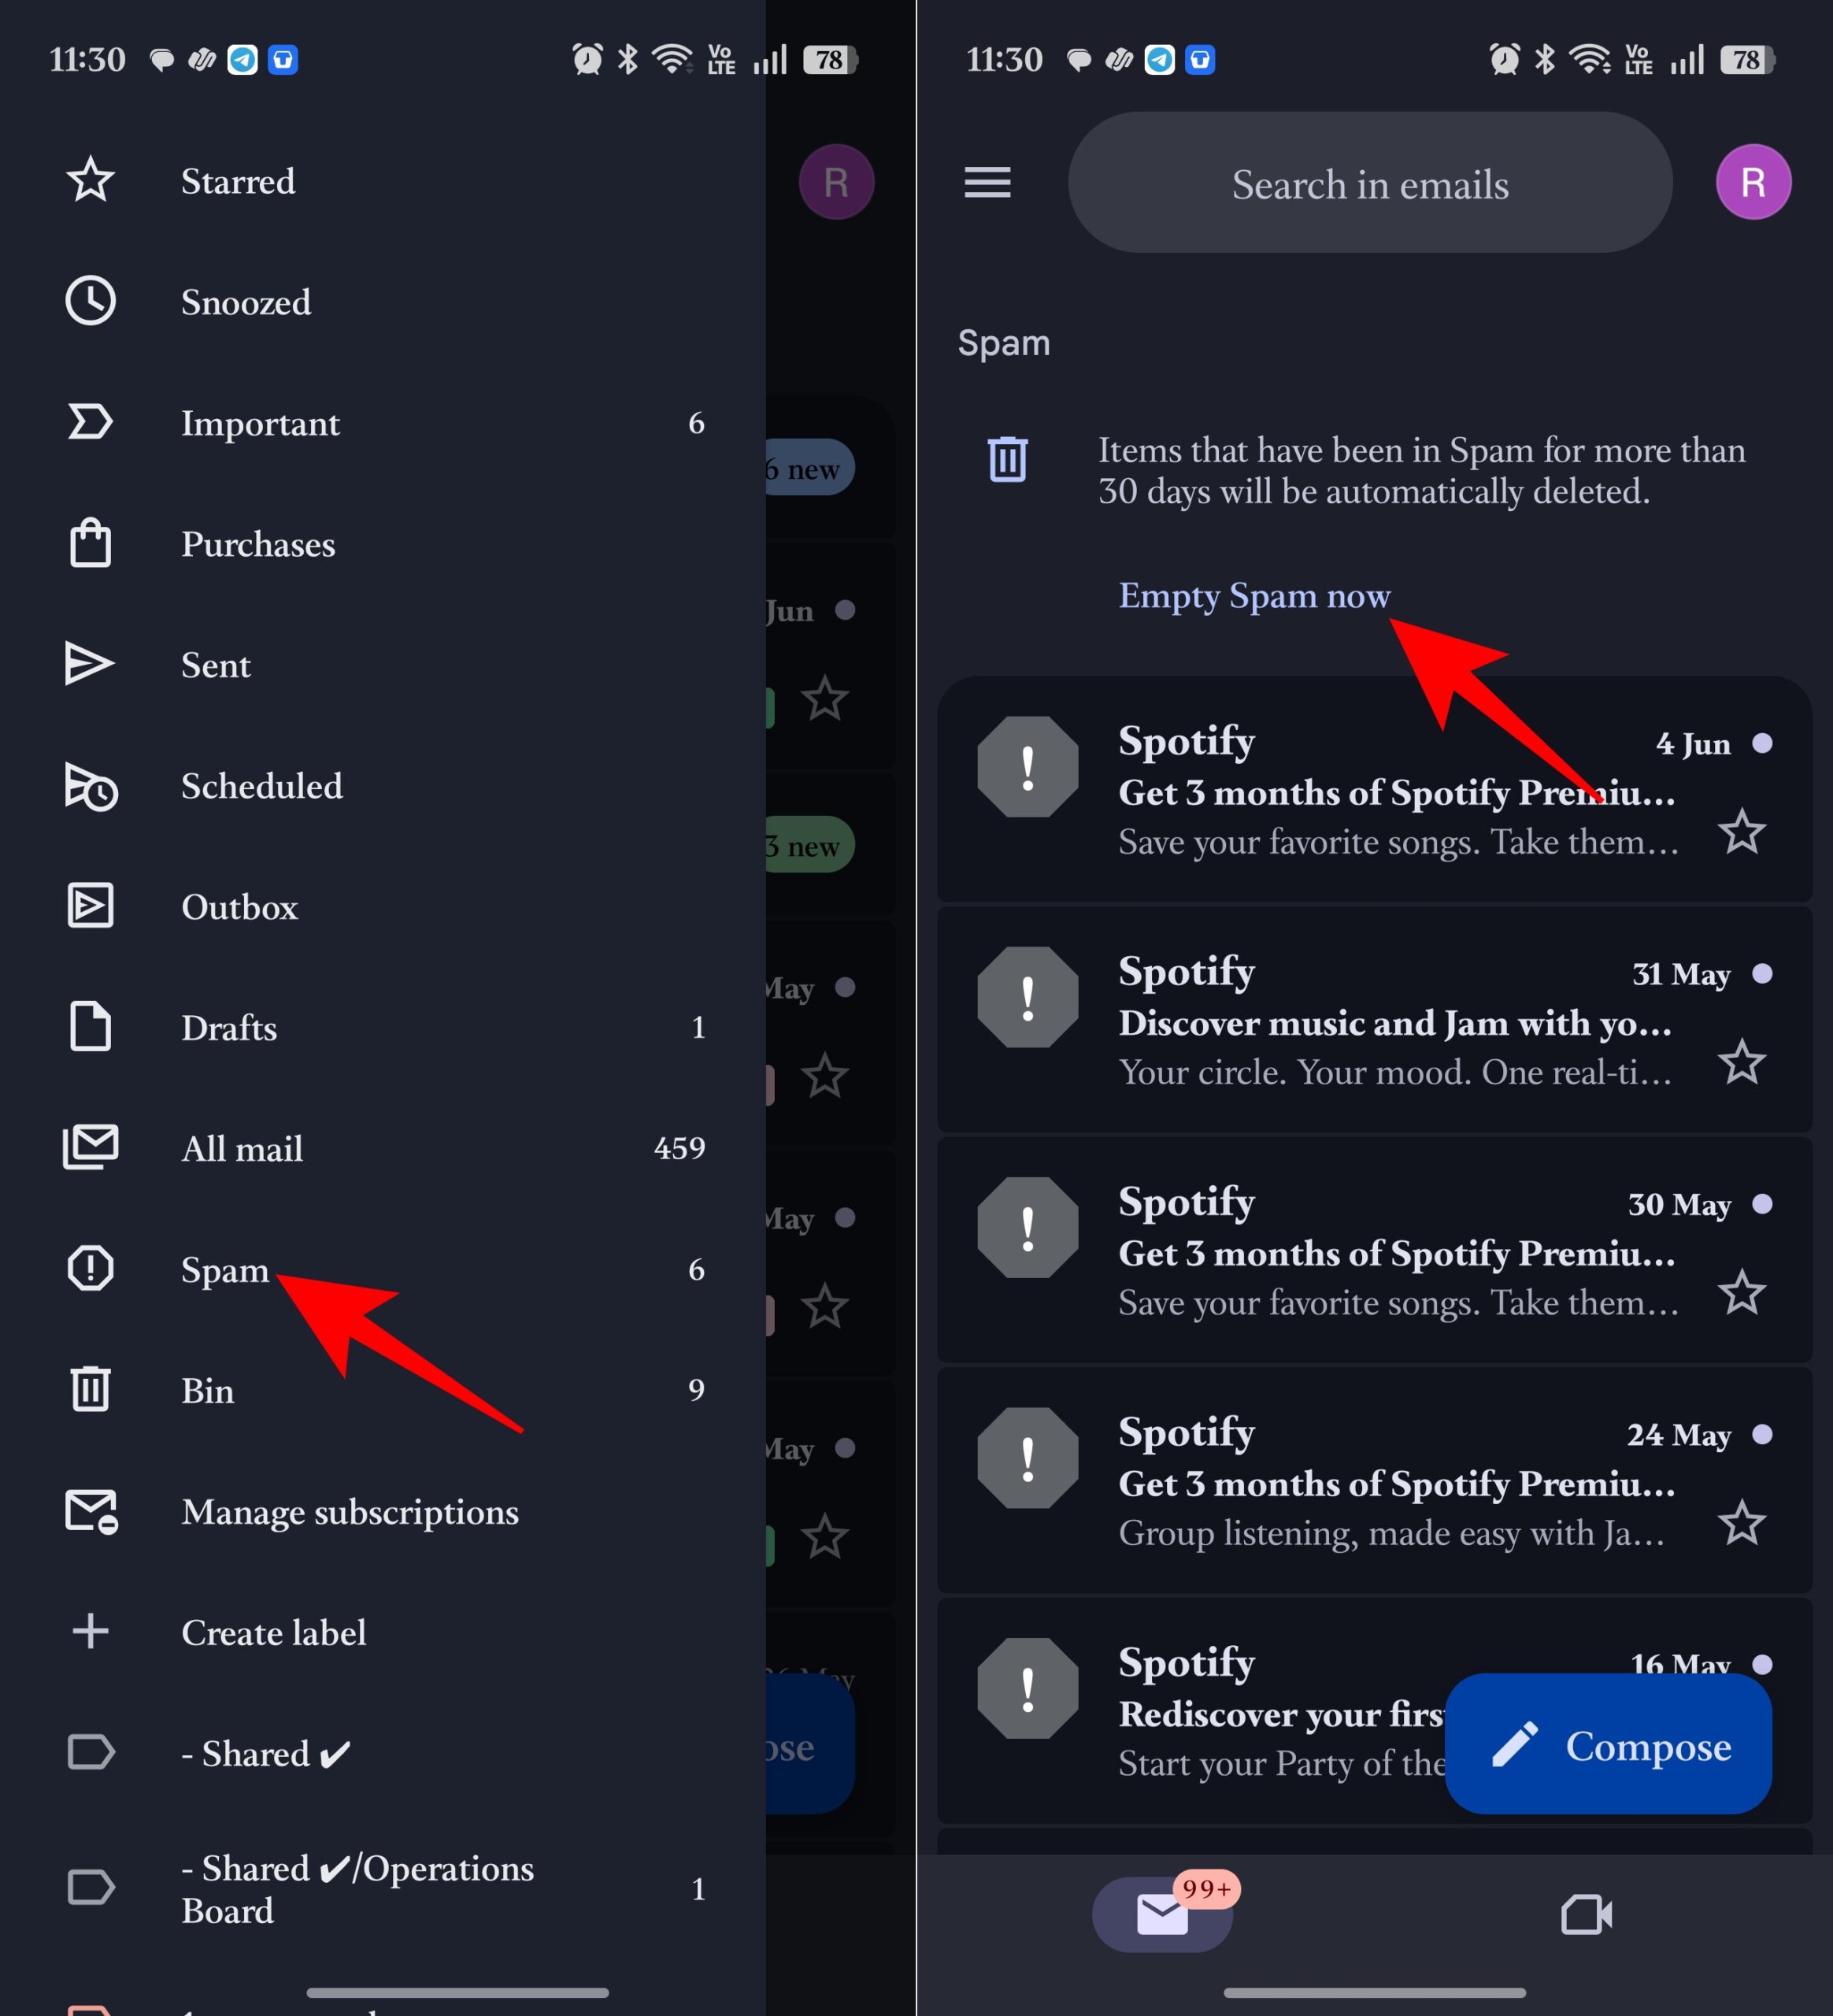
- Next, go to the sidebar and open the Bin folder.
- Click Empty Bin now.
- Confirm the deletion.
It will show all the spam emails. Tap Empty spam now at the top and confirm.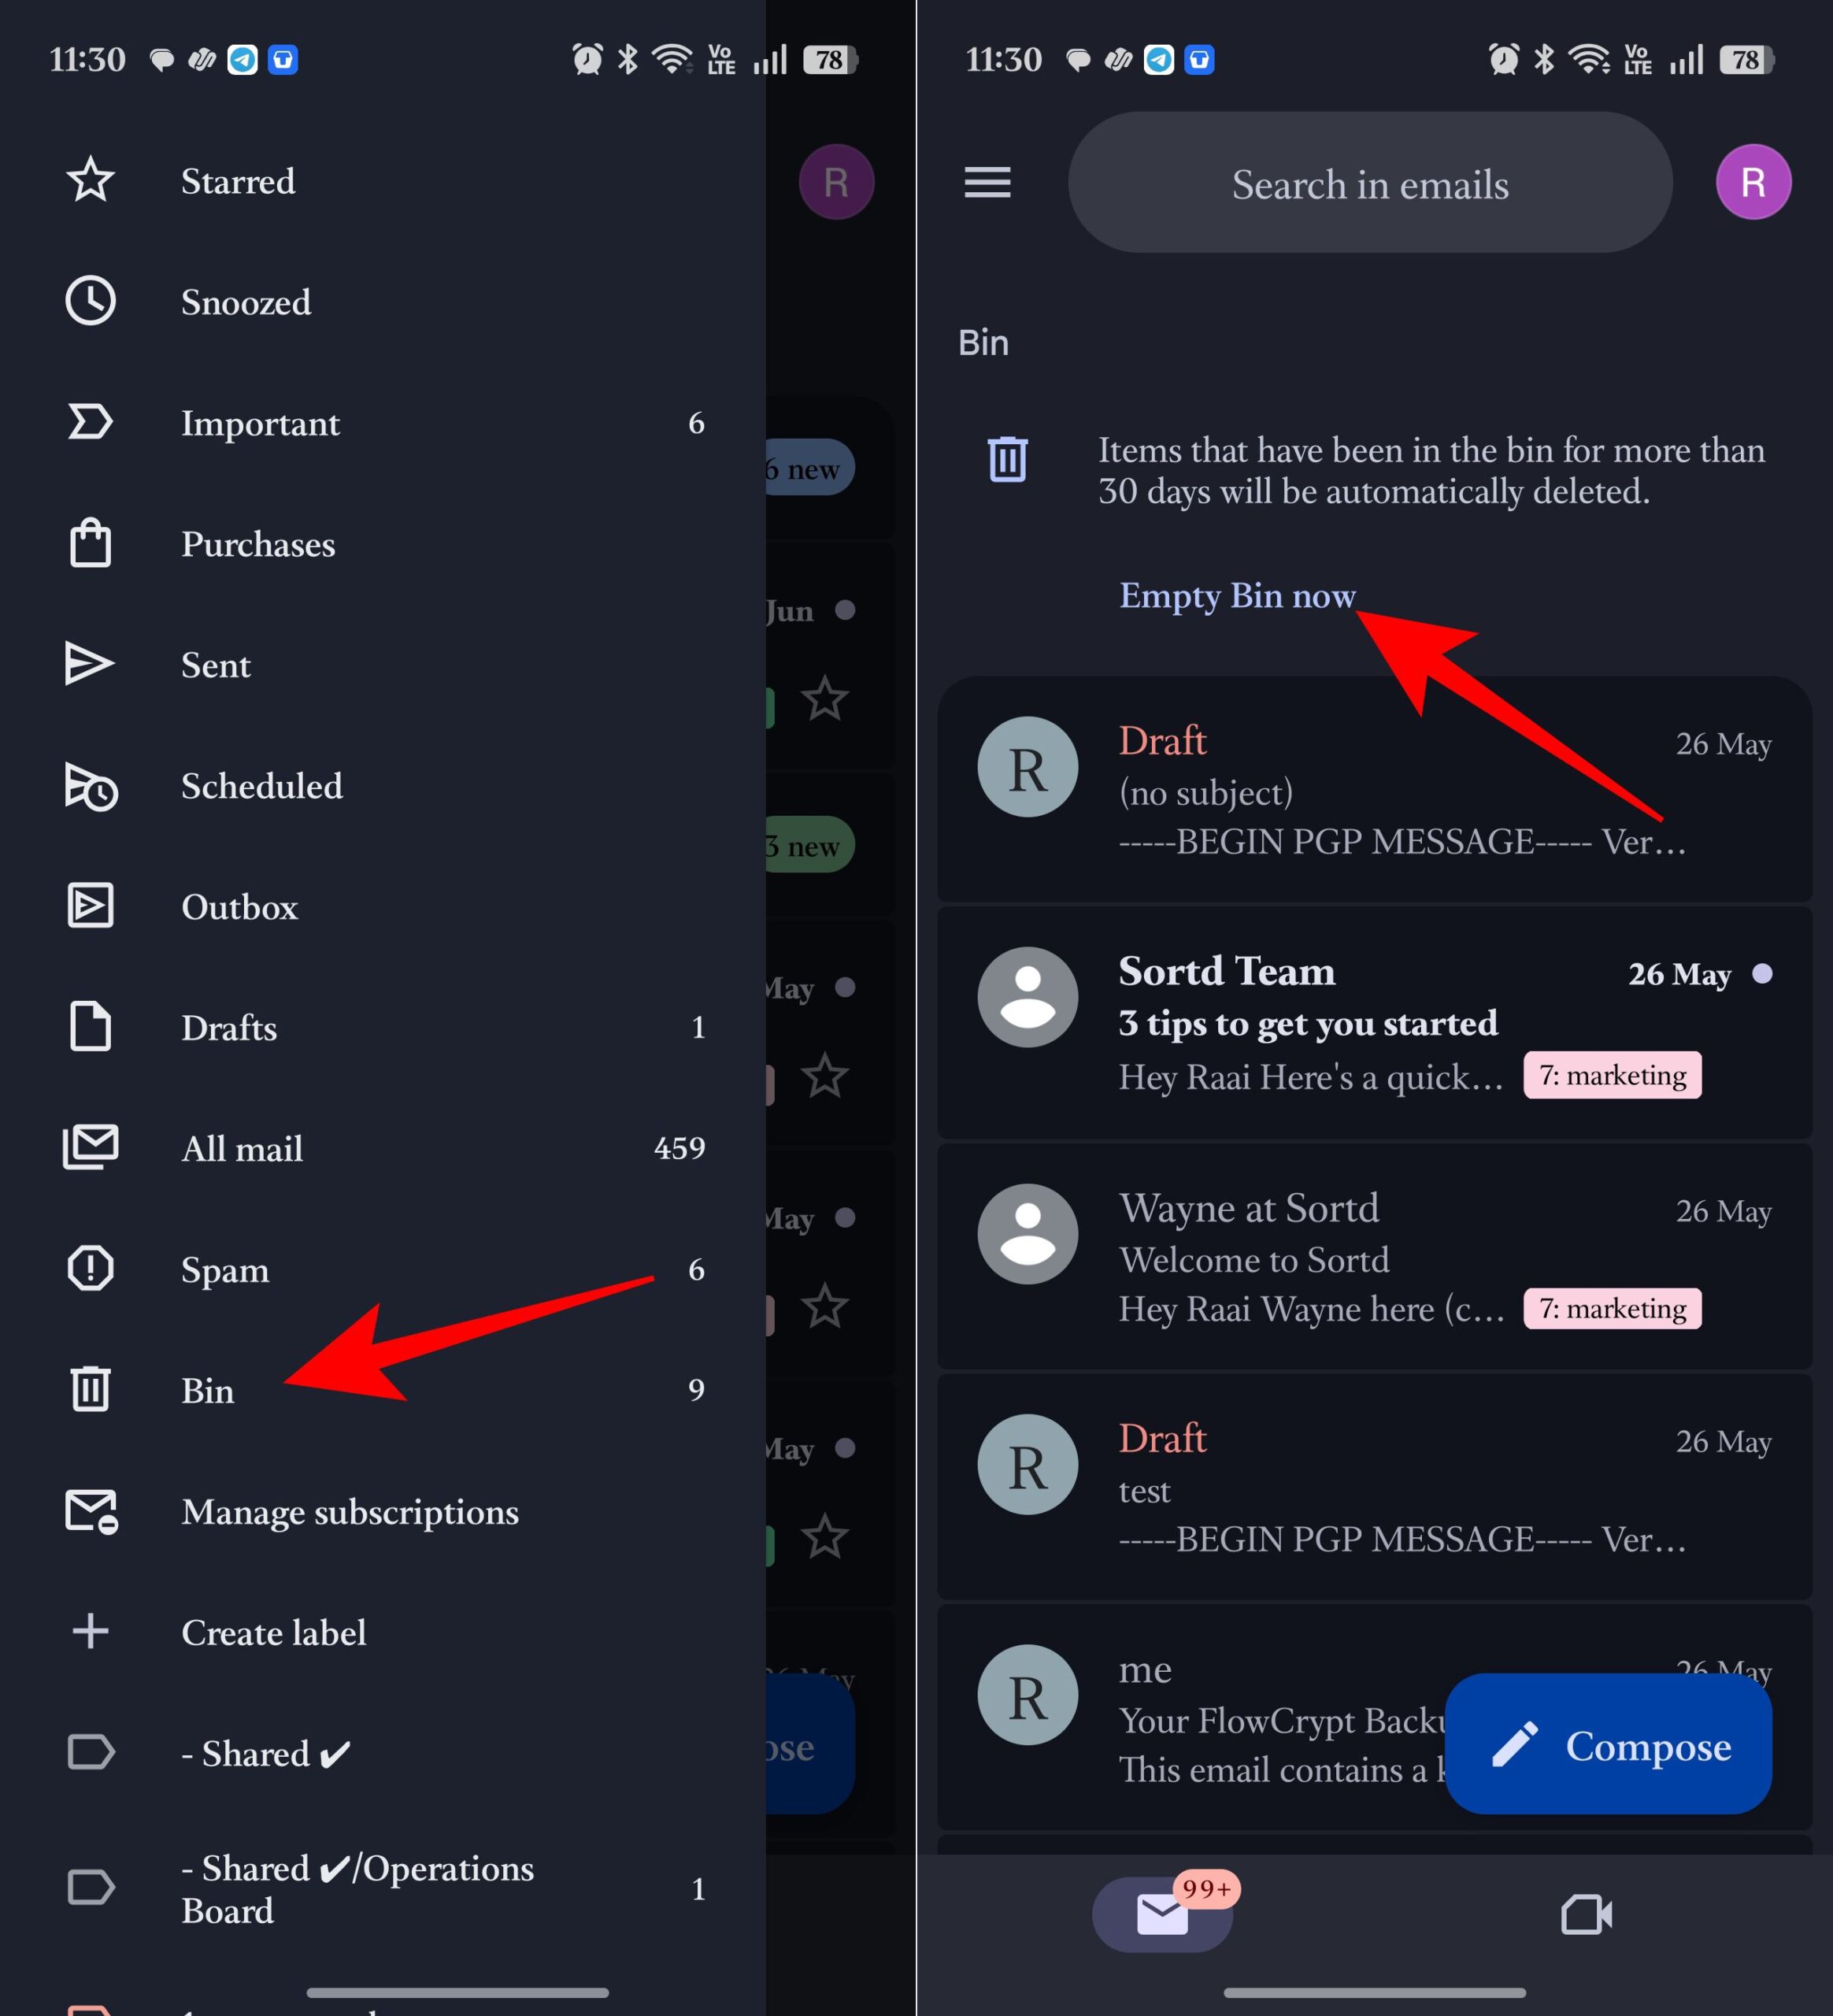


Gmail automatically removes items after 30 days, but if you’re running out of storage, there’s no reason to wait.
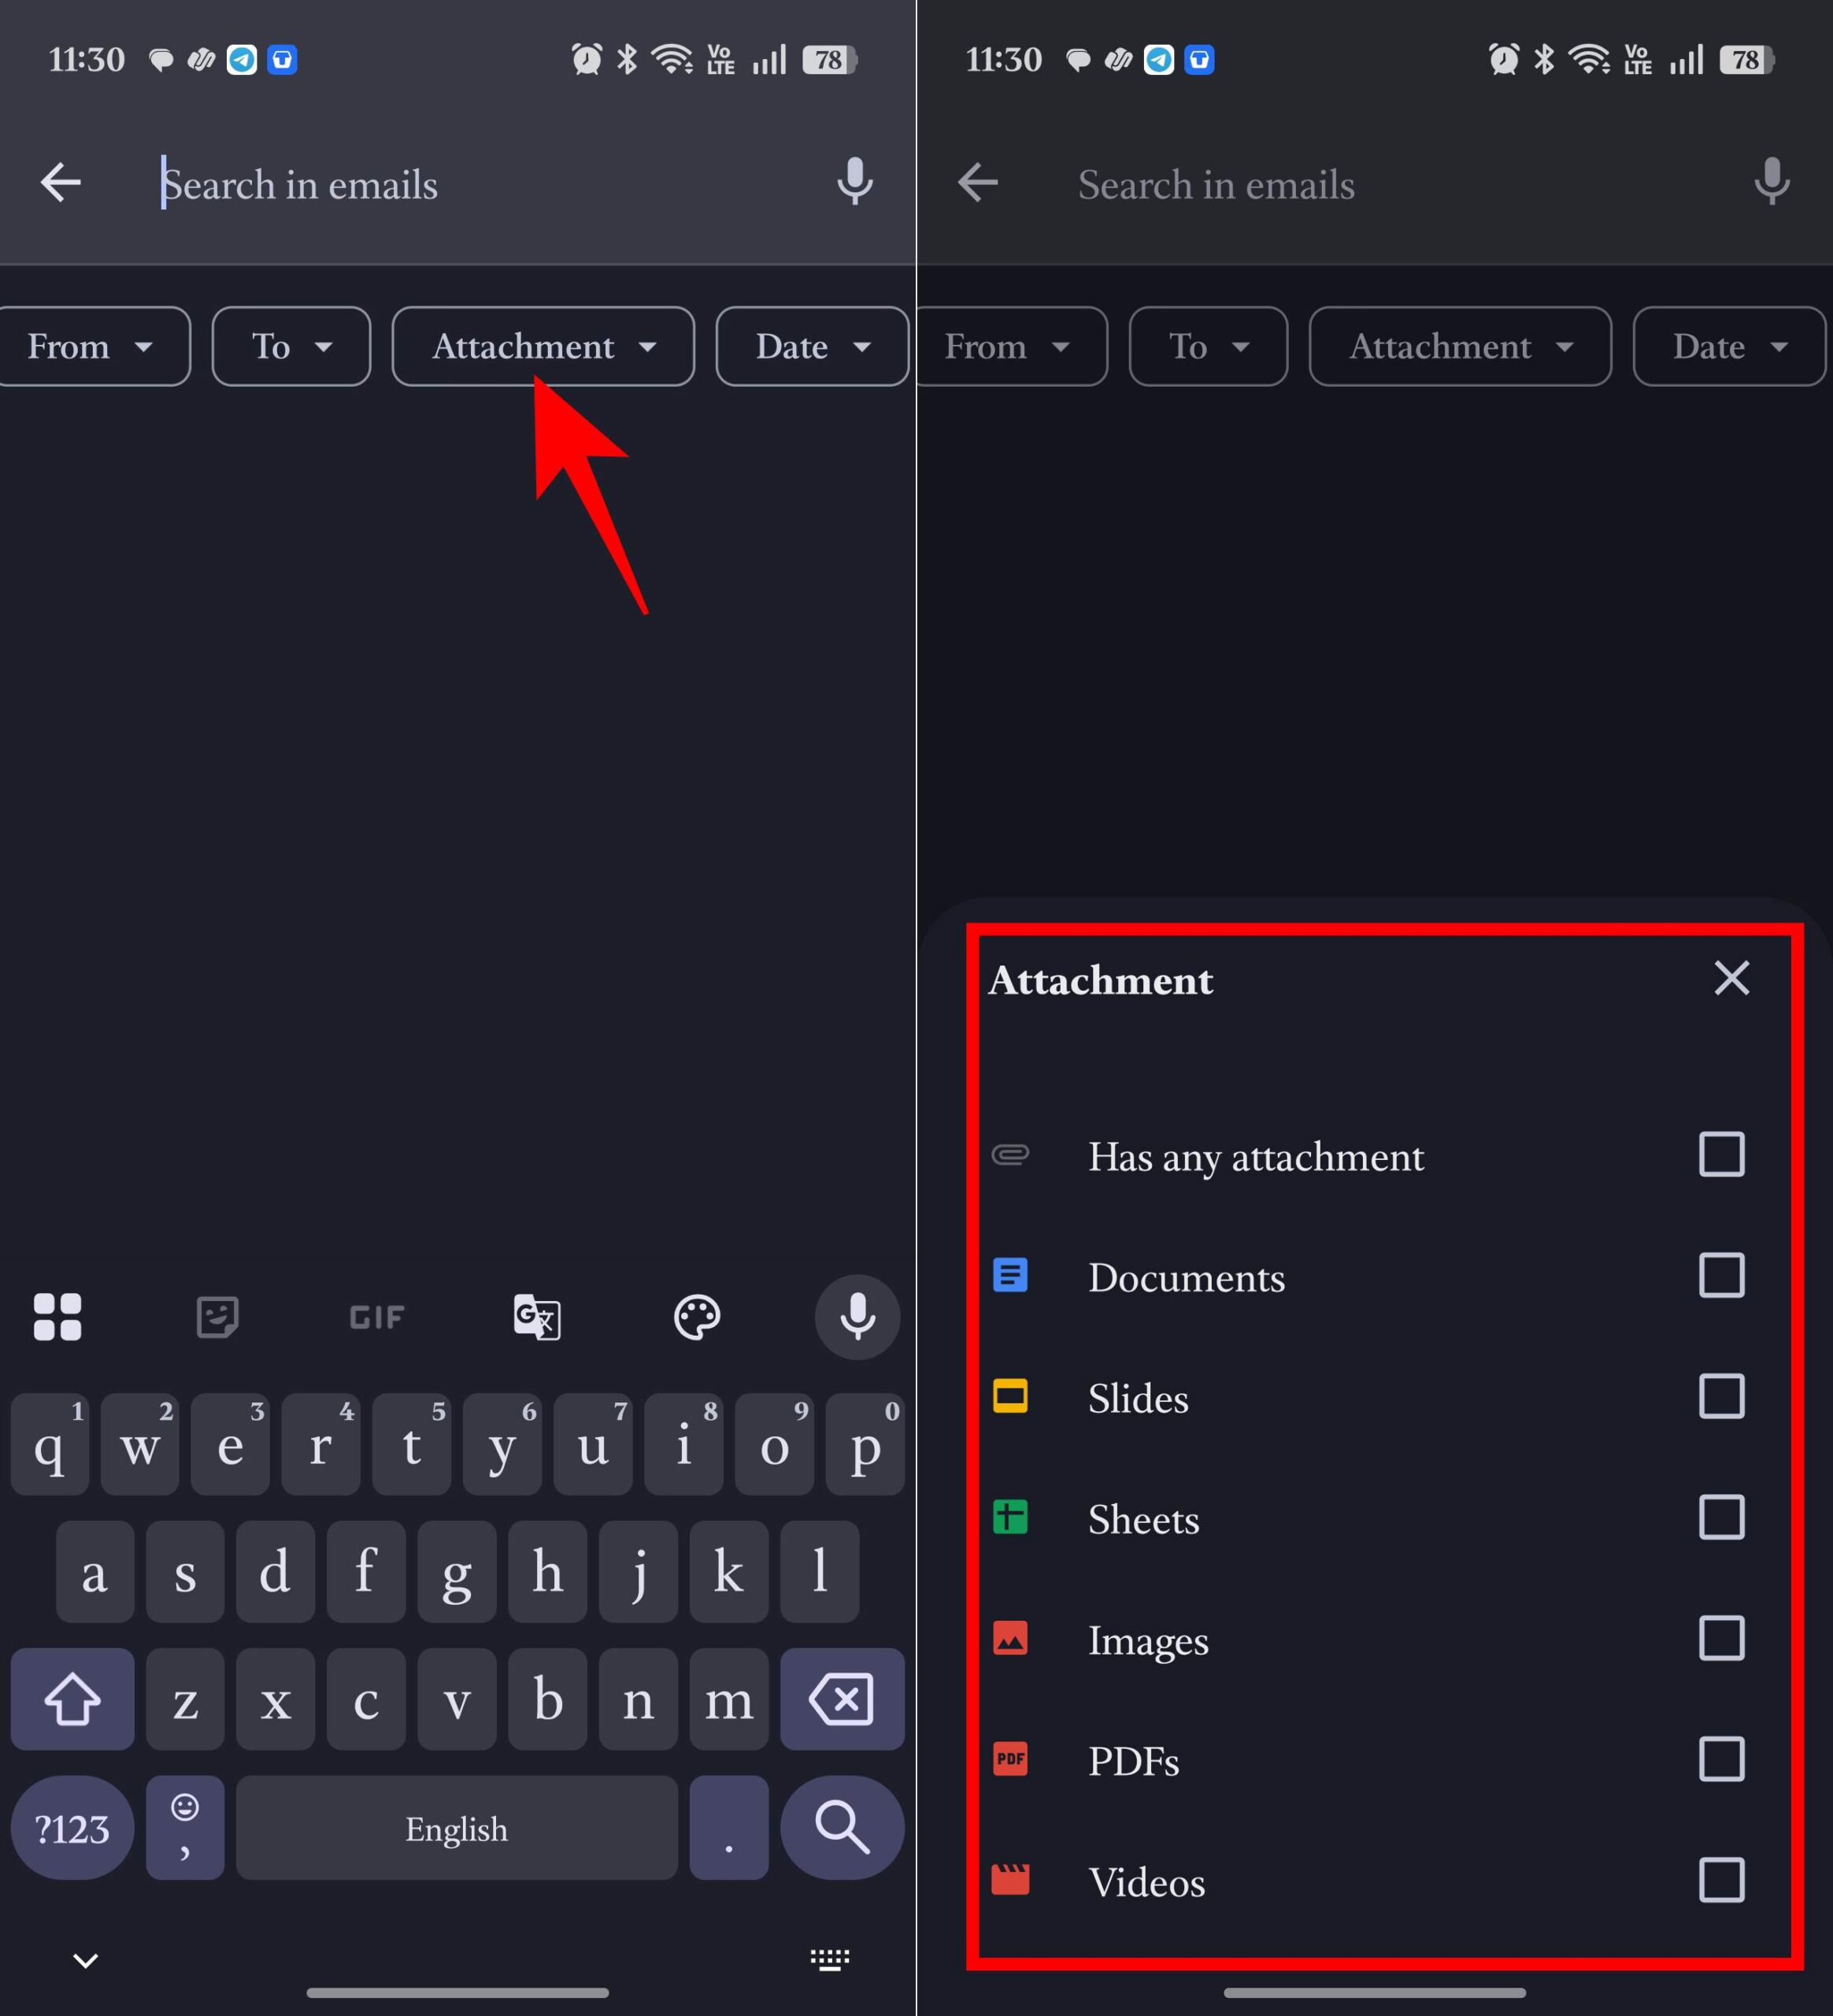
3. Deleting large Gmail attachments
With your Google storage approaching the limit, the first thing that you need to check is your Gmail account. Most people focus on photos and videos, but years of email attachments can quietly consume several gigabytes of storage. In my case, old presentations, PDF reports, ZIP files, and shared videos were taking up far more space than I expected.
The good news is that you don’t have to scroll through thousands of emails manually. Gmail’s search operators make it easy to find the biggest offenders in seconds.
- Open Gmail on your phone.
- Tap the search bar and select Attachment from the top menu.
- Now, you can choose between Documents, Slides, Sheets, Images, PDFs, and Videos. I chose Has any attachments.
- Type
larger:5MBand tap Enter to see emails with attachments larger than 5MB. - Review the results and long-press emails you no longer need.
- Tap the Delete icon.
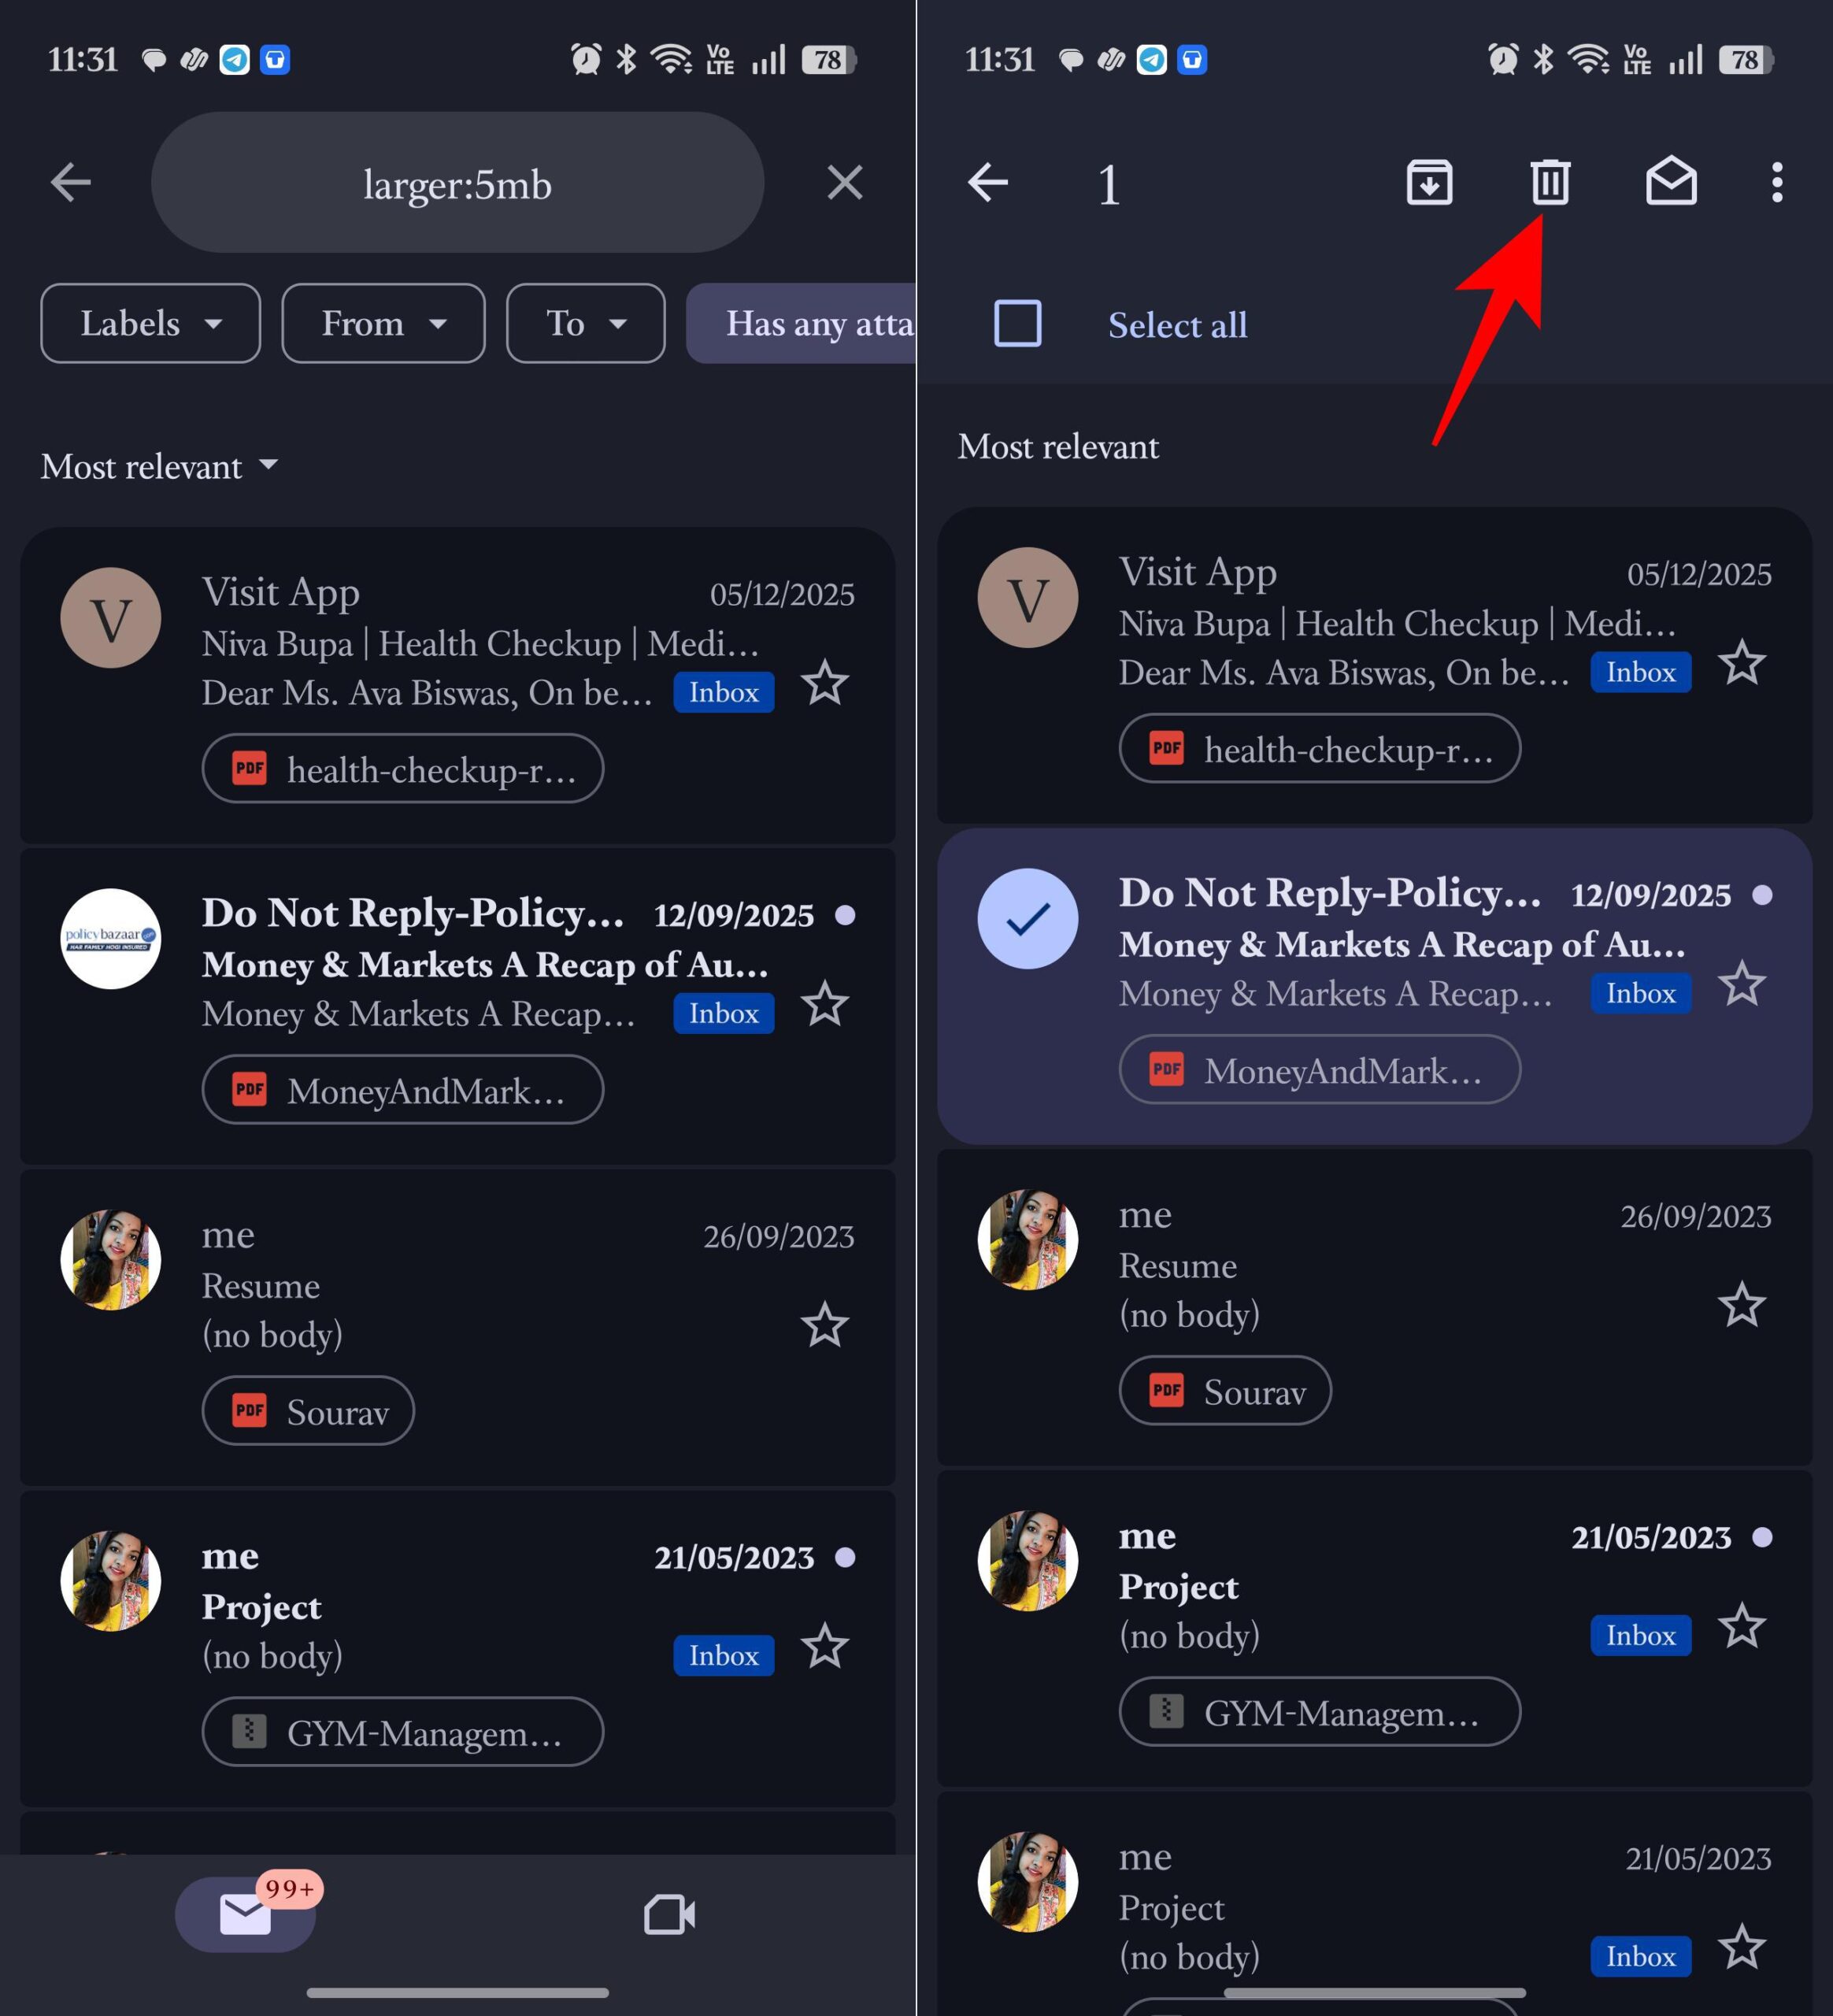
- Open the Bin folder and hit Empty Bin now to permanently remove the emails.


You can also adjust the file size threshold depending on how aggressive you want to be, like larger:10MB — Emails larger than 10MB.
Other useful Gmail searches with Attachment filter:
- Find old emails with attachments:
older:2y - Get emails from a specific sender:
from:example@domain.com - Check promotional emails you no longer need:
category:promotions
Tip:
If your inbox is full of marketing emails, use the Manage Subscription tool in Gmail to clear them in one go.
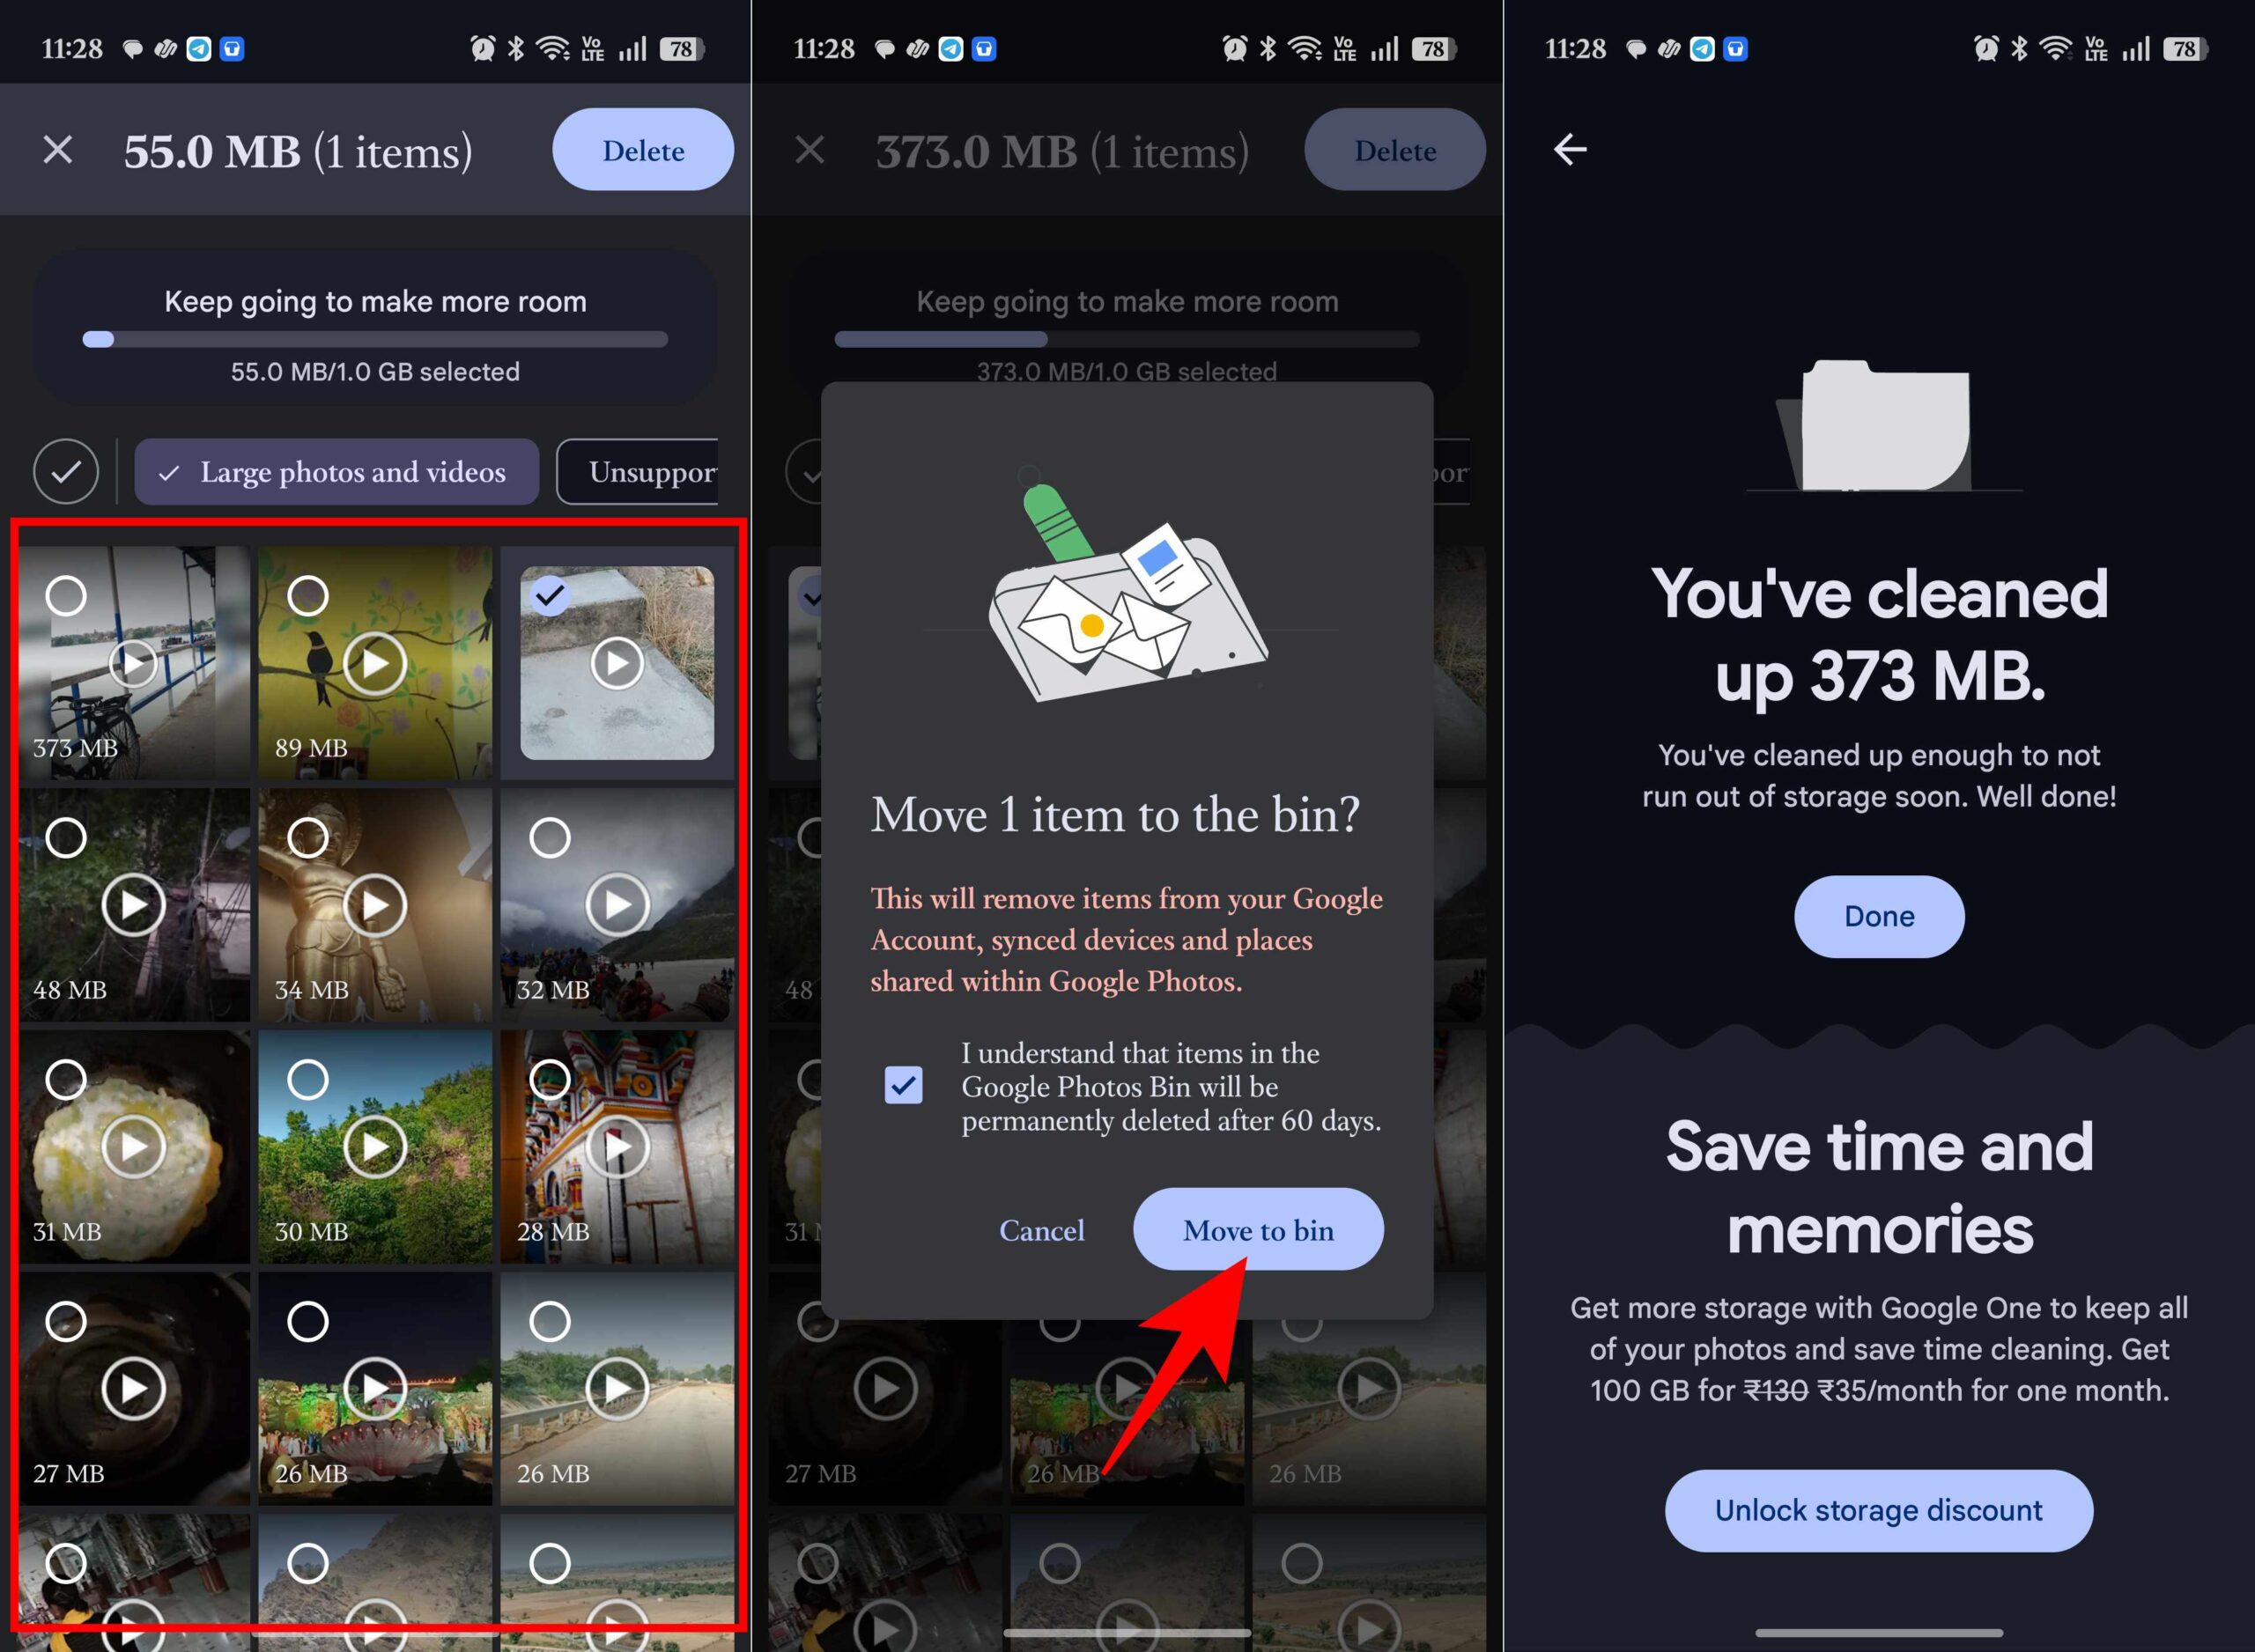
4. Cleaning up Google Photos videos and duplicate photos
Videos turned out to be the major space eaters among the content I had on Google storage. Several 4K videos occupied way more space than several thousand photos could. That’s why you should start by clearing your videos before moving on to photos.
Google Photos also makes it surprisingly easy to find screenshots and blurry images that don’t need to live in your account forever.
- Open Google Photos.
- Tap your profile picture in the top-right corner and select Clean up space.
- Scroll to the Large photos and videos section.
- Review the videos taking up the most space. You can also find duplicate images, screenshots, GIFs, memes, etc. under the Clutter tab.
- Select the ones you no longer need and tap Delete.
- Open the Bin and permanently remove the files.
I was surprised by how many accidental recordings and old videos I had backed up. Deleting just a handful of large clips freed up significant storage.
5. Delete large files in Google Drive
If Google Photos and Gmail aren’t the main culprits, Google Drive probably is. First off, most users are unaware of all the forgotten junk that might be stored within their Google Drive. Old ZIP archives, downloaded software, video projects, backups, and shared files can quietly accumulate over the years.
Instead of randomly deleting folders, I focused on finding the largest files first.
- Open Google Drive in your browser.
- Click Storage from the left sidebar.
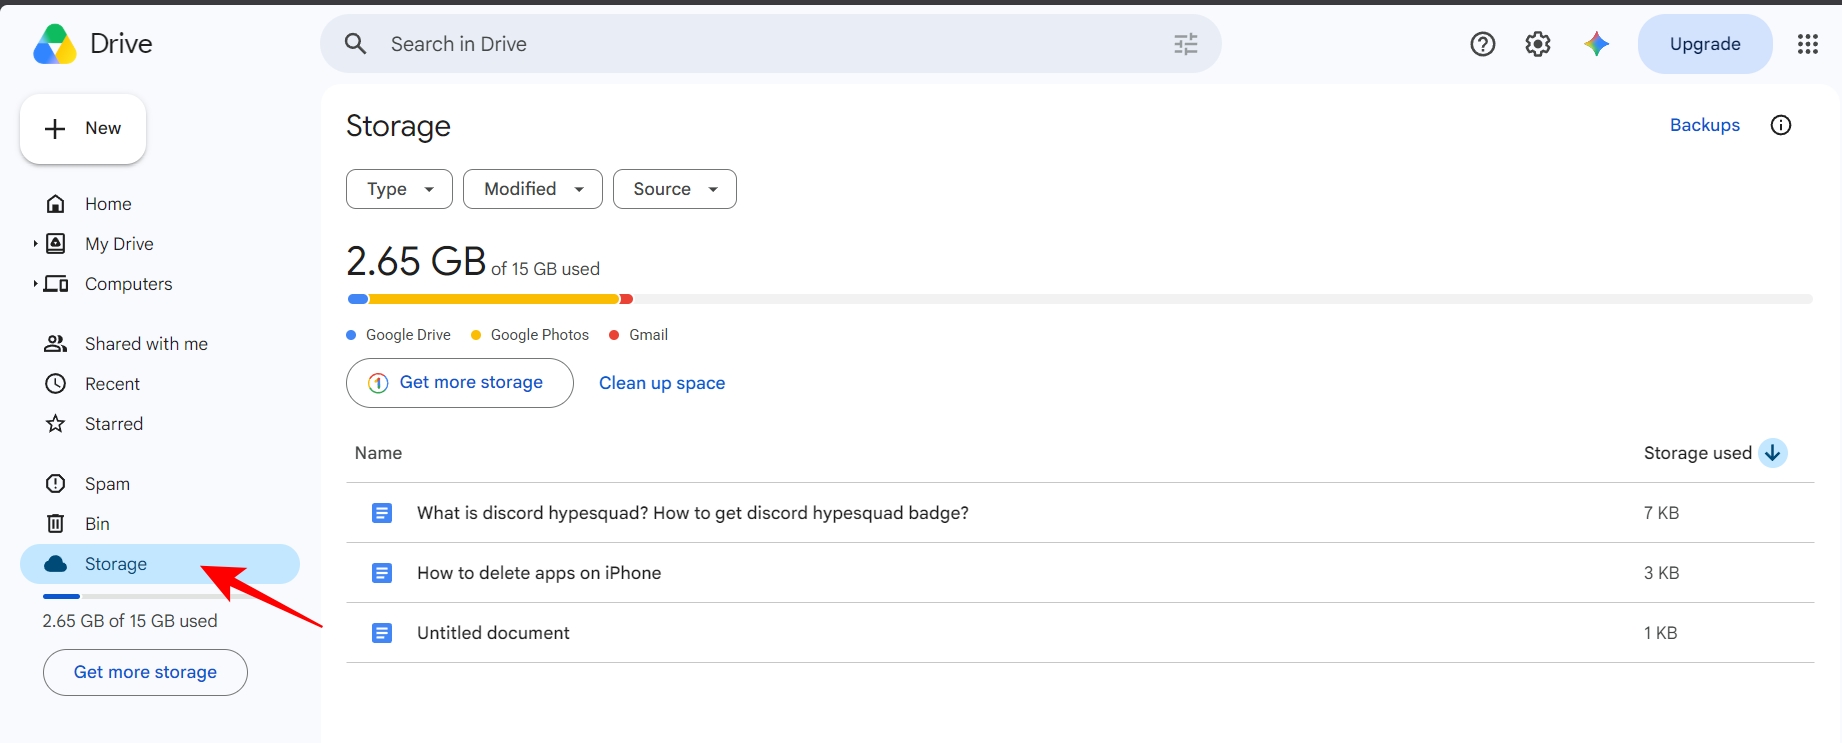
- Google Drive will automatically sort files by storage usage, with the largest files at the top.
- Review the list carefully and identify files you no longer need, such as old ZIP archives, video exports, large documents or PDFs.
- Select the unwanted files and click the Trash icon to delete them.

Also, don’t forget to empty the Bin folder later. Else, those files may continue counting toward your storage quota.
Bonus: Gemini’s Organize My Files helps me declutter Google storage quickly
One of the newer tools I tested while cleaning up my Google storage was Gemini’s Organize My Files feature in Google Drive. It’s available on the web in English for users with eligible Google Workspace or Google AI Premium plans.
Instead of manually sorting hundreds of files into folders, Gemini scans your Drive and suggests where files should go. It can recommend moving documents into existing folders or even create new folders for related files automatically. The best part is that nothing gets moved unless you approve the suggestions first.
For someone with years of screenshots, PDFs, downloads, and random files scattered across Drive, this sounds like a dream. During testing, Gemini quickly identified obvious groups of files and suggested logical folders for them. I can just approve multiple moves at once. However, it repeated some of the same recommendations when run again.
With that being said, this particular version only helps to organize the existing storage and will not search for old backups, eliminate duplicates, or show which files occupy your storage the most.
Common reasons storage doesn’t update immediately
One of the most frustrating moments comes after deleting files. You free up space. Then Google still says your storage is full.
I’ve seen this happen multiple times. Usually, one of these reasons is responsible:
- Trash folders haven’t been emptied
- Google is still recalculating storage usage
- Files were removed from one service but not permanently deleted
- Recently deleted photos are still in the Photos trash
- Account synchronization hasn’t completed
In many cases, the storage meter updates within a few hours. Sometimes it can take longer. The important thing is not to panic and start deleting more files unnecessarily.
Should you upgrade to Google One?
This might be unpopular, but I don’t think most people need Google One immediately. When Google warns you that storage is full, the easiest solution is to pay for more space. But the smarter solution is figuring out why you’re out of space in the first place.
If your account is packed with years of forgotten junk, upgrading only postpones the problem.
That said, Google One makes sense if you:
- Regularly record videos
- Back up multiple phones
- Store large work files
- Share storage with family members
- Need extra cloud space every month
For everyone else, spending 20 minutes cleaning up your account can save money and improve organization at the same time. I view Google One as a convenience purchase, not a storage emergency solution.
Final thoughts
Just because your Google storage has reached full capacity does not necessarily mean you should pay for extra storage. In most instances, all you need is some cleanup to reclaim space. The most important thing that I have learned is not the way to clear my storage space. It was realizing how much digital clutter I was carrying around without knowing it.
I expected Google Photos to be the villain. Instead, the real problem was years of forgotten attachments, deleted files sitting in trash folders, duplicate photos, oversized videos, and giant Drive files I no longer needed.
If you’ve cleaned up everything you can and still need more room, upgrading to Google One may be worth considering.


