A VPN helps you browse the internet without worrying much about your privacy and data breaches. Most paid VPN services offer fast and reliable speeds. However, sometimes your VPN might get stuck on the connecting page, the data speeds might be pathetic, or websites might fail to load. If you’re in a similar situation, read along to find out how to fix VPN not working on iPhone and iPad.
- Check the internet connection on your iPhone
- Check router settings
- Restart your Wi-Fi
- Disconnect and reconnect VPN
- Restart the VPN app
- Update the VPN app on iPhone or iPad
- Update the web browser
- Check VPN server overcrowding
- Try different VPN servers
- Check VPN data limit
- Change the VPN Tunneling Protocol
- Delete VPN profile
- Disable private Wi-Fi address on iPhone
- Reinstall the VPN app
- Restart your iPhone
- Reset Network Settings
- ContactVPN service provider
1. Check the internet connection on your iPhone
A VPN can only function when you are connected to the internet. While this might seem very silly, please check if the network (Wi-Fi or Cellular) you are connected to has an active internet connection. The VPN cannot perform its primary functions without an active internet connection.
Here’s how to check if you have an active internet connection:
- Turn on Wi-Fi, connect to a Wi-Fi network, or turn on Cellular/Mobile Data.
- Open the VPN app and disconnect from the connected VPN.
- Launch any web browser and load any website.
If the website loads, it means you have an active internet connection, and you can move on to try the next steps. And, if the website does not load, you do not have an active internet connection. Refer to our guides on how to fix Wi-Fi not working and how to fix cellular/mobile data not working to sort this out.
2. Check router settings
For the uninitiated, a VPN Passthrough helps connect two secured networks over the internet. There is a slim chance that your Wi-Fi router does not support VPN Passthrough. Check if the router supports this setting, and if it does, you can make the required changes by connecting to the router as an Administrator.
3. Restart your Wi-Fi
If you just enabled VPN Passthrough on your Wi-Fi router, it must’ve restarted already. However, if VPN Passthrough was enabled by default and you didn’t have to restart your router, you must restart it right now.
I’ve noticed several times that whenever my internet is disconnected, restarting the router fixes connection issues. Software issues are present everywhere, and it is likely that you cannot connect to the internet due to some software shortcoming, which is directly responsible for not establishing a VPN connection.
4. Disconnect and reconnect VPN
Disconnecting and reconnecting is a simple yet efficient troubleshooting method that helps resolve issues. Just open your VPN app and disconnect from the service. Wait for a couple of minutes and reconnect to the VPN.
5. Restart the VPN app
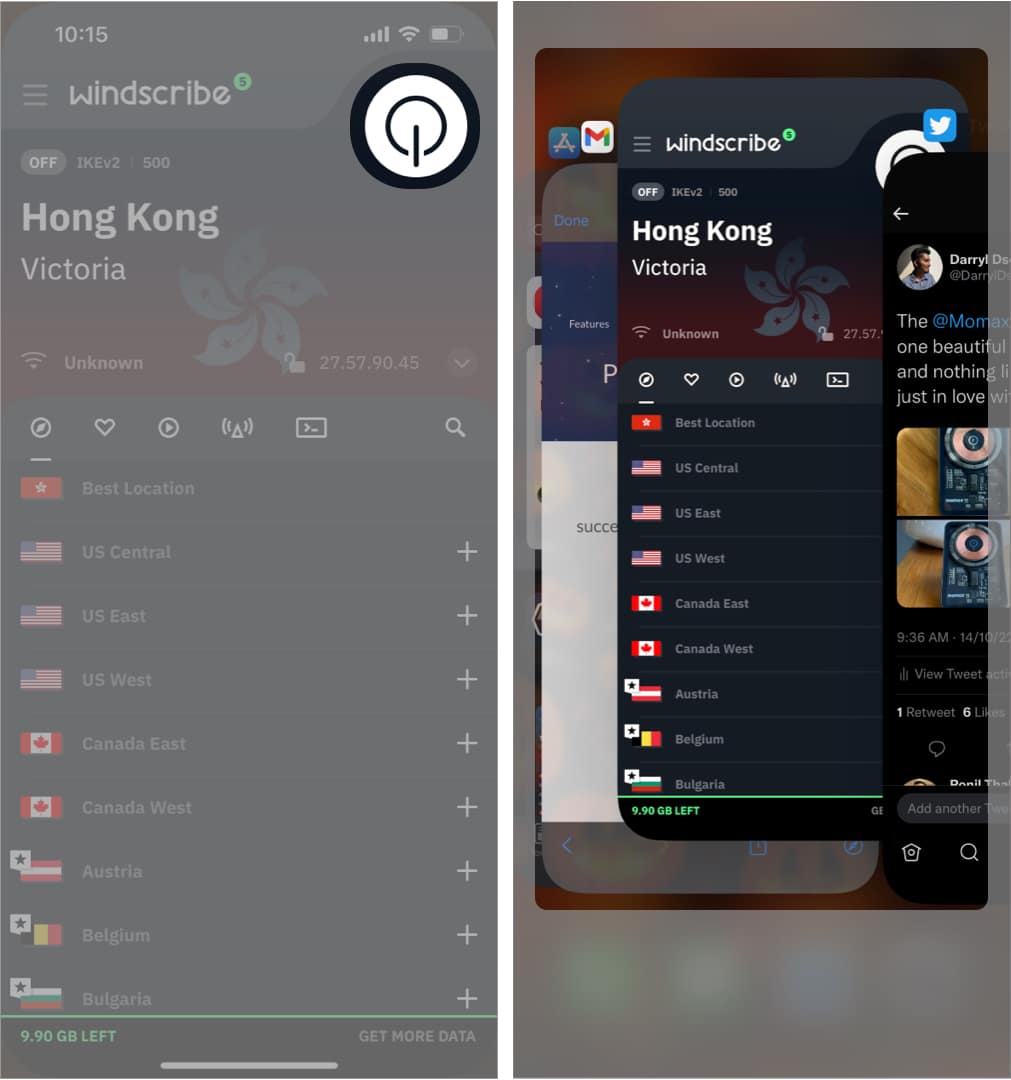
- Open the VPN app and disconnect from the VPN.
- Navigate to the App drawer by swiping up on the home screen or double tapping the home button.
- Swipe up on the VPN app and kill it.
- Open the VPN app and connect to the VPN.
6. Update the VPN app on iPhone or iPad
In my experience, software always has some or the other bug. No matter how minor, there will always be a bug in operating systems, applications, etc. The best way to eliminate these bugs is to update the software to the latest version. For those unaware, here’s a guide to help you learn how to update apps on your iPhone or iPad.
7. Update the web browser
Just like how the VPN app is a software app, the web browser you use it for is also a software app. Developers regularly push updates for web browsers. As a consumer, you should ensure that you are on the latest version to avoid any browser-based problems.
Here are step-by-step guides to help you update Chrome and Safari to their latest versions.
8. Check VPN server overcrowding
A VPN service has a limited number of servers in every country. If many people are on the same server, the utilization rate is high, leading to a slower speed. You can view the utilization rate within the app.
Let’s suppose the server is congested with several people. In that case, moving to a different unoccupied server or at least one that is comparatively less occupied will offer faster and much more reliable connectivity.
9. Try different VPN servers
We just discussed how servers could be too crowded, leading to a slow and unreliable connection. Also, in certain situations, a VPN server from a particular country might not provide the desired results, especially when accessing geo-restricted content. Switching from one VPN server to another is a great way to resolve the issue.
10. Check VPN data limit
Paid VPN subscriptions offer high speeds, access to a plethora of servers from different locations worldwide, and unlimited data. However, I cannot say the same for free VPN services. On a trial plan, the services are quite limited.
Once you’ve exhausted the limit, the VPN won’t work. And the solution to this is to either switch to a different VPN service or just upgrade to a paid VPN plan of the existing VPN service.
11. Change the VPN Tunneling Protocol on iPhone
Tunneling protocols – now referred to as VPN protocols – play the role of routing the network between your iPhone and the server. Different protocols shine in different areas. Some offer super-fast speeds, while others specialize in providing the utmost security and privacy.
The option to switch protocols is available within the VPN app. Try switching to a different protocol and check if you can establish a reliable connection. If this does not bear fruit, switch back to the default protocol and go through our next few solutions.
12. Delete VPN profile
Whenever you install and open a VPN app for the first time on your iPhone, the device asks permission to add VPN configurations to your iPhone. It creates a VPN profile, and that is what you need to delete. Once deleted, the VPN app will create a profile the next time you open it. Doing so will reset any discrepancies present. Here’s how to do it:
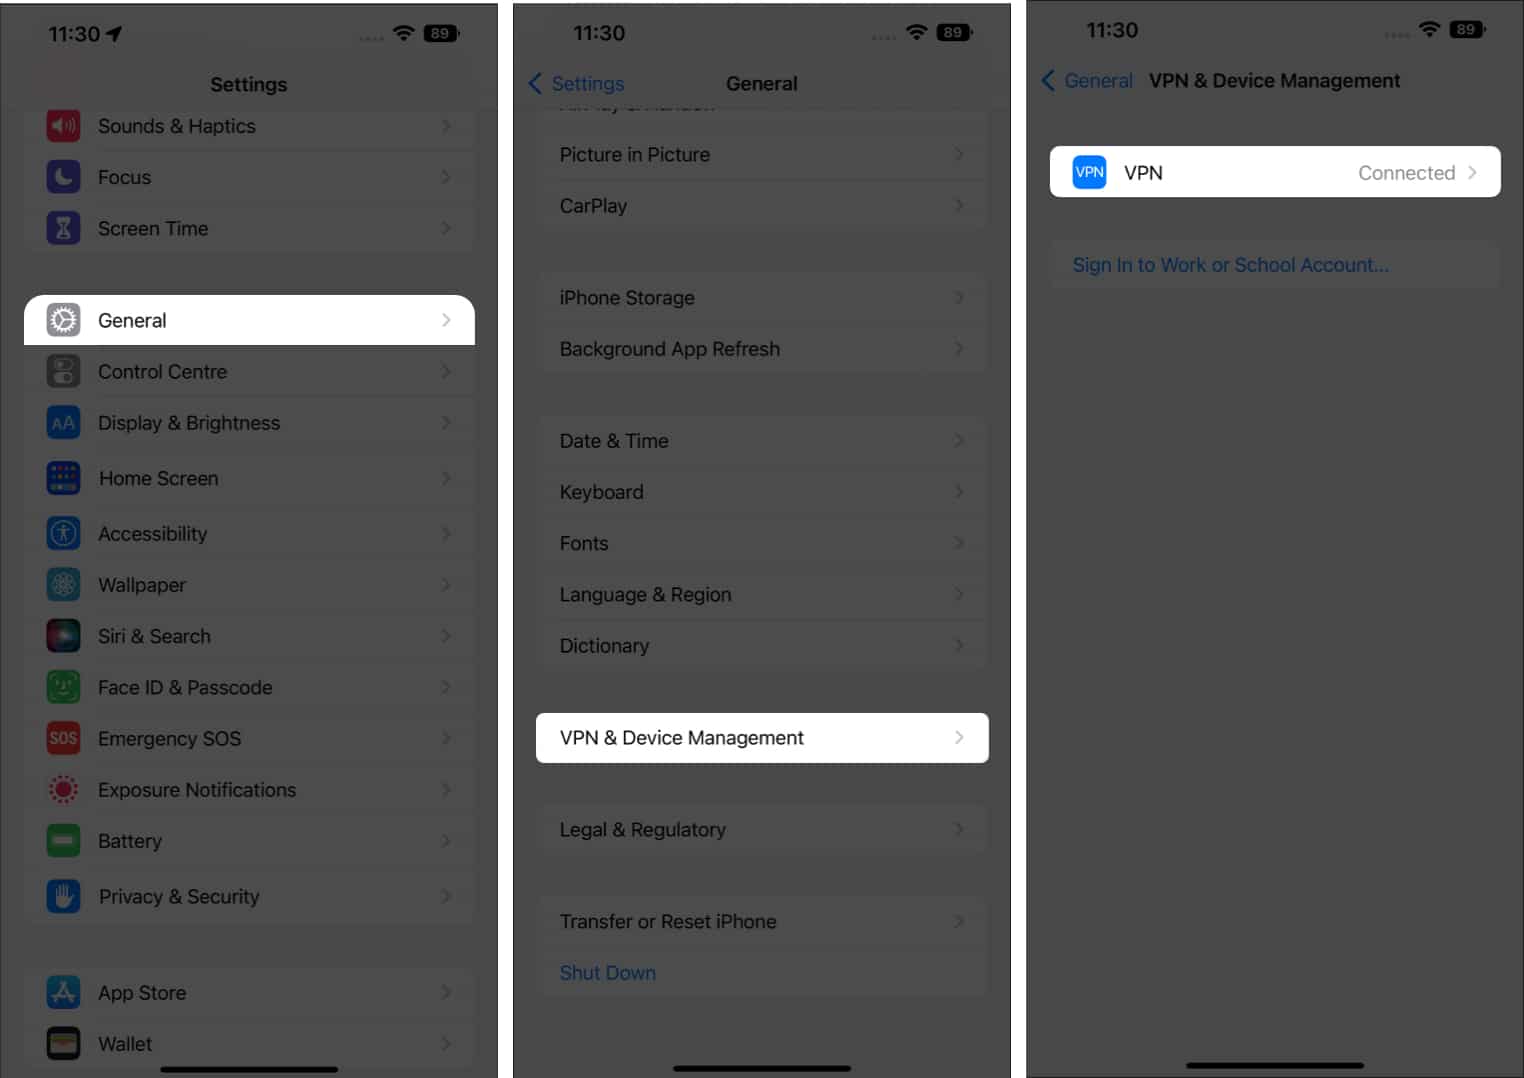
- Open Settings on iPhone.
- Tap General.
- Navigate to VPN & Device Management.
- Tap VPN.
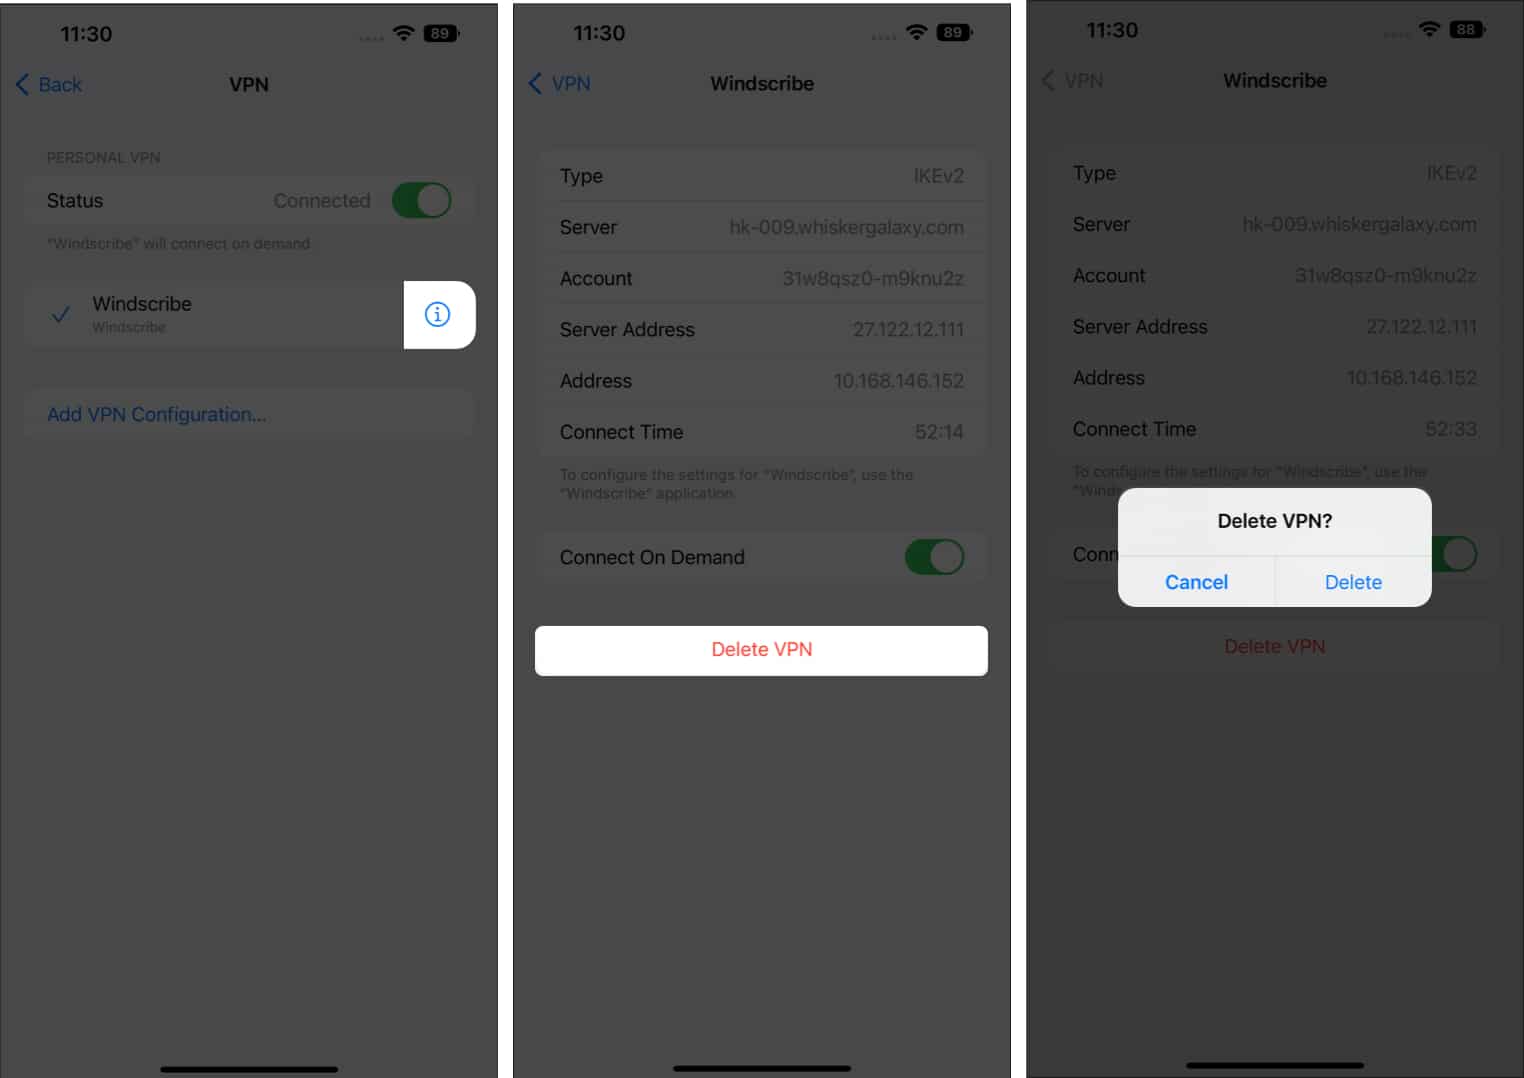
- On the next page, tap the “i” button. If you use multiple VPN apps, please select the one you want to reset the profile from.
- Tap Delete VPN and confirm your selection by tapping Delete on the pop-up.
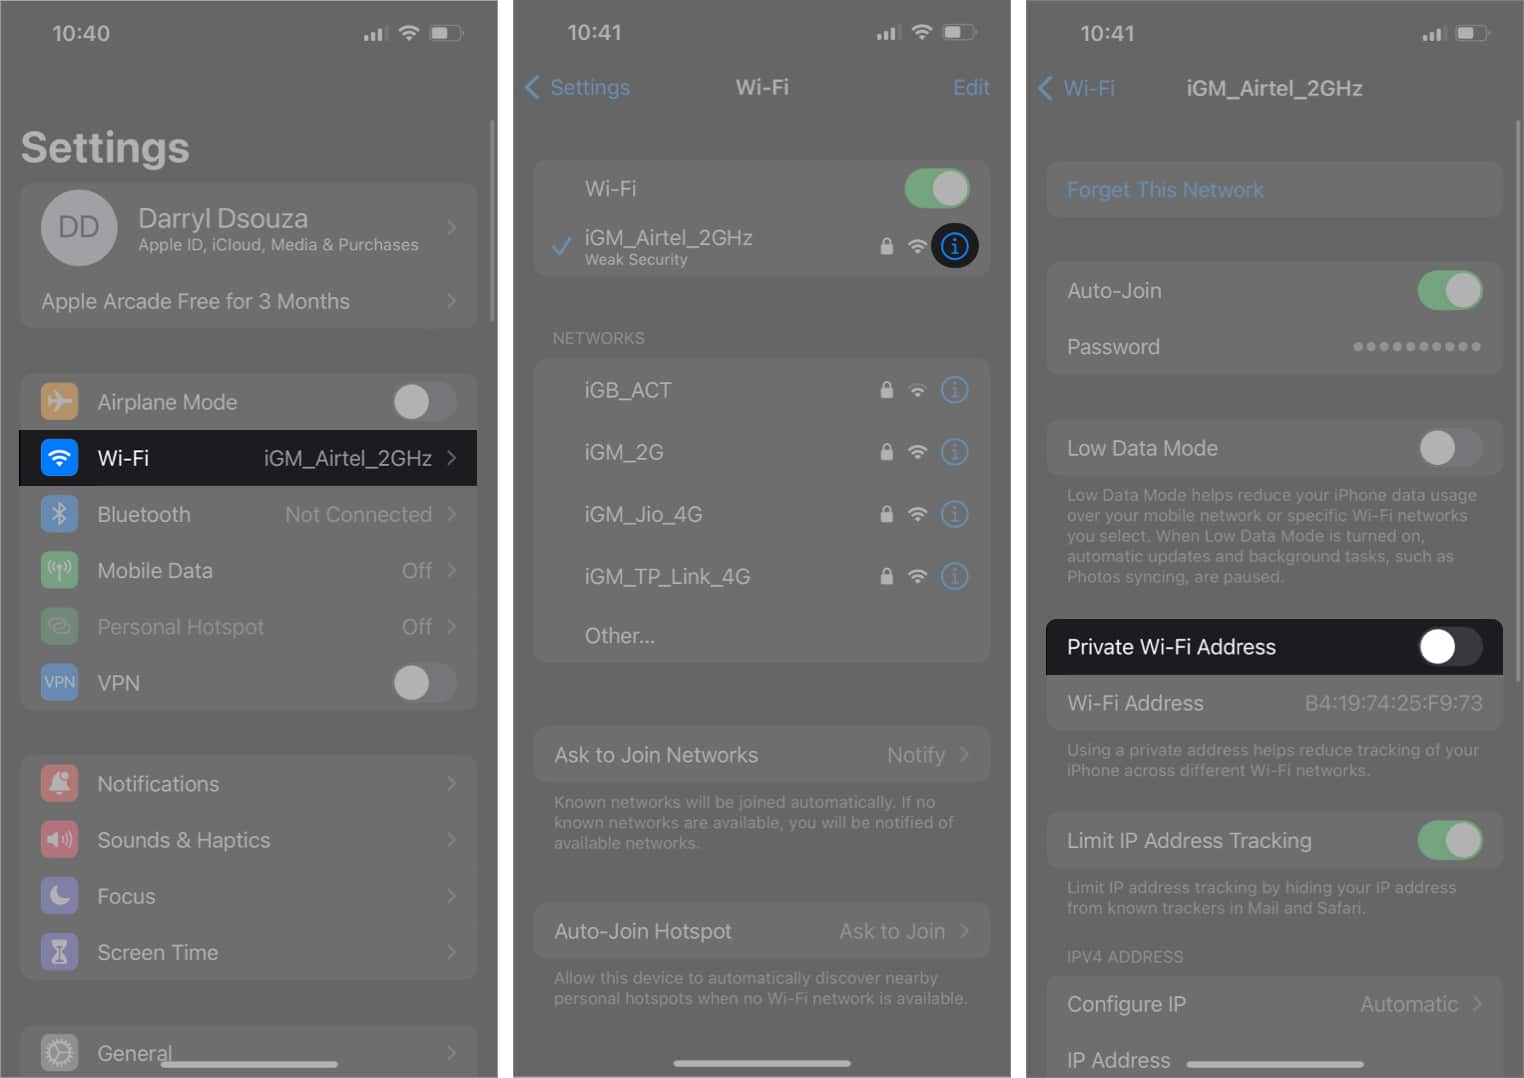
13. Disable private Wi-Fi address on iPhone
Using a Private Wi-Fi Address helps reduce the tracking of your iPhone across different Wi-Fi networks. However, it might be the reason you aren’t able to establish a connection with the VPN server. Hence, disabling the Private Wi-Fi Address might do the job. Follow these steps to disable this setting:
- Open Settings on iPhone.
- Select Wi-Fi.
- Tap the “i” button beside the Wi-Fi network the device is connected to.
- Turn off the Private Wi-Fi Address toggle.
- Now, confirm your selection by tapping Continue on the pop-up dialogue box.
14. Reinstall the VPN app
While troubleshooting, nothing seems to work at times. In such cases, the one solution that resolves many issues is reinstalling the app. We often disregard this step, but trust me, a fresh and clean re-installation of software works wonders.
To delete the VPN app:
- Unlock your iPhone and swipe left to head to the App Library page on your iPhone.
- Navigate to the VPN app you want to uninstall.
- Tap and hold on to it.
- Select Delete App.
- Tap Delete on the dialogue box to confirm your selection.
Follow these steps to reinstall the VPN app:
- Open the App Store on your iPhone.
- Tap the Search Bar and enter the name of your VPN app.
- Tap the Install icon (cloud with a downward arrow).
- Once installed, launch the app and check if it connects to a server.
15. Restart your iPhone
Restarting is the solution to most software issues on the iPhone. And that’s exactly what you should try, especially when it’s a network-related issue. It will most likely get resolved by restarting the device. It might not always work, but it is certainly worth trying out. For those unaware, here’s our guide on how to restart your iPhone.
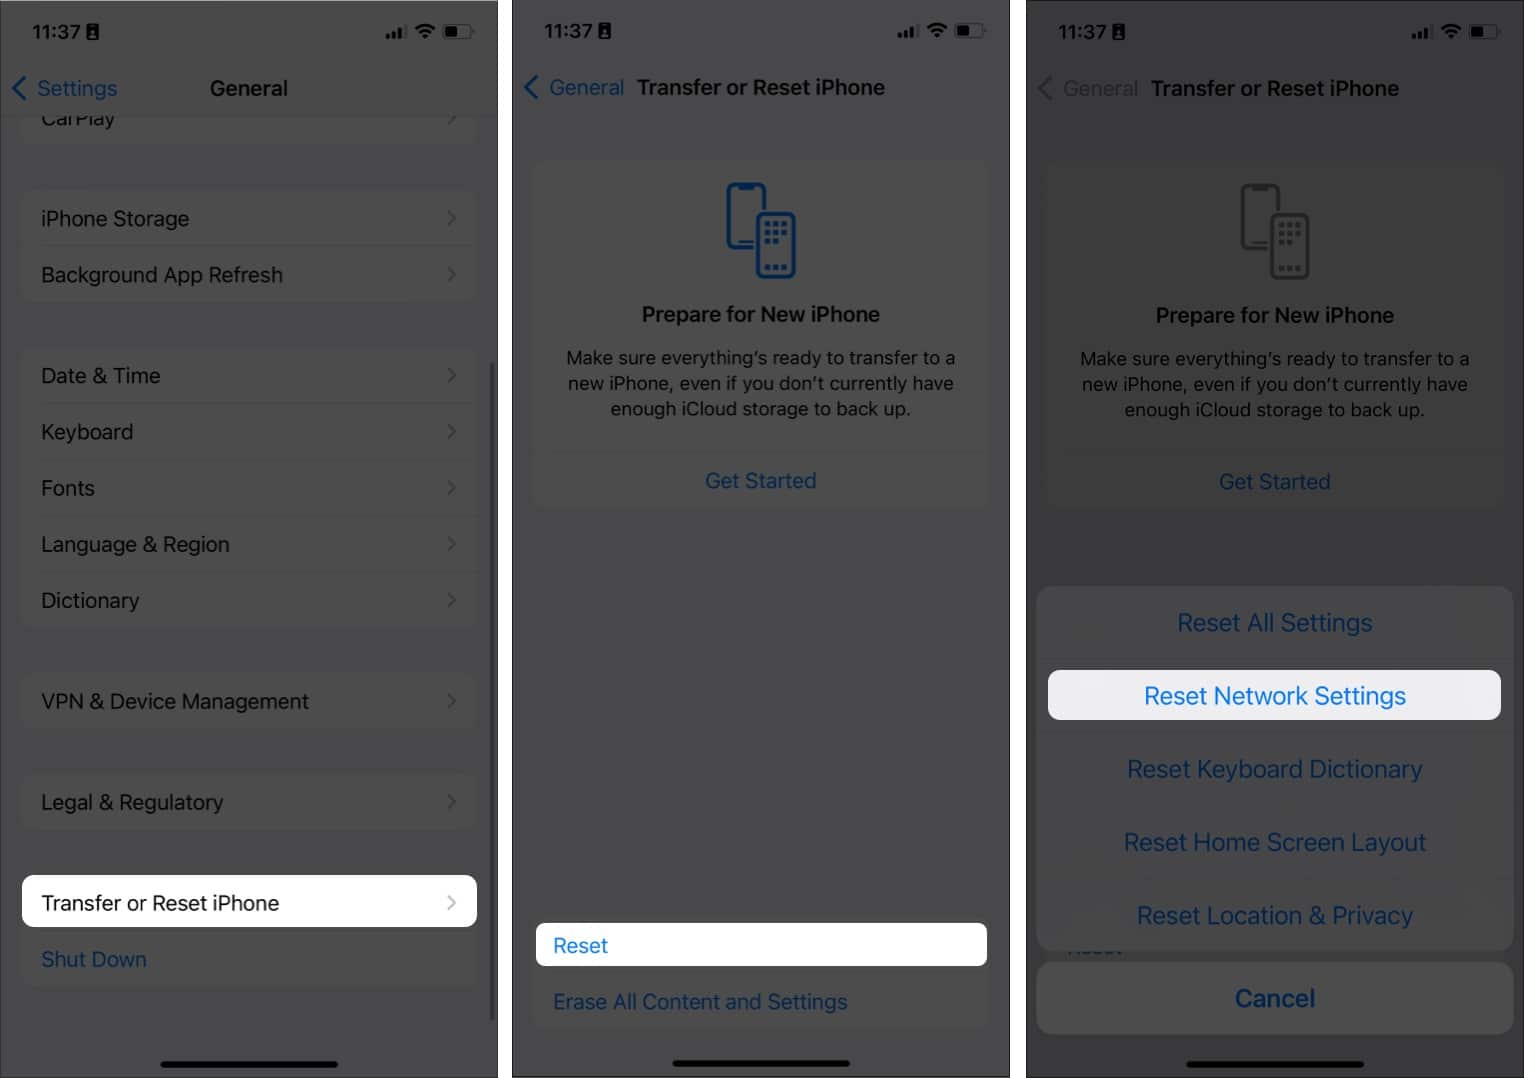
16. Reset network settings
You don’t need to reset your entire iPhone just because you face an issue in a certain device aspect. Rather, you could reset the settings for that specific section. In our case, a VPN not working despite being connected to Wi-Fi or Cellular Data can be attributed to messed-up network settings. In such cases, you can Reset Network Settings on your iPhone, and here’s how to do it:
- Open Settings on iPhone.
- Navigate to General.
- Select Transfer or Reset iPhone.
- Tap Reset.
- Now, select Reset Network Settings.
- Confirm your selection by tapping Reset Network Settings.
Your iPhone will restart and will reset all the previously saved network settings.
17. Contact VPN service provider
If none of the steps mentioned above helped resolve your issue, I’m skeptical if there’s anything else that can. The only ray of hope right now is to contact your VPN service provider. Doing so will help you clarify if the servers are down from the service provider’s end or if there is any other issue with your account.
Most VPN service providers will have a Contact Us page, and you can either send them an email or call their customer care number. However, if there’s nothing wrong at either your end or the service provider’s end, maybe this is a sign that you should move on to another VPN service that offers better connectivity and service.
That was all
I hope this article helps you establish a secure and stable VPN connection. If you’re planning to switch to a different VPN connection, don’t forget to refer to our list of the best VPNs for iPhones and iPad. Also, if you’ve come across any method apart from the ones listed above, leave the solution in the comments, as it will help the other readers. Let me know in the comments below if you have any other questions regarding the VPN not working on iPhone.
Read more:



Leave a Reply