iPhone Not Showing Up in Finder? Here’s How to Fix It
If your iPhone isn’t appearing in Finder on Mac, a missed trust prompt, faulty cable, or Finder setting could be the reason. This guide walks you through simple, proven fixes.

Connecting your iPhone to a Mac should be simple. You plug it in, open Finder, and your iPhone appears under Locations so you can sync, back up, restore, or update iOS. But sometimes, Finder refuses to show your iPhone.
The good news is that this problem is almost always fixable. In most cases, it comes down to a trust prompt you missed, a cable that only supports charging, or a Finder setting that hides iOS devices.
This guide explains why your iPhone may not appear in Finder on your Mac and walks you through reliable fixes.
Why Your iPhone Isn’t Showing Up in Finder on Mac
Your iPhone usually appears in Finder as soon as it’s connected, but a few common issues can prevent that from happening. In most cases, the problem is not serious. Finder simply cannot complete the connection properly.
Here are the most common reasons:
- Your iPhone isn’t unlocked or trusted: Finder needs permission from your iPhone before it can access device data.
- The cable or connection isn’t transferring data: Some cables only support charging, and damaged connectors can also break the data link.
- Finder sidebar settings are disabled: The iPhone may be detected, but Finder may be set to hide iOS devices under Locations.
- macOS or iOS is glitching: Minor software bugs can prevent Finder from refreshing connected devices properly.
- VPNs or security tools are interfering: Some background apps, antivirus tools, or device management restrictions can block the connection handshake.
How to Fix an iPhone Not Showing Up in Finder on Mac
These solutions fix iPhones not appearing in Finder or Macs not recognizing iPhones.
1. Ensure Your Mac Supports iPhone Management Via Finder
Finder only manages iPhones on Macs running macOS Catalina or later. If your Mac is running an older version of macOS, iPhone syncing and backups are handled through iTunes instead.
If Finder does not show your iPhone and you are on an older macOS version, the issue may simply be that Finder is not designed to manage it.
2. Unlock Your iPhone and Tap “Trust This Computer”
This is the most common reason an iPhone does not appear in Finder. Even if both devices use the same Apple Account, Finder will not list the iPhone until it is unlocked and the trust prompt is accepted.
Here’s what to do:
- Plug your iPhone into the Mac.
- Unlock your iPhone and stay on the Home Screen.
- Look for the pop-up labeled “Trust This Computer?“
- Click Trust and enter your passcode.
- Now open Finder again and check your iPhone’s name under Locations.
Note:
3. Make Sure Finder Is Not Hiding Your iPhone
Sometimes, Finder detects the iPhone but does not display it in the sidebar due to a disabled setting. Although rare, glitches can change these settings unexpectedly.
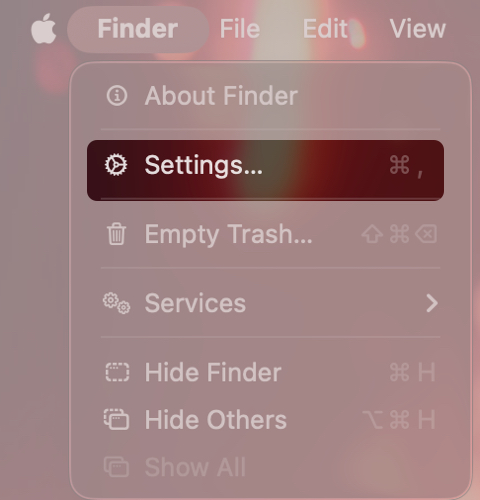
- Open Finder and click Finder in the top menu bar.
- Select Settings in the drop-down menu.
- Go to the Sidebar tab.
- Check the boxes next to CDs, DVDs, and iOS Devices.
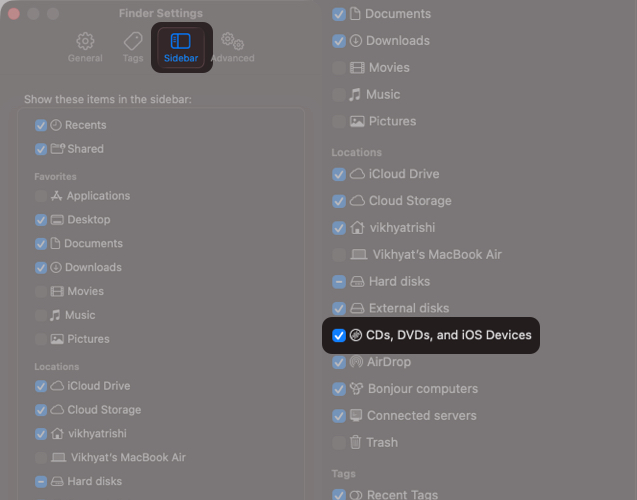
Your iPhone should now appear under Locations.
If the Finder sidebar itself is hidden, press Command + Option + S to show it.
4. Switch to Another Data Cable
This often catches people off guard. The Lightning or USB-C cable you are using may support charging only. In that case, your iPhone charges normally, but Finder cannot detect it because there is no data connection.
Try another cable, preferably an original Apple cable or an MFi-certified one. Avoid cheap third-party cables.
Also, connect the iPhone directly to your Mac instead of using a USB hub or docking station.
5. Switch Ports and Clean the iPhone Charging Port
Connection issues are often caused by dust or lint inside ports, which prevents proper contact with the data pins.
If your iPhone keeps disconnecting or never shows up:
- Try a different USB port on your Mac.
- Avoid loose ports on older Macs.
- Inspect the iPhone Lightning or USB-C port.
- Gently clean the port using a soft toothpick or anti-static brush.
6. Check Whether Your Mac Detects the iPhone
If your iPhone still does not appear in Finder, check whether macOS detects it at all.
- Open Settings, go to General, and select About.
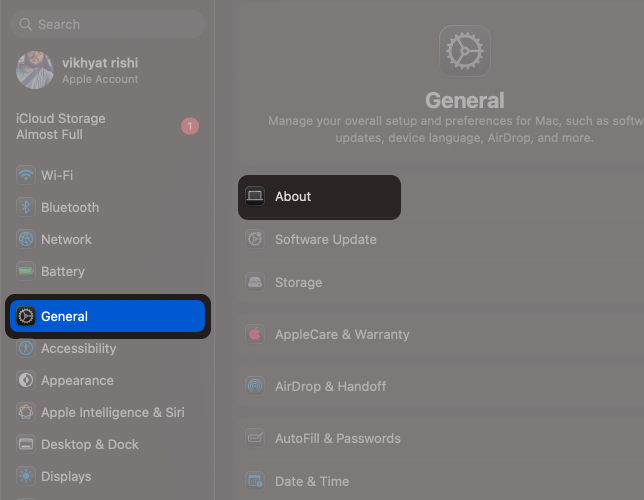
- Click System Report.
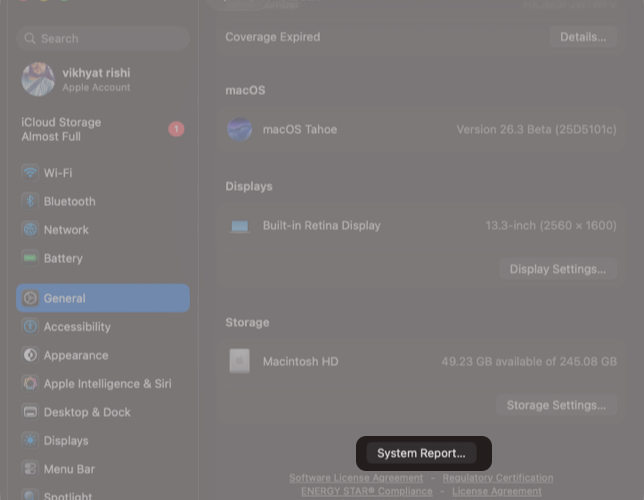
- Select USB to view details.
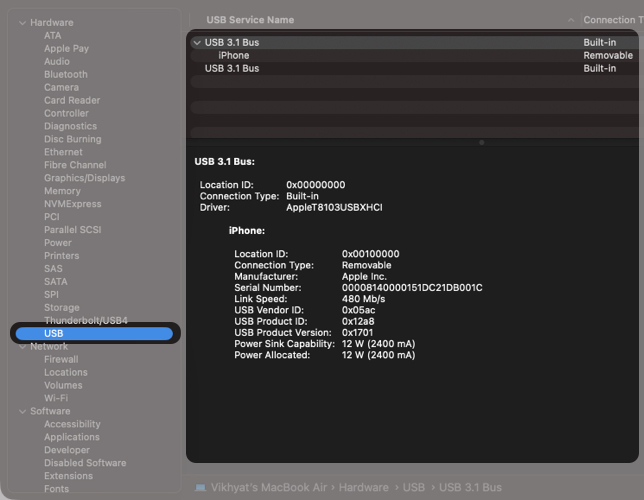
If your iPhone appears here, the Mac is detecting it. This usually means the issue is related to Finder settings, trust permissions, or a software conflict.
If it does not appear, the problem is likely the cable, USB port, adapter, or the iPhone’s charging port.
7. Restart Both Your iPhone and Mac
If everything looks correct but Finder still does not show the iPhone, restart both devices. This often fixes temporary Finder glitches.
After restarting, reconnect the iPhone, unlock it, and open Finder again.
8. Reset the Trust Relationship Between iPhone and Mac
If you previously tapped Don’t Trust, or if the pairing data became corrupted, your Mac may fail to recognize the iPhone, no matter how many times you reconnect it.
To reset the trust relationship:
- On iPhone, open Settings → General → Transfer or Reset iPhone.
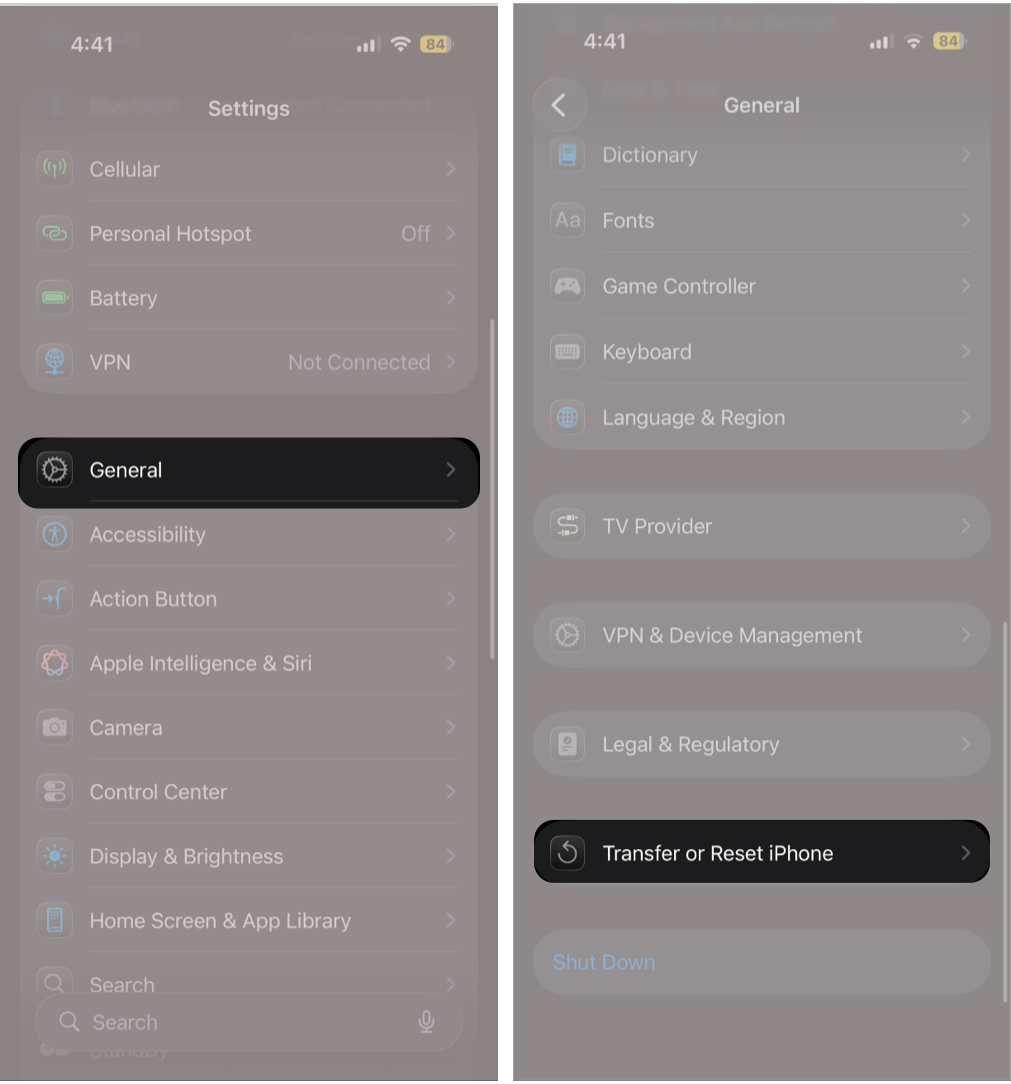
- Tap Reset.
- Tap Reset Location & Privacy.
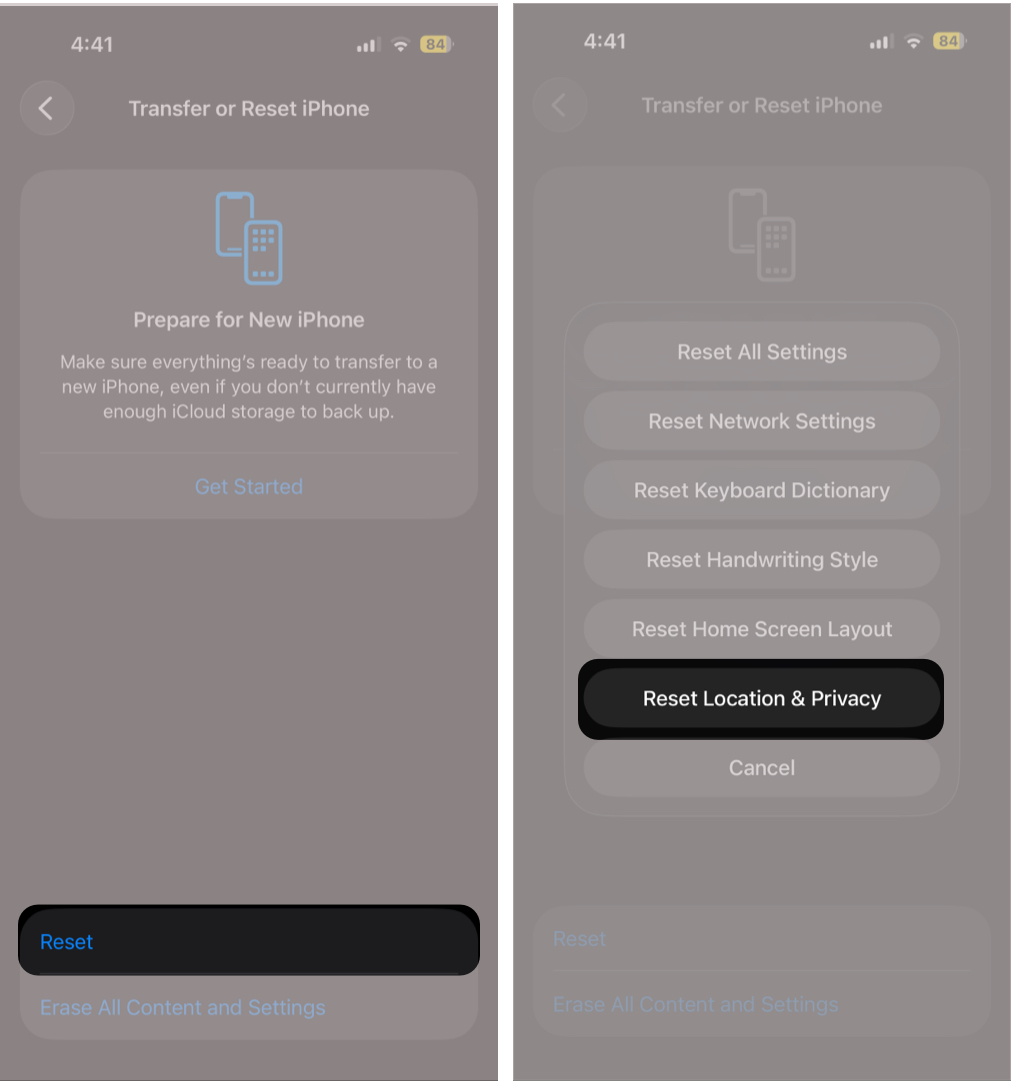
- Next, reconnect the iPhone to the Mac.
- Unlock the iPhone and tap Trust This Computer when prompted.
Finder should now detect the device.
9. Update macOS and iOS
Software updates sometimes introduce temporary device recognition issues, especially after major releases. Apple usually fixes these bugs quickly in follow-up updates.
Keeping both macOS and iOS updated reduces the chance of Finder connection problems.
10. Turn Off VPNs and Disable Antivirus Apps
This may sound odd, but it happens. VPN apps, antivirus software, endpoint security tools, and network monitoring utilities can interfere with the connection between Finder and your iPhone.
Try the following:
- Disconnect any active VPN on your Mac.
- Temporarily disable antivirus or network monitoring tools.
- If this is a work Mac, check for device management restrictions.
On managed Macs, MDM profiles may block connections to external iOS devices.
11. Force Relaunch Finder
Sometimes Finder stops refreshing connected devices.
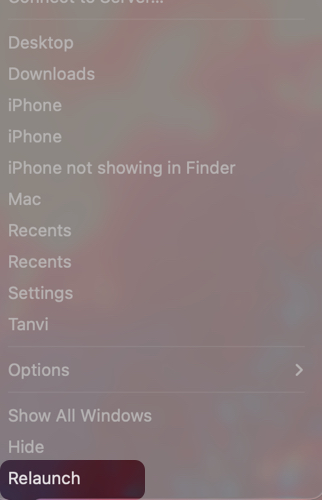
- Close Finder.
- Hold the Option key and right-click the Finder icon in the Dock.
- Click Relaunch.
Reconnect your iPhone and check again.
12. Use Safe Mode
If Finder still does not show your iPhone, boot your Mac into Safe Mode.
Safe Mode loads only essential system components and disables third-party extensions that might interfere with Finder.
Once in Safe Mode, reconnect your iPhone using a data-capable cable, unlock it, and check Finder. In many cases, the iPhone appears under Locations in Safe Mode even if it did not during a normal startup.
13. Put the iPhone into Recovery Mode
If Finder still cannot detect your iPhone, even in Safe Mode, the issue is likely on the iPhone itself. Recovery Mode forces the iPhone into a troubleshooting state that macOS can recognize more reliably.
Steps:
- Connect the iPhone to the Mac.
- Quickly press and release Volume Up.
- Quickly press and release Volume Down.
- Press and hold the Side button until the Recovery Mode screen appears.
Finder will display options to Update iPhone or Restore iPhone.
Always choose Update first, as it reinstalls iOS without erasing data. Use Restore only if Update fails.
What to Do When Nothing Works
If none of the fixes above work, and your iPhone does not appear on any computer or disconnects randomly, the issue may be hardware-related. Common causes include a damaged iPhone charging port or a faulty USB port on your Mac.
In these cases, contact Apple Support or visit an authorized service center for inspection.
Final Thoughts
If your iPhone is not showing up in Finder on your Mac, start with the basics. Unlock the iPhone, tap Trust, enable iOS devices in Finder’s sidebar, and try a different cable. These steps alone fix the issue for most users.
If the problem continues, resetting Location and Privacy settings or using Recovery Mode are the next best options.
Did one of these fixes work for you? Share which method helped in the comments. If you are still stuck, drop your Mac model and macOS version, and I will help you figure out the next step.

Written by
VikhyatVikhyat has a bachelor's degree in Electronic and Communication Engineering and over five years of writing experience. His passion for technology and Apple products led him to the tech writing space, where he specializes in writing App features, How-to guides, and troubleshooting guides for fellow Apple users. When not typing away on his MacBook Pro, he loves exploring the real world.
View all posts →More from How-to

Snapchat Parental Controls: How to Set Up Family Center and Keep Your Teen Safe
Snapchat’s Family Center lets parents monitor their teen’s friend activity and screen time without reading private messages. Here’s how to set it up and what to expect.

How to Block and Unblock Someone on Instagram
Instagram lets you block or unblock someone in seconds. Follow these simple steps to take full control of your privacy and online peace.
Apple Watch Not Responding? 8 Fixes That Actually Work
Is your Apple Watch unresponsive or stuck on a black screen? Here are 8 proven fixes to help you unfreeze it and get it working again quickly.