Timers are incredibly useful for managing tasks, whether you’re cooking, working out, or just trying to stay organized. But did you know your iPhone allows you to set multiple timers at once? So you can juggle various tasks without losing track of time. In this guide, I’ll share how to use multiple timers on your iPhone.
What are multiple timers on an iPhone, and how do they work?
Before iOS 17, the Clock app used the traditional single-timer setup, which allowed you to run only one countdown at a time. Multi-timers on iPhone allow you to set and manage more than one timer at the same time, so you can handle multiple activities simultaneously.
This feature is particularly handy in situations like cooking meals, where different dishes require different cooking times, during a workout session with varied exercise intervals, or following the schedule of a busy day.
Here’s how they work:
- Individually named timers: Each timer can be labeled, making it easier to keep track of tasks (e.g., “Laundry,” “Tea,” or “Meeting Reminder”).
- Custom durations: You can assign different countdown times to each timer based on your needs.
- Notifications: When a timer finishes, you’ll receive a distinct notification. So, you’re alerted without needing to check the app constantly.
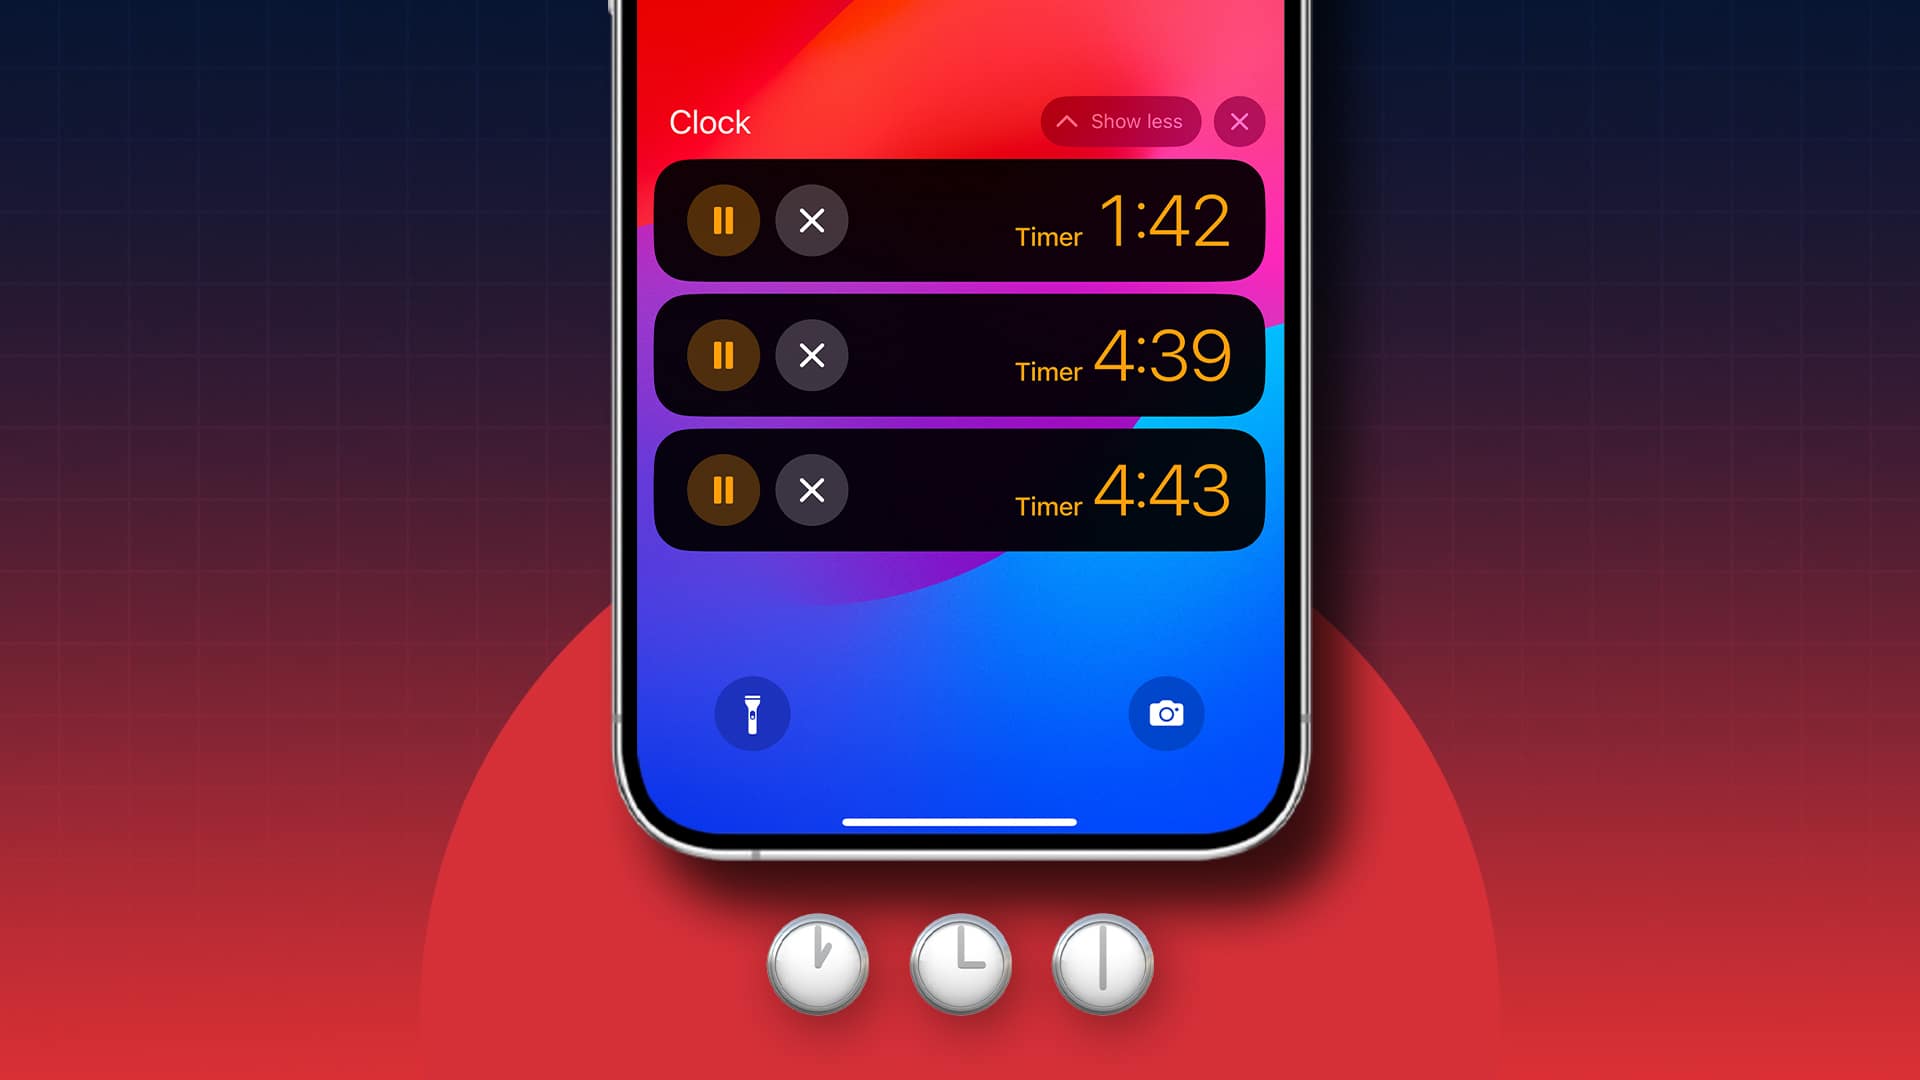
Thus, managing your day becomes more efficient and stress-free. Further, all the timers you create in the Clock app will also be visible on the Lock Screen. You can pause, resume, or stop a timer right there. This feature supports Dynamic Island, too.
How to create multiple timers at once on iPhone and iPad
Here’s how you can set multiple timers at once using three different methods.
Method 1: Using the Clock app
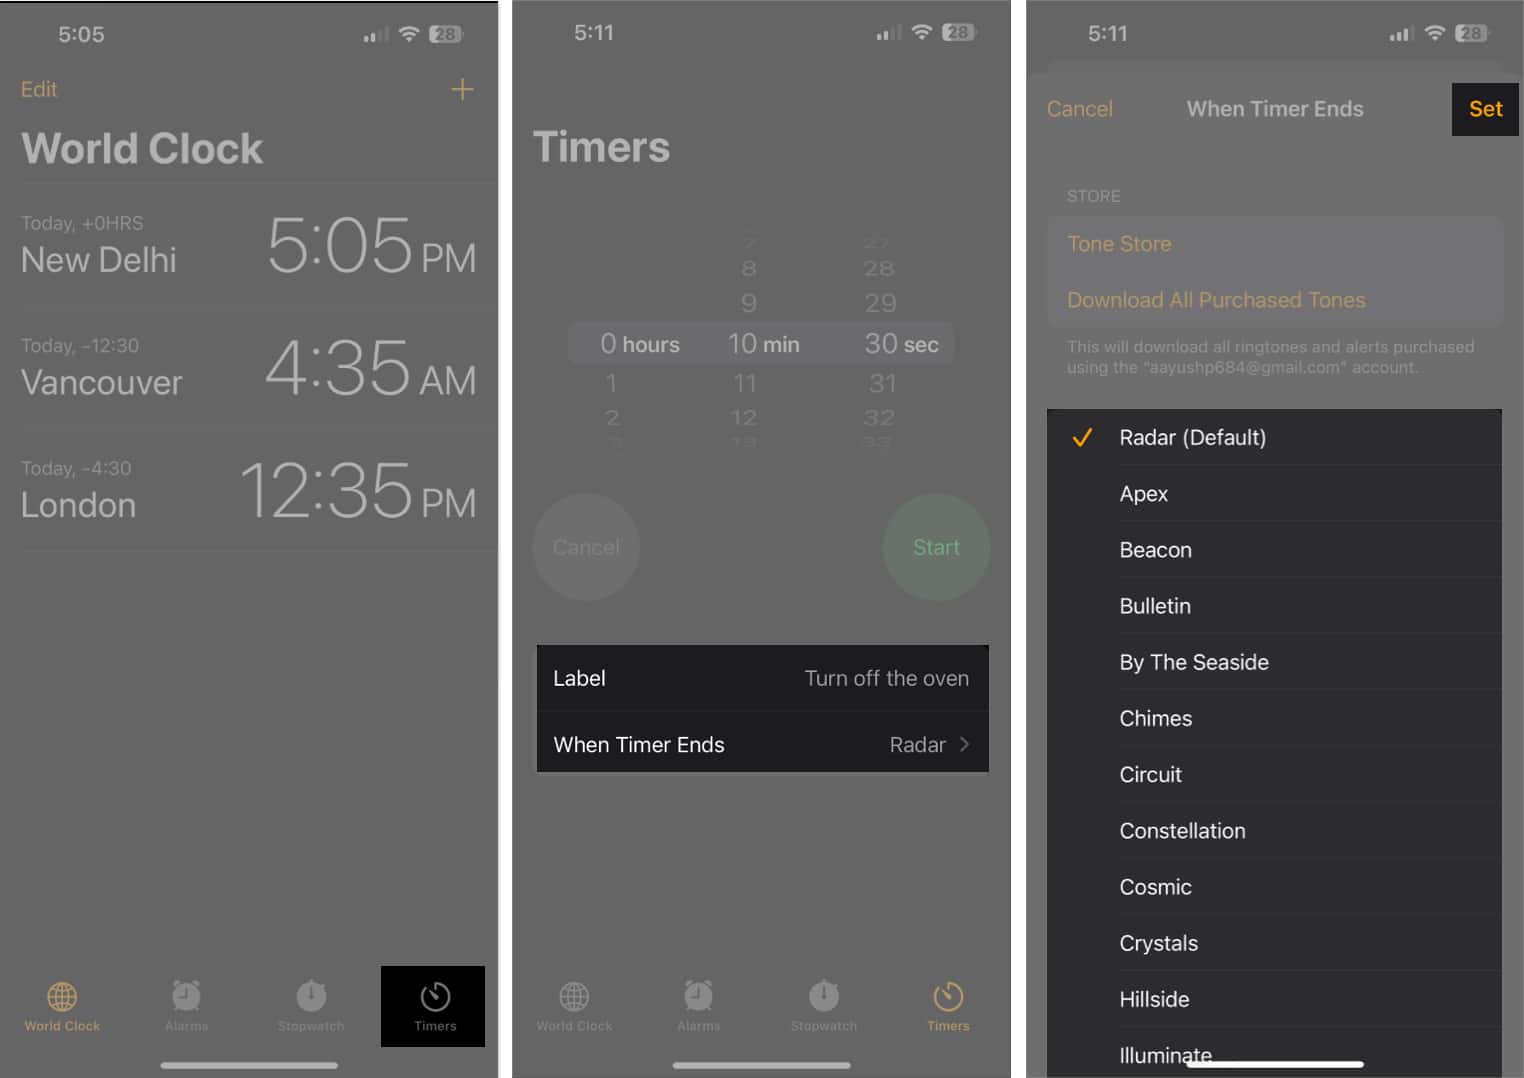
- Launch the Clock app on your iPhone → Navigate to the Timers tabs.
- Select a duration for the timer.
- Enter a name for the timer in the Label text field.
- Select When Timer Ends to find a tone → Tap Set to apply it.
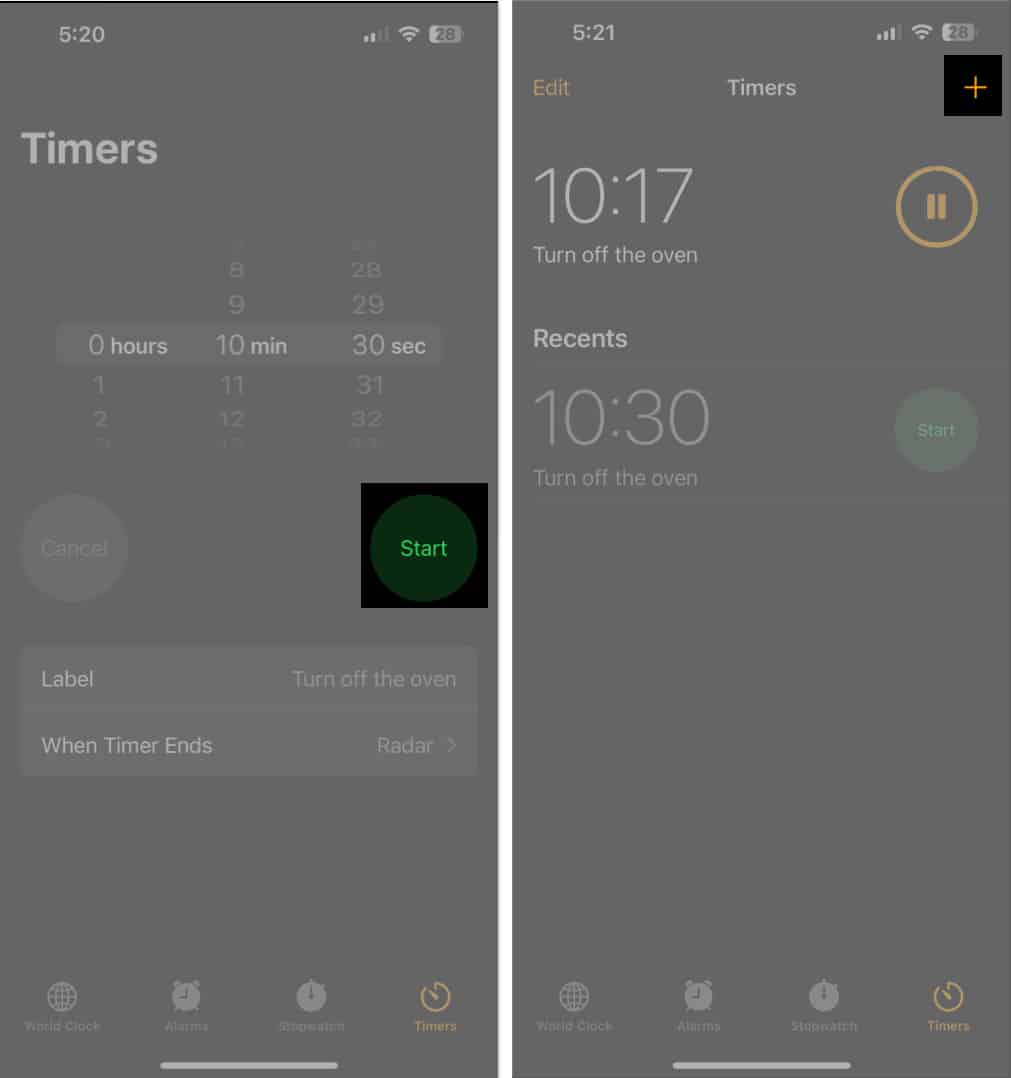
- Tap Start to kick off the first timer.
- Now, tap the play button next to any existing timer from the Recents section. It will start the second timer.
- To create a custom timer, tap the plus button at the top right.
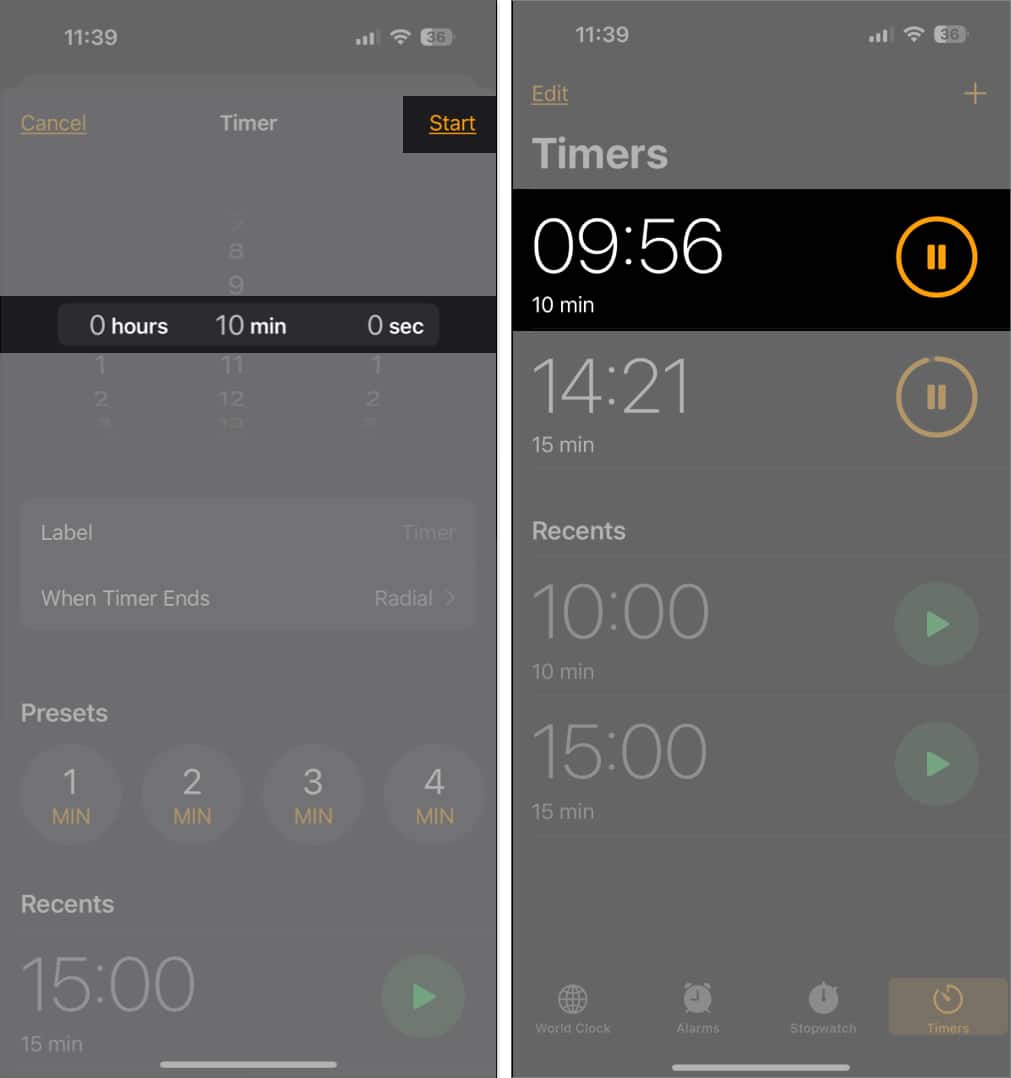
- Set a duration or select a time from the Presets section.
- Enter the name of the timer, choose a tone, and hit Start.
You can repeat the process to create an infinite number of timers. The longest timer can be set for 23 hours and 59 seconds. If you find this method daunting, use the next one.
Method 2: Ask Siri
Suppose you are busy with a task and unable to use your iPhone to set timers at the moment. In such a case, Siri comes in handy.
- Invoke Siri by saying, “Siri” or pressing the Side button.
- Then ask, “Set a 10-minute timer for laundry.” You can customize the time duration and name of the timer.
- To add another timer, say, “Siri, set a 5-minute timer for tea.“
- Siri will manage multiple timers and keep you updated.
The only issue with this method is Siri will set the same alert tone for each timer. So, you may find it difficult to distinguish between them.
Method 3: From Control Center
There is another quick way to kick off multiple timers on your iPhone.
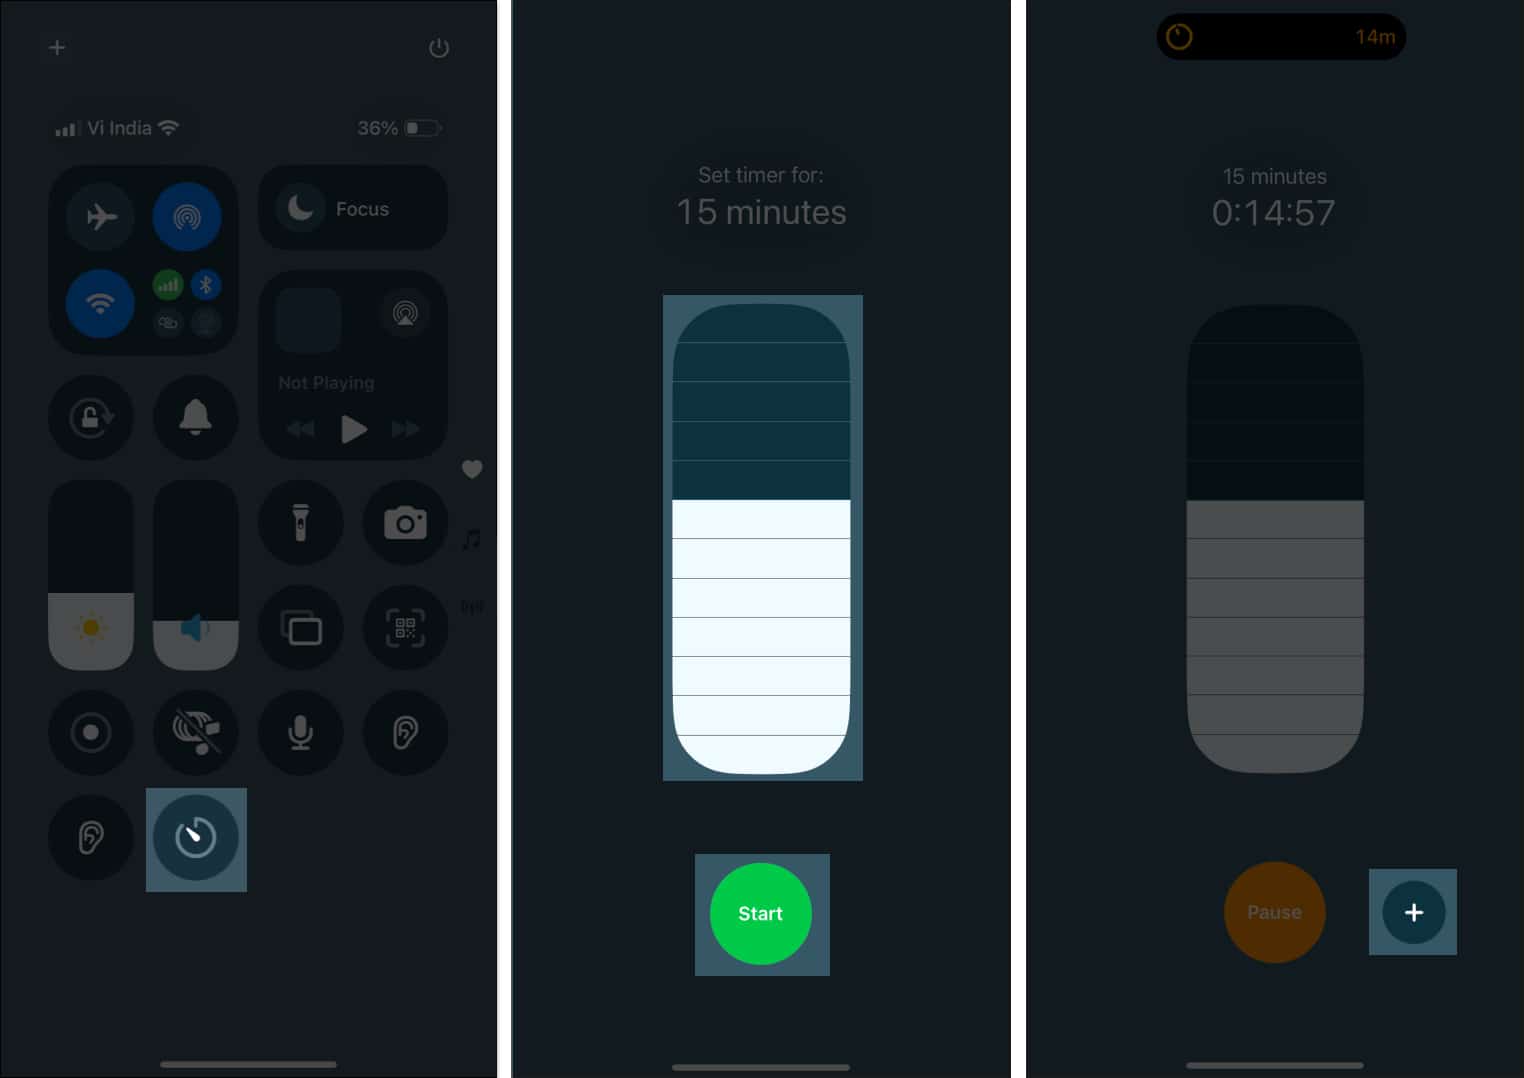
- Swipe down from the top-right corner of your screen to open the Control Center.
- Tap and hold the Timer icon.
- Set the timer duration on the slider and tap Start.
- To add another timer, tap the plus sign next to the Pause button.
- It will redirect you to the Clock app. Now, customize your timer and hit Start.
If you don’t see the Timer icon while doing the steps, you can quickly add it and customize the Control Center on your iPhone.
Once you follow the instructions listed above to create multiple timers, they should appear on the lock screen and Notification Centre as Live Activities, allowing you to easily manage them or track their progress.
How to manage multiple timers
After setting up multiple timers on your iPhone, you can quickly pause or delete any of them as usual. You can go back to the Clock app, access them using Live Activities from the Lock Screen or the Notification Centre, or ask Siri as detailed below:
Method 1: Pause, resume, or delete timers from the Clock app
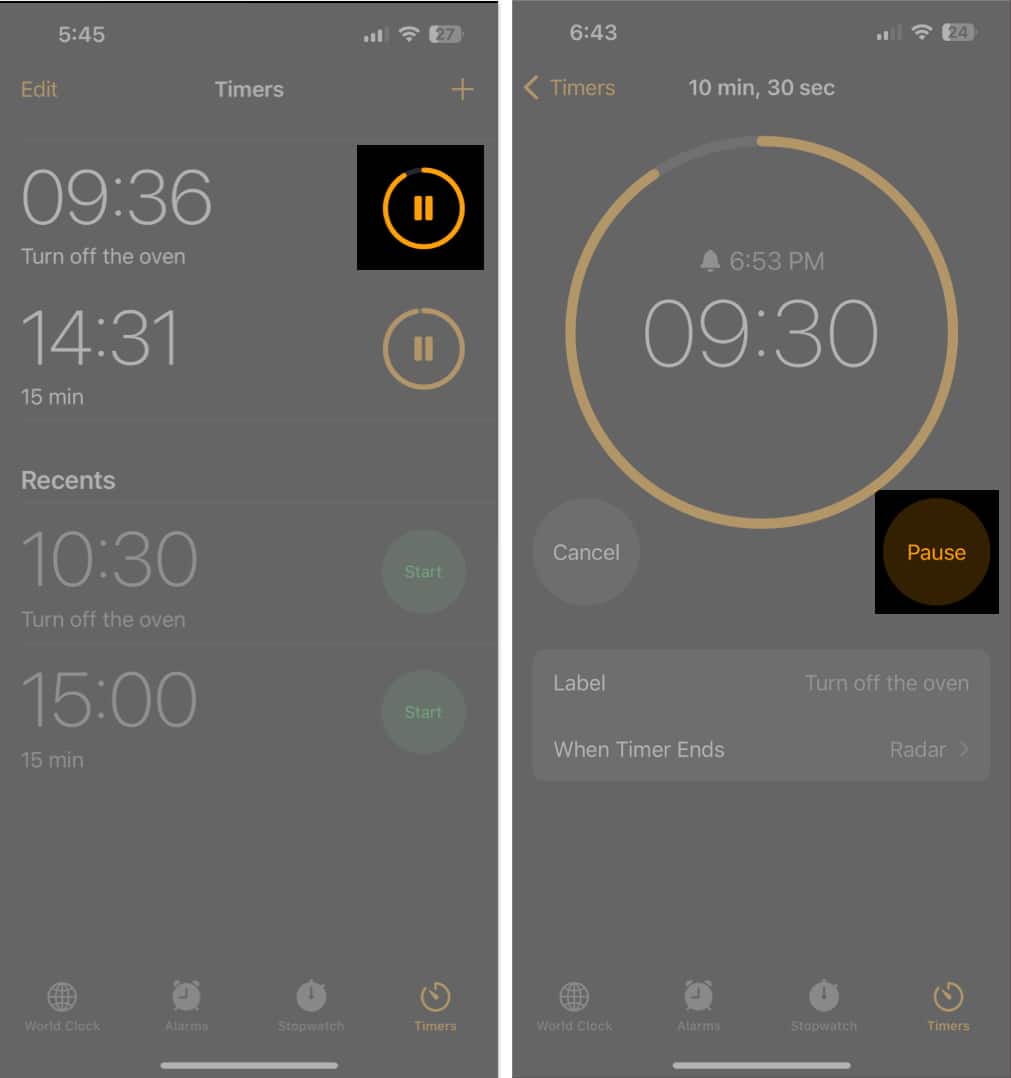
- To pause a timer, tap the pause button next to it. You can also tap the timer and hit Pause.
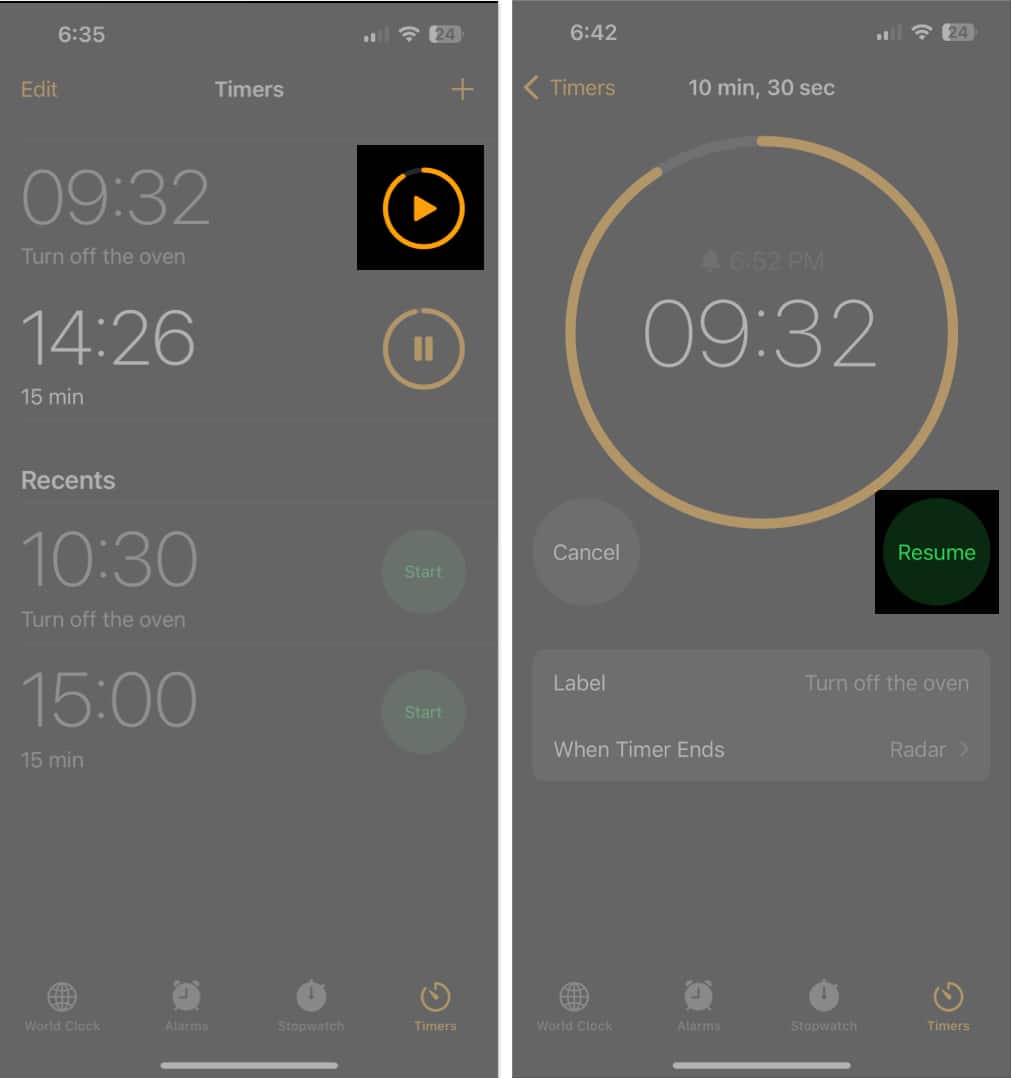
- To resume a timer, tap the play button next to it. You can also tap the timer and hit Resume.
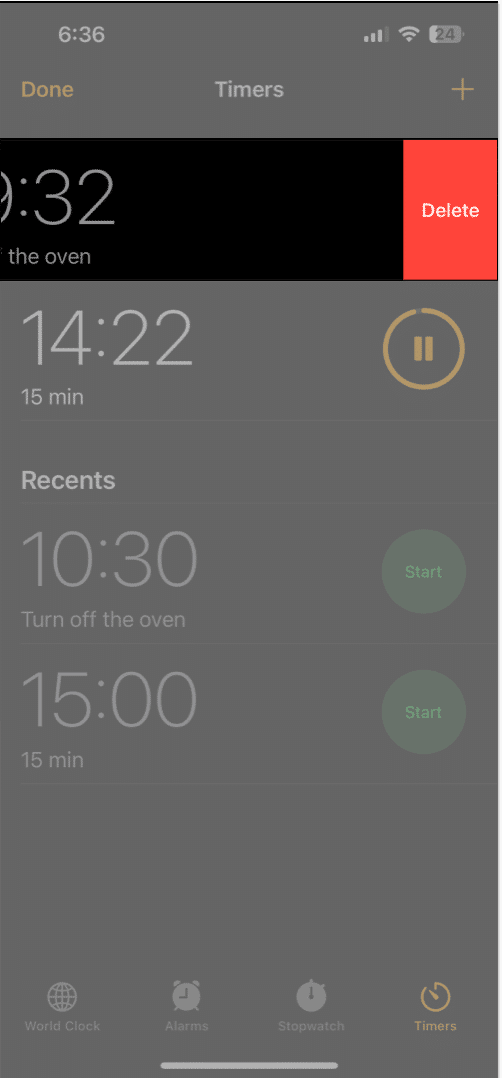
- To delete a timer, swipe right to left on the timer and tap Delete. You can also tap the timer and hit Cancel.
Method 2: Pause, resume, or delete timers using Live Activities
As mentioned above, you can create as many timers as you want on your iPhone. However, you will only see the first five timers on the Lock Screen simultaneously. To manage multi-timers from Live Activities:
- Press the Side button to lock your iPhone and double-tap on the screen to activate.
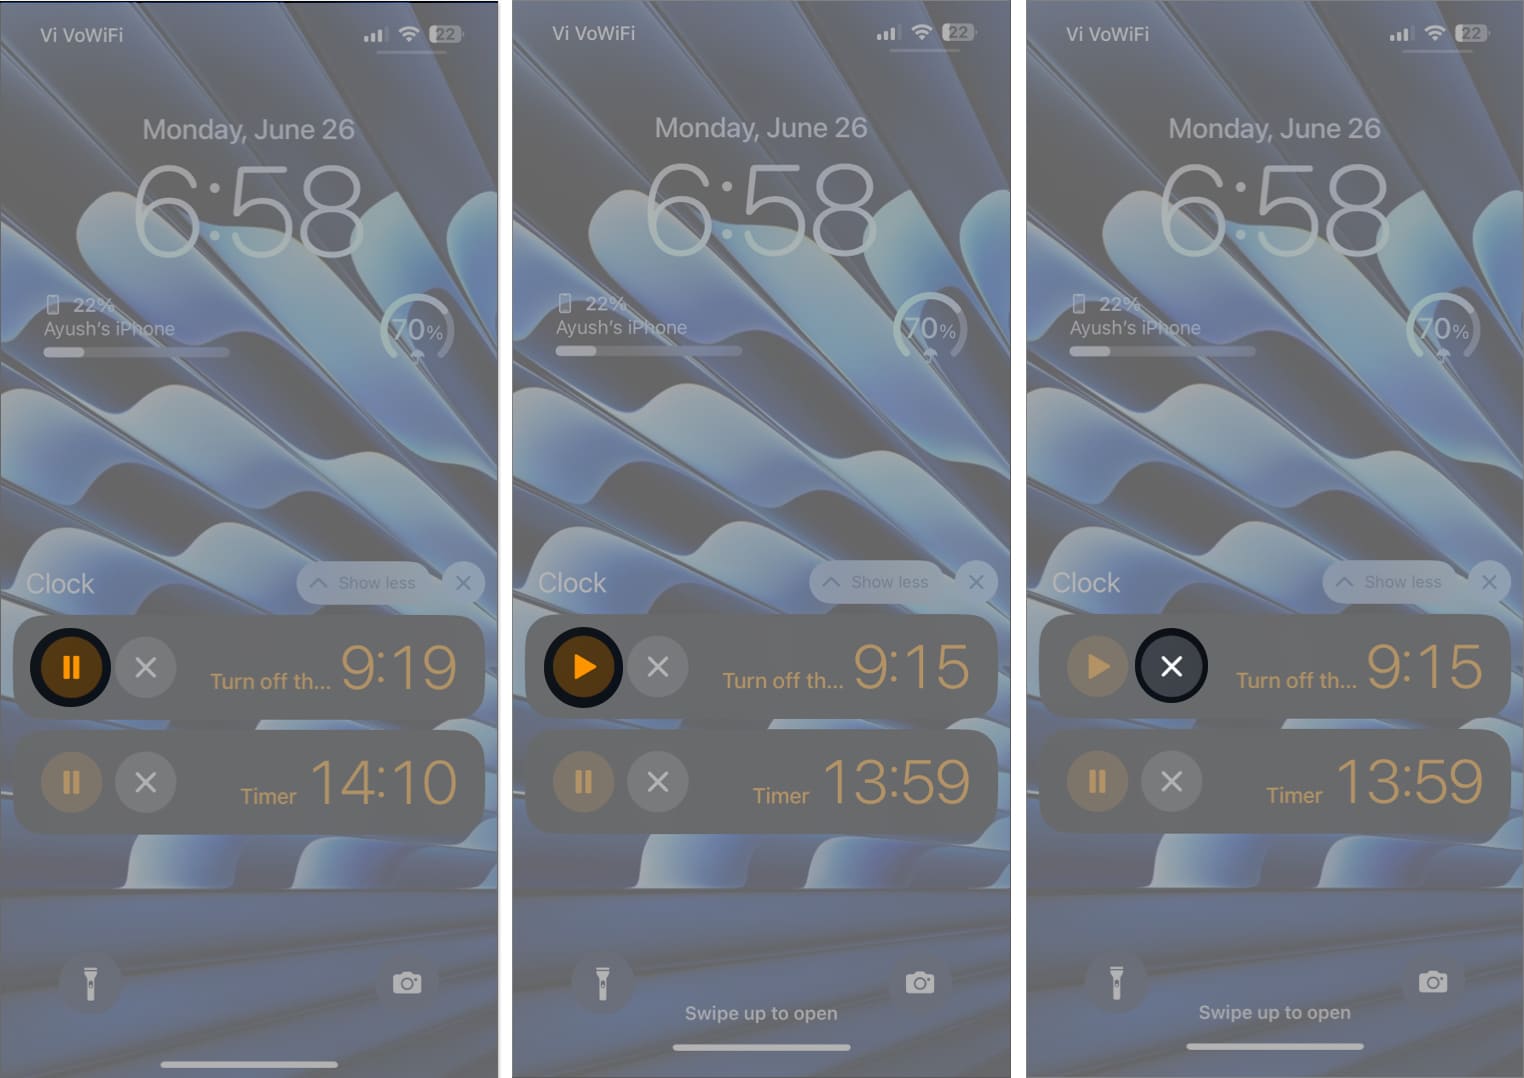
- Now, tap the Clock Live Activity on the Lock Screen to expand and view your timers.
- To pause a timer, tap the Pause button next to it.
- Tap the Play button to resume a paused timer.
- To delete a timer, tap the X button.
Method 3: Manage multiple timers using Siri
Using Siri makes managing timers hands-free and convenient. Let’s see how to do so:
- Activate Siri and say, “Pause the tea timer” or “Resume the laundry timer.”
- To stop a timer, say, “Cancel the 10-minute timer.”
- You can also ask, “How much time is left on my timers?” to check all active timers.
Signing off
Setting multiple timers on your iPhone can be a great way to track several time-bound activities simultaneously for improved time management and productivity. And now, with the ability to create multiple timers from the native Clock app on iPhone, you won’t need any third-party apps to do so.
So, the next time you have multiple tasks to handle, let your iPhone do the heavy lifting. If you find this guide helpful, do let us know in the comments below!
Read more:

