11 Ways to secure your Apple ID on iPhone, iPad, and Mac
Your Apple ID is your key to accessing Apple services such as the App Store, Apple Music, iCloud, etc. Besides, it contains your contact, payment, and security information you use across these services. Therefore, you need to keep your Apple ID secure. Let’s find out how you can secure Apple ID on iPhone, iPad, and Mac.
1. Use two-factor authentication
To make Apple ID more secure, enabling 2FA is a must. So, if someone else knows your password, it will ensure that only you can access your Apple ID. The verification code is requested when anyone logs in with their Apple ID and password on a new device. Also, you will get notifications on your trusted devices.
To secure Apple ID on iPhone, iPad, or Mac using 2FA, verify at least one trusted phone number to receive verification codes through text messages or automated phone calls. If you created your Apple ID on iOS 13.4, iPadOS 13.4, macOS 10.15.4, or later, two-factor authentication is enabled by default. Read our article on how to set up Two-Factor Authentication (2FA) for Apple ID to find out more.

2. Keep your Apple ID password and OTP private
You may already know sharing passwords and OTP must be avoided at all costs. For safeguarding your Apple ID and all sensitive data, Apple mandates the use of a secure password with eight or more characters, including upper- and lowercase letters and at least one number. Remember, Apple never asks for your account’s security details.
However, when you approach Apple Support by chat, phone, or email, the agent may request to validate your Apple ID. Also, when you are logging in with your Apple ID, don’t expose your password, verification codes, and other account security information. Personally, I suggest not using your Apple ID password for other online accounts.
3. Don’t share your Apple ID
I know sharing is caring, but it’s a complete no-no when it comes to online security. Allow no one, not even family members, to use your Apple ID. By doing this, you are providing someone else access to your account with personal material. So, if anyone else has created your account, change the password to keep your Apple ID secure. Learn how to reset your Apple ID password.
As an alternative, you may set up Family Sharing to share purchases made from the App Store, subscriptions, a family calendar, Apple Books, etc. Besides, iCloud Photo Sharing is a great option for having shared albums.
4. Keep your account information up to date
Always check your inbox for any Apple ID-related messages. When your account got any changes, like signing in on a new device or resetting your password, Apple alerts you through email, text messages, or push notifications. Unknown sign-in attempt alerts indicate that someone has accessed or is attempting to access your account that you did not authorize.
If it’s you, authorize the verification or change your password immediately. For this reason, it’s critical to maintain your contact information up to date. Also, I suggest changing your Apple ID password if you created it long ago.
- On your iPhone or iPad: Tap Settings → your name → Name, Phone Numbers, Email.

On your Mac with macOS 13 or later: Click Apple menu → System Settings → Apple ID. Or you may visit your Apple ID account page from Safari. - Update any incorrect information like your name, contact information, phone numbers, email addresses, payment information, and shipping details. You may also update Apple ID security questions after a few days.
- Tap Sign-In & Security to review your trusted phone number and devices if two-factor authentication is enabled. Also, check the apps that have access to your Apple ID. You may remove any from the list.
5. Add Account Recovery and Legacy Contacts
Apple suggests adding recovery contacts to assist you in resetting your Apple ID password. Recovery contacts will help regain access to your account if you forget your password or are locked out. Here is our detailed guide to learning how to set a recovery contact for Apple ID on iPhone, iPad, and Mac.
On the other hand, you may select individuals as Legacy Contacts in the Digital Legacy program. So they can access your Apple ID account in the case of your death. Read Apple Digital Legacy: What is it and how to use it.
6. Generate a recovery key for your account
Apple lets you create a recovery key to reset your account password or restore access to your Apple ID. Therefore, you can have more control over your account security. A recovery key is a 28-character code produced randomly and kept in a secure location. So, rather than having another device logged in with your Apple ID, use the recovery key to reset your account password.
You may also want to know what are passkeys and how to use them on iPhone, iPad, and Mac.
7. Manage apps and devices linked with your Apple ID
To make your Apple ID more secure, delete any unrecognized devices associated with your Apple ID. Removing an unknown device ensures that it won’t be able to get verification codes or access iCloud and other Apple services. So, review apps associated with your Apple ID:
- Launch Settings → Apple ID.
- Select Sign-In & Security or Password & Security, depending on your iOS version.
- Go to Apps Using Apple ID.

- Now you will get a list of apps. Tap Edit, which will show red minus signs apps.
- Choose the one you want to unlink and tap Delete.

- Then confirm your choice by selecting Stop Using from the pop-up.
8. Set a passcode on all your Apple devices
If you have multiple devices linked with your Apple ID, use Face ID or Touch ID together with a device passcode or password. You may secure your iPad with a passcode or a login password on a Mac to help safeguard your on-device data. Also, use Face ID for accessing Apple Pay and other apps, and validate Password AutoFill, etc.
For that, go to Settings → Face ID & Passcode on your iPhone and customize the settings for more security.
You can refer to our article to learn how to set an alphanumeric passcode on iPhone or iPad.
9. Regularly update software
Apple launches regular software updates to implement bug fixes, new features, and important security patches. Whenever an iOS, watchOS, iPadOS, macOS, or tvOS update is available, be sure you update your device. You may turn it on by following these steps:
- Go to Settings and tap General.
- Now choose Software Update.

- Finally, tap Automatic Updates and toggle on Download iOS Updates, Install iOS Updates, and Security Responses & System Files.

Also, update the apps you use, especially those linked with your Apple ID. If you are facing issues, read our troubleshooting guide: Can’t update apps on iPhone or iPad in iOS 16? How to fix it.
10. Sell or pass on your old device carefully
If you are giving away your used Apple devices, remember to take some security measures. We have made a complete round-up on what to do before selling your old iPhone. So, the new owner can not access your personal data.
11. Be aware of scams and report them to Apple
At times, you may get a message, email, call, or other interaction from someone impersonating Apple. They might request your personal information or urge you to tap a link and update your details. Besides, through a popup alert like the iOS Apple ID password box, certain websites and applications may attempt to con you.
So, be alerted and get rid of such fake Apple security alerts on your iPhone. Take a screenshot and submit it to Apple at reportphishing@apple.com if you believe it to be suspicious. Know more about how to identify and report Phishing emails and other scams to Apple.
Don’t let hackers fool you!
I hope my suggestions will aid to secure Apple ID on iPhone, iPad, and Mac and prevent hackers from accessing your info. Also, while creating new accounts online, check if the website is secure. I use the best security apps for iPhones and iPads to keep everything in place. Finally, it’s wise to regularly evaluate your account security using the Safety Check in iOS 16. Got more questions? Let me know in the comments, and I’ll be sure to respond ASAP.
Explore more…

Written by
Ava BiswasAva is a die-hard Apple aficionado and seasoned writer with a knack for breaking down complex tech concepts into easily digestible content. Having honed her writing and editing skills over 4 years at renowned media houses like TechBurner, Ava crafts informative and engaging articles including troubleshooting guides, product reviews, editorials at iGeeksBlog. When not typing, you can find her exploring the latest Apple releases or pondering the future of tech innovation.
View all posts →More from How-to
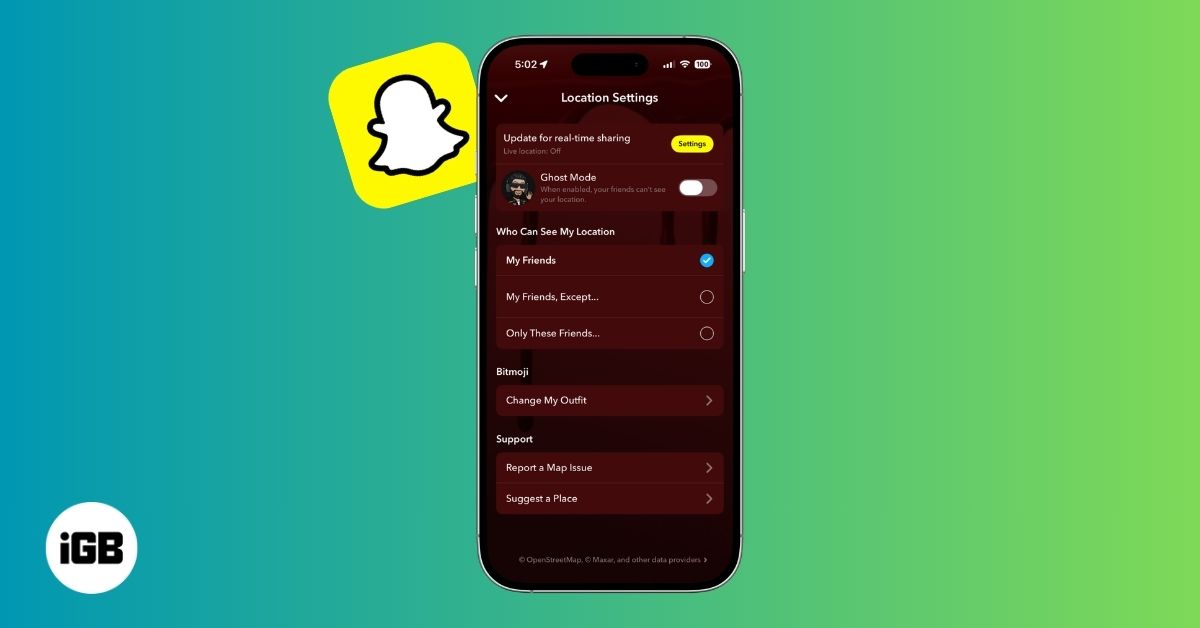
How to Turn Off Location on Snapchat (Step-by-Step Guide)
Want to stop sharing your location on Snapchat? This guide explains how Snapchat location sharing works and shows simple ways to turn off your location using Ghost Mode or phone settings. Stay in control of your privacy in just a few steps.

Snapchat Parental Controls: How to Set Up Family Center and Keep Your Teen Safe
Snapchat’s Family Center lets parents monitor their teen’s friend activity and screen time without reading private messages. Here’s how to set it up and what to expect.

How to Block and Unblock Someone on Instagram
Instagram lets you block or unblock someone in seconds. Follow these simple steps to take full control of your privacy and online peace.