Updating your iPhone to the latest iOS version is important for security, performance, and new features. Normally, Apple recommends downloading iOS updates over Wi-Fi because the update files are large. However, there are situations where Wi-Fi isn’t available or too slow, and you may want to update your iPhone using cellular data instead.
In this guide, you’ll learn how to download over-the-air iOS updates using mobile data on iPhone or iPad, when it works, and what to do if the option doesn’t appear.
Can You Update Your iPhone Over Cellular Data?
Yes, newer iPhones running iOS 15 or later allow you to download iOS updates over the air using cellular data, especially on 5G connections and when certain settings are enabled.
Apple added this flexibility so users can update their devices even when Wi-Fi isn’t available. This is especially useful when you begin downloading an iOS update using Wi-Fi but lose connection in the middle. The download will resume over the cellular connection.
How to Download an iOS Update Using Mobile Data
If Wi-Fi isn’t available, follow these methods to install over-the-air iPhone software updates. If you have an iPhone that supports 5G (iPhone 12 or later), you can install the iOS update via cellular data without employing any workarounds.
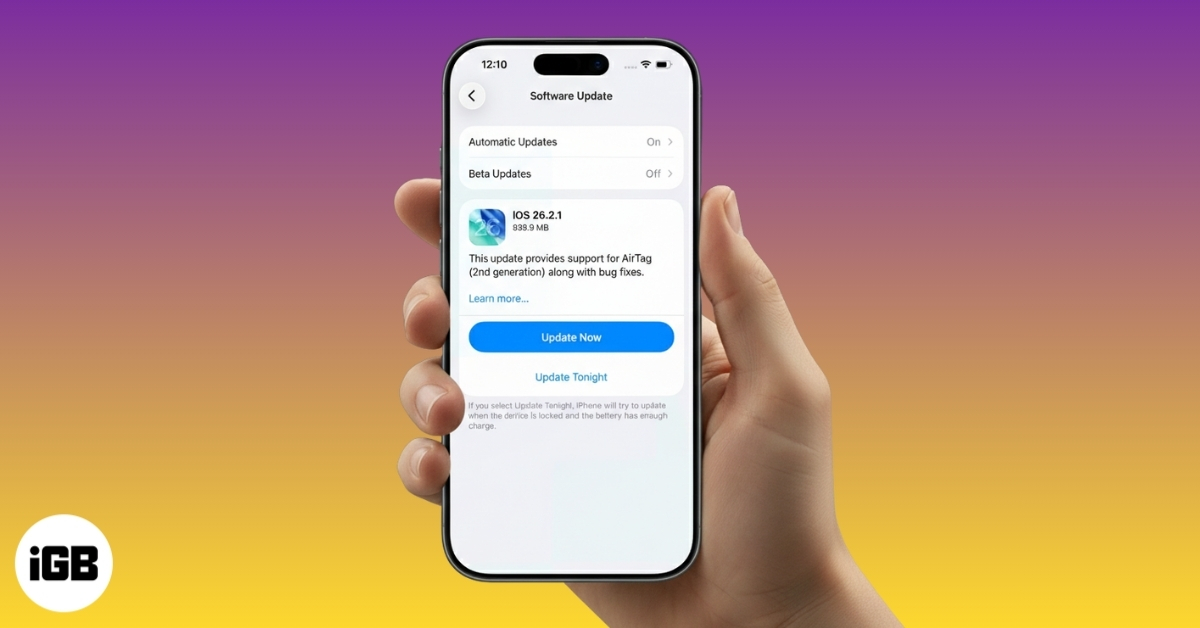
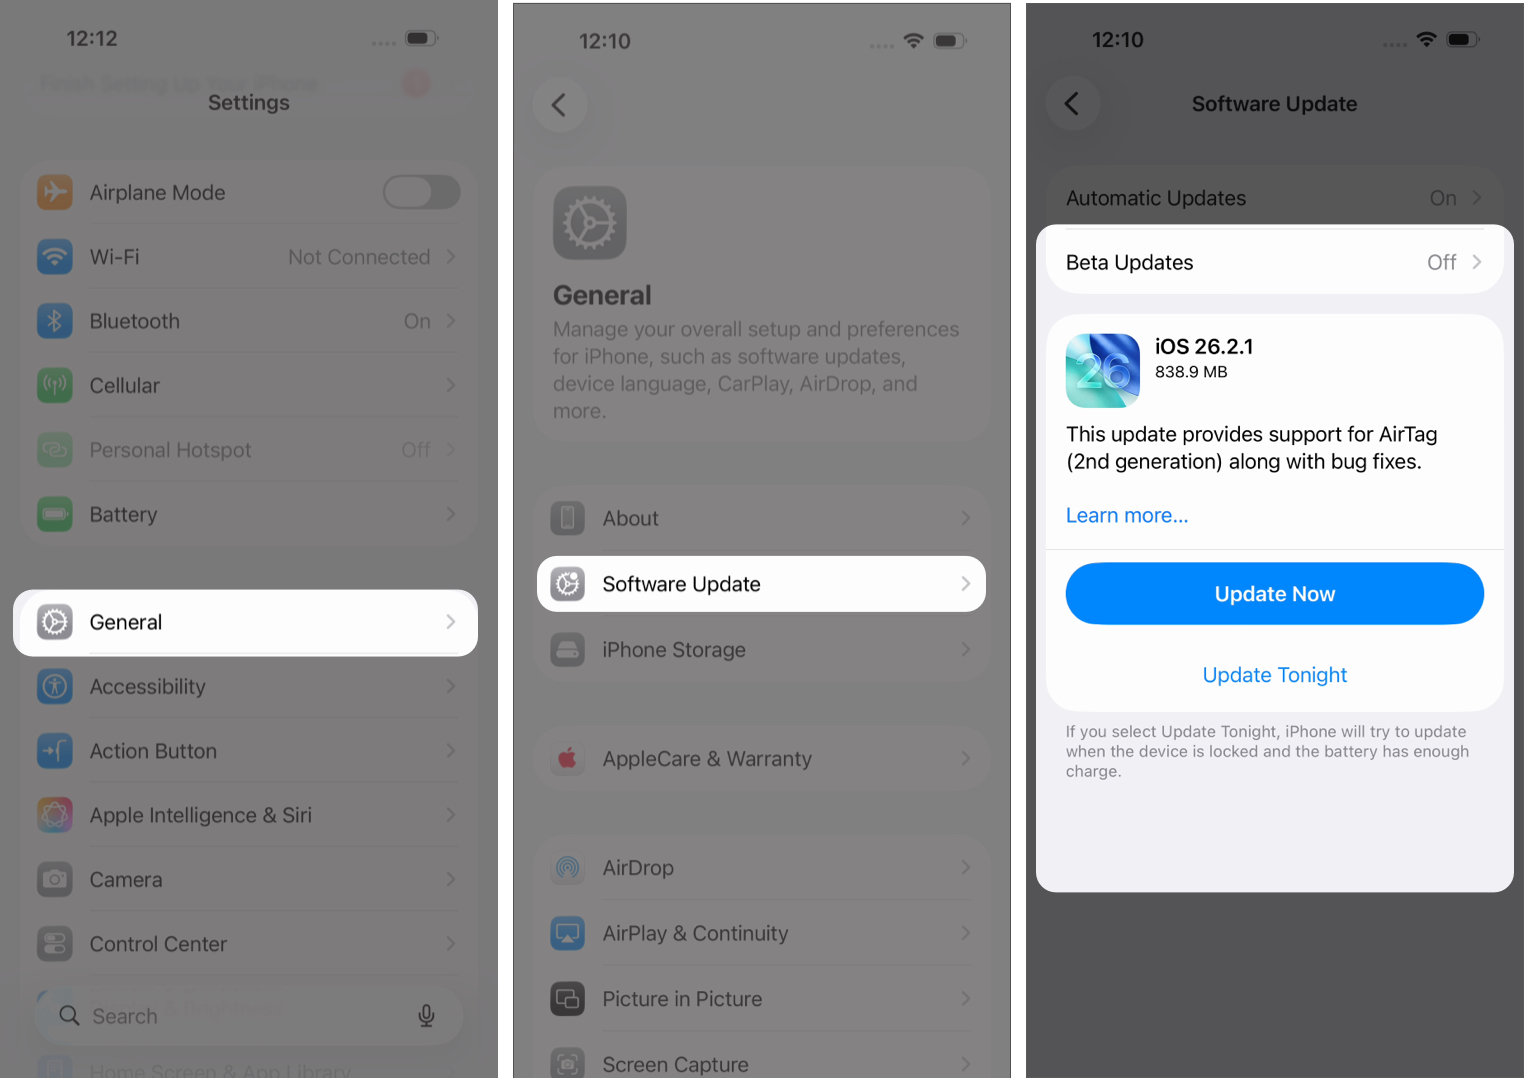
- Simply, go to Settings > General > Software Update.
- Your iPhone will check for available updates. Tap Download & Install to start downloading.
- If your iPhone is disconnected from Wi-Fi, it will show a dialogue box asking for cellular data permission.
- Tap Continue, and the download will resume.
Ensure you have an active cellular plan. These same steps will also be applicable for 4G, LTE, or 3G networks.
However, sometimes it gets restricted due to data limits and carrier settings. To download a large file, all you need to do is:
- Open Settings and go to Cellular.
- Toggle on Cellular Data and tap Cellular Data Options. On dual-SIM iPhones, you must select a SIM to get these options.
- Now, select Data Mode and choose Allow More Data on 5G.
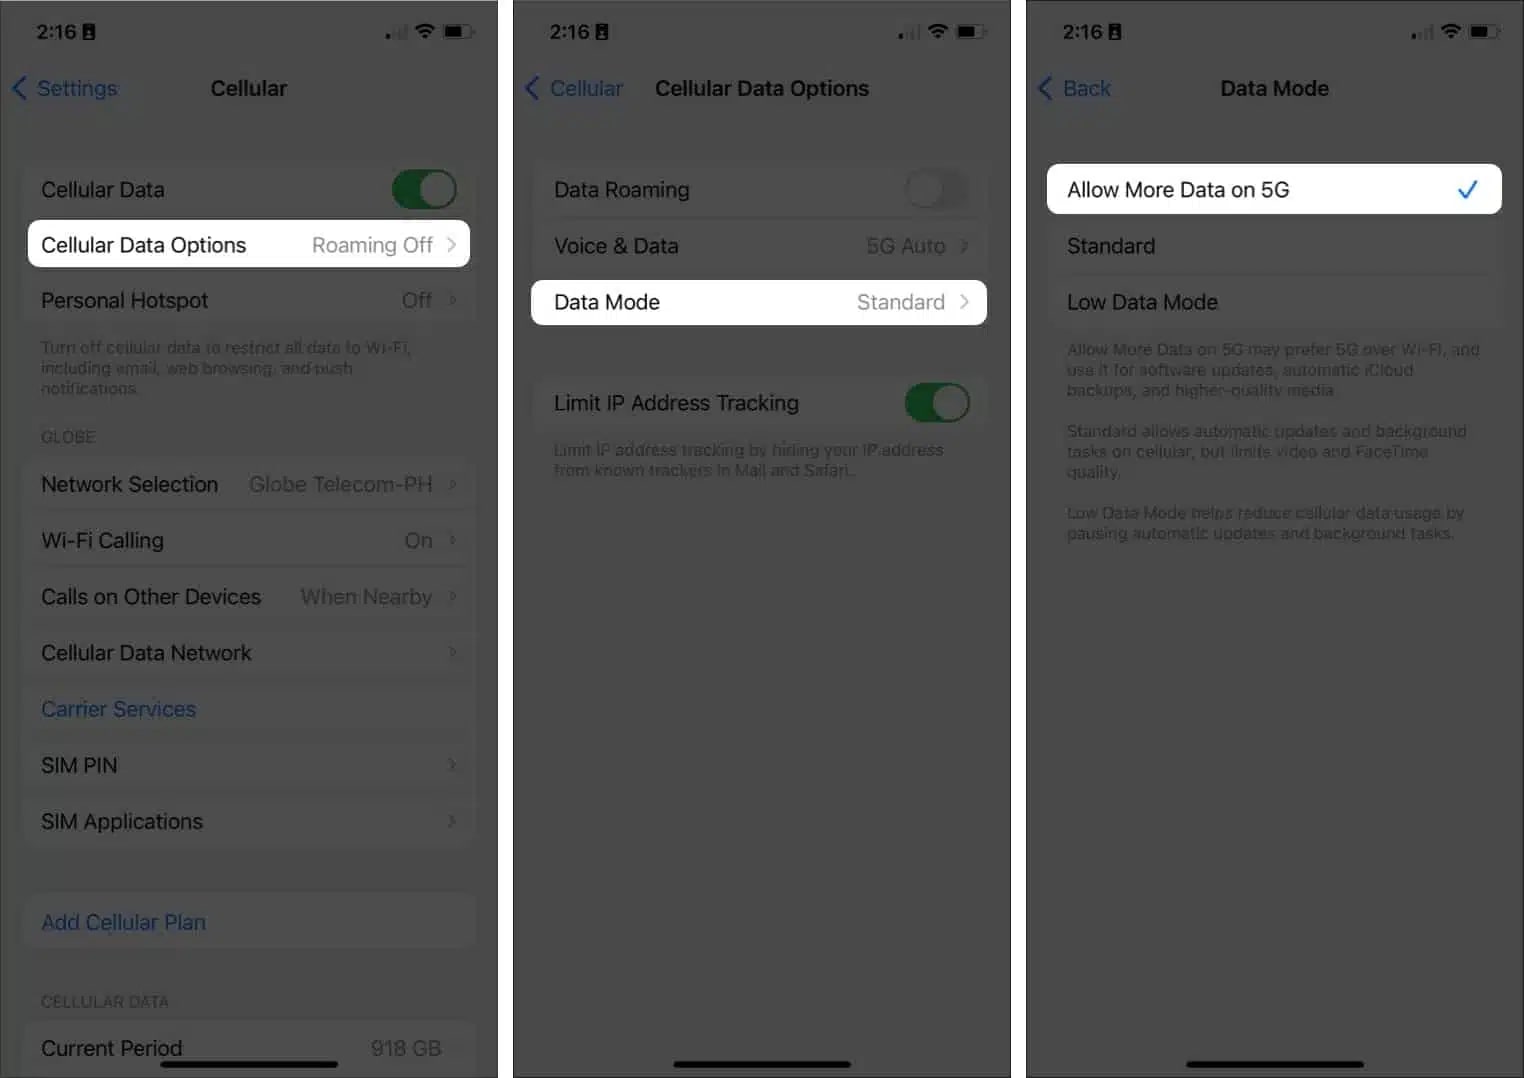
This will allow iOS updates, automatic iCloud backups, and FaceTime in higher quality over cellular. Now, try installing the update again.
Note:
You may hit your monthly data allowance and face extra data charges. You can also turn off cellular data for specific apps to save mobile data and use it later.
Important Things to Know About Updating Over Cellular
Before downloading an iOS update using cellular data, there are a few important things you should keep in mind to avoid interruptions or unexpected data usage.
- iOS Updates Are Large: Most iOS updates are between 1 GB and 6 GB. Make sure your cellular plan can handle it.
- Battery Level Matters: Your iPhone usually requires 50% battery or to be plugged into a charger.
- 4G vs 5G Limitations: Cellular updates are more reliable on 5G networks. Some carriers may restrict large downloads on 4G/LTE.
- Network Stability: If your cellular signal drops during the download, the update may pause or fail.
- Download Speed May Be Slower: Cellular downloads can take longer than Wi-Fi, depending on signal strength. You may use some workarounds to boost cellular speed.
Taking a moment to check these factors can help ensure your iOS update installs smoothly without interruptions.
What to Do If You Can’t Download iOS Updates Using Cellular Data
If your iPhone won’t download the iOS update, don’t worry! A few simple checks can usually fix the issue.
- Restart your iPhone: A quick restart can resolve temporary network or system glitches that may prevent the update from downloading.
- Check available storage: iOS updates require enough free space to download and install. Go to Settings > General > iPhone Storage and free up space if needed.
- Update carrier settings: Sometimes carrier configuration updates are required for cellular downloads to work properly. Open Settings > General > About and install any available carrier updates.
- Ensure cellular data is enabled from Settings > Cellular.
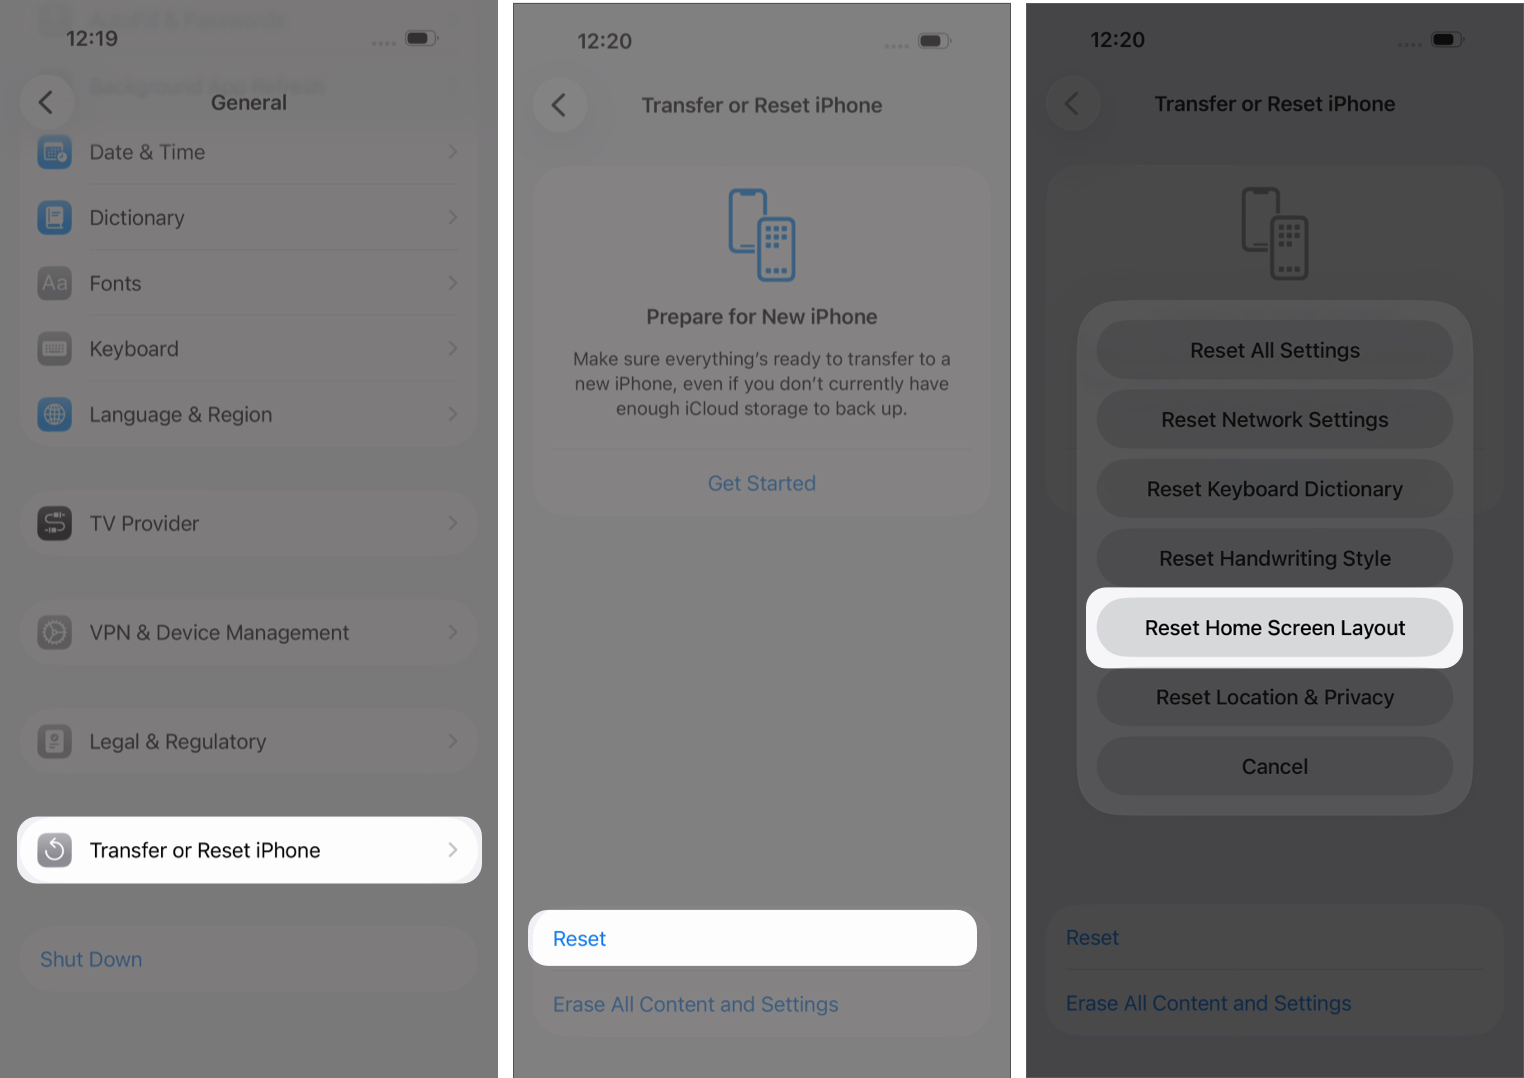
- Reset network settings if needed. Go to Settings > General > Transfer or Reset iPhone > Reset > Reset Network Settings. This will remove saved Wi-Fi passwords.
Temporary carrier restrictions or weak signal strength can block large downloads. Moving to a location with better coverage or trying again later may help.
If it still doesn’t work, Apple may be restricting downloads based on region, carrier rules, or network type. In that case, contact Apple Support for the best solution.
Alternative Method: Use Personal Hotspot
If cellular updates are blocked, you can:
- Connect to another phone’s hotspot
- Use a portable Wi-Fi device
- Visit a public Wi-Fi location
Your iPhone treats hotspot connections as Wi-Fi. If nothing works, update your iPhone manually using your Mac or PC.
Final Thoughts
Downloading an iOS update using cellular data can be a convenient option when Wi-Fi isn’t available. With the right settings enabled and a stable mobile connection, you can keep your iPhone updated without waiting to connect to a wireless network.
Just remember to check your data limit, battery level, and storage space before starting the update to avoid interruptions. Stay updated, stay secure, and make the most of your iPhone!