
Windows Search is useful out of the box, but it seems inefficient in certain situations. If I couldn’t remember the exact filename, I would go to the search bar, try a few variations, and eventually wonder why finding a document on my own PC felt so hard.
The problem wasn’t really Windows Search. It was how Windows was indexing my files. Once I customized a handful of Windows Search indexing settings, search became much more predictable. If you also want to improve Windows Search in Windows 11 to find files faster, here are the best settings you should change right now.
Why Windows Search can feel inefficient
Windows Search relies heavily on a system called the index: a catalog of file names, paths, properties, and, when configured to do so, the text inside files. Instead of scanning each drive on your PC every time you search, Windows can simply use the index to provide you with the necessary results quickly.
That sounds simple, but there is an obvious catch: Windows can only search efficiently for what it has actually indexed.
By default, Windows 11’s Classic search mode indexes common locations such as Documents, Pictures, Music, and the Desktop. You need to enable Enhanced Search to index the entire PC, but Microsoft notes that this can consume more system resources.
That explains a lot of the “Windows Search is broken” complaints I’ve had. Sometimes the file wasn’t missing. Search simply wasn’t looking in the folder where I’d saved it. And sometimes the file was indexed, but Windows only knew about its properties, not the words inside it. So instead of accepting Windows Search as-is, I started optimizing it to search files faster.
5 tips that improved my Windows search
1. Making Windows index the folders I actually use
This was the first change I made, and arguably the most important. I organize my files differently from the way Windows expects me to do it. Some folders that I need to access regularly are not located in the standard Documents folder, and that’s where the search problem started.
If Windows doesn’t index a location, using the Search bar won’t necessarily give you the fast, reliable results you expect.
In Windows 11, follow these steps:
- Launch Settings on your PC.
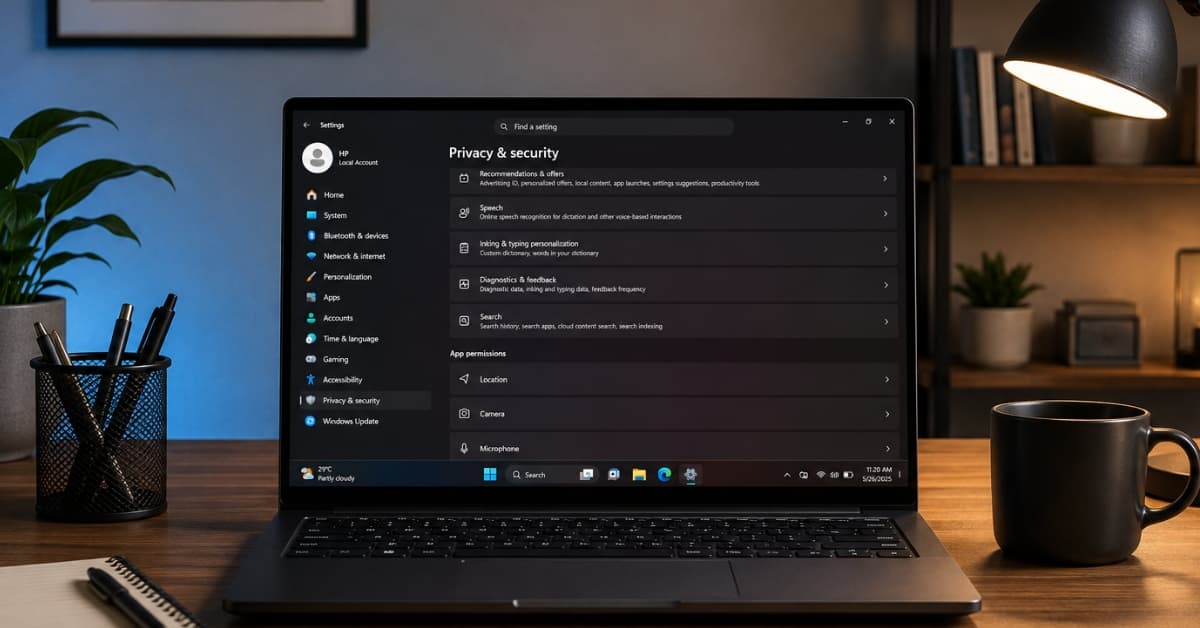
- Click Privacy & security on the left sidebar. Now, scroll and select Search.
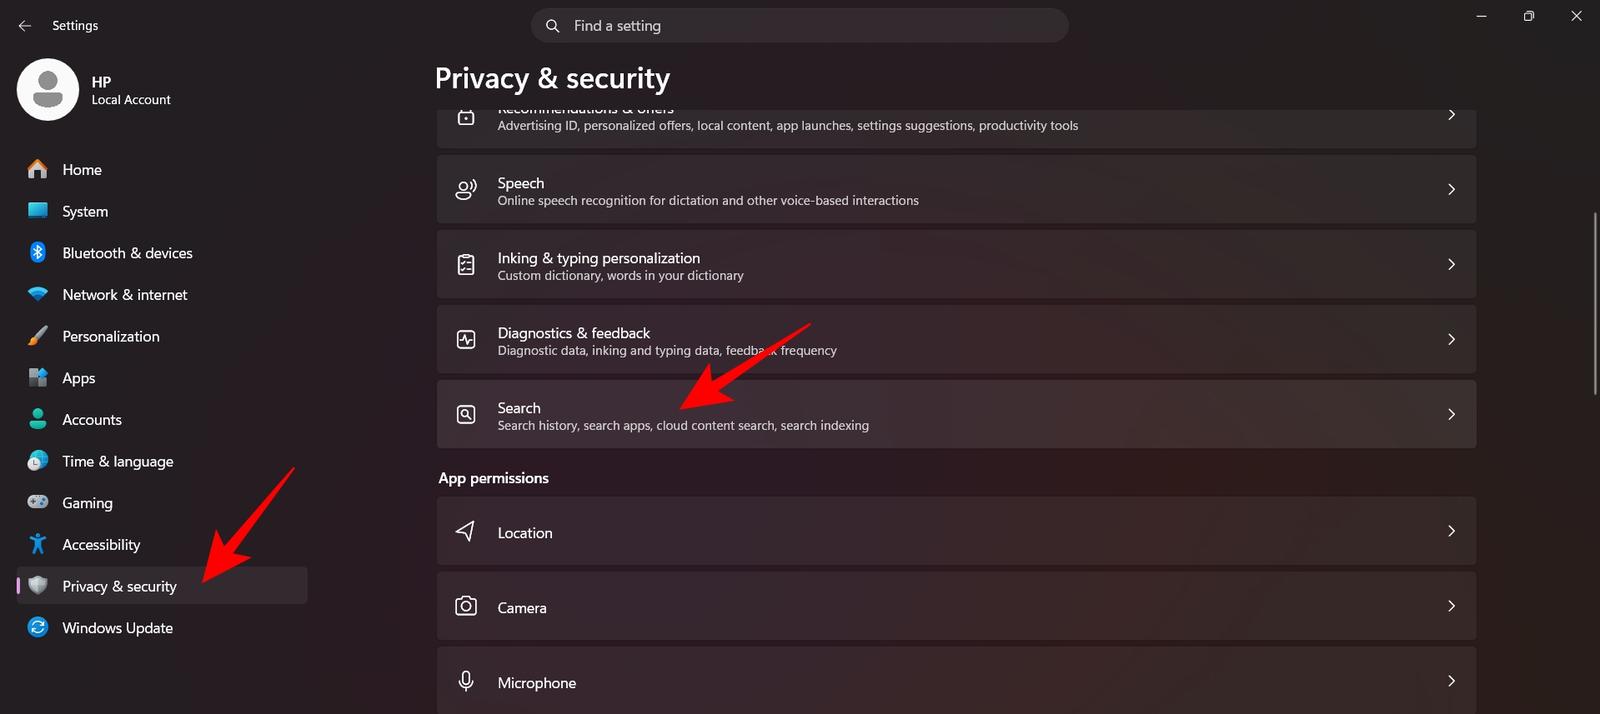
- Under Find my files, choose Enhanced search.
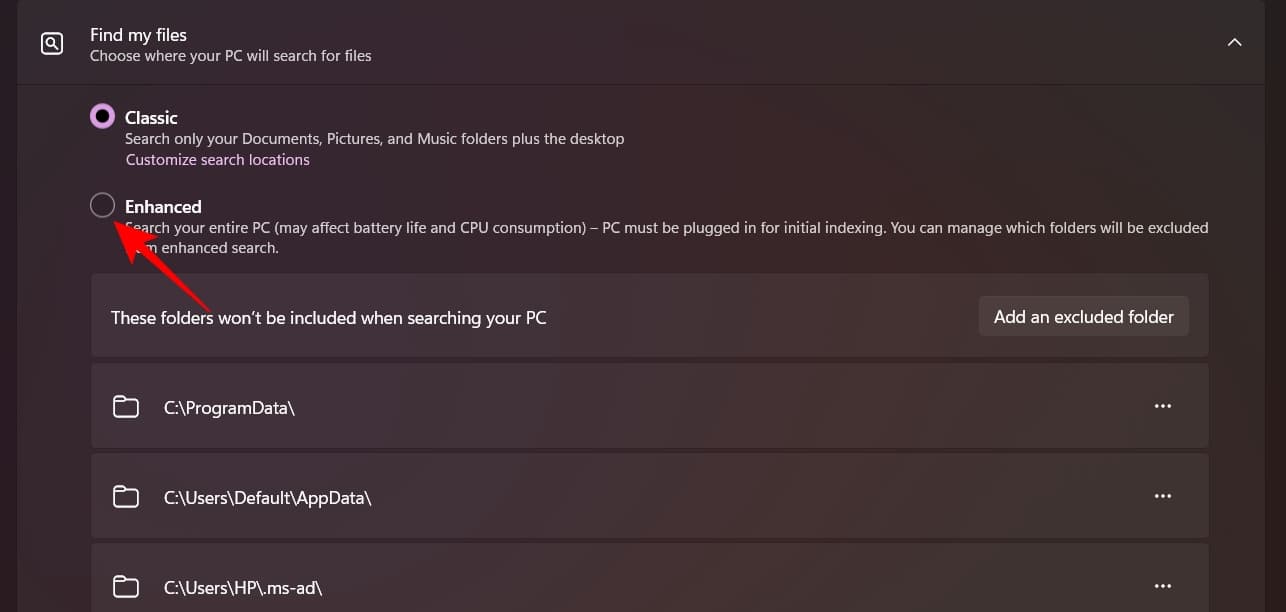
- Now, Windows will scan and index the entire PC. Keep it plugged in to finish the process, as it will take some time.
You can also customize which locations are indexed and exclude unimportant folders to speed up the process. Click Add an excluded file and select temporary folders, old archives, development files, large collections of documents you never search, and application data.
But I like to be more methodical about it: index the folders I actually search, rather than blindly indexing everything. If you have a dedicated work folder, downloads directory, or external folder and want to save resources, keep the Search settings set to Classic and add the drive or folder to your indexed locations.
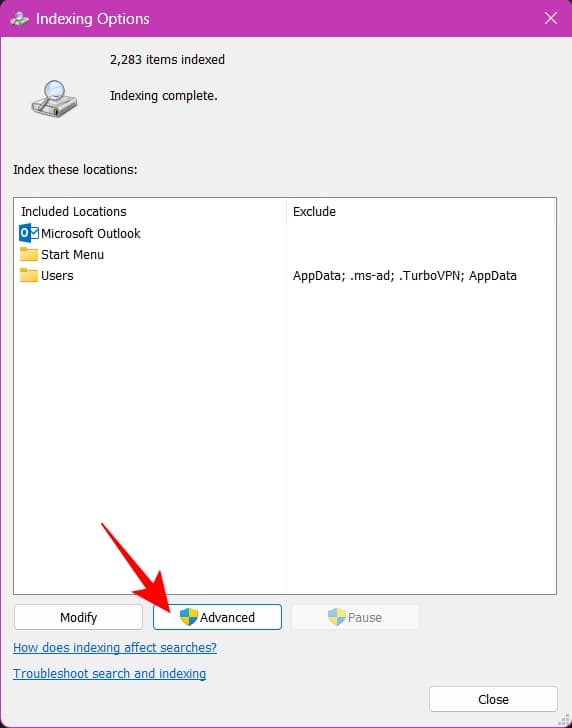
Simply click Customize search location under Classic > Modify in the dialog box, then choose a drive or a specific folder. Click Ok to save the location. That’s much more useful than assuming every folder on my PC is important.
One important caveat: indexing can take time initially. Microsoft says the first indexing pass can take up to a couple of hours, depending on the amount of data. After that, Windows updates the index as files change.
2. I enabled file-content searching for the documents I need
This setting made Windows Search feel dramatically smarter. Searching by filename is useful when you remember the filename. However, most of the time I forget the name and usually remember something inside the file.
For example, you may remember that a document mentioned “Q4 budget,” “client onboarding,” or “backup strategy,” but you can’t be sure about its name. In such cases, enable Windows to index file contents along with the default file names and properties.
- Go to Settings > Privacy & security > Search.
- Scroll down and click Advanced indexing options.
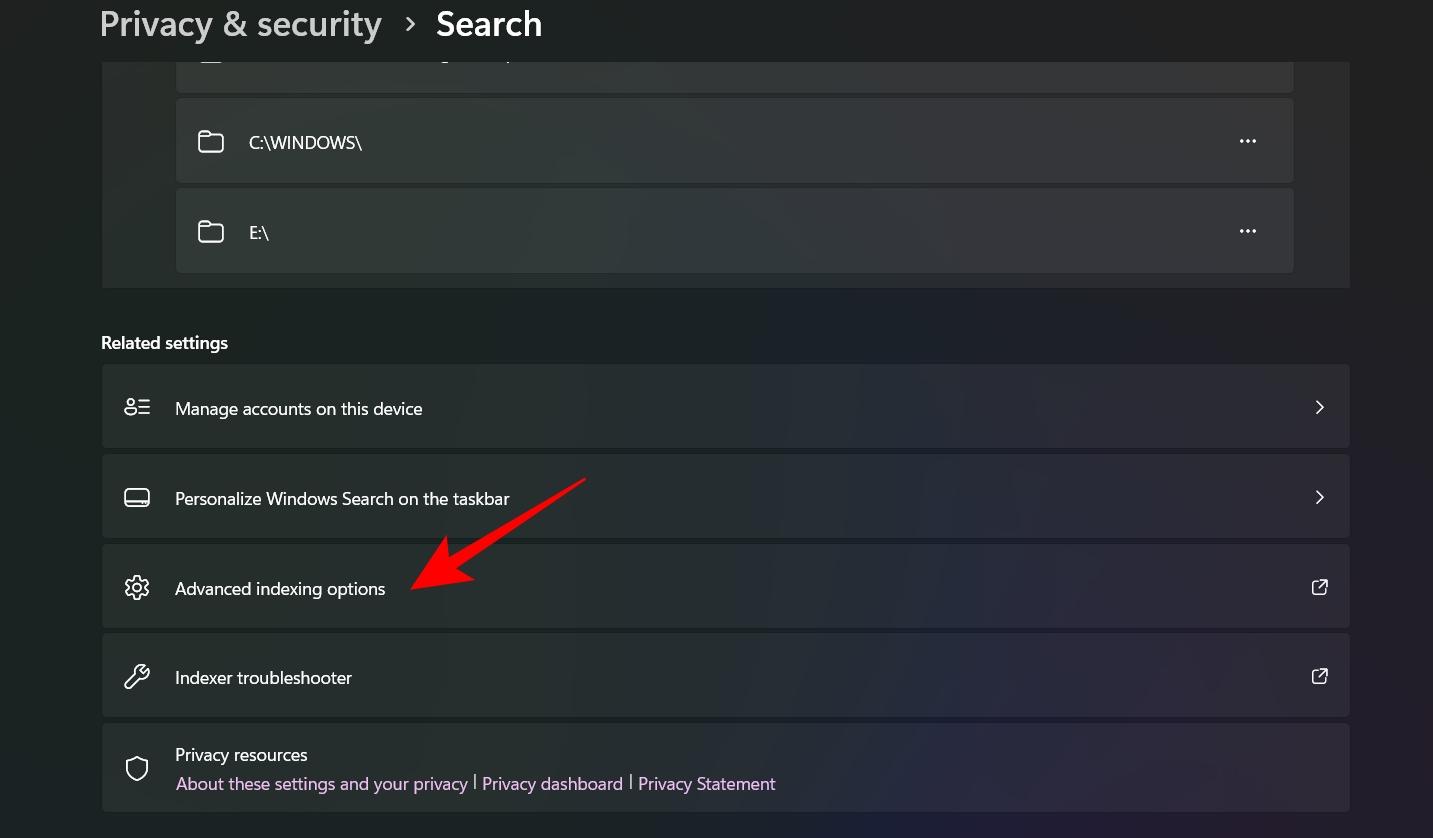
- It will open the indexing options control panel. Here, click Advanced at the bottom. Ensure you have administrative access.
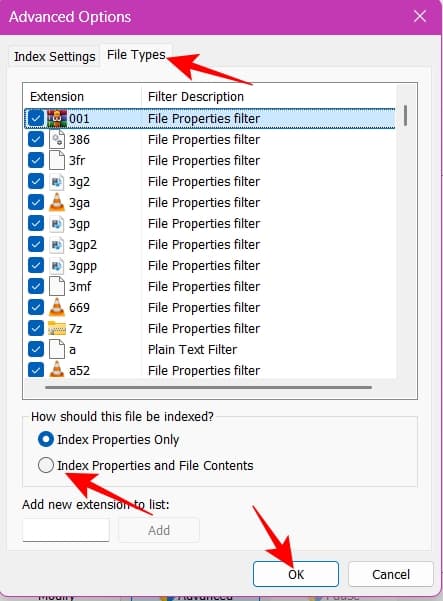
- Move to the File Types tab. Select Index Properties & File Contents.
- Click Ok to apply the changes.
- Now, search for a sentence or keywords, and the Search bar will actually pull up documents containing them.
Content indexing makes the search index more useful, but it can also make the index larger. For me, searchable documents are worth it. That’s why I deselected the file types I don’t usually use and then enabled content indexing to minimize the process load.
If you regularly search PDFs, Word documents, text files, spreadsheets, or similar files by words contained inside them, this is one of the first settings I’d check.
And on supported Copilot+ PCs, Windows 11 can go beyond traditional keyword indexing with semantic indexing, which is designed to surface results based on the meaning of a query rather than matching only exact terms.
3. Clean up search results with better filters
Sometimes Windows Search isn’t failing. You’re just asking it a question that’s too vague. I learned to use search terms that give Windows more context, rather than typing a single generic word and scrolling through a mountain of results.
If you’re looking for a spreadsheet about a particular project, search using several useful terms rather than just the project name.
Instead of searching report“, try narrowing it with a search operator at the end like report kind:document datemodified:last week. Now, Windows will find the document file type named report that you accessed last week. If you type “size:>10MB, the search result returns files sized more than 10 MB.
You can also use multiple search operators together or access the search options to find files faster by file type, date, name, and other properties.
- Open File Explorer and click the search bar in the top-right corner.
- Enter the file name or keyword.
- Now, select Search options. Here, you will find different filters.
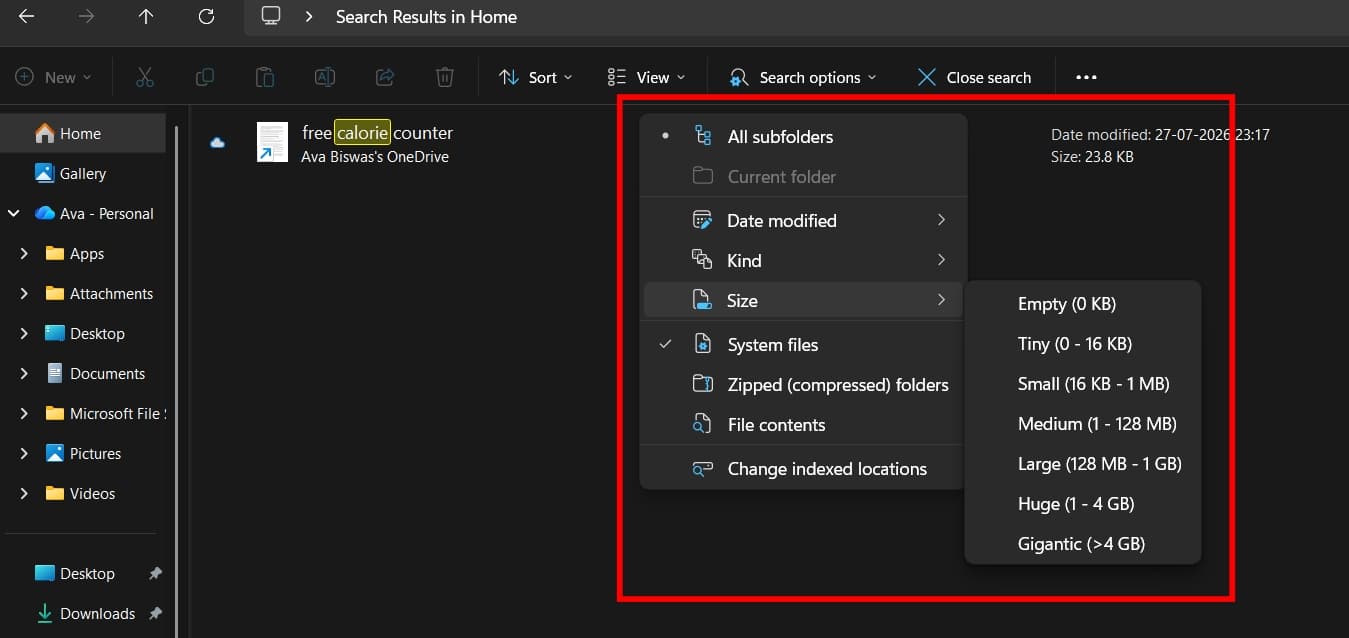
The less irrelevant material Windows has to return, the less time you spend scanning the results.
4. Use filename extensions when you know the format
If you know you’re looking for a PDF, don’t make Windows sift through Word documents, spreadsheets, images, and everything else.
For example: *.pdf Or combine the extension with a keyword: budget *.pdf
Likewise:
*.docx*.xlsx*.pptx
This is particularly useful when several files have similar names.
Moreover, when I know the file is somewhere inside Documents\Projects I open that folder first and search there. Don’t search the entire PC to get faster results.
5. Rebuild the Search Index when the search is broken
This is the nuclear option, but sometimes it’s exactly what you need.
If Windows Search suddenly stops finding files that it previously found, returns obviously incomplete results, or behaves inconsistently even after you’ve checked your indexed locations and file types, it may be time to take care of the Search index itself.
Windows 11 lets you rebuild the index to troubleshoot search problems.
- Go to Search settings in Privacy & security.
- Click Advanced indexing options and select Advanced at the bottom.
- Finally, click Rebuild.
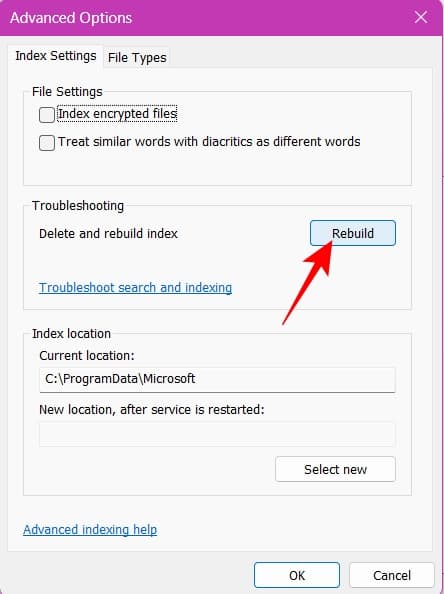
Now, Windows will remove the old index, crawl your entire PC according to your configuration, and create a new search directory. It gives Windows a fresh catalog to work from. However, remember that rebuilding doesn’t automatically mean that your files will become more searchable.
And yes, the process can take hours to complete and bump your CPU usage. That’s why I wouldn’t rebuild the index every time Search feels slightly slow. Check your indexing settings and rebuild only when the index itself appears to be the problem.
What I wouldn’t change
I’m deliberately not recommending that everyone turn on every search option.
Indexing more locations can increase the amount of data Windows has to catalog. Searching the entire PC can also have resource implications. If you have a relatively clean file structure and rarely search outside your normal user folders, Classic search may be perfectly adequate.
I also wouldn’t enable content indexing for every obscure file type simply because the option exists. My approach is more practical:
- Index what I use.
- Make the important documents searchable by content.
- Exclude what I never search.
- Ensure specific file types are selected in search settings.
That’s enough.
Final takeaway
Windows Search doesn’t need a dramatic overhaul. It needs a little direction.
The biggest improvement I made was realizing that the search box doesn’t determine what Windows can find. The search index, indexed locations, file types, and search scope determine what information Windows has available when I ask it a question.
Once you change those settings around the way you actually store and search for files, Windows Search finds files way faster.
In case you missed: