- iCloud Shared Photo Library enables live collaboration between up to six people, syncing edits and additions across devices in real-time since iOS 16.1.
- Simplifies event photo sharing by letting families or groups collect and manage all images in one space without constant AirDrop or message threads.
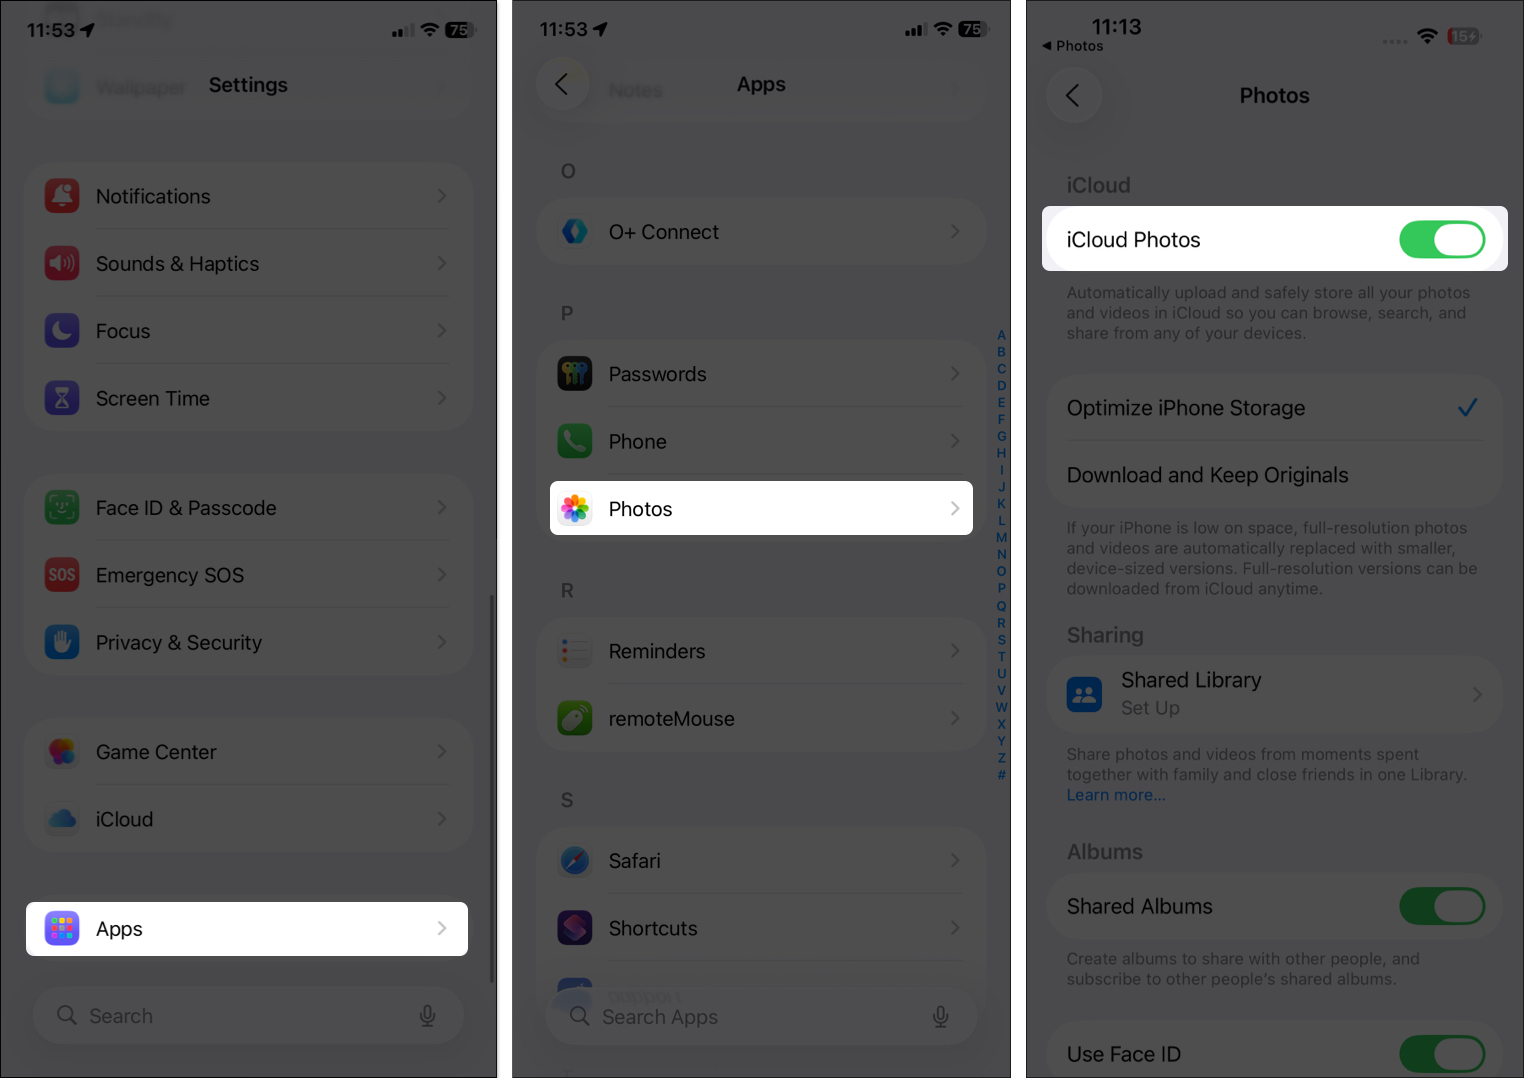
- You can set it up from iPhone, iPad, or Mac by enabling iCloud Photos, selecting contributors, and choosing which photos to include or automate.
- Invites are sent via Messages or Mail, and participants can choose what to share when they join – either all photos or ones from a date or people.
- Shared mode replaces originals on all linked devices, so be cautious: deleting or editing a photo affects everyone, and privacy filters only go so far.
Apple’s iCloud Shared Photo Library has changed the way we share and store memories with our family and friends! Whether it’s a family vacation, group event, or just casual snapshots, this feature makes sharing photos and videos with your loved ones easy and collaborative.
In this guide, I’ll walk you through everything you need to know about iCloud Shared Photo Library, from setting it up to using and managing it on your iPhone, iPad, or Mac.
What Is iCloud Shared Photo Library?
iCloud Shared Photo Library is a feature introduced with iOS 16.1, iPadOS 16.1, and macOS Ventura in late 2022. It allows up to six people, including the organizer, to share a single photo library in real time.
Unlike the standard iCloud Photo Library, which is private to one user, the Shared Photo Library lets participants add, edit, delete, and favorite photos and videos.
- All media remains in full resolution with original metadata.
- Everyone can see edits and changes instantly.
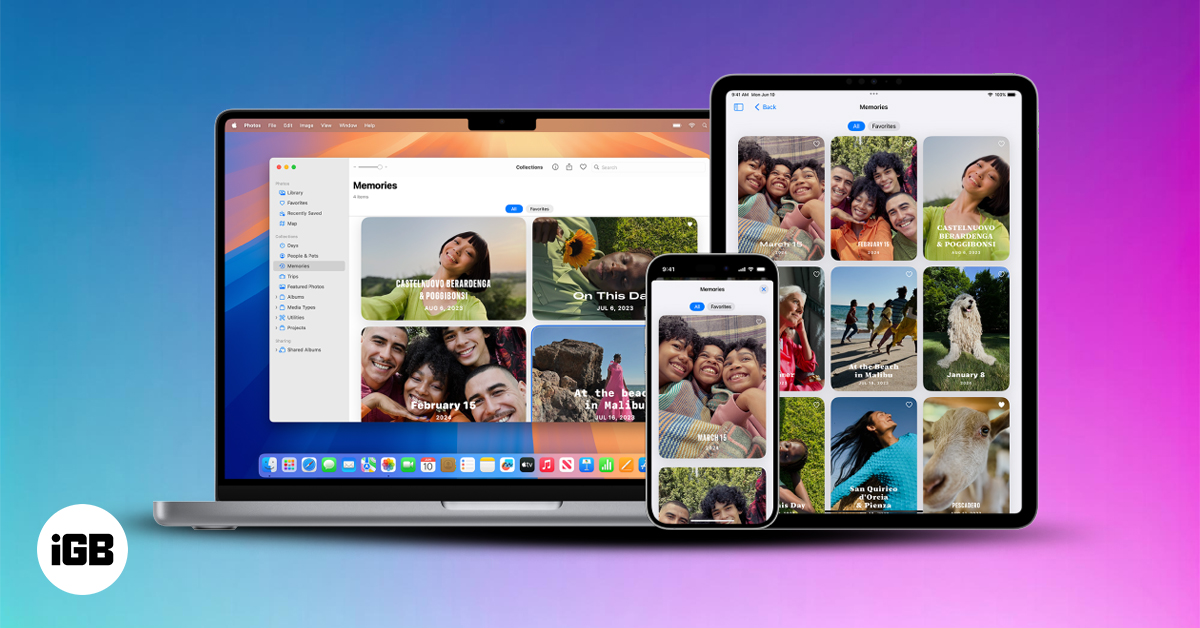
- Shared content appears in Memories, Featured Photos, and the Photos widget just like personal content.
- You can also take photos or videos and save them directly to the Shared Library.
The person who creates the Shared Library provides the iCloud storage, while other members can view and interact with the content without using their own iCloud space.
Important:
If any participant uses an earlier iOS version, they won’t have access. Ensure all devices are updated.
Note:
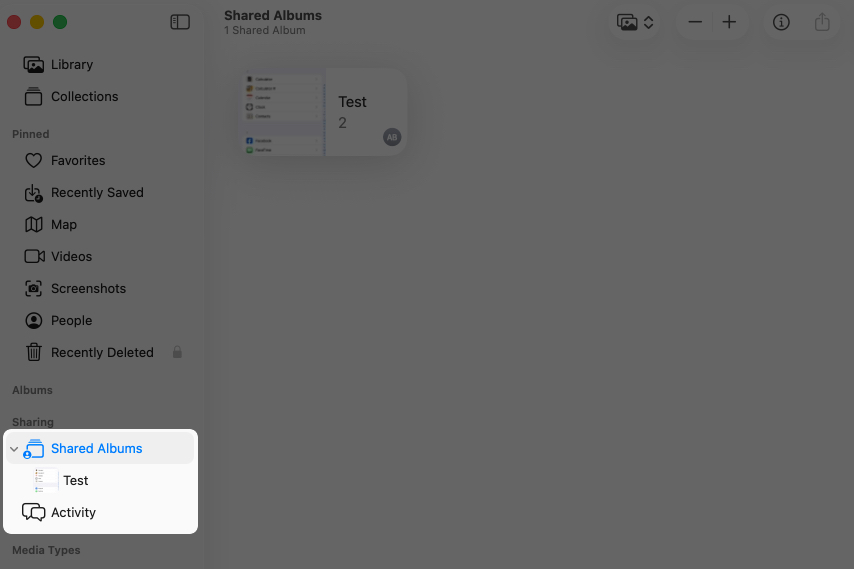
If you haven’t tried Shared Albums, check out these guides:
Why Use iCloud Shared Photo Library?
Here’s why iCloud Shared Photo Library is a game-changer:
- Share photos and videos with up to five other people.
- Changes sync instantly across all members’ devices.
- Perfect for vacations, weddings, family events, and group hangouts where everyone can contribute.
How to Create an iCloud Shared Photo Library
Before starting, update your device and ensure you have enough iCloud storage or an active iCloud+ subscription.
On iPhone and iPad
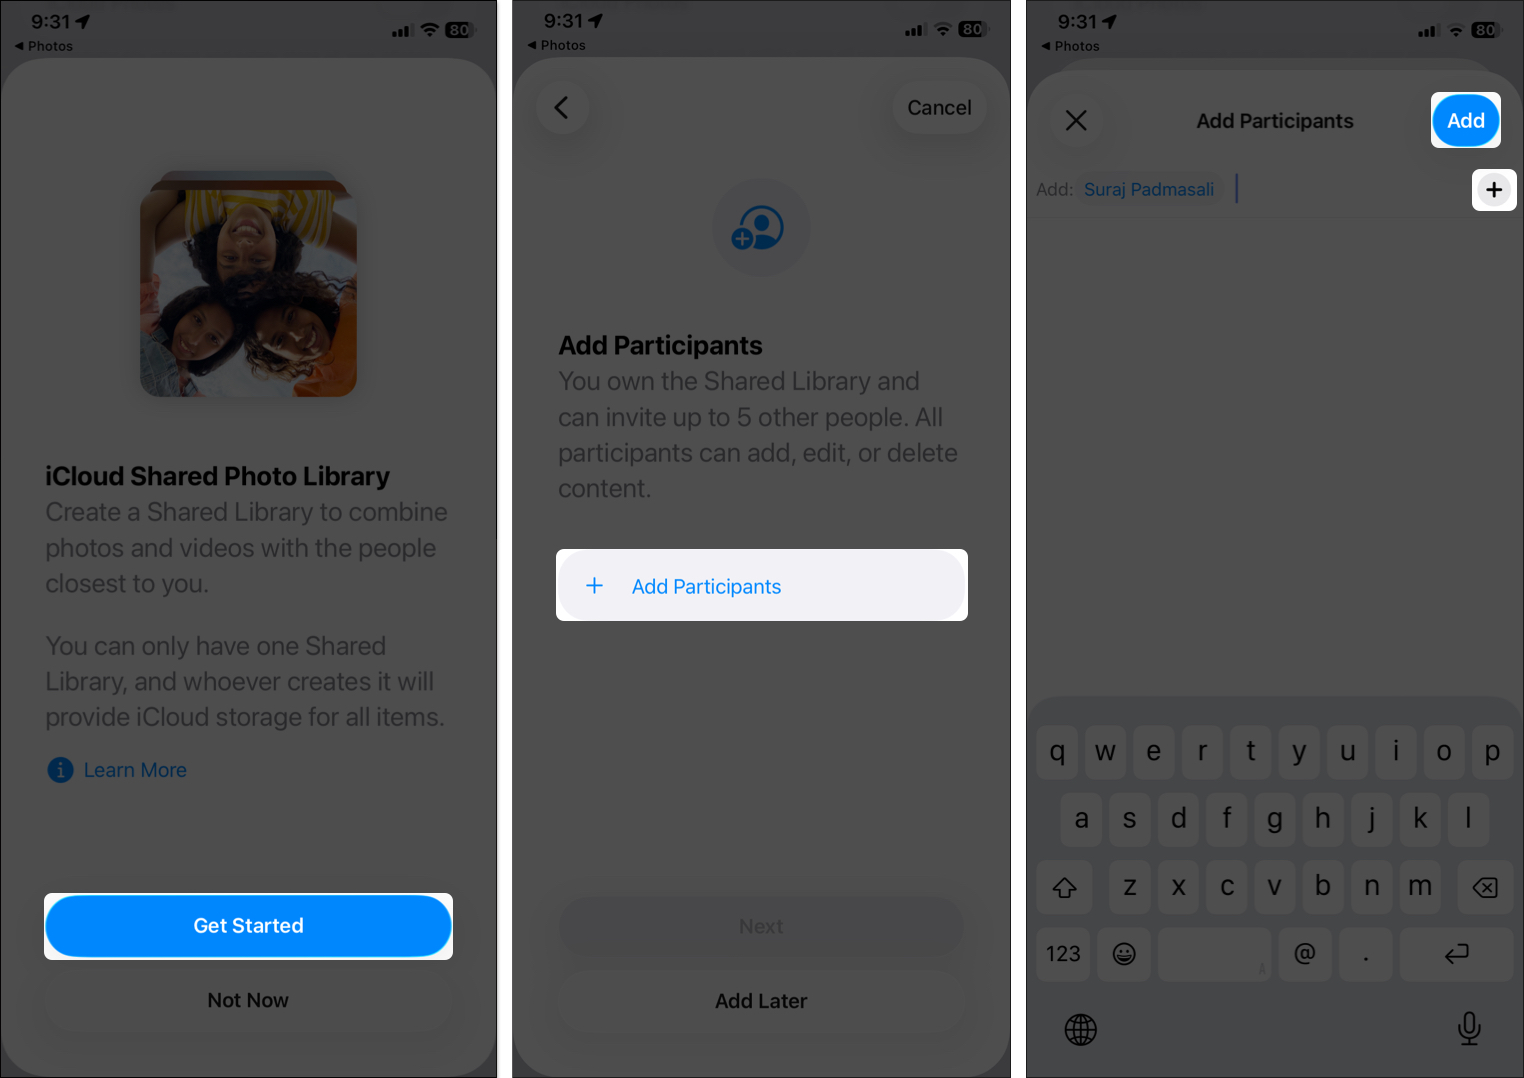
- Open Settings, scroll down and tap Apps, select Photos and ensure iCloud Photos is toggled on.
- Tap Shared Library and then Get Started.
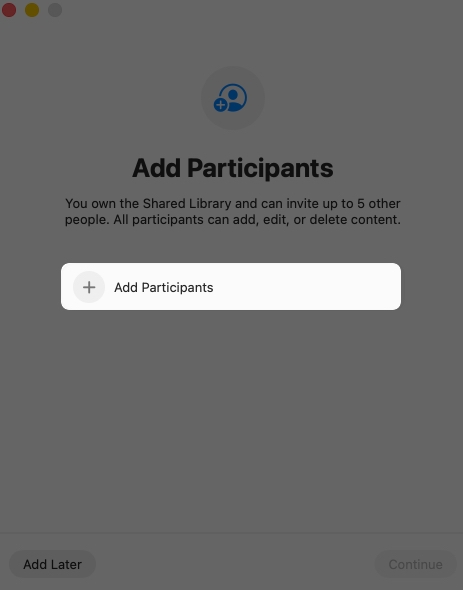
- Tap Add Participants and type an email or phone number in the recipients’ field or tap the plus icon (+) to select from your contacts (up to 5 people).
- Tap Add, then tap Next.
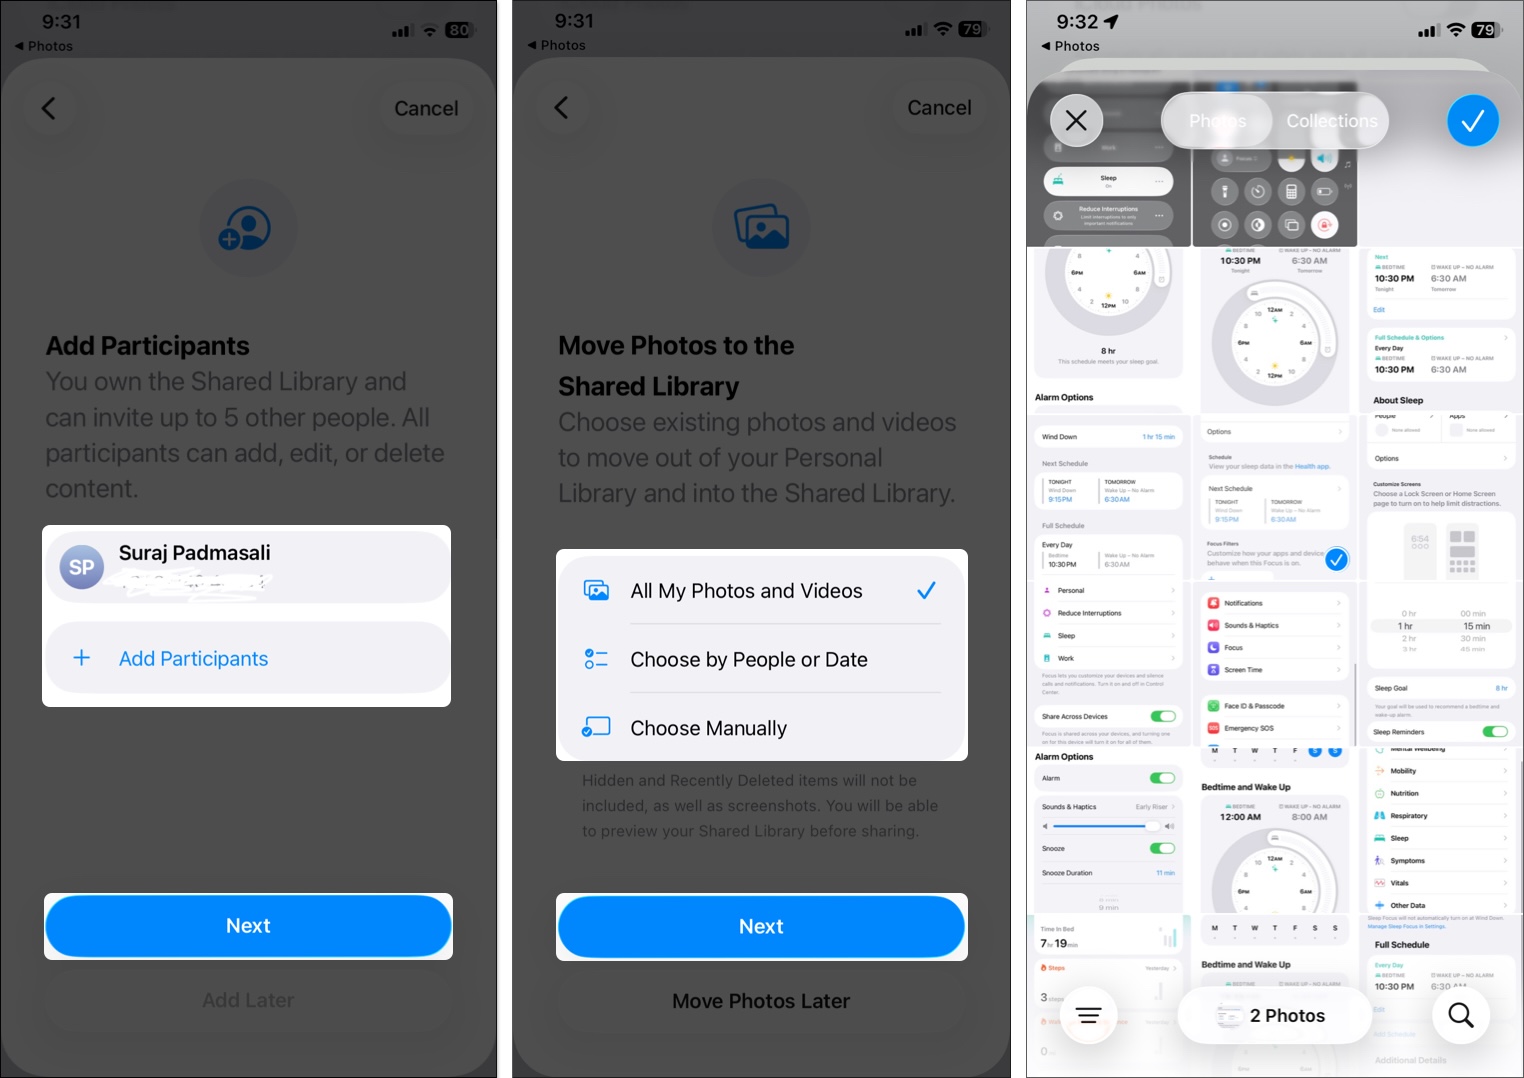
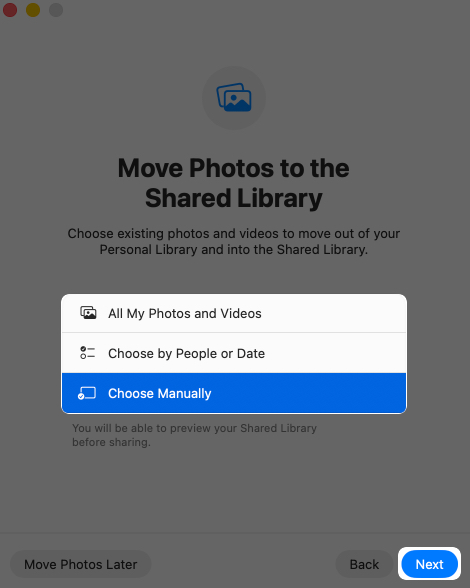
- Select which photos and videos to move to the Shared Library. Options include:
- All My Photos and Videos: Share your entire photo library, excluding screenshots, deleted, or hidden photos and videos.
- Choose by People or Date: Add media sorted by specific people or dates from your library. You might want to do this for partners, for instance.
- Choose Manually: This lets you manually select what you share. It ensures that you only share the chosen pictures with the recipients.
- Tap Next after picking an option.
- In the following menu, you’ll see the people with whom you’re about to share your library.
- Tap Next if you’re satisfied with the list.

If you’ve selected All My Photos and Videos:
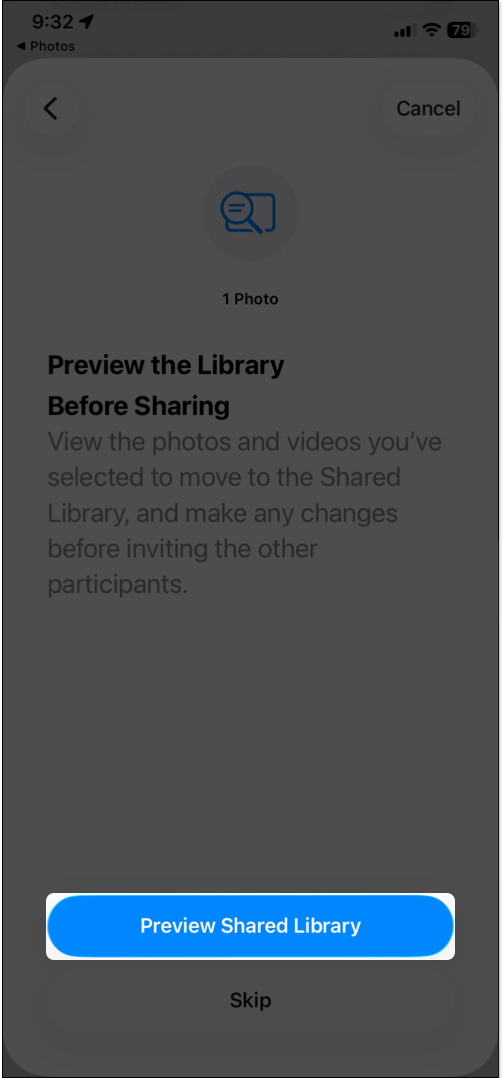
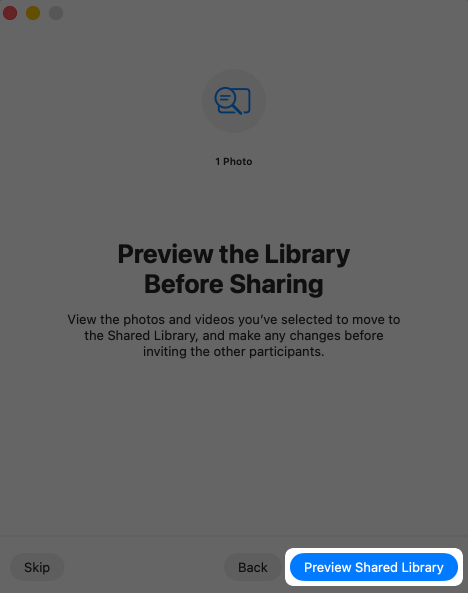
- Select Preview Shared Library.
- Tap Continue at the top-right.

If you opted to choose by People or Date:
- You’ll get a prompt to identify the added contacts from your photos. Tap this prompt to sort your Shared Library by people. Ensure you select at least two people to continue. Tap Done at the top-right after identifying people.
- Next up is sorting pictures by date. Tap Start Date and set the date you want your Shared Library to span.
- Tap Next.
- Then select Preview Shared Library to view the pictures before sharing.
- Tap Continue at the top-right.
If you’re choosing pictures manually:
- Select the pictures you want to include in your Shared Library by tapping each.
- Tap Add at the top-right.
- Then tap Preview Shared Library.
- Tap Continue at the top-right.
After you have selected the photos, tap Invite via Messages to send an invite MMS to participants or tap Share Link to share the URL via social media. Choose to share your library Automatically or Manually via Bluetooth when participants are nearby. Finally, tap Done.

The Shared Library will now appear in the Photos app alongside your Personal Library. You can later add more participants from the Photos app > Collections tab > your account in the top-right corner > Shared Library > Manage > Add Participants.
Note:
On Mac
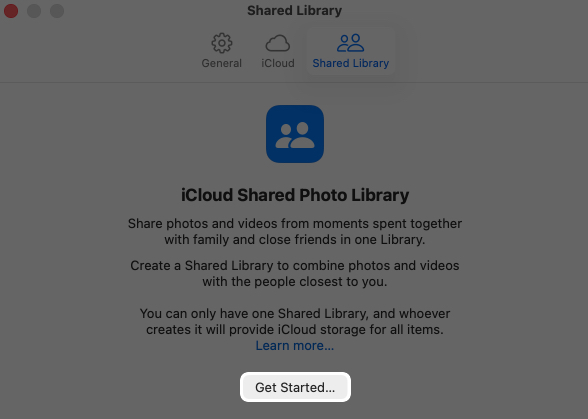
- Open Photos app, go to Photos menu → Settings → iCloud tab.
- Ensure iCloud Photos is checked.

- Go to the Shared Library tab → Click Get Started.
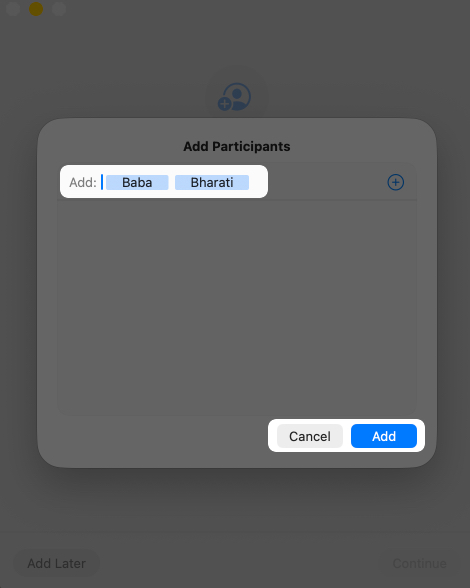
- Click Add Participant, enter emails or phone numbers (up to 5 people).
- Click Add → Click Continue.
- Choose what to share (All, People/Date, or Manually) → Click Next.
- Select the photos and videos and click Add.

- Click Preview Shared Library and confirm by clicking Continue. Send invitations via Messages or a link.
- The Shared Library appears in the Photos app’s sidebar. You can view changes in the library from the Activity tab.


Tip:
How to Join a Shared Library
You need iOS 16.1, iPadOS 16.1, macOS Ventura, or later. Kids under 13 can only join via Family Sharing.
On iPhone and iPad
- Tap the invitation link in Messages or Mail.
- Tap Accept & Continue and follow the prompts.
- Select photos or videos from your Personal Library to add to the Shared Library. You can skip this step and add photos later.
- Preview your selected photos, then confirm to join the library.
- Open the Photos app. The Shared Library is accessible via the Library tab.
On Mac
- Click the invitation link → Click Get Started.
- Choose which photos or videos to contribute. You can skip this step.
- Preview your selections, then confirm to join. The Shared Library appears in the Photos app’s sidebar.
Once joined, you can add, edit, or delete content, and changes sync for all participants.
Using iCloud Shared Photo Library on iPhone, iPad, and Mac
Once set up, managing and using the Shared Photo Library is intuitive, with options to organize content, save photos directly from your camera, and switch viewing modes.
Manage Photos and Videos
iCloud lets you manually add, edit, and delete photos and videos to your shared library. Here’s how:
- Add Photos: In the Photos app, select photos or videos from your Personal Library, tap the three-dot icon, and choose Move to Shared Library. All participants can add content.
- Edit Photos: Crop, apply filters, or adjust settings. Edits sync across all devices in real time.
- Delete Photos: Moves to Recently Deleted for 30 days. You’re notified if someone deletes your content.
- Like and Comment: Add favorites, captions, or metadata visible to all.
- Move Back to Personal Library: Tap the person icon → Select Move to Personal Library.
Save Camera Shots to Shared Library
Once you share an iCloud Library, you get to select where to save the output while making a video or taking a shot. For instance, if you choose Shared Library while taking a picture or making a video, the iPhone shares the output automatically.
- Access Settings > Apps > Photos, and then select Shared Library.
- Tap Sharing from Camera and ensure it is switched on.
- Choose Share Automatically if you want the Camera app to automatically add photos and videos to your Shared Library when you are near participants. Ensure all participants have Bluetooth enabled.
- To control when the Camera app adds photos, select Share Manually.
- For automatic sharing photos taken at home to the Shared Library, toggle on Share When At Home.
When you open your iPhone camera, look to the top left. You’ll see a double profile icon. Tap that icon to toggle between Shared and Personal Library for storage.
Switch Viewing Modes
After creating a Shared Library, you can choose to show only the pictures you’ve shared, a personal library, or a mixture of both.
On iPhone
- In the Photos app, tap Collections > your account in the top-right corner, and scroll down to Library View Options. Choose:
- Both Libraries: View Personal and Shared Library content together.
- Personal Library: View only your private photos.
- Shared Library: View only shared content. Shared photos have a person badge in the All Photos view.
On Mac
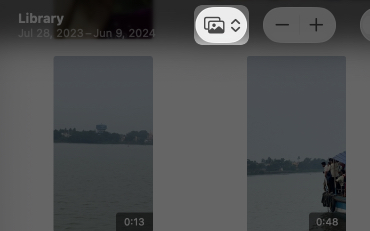
- In the Photos app, click the drop-down with the photo icon next to Library
- Select Personal Library, Shared Library, or Both Libraries.
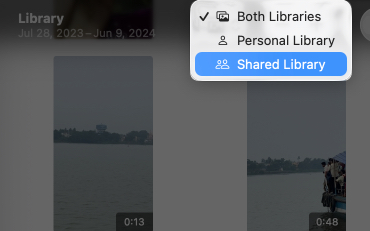
- Select Personal Library, Shared Library, or Both Libraries.

Note:
Some features, like the People album, are only available in the Both Libraries view.
How to Remove Participants from Your Shared Library
As the library creator, you can remove participants at any time:
On iPhone
- Go to Settings > Photos > Shared Library.
- Select the contact you want to remove, tap Remove from Shared Library and confirm your choice.
On Mac
- Open Photos > Settings > Shared Library tab.
- Click the three-dot icon next to the participant’s name and select Remove. Select Remove from Shared Library.
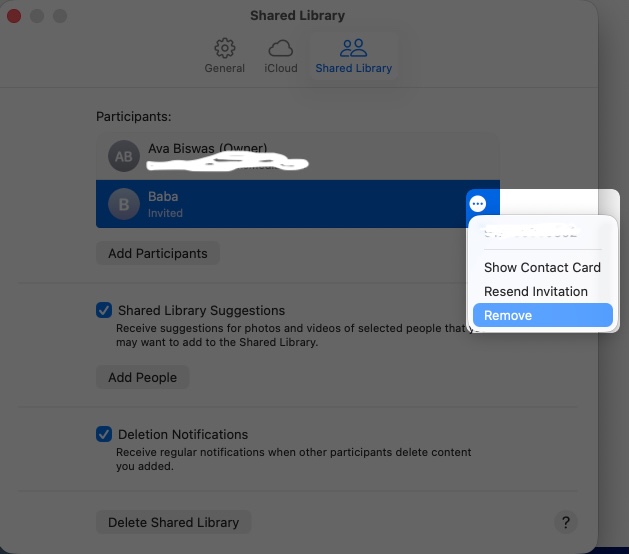

Participants are notified, and if they’ve been in the library for more than 7 days, they can keep all shared content.
Delete Your Shared Photo Library
To delete the entire Shared Library (creator only):
On iPhone
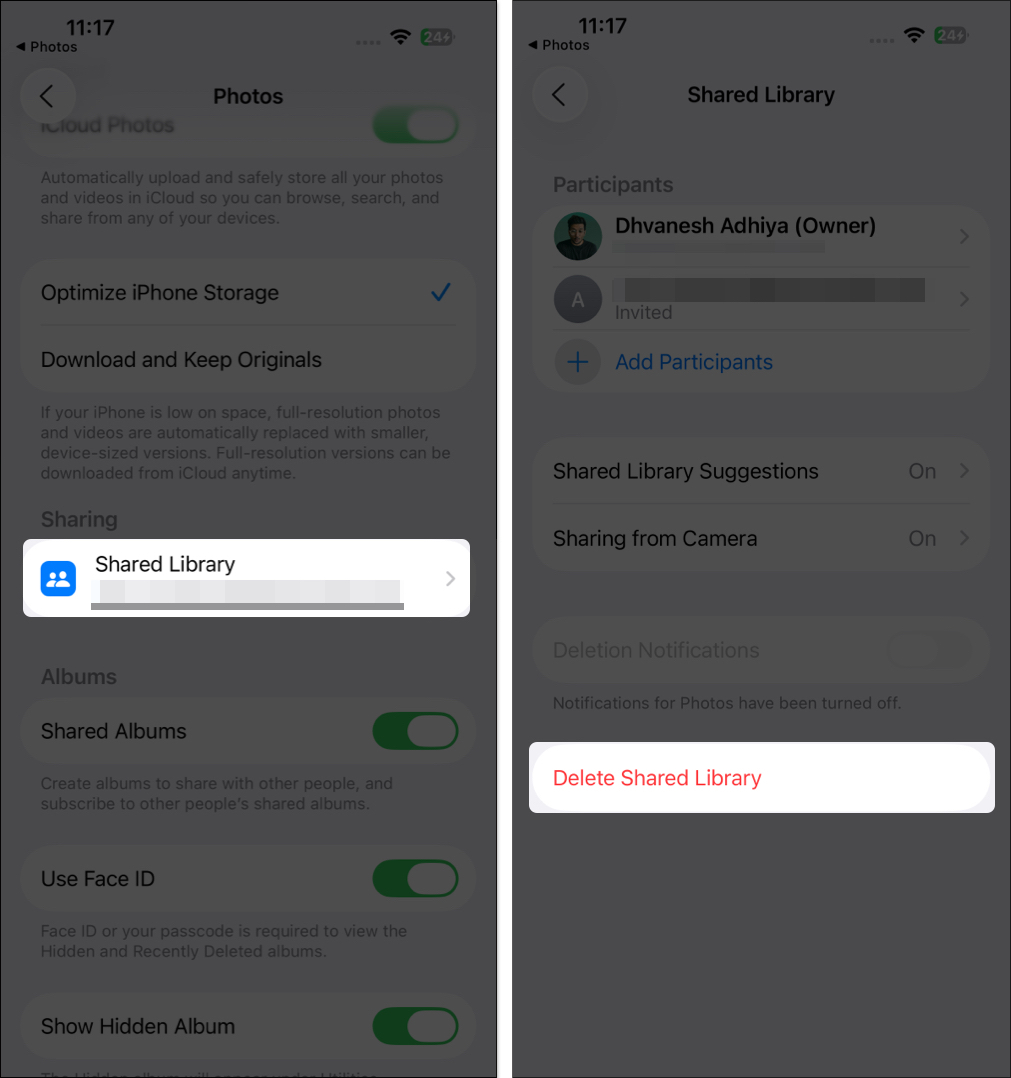
- Go to Settings > Apps > Photos.
- Tap the Shared Library > Delete Shared Library. Confirm the action.

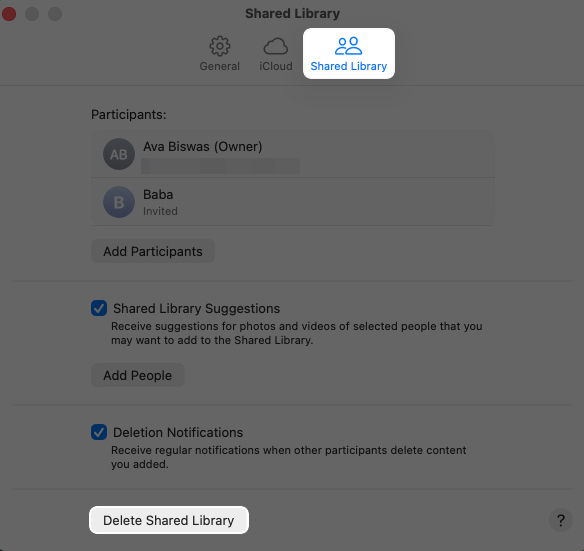
On Mac
- On Mac: In Photos > Settings > Shared Library and click Delete Shared Library.
- Choose which content you want to keep and select Delete Shared Library.
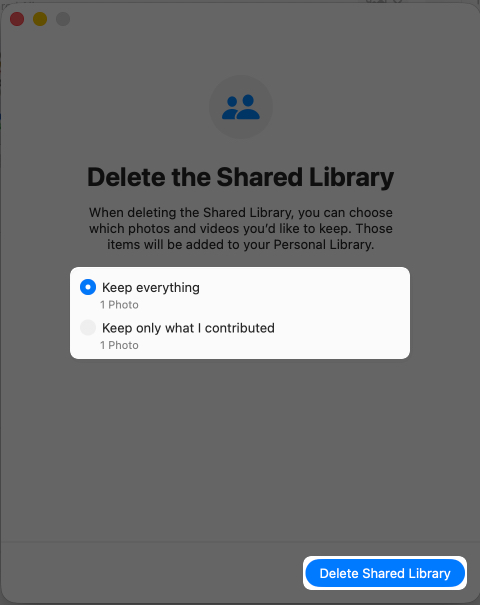


All participants receive a notification. If they were members for over seven days, they can download all iCloud photos and videos in their Personal Library. If less than seven days, they only get their contributed photos. Deleted photos go to the creator’s Recently Deleted folder for 30 days.
How to Leave a Shared Library (Participant)
If you’re a participant, you can leave the Shared Library:
On iPhone
- Go to Settings > Apps > Photos > Shared Library > Leave Shared Library.
- Choose to copy all content or only your contributions to your Personal Library.
On Mac
- In Photos > Settings > Shared Library.
- Click Leave Shared Library and select your content preference.
You’ll lose access. Others are notified. Your content remains unless you delete it before leaving.
Share Memories Quickly with iCloud Shared Library!
With iCloud Shared Photo Library, you can effortlessly share memories with people who matter most. It’s the perfect tool for organizing family photos, planning trips, or preserving moments with friends.
Have a question or issue? Drop it in the comments—I’m happy to help.