Gmail is the world’s most popular email service, offering seamless integration with other Google products like Google Drive and Google Calendar. This makes it a powerful tool for both personal and business use on the iPhone.
While the Gmail app may have fewer features compared to its desktop and web versions, it still allows you to perform many essential tasks efficiently. Here are some expert tips to help you make the most of the Gmail app on your iPhone and iPad!
15+ best tips for using the Gmail app on iPhone and iPad
Master the Gmail iOS app with these expert tips to boost organization, efficiency, and productivity.
1. Swipe down to change accounts
The Gmail app on the iPhone has this nifty little shortcut that lets you easily switch from one email account to another.
Open the app and tap your profile icon at the top right. Then, swipe down on the profile menu and release when the desired account appears to switch instantly.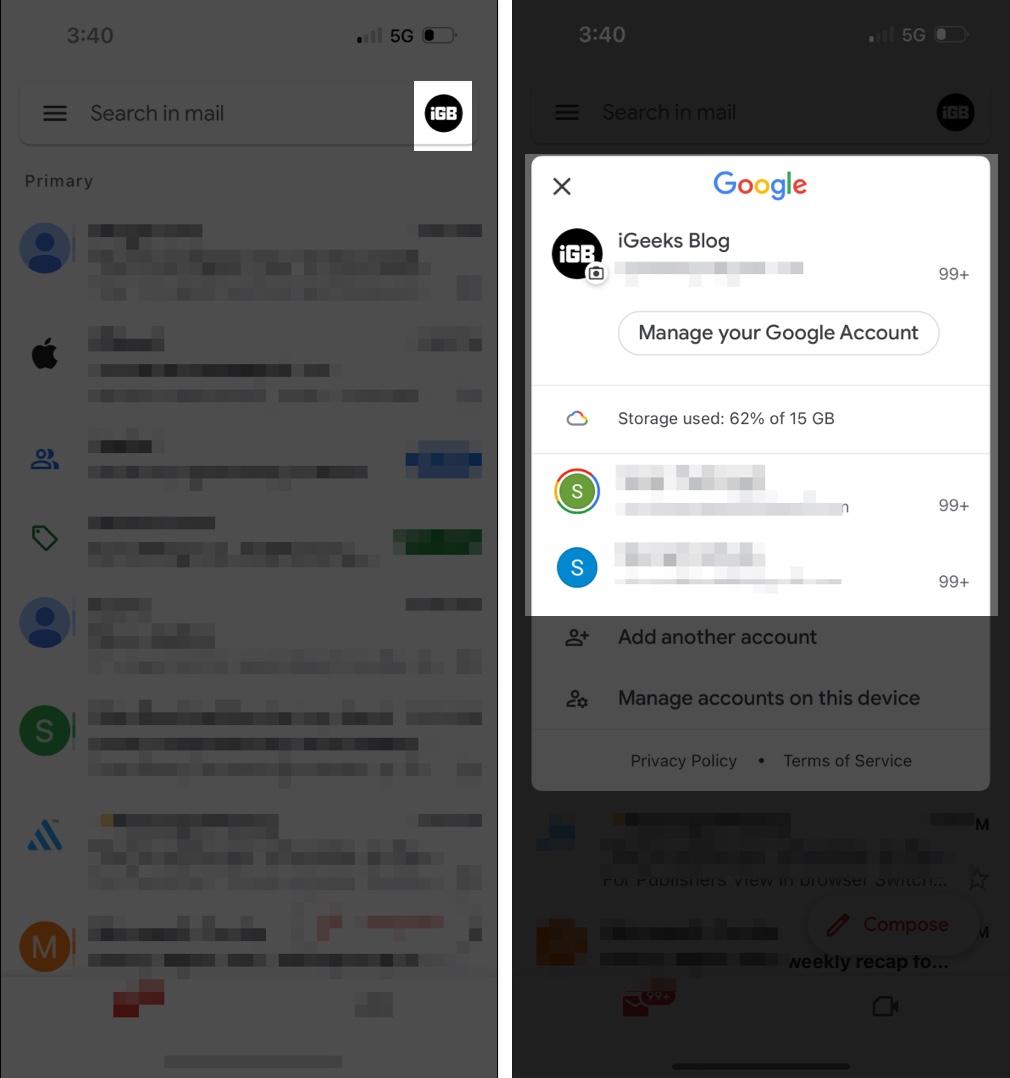
2. Change your status on Gmail
Your Google Chat availability status lets people know if you’re available to chat. But first, you need to enable Google Chat within your Gmail app. To do that, open Gmail app → Menu (hamburger) → Settings → Google Chat → Toggle on Google Chat.
Further, you can adjust your availability status for Chat. Note that only the people you share space with or who have accepted a chat invite can view your status. To do this:
- Open the Gmail app.
- At the top left, tap Menu.
- Tap the downward arrow next to the status indicator.
You’ll see Away by default. - Choose one from the following:
- Automatic: This is based on your activity on the app
- Do not disturb: Select this to mute Google chat notifications
- Away: This means that you’re either in a “Set as away” status or that you’re not connected to the internet

If you can’t see this option, Google Chat may be disabled. To enable it:
- Open Gmail app → Settings.
- Tap Chat and toggle it on.

3. Switch conversation view
To reduce clutter in your mail, you can group emails into conversations instead of letting each email appear separately in your inbox.
When enabled, group responses are clustered together in a single conversation with the newest email at the bottom. To enable this:
- Open the Gmail app.
- Tap Menu → Settings.
- Under Inbox, select Inbox customizations.

- Toggle on Conversation view.

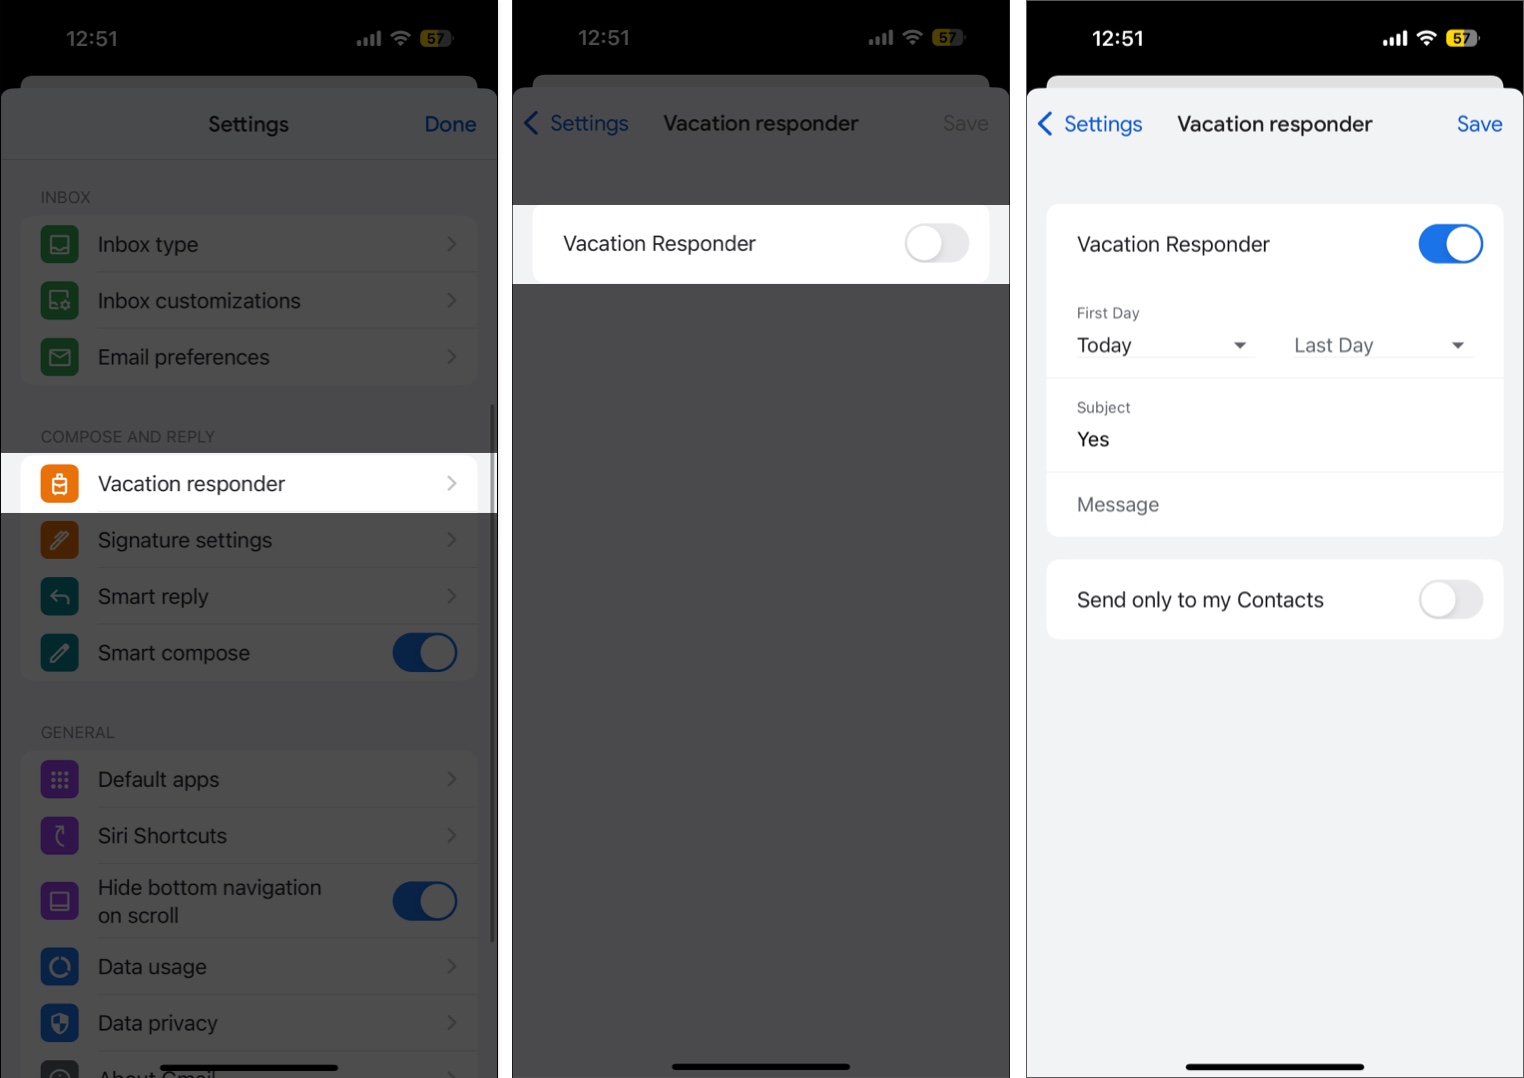
4. Set up Vacation Responder
If you are going to be away for some time, like going somewhere without internet access or a much-needed vacay, you can set up a vacation responder that automatically notifies people when they send you a message.
In response, they’ll get a message containing whatever you’ve written. To set this up:
- Open the Gmail app.
- Tap Menu → Settings.
- Here, select the Vacation Responder option under the Compose and Reply section.
- Toggle on Vacation Responder.
- Enter the first and last day of your vacation. Add a subject and a message.
- Tap Save at the top-right of the screen.

5. Customize Swipe in Inbox
Ever accidentally swiped on an email, sending it to the archive? That’s the Mail Swipe feature. By default, both the left and right swipes are set to archive emails.
You can customize this by doing the following:
- Open the Gmail app. Select Menu → Settings.
- Tap Inbox customizations → Email swipe actions.
- Tap Right swipe → Select from Archive, Trash, Mark as read/unread, Snooze, or Move.
Do the same for the Left swipe action.
6. Remember to respond and follow up with Nudges
Nudges are reply reminders that inform you to follow up on messages after a specified time has passed without a response. This includes:
- Emails you’ve sent that received no reply
- Emails you received and haven’t responded to
When enabled, these emails will appear at the top of your inbox, so you’ll be reminded of them.
- Go to Menu → Settings → Inbox customizations.
- Select Nudges → Toggle one or both Suggest emails to reply to and Suggest emails to follow up on.

7. Print Gmail messages
You can print individual messages or all the messages contained in a conversation via your Gmail app as long as your device is connected to a printer via AirPrint. To print a single email:
- Open Gmail → open the email you want to print.
- In the top right of the single email you wish to print, tap More (…) → Print.

If you want to print the whole conversation along with all the replies, open the thread, tap More at the top right, and select Print all.
8. Schedule email for later sending
If you need to send emails at a specific time, such as when a colleague resides in a different time zone, Gmail’s scheduling feature can be an invaluable tool.
The schedule email feature lets you set your emails to be sent at a later, designated time. It’s important to note that Gmail will follow the time zone you’ve scheduled them, ensuring timely delivery that aligns with your recipient’s local time.
- Open Gmail on your iPhone or iPad.
- Tap Compose and create your email.

- Tap More on the right → select Schedule send. Select from the available options.
- If you want to make changes to your scheduled email, tap Menu → Scheduled.

- Select the email you wish to change → select Cancel send. This moves the email from Scheduled to Drafts. Make your changes and schedule it again.
- If you want to make changes to your scheduled email, tap Menu → Scheduled.
9. Snooze an email
If you don’t want to see an email until a particular time, you can snooze them. Doing so removes the email from the top of your inbox and only appears when you want it to.
To do this, open the email → tap More → select Snooze. Choose a specific time and date.
To view all your snoozed emails, open the app → tap Menu → Snoozed.
You may like to read: How to enable and use Gmail end-to-end encryption
10. Use emails and messages confidentially
If you plan to send sensitive information, you can use Gmail’s Confidential Mode to protect the email from unauthorized access. The feature lets you add an expiration date to the message or revoke access to the email at any time. Recipients of this type of email won’t be able to forward, copy, print, or download confidential messages.
Note:
Recipients can still take photos or screenshots of confidential messages. They may also use apps or programs to copy or download messages or attachments from your confidential message.
To send a message or attachment confidentially:
- Compose a message → tap More (…) → Confidential mode.
- Set an expiration date for the message from 1 day to 5 years.

- Set either Standard or SMS passcode.
- Google will generate passcodes for other Gmail users, while non-Gmail recipients will get emailed their passcodes.
- If you choose the SMS passcode, recipients will receive their passcode via text message.
- Tap Done (check mark) at the top-right of the screen.
Must read: How to send Gmail emails through ChatGPT
11. Turn images on or off in emails
By default, when you receive an email with an image, you’ll see the image automatically. You might not want them to load in Gmail, especially if you want to save mobile data or have a poor internet connection. To make Gmail ask before showing you images:
- Open Gmail → Menu → Settings.
- Under Inbox, select Email Preferences.
- Select Images → Select Ask before displaying external images.
- Once enabled, you must tap Display images to see the photos in emails.

- Once enabled, you must tap Display images to see the photos in emails.
12. Mute emails
If your workplace or group relies on email threads for collaboration, this can sometimes lead to a never-ending back-and-forth that could cause excessive noise and clutter in your inbox. Fortunately, Gmail lets you mute these annoying threads.
Just go to the email, tap More → Mute. New emails from the thread will automatically go straight to your Archives.
13. Block or Report Spam message
Nobody’s exempt from receiving spam every now and then.
- To block and report the message as spam, open the email and tap More.
- Select Report spam.
- Choose Report spam or Report spam and unsubscribe to stop receiving emails from the sender going forward.

14. Searching in Gmail
The Gmail app has a robust search function that lets you quickly find what you’re looking for. You can tap Search and choose specific emails, labels, attachment types, dates, and more. You can also use search operators to help specify your search further. Here are some of them:
- from: specifies the sender
- to: specifies the recipient
- cc: or bcc: specifies the recipient who received a copy
- subject: specifies a word used in the subject line
- OR or { }: specifies messages that match multiple terms
- “-“: removes emails containing emails with certain words from the search results
- Label: messages that have a certain label
- has:attachment: message has an attachment
- has:drive, has:document, has:presentation, has:spreadsheet: includes items with specific types of attachments
15. Set up Mobile signature
You can set up an email signature to be automatically added to every email you send from your email app.
- Go to Menu → Settings → Signature settings.
- Toggle Mobile Signature on and type your signature → Done.

16. Work with bulk emails
You can select multiple emails in the Gmail app to do bulk actions.
- Just select and long-press on an email to select it.
- Tap on other emails to select them.
- Then select an action you want to apply to all of them, such as Mute, Snooze, and Report spam.

17. Get only High Priority Email Notifications
If you use your email to sign up for various services, you may be inundated with many updates and promotions. If you’re tired of getting alerted with every single email, you can make Gmail alert you only of those it deems crucial.
- Open Gmail → Go to Settings.
- Under Notifications, select Email notifications → select High priority only.

Wrapping up…
If checking and sending emails is crucial to your workflow, mastering the Gmail app on your iPhone or iPad can greatly enhance your efficiency. Did we miss anything? If you have additional tips, feel free to share them below!
You might also like:
