Several users who want to erase their Macs have reported being hindered from doing so by an error message that reads “Erase Assistant is not supported on this Mac.”
If you are one such user, read on to learn what it is, what’s causing it, and what you can do to reset your Mac.
What is Erase Assistant on Mac?
If you’ve owned, given away, or sold an iPhone, you’ve probably used its hassle-free feature called “Erase All Content and Settings” to bring it back to its out-of-box state.
For years, Mac didn’t have this feature, and it took a painstaking process to erase. Traditionally, you had to manually log out of all your accounts, erase the startup disk, and reinstall the macOS.
This was until macOS Monterey, where Apple finally released Mac’s own Erase All Content and Settings, popularly known as the Erase Assistant. It was brought in to simplify the process of resetting your Mac to factory settings and erasing all its contents before you reinstall macOS on your Mac with just one click.
Who can use it?
Erase Assistant only works on Macs with Apple Silicon or Intel Macs with T2 security chips. Your Mac should also run at least macOS Monterey or later. If you’re unsure about what your Mac is running under the hood, give our guide on how to check your Mac’s tech specs a look.
What does the Erase Assistant error mean?
The “Erase Assistant is not supported On This Mac” error appears when your Mac is an older model and doesn’t have the Apple silicon or T2 security chips.
However, the error seems to be an issue experienced mainly by those who own MacBook Pro 2017 models running macOS Ventura. But generally, older models can also share this problem.
There may also be rare instances where the error might pop up in supported devices due to a bug. If you’re facing this issue, fret not! We have a few possible solutions for you.
What to do if Erase Assistant is not supported on this Mac
If an error message is holding you back from resetting your Mac, the only way to fix the “Erase Assistant is not supported on this Mac” error is to ensure you’re using a compatible model and running macOS Monterey or the latest version of macOS on your Mac.
If you see a notification explaining that other volumes need to be erased before you can erase all content and settings, you may have used Boot Camp to install Microsoft Windows on your Mac. In that case, you must first use Boot Camp to remove Windows and its partition before resetting your Mac.
If your device doesn’t meet the requirements, you won’t be able to use Erase Assistant. However, you can still go the traditional route of wiping out your Mac, which is mentioned below.
Reset Mac without Erase Assistant
Even without Erase Assistant’s help, there are still various ways to reset your Mac depending on the macOS it’s running and whether it’s an Intel-based Mac or not.
Here’s a comprehensive guide that covers different ways to reset a Mac based on its macOS and model.
Reset Mac with Erase Assistant
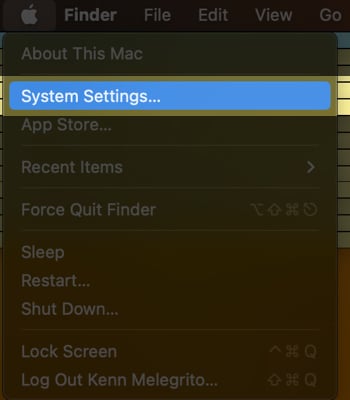
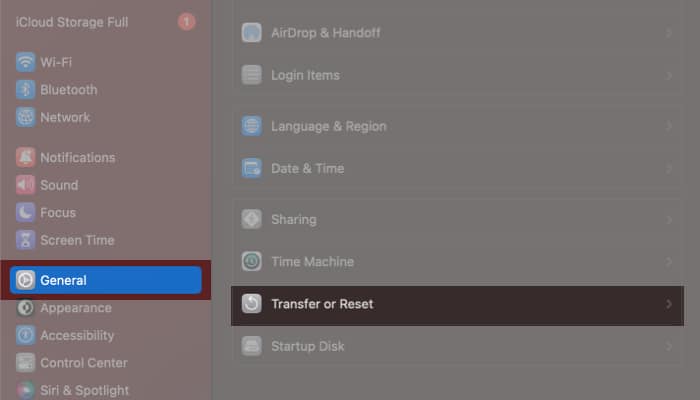
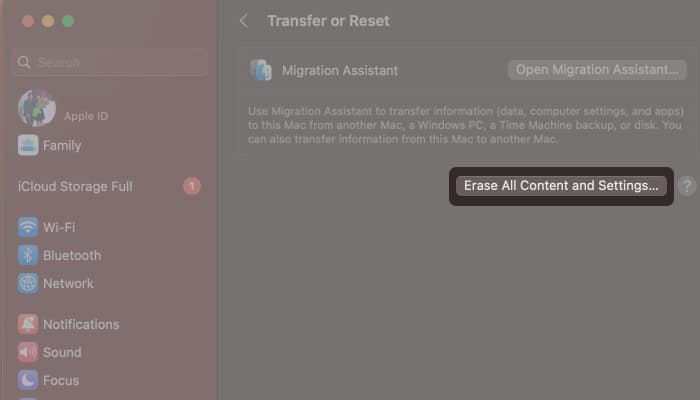
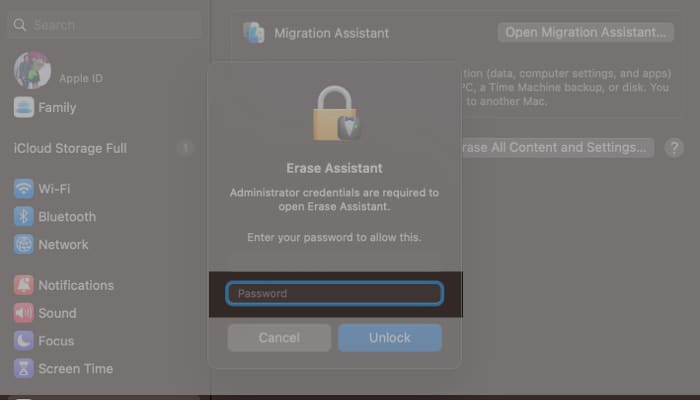
To use Erase Assistant, aka Erase All Content and Settings on your Mac, do the following if you’re running macOS Ventura:
- Go to the Apple menu → System Settings.
- Select General in the sidebar, then click Transfer of Reset.
- Click Erase All Content and Settings.
- Now, sign in with your administrator login → enter the password to log in to your Mac.
- You can make a backup with Time Machine or an external storage device or skip this step.
- Click Continue to erase all your media, settings, and data.
- You may be asked to sign out of Apple ID. Enter your Apple ID password → click Continue.
- Click Erase All Content & Settings to proceed.
- Your Mac will restart. Wait until the progress bar finishes.
- You may need to connect to a Wi-Fi network. Select a Wi-Fi network from the upper-right corner of the screen.
- Wait for the Mac to activate. Click Restart.
On macOS Monterey:
Go to the Apple logo → System Preferences → select Erase All Content and Settings → follow steps 4-10 from above.
Wrapping up…
If your Mac meets the system requirements, you can use Erase All Content and Settings to reset it without going through the manual process of erasing your Mac.
But if your Mac doesn’t have Apple silicon or T2 security chips, you won’t be able to use this feature and will have to resort to the traditional way of resetting your Mac.
I hope this helps! If you have any questions, further issues, or potential solutions to share, let us know in the comments.
Read more:

